|
|
| (18 intermediate revisions by 11 users not shown) |
| Line 11: |
Line 11: |
| |generation={{gen|V}} | | |generation={{gen|V}} |
| }} | | }} |
| '''Giant Chasm''' (Japanese: '''ジャイアントホール''' ''Giant Hole'') is an area in the northeastern part of the [[Unova]] region. | | '''Giant Chasm''' (Japanese: '''ジャイアントホール''' ''Giant Hole'') is an area in the northeastern part of the [[Unova]] [[region]]. |
|
| |
|
| It is a large impact crater containing a maze-like forest, and is home to a number of [[extraterrestrial Pokémon]], including the [[Legendary Pokémon]] {{p|Kyurem}}, who resides in the deepest part of the cave at the far end of the crater. | | It is a large impact crater containing a maze-like forest, and is home to a number of [[extraterrestrial Pokémon]], including the [[Legendary Pokémon]] {{p|Kyurem}}, who resides in the deepest part of the cave at the far end of the crater. |
| Line 19: |
Line 19: |
| ==Role== | | ==Role== |
| {{spoilers}} | | {{spoilers}} |
| When the {{player}} reaches the pond in the middle of the crater, the forest will freeze and be completely covered in snow, thus giving the player access to the cave {{p|Kyurem}} is hiding. Once the player has captured or defeated Kyurem and left the area, the snow will disappear, and the northern portion of the caves will no longer be accessible. If Kyurem is defeated, however, the area will become accessible again after defeating the {{un|Pokémon League}} once more and returning to the pond in the center of the crater.
| | In {{game|Black and White|s|Black and White}}, when the {{player}} reaches the pond in the middle of the crater, the forest will freeze and be completely covered in snow, thus giving the player access to the cave {{p|Kyurem}} is hiding. Once the player has captured or defeated Kyurem and left the area, the snow will disappear, and the northern portion of the caves will no longer be accessible. If Kyurem is defeated, however, the area will become accessible again after defeating the {{un|Pokémon League}} once more and returning to the pond in the center of the crater. |
|
| |
|
| In the years between Black and White and Black 2 and White 2, the path from [[Lacunosa Town]] to the Giant Chasm has been blocked by a landslide. A lone boulder blocks the path, which can be pushed with {{m|Strength}} from the Giant Chasm's exterior. | | In the years between Black and White and Black 2 and White 2, the path from [[Lacunosa Town]] to the Giant Chasm has been blocked by a landslide. A lone boulder blocks the path, which can be pushed with {{m|Strength}} from the Giant Chasm's exterior. |
|
| |
|
| In {{2v2|Black|White|2}}, the player encounters [[Team Plasma]] here. Two {{tc|Team Plasma Grunt}}s block a path inside the east of the cave until the [[Plasma Frigate]] arrives on top of the crater's forest after the player obtains the {{badge|Wave}}. The frigate freezes over many of the trees, creating an icy hill on top of which the frigate is docked. [[Rood]] of the [[Seven Sages]] along with several old Team Plasma members confront the new Team Plasma; this gives the player the opportunity to sneak aboard the Plasma Frigate, where he or she battles against [[Colress]] and run into [[Ghetsis]]. The player follows Ghetsis out of the ship after defeating the [[Shadow Triad]]. At the end of the cave, Ghetsis appears and tries to freeze the player alive with Kyurem's {{m|Glaciate}}, but are saved by [[N]] and his {{p|Zekrom}}{{sup/5|B2}}/{{p|Reshiram}}{{sup/5|W2}} flying down from above. Ghetsis then reveals he tricked N into coming here so Ghetsis could fuse Kyurem with N's dragon. Ghetsis then uses his cane to control Kyurem, who then proceeds to fuse with N's dragon with the [[DNA Splicers]], forcing the player to fight Black{{sup/5|B2}}/White{{sup/5|W2}} Kyurem. Upon winning the battle, {{p|Zekrom}}{{sup/5|B2}}/{{p|Reshiram}}{{sup/5|W2}} will be separated from Kyurem and return to N, and Kyurem will disappear from the cave. Afterwards, the player fights Ghetsis himself. | | In {{2v2|Black|White|2}}, the player encounters [[Team Plasma]] here. Two {{tc|Team Plasma Grunt}}s block a path inside the east of the cave until the [[Plasma Frigate]] arrives on top of the crater's forest after the player obtains the {{badge|Wave}}. The frigate freezes over many of the trees, creating an icy hill on top of which the frigate is docked. [[Rood]] of the [[Seven Sages]] along with several old Team Plasma members confront the new Team Plasma; this gives the player the opportunity to sneak aboard the Plasma Frigate, where they battle against [[Colress]] and run into [[Ghetsis]]. The player follows Ghetsis out of the ship after defeating the [[Shadow Triad]]. At the end of the cave, Ghetsis appears and tries to freeze the player alive with Kyurem's {{m|Glaciate}}, but are saved by [[N]] and his {{p|Zekrom}}{{sup/5|B2}}/{{p|Reshiram}}{{sup/5|W2}} flying down from above. Ghetsis then reveals he tricked N into coming here so Ghetsis could fuse Kyurem with N's dragon. Ghetsis then uses his cane to control Kyurem, who then proceeds to fuse with N's dragon with the [[DNA Splicers]], forcing the player to fight Black{{sup/5|B2}}/White{{sup/5|W2}} Kyurem. Upon winning the battle, {{p|Zekrom}}{{sup/5|B2}}/{{p|Reshiram}}{{sup/5|W2}} will be separated from Kyurem and return to N, and Kyurem will disappear from the cave. Afterwards, the player fights Ghetsis himself. |
|
| |
|
| After defeating Ghetsis, he goes into madness, causing the [[Shadow Triad]] to appear and take him away, leaving his cane. Outside, the Plasma Frigate has left. Rood and his team wait to tell the player that Colress has disbanded the new Team Plasma and taken the Plasma Frigate. Kyurem will appear here after the player has caught {{p|Zekrom}}{{sup/5|B2}}/{{p|Reshiram}}{{sup/5|W2}} at [[Dragonspiral Tower]]. | | After defeating Ghetsis, he goes into madness, causing the [[Shadow Triad]] to appear and take him away, leaving his cane. Outside, the Plasma Frigate has left. Rood and his team wait to tell the player that Colress has disbanded the new Team Plasma and taken the Plasma Frigate. Kyurem will appear here after the player has caught {{p|Zekrom}}{{sup/5|B2}}/{{p|Reshiram}}{{sup/5|W2}} at [[Dragonspiral Tower]]. |
| Line 42: |
Line 42: |
| * Northeast of southwest corner, on the other side of a {{m|Strength}} boulder (requires {{m|Strength}}) | | * Northeast of southwest corner, on the other side of a {{m|Strength}} boulder (requires {{m|Strength}}) |
| * Behind a {{m|Strength}} boulder east of the northwest corner (requires {{m|Strength}})|Bl=yes|W=yes|display=[[Star Piece]] ×2}} | | * Behind a {{m|Strength}} boulder east of the northwest corner (requires {{m|Strength}})|Bl=yes|W=yes|display=[[Star Piece]] ×2}} |
| {{Itemlist|TinyMushroom| | | {{Itemlist|Tiny Mushroom| |
| * On rock near northwest corner ''(hidden)'' | | * On rock near northwest corner ''(hidden)'' |
| * On a rock east of the Star Piece near northwest corner ''(hidden)''|Bl=yes|W=yes|display=[[Tiny Mushroom|TinyMushroom]] ×2}} | | * On a rock east of the Star Piece near northwest corner ''(hidden)''|Bl=yes|W=yes|display=[[Tiny Mushroom|TinyMushroom]] ×2}} |
| Line 51: |
Line 51: |
| *Northwestern part (requires {{m|Strength}})|B2=yes|W2=yes|display=[[Star Piece]] ×2}} | | *Northwestern part (requires {{m|Strength}})|B2=yes|W2=yes|display=[[Star Piece]] ×2}} |
| {{Itemlist|Max Repel|Southwestern part (requires {{m|Strength}})|B2=yes|W2=yes}} | | {{Itemlist|Max Repel|Southwestern part (requires {{m|Strength}})|B2=yes|W2=yes}} |
| {{Itemlist|Ultra Ball|Northwestern part ''(hidden)''|B2=yes|W2=yes|display={{ball|Ultra}}}} | | {{Itemlist|Ultra Ball|Northwestern part ''(hidden)''|B2=yes|W2=yes}} |
| {{Itemlist|Ice Gem|Southern part (requires {{m|Strength}}) ''(hidden)''|B2=yes|W2=yes}} | | {{Itemlist|Ice Gem|Northern part, on the other side of a {{m|Strength}} boulder (requires {{m|Strength}}) ''(hidden)''|B2=yes|W2=yes}} |
| {{Itlistfoot|cave}} | | {{Itlistfoot|cave}} |
|
| |
|
| Line 77: |
Line 77: |
| ====Hidden Grotto==== | | ====Hidden Grotto==== |
| {{Itlisth|forest}} | | {{Itlisth|forest}} |
| {{Itemlist|Damp Mulch|Sometimes in Hidden Grotto ([[Item#Recurring items|reappears]]) ''(hidden)''|B2=yes|W2=yes}} | | {{Itemlist|Damp Mulch|Sometimes in Hidden Grotto ([[Recurring item|reappears]]) ''(hidden)''|B2=yes|W2=yes}} |
| {{Itemlist|Growth Mulch|Sometimes in Hidden Grotto ([[Item#Recurring items|reappears]]) ''(hidden)''|B2=yes|W2=yes}} | | {{Itemlist|Growth Mulch|Sometimes in Hidden Grotto ([[Recurring item|reappears]]) ''(hidden)''|B2=yes|W2=yes}} |
| {{Itemlist|Stable Mulch|Sometimes in Hidden Grotto ([[Item#Recurring items|reappears]]) ''(hidden)''|B2=yes|W2=yes}} | | {{Itemlist|Stable Mulch|Sometimes in Hidden Grotto ([[Recurring item|reappears]]) ''(hidden)''|B2=yes|W2=yes}} |
| {{Itemlist|Gooey Mulch|Sometimes in Hidden Grotto ([[Item#Recurring items|reappears]]) ''(hidden)''|B2=yes|W2=yes}} | | {{Itemlist|Gooey Mulch|Sometimes in Hidden Grotto ([[Recurring item|reappears]]) ''(hidden)''|B2=yes|W2=yes}} |
| {{Itemlist|Repel|Sometimes in Hidden Grotto ([[Item#Recurring items|reappears]])|B2=yes|W2=yes}} | | {{Itemlist|Repel|Sometimes in Hidden Grotto ([[Recurring item|reappears]])|B2=yes|W2=yes}} |
| {{Itemlist|Super Repel|Sometimes in Hidden Grotto ([[Item#Recurring items|reappears]])|B2=yes|W2=yes}} | | {{Itemlist|Super Repel|Sometimes in Hidden Grotto ([[Recurring item|reappears]])|B2=yes|W2=yes}} |
| {{Itemlist|Max Repel|Sometimes in Hidden Grotto ([[Item#Recurring items|reappears]])|B2=yes|W2=yes}} | | {{Itemlist|Max Repel|Sometimes in Hidden Grotto ([[Recurring item|reappears]])|B2=yes|W2=yes}} |
| {{Itemlist|Poké Ball|Sometimes in Hidden Grotto ([[Item#Recurring items|reappears]])|B2=yes|W2=yes|display={{ball|Poké}}}} | | {{Itemlist|Poké Ball|Sometimes in Hidden Grotto ([[Recurring item|reappears]])|B2=yes|W2=yes|display={{i|Poké Ball}}}} |
| {{Itemlist|Great Ball|Sometimes in Hidden Grotto ([[Item#Recurring items|reappears]])|B2=yes|W2=yes|display={{ball|Great}}}} | | {{Itemlist|Great Ball|Sometimes in Hidden Grotto ([[Recurring item|reappears]])|B2=yes|W2=yes}} |
| {{Itemlist|Ultra Ball|Sometimes in Hidden Grotto ([[Item#Recurring items|reappears]])|B2=yes|W2=yes|display={{ball|Ultra}}}} | | {{Itemlist|Ultra Ball|Sometimes in Hidden Grotto ([[Recurring item|reappears]])|B2=yes|W2=yes}} |
| {{Itemlist|Potion|Sometimes in Hidden Grotto ([[Item#Recurring items|reappears]])|B2=yes|W2=yes}} | | {{Itemlist|Potion|Sometimes in Hidden Grotto ([[Recurring item|reappears]])|B2=yes|W2=yes}} |
| {{Itemlist|Super Potion|Sometimes in Hidden Grotto ([[Item#Recurring items|reappears]])|B2=yes|W2=yes}} | | {{Itemlist|Super Potion|Sometimes in Hidden Grotto ([[Recurring item|reappears]])|B2=yes|W2=yes}} |
| {{Itemlist|Hyper Potion|Sometimes in Hidden Grotto ([[Item#Recurring items|reappears]])|B2=yes|W2=yes}} | | {{Itemlist|Hyper Potion|Sometimes in Hidden Grotto ([[Recurring item|reappears]])|B2=yes|W2=yes}} |
| {{Itemlist|TinyMushroom|Sometimes in Hidden Grotto ([[Item#Recurring items|reappears]]) ''(hidden)''|B2=yes|W2=yes|display=[[Tiny Mushroom|TinyMushroom]]}} | | {{Itemlist|Tiny Mushroom|Sometimes in Hidden Grotto ([[Recurring item|reappears]]) ''(hidden)''|B2=yes|W2=yes|display=[[Tiny Mushroom|TinyMushroom]]}} |
| {{Itemlist|Big Mushroom|Sometimes in Hidden Grotto ([[Item#Recurring items|reappears]]) ''(hidden)''|B2=yes|W2=yes}} | | {{Itemlist|Big Mushroom|Sometimes in Hidden Grotto ([[Recurring item|reappears]]) ''(hidden)''|B2=yes|W2=yes}} |
| {{Itemlist|Rare Candy|Sometimes in Hidden Grotto ([[Item#Recurring items|reappears]]) ''(hidden)''|B2=yes|W2=yes}} | | {{Itemlist|Rare Candy|Sometimes in Hidden Grotto ([[Recurring item|reappears]]) ''(hidden)''|B2=yes|W2=yes}} |
| {{Itemlist|PP Up|Sometimes in Hidden Grotto ([[Item#Recurring items|reappears]]) ''(hidden)''|B2=yes|W2=yes}} | | {{Itemlist|PP Up|Sometimes in Hidden Grotto ([[Recurring item|reappears]]) ''(hidden)''|B2=yes|W2=yes}} |
| {{Itemlist|PP Max|Sometimes in Hidden Grotto ([[Item#Recurring items|reappears]]) ''(hidden)''|B2=yes|W2=yes}} | | {{Itemlist|PP Max|Sometimes in Hidden Grotto ([[Recurring item|reappears]]) ''(hidden)''|B2=yes|W2=yes}} |
| {{Itemlist|Red Shard|Sometimes in Hidden Grotto ([[Item#Recurring items|reappears]]) ''(hidden)''|B2=yes|W2=yes}} | | {{Itemlist|Red Shard|Sometimes in Hidden Grotto ([[Recurring item|reappears]]) ''(hidden)''|B2=yes|W2=yes}} |
| {{Itemlist|Green Shard|Sometimes in Hidden Grotto ([[Item#Recurring items|reappears]]) ''(hidden)''|B2=yes|W2=yes}} | | {{Itemlist|Green Shard|Sometimes in Hidden Grotto ([[Recurring item|reappears]]) ''(hidden)''|B2=yes|W2=yes}} |
| {{Itemlist|Yellow Shard|Sometimes in Hidden Grotto ([[Item#Recurring items|reappears]]) ''(hidden)''|B2=yes|W2=yes}} | | {{Itemlist|Yellow Shard|Sometimes in Hidden Grotto ([[Recurring item|reappears]]) ''(hidden)''|B2=yes|W2=yes}} |
| {{Itemlist|Blue Shard|Sometimes in Hidden Grotto ([[Item#Recurring items|reappears]]) ''(hidden)''|B2=yes|W2=yes}} | | {{Itemlist|Blue Shard|Sometimes in Hidden Grotto ([[Recurring item|reappears]]) ''(hidden)''|B2=yes|W2=yes}} |
| {{Itlistfoot|forest}} | | {{Itlistfoot|forest}} |
|
| |
|
| Line 375: |
Line 375: |
| {{catch/div|cave|Special}} | | {{catch/div|cave|Special}} |
| {{catch/entry5-2|646|Kyurem|yes|yes|Special|70|all={{tt|One|Can only be caught after catching or defeating Reshiram or Zekrom at Dragonspiral Tower}}|type1=Dragon|type2=Ice}} | | {{catch/entry5-2|646|Kyurem|yes|yes|Special|70|all={{tt|One|Can only be caught after catching or defeating Reshiram or Zekrom at Dragonspiral Tower}}|type1=Dragon|type2=Ice}} |
| {{catch/entry5-2|646B|Kyurem|yes|no|Special|55|all={{tt|One|Can't be caught}}|type1=Dragon|type2=Ice}} | | {{catch/entry5-2|646B|Kyurem|yes|no|Special|55|all={{tt|One|Cannot be caught}}|type1=Dragon|type2=Ice}} |
| {{catch/entry5-2|646W|Kyurem|no|yes|Special|55|all={{tt|One|Can't be caught}}|type1=Dragon|type2=Ice}} | | {{catch/entry5-2|646W|Kyurem|no|yes|Special|55|all={{tt|One|Cannot be caught}}|type1=Dragon|type2=Ice}} |
| {{catch/footer|cave}} | | {{catch/footer|cave}} |
|
| |
|
| Line 394: |
Line 394: |
| |prize={{PDollar}}{{tt|9360|8640 in Easy Mode, 10080 in Challenge Mode}} | | |prize={{PDollar}}{{tt|9360|8640 in Easy Mode, 10080 in Challenge Mode}} |
| |class=Team Plasma | | |class=Team Plasma |
| |name=Ghetsis | | |name={{color2|000|Ghetsis}} |
| |game=B2W2 | | |game=B2W2 |
| |location=Giant Chasm | | |location=Giant Chasm |
| Line 507: |
Line 507: |
| ==In the anime== | | ==In the anime== |
| [[File:Giant Chasm PG.png|thumb|220px|Giant Chasm in [[Pokémon Generations]]]] | | [[File:Giant Chasm PG.png|thumb|220px|Giant Chasm in [[Pokémon Generations]]]] |
| [[File:Giant Chasm Cave's Deepest Part PG.png|thumb|left|220px|Cave Depths in Pokémon Generations]] | | [[File:Giant Chasm Cave Depths PG.png|thumb|left|220px|Cave Depths in Pokémon Generations]] |
| ===In Pokémon Generations=== | | ===In Pokémon Generations=== |
| Giant Chasm appeared in ''[[PG15|The King Returns]]'', where [[Ghetsis]] was seen there with {{p|Kyurem}}, commanding it to cover all of Unova in ice. However, he was interrupted by [[N]] arriving with {{p|Reshiram}}, wanting to protect the place that had taught him how humans and Pokémon can live together. Ghetsis then used the [[DNA Splicers]] on Kyurem, allowing it to absorb Reshiram and turn into {{DL|List of Pokémon with form differences|Kyurem|White Kyurem}}. He then ordered Kyurem to attack N, but N was saved by the sudden arrival of {{ga|Hilbert}} and {{p|Zekrom}}, who had arrived to help stop Ghetsis. | | Giant Chasm appeared in ''[[PG15|The King Returns]]'', where [[Ghetsis]] was seen there with {{p|Kyurem}}, commanding it to cover all of Unova in ice. However, he was interrupted by [[N]] arriving with {{p|Reshiram}}, wanting to protect the place that had taught him how humans and Pokémon can live together. Ghetsis then used the [[DNA Splicers]] on Kyurem, allowing it to absorb Reshiram and turn into {{DL|List of Pokémon with form differences|Kyurem|White Kyurem}}. He then ordered Kyurem to attack N, but N was saved by the sudden arrival of {{ga|Hilbert}} and {{p|Zekrom}}, who had arrived to help stop Ghetsis. |
| Line 513: |
Line 513: |
|
| |
|
| ==In the manga== | | ==In the manga== |
| [[File:Giant Chasm PBW.png|thumb|180px|Giant Chasm in Be the Best! Pokémon B+W]] | | [[File:Giant Chasm PBW.png|thumb|left|180px|Giant Chasm in Be the Best! Pokémon B+W]] |
| ===In the Be the Best! Pokémon B+W manga=== | | ===In the Be the Best! Pokémon B+W manga=== |
| Giant Chasm appeared in ''[[PBW6|Pokédex Complete!]]''. | | Giant Chasm appeared in ''[[PBW6|Pokédex Complete!]]'', where [[Monta]], [[Cheren]], and [[Bianca]] entered it in order for Monta to {{pkmn2|caught|catch}} Kyurem. He eventually succeeded, adding Kyurem's data to his [[Pokédex]]. |
| {{sectionstub}} | | |
| | [[File:Giant Chasm Adventures.png|thumb|250px|Giant Chasm in Pokémon Adventures]] |
| | ===In the Pokémon Adventures manga=== |
| | The Giant Chasm first appeared in [[PS545]], where {{DL|Tao trio (Adventures)|Kyurem}} and the [[Plasma Frigate]] were revealed to be heading towards it. |
| | |
| | In [[PS546]], the [[Unova]] [[Pokédex holder]]s, pursuing [[Team Plasma]], arrived there as well. Upon arrival, they met [[Iris]] and [[Gorm]], learning that Iris had become the new {{pkmn|Champion}} of Unova after defeating [[Alder]] and {{adv|N}}. [[Colress]] then appeared and had Kyurem attack the group with {{m|Freeze Shock}}, freezing the entire Giant Chasm over in the process. However, Colress suddenly lost control of Kyurem, and [[Rood]], arriving at the scene, informed him that the white Team Plasma had activated a device that neutralizes the [[Colress Machine]]'s ability to control Pokémon. Freed of Colress's control, Kyurem ejected the [[Dark Stone]] from its body and absorbed {{DL|Tao trio (Adventures)|Reshiram}}, turning into {{DL|List of Pokémon with form differences|Kyurem|White Kyurem}}. Seeing that Kyurem was no longer under his control, Colress decided to quit Team Plasma and escape. While {{adv|Blake}} pursued Colress, {{adv|Black}}, {{adv|White}}, and Iris tried to stop Kyurem from destroying the Plasma Frigate, since N was still inside it. Eventually, Kyurem separated from Reshiram and left, only returning briefly afterwards to freeze Colress after he had been defeated by Blake. Once all the humans had left the Giant Chasm, Kyurem covered the entire location in ice in order to rest undisturbed. |
| {{-}} | | {{-}} |
|
| |
|
| Line 522: |
Line 527: |
| * In {{2v2|Black|White}}, Crater Forest has the highest-leveled [[wild Pokémon]] in grass in the game, the highest level being 65. | | * In {{2v2|Black|White}}, Crater Forest has the highest-leveled [[wild Pokémon]] in grass in the game, the highest level being 65. |
| * The Giant Chasm and its lore seem to have been inspired by the real-life {{wp|Tunguska event}}. A shard of comet struck the Siberian taiga, forming a huge crater and felling trees for miles. Like how Kyurem is thought to have fallen on a comet, and how the Plasma Frigate destroys the forest, the Tunguska event is surrounded by conspiracy theories of aliens and weapons testing. | | * The Giant Chasm and its lore seem to have been inspired by the real-life {{wp|Tunguska event}}. A shard of comet struck the Siberian taiga, forming a huge crater and felling trees for miles. Like how Kyurem is thought to have fallen on a comet, and how the Plasma Frigate destroys the forest, the Tunguska event is surrounded by conspiracy theories of aliens and weapons testing. |
| * The Giant Chasm is the only place in all American Pokémon games where players can catch a wild [[Metagross]], [[Mamoswine]], and [[Clefable]] (apart from [[Pal Park]]). | | * The Giant Chasm is the only location in all the [[core series]] Pokémon games where wild {{p|Metagross}} and {{p|Mamoswine}} can be found and {{pkmn2|caught}}. |
|
| |
|
| ==In other languages== | | ==In other languages== |
| {{Langtable|color={{locationcolor/light|cave}}|bordercolor={{locationcolor/dark|cave}} | | {{Langtable|color={{locationcolor/light|cave}}|bordercolor={{locationcolor/dark|cave}} |
| |zh_cmn=巨人洞窟 ''{{tt|Jùrén Dòngkū|Giant's Hole}}'' | | |zh_cmn=巨人洞窟 ''{{tt|Jùrén Dòngkū|Giant's Hole}}'' <br>巨大洞穴 ''{{tt|Jùdà Dòngxué|Giant's Hole}}'' |
| |fr=Grotte Cyclopéenne | | |fr=Grotte Cyclopéenne |
| |de=Riesengrotte | | |de=Riesengrotte |
| |it=Fossa Gigante | | |it=Fossa Gigante |
| |ko=자이언트홀 ''Giant Hole'' | | |ko=자이언트홀 ''Giant Hole'' |
| |es_eu=Boquete Gigante | | |es=Boquete Gigante |
| |vi=Hố Khổng Lồ | | |vi=Hố Khổng Lồ |
| }} | | }} |
| Giant Chasm
|
|
ジャイアントホール
Giant Hole
|
| "Wild Missingno. appeared!"
|
|
|
|
| Map description:
|
Legend says that if you approach this big chasm, disasters surely follow.
|
| Location:
|
North of Route 13
Between Routes 22 and 23B2W2
|
| Region:
|
Unova
|
| Generations:
|
V
|
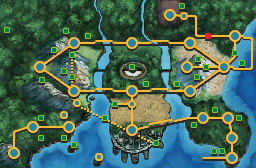
Location of Giant Chasm in Unova.
|
| Pokémon world locations
|
Giant Chasm (Japanese: ジャイアントホール Giant Hole) is an area in the northeastern part of the Unova region.
It is a large impact crater containing a maze-like forest, and is home to a number of extraterrestrial Pokémon, including the Legendary Pokémon Kyurem, who resides in the deepest part of the cave at the far end of the crater.
This area has many high-level Pokémon from previous generations. It is said that disaster will befall to any person who approaches it, which may explain why Absol can be caught here.
Role
In Black and White, when the player reaches the pond in the middle of the crater, the forest will freeze and be completely covered in snow, thus giving the player access to the cave Kyurem is hiding. Once the player has captured or defeated Kyurem and left the area, the snow will disappear, and the northern portion of the caves will no longer be accessible. If Kyurem is defeated, however, the area will become accessible again after defeating the Pokémon League once more and returning to the pond in the center of the crater.
In the years between Black and White and Black 2 and White 2, the path from Lacunosa Town to the Giant Chasm has been blocked by a landslide. A lone boulder blocks the path, which can be pushed with Strength from the Giant Chasm's exterior.
In Black 2 and White 2, the player encounters Team Plasma here. Two Team Plasma Grunts block a path inside the east of the cave until the Plasma Frigate arrives on top of the crater's forest after the player obtains the Wave Badge. The frigate freezes over many of the trees, creating an icy hill on top of which the frigate is docked. Rood of the Seven Sages along with several old Team Plasma members confront the new Team Plasma; this gives the player the opportunity to sneak aboard the Plasma Frigate, where they battle against Colress and run into Ghetsis. The player follows Ghetsis out of the ship after defeating the Shadow Triad. At the end of the cave, Ghetsis appears and tries to freeze the player alive with Kyurem's Glaciate, but are saved by N and his ZekromB2/ReshiramW2 flying down from above. Ghetsis then reveals he tricked N into coming here so Ghetsis could fuse Kyurem with N's dragon. Ghetsis then uses his cane to control Kyurem, who then proceeds to fuse with N's dragon with the DNA Splicers, forcing the player to fight BlackB2/WhiteW2 Kyurem. Upon winning the battle, ZekromB2/ReshiramW2 will be separated from Kyurem and return to N, and Kyurem will disappear from the cave. Afterwards, the player fights Ghetsis himself.
After defeating Ghetsis, he goes into madness, causing the Shadow Triad to appear and take him away, leaving his cane. Outside, the Plasma Frigate has left. Rood and his team wait to tell the player that Colress has disbanded the new Team Plasma and taken the Plasma Frigate. Kyurem will appear here after the player has caught ZekromB2/ReshiramW2 at Dragonspiral Tower.

|
Spoilers end here.
|
|
Items
Entrance
Cave
Crater Forest
Hidden Grotto
Cave Depths
Phenomenon
Pokémon
Pokémon Black and White
Entrance
| Pokémon
|
Games
|
Location
|
Levels
|
Rate
|
|
|
B
|
W
|
|
48-50
|
15%
|
|
|
B
|
W
|
|
47-49
|
25%
|
|
|
B
|
W
|
|
47
|
20%
|
|
|
B
|
W
|
|
48
|
10%
|
|
|
B
|
W
|
|
48
|
10%
|
|
|
B
|
W
|
|
48-50
|
10%
|
|
|
B
|
W
|
|
49
|
10%
|
| Dark grass
|
|
|
B
|
W
|
|
58-60
|
15%
|
|
|
B
|
W
|
|
57-59
|
25%
|
|
|
B
|
W
|
|
57
|
20%
|
|
|
B
|
W
|
|
58
|
10%
|
|
|
B
|
W
|
|
58
|
10%
|
|
|
B
|
W
|
|
58-60
|
10%
|
|
|
B
|
W
|
|
59
|
10%
|
| Rustling grass
|
|
|
B
|
W
|
|
50
|
5%
|
|
|
B
|
W
|
|
50
|
5%
|
|
|
B
|
W
|
|
47-50
|
80%
|
|
|
B
|
W
|
|
48
|
10%
|
| A colored background means that the Pokémon can be found in this location in the specified game. A white background with a colored letter means that the Pokémon cannot be found here.
|
Cave
| Pokémon
|
Games
|
Location
|
Levels
|
Rate
|
|
|
B
|
W
|
|
47-49
|
25%
|
|
|
B
|
W
|
|
47
|
20%
|
|
|
B
|
W
|
|
48
|
10%
|
|
|
B
|
W
|
|
48
|
10%
|
|
|
B
|
W
|
|
50
|
10%
|
|
|
B
|
W
|
|
50
|
10%
|
|
|
B
|
W
|
|
48-50
|
10%
|
|
|
B
|
W
|
|
49
|
5%
|
| Dust clouds
|
|
|
B
|
W
|
|
47-50
|
100%
|
| Surfing
|
|
|
B
|
W
|
|
25-55
|
70%
|
|
|
B
|
W
|
|
25-55
|
70%
|
|
|
B
|
W
|
|
25-55
|
30%
|
| Surfing in rippling water
|
|
|
B
|
W
|
|
26-60
|
60%
|
|
|
B
|
W
|
|
25-60
|
30%
|
|
|
B
|
W
|
|
25-60
|
30%
|
|
|
B
|
W
|
|
35-70
|
10%
|
| Fishing
|
|
|
B
|
W
|
|
35-55
|
65%
|
|
|
B
|
W
|
|
35-55
|
30%
|
|
|
B
|
W
|
|
35-55
|
30%
|
|
|
B
|
W
|
|
35-55
|
5%
|
| Fishing in rippling water
|
|
|
B
|
W
|
|
35-70
|
65%
|
|
|
B
|
W
|
|
35-60
|
30%
|
|
|
B
|
W
|
|
35-60
|
30%
|
|
|
B
|
W
|
|
45-70
|
5%
|
| A colored background means that the Pokémon can be found in this location in the specified game. A white background with a colored letter means that the Pokémon cannot be found here.
|
Crater Forest
| Pokémon
|
Games
|
Location
|
Levels
|
Rate
|
|
|
B
|
W
|
|
52-54
|
30%
|
|
|
B
|
W
|
|
52-54
|
25%
|
|
|
B
|
W
|
|
53-55
|
15%
|
|
|
B
|
W
|
|
55
|
10%
|
|
|
B
|
W
|
|
55
|
10%
|
|
|
B
|
W
|
|
53-55
|
10%
|
| Dark grass
|
|
|
B
|
W
|
|
62-64
|
30%
|
|
|
B
|
W
|
|
62-64
|
25%
|
|
|
B
|
W
|
|
63-65
|
15%
|
|
|
B
|
W
|
|
64-65
|
10%
|
|
|
B
|
W
|
|
64-65
|
10%
|
|
|
B
|
W
|
|
63-65
|
10%
|
| Rustling grass
|
|
|
B
|
W
|
|
52-55
|
85%
|
|
|
B
|
W
|
|
55
|
5%
|
|
|
B
|
W
|
|
55
|
5%
|
|
|
B
|
W
|
|
55
|
5%
|
| A colored background means that the Pokémon can be found in this location in the specified game. A white background with a colored letter means that the Pokémon cannot be found here.
|
Cave Depths
| Pokémon
|
Games
|
Location
|
Levels
|
Rate
|
|
|
B
|
W
|
|
57-59
|
25%
|
|
|
B
|
W
|
|
57
|
20%
|
|
|
B
|
W
|
|
58
|
10%
|
|
|
B
|
W
|
|
58
|
10%
|
|
|
B
|
W
|
|
60
|
10%
|
|
|
B
|
W
|
|
60
|
10%
|
|
|
B
|
W
|
|
58-60
|
10%
|
|
|
B
|
W
|
|
59
|
5%
|
| Dust clouds
|
|
|
B
|
W
|
|
57-60
|
100%
|
| Surfing
|
|
|
B
|
W
|
|
25-55
|
70%
|
|
|
B
|
W
|
|
25-55
|
70%
|
|
|
B
|
W
|
|
25-55
|
30%
|
| Surfing in rippling water
|
|
|
B
|
W
|
|
25-60
|
60%
|
|
|
B
|
W
|
|
25-60
|
30%
|
|
|
B
|
W
|
|
25-60
|
30%
|
|
|
B
|
W
|
|
35-70
|
10%
|
| Fishing
|
|
|
B
|
W
|
|
35-55
|
65%
|
|
|
B
|
W
|
|
35-55
|
30%
|
|
|
B
|
W
|
|
35-55
|
30%
|
|
|
B
|
W
|
|
35-55
|
5%
|
| Fishing in rippling water
|
|
|
B
|
W
|
|
35-70
|
65%
|
|
|
B
|
W
|
|
35-60
|
30%
|
|
|
B
|
W
|
|
35-60
|
30%
|
|
|
B
|
W
|
|
45-70
|
5%
|
| Special Pokémon
|
|
|
B
|
W
|

|
Only one
|
|
75
|
One
|
| A colored background means that the Pokémon can be found in this location in the specified game. A white background with a colored letter means that the Pokémon cannot be found here.
|
Pokémon Black 2 and White 2
Entrance
| Pokémon
|
Games
|
Location
|
Levels
|
Rate
|
|
|
B2
|
W2
|
|
45, 47
|
15%
|
|
|
B2
|
W2
|
|
44, 45
|
30%
|
|
|
B2
|
W2
|
|
44
|
5%
|
|
|
B2
|
W2
|
|
45
|
20%
|
|
|
B2
|
W2
|
|
45
|
10%
|
|
|
B2
|
W2
|
|
46
|
10%
|
|
|
B2
|
W2
|
|
45, 47
|
10%
|
| Dark grass
|
|
|
B2
|
W2
|
|
50, 52
|
15%
|
|
|
B2
|
W2
|
|
49, 50
|
30%
|
|
|
B2
|
W2
|
|
49
|
5%
|
|
|
B2
|
W2
|
|
50
|
20%
|
|
|
B2
|
W2
|
|
50
|
10%
|
|
|
B2
|
W2
|
|
51
|
10%
|
|
|
B2
|
W2
|
|
50, 52
|
10%
|
| Rustling grass
|
|
|
B2
|
W2
|
|
47
|
5%
|
|
|
B2
|
W2
|
|
47
|
5%
|
|
|
B2
|
W2
|
|
47
|
5%
|
|
|
B2
|
W2
|
|
44-47
|
85%
|
| A colored background means that the Pokémon can be found in this location in the specified game. A white background with a colored letter means that the Pokémon cannot be found here.
|
Cave
| Pokémon
|
Games
|
Location
|
Levels
|
Rate
|
|
|
B2
|
W2
|
|
44, 46
|
15%
|
|
|
B2
|
W2
|
|
44
|
20%
|
|
|
B2
|
W2
|
|
44, 46
|
25%
|
|
|
B2
|
W2
|
|
47
|
5%
|
|
|
B2
|
W2
|
|
46
|
10%
|
|
|
B2
|
W2
|
|
46
|
10%
|
|
|
B2
|
W2
|
|
45, 47
|
15%
|
| Dust clouds
|
|
|
B2
|
W2
|
|
44-47
|
100%
|
| Surfing
|
|
|
B2
|
W2
|
|
35-50
|
30%
|
|
|
B2
|
W2
|
|
35-50
|
70%
|
|
|
B2
|
W2
|
|
35-50
|
70%
|
| Surfing in rippling water
|
|
|
B2
|
W2
|
|
35-50
|
60%
|
|
|
B2
|
W2
|
|
40-50
|
10%
|
|
|
B2
|
W2
|
|
35-50
|
30%
|
|
|
B2
|
W2
|
|
35-50
|
30%
|
| Fishing
|
|
|
B2
|
W2
|
|
40-70
|
70%
|
|
|
B2
|
W2
|
|
40-60
|
30%
|
|
|
B2
|
W2
|
|
40-60
|
30%
|
| Fishing in rippling water
|
|
|
B2
|
W2
|
|
40-70
|
65%
|
|
|
B2
|
W2
|
|
50-70
|
5%
|
|
|
B2
|
W2
|
|
40-60
|
30%
|
|
|
B2
|
W2
|
|
40-60
|
30%
|
| A colored background means that the Pokémon can be found in this location in the specified game. A white background with a colored letter means that the Pokémon cannot be found here.
|
Crater Forest
| Pokémon
|
Games
|
Location
|
Levels
|
Rate
|
|
|
B2
|
W2
|
|
45
|
20%
|
|
|
B2
|
W2
|
|
45, 47
|
15%
|
|
|
B2
|
W2
|
|
44, 46
|
30%
|
|
|
B2
|
W2
|
|
44
|
5%
|
|
|
B2
|
W2
|
|
46
|
10%
|
|
|
B2
|
W2
|
|
46
|
10%
|
|
|
B2
|
W2
|
|
45, 47
|
10%
|
| Dark grass
|
|
|
B2
|
W2
|
|
50
|
20%
|
|
|
B2
|
W2
|
|
50, 52
|
15%
|
|
|
B2
|
W2
|
|
49, 51
|
30%
|
|
|
B2
|
W2
|
|
49
|
5%
|
|
|
B2
|
W2
|
|
51
|
10%
|
|
|
B2
|
W2
|
|
51
|
10%
|
|
|
B2
|
W2
|
|
50, 52
|
10%
|
| Rustling grass
|
|
|
B2
|
W2
|
|
44-47
|
85%
|
|
|
B2
|
W2
|
|
47
|
5%
|
|
|
B2
|
W2
|
|
47
|
5%
|
|
|
B2
|
W2
|
|
47
|
5%
|
| Hidden Grotto
|
|
|
B2
|
W2
|
|
45-50
|
15%
|
|
|
B2
|
W2
|
|
45-50
|
1%
|
|
|
B2
|
W2
|
|
45-50
|
2%
|
|
|
B2
|
W2
|
|
45-50
|
2%
|
| A colored background means that the Pokémon can be found in this location in the specified game. A white background with a colored letter means that the Pokémon cannot be found here.
|
Cave Depths
| Pokémon
|
Games
|
Location
|
Levels
|
Rate
|
|
|
B2
|
W2
|
|
44, 46
|
15%
|
|
|
B2
|
W2
|
|
44
|
20%
|
|
|
B2
|
W2
|
|
44, 46
|
25%
|
|
|
B2
|
W2
|
|
47
|
5%
|
|
|
B2
|
W2
|
|
46
|
10%
|
|
|
B2
|
W2
|
|
46
|
10%
|
|
|
B2
|
W2
|
|
45, 47
|
15%
|
| Dust clouds
|
|
|
B2
|
W2
|
|
44-47
|
100%
|
| Surfing
|
|
|
B2
|
W2
|
|
35-50
|
30%
|
|
|
B2
|
W2
|
|
35-50
|
70%
|
|
|
B2
|
W2
|
|
35-50
|
70%
|
| Surfing in rippling water
|
|
|
B2
|
W2
|
|
35-50
|
60%
|
|
|
B2
|
W2
|
|
40-50
|
10%
|
|
|
B2
|
W2
|
|
35-50
|
30%
|
|
|
B2
|
W2
|
|
35-50
|
30%
|
| Fishing
|
|
|
B2
|
W2
|
|
40-70
|
70%
|
|
|
B2
|
W2
|
|
40-60
|
30%
|
|
|
B2
|
W2
|
|
40-60
|
30%
|
| Fishing in rippling water
|
|
|
B2
|
W2
|
|
40-70
|
65%
|
|
|
B2
|
W2
|
|
50-70
|
5%
|
|
|
B2
|
W2
|
|
40-60
|
30%
|
|
|
B2
|
W2
|
|
40-60
|
30%
|
| Special Pokémon
|
|
|
B2
|
W2
|
|
|
Only one
|
|
70
|
One
|
|
|
B2
|
W2
|
|
|
Only one
|
|
55
|
One
|
|
|
B2
|
W2
|
|
|
Only one
|
|
55
|
One
|
| A colored background means that the Pokémon can be found in this location in the specified game. A white background with a colored letter means that the Pokémon cannot be found here.
|
Trainers
Pokémon Black 2 and White 2
Crater Forest
| Trainer
|
Pokémon
|
|
|
|

|
Muk♂
|
Lv.47
|
| No item
|
|
|
|
Cave Depths

|
|
Reward: $9360
|
|
|
|
|
|
Layout

|
This section is incomplete.
Please feel free to edit this section to add missing information and complete it.
Reason: Ice layout for Crater Forest in B2W2 and other season maps
|
In the anime
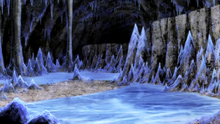
Cave Depths in Pokémon Generations
In Pokémon Generations
Giant Chasm appeared in The King Returns, where Ghetsis was seen there with Kyurem, commanding it to cover all of Unova in ice. However, he was interrupted by N arriving with Reshiram, wanting to protect the place that had taught him how humans and Pokémon can live together. Ghetsis then used the DNA Splicers on Kyurem, allowing it to absorb Reshiram and turn into White Kyurem. He then ordered Kyurem to attack N, but N was saved by the sudden arrival of Hilbert and Zekrom, who had arrived to help stop Ghetsis.
In the manga

Giant Chasm in Be the Best! Pokémon B+W
In the Be the Best! Pokémon B+W manga
Giant Chasm appeared in Pokédex Complete!, where Monta, Cheren, and Bianca entered it in order for Monta to catch Kyurem. He eventually succeeded, adding Kyurem's data to his Pokédex.

Giant Chasm in Pokémon Adventures
In the Pokémon Adventures manga
The Giant Chasm first appeared in PS545, where Kyurem and the Plasma Frigate were revealed to be heading towards it.
In PS546, the Unova Pokédex holders, pursuing Team Plasma, arrived there as well. Upon arrival, they met Iris and Gorm, learning that Iris had become the new Champion of Unova after defeating Alder and N. Colress then appeared and had Kyurem attack the group with Freeze Shock, freezing the entire Giant Chasm over in the process. However, Colress suddenly lost control of Kyurem, and Rood, arriving at the scene, informed him that the white Team Plasma had activated a device that neutralizes the Colress Machine's ability to control Pokémon. Freed of Colress's control, Kyurem ejected the Dark Stone from its body and absorbed Reshiram, turning into White Kyurem. Seeing that Kyurem was no longer under his control, Colress decided to quit Team Plasma and escape. While Blake pursued Colress, Black, White, and Iris tried to stop Kyurem from destroying the Plasma Frigate, since N was still inside it. Eventually, Kyurem separated from Reshiram and left, only returning briefly afterwards to freeze Colress after he had been defeated by Blake. Once all the humans had left the Giant Chasm, Kyurem covered the entire location in ice in order to rest undisturbed.
Trivia
- In Black and White, Crater Forest has the highest-leveled wild Pokémon in grass in the game, the highest level being 65.
- The Giant Chasm and its lore seem to have been inspired by the real-life Tunguska event. A shard of comet struck the Siberian taiga, forming a huge crater and felling trees for miles. Like how Kyurem is thought to have fallen on a comet, and how the Plasma Frigate destroys the forest, the Tunguska event is surrounded by conspiracy theories of aliens and weapons testing.
- The Giant Chasm is the only location in all the core series Pokémon games where wild Metagross and Mamoswine can be found and caught.
In other languages


