Totem Pokémon: Difference between revisions
No edit summary |
|||
| (99 intermediate revisions by 41 users not shown) | |||
| Line 1: | Line 1: | ||
[[File:SM Prerelease SOS Battle.png|thumb| | [[File:SM Prerelease SOS Battle.png|thumb|300px|A Totem {{p|Gumshoos}} and its ally]] | ||
'''Totem Pokémon''' (Japanese: '''ぬしポケモン''' ''Leader Pokémon'') are a type of [[variant Pokémon]] that are battled at the end of every [[island challenge|trial]], | '''Totem Pokémon''' (Japanese: '''ぬしポケモン''' ''Leader Pokémon'') are a type of [[variant Pokémon]] that are battled at the end of every [[island challenge|trial]]. In the [[core series]], most Totem Pokémon have been {{pkmn|training|trained}} by their respective [[Trial Captain|Captain]], providing them their role. Trial-goers are expected to prove their strength to these powerful Pokémon and those who win are considered to have completed the trial and are rewarded with a [[Z-Crystal]]. | ||
==In the games== | There is currently twelve known Totem Pokémon. These Pokémon (with exception of Totem {{p|Wishiwashi}}) appear {{pkmn2|giant|larger}} than normal, and weigh approximately two to four times as much as other Pokémon of the same [[Pokémon (species)|species]]. The eleven with changed [[height]] and [[weight]] can be obtained as Totem-sized Pokémon from [[Samson Oak]] at [[Heahea Beach]]. | ||
At the start of a battle, Totem Pokémon are enveloped in a special aura which boosts one or more of its [[statistic|stats]] by a fixed number of [[Statistic#Stat modifiers|stages]]. According to [[Wicke]], their size and aura are a result of being bathed in the energy spilled from [[Ultra Wormhole]]s, the same kind that the [[Ultra Beast]]s use to | |||
==In the core series games== | |||
[[File:USUM Prerelease Totem Marowak.png|thumb|250px|Totem {{p|Marowak}}'s aura]] | |||
At the start of a battle, Totem Pokémon are enveloped in a special aura which boosts one or more of its [[statistic|stats]] by a fixed number of [[Statistic#Stat modifiers|stages]], this is the same energy used in [[Z-Move]]s, [[Z-Power]]. According to [[Wicke]], their size and aura are a result of being bathed in the energy spilled from [[Ultra Wormhole]]s, the same kind that the [[Ultra Beast]]s use to store within their bodies, giving them a similar stat boost. This energy is further revealed in {{g|Ultra Sun and Ultra Moon}} to be {{ga|Necrozma}}'s light. Their size and [[weight]] mechanically affect their battles and are not only visual aesthetic, moves such as {{m|Grass Knot}} and {{m|Heavy Slam}} are affected by these weights and {{m|Sky Drop}} will fail against Totem {{p|Araquanid}} and {{p|Kommo-o}}. Totem Pokémon are battled in [[SOS Battle]]s, which allows them to summon an ally to help. | |||
SOS Battles with Totem Pokémon differ from regular SOS Battles in that their supply of allies may be limited, which allies they call is not influenced by the [[weather]], and they call allies at specific times rather than at random (so their calls are unaffected by the [[Adrenaline Orb]] and [[status condition]]s). Both the Totem Pokémon and their allies have more advanced {{wp|Artificial intelligence (video games)|artificial intelligence}} than [[wild Pokémon]], mirroring Trainer behavior. Totem Pokémon each also hold a specific [[item]], usually one that will synergize effectively with their particular strategies or cover their weaknesses. Due to the island challenge rules, Totem Pokémon and their allies cannot be {{pkmn2|caught}}. Like all wild Pokémon, if the player steals an item from a Totem Pokémon (such as by using {{m|Thief}}), the player's Pokémon will still be holding the stolen item at the end of battle. | SOS Battles with Totem Pokémon differ from regular SOS Battles in that their supply of allies may be limited, which allies they call is not influenced by the [[weather]], and they call allies at specific times rather than at random (so their calls are unaffected by the [[Adrenaline Orb]] and [[status condition]]s). Both the Totem Pokémon and their allies have more advanced {{wp|Artificial intelligence (video games)|artificial intelligence}} than [[wild Pokémon]], mirroring Trainer behavior. Totem Pokémon each also hold a specific [[item]], usually one that will synergize effectively with their particular strategies or cover their weaknesses. Due to the island challenge rules, Totem Pokémon and their allies cannot be {{pkmn2|caught}}. Like all wild Pokémon, if the player steals an item from a Totem Pokémon (such as by using {{m|Thief}}), the player's Pokémon will still be holding the stolen item at the end of battle. | ||
===Totem | The {{pkmn|battle}} theme for the Totem Pokémon is a remix of the [[wild Pokémon]] battle theme from the original Sun and Moon games. Totem Pokémon and Totem-sized Pokémon are not registered in the [[Pokédex]] as unique forms, despite behaving as such. | ||
Totem | |||
Totem {{p|Kommo-o}} is the only Totem Pokémon to not be accompanied by a [[Trial Captain]]. | |||
===List of Totem Pokémon=== | |||
====Melemele Island ==== | |||
[[Melemele Island]] has one Totem Pokémon who is governed by by the Captain [[Ilima]] at [[Verdant Cavern]]. The Pokémon here changes based on the game being played, in Sun and Ultra Sun, a {{p|Gumshoos}} will appear as the Totem, while in Moon and Ultra Moon, it is an {{rf|Alolan}} {{p|Raticate}}. The Totem Gumshoos and Raticate in Ultra Sun and Ultra Moon are the only Totem Pokémon that can be battled during the post-game and the only ones that can be rematched. | |||
{| class="roundy" style="margin:auto; text-align:center; background: #{{yellow color dark}}; border: 5px solid #{{yellow color}}" cellpadding="5px" | |||
|- | |||
! style="background:#{{yellow color light}}; {{roundytl|5px}}" |Location | |||
! style="background:#{{yellow color light}}" |Totem Pokémon | |||
! style="background:#{{yellow color light}}" |Size | |||
! style="background:#{{yellow color light}}" |Aura | |||
! style="background:#{{yellow color light}}; {{roundytr|5px}}" colspan="2" |{{color2 |000|SOS Battle|Ally Pokémon}} | |||
|- style="background:#fff" | |||
| rowspan="2" |[[Verdant Cavern]] | |||
|[[File:0735Gumshoos.png|100px|link=Gumshoos]]<br>{{p|Gumshoos}}{{sup/7|SUS}}<br><small>Level 12 (Island challenge)<br>Level 60 (post game){{sup/7|US}}</small> | |||
|4'07" (1.4m)<br>132.3 lbs. (60.0 kg) | |||
| rowspan="2" |Story battle:<br>{{stat|Defense}} +1<br><br>Post game:{{sup/7|USUM}}<br>{{stat|Attack}} +2<br>{{stat|Defense}} +2<br>{{stat|Special Attack|Sp. Attack}} +2<br>{{stat|Special Defense|Sp. Defense}} +2<br>{{stat|Speed}} +2 | |||
|[[File:Menu HOME 0734.png|50px|link=Yungoos]]<br>{{p|Yungoos}}{{sup/7|SUS}}<br><small>Level 10 (Island challenge)<br>Level 58 (post game){{sup/7|US}}</small> | |||
|- style="background:#fff" | |||
|[[File:020Raticate-Alola.png|100px|link=Alolan Raticate]]<br>{{p|Raticate|Alolan Raticate}}{{sup/7|MUM}}<br><small>Level 12 (Island challenge)<br>Level 60 (post game){{sup/7|UM}}</small> | |||
|4'07" (1.4m)<br>231.5 lbs. (105.0 kg) | |||
|[[File:Menu HOME 0019-Alola.png|50px|link=Alolan Rattata]]<br>{{p|Rattata|Alolan Rattata}}{{sup/7|MUM}}<br><small>Level 10 (Island challenge)<br>Level 58 (post game){{sup/7|UM}}</small> | |||
|} | |||
====Akala Island==== | |||
[[Akala Island]] has three Totem Pokémon who were trained under the Captains of [[Lana]], [[Kiawe]] and [[Mallow]] respectively. In Sun and Moon, Lana and Kiawe have trained a Totem {{p|Wishiwashi}} and {{p|Salazzle}}, while in Ultra Sun and Ultra Moon they have trained a {{p|Araquanid}} and {{rf|Alolan}} {{p|Marowak}} instead. Mallow's {{p|Lurantis}} remains in all four versions. Totem Wishiwashi is the only Totem Pokémon without a change in weight or height, taking advantage of its unique [[form change]] that is controlled by its {{a|Schooling}} ability. | |||
Totem- | {| class="roundy" style="margin:auto; text-align:center; background: #{{fairy egg color dark}}; border: 5px solid #{{fairy egg color}}" cellpadding="5px" | ||
|- | |||
! style="background:#{{fairy egg color light}}; {{roundytl|5px}}" | Location | |||
! style="background:#{{fairy egg color light}}" |Totem Pokémon | |||
! style="background:#{{fairy egg color light}}" |Size | |||
! style="background:#{{fairy egg color light}}" |Aura | |||
! style="background:#{{fairy egg color light}}; {{roundytr|5px}}" colspan="2" |{{color2 |000|SOS Battle|Ally Pokémon}} | |||
|- style="background:#fff" | |||
| rowspan="2" |[[Brooklet Hill]] | |||
|[[File:0746Wishiwashi-School.png|100px|link=Wishiwashi]]<br>{{p|Wishiwashi}}{{sup/7|SM}}<br><small>Level 20</small> | |||
|0'08" (0.2 m) (Solo Form)<br>26'11" (8.2 m) (School Form)<br><br>0.7 lbs. (0.3 kg ) (Solo Form)<br>173.3 lbs. (78.6 kg) (School Form) | |||
|{{stat|Defense}} +1 | |||
|[[File:Menu HOME 0746.png|50px|link=Wishiwashi]]<br>{{p|Wishiwashi}}{{sup/7|SM}}<br><small>Level 18</small> | |||
|[[File:Menu HOME 0594.png|50px|link=Alomomola]]<br>{{p|Alomomola}}{{sup/7|SM}}<br><small>Level 18</small> | |||
|- style="background:#fff" | |||
|[[File:752Araquanid.png|100px|link=Araquanid]]<br>{{p|Araquanid}}{{sup/7|USUM}}<br><small>Level 20</small> | |||
|10'02" (3.1 m)<br>479.5 lbs. (217.5 kg) | |||
|{{stat|Speed}} +1 | |||
|[[File:Menu HOME 0751.png|50px|link=Dewpider]]<br>{{p|Dewpider}}{{sup/7|USUM}}<br><small>Level 18</small> | |||
|[[File:Menu HOME 0284.png|50px|link=Masquerain]]<br>{{p|Masquerain}}{{sup/7|USUM}}<br><small>Level 18</small> | |||
|- style="background:#fff" | |||
| rowspan="2" |[[Wela Volcano Park]] | |||
|[[File:758Salazzle.png|100px|link=Salazzle]]<br>{{p|Salazzle}}{{sup/7|SM}}<br><small>Level 22</small> | |||
|6'11" (2.1 m)<br>178.6 lbs. (81.0 kg) | |||
|{{stat|Sp. Defense}} +1 | |||
|[[File:Menu HOME 0757.png|50px|link=Salandit]]<br>{{p|Salandit}}{{sup/7|SM}}<br><small>Level 20</small> | |||
| | |||
|- style="background:#fff" | |||
|[[File:0105Marowak-Alola.png|100px|link=Alolan Marowak]]<br>{{p|Marowak|Alolan Marowak}}{{sup/7|USUM}}<br><small>Level 22</small> | |||
|5'07" (1.7 m)<br>216.1 lbs. (98.0 kg) | |||
|{{stat|Speed}} +1 | |||
|[[File:Menu HOME 0758.png|50px|link=Salazzle]]<br>{{p|Salazzle}}{{sup/7|USUM}}<br><small>Level 20</small> | |||
| | |||
|- style="background:#fff" | |||
| rowspan="2" |[[Lush Jungle]] | |||
| rowspan="2" |[[File:754Lurantis.png|100px|link=Lurantis]]<br>{{p|Lurantis}}<br><small>Level 24</small> | |||
| rowspan="2" |4'11" (1.5 m)<br>127.9 lbs. (58.0 kg) | |||
| rowspan="2" |{{stat|Speed}} +2 | |||
| [[File:Menu HOME 0732.png|50px|link=Trumbeak]]<br>{{p|Trumbeak}}{{sup/7|SM}}<br><small>Level 22</small> | |||
|[[File:Menu HOME 0351.png|50px|link=Castform]]<br>{{p|Castform}}{{sup/7|SM}}<br><small>Level 22</small> | |||
|- style="background:#fff" | |||
|[[File:Menu HOME 0764.png|50px|link=Comfey]]<br>{{p|Comfey}}{{sup/7|USUM}}<br><small>Level 22</small> | |||
|[[File:Menu HOME 0352.png|50px|link=Kecleon]]<br>{{p|Kecleon}}{{sup/7|USUM}}<br><small>Level 22</small> | |||
|} | |||
Totem-sized Pokémon that | ====Ula'ula Island==== | ||
[[Ula'ula Island]] has two Totem Pokémon cared for by [[Sophocles]] and [[Acerola]]. Sophocles' Totem Pokémon is a {{p|Vikavolt}} in Sun and Moon, while in Ultra Sun and Ultra moon, he has trained a {{p|Togedemaru}}. | |||
{| class="roundy" style="margin:auto; text-align:center; background: #{{red color dark}}; border: 5px solid #{{red color}}" cellpadding="5px" | |||
|- | |||
! style="background:#{{red color light}}; {{roundytl|5px}}" |Location | |||
! style="background:#{{red color light}}" |Totem Pokémon | |||
! style="background:#{{red color light}}" |Size | |||
! style="background:#{{red color light}}" |Aura | |||
! style="background:#{{red color light}}; {{roundytr|5px}}" colspan="2" |{{color2 |000|SOS Battle|Ally Pokémon}} | |||
|- style="background:#fff" | |||
| rowspan="2" |[[Hokulani Observatory]] | |||
|[[File:738Vikavolt.png|100px|link=Vikavolt]]<br>{{p|Vikavolt}}{{sup/7|SM}}<br><small>Level 29</small> | |||
|8'06" (2.6 m)<br>325.2 lbs. (147.5 kg) | |||
|{{stat|Attack}} +1<br>{{stat|Defense}} +1<br>{{stat|Sp. Attack}} +1<br>{{stat|Sp. Defense}} +1<br>{{stat|Speed}} +1 | |||
|[[File:Menu HOME 0737.png|50px|link=Charjabug]]<br>{{p|Charjabug}}{{sup/7|SM}}<br><small>Level 28</small> | |||
|[[File:Menu HOME 0737.png|50px|link=Charjabug]]<br>{{p|Charjabug}}{{sup/7|SM}}<br><small>Level 28</small> | |||
|- style="background:#fff" | |||
|[[File:777Togedemaru.png|100px|link=Togedemaru]]<br>{{p|Togedemaru}}{{sup/7|USUM}}<br><small>Level 33</small> | |||
|2'00" (0.6 m)<br>28.7 lbs. (13.0 kg) | |||
|{{stat|Defense}} +2 | |||
|[[File:Menu HOME 0227.png|50px|link=Skarmory]]<br>{{p|Skarmory}}{{sup/7|USUM}}<br><small>Level 32</small> | |||
|[[File:Menu HOME 0702.png|50px|link=Dedenne]]<br>{{p|Dedenne}}{{sup/7|USUM}}<br><small>Level 31</small> | |||
|- style="background:#fff" | |||
| rowspan="2" |[[Thrifty Megamart (Abandoned Site)|Thrifty Megamart<br>(Abandoned Site)]] | |||
| rowspan="2" |[[File:778Mimikyu.png|100px|link=Mimikyu]]<br>{{p|Mimikyu}}<br><small>Level 33{{sup/7|SM}}</small><br><small>Level 35{{sup/7|USUM}}</small> | |||
| rowspan="2" |1'04" (0.4 m)<br>6.2 lbs. (2.8 kg) | |||
| rowspan="2" |{{stat|Attack}} +1<br>{{stat|Defense}} +1<br>{{stat|Special Attack|Sp. Attack}} +1<br>{{stat|Special Defense|Sp. Defense}} +1<br>{{stat|Speed}} +1 | |||
|[[File:Menu HOME 0093.png|50px|link=Haunter]]<br>{{p|Haunter}}{{sup/7|SM}}<br><small>Level 27</small> | |||
|[[File:Menu HOME 0094.png|50px|link=Gengar]]<br>{{p|Gengar}}{{sup/7|SM}}<br><small>Level 27</small> | |||
|- style="background:#fff" | |||
|[[File:Menu HOME 0354.png|50px|link=Banette]]<br>{{p|Banette}}{{sup/7|USUM}}<br><small>Level 32</small> | |||
|[[File:Menu HOME 0593.png|50px|link=Jellicent]]<br>{{p|Jellicent}}{{sup/7|USUM}}<br><small>Level 33</small> | |||
|} | |||
====Poni Island ==== | |||
[[Poni Island]]'s Totem Pokémon count changes based on title played, in Sun and Moon exclusively, it has one, a {{p|Kommo-o}}, who lacks any sort of Trial Captain. [[Mina]] is a Captain who lives in [[Seafolk Village]] and is one of Poni's Captains, but has no respective Totem Pokémon. In Ultra Sun and Ultra Moon, along with Totem Kommo-o who reappars, Poni Island has another Totem Pokémon, a Totem {{p|Ribombee}} who is cared for by Captain Mina. | |||
{| class="roundy" style="margin:auto; text-align:center; background: #{{TCG Pokémon Tool color dark}}; border: 5px solid #{{TCG Pokémon Tool color}}" cellpadding="5px" | |||
|- | |||
! style="background:#{{TCG Pokémon Tool color light}}; {{roundytl|5px}}" |Location | |||
! style="background:#{{TCG Pokémon Tool color light}}" |Totem Pokémon | |||
! style="background:#{{TCG Pokémon Tool color light}}" | Size | |||
! style="background:#{{TCG Pokémon Tool color light}}" |Aura | |||
! style="background:#{{TCG Pokémon Tool color light}}; {{roundytr|5px}}" colspan="2" |{{color2 |000|SOS Battle|Ally Pokémon}} | |||
|- style="background:#fff" | |||
| rowspan="2" |[[Vast Poni Canyon]] | |||
| rowspan="2" |[[File:784Kommo-o.png|100px|link=Kommo-o]]<br>{{p|Kommo-o}}<br><small>Level 45{{sup/7|SM}}</small><br><small>Level 49{{sup/7|USUM}}</small> | |||
| rowspan="2" |7'10" (2.4 m)<br>457.5 lbs. (207.5 kg) | |||
| rowspan="2" |{{stat|Attack}} +1<br>{{stat|Defense}} +1<br>{{stat|Sp. Attack}} +1<br>{{stat|Sp. Defense}} +1<br>{{stat|Speed}} +1 | |||
|[[File:Menu HOME 0748.png|50px|link=Hakamo-o]]<br>{{p|Hakamo-o}}{{sup/7|SM}}<br><small>Level 32</small> | |||
|[[File:Menu HOME 0212.png|50px|link=Scizor]]<br>{{p|Scizor}}{{sup/7|SM}}<br><small>Level 32</small> | |||
|- style="background:#fff" | |||
|[[File:Menu HOME 0715.png|50px|link=Noivern]]<br>{{p|Noivern}}{{sup/7|USUM}}<br><small>Level 48</small> | |||
|[[File:Menu HOME 0212.png|50px|link=Scizor]]<br>{{p|Scizor}}{{sup/7|USUM}}<br><small>Level 46</small> | |||
|- style="background:#fff" | |||
|[[Seafolk Village]] | |||
| [[File:743Ribombee.png|100px|link=Ribombee]]<br>{{p|Ribombee}}<br><small>Level 55</small> | |||
|1'04" (0.4 m)<br>4.4 lbs. (2.0 kg) | |||
|{{stat|Attack}} +2<br>{{stat|Defense}} +2<br>{{stat|Special Attack|Sp. Attack}} +2<br>{{stat|Special Defense|Sp. Defense}} +2<br>{{stat|Speed}} +2 | |||
|[[File:Menu HOME 0242.png|50px|link=Blissey]]<br>{{p|Blissey}}<br><small>Level 53</small> | |||
|[[File:Menu HOME 0279.png|50px|link=Pelipper]]<br>{{p|Pelipper}}<br><small>Level 52</small> | |||
|} | |||
====[[Pokémon Sun and Pokémon Moon Special Demo Version]] ==== | |||
{{incomplete|section|needs=Does Kommo-o have unique form properties or is it like Wishiwashi?}} | |||
A Totem {{p|Hakamo-o}} is found exclusively at the trial at [[Ten Carat Hill]] in the [[Pokémon Sun and Pokémon Moon Special Demo Version|Sun and Moon Special Demo]]. Similarly to the {{p|Kommo-o}} in the full game's [[Vast Poni Canyon]], it is not accompanied or cared for by a [[Trial Captain]]. Unlike the other Totem Pokémon, the player is rewarded with an [[Electrium Z]], a [[Z-Crystal]] with no relation to the type of the Totem Pokémon. | |||
{| class="roundy" style="margin:auto; text-align:center; background: #{{yellow color dark}}; border: 5px solid #{{yellow color}}" cellpadding="5px" width="800px" | |||
|- | |||
! style="background:#{{yellow color light}}; {{roundytl|5px}}" |Island | |||
! style="background:#{{yellow color light}};" |Location | |||
! style="background:#{{yellow color light}}" |Totem Pokémon | |||
! style="background:#{{yellow color light}}" |Aura | |||
! style="background:#{{yellow color light}}; {{roundytr|5px}}" |{{color2 |000|SOS Battle|Ally Pokémon}} | |||
|- | |||
| style="background:#fff; {{roundybl|5px}}" |[[File:Melemele Trial Completion.png|link=Melemele Island]]<br>[[Melemele Island]] | |||
| style="background:#fff" |[[Ten Carat Hill]] | |||
| style="background:#fff" |[[File:783Hakamo-o.png|100px|link=Hakamo-o]]<br>{{p|Hakamo-o}}<br><small>Level 36</small> | |||
| style="background:#fff" |{{stat|Special Defense|Sp. Defense}} +1 | |||
| style="background:#fff; {{roundybr|5px}}" |[[File:Menu HOME 0744.png|50px|link=Rockruff]]<br>{{p|Rockruff}}<br><small>Level 30</small> | |||
|} | |||
=== Totem-sized Pokémon=== | |||
Totem-sized Pokémon are obtainable variants of the Totem Pokémon found at trial sites. Acting as near replicas the actual Totem Pokémon, they too are larger in height and weight compared to their original species counterparts, affecting the mechanics of some moves (such as {{m|Low Kick}} and {{m|Sky Drop}}). Totem-sized Pokémon can be only obtained in {{g|Ultra Sun and Ultra Moon}}, where they can be received from [[Samson Oak]] at [[Heahea Beach]] after meeting him for the first time at {{rt|2|Alola}} depending on the number of [[Totem Sticker]]s the player has obtained. The Pokémon obtained are often [[version exclusive]] based on either Ultra Sun or Ultra Moon. | |||
Totem-sized Pokémon are {{Shiny}}-locked, and their sizes cannot be passed down through [[Pokémon breeding]]. Even if their species normally have multiple {{Abilities}}, Totem-sized Pokémon can only have a particular Ability, as listed below. The Ability is the species' Hidden Ability if the species has two standard Abilities, and the species' sole standard Ability otherwise; thus Totem-sized Pokémon's Ability cannot be changed by [[Ability Capsule]]. Some Totem-sized Pokémon have different abilities than what their trial site counterparts may have. Totem-sized Pokémon always have at least three perfect [[individual values|IVs]]. | |||
Totem-sized Pokémon that are based on Totem Pokémon in {{g|Sun and Moon}} are the only ones that can be [[trade]]d to the original Sun and Moon games and deposited in [[Pokémon Bank]]. Totem-sized Pokémon based on Totem Pokémon that only appear in Ultra Sun and Ultra Moon cannot be deposited in Pokémon Bank or traded to the original Sun and Moon games. | |||
Totem-sized Pokémon that are [[transfer]]red to [[Pokémon HOME]] are turned into their normal-sized forms. | |||
{| class="roundy" style="text-align:center; background:#{{alola color}}; border: 3px solid #{{alola color dark}}; {{roundy|10px}} padding: 1px; margin:auto" | {| class="roundy" style="text-align:center; background:#{{alola color}}; border: 3px solid #{{alola color dark}}; {{roundy|10px}} padding: 1px; margin:auto" | ||
! style="background:#{{alola color light}}; {{roundytl|10px}}" colspan="2" | Pokémon | ! style="background:#{{alola color light}}; {{roundytl|10px}}" colspan="2" |Pokémon | ||
! style="background:#{{alola color light}};" | Introduced | ! style="background:#{{alola color light}};" |Introduced | ||
! style="background:#{{alola color light}};" colspan="2" | {{color2|000|List of Pokémon by height|Height}} | ! style="background:#{{alola color light}};" colspan="2" |{{color2|000|List of Pokémon by height|Height}} | ||
! style="background:#{{alola color light}};" colspan="2" | {{color2|000|List of Pokémon by weight|Weight}} | ! style="background:#{{alola color light}};" colspan="2" |{{color2|000|List of Pokémon by weight|Weight}} | ||
! style="background:#{{alola color light}}; {{roundytr|10px}}" | {{ | ! style="background:#{{alola color light}};" |{{colorlink|Ability|000}} | ||
! style="background:#{{alola color light}}; {{roundytr|10px}}" |{{color2|000|Totem Sticker}} Count | |||
|- style="background:#FFF" | |- style="background:#FFF" | ||
| | |[[File:Menu HOME 0020-Alola.png|50px|link=Raticate]] | ||
| {{color2|000| | |{{color2|000|Alolan form|Alolan}} {{pcolor|Raticate|000}} | ||
| {{gameabbrev7|SM}} | |{{gameabbrev7|SM}} | ||
| 4'07" | |4'07" | ||
| 1.4 m | |1.4 m | ||
| 231.5 lbs | |231.5 lbs. | ||
| 105.0 kg | |105.0 kg | ||
| {{acolor|Thick Fat|000}} | |{{acolor|Thick Fat|000}} | ||
|20{{sup/7|UM}} | |||
|- style="background:#FFF" | |- style="background:#FFF" | ||
| | |[[File:Menu HOME 0105-Alola.png|50px|link=Marowak]] | ||
| {{color2|000| | |{{color2|000|Alolan form|Alolan}} {{pcolor|Marowak|000}} | ||
| {{gameabbrev7|USUM}} | |{{gameabbrev7|USUM}} | ||
| 5'07" | |5'07" | ||
| 1.7 m | | 1.7 m | ||
| 216.1 lbs | |216.1 lbs. | ||
| 98.0 kg | |98.0 kg | ||
| {{acolor|Rock Head|000}} | |{{acolor|Rock Head|000}} | ||
|40{{sup/7|US}} | |||
|- style="background:#FFF" | |- style="background:#FFF" | ||
| | |[[File:Menu HOME 0735.png|50px|link=Gumshoos]] | ||
| {{pcolor|Gumshoos|000}} | |{{pcolor|Gumshoos|000}} | ||
| {{gameabbrev7|SM}} | |{{gameabbrev7|SM}} | ||
| 4'07" | |4'07" | ||
| 1.4 m | |1.4 m | ||
| 132.3 lbs | |132.3 lbs. | ||
| 60.0 kg | |60.0 kg | ||
| {{acolor|Adaptability|000}} | |{{acolor|Adaptability|000}} | ||
|20{{sup/7|US}} | |||
|- style="background:#FFF" | |- style="background:#FFF" | ||
| | |[[File:Menu HOME 0738.png|50px|link=Vikavolt]] | ||
| {{pcolor|Vikavolt|000}} | |{{pcolor|Vikavolt|000}} | ||
| {{gameabbrev7|SM}} | |{{gameabbrev7|SM}} | ||
| 8'06" | |8'06" | ||
| 2.6 m | |2.6 m | ||
| 325.2 lbs | |325.2 lbs. | ||
| 147.5 kg | |147.5 kg | ||
| {{acolor|Levitate|000}} | |{{acolor|Levitate|000}} | ||
|70{{sup/7|US}} | |||
|- style="background:#FFF" | |- style="background:#FFF" | ||
| | |[[File:Menu HOME 0743.png|50px|link=Ribombee]] | ||
| {{pcolor|Ribombee|000}} | |{{pcolor|Ribombee|000}} | ||
| {{gameabbrev7|USUM}} | |{{gameabbrev7|USUM}} | ||
| 1'04" | |1'04" | ||
| 0.4 m | |0.4 m | ||
| 4.4 lbs | |4.4 lbs. | ||
| 2.0 kg | |2.0 kg | ||
| {{acolor|Sweet Veil|000}} | |{{acolor|Sweet Veil|000}} | ||
|100{{sup/7|US}} | |||
|- style="background:#FFF" | |- style="background:#FFF" | ||
| | |[[File:Menu HOME 0752.png|50px|link=Araquanid]] | ||
| {{pcolor|Araquanid|000}} | |{{pcolor|Araquanid|000}} | ||
| {{gameabbrev7|USUM}} | |{{gameabbrev7|USUM}} | ||
| 10'02" | |10'02" | ||
| 3.1 m | |3.1 m | ||
| 479.5 lbs | |479.5 lbs. | ||
| 217.5 kg | |217.5 kg | ||
| {{acolor|Water Bubble|000}} | |{{acolor|Water Bubble|000}} | ||
|40{{sup/7|UM}} | |||
|- style="background:#FFF" | |- style="background:#FFF" | ||
| | |[[File:Menu HOME 0754.png|50px|link=Lurantis]] | ||
| {{pcolor|Lurantis|000}} | |{{pcolor|Lurantis|000}} | ||
| {{gameabbrev7|SM}} | | {{gameabbrev7|SM}} | ||
| 4'11" | |4'11" | ||
| 1.5 m | |1.5 m | ||
| 127.9 lbs | |127.9 lbs. | ||
| 58.0 kg | |58.0 kg | ||
| {{acolor|Leaf Guard|000}} | |{{acolor|Leaf Guard|000}} | ||
|50{{sup/7|US}} | |||
|- style="background:#FFF" | |- style="background:#FFF" | ||
| | |[[File:Menu HOME 0758.png|50px|link=Salazzle]] | ||
| {{pcolor|Salazzle|000}} | | {{pcolor|Salazzle|000}} | ||
| {{gameabbrev7|SM}} | |{{gameabbrev7|SM}} | ||
| 6'11" | |6'11" | ||
| 2.1 m | |2.1 m | ||
| 178.6 lbs | |178.6 lbs. | ||
| 81.0 kg | |||
|81.0 kg | |||
| {{acolor|Corrosion|000}} | | {{acolor|Corrosion|000}} | ||
| 50{{sup/7|UM}} | |||
|- style="background:#FFF" | |- style="background:#FFF" | ||
| | |[[File:Menu HOME 0777.png|50px|link=Togedemaru]] | ||
| {{pcolor|Togedemaru|000}} | |{{pcolor|Togedemaru|000}} | ||
| {{gameabbrev7|USUM}} | |{{gameabbrev7|USUM}} | ||
| 2'00" | |2'00" | ||
| 0.6 m | |0.6 m | ||
| 28.7 lbs | |28.7 lbs. | ||
| 13.0 kg | |13.0 kg | ||
| {{acolor|Sturdy|000}} | |{{acolor|Sturdy|000}} | ||
|70{{sup/7|UM}} | |||
|- style="background:#FFF" | |- style="background:#FFF" | ||
| | |[[File:Menu HOME 0778.png|50px|link=Mimikyu]] | ||
| {{pcolor|Mimikyu|000}} | | {{pcolor|Mimikyu|000}} | ||
| {{gameabbrev7|SM}} | | {{gameabbrev7|SM}} | ||
| 1'04" | |1'04" | ||
| 0.4 m | |0.4 m | ||
| 6.2 lbs | |6.2 lbs. | ||
| 2.8 kg | | 2.8 kg | ||
| {{acolor|Disguise|000}} | | {{acolor|Disguise|000}} | ||
|80 | |||
|- style="background:#FFF" | |- style="background:#FFF" | ||
| style="{{roundybl|10px}}" | | | style="{{roundybl|10px}}" |[[File:Menu HOME 0784.png|50px|link=Kommo-o]] | ||
| {{pcolor|Kommo-o|000}} | |{{pcolor|Kommo-o|000}} | ||
| {{gameabbrev7|SM}} | |{{gameabbrev7|SM}} | ||
| 7'10" | |7'10" | ||
| 2.4 m | |2.4 m | ||
| 457.5 lbs | |457.5 lbs. | ||
| 207.5 kg | | 207.5 kg | ||
| style="{{roundybr|10px}}" | {{acolor|Overcoat|000}} | | style="{{roundybr|10px}}" |{{acolor|Overcoat|000}} | ||
| 100{{sup/7|UM}} | |||
|} | |} | ||
== | ==In the anime == | ||
{ | {{MissingInfo|1|java}} | ||
| | <!--Do NOT add any moves to the Alolan Rattata and Alolan Raticate templates until they're confirmed. It was not said to be Bite, and it could've been any other biting move.--> | ||
! | |||
While most of the Totem Pokémon from the {{pkmn|anime}} are based on those from the games, Totem {{p|Trevenant}} is the only anime-original Totem Pokémon and the only depicted Totem Pokémon that is neither a [[Generation VII]] Pokémon nor a [[regional form]]. In addition, not every Totem Pokémon was adapted, even from the original games. Unlike the games, Ally Pokémon have had at least one instance of being caught in the case of | |||
{{ | [[Officer Jenny's Gumshoos]]. | ||
===Totem Pokémon=== | ===Totem Pokémon=== | ||
{{anchor|Totem Gumshoos}}{{TrainerPoké | {{anchor|Totem Gumshoos}}{{TrainerPoké | ||
| Line 224: | Line 312: | ||
|epname=To Top a Totem! | |epname=To Top a Totem! | ||
|vaen=Billy Bob Thompson | |vaen=Billy Bob Thompson | ||
|desc={{Ash}} battled the Totem {{p|Gumshoos}} as part of the [[Verdant Cavern]] trial, using his {{AP|Pikachu}} and {{AP|Rowlet}}. Gumshoos was able to defeat Rowlet, but was eventually defeated by Pikachu. After Ash won the battle, Gumshoos gave him a [[Normalium Z]]. It later assisted [[Officer Jenny]] with tackling an outbreak of {{ | |desc={{Ash}} battled the Totem {{p|Gumshoos}} as part of the [[Verdant Cavern]] trial, using his {{AP|Pikachu}} and {{AP|Rowlet}}. Gumshoos was able to defeat Rowlet, but it was eventually defeated by Pikachu. After Ash won the battle, Gumshoos gave him a [[Normalium Z]]. It later assisted [[Officer Jenny]] with tackling an outbreak of {{rf|Alolan}} {{p|Rattata}} and {{p|Raticate}}. | ||
Gumshoos's known moves are {{m|Frustration}} and {{m|Sand Attack}}.}} | Gumshoos's known moves are {{m|Frustration}} and {{m|Sand Attack}}.}} | ||
| Line 236: | Line 324: | ||
|epnum=SM025 | |epnum=SM025 | ||
|epname=A Team-on-Team Tussle! | |epname=A Team-on-Team Tussle! | ||
|vaen= | |vaen=Carter Cathcart | ||
|desc=A Totem {{ | |desc=A Totem {{rf|Alolan}} {{p|Raticate}} was seen guarding a [[Darkinium Z]], which was being targeted by {{TRT}} and {{tc|Team Skull Grunt|Team Skull}}. Although it was an extremely powerful opponent, taking down {{MTR}}, [[James's Mareanie]], and all of Team Skull's Pokémon, it was eventually defeated by [[Jessie's Mimikyu]]. | ||
Raticate's known moves are {{m|Tail Whip}}, {{m|Hyper Fang}}, and {{m|Hyper Beam}}.}} | Raticate's known moves are {{m|Tail Whip}}, {{m|Hyper Fang}}, and {{m|Hyper Beam}}.}} | ||
| Line 248: | Line 336: | ||
|epnum=SM033 | |epnum=SM033 | ||
|epname=Big Sky, Small Fry! | |epname=Big Sky, Small Fry! | ||
|vaen= | |vaen=H.D. Quinn | ||
|desc=A Totem {{p|Wishiwashi}} appeared at [[Brooklet Hill]], being hooked up by {{an|Lana}}, who | |vaennote=<small>School Form</small> | ||
|vaen2=Lisa Ortiz | |||
|vaen2note=<small>Solo Form</small> | |||
|desc=A Totem {{p|Wishiwashi}} appeared at [[Brooklet Hill]], being hooked up by {{an|Lana}}, who proceeded to battle it with her {{TP|Lana|Popplio}}. It was eventually defeated by Popplio's newly learned {{m|Aqua Jet}}, earning Lana a [[Waterium Z]] from it as a reward. | |||
None of Wishiwashi's moves are known.}} | None of Wishiwashi's moves are known.}} | ||
| Line 261: | Line 352: | ||
|epname=Currying Favor and Flavor! | |epname=Currying Favor and Flavor! | ||
|vajp=Risa Shimizu | |vajp=Risa Shimizu | ||
|vaen= | |vaen=Samara Naeymi | ||
|desc=Totem {{p|Lurantis}} challenged {{Ash}} while he was collecting ingredients for the "Akala Curry" in [[Lush Jungle]] with {{an|Mallow}}. Ash | |desc=Totem {{p|Lurantis}} challenged {{Ash}} while he was collecting ingredients for the "Akala Curry" in [[Lush Jungle]] with {{an|Mallow}}. Ash proceeded to battle it with {{AP|Litten}} and {{AP|Rowlet}}. Although it proved to be an extremely tough opponent, Ash was finally able to defeat it with Litten's {{m|Breakneck Blitz}}, after which it rewarded Ash with a [[Grassium Z]]. | ||
Lurantis's known moves are {{m|Petal Blizzard}}, {{m|Solar Blade}}, and {{m|Synthesis}}.}} | Lurantis's known moves are {{m|Petal Blizzard}}, {{m|Solar Blade}}, and {{m|Synthesis}}.}} | ||
| Line 275: | Line 366: | ||
|epname=Family Determination! | |epname=Family Determination! | ||
|vajp= | |vajp= | ||
|vaen=Ryan Andes | |||
|desc=Totem {{p|Kommo-o}} and its allies attacked {{an|Lillie}} and {{an|Gladion}} at the [[Vast Poni Canyon]] on their way to the [[Altar of the Sunne]]. Eventually, Gladion was able to change his {{TP|Gladion|Silvally}} into a {{t|Fairy}} type, allowing it to knock Kommo-o out with a super-effective {{m|Multi-Attack}}. | |||
Kommo-o's only known move is {{m|Clanging Scales}}.}} | |||
{{anchor|Totem Trevenant}}{{TrainerPoké | |||
|pkmn=Totem Trevenant | |||
|type1=Ghost | |||
|type2=Grass | |||
|img=Totem Trevenant.png | |||
|cap=Totem Trevenant | |||
|img2=Totem Trevenant present.png | |||
|cap2=Totem Trevenant in the present | |||
|epnum=SM125 | |||
|epname=A Timeless Encounter! | |||
|vaen= | |vaen= | ||
|desc= | |desc=Totem {{p|Trevenant}} lived in the forests of [[Melemele Island]]. It was good friends with {{an|Professor Kukui}} when he was a child. Trevenant rewarded Kukui with a [[Firium Z]] after he had his {{TP|Professor Kukui|Litten}} use {{m|Scratch}} to ease its sneezing. | ||
It appeared when Ash was accidentally transported to the past by {{p|Celebi}}. When Trevenant kept sneezing due to multiple {{p|Cutiefly}} being stuck in its leaves, Ash and a young Professor Kukui freed the Cutiefly and used their {{AP|Torracat}} and Litten, respectively, to warm up some of the Cutiefly. Afterwards, Trevenant rewarded Ash with a Firium Z. When Ash returned to the present, Trevenant was revealed to have died. | |||
None of Trevenant's moves are known.}} | |||
===Ally Pokémon=== | ===Ally Pokémon=== | ||
{{MissingInfo| | {{MissingInfo|1|java}} | ||
====Totem Gumshoos==== | ====Totem Gumshoos==== | ||
{{anchor|Ally Yungoos}}{{TrainerPoké | {{anchor|Ally Yungoos}}{{TrainerPoké | ||
| Line 291: | Line 399: | ||
|epname=To Top a Totem! | |epname=To Top a Totem! | ||
|vaen=Billy Bob Thompson | |vaen=Billy Bob Thompson | ||
|desc={{Ash}} battled this {{p|Yungoos}} when he first entered the [[Verdant Cavern]] trial. It later assisted [[Officer Jenny]] with tackling an outbreak of {{ | |desc={{Ash}} battled this {{p|Yungoos}} when he first entered the [[Verdant Cavern]] trial. It later assisted [[Officer Jenny]] with tackling an outbreak of {{rf|Alolan}} {{p|Rattata}} and {{p|Raticate}}. | ||
Yungoos's known moves are {{m|Hyper Fang}} and {{m|Sand Attack}}.}} | Yungoos's known moves are {{m|Hyper Fang}} and {{m|Sand Attack}}.}} | ||
| Line 305: | Line 413: | ||
|vajp=Kaito Ishikawa | |vajp=Kaito Ishikawa | ||
|vaen=Billy Bob Thompson | |vaen=Billy Bob Thompson | ||
|desc={{Ash}} battled this Gumshoos when he first entered the [[Verdant Cavern]] trial. It later assisted [[Officer Jenny]] with tackling an outbreak of {{ | |desc={{Ash}} battled this Gumshoos when he first entered the [[Verdant Cavern]] trial. It later assisted [[Officer Jenny]] with tackling an outbreak of {{rf|Alolan}} {{p|Rattata}} and {{p|Raticate}}. [[Melemele Island]]'s Officer Jenny later convinced Gumshoos to stay with her.}} | ||
====Totem Raticate==== | ====Totem Raticate==== | ||
| Line 316: | Line 424: | ||
|epnum=SM025 | |epnum=SM025 | ||
|epname=A Team-on-Team Tussle! | |epname=A Team-on-Team Tussle! | ||
|vaen= | |vaen=Carter Cathcart | ||
|desc=These {{ | |desc=These {{rf|Alolan}} {{p|Rattata}} were seen guarding a [[Darkinium Z]], which was being targeted by {{TRT}} and {{tc|Team Skull Grunt|Team Skull}}. Although powerful, they were lured into a cage of {{Berries}} and trapped there. They later escaped and continued their attack on the thieves. | ||
Rattata's only known move is {{m|Hyper Fang}}.}} | Rattata's only known move is {{m|Hyper Fang}}.}} | ||
| Line 329: | Line 437: | ||
|epnum=SM025 | |epnum=SM025 | ||
|epname=A Team-on-Team Tussle! | |epname=A Team-on-Team Tussle! | ||
|vaen= | |vaen=Carter Cathcart | ||
|desc=These {{ | |desc=These {{rf|Alolan}} {{p|Raticate}} were seen guarding a [[Darkinium Z]], which was being targeted by {{TRT}} and {{tc|Team Skull Grunt|Team Skull}}. Although powerful, they were lured into a cage of {{Berries}} and trapped there. They later escaped and continued their attack on the thieves. | ||
Raticate's only known move is {{m|Hyper Fang}}.}} | Raticate's only known move is {{m|Hyper Fang}}.}} | ||
| Line 342: | Line 450: | ||
|epnum=SM033 | |epnum=SM033 | ||
|epname=Big Sky, Small Fry! | |epname=Big Sky, Small Fry! | ||
|vaen= | |vaen=Lisa Ortiz | ||
|desc=This {{p|Alomomola}} appeared to support Totem {{p|Wishiwashi}} during {{an|Lana}}'s trial against it, healing it with Heal Pulse. In order to help Lana, Ash | |desc=This {{p|Alomomola}} appeared to support Totem {{p|Wishiwashi}} during {{an|Lana}}'s trial against it, healing it with Heal Pulse. In order to help Lana, Ash proceeded to fish up the Alomomola and had {{AP|Pikachu}} use {{m|Electro Ball}} on it, defeating it and causing it to flee in a fit of tears. | ||
Alomomola's only known move is {{m|Heal Pulse}}.}} | Alomomola's only known move is {{m|Heal Pulse}}.}} | ||
| Line 357: | Line 465: | ||
|epnum=SM035 | |epnum=SM035 | ||
|epname=Currying Favor and Flavor! | |epname=Currying Favor and Flavor! | ||
|vaen= | |vaen=Marisa Kennedy | ||
|desc=This {{p|Castform}} appeared to support Totem {{p|Lurantis}} when it called for help during {{Ash}}'s battle against it. With its help, Lurantis gained an upper hand over {{AP|Litten}}. The Weather Pokémon was eventually defeated by {{AP|Rowlet}}. | |desc=This {{p|Castform}} appeared to support Totem {{p|Lurantis}} when it called for help during {{Ash}}'s battle against it. With its help, Lurantis gained an upper hand over {{AP|Litten}}. The Weather Pokémon was eventually defeated by {{AP|Rowlet}}. | ||
Castform's known moves are {{m|Sunny Day}}, {{m|Water Gun}}, and {{m|Headbutt}}, and its Ability is {{a|Forecast}}.}} | Castform's known moves are {{m|Sunny Day}}, {{m|Water Gun}}, and {{m|Headbutt}}, and its Ability is {{a|Forecast}}.}} | ||
====Totem Kommo-o==== | ==== Totem Kommo-o==== | ||
{{anchor|Jangmo-o}}{{TrainerPoké | {{anchor|Ally Jangmo-o}}{{TrainerPoké | ||
|pkmn=Ally Jangmo-o (multiple) | |pkmn=Ally Jangmo-o (multiple) | ||
|type1=Dragon | |type1=Dragon | ||
| Line 370: | Line 478: | ||
|epnum=SM051 | |epnum=SM051 | ||
|epname=Family Determination! | |epname=Family Determination! | ||
|vaen= | |vaen=Erica Schroeder | ||
|desc=These {{p|Jangmo-o}} attacked {{an|Lillie}} and {{an|Gladion}} when the two ventured through the trial site of [[Vast Poni Canyon]]. Following the defeat of the Totem {{p|Kommo-o}}, they all retreated as the ceiling began to collapse. They reappeared in [[SM052|the next episode]], in which they had cornered | |desc=These {{p|Jangmo-o}} attacked {{an|Lillie}} and {{an|Gladion}} when the two ventured through the trial site of [[Vast Poni Canyon]]. Following the defeat of the Totem {{p|Kommo-o}}, they all retreated as the ceiling began to collapse. They reappeared in [[SM052|the next episode]], in which they had cornered {{an|Professor Burnet}}. The Scaly Pokémon were swiftly defeated by {{an|Professor Kukui}}'s {{p|Braviary}}. | ||
None of Jangmo-o's moves are known.}} | None of Jangmo-o's moves are known.}} | ||
| Line 383: | Line 491: | ||
|epnum=SM051 | |epnum=SM051 | ||
|epname=Family Determination! | |epname=Family Determination! | ||
|vaen= | |vaen=Eddy Lee | ||
|desc=These {{p|Hakamo-o}} attacked {{an|Lillie}} and {{an|Gladion}} when the two ventured through the trial site of [[Vast Poni Canyon]]. Following the defeat of the Totem Kommo-o, they all retreated as the ceiling began to collapse. They reappeared in [[SM052|the next episode]], in which they had cornered | |desc=These {{p|Hakamo-o}} attacked {{an|Lillie}} and {{an|Gladion}} when the two ventured through the trial site of [[Vast Poni Canyon]]. Following the defeat of the Totem Kommo-o, they all retreated as the ceiling began to collapse. They reappeared in [[SM052|the next episode]], in which they had cornered {{an|Professor Burnet}}. The Scaly Pokémon were swiftly defeated by {{an|Professor Kukui}}'s {{p|Braviary}}. | ||
None of Hakamo-o's moves are known.}} | None of Hakamo-o's moves are known.}} | ||
==In the manga== | ==In the manga== | ||
=== | ===Movie adaptations=== | ||
{{TrainerPoké | {{TrainerPoké | ||
|pkmn=Totem Kommo-o | |pkmn=Totem Kommo-o | ||
| Line 401: | Line 509: | ||
Kommo-o's only known move is {{m|Draco Meteor}}.}} | Kommo-o's only known move is {{m|Draco Meteor}}.}} | ||
=== | ===Pokémon Adventures=== | ||
====Totem Pokémon==== | ==== Totem Pokémon==== | ||
{{anchor|Totem Wishiwashi}}{{TrainerPoké | {{anchor|Totem Wishiwashi}}{{TrainerPoké | ||
|pkmn=Totem Wishiwashi | |pkmn=Totem Wishiwashi | ||
|type1=Water | |type1=Water | ||
|img=Sun | |img=Sun Quarter School Form.png | ||
|cap=Totem Wishiwashi | |cap=Totem Wishiwashi | ||
|epnum=PASM09 | |epnum=PASM09 | ||
|desc={{main|Sun (Adventures)# | |epname=True Identity and the Totem Pokémon of Brooklet Hill | ||
This {{p|Wishiwashi}} is the Totem of Brooklet Hill. When {{adv|Sun}} traveled to Brooklet Hill to begin his first trial, he encountered a wild Solo Form Wishiwashi that helped retrieve a one yen coin he dropped in the water. Taking a liking to the Pokémon, Sun decided to name it | |desc={{main|Sun (Adventures)#Quarter|Sun (Adventures) → Quarter}} | ||
This {{p|Wishiwashi}} is the Totem of Brooklet Hill. When {{adv|Sun}} traveled to Brooklet Hill to begin his first trial, he encountered a wild Solo Form Wishiwashi that helped retrieve a one yen coin he dropped in the water. Taking a liking to the Pokémon, Sun decided to name it Quarter and asked it to help him find the Totem Pokémon of Brooklet Hill. Quarter led Sun around the area for hours but failed to find the Totem each time. Angered by this, Sun's {{p|Litten}}, {{adv|Dollar}}, attacked Quarter, causing it to get scared and run away. | |||
Several other Wishiwashi soon began surrounding Sun and leaped out of the water as a School Form Wishiwashi, revealing that Quarter and the other Wishiwashi together were the Totem Pokémon the whole time. Sun eventually defeated the Totem by attacking its left eye, which contained Quarter, the leader controlling the other Wishiwashi. With Quarter defeated, the Totem broke apart into several Solo Form Wishiwashi. | |||
Wishiwashi's known moves are {{m|Water Gun}} and {{m|Aqua Tail}}, and its Ability is {{a|Schooling}}.}} | Wishiwashi's known moves are {{m|Water Gun}} and {{m|Aqua Tail}}, and its Ability is {{a|Schooling}}.}} | ||
| Line 420: | Line 531: | ||
|cap=Totem Lurantis | |cap=Totem Lurantis | ||
|epnum=PASM14 | |epnum=PASM14 | ||
|epname=Flash and Cosmog's Secret | |||
|desc=This {{p|Lurantis}} is the Totem of [[Lush Jungle]]. In order to get strong enough to face the [[Ultra Beast]]s threatening to invade Alola, {{adv|Moon}} summoned Lurantis to [[Konikoni City]] with a soup made by [[Mallow]] and battled it as a form of training. Despite the assistance of many ally Pokémon, Lurantis was eventually defeated by Moon's {{p|Mareanie}}. | |desc=This {{p|Lurantis}} is the Totem of [[Lush Jungle]]. In order to get strong enough to face the [[Ultra Beast]]s threatening to invade Alola, {{adv|Moon}} summoned Lurantis to [[Konikoni City]] with a soup made by [[Mallow]] and battled it as a form of training. Despite the assistance of many ally Pokémon, Lurantis was eventually defeated by Moon's {{p|Mareanie}}. | ||
| Line 428: | Line 540: | ||
|type1=Ghost | |type1=Ghost | ||
|type2=Fairy | |type2=Fairy | ||
|img=Sun | |img=Sun Penny.png | ||
|cap=Totem Mimikyu | |cap=Totem Mimikyu | ||
|gender=male | |||
|epnum=PASM16 | |epnum=PASM16 | ||
|desc={{main|Sun (Adventures)# | |epname=A Photoshoot and the Abandoned Thrifty Megamart | ||
This {{p|Mimikyu}} is the Totem of the [[Thrifty Megamart (Abandoned Site)|former Thrifty Megamart]]. Sun was tasked with taking a picture of Mimikyu to complete his second trial. Sun had his {{p|Torracat}}, {{adv|Dollar}}, battle Mimikyu in order to keep it still long enough to take the photo. After discovering its anger towards humans for mistreating it, Sun offered it a spot on his team and named it | |desc={{main|Sun (Adventures)#Penny|Sun (Adventures) → Penny}} | ||
This {{p|Mimikyu}} is the Totem of the [[Thrifty Megamart (Abandoned Site)|former Thrifty Megamart]]. Sun was tasked with taking a picture of Mimikyu to complete his second trial. Sun had his {{p|Torracat}}, {{adv|Dollar}}, battle Mimikyu in order to keep it still long enough to take the photo. After discovering its anger towards humans for mistreating it, Sun offered it a spot on his team and named it Penny. | |||
None of Mimikyu's moves are known and its Ability is {{a|Disguise}}.}} | None of Mimikyu's moves are known and its Ability is {{a|Disguise}}.}} | ||
| Line 445: | Line 559: | ||
|cap=Ally Castform | |cap=Ally Castform | ||
|epnum=PASM14 | |epnum=PASM14 | ||
|epname=Flash and Cosmog's Secret | |||
|desc=These {{p|Castform}} appeared to support Totem {{p|Lurantis}} when it battled against {{adv|Moon}}. Despite a lengthy battle, they were all defeated. | |desc=These {{p|Castform}} appeared to support Totem {{p|Lurantis}} when it battled against {{adv|Moon}}. Despite a lengthy battle, they were all defeated. | ||
| Line 457: | Line 572: | ||
|cap=Ally Trumbeak | |cap=Ally Trumbeak | ||
|epnum=PASM14 | |epnum=PASM14 | ||
|epname=Flash and Cosmog's Secret | |||
|desc=These {{p|Trumbeak}} appeared to support Totem {{p|Lurantis}} when it battled against {{adv|Moon}}. Despite a lengthy battle, they were all defeated. | |desc=These {{p|Trumbeak}} appeared to support Totem {{p|Lurantis}} when it battled against {{adv|Moon}}. Despite a lengthy battle, they were all defeated. | ||
| Line 468: | Line 584: | ||
|cap=Ally Comfey | |cap=Ally Comfey | ||
|epnum=PASM14 | |epnum=PASM14 | ||
|epname=Flash and Cosmog's Secret | |||
|desc=These {{p|Comfey}} appeared to support Totem {{p|Lurantis}} when it battled against {{adv|Moon}}. Despite a lengthy battle, they were all defeated. | |desc=These {{p|Comfey}} appeared to support Totem {{p|Lurantis}} when it battled against {{adv|Moon}}. Despite a lengthy battle, they were all defeated. | ||
| Line 479: | Line 596: | ||
|cap=Ally Kecleon | |cap=Ally Kecleon | ||
|epnum=PASM14 | |epnum=PASM14 | ||
|epname=Flash and Cosmog's Secret | |||
|desc=This {{p|Kecleon}} appeared to support Totem {{p|Lurantis}} when it battled against {{adv|Moon}}. Despite a lengthy battle, they were all defeated. | |desc=This {{p|Kecleon}} appeared to support Totem {{p|Lurantis}} when it battled against {{adv|Moon}}. Despite a lengthy battle, they were all defeated. | ||
None of Kecleon's moves are known.}} | None of Kecleon's moves are known.}} | ||
==Trivia== | ===Pokémon Horizon=== | ||
* | A Totem {{p|Lucario}} appeared in ''[[HOR04|Mastering the Z-Move!]]''. | ||
== Trivia== | |||
*In [[Pokémon Sun and Moon]], in the battle against Totem {{p|Wishiwashi}} at [[Brooklet Hill]], the Totem Pokémon can summon an [[SOS Battle|Ally]] {{p|Alomomola}} which knows {{m|Water Gun}}, but Alomomola [[Game move errors|cannot legitimately have the move]] in any of the games. | |||
*In {{pkmn|Sun and Moon|Pokémon Moon}} and {{pkmn|Ultra Sun and Ultra Moon|Ultra Moon}}, during the cutscene before Totem Raticate's battle, it cries out Gumshoos's [[cry]] instead of its own cry. | |||
*Compared to their non-Totem counterparts, every Totem Pokémon's weight is increased less than appropriately to its height. If a Pokémon's density were to remain the same between its Totem and non-Totem variants, a Totem Pokémon twice the height should be eight times the weight. | |||
*In all languages of the games except English and Chinese, the same terms are used to refer to both Totem Pokémon and [[Titan Pokémon]]. | |||
**The Japanese term for Titan Pokémon (Japanese: '''ヌシポケモン''' ''Leader Pokémon'') is fully written in katakana, distinguishing it from Totem Pokémon (Japanese: '''ぬしポケモン''' ''Leader Pokémon''), but the two terms are otherwise identical, being pronounced the same and having the same meaning. | |||
==In other languages== | ==In other languages== | ||
<div style="display:inline-block"> | |||
''Totem Pokémon'' | ''Totem Pokémon'' | ||
{{Langtable|color={{alola color}}|bordercolor={{alola color dark}} | {{Langtable|color={{alola color}}|bordercolor={{alola color dark}} | ||
| Line 502: | Line 624: | ||
|de=Herrscher-Pokémon | |de=Herrscher-Pokémon | ||
|el=Τοτέμ ''Totém'' | |el=Τοτέμ ''Totém'' | ||
|he=פוקימון טוטם ''Pokémon Totem'' | |||
|hu=Totem Pokémon | |hu=Totem Pokémon | ||
|it=Pokémon dominante | |it=Pokémon dominante | ||
| Line 511: | Line 634: | ||
|es=Pokémon dominante | |es=Pokémon dominante | ||
|sv=Totem Pokémon | |sv=Totem Pokémon | ||
|vi= | |vi=Thần Thú | ||
}} | }}</div> | ||
<div style="display:inline-block"> | |||
''Ally Pokémon'' | ''Ally Pokémon'' | ||
{{Langtable|color={{alola color}}|bordercolor={{alola color dark}} | {{Langtable|color={{alola color}}|bordercolor={{alola color dark}} | ||
| Line 527: | Line 650: | ||
|ko=동료 ''{{tt|Dongnyo|Ally}}'' | |ko=동료 ''{{tt|Dongnyo|Ally}}'' | ||
|no=Alliert | |no=Alliert | ||
|pl=Sojusznik{{tt|*|SM035}}<br>Sprzymierzeniec{{tt|*|SM009}} | |||
|pt_br=Aliado | |pt_br=Aliado | ||
|es=Aliado | |es=Aliado | ||
|sv=Bundsförvant | |sv=Bundsförvant | ||
}} | }} | ||
</div> | |||
==See also== | |||
{{ | {{Totem Pokémon}} | ||
{{forms}}<br> | |||
{{Project Games notice}} | {{Project Games notice}} | ||
| Line 539: | Line 666: | ||
[[Category:Pokémon Ultra Sun and Ultra Moon]] | [[Category:Pokémon Ultra Sun and Ultra Moon]] | ||
[[Category:Variant Pokémon]] | [[Category:Variant Pokémon]] | ||
[[Category:Pokémon with game move errors]] | |||
[[Category:Giant Pokémon]] | |||
[[Category:Pokémon groupings]] | |||
[[de:Herrscher-Pokémon]] | [[de:Herrscher-Pokémon]] | ||
[[es:Pokémon dominante]] | [[es:Pokémon dominante (Alola)]] | ||
[[fr:Pokémon Dominant]] | [[fr:Pokémon Dominant (Alola)]] | ||
[[it:Pokémon dominante]] | [[it:Pokémon dominante (Alola)]] | ||
[[ja:ぬしポケモン]] | [[ja:ぬしポケモン]] | ||
[[zh:霸主寶可夢]] | [[zh:霸主寶可夢]] | ||
Latest revision as of 23:41, 21 May 2024

Totem Pokémon (Japanese: ぬしポケモン Leader Pokémon) are a type of variant Pokémon that are battled at the end of every trial. In the core series, most Totem Pokémon have been trained by their respective Captain, providing them their role. Trial-goers are expected to prove their strength to these powerful Pokémon and those who win are considered to have completed the trial and are rewarded with a Z-Crystal.
There is currently twelve known Totem Pokémon. These Pokémon (with exception of Totem Wishiwashi) appear larger than normal, and weigh approximately two to four times as much as other Pokémon of the same species. The eleven with changed height and weight can be obtained as Totem-sized Pokémon from Samson Oak at Heahea Beach.
In the core series games

At the start of a battle, Totem Pokémon are enveloped in a special aura which boosts one or more of its stats by a fixed number of stages, this is the same energy used in Z-Moves, Z-Power. According to Wicke, their size and aura are a result of being bathed in the energy spilled from Ultra Wormholes, the same kind that the Ultra Beasts use to store within their bodies, giving them a similar stat boost. This energy is further revealed in Pokémon Ultra Sun and Ultra Moon to be Necrozma's light. Their size and weight mechanically affect their battles and are not only visual aesthetic, moves such as Grass Knot and Heavy Slam are affected by these weights and Sky Drop will fail against Totem Araquanid and Kommo-o. Totem Pokémon are battled in SOS Battles, which allows them to summon an ally to help.
SOS Battles with Totem Pokémon differ from regular SOS Battles in that their supply of allies may be limited, which allies they call is not influenced by the weather, and they call allies at specific times rather than at random (so their calls are unaffected by the Adrenaline Orb and status conditions). Both the Totem Pokémon and their allies have more advanced artificial intelligence than wild Pokémon, mirroring Trainer behavior. Totem Pokémon each also hold a specific item, usually one that will synergize effectively with their particular strategies or cover their weaknesses. Due to the island challenge rules, Totem Pokémon and their allies cannot be caught. Like all wild Pokémon, if the player steals an item from a Totem Pokémon (such as by using Thief), the player's Pokémon will still be holding the stolen item at the end of battle.
The battle theme for the Totem Pokémon is a remix of the wild Pokémon battle theme from the original Sun and Moon games. Totem Pokémon and Totem-sized Pokémon are not registered in the Pokédex as unique forms, despite behaving as such.
Totem Kommo-o is the only Totem Pokémon to not be accompanied by a Trial Captain.
List of Totem Pokémon
Melemele Island
Melemele Island has one Totem Pokémon who is governed by by the Captain Ilima at Verdant Cavern. The Pokémon here changes based on the game being played, in Sun and Ultra Sun, a Gumshoos will appear as the Totem, while in Moon and Ultra Moon, it is an Alolan Raticate. The Totem Gumshoos and Raticate in Ultra Sun and Ultra Moon are the only Totem Pokémon that can be battled during the post-game and the only ones that can be rematched.
| Location | Totem Pokémon | Size | Aura | Ally Pokémon | |
|---|---|---|---|---|---|
| Verdant Cavern | 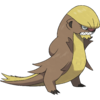 GumshoosSUS Level 12 (Island challenge) Level 60 (post game)US |
4'07" (1.4m) 132.3 lbs. (60.0 kg) |
Story battle: Defense +1 Post game:USUM Attack +2 Defense +2 Sp. Attack +2 Sp. Defense +2 Speed +2 |
 YungoosSUS Level 10 (Island challenge) Level 58 (post game)US | |
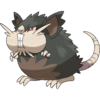 Alolan RaticateMUM Level 12 (Island challenge) Level 60 (post game)UM |
4'07" (1.4m) 231.5 lbs. (105.0 kg) |
 Alolan RattataMUM Level 10 (Island challenge) Level 58 (post game)UM | |||
Akala Island
Akala Island has three Totem Pokémon who were trained under the Captains of Lana, Kiawe and Mallow respectively. In Sun and Moon, Lana and Kiawe have trained a Totem Wishiwashi and Salazzle, while in Ultra Sun and Ultra Moon they have trained a Araquanid and Alolan Marowak instead. Mallow's Lurantis remains in all four versions. Totem Wishiwashi is the only Totem Pokémon without a change in weight or height, taking advantage of its unique form change that is controlled by its Schooling ability.
| Location | Totem Pokémon | Size | Aura | Ally Pokémon | |
|---|---|---|---|---|---|
| Brooklet Hill | 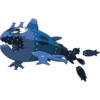 WishiwashiSM Level 20 |
0'08" (0.2 m) (Solo Form) 26'11" (8.2 m) (School Form) 0.7 lbs. (0.3 kg ) (Solo Form) 173.3 lbs. (78.6 kg) (School Form) |
Defense +1 |  WishiwashiSM Level 18 |
 AlomomolaSM Level 18 |
 AraquanidUSUM Level 20 |
10'02" (3.1 m) 479.5 lbs. (217.5 kg) |
Speed +1 |  DewpiderUSUM Level 18 |
 MasquerainUSUM Level 18 | |
| Wela Volcano Park | 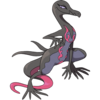 SalazzleSM Level 22 |
6'11" (2.1 m) 178.6 lbs. (81.0 kg) |
Sp. Defense +1 |  SalanditSM Level 20 |
|
 Alolan MarowakUSUM Level 22 |
5'07" (1.7 m) 216.1 lbs. (98.0 kg) |
Speed +1 |  SalazzleUSUM Level 20 |
||
| Lush Jungle | 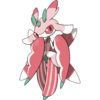 Lurantis Level 24 |
4'11" (1.5 m) 127.9 lbs. (58.0 kg) |
Speed +2 |  TrumbeakSM Level 22 |
 CastformSM Level 22 |
 ComfeyUSUM Level 22 |
 KecleonUSUM Level 22 | ||||
Ula'ula Island
Ula'ula Island has two Totem Pokémon cared for by Sophocles and Acerola. Sophocles' Totem Pokémon is a Vikavolt in Sun and Moon, while in Ultra Sun and Ultra moon, he has trained a Togedemaru.
| Location | Totem Pokémon | Size | Aura | Ally Pokémon | |
|---|---|---|---|---|---|
| Hokulani Observatory |  VikavoltSM Level 29 |
8'06" (2.6 m) 325.2 lbs. (147.5 kg) |
Attack +1 Defense +1 Sp. Attack +1 Sp. Defense +1 Speed +1 |
 CharjabugSM Level 28 |
 TogedemaruUSUM Level 33 |
2'00" (0.6 m) 28.7 lbs. (13.0 kg) |
Defense +2 |  SkarmoryUSUM Level 32 |
 DedenneUSUM Level 31 | |
| Thrifty Megamart (Abandoned Site) |
 Mimikyu Level 33SM Level 35USUM |
1'04" (0.4 m) 6.2 lbs. (2.8 kg) |
Attack +1 Defense +1 Sp. Attack +1 Sp. Defense +1 Speed +1 |
 HaunterSM Level 27 |
 GengarSM Level 27 |
 BanetteUSUM Level 32 |
 JellicentUSUM Level 33 | ||||
Poni Island
Poni Island's Totem Pokémon count changes based on title played, in Sun and Moon exclusively, it has one, a Kommo-o, who lacks any sort of Trial Captain. Mina is a Captain who lives in Seafolk Village and is one of Poni's Captains, but has no respective Totem Pokémon. In Ultra Sun and Ultra Moon, along with Totem Kommo-o who reappars, Poni Island has another Totem Pokémon, a Totem Ribombee who is cared for by Captain Mina.
| Location | Totem Pokémon | Size | Aura | Ally Pokémon | |
|---|---|---|---|---|---|
| Vast Poni Canyon | 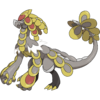 Kommo-o Level 45SM Level 49USUM |
7'10" (2.4 m) 457.5 lbs. (207.5 kg) |
Attack +1 Defense +1 Sp. Attack +1 Sp. Defense +1 Speed +1 |
 Hakamo-oSM Level 32 |
 ScizorSM Level 32 |
 NoivernUSUM Level 48 |
ScizorUSUM Level 46 | ||||
| Seafolk Village | 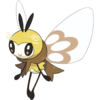 Ribombee Level 55 |
1'04" (0.4 m) 4.4 lbs. (2.0 kg) |
Attack +2 Defense +2 Sp. Attack +2 Sp. Defense +2 Speed +2 |
 Blissey Level 53 |
 Pelipper Level 52 |
Pokémon Sun and Pokémon Moon Special Demo Version

|
This section is incomplete. Please feel free to edit this section to add missing information and complete it. Reason: Does Kommo-o have unique form properties or is it like Wishiwashi? |
A Totem Hakamo-o is found exclusively at the trial at Ten Carat Hill in the Sun and Moon Special Demo. Similarly to the Kommo-o in the full game's Vast Poni Canyon, it is not accompanied or cared for by a Trial Captain. Unlike the other Totem Pokémon, the player is rewarded with an Electrium Z, a Z-Crystal with no relation to the type of the Totem Pokémon.
| Island | Location | Totem Pokémon | Aura | Ally Pokémon |
|---|---|---|---|---|
 Melemele Island |
Ten Carat Hill |  Hakamo-o Level 36 |
Sp. Defense +1 |  Rockruff Level 30 |
Totem-sized Pokémon
Totem-sized Pokémon are obtainable variants of the Totem Pokémon found at trial sites. Acting as near replicas the actual Totem Pokémon, they too are larger in height and weight compared to their original species counterparts, affecting the mechanics of some moves (such as Low Kick and Sky Drop). Totem-sized Pokémon can be only obtained in Pokémon Ultra Sun and Ultra Moon, where they can be received from Samson Oak at Heahea Beach after meeting him for the first time at Route 2 depending on the number of Totem Stickers the player has obtained. The Pokémon obtained are often version exclusive based on either Ultra Sun or Ultra Moon.
Totem-sized Pokémon are Shiny-locked, and their sizes cannot be passed down through Pokémon breeding. Even if their species normally have multiple Abilities, Totem-sized Pokémon can only have a particular Ability, as listed below. The Ability is the species' Hidden Ability if the species has two standard Abilities, and the species' sole standard Ability otherwise; thus Totem-sized Pokémon's Ability cannot be changed by Ability Capsule. Some Totem-sized Pokémon have different abilities than what their trial site counterparts may have. Totem-sized Pokémon always have at least three perfect IVs.
Totem-sized Pokémon that are based on Totem Pokémon in Pokémon Sun and Moon are the only ones that can be traded to the original Sun and Moon games and deposited in Pokémon Bank. Totem-sized Pokémon based on Totem Pokémon that only appear in Ultra Sun and Ultra Moon cannot be deposited in Pokémon Bank or traded to the original Sun and Moon games.
Totem-sized Pokémon that are transferred to Pokémon HOME are turned into their normal-sized forms.
| Pokémon | Introduced | Height | Weight | Ability | Totem Sticker Count | |||
|---|---|---|---|---|---|---|---|---|

|
Alolan Raticate | SM | 4'07" | 1.4 m | 231.5 lbs. | 105.0 kg | Thick Fat | 20UM |

|
Alolan Marowak | USUM | 5'07" | 1.7 m | 216.1 lbs. | 98.0 kg | Rock Head | 40US |

|
Gumshoos | SM | 4'07" | 1.4 m | 132.3 lbs. | 60.0 kg | Adaptability | 20US |

|
Vikavolt | SM | 8'06" | 2.6 m | 325.2 lbs. | 147.5 kg | Levitate | 70US |

|
Ribombee | USUM | 1'04" | 0.4 m | 4.4 lbs. | 2.0 kg | Sweet Veil | 100US |

|
Araquanid | USUM | 10'02" | 3.1 m | 479.5 lbs. | 217.5 kg | Water Bubble | 40UM |

|
Lurantis | SM | 4'11" | 1.5 m | 127.9 lbs. | 58.0 kg | Leaf Guard | 50US |
|
|
Salazzle | SM | 6'11" | 2.1 m | 178.6 lbs. | 81.0 kg | Corrosion | 50UM |

|
Togedemaru | USUM | 2'00" | 0.6 m | 28.7 lbs. | 13.0 kg | Sturdy | 70UM |

|
Mimikyu | SM | 1'04" | 0.4 m | 6.2 lbs. | 2.8 kg | Disguise | 80 |

|
Kommo-o | SM | 7'10" | 2.4 m | 457.5 lbs. | 207.5 kg | Overcoat | 100UM |
In the anime
| の | This article is missing information on this character's Japanese voice actor. You can help by adding this information. |
While most of the Totem Pokémon from the anime are based on those from the games, Totem Trevenant is the only anime-original Totem Pokémon and the only depicted Totem Pokémon that is neither a Generation VII Pokémon nor a regional form. In addition, not every Totem Pokémon was adapted, even from the original games. Unlike the games, Ally Pokémon have had at least one instance of being caught in the case of Officer Jenny's Gumshoos.
Totem Pokémon

|
||
| Ash battled the Totem Gumshoos as part of the Verdant Cavern trial, using his Pikachu and Rowlet. Gumshoos was able to defeat Rowlet, but it was eventually defeated by Pikachu. After Ash won the battle, Gumshoos gave him a Normalium Z. It later assisted Officer Jenny with tackling an outbreak of Alolan Rattata and Raticate.
Gumshoos's known moves are Frustration and Sand Attack. | ||
| Debut | To Top a Totem! | |
|---|---|---|
| Voice actors | ||
| Japanese | ||
| English | Billy Bob Thompson | |

|
||
| A Totem Alolan Raticate was seen guarding a Darkinium Z, which was being targeted by Team Rocket and Team Skull. Although it was an extremely powerful opponent, taking down Meowth, James's Mareanie, and all of Team Skull's Pokémon, it was eventually defeated by Jessie's Mimikyu.
Raticate's known moves are Tail Whip, Hyper Fang, and Hyper Beam. | ||
| Debut | A Team-on-Team Tussle! | |
|---|---|---|
| Voice actors | ||
| Japanese | ||
| English | Carter Cathcart | |

|
||
| A Totem Wishiwashi appeared at Brooklet Hill, being hooked up by Lana, who proceeded to battle it with her Popplio. It was eventually defeated by Popplio's newly learned Aqua Jet, earning Lana a Waterium Z from it as a reward.
None of Wishiwashi's moves are known. | ||
| Debut | Big Sky, Small Fry! | |
|---|---|---|
| Voice actors | ||
| Japanese | ||
| English | H.D. Quinn (School Form) Lisa Ortiz (Solo Form) | |

|
||
| Totem Lurantis challenged Ash while he was collecting ingredients for the "Akala Curry" in Lush Jungle with Mallow. Ash proceeded to battle it with Litten and Rowlet. Although it proved to be an extremely tough opponent, Ash was finally able to defeat it with Litten's Breakneck Blitz, after which it rewarded Ash with a Grassium Z.
Lurantis's known moves are Petal Blizzard, Solar Blade, and Synthesis. | ||
| Debut | Currying Favor and Flavor! | |
|---|---|---|
| Voice actors | ||
| Japanese | Risa Shimizu | |
| English | Samara Naeymi | |

|
||
| Totem Kommo-o and its allies attacked Lillie and Gladion at the Vast Poni Canyon on their way to the Altar of the Sunne. Eventually, Gladion was able to change his Silvally into a Fairy type, allowing it to knock Kommo-o out with a super-effective Multi-Attack.
Kommo-o's only known move is Clanging Scales. | ||
| Debut | Family Determination! | |
|---|---|---|
| Voice actors | ||
| Japanese | ||
| English | Ryan Andes | |
 
|
||
| Totem Trevenant lived in the forests of Melemele Island. It was good friends with Professor Kukui when he was a child. Trevenant rewarded Kukui with a Firium Z after he had his Litten use Scratch to ease its sneezing.
It appeared when Ash was accidentally transported to the past by Celebi. When Trevenant kept sneezing due to multiple Cutiefly being stuck in its leaves, Ash and a young Professor Kukui freed the Cutiefly and used their Torracat and Litten, respectively, to warm up some of the Cutiefly. Afterwards, Trevenant rewarded Ash with a Firium Z. When Ash returned to the present, Trevenant was revealed to have died. None of Trevenant's moves are known. | ||
| Debut | A Timeless Encounter! | |
|---|---|---|
Ally Pokémon
| の | This article is missing information on this character's Japanese voice actor. You can help by adding this information. |
Totem Gumshoos

|
||
| Ash battled this Yungoos when he first entered the Verdant Cavern trial. It later assisted Officer Jenny with tackling an outbreak of Alolan Rattata and Raticate.
Yungoos's known moves are Hyper Fang and Sand Attack. | ||
| Debut | To Top a Totem! | |
|---|---|---|
| Voice actors | ||
| Japanese | ||
| English | Billy Bob Thompson | |

|
||
Ash battled this Gumshoos when he first entered the Verdant Cavern trial. It later assisted Officer Jenny with tackling an outbreak of Alolan Rattata and Raticate. Melemele Island's Officer Jenny later convinced Gumshoos to stay with her. | ||
| Debut | To Top a Totem! | |
|---|---|---|
| Voice actors | ||
| Japanese | Kaito Ishikawa | |
| English | Billy Bob Thompson | |
Totem Raticate

|
||
| These Alolan Rattata were seen guarding a Darkinium Z, which was being targeted by Team Rocket and Team Skull. Although powerful, they were lured into a cage of Berries and trapped there. They later escaped and continued their attack on the thieves.
Rattata's only known move is Hyper Fang. | ||
| Debut | A Team-on-Team Tussle! | |
|---|---|---|
| Voice actors | ||
| Japanese | ||
| English | Carter Cathcart | |
|
|
||
| These Alolan Raticate were seen guarding a Darkinium Z, which was being targeted by Team Rocket and Team Skull. Although powerful, they were lured into a cage of Berries and trapped there. They later escaped and continued their attack on the thieves.
Raticate's only known move is Hyper Fang. | ||
| Debut | A Team-on-Team Tussle! | |
|---|---|---|
| Voice actors | ||
| Japanese | ||
| English | Carter Cathcart | |
Totem Wishiwashi

|
||
| This Alomomola appeared to support Totem Wishiwashi during Lana's trial against it, healing it with Heal Pulse. In order to help Lana, Ash proceeded to fish up the Alomomola and had Pikachu use Electro Ball on it, defeating it and causing it to flee in a fit of tears.
Alomomola's only known move is Heal Pulse. | ||
| Debut | Big Sky, Small Fry! | |
|---|---|---|
| Voice actors | ||
| Japanese | ||
| English | Lisa Ortiz | |
Totem Lurantis
 
|
||
| This Castform appeared to support Totem Lurantis when it called for help during Ash's battle against it. With its help, Lurantis gained an upper hand over Litten. The Weather Pokémon was eventually defeated by Rowlet.
Castform's known moves are Sunny Day, Water Gun, and Headbutt, and its Ability is Forecast. | ||
| Debut | Currying Favor and Flavor! | |
|---|---|---|
| Voice actors | ||
| Japanese | ||
| English | Marisa Kennedy | |
Totem Kommo-o

|
||
| These Jangmo-o attacked Lillie and Gladion when the two ventured through the trial site of Vast Poni Canyon. Following the defeat of the Totem Kommo-o, they all retreated as the ceiling began to collapse. They reappeared in the next episode, in which they had cornered Professor Burnet. The Scaly Pokémon were swiftly defeated by Professor Kukui's Braviary.
None of Jangmo-o's moves are known. | ||
| Debut | Family Determination! | |
|---|---|---|
| Voice actors | ||
| Japanese | ||
| English | Erica Schroeder | |

|
||
| These Hakamo-o attacked Lillie and Gladion when the two ventured through the trial site of Vast Poni Canyon. Following the defeat of the Totem Kommo-o, they all retreated as the ceiling began to collapse. They reappeared in the next episode, in which they had cornered Professor Burnet. The Scaly Pokémon were swiftly defeated by Professor Kukui's Braviary.
None of Hakamo-o's moves are known. | ||
| Debut | Family Determination! | |
|---|---|---|
| Voice actors | ||
| Japanese | ||
| English | Eddy Lee | |
In the manga
Movie adaptations

|
||
| Ash battled this Totem Kommo-o on Poni Island. It initially proved to be a powerful opponent, but after remembering the day they first met, Ash and Pikachu defeated Kommo-o with a 10,000,000 Volt Thunderbolt.
Kommo-o's only known move is Draco Meteor. | ||
| Debut | ICYR1 | |
|---|---|---|
Pokémon Adventures
Totem Pokémon

|
||
This Wishiwashi is the Totem of Brooklet Hill. When Sun traveled to Brooklet Hill to begin his first trial, he encountered a wild Solo Form Wishiwashi that helped retrieve a one yen coin he dropped in the water. Taking a liking to the Pokémon, Sun decided to name it Quarter and asked it to help him find the Totem Pokémon of Brooklet Hill. Quarter led Sun around the area for hours but failed to find the Totem each time. Angered by this, Sun's Litten, Dollar, attacked Quarter, causing it to get scared and run away. Several other Wishiwashi soon began surrounding Sun and leaped out of the water as a School Form Wishiwashi, revealing that Quarter and the other Wishiwashi together were the Totem Pokémon the whole time. Sun eventually defeated the Totem by attacking its left eye, which contained Quarter, the leader controlling the other Wishiwashi. With Quarter defeated, the Totem broke apart into several Solo Form Wishiwashi. Wishiwashi's known moves are Water Gun and Aqua Tail, and its Ability is Schooling. | ||
| Debut | True Identity and the Totem Pokémon of Brooklet Hill | |
|---|---|---|

|
||
| This Lurantis is the Totem of Lush Jungle. In order to get strong enough to face the Ultra Beasts threatening to invade Alola, Moon summoned Lurantis to Konikoni City with a soup made by Mallow and battled it as a form of training. Despite the assistance of many ally Pokémon, Lurantis was eventually defeated by Moon's Mareanie.
Lurantis's only known move is Solar Blade. | ||
| Debut | Flash and Cosmog's Secret | |
|---|---|---|

|
||
This Mimikyu is the Totem of the former Thrifty Megamart. Sun was tasked with taking a picture of Mimikyu to complete his second trial. Sun had his Torracat, Dollar, battle Mimikyu in order to keep it still long enough to take the photo. After discovering its anger towards humans for mistreating it, Sun offered it a spot on his team and named it Penny. None of Mimikyu's moves are known and its Ability is Disguise. | ||
| Debut | A Photoshoot and the Abandoned Thrifty Megamart | |
|---|---|---|
Ally Pokémon
Totem Lurantis

|
||
| These Castform appeared to support Totem Lurantis when it battled against Moon. Despite a lengthy battle, they were all defeated.
None of Castform's moves are known. | ||
| Debut | Flash and Cosmog's Secret | |
|---|---|---|

|
||
| These Trumbeak appeared to support Totem Lurantis when it battled against Moon. Despite a lengthy battle, they were all defeated.
None of Trumbeak's moves are known. | ||
| Debut | Flash and Cosmog's Secret | |
|---|---|---|

|
||
| These Comfey appeared to support Totem Lurantis when it battled against Moon. Despite a lengthy battle, they were all defeated.
None of Comfey's moves are known. | ||
| Debut | Flash and Cosmog's Secret | |
|---|---|---|

|
||
| This Kecleon appeared to support Totem Lurantis when it battled against Moon. Despite a lengthy battle, they were all defeated.
None of Kecleon's moves are known. | ||
| Debut | Flash and Cosmog's Secret | |
|---|---|---|
Pokémon Horizon
A Totem Lucario appeared in Mastering the Z-Move!.
Trivia
- In Pokémon Sun and Moon, in the battle against Totem Wishiwashi at Brooklet Hill, the Totem Pokémon can summon an Ally Alomomola which knows Water Gun, but Alomomola cannot legitimately have the move in any of the games.
- In Pokémon Moon and Ultra Moon, during the cutscene before Totem Raticate's battle, it cries out Gumshoos's cry instead of its own cry.
- Compared to their non-Totem counterparts, every Totem Pokémon's weight is increased less than appropriately to its height. If a Pokémon's density were to remain the same between its Totem and non-Totem variants, a Totem Pokémon twice the height should be eight times the weight.
- In all languages of the games except English and Chinese, the same terms are used to refer to both Totem Pokémon and Titan Pokémon.
- The Japanese term for Titan Pokémon (Japanese: ヌシポケモン Leader Pokémon) is fully written in katakana, distinguishing it from Totem Pokémon (Japanese: ぬしポケモン Leader Pokémon), but the two terms are otherwise identical, being pronounced the same and having the same meaning.
In other languages
Totem Pokémon
| |||||||||||||||||||||||||||||||||||||||||||||||||||||||||||||||||
Ally Pokémon
| ||||||||||||||||||||||||||||||||||||||||||||||||||
See also
| |||||||||||||||||||||||||||||||||||||||||||||||
| This game-related article is part of Project Games, a Bulbapedia project that aims to write comprehensive articles on the Pokémon games. |