|
|
| Line 11: |
Line 11: |
| |region=Johto | | |region=Johto |
| |generation={{Gen|II}}, {{Gen|IV}} | | |generation={{Gen|II}}, {{Gen|IV}} |
| |map=Johto Whirl Islands Map.png
| |
| }} | | }} |
|
| |
|
| Line 24: |
Line 23: |
| {{Itemlist|Guard Spec.|Southwestern island section|G=yes|S=yes|display={{DL|Battle item|Guard Spec.}}}} | | {{Itemlist|Guard Spec.|Southwestern island section|G=yes|S=yes|display={{DL|Battle item|Guard Spec.}}}} |
| {{Itemlist|Full Restore| | | {{Itemlist|Full Restore| |
| * B1F, southeast of northwest island ladder | | * B1F; southeast of northwest island ladder |
| * B1F west, in the isolated boulder ''(hidden)'' | | * B1F west; in the isolated boulder ''(hidden)'' |
| |G=yes|S=yes|C=yes|display={{DL|Potion|Full Restore}} ×2}} | | |G=yes|S=yes|C=yes|display={{DL|Potion|Full Restore}} ×2}} |
| {{Itemlist|Ultra Ball|B1F east, northeast of southeast island ladder ''(hidden)''|G=yes|S=yes|C=yes|display={{ball|Ultra}}}} | | {{Itemlist|Ultra Ball|B1F east; northeast of southeast island ladder ''(hidden)''|G=yes|S=yes|C=yes|display={{ball|Ultra}}}} |
| {{Itemlist|Rare Candy|B1F northeast, northeast of northeast island ladder ''(hidden)''|G=yes|S=yes|C=yes|display={{DL|Vitamin|Rare Candy}}}} | | {{Itemlist|Rare Candy|B1F northeast; northeast of northeast island ladder ''(hidden)''|G=yes|S=yes|C=yes|display={{DL|Vitamin|Rare Candy}}}} |
| {{Itemlist|Carbos|B1F, southwest of northwest island ladder|G=yes|S=yes|C=yes|HG=yes|SS=yes|display={{DL|Vitamin|Carbos}}}} | | {{Itemlist|Carbos|B1F southwest; of northwest island ladder|G=yes|S=yes|C=yes|HG=yes|SS=yes|display={{DL|Vitamin|Carbos}}}} |
| {{Itemlist|Nugget|B1F, near center of northern edge of room|G=yes|S=yes|C=yes|HG=yes|SS=yes|display={{DL|Valuable item|Nugget}}}} | | {{Itemlist|Nugget|B1F; near center of northern edge of room|G=yes|S=yes|C=yes|HG=yes|SS=yes|display={{DL|Valuable item|Nugget}}}} |
| {{Itemlist|Ultra Ball|Northeastern island, next to southern ladder|G=yes|S=yes|C=yes|HG=yes|SS=yes|display={{ball|Ultra}}}} | | {{Itemlist|Ultra Ball|Northeastern island; next to southern ladder|G=yes|S=yes|C=yes|HG=yes|SS=yes|display={{ball|Ultra}}}} |
| {{Itemlist|Calcium|B1F, northeast of southeast island ladder|G=yes|S=yes|C=yes|HG=yes|SS=yes|display={{DL|Vitamin|Calcium}}}} | | {{Itemlist|Calcium|B1F; northeast of southeast island ladder|G=yes|S=yes|C=yes|HG=yes|SS=yes|display={{DL|Vitamin|Calcium}}}} |
| {{Itemlist|Escape Rope|B1F, east of southwest island ladder|G=yes|S=yes|C=yes|HG=yes|SS=yes}} | | {{Itemlist|Escape Rope|B1F; east of southwest island ladder|G=yes|S=yes|C=yes|HG=yes|SS=yes}} |
| {{Itemlist|Max Revive|B2F, west of main ladder located at the top|G=yes|S=yes|C=yes|HG=yes|SS=yes|display={{DL|Revive|Max Revive}}}} | | {{Itemlist|Max Revive|B2F; west of main ladder located at the top|G=yes|S=yes|C=yes|HG=yes|SS=yes|display={{DL|Revive|Max Revive}}}} |
| {{Itemlist|Max Elixir|B2F, southwest of ladder in enclosed section|G=yes|S=yes|C=yes|HG=yes|SS=yes|display={{DL|Ether|Max Elixir}}}} | | {{Itemlist|Max Elixir|B2F; southwest of ladder in enclosed section|G=yes|S=yes|C=yes|HG=yes|SS=yes|display={{DL|Ether|Max Elixir}}}} |
| {{Itemlist|Full Restore|B2F, northeast of ladder in enclosed section|C=yes|HG=yes|SS=yes|display={{DL|Potion|Full Restore}}}} | | {{Itemlist|Full Restore|B2F; northeast of ladder in enclosed section|C=yes|HG=yes|SS=yes|display={{DL|Potion|Full Restore}}}} |
| {{Itemlist|Ultra Ball|East section of southwest island|C=yes|HG=yes|SS=yes|display={{ball|Ultra}}}} | | {{Itemlist|Ultra Ball|Southwest island; east section|C=yes|HG=yes|SS=yes|display={{ball|Ultra}}}} |
| {{Itemlist|Rare Candy|In rock in northwest corner of southeast island ''(hidden)''|HG=yes|SS=yes|display={{DL|Vitamin|Rare Candy}}}} | | {{Itemlist|Rare Candy|Southeast island; in rock in northwest corner ''(hidden)''|HG=yes|SS=yes|display={{DL|Vitamin|Rare Candy}}}} |
| {{Itemlist|Pearl|B1F, in rock east of northwest ladder ''(hidden)''|HG=yes|SS=yes|display={{DL|Valuable item|Pearl}}}} | | {{Itemlist|Pearl|B1F; in rock east of northwest ladder ''(hidden)''|HG=yes|SS=yes|display={{DL|Valuable item|Pearl}}}} |
| {{Itemlist|Full Restore|B1F, southeast of northwest ladder|HG=yes|SS=yes|display={{DL|Potion|Full Restore}}}} | | {{Itemlist|Full Restore|B1F; southeast of northwest ladder|HG=yes|SS=yes|display={{DL|Potion|Full Restore}}}} |
| {{Itemlist|Revive|B1F, in a rock south of northeast ladder ''(hidden)''|HG=yes|SS=yes|display={{DL|Revive|Revive}}}} | | {{Itemlist|Revive|B1F; in a rock south of northeast ladder ''(hidden)''|HG=yes|SS=yes|display={{DL|Revive|Revive}}}} |
| {{Itemlist|Super Repel|B1F, on rock northeast of ladder southwest of northeast ladder ''(hidden)''|HG=yes|SS=yes|display={{DL|Repel|Super Repel}}}} | | {{Itemlist|Super Repel|B1F; on rock northeast of ladder southwest of northeast ladder ''(hidden)''|HG=yes|SS=yes|display={{DL|Repel|Super Repel}}}} |
| {{Itemlist|Ultra Ball|B1F, in wall northwest of southeast ladder ''(hidden)''|HG=yes|SS=yes|display={{ball|Ultra}}}} | | {{Itemlist|Ultra Ball|B1F; in wall northwest of southeast ladder ''(hidden)''|HG=yes|SS=yes|display={{ball|Ultra}}}} |
| {{Itemlist|Full Restore|B2F, in wall northwest of main ladder ''(hidden)''|HG=yes|SS=yes|display={{DL|Potion|Full Restore}}}} | | {{Itemlist|Full Restore|B2F; in wall northwest of main ladder ''(hidden)''|HG=yes|SS=yes|display={{DL|Potion|Full Restore}}}} |
| {{Itemlist|Rare Candy|Ledge overlooking Lugia's chamber|HG=yes|SS=yes|display={{DL|Vitamin|Rare Candy}}}} | | {{Itemlist|Rare Candy|Ledge overlooking Lugia's chamber|HG=yes|SS=yes|display={{DL|Vitamin|Rare Candy}}}} |
| {{itlistfoot|water}} | | {{itlistfoot|water}} |
| Line 189: |
Line 188: |
|
| |
|
| ==Layout== | | ==Layout== |
| {| align="center" style="background: #000; {{roundy|10px}}; border: 5px solid #{{Locationcolor/med|water}}" | | {| class="roundy" style="margin:auto; background: #000; border: 5px solid #{{Locationcolor/med|water}}" |
| |- | | |- |
| ! style="background:#{{Locationcolor/light|water}}; {{roundytl|5px}};" | Version | | ! style="background:#{{Locationcolor/light|water}}; {{roundytl|5px}}" | Version |
| ! style="background:#{{Locationcolor/light|water}}" | Northwest | | ! style="background:#{{Locationcolor/light|water}}" | Northwest |
| ! style="background:#{{Locationcolor/light|water}}" | Northeast | | ! style="background:#{{Locationcolor/light|water}}" | Northeast |
| ! style="background:#{{Locationcolor/light|water}}" | Southwest | | ! style="background:#{{Locationcolor/light|water}}" | Southwest |
| ! style="background:#{{Locationcolor/light|water}}; {{roundytr|5px}}" | Southeast | | ! style="background:#{{Locationcolor/light|water}}; {{roundytr|5px}}" | Southeast |
| |- style="background:#000" | | |- |
| ! style="background:#{{gold color}}" | {{color2|000|Pokémon Gold and Silver Versions|Gold}} | | ! style="background:#{{gold color}}" | {{color2|000|Pokémon Gold and Silver Versions|Gold}} |
| | rowspan="3" | [[File:Whirl Islands 1F NW GSC.png|150px]] | | | rowspan="3" | [[File:Whirl Islands 1F NW GSC.png|150px]] |
| | rowspan="3" | [[File:Whirl Islands 1F NE GSC.png|150px]] | | | rowspan="3" | [[File:Whirl Islands 1F NE GSC.png|150px]] |
| Line 203: |
Line 202: |
| | rowspan="3" | [[File:Whirl Islands 1F SE GSC.png|150px]] | | | rowspan="3" | [[File:Whirl Islands 1F SE GSC.png|150px]] |
| |- | | |- |
| ! style="background:#{{silver color}}" | {{color2|000|Pokémon Gold and Silver Versions|Silver}} | | ! style="background:#{{silver color}}" | {{color2|000|Pokémon Gold and Silver Versions|Silver}} |
| |- | | |- |
| ! style="background:#{{crystal color}}" | {{color2|000|Pokémon Crystal Version|Crystal}} | | ! style="background:#{{crystal color}}" | {{color2|000|Pokémon Crystal Version|Crystal}} |
| |- | | |- |
| ! style="background:#{{heartgold color}}" | {{color2|000|Pokémon HeartGold and SoulSilver Versions|HeartGold}} | | ! style="background:#{{heartgold color}}" | {{color2|000|Pokémon HeartGold and SoulSilver Versions|HeartGold}} |
| | rowspan="2" | [[File:Whirl Islands 1F NW HGSS.png|150px]] | | | rowspan="2" | [[File:Whirl Islands 1F NW HGSS.png|150px]] |
| | rowspan="2" | [[File:Whirl Islands 1F NE HGSS.png|150px]] | | | rowspan="2" | [[File:Whirl Islands 1F NE HGSS.png|150px]] |
| Line 215: |
Line 214: |
| ! style="background:#{{soulsilver color}}" | {{color2|000|Pokémon HeartGold and SoulSilver Versions|SoulSilver}} | | ! style="background:#{{soulsilver color}}" | {{color2|000|Pokémon HeartGold and SoulSilver Versions|SoulSilver}} |
| |- | | |- |
| | colspan="5" style="background:#{{Locationcolor/light|water}}; {{roundybottom|5px}};" | | | | colspan="5" style="background:#{{Locationcolor/light|water}}; {{roundybottom|5px}}" | |
| |} | | |} |
| {{-}} | | {{-}} |
| {| align="center" style="background: #000; {{roundy|10px}}; border: 5px solid #{{Locationcolor/med|water}}" | | {| class="roundy" style="margin:auto; background: #000; border: 5px solid #{{Locationcolor/med|water}}" |
| |- | | |- |
| ! style="background:#{{Locationcolor/light|water}}; {{roundytl|5px}};" | Version | | ! style="background:#{{Locationcolor/light|water}}; {{roundytl|5px}}" | Version |
| ! style="background:#{{Locationcolor/light|water}}" | B1F | | ! style="background:#{{Locationcolor/light|water}}" | B1F |
| ! style="background:#{{Locationcolor/light|water}}" | B1F Middle | | ! style="background:#{{Locationcolor/light|water}}" | B1F Middle |
| ! style="background:#{{Locationcolor/light|water}}" | B2F | | ! style="background:#{{Locationcolor/light|water}}" | B2F |
| ! style="background:#{{Locationcolor/light|water}}" | B2F Inner | | ! style="background:#{{Locationcolor/light|water}}" | B2F Inner |
| ! style="background:#{{Locationcolor/light|water}}; {{roundytr|5px}};" | B3F | | ! style="background:#{{Locationcolor/light|water}}; {{roundytr|5px}}" | B3F |
| |- style="background:#000" | | |- |
| ! style="background:#{{gold color}}" | {{color2|000|Pokémon Gold and Silver Versions|Gold}} | | ! style="background:#{{gold color}}" | {{color2|000|Pokémon Gold and Silver Versions|Gold}} |
| | rowspan="3" | [[File:Whirl Islands B1F GSC.png|150px]] | | | rowspan="3" | [[File:Whirl Islands B1F GSC.png|150px]] |
| | rowspan="3" | [[File:Whirl Islands B1F Middle GSC.png|150px]] | | | rowspan="3" | [[File:Whirl Islands B1F Middle GSC.png|150px]] |
| Line 233: |
Line 232: |
| | rowspan="3" | [[File:Whirl Islands B2F Inner GSC.png|150px]] | | | rowspan="3" | [[File:Whirl Islands B2F Inner GSC.png|150px]] |
| |- | | |- |
| ! style="background:#{{silver color}}" | {{color2|000|Pokémon Gold and Silver Versions|Silver}} | | ! style="background:#{{silver color}}" | {{color2|000|Pokémon Gold and Silver Versions|Silver}} |
| |- | | |- |
| ! style="background:#{{crystal color}}" | {{color2|000|Pokémon Crystal Version|Crystal}} | | ! style="background:#{{crystal color}}" | {{color2|000|Pokémon Crystal Version|Crystal}} |
| |- | | |- |
| ! style="background:#{{heartgold color}}" | {{color2|000|Pokémon HeartGold and SoulSilver Versions|HeartGold}} | | ! style="background:#{{heartgold color}}" | {{color2|000|Pokémon HeartGold and SoulSilver Versions|HeartGold}} |
| | rowspan="2" | [[File:Whirl Islands B1F HGSS.png|150px]] | | | rowspan="2" | [[File:Whirl Islands B1F HGSS.png|150px]] |
| | rowspan="2" | [[File:|150px]] | | | rowspan="2" | [[File:|150px]] |
| Line 244: |
Line 243: |
| | rowspan="2" | [[File:Whirl Islands B3F HGSS.png|150px]] | | | rowspan="2" | [[File:Whirl Islands B3F HGSS.png|150px]] |
| |- | | |- |
| ! style="background:#{{soulsilver color}}" | {{color2|000|Pokémon HeartGold and SoulSilver Versions|SoulSilver}} | | ! style="background:#{{soulsilver color}}" | {{color2|000|Pokémon HeartGold and SoulSilver Versions|SoulSilver}} |
| |- | | |- |
| | colspan="6" style="background:#{{Locationcolor/light|water}}; {{roundybottom|5px}};" | | | | colspan="6" style="background:#{{Locationcolor/light|water}}; {{roundybottom|5px}}" | |
| |} | | |} |
|
| |
|
| Line 288: |
Line 287: |
|
| |
|
| ==In other languages== | | ==In other languages== |
| {{Langtable|color={{johto color}}|bordercolor={{johto color dark}} | | {{Langtable|color={{locationcolor/light|water}}|bordercolor={{locationcolor/dark|water}} |
| |zh_cmn=漩渦列島 ''Xuánwō Lièdǎo'' | | |zh_cmn=漩渦列島 ''Xuánwō Lièdǎo'' |
| |fr=Tourb'Îles | | |fr=Tourb'Îles |
| Line 298: |
Line 297: |
| {{-}} | | {{-}} |
|
| |
|
| {{-}}
| |
| {{Johto}} | | {{Johto}} |
| {{legendarylocations|johto}}<br> | | {{legendarylocations|johto}}<br/> |
| {{Project Locations notice}} | | {{Project Locations notice}} |
|
| |
|

|
This article is incomplete.
Please feel free to edit this article to add missing information and complete it.
Reason: Layout images for HGSS
|
| Whirl Islands
|
|
うずまきじま
Whirlpool Islands
|
| "Wild Missingno. appeared!"
|
|
|
|
| Map description:
|
Four islands that are protected by whirlpools and are difficult to reach.
|
| Location:
|
Route 41
|
| Region:
|
Johto
|
| Generations:
|
II, IV
|
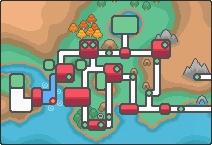
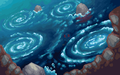
Location of Whirl Islands in Johto.
|
| Pokémon world locations
|
The Whirl Islands (Japanese: うずまきじま Whirlpool Islands) are a small archipelago located between the mainland of Johto and Cianwood City, on Route 41. Beneath the sea, a maze of dark caves sprawl, with explorers able to travel between the four islands with some amount of difficulty. Deep within these caves, Lugia can be found.
Named after the dangerous whirlpools that surround them, some parts of the Whirl Islands are mysterious and largely inaccessible. Children in Olivine City are told that bad kids are sent to the islands.
As explained in Pokémon SoulSilver, the Whirl Islands used to be one large island. At some point in time, there were two countries fighting over the island. Lugia, the guardian of the island, got upset and cast lightning bolts to tear the island into four pieces. It then disappeared into the deep end of the waterfall basin, longing for the invisible trust between people and Pokémon to manifest once more.
Items
Pokémon
Generation II
1F
| Pokémon
|
Games
|
Location
|
Levels
|
Rate
|

|

|

|
|
|
G
|
S
|
C
|
|
23
|
30%
|
|
|
G
|
S
|
C
|
|
23
|
5%
|
|
|
G
|
S
|
C
|
|
25
|
5%
|
5%
|
0%
|
|
|
G
|
S
|
C
|
|
24-25
|
0%
|
0%
|
10%
|
|
|
G
|
S
|
C
|
|
22-24
|
15%
|
|
|
G
|
S
|
C
|
|
22-24
|
25%
|
25%
|
0%
|
|
|
G
|
S
|
C
|
|
22-24
|
50%
|
|
|
G
|
S
|
C
|
|
22-24
|
40%
|
40%
|
60%
|
| Surfing
|
|
|
G
|
S
|
C
|
|
20-24
|
60%
|
|
|
G
|
S
|
C
|
|
20-24
|
10%
|
|
|
G
|
S
|
C
|
|
15-19
|
30%
|
| Fishing
|
|
|
G
|
S
|
C
|
|
10
|
15%
|
|
|
G
|
S
|
C
|
|
10
|
85%
|
|
|
G
|
S
|
C
|
|
20
|
55%
|
|
|
G
|
S
|
C
|
|
20
|
10%
|
|
|
G
|
S
|
C
|
|
20
|
35%
|
|
|
G
|
S
|
C
|
|
40
|
40%
|
|
|
G
|
S
|
C
|
|
40
|
20%
|
|
|
G
|
S
|
C
|
|
40
|
30%
|
|
|
G
|
S
|
C
|
|
40
|
10%
|
| A colored background means that the Pokémon can be found in this location in the specified game. A white background with a colored letter means that the Pokémon cannot be found here.
|
B1F
| Pokémon
|
Games
|
Location
|
Levels
|
Rate
|
|
|
|
|
|
|
G
|
S
|
C
|
|
24
|
30%
|
|
|
G
|
S
|
C
|
|
24
|
5%
|
|
|
G
|
S
|
C
|
|
26
|
5%
|
5%
|
0%
|
|
|
G
|
S
|
C
|
|
25-26
|
0%
|
0%
|
10%
|
|
|
G
|
S
|
C
|
|
23-25
|
15%
|
|
|
G
|
S
|
C
|
|
23-25
|
25%
|
25%
|
0%
|
|
|
G
|
S
|
C
|
|
23-25
|
50%
|
|
|
G
|
S
|
C
|
|
23-25
|
40%
|
40%
|
60%
|
| A colored background means that the Pokémon can be found in this location in the specified game. A white background with a colored letter means that the Pokémon cannot be found here.
|
B2F
| Pokémon
|
Games
|
Location
|
Levels
|
Rate
|
|
|
|
|
|
|
G
|
S
|
C
|
|
24
|
30%
|
|
|
G
|
S
|
C
|
|
25
|
30%
|
|
|
G
|
S
|
C
|
|
24
|
5%
|
|
|
G
|
S
|
C
|
|
27
|
5%
|
5%
|
0%
|
|
|
G
|
S
|
C
|
|
26-27
|
0%
|
0%
|
10%
|
|
|
G
|
S
|
C
|
|
23-25
|
15%
|
|
|
G
|
S
|
C
|
|
24-26
|
25%
|
25%
|
0%
|
|
|
G
|
S
|
C
|
|
23-25
|
50%
|
|
|
G
|
S
|
C
|
|
24-26
|
40%
|
40%
|
60%
|
| Surfing
|
|
|
G
|
S
|
C
|
|
15-24
|
90%
|
|
|
G
|
S
|
C
|
|
20-24
|
10%
|
| Fishing
|
|
|
G
|
S
|
C
|
|
10
|
15%
|
|
|
G
|
S
|
C
|
|
10
|
85%
|
|
|
G
|
S
|
C
|
|
20
|
55%
|
|
|
G
|
S
|
C
|
|
20
|
10%
|
|
|
G
|
S
|
C
|
|
20
|
35%
|
|
|
G
|
S
|
C
|
|
40
|
40%
|
|
|
G
|
S
|
C
|
|
40
|
20%
|
|
|
G
|
S
|
C
|
|
40
|
30%
|
|
|
G
|
S
|
C
|
|
40
|
10%
|
| A colored background means that the Pokémon can be found in this location in the specified game. A white background with a colored letter means that the Pokémon cannot be found here.
|
B2F (Inner Cave)
| Pokémon
|
Games
|
Location
|
Levels
|
Rate
|
|
|
|
|
|
|
G
|
S
|
C
|
|
25
|
30%
|
|
|
G
|
S
|
C
|
|
26
|
30%
|
|
|
G
|
S
|
C
|
|
25
|
5%
|
|
|
G
|
S
|
C
|
|
28
|
5%
|
5%
|
0%
|
|
|
G
|
S
|
C
|
|
27-28
|
0%
|
0%
|
10%
|
|
|
G
|
S
|
C
|
|
24-26
|
15%
|
|
|
G
|
S
|
C
|
|
25-27
|
25%
|
25%
|
0%
|
|
|
G
|
S
|
C
|
|
24-26
|
50%
|
|
|
G
|
S
|
C
|
|
25-27
|
40%
|
40%
|
60%
|
| Surfing
|
|
|
G
|
S
|
C
|
|
20-24
|
60%
|
|
|
G
|
S
|
C
|
|
20-24
|
10%
|
|
|
G
|
S
|
C
|
|
20-24
|
30%
|
| Fishing
|
|
|
G
|
S
|
C
|
|
10
|
15%
|
|
|
G
|
S
|
C
|
|
10
|
85%
|
|
|
G
|
S
|
C
|
|
20
|
55%
|
|
|
G
|
S
|
C
|
|
20
|
10%
|
|
|
G
|
S
|
C
|
|
20
|
35%
|
|
|
G
|
S
|
C
|
|
40
|
40%
|
|
|
G
|
S
|
C
|
|
40
|
20%
|
|
|
G
|
S
|
C
|
|
40
|
30%
|
|
|
G
|
S
|
C
|
|
40
|
10%
|
| Special Pokémon
|
|
|
G
|
S
|
C
|

|
Only one
|
|
70
|
One
|
|
|
G
|
S
|
C
|
|
|
Only one
|
|
40
|
One
|
|
|
G
|
S
|
C
|
|
|
Only one
|
|
60
|
One
|
| A colored background means that the Pokémon can be found in this location in the specified game. A white background with a colored letter means that the Pokémon cannot be found here.
|
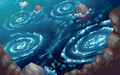
Generation IV

Kimono Girls summoning Lugia inside the Whirl Islands in SoulSilver
1F, B1F, B2F
| Pokémon
|
Games
|
Location
|
Levels
|
Rate
|
|
|
HG
|
SS
|
|
22-24
|
50%
|
|
|
HG
|
SS
|
|
23
|
30%
|
|
|
HG
|
SS
|
|
22-24
|
15%
|
|
|
HG
|
SS
|
|
23
|
5%
|
| Surfing
|
|
|
HG
|
SS
|
|
15-25
|
60%
|
|
|
HG
|
SS
|
|
15-25
|
10%
|
|
|
HG
|
SS
|
|
10-20
|
30%
|
| Fishing
|
|
|
HG
|
SS
|
|
10
|
5%
|
|
|
HG
|
SS
|
|
10
|
95%
|
|
|
HG
|
SS
|
|
20
|
37%
|
|
|
HG
|
SS
|
|
20
|
3%
|
|
|
HG
|
SS
|
|
20
|
60%
|
|
|
HG
|
SS
|
|
40
|
60%
|
|
|
HG
|
SS
|
|
40
|
30%
|
|
|
HG
|
SS
|
|
40
|
3%
|
|
|
HG
|
SS
|
|
40
|
7%
|
| Special Pokémon
|
|
|
HG
|
SS
|
|
24
|
20%
|
|
|
HG
|
SS
|
|
22-23
|
20%
|
|
|
HG
|
SS
|
|
24
|
20%
|
|
|
HG
|
SS
|
|
22-23
|
20%
|
| A colored background means that the Pokémon can be found in this location in the specified game. A white background with a colored letter means that the Pokémon cannot be found here.
|
B3F
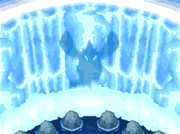
Lugia in the Whirl Islands in Generation IV
| Pokémon
|
Games
|
Location
|
Levels
|
Rate
|
|
|
HG
|
SS
|
|
24
|
30%
|
|
|
HG
|
SS
|
|
24
|
5%
|
|
|
HG
|
SS
|
|
23-25
|
15%
|
|
|
HG
|
SS
|
|
23-25
|
50%
|
| Special Pokémon
|
|
|
HG
|
SS
|
|
|
Only one
|
|
70
|
One
|
|
|
HG
|
SS
|
|
|
Only one
|
|
45
|
One
|
|
|
HG
|
SS
|
|
25
|
20%
|
|
|
HG
|
SS
|
|
23-24
|
20%
|
|
|
HG
|
SS
|
|
25
|
20%
|
|
|
HG
|
SS
|
|
23-24
|
20%
|
| A colored background means that the Pokémon can be found in this location in the specified game. A white background with a colored letter means that the Pokémon cannot be found here.
|
Layout
Eyecatch
In the anime

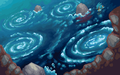
Map of the Whirl Islands in the anime
The depiction of the islands is far different in the anime. Far from being deserted, it contains many towns and other inhabitable areas. The Whirl Islands are home to the Whirl Cup, a competition for Water Pokémon Trainers held once every three years.
Rumors circulate that families of Lugia reside there. A mother Lugia and her baby, Silver, were sought by Dr. Namba and did, in fact, reveal themselves.
There are four main islands, with many smaller ones scattered throughout. Together, the islands in the archipelago form a spiral shape.
The islands, from north to south:
According to the Nurse Joy on Blue Point Isle, the climate varies from island to island.
In the manga
The Whirl Islands first appeared in the Pokémon Adventures manga in Really Remoraid, where Morty was able to track the location of Gold and Silver at Lt. Surge's request. Having been nursed back to health by the Entei that had just left, the two awaken to find that Gold lost his backpack again (along with several of his other belongings), and Silver was missing the Red Gyarados he caught at the Lake of Rage. After fighting off a herd of Sandslash, the two come across Surge, who then returns them. However, there was a catch: before he could even inquire information regarding the Masked Man, the three were attacked by the wild Lugia that inhabited the islands, quite a berserk one that rampaged firing Aeroblasts left and right. After a tough battle during which they are joined by Crystal and their starters all evolve, they try to it in a Poké Ball, only to find out someone else, later revealed to be the Masked Man himself, did so before them.
After the incident, the three fail to track it down even with the Pokédexes' Area function, and soon Silver flies off on his own to the fourth and final island, in which Lance's hidden chamber resides. By using the three Water-type HM moves available at the time, he is able to enter it and acquire information from Lance, during which he returns the Tyranitar he borrowed.
Much later, in the HeartGold & SoulSilver arc, Silver returns to Lance's chamber again, only to be joined by an angry Clair who demanded to know what he did to her cousin, who had recently gone missing. They are soon attacked by Petrel's many Koffing.
Trivia
In other languages


