|
|
| Line 1: |
Line 1: |
| {{WalkthroughNotice|HGSS}} | | {{WalkthroughNotice|HGSS}} |
|
| |
| ==Mahogany Town==
| |
| [[File:Mahogany Town HGSS.png|thumb|left|Mahogany Town]]
| |
|
| |
| {{to|Mahogany}} is a small, quiet town in the northeast mountains that connects Routes {{rtn|42|Johto}} to the west, {{rtn|43|Johto}} to the north, and {{rtn|44|Johto}} to the east. There is no official Poké Mart, but the Souvenir Shop in the center of town offers the usual {{i|Poké Ball}}s and [[Potion]]s in addition to oddities like [[Tiny Mushroom|TinyMushrooms]]. The east exit is blocked off by a man selling [[Rage Candy Bar|RageCandyBars]]. The [[Mahogany Gym]] is currently blocked off, as well.
| |
|
| |
| {| class="expandable" align="center" style="background: #B6503D; {{roundy}}; border: 5px solid #D16654;"
| |
| |- align="center"
| |
| ! Items
| |
| |-
| |
| |
| |
| {{itlisth|mountain}}
| |
| {{itemlist|RageCandyBar|From the man on the east side, purchased for {{pdollar}}300|HG=yes|SS=yes|display=[[Rage Candy Bar|RageCandyBar]]|sprite=Bag Rage Candy Bar Sprite}}
| |
| {{itlistfoot|mountain}}
| |
| |}
| |
| {{-}}
| |
|
| |
| ==Route 43==
| |
| [[File:Johto Route 43 HGSS.png|thumb|Route 43]]
| |
|
| |
| {{rt|43|Johto}} links [[Mahogany Town]] to a major landmark, the [[Lake of Rage]]. Two separate paths lead to the lake; passing through the gate requires a {{pdollar}}1000 toll paid to a pair of [[Team Rocket]] members, while the western path winds its way through tall grass and past several Trainers. This route is the only place in [[Johto]] where the player can find a [[level]] 50 {{p|Magikarp}}. Additionally, no Pokémon between level 26 and 49 appear when {{m|Surf}}ing, so it is easy to use the {{appendix|repel trick}} to find a level 50 Magikarp.
| |
|
| |
| {| class="expandable" style="margin: auto; background: #{{locationcolor/med|lake}}; {{roundy}}; border: 5px solid #{{locationcolor/light|lake}};"
| |
| |- align="center"
| |
| ! Trainers
| |
| |-
| |
| |
| |
| {{trainerheader|land}}
| |
| {{Trainerentry|Spr DP Camper.png|Camper|Spencer|320|3|027|Sandshrew|♂|18|None|028|Sandslash|♂|18|None|041|Zubat|♂|20|None}}
| |
| {{Trainerdiv|land}}
| |
| {{Trainerentry|Spr DP Picnicker.png|Picnicker|Tiffany|336|1|035|Clefairy|♀|21|None|38=phone}}
| |
| {{Trainerdiv|land}}
| |
| {{Trainerentry|Spr HGSS Poké Maniac.png|Poké Maniac|Brent|1536|2|030|Nidorina|♀|20|None|033|Nidorino|♂|24|None|38=phone}}
| |
| {{Trainerdiv|land}}
| |
| {{Trainerentry|Spr HGSS Poké Maniac.png|Poké Maniac|Beckett|1280|1|080|Slowbro|♂|20|None}}
| |
| {{Trainerdiv|land}}
| |
| {{Trainerentry|Spr HGSS Poké Maniac.png|Poké Maniac|Ron|1280|1|034|Nidoking|♂|20|None}}
| |
| {{Trainerdiv|land}}
| |
| {{Trainerentry|Spr DP Fisherman.png|Fisherman|Marvin|480|3|129|Magikarp|♂|10|None|130|Gyarados|♂|20|None|129|Magikarp|♂|15|None}}
| |
| {{Trainerfooter|land|II}}
| |
| |}
| |
| {| class="expandable" style="margin: auto; background: #{{locationcolor/med|lake}}; {{roundy}}; border: 5px solid #{{locationcolor/light|lake}};"
| |
| |- align="center"
| |
| ! Available Pokémon
| |
| |-
| |
| |
| |
| {{catch/header|land}}
| |
| {{catch/entryhs|180|Flaaffy|yes|yes|Grass|{{tt|15|Morning, Night}}, {{tt|15-17|Day}}|30%|40%|30%|type1=Electric}}
| |
| {{catch/entryhs|203|Girafarig|yes|yes|Grass|15|all=30%|type1=Normal|type2=Psychic}}
| |
| {{catch/entryhs|017|Pidgeotto|yes|yes|Grass|17|25%|20%|0%|type1=Normal|type2=Flying}}
| |
| {{catch/entryhs|164|Noctowl|yes|yes|Grass|17|0%|0%|20%|type1=Normal|type2=Flying}}
| |
| {{catch/entryhs|179|Mareep|yes|yes|Grass|{{tt|15|Morning, Day}}, {{tt|16|Night}}|10%|10%|5%|type1=Electric}}
| |
| {{catch/entryhs|048|Venonat|yes|yes|Grass|{{tt|16|Morning}}, {{tt|15-17|Night}}|5%|0%|15%|type1=Bug|type2=Poison}}
| |
| {{catch/div|water|Surfing}}
| |
| {{catch/entryhs|129|Magikarp|yes|yes|Surf|5-50|all=100%|type1=Water}}
| |
| {{catch/div|water|Fishing}}
| |
| {{catch/entryhs|129|Magikarp|yes|yes|Fish Old|10|all=95%|type1=Water}}
| |
| {{catch/entryhs|060|Poliwag|yes|yes|Fish Old|10|all=5%|type1=Water}}
| |
| {{catch/entryhs|129|Magikarp|yes|yes|Fish Good|20|all=60%|type1=Water}}
| |
| {{catch/entryhs|060|Poliwag|yes|yes|Fish Good|20|all=40%|type1=Water}}
| |
| {{Catch/div|forest|Headbutt}}
| |
| {{catch/entryhs|163|Hoothoot|yes|yes|Headbutt|17-18|all=65%|type1=Normal|type2=Flying|10=j}}
| |
| {{catch/entryhs|163|Hoothoot|yes|yes|Headbutt|15-16|all=50%|type1=Normal|type2=Flying|10=j}}
| |
| {{catch/entryhs|204|Pineco|yes|yes|Headbutt|15-16|all=30%|type1=Bug|10=j}}
| |
| {{catch/entryhs|102|Exeggcute|yes|yes|Headbutt|15-18|all=20%|type1=Grass|type2=Psychic|10=j}}
| |
| {{catch/entryhs|048|Venonat|yes|yes|Headbutt|17-18|all=15%|type1=Bug|type2=Poison|10=j}}
| |
| {{catch/footer|land}}
| |
| |}
| |
| {| class="expandable" style="margin: auto; background: #{{locationcolor/med|lake}}; {{roundy}}; border: 5px solid #{{locationcolor/light|lake}};"
| |
| |- align="center"
| |
| ! Items
| |
| |-
| |
| |
| |
| {{itlisth|land}}
| |
| {{itemlist|Max Ether|Northwest of the gate|HG=yes|SS=yes}}
| |
| {{itemlist|Black Apricorn|West of the larger pond (requires {{m|Surf}}, {{m|Cut}})|HG=yes|SS=yes|display=[[Black Apricorn|Blk Apricorn]]}}
| |
| {{itlistfoot|land}}
| |
| |}
| |
|
| |
| ==Lake of Rage==
| |
| [[File:Lake of Rage HGSS wet.png|thumb|250px|left|The flooded Lake of Rage]]
| |
|
| |
| The [[Lake of Rage]] is the largest lake in the region. {{DL|Weather|Heavy rain}}s have flooded the area, causing the lake to engulf the maze-like forest to the west. These waters used to be known as a fishing spot with the liveliest {{p|Magikarp}} around, but now a [[red Gyarados]] dominates the entire lake. The [[Choice Specs]] powers up the holder's [[special move]]s by 1.5 times, so be sure to grab it if you're using any special attackers.
| |
|
| |
| {| class="expandable" align="center" style="background: #{{locationcolor/med|lake}}; {{roundy}}; border: 5px solid #{{locationcolor/light|lake}};"
| |
| |- align="center"
| |
| ! Available Pokémon
| |
| |-
| |
| |
| |
| {{catch/header|lake|4}}
| |
| {{Catch/div|lake|Surfing}}
| |
| {{catch/entryhs|129|Magikarp|yes|yes|Surf|5-20|all=90%|type1=Water}}
| |
| {{catch/entryhs|130|Gyarados|yes|yes|Surf|10-20|all=10%|type1=Water}}
| |
| {{Catch/div|lake|Fishing}}
| |
| {{catch/entryhs|129|Magikarp|yes|yes|Fish Old|10|all=100%|type1=Water}}
| |
| {{catch/entryhs|129|Magikarp|yes|yes|Fish Good|20|all=97%|type1=Water}}
| |
| {{catch/entryhs|130|Gyarados|yes|yes|Fish Good|20|all=3%|type1=Water|type2=Flying}}
| |
| {{Catch/div|lake|Headbutt}}
| |
| {{catch/entryhs|048|Venonat|yes|yes|Headbutt|17-19|all=15%|type1=Bug|type2=Poison|10=j}}
| |
| {{catch/entryhs|102|Exeggcute|yes|yes|Headbutt|14-19|all=20%|type1=Grass|type2=Psychic|10=j}}
| |
| {{catch/entryhs|163|Hoothoot|yes|yes|Headbutt|14-16|all=50%|type1=Normal|type2=Flying|10=j}}
| |
| {{catch/entryhs|163|Hoothoot|yes|yes|Headbutt|17-19|all=65%|type1=Normal|type2=Flying|10=j}}
| |
| {{catch/entryhs|204|Pineco|yes|yes|Headbutt|14-16|all=30%|type1=Bug|10=j}}
| |
| {{catch/div|lake|Special}}
| |
| {{catch/entryhs|130|Gyarados|yes|yes|Shiny|30|all={{tt|One|Respawns after defeating the Elite Four if not caught}}|type1=Water|type2=Flying}}
| |
| {{catch/footer|lake}}
| |
| |}
| |
| {| class="expandable" align="center" style="background: #{{locationcolor/med|lake}}; {{roundy}}; border: 5px solid #{{locationcolor/light|lake}};"
| |
| |- align="center"
| |
| ! Items
| |
| |-
| |
| |
| |
| {{itlisth|lake}}
| |
| {{Itemlist|Full Restore|On the southwest dead end path to the lake, between two ledges ''(hidden)''|HG=yes|SS=yes}}
| |
| {{itemlist|Rare Candy|Between the trees on the southeast shore ''(hidden)''|HG=yes|SS=yes}}
| |
| {{itemlist|Red Flute|Western shore (requires {{m|Surf}})|HG=yes|SS=yes}}
| |
| {{itemlist|Choice Specs|Northeast shore (requires {{m|Surf}})|HG=yes|SS=yes}}
| |
| {{itemlist|Max Potion|Northeast shore ''(hidden)'', (requires {{m|Surf}})|HG=yes|SS=yes}}
| |
| {{itemlist|TM Normal|Northeast of the northwest house (requires {{m|Surf}})|HG=yes|SS=yes|display={{TM|43|Secret Power}}}}
| |
| {{itemlist|TM Normal|From the man in the northwest house (requires {{m|Surf}})|HG=yes|SS=yes|display={{TM|10|Hidden Power}}}}
| |
| {{itemlist|Red Scale|Found after battling the [[Red Gyarados]]|HG=yes|SS=yes}}
| |
| {{itlistfoot|lake}}
| |
| |}
| |
|
| |
| ===A Red Gyarados?!===
| |
| Unlike others of its species, this {{p|Gyarados}} evolved under mysterious circumstances which resulted in its [[Shiny Pokémon|unusual coloration]]. '''SAVE''' your game before trying to catch it.
| |
| {{-}}
| |
| {| style="margin: auto;"
| |
| |
| |
| {{Pokémon/4|game=HeartGold
| |
| |ndex=130|pokemon=Gyarados
| |
| |spritegender={{#switch: {{#expr: {{#time: U}} mod 2}}|0=fe}}male shiny
| |
| |type1=Water|type2=Flying
| |
| |level=30|gender=both
| |
| |ability=Intimidate
| |
| |move1=Bite|move1type=Dark|move1cat=Physical
| |
| |move2=Dragon Rage|move2type=Dragon|move2cat=Special
| |
| |move3=Leer|move3type=Normal|move3cat=Status
| |
| |move4=Twister|move4type=Dragon|move4cat=Special
| |
| }}
| |
| |}
| |
|
| |
| When the battle ends, you find a [[Red Scale]] floating on the water. This can be traded to Mr. Pokémon back on {{rt|30|Johto}} for an [[Exp. Share]].
| |
|
| |
| ===The Caped Crusader===
| |
| When you return to shore, you meet a man in a black cape with his {{p|Dragonite}}. This is [[Lance]]; he has been investigating rumors that all of the {{p|Magikarp}} in the lake are being forced to evolve prematurely. He believes that an odd radio signal from {{to|Mahogany}} is the cause, so follow him back to the suspicious Souvenir Shop.
| |
|
| |
|
| ==Mahogany Town== | | ==Mahogany Town== |
| Line 544: |
Line 398: |
| |gamename=HeartGold and SoulSilver | | |gamename=HeartGold and SoulSilver |
| |prevsection=8 | | |prevsection=8 |
| |prevname=Cianwood City, Olivine City, Route 47, Cliff Cave, Route 48, Safari Zone Gate, Route 42 | | |prevname=Olivine City, Route 47, Cliff Cave, Route 48, Safari Zone Gate, Routes 42 and 43, Lake of Rage |
| |nextsection=10 | | |nextsection=10 |
| |nextname=Goldenrod City, Route 44, Ice Path | | |nextname=Goldenrod City, Route 44, Ice Path |
This is the Bulbapedia walkthrough for Pokémon HeartGold and SoulSilver.
These pages follow the remade Nintendo DS iteration, not Pokémon Gold and Silver. The guide for those games can be found here.
Mahogany Town
Souvenir Shop
As you enter the shop, Lance's Dragonite uses Hyper Beam to ensure cooperation from the shopkeeper. Lance confirms that the strange radio signal is coming from this location, and moves a cabinet to reveal a flight of stairs leading down into the Team Rocket HQ.
Team Rocket HQ
| Trainers
|
| B1F
|
| Trainer
|
Pokémon
|
| Guards
|
|
|
|
|
|
|
|
|
|
|
|
|
|
|
| Other Trainers
|
|
|
|
|
|
|
|
|
|
|
|
|
|
|
|
|
|
|
|
|
|
|
| Available Pokémon
|
| Pokémon
|
Games
|
Location
|
Levels
|
Rate
|
| B1F
|
|
|
HG
|
SS
|

|
Trap floor
|
|
21
|
Five
|
|
|
HG
|
SS
|

|
Trap floor
|
|
23
|
Six
|
|
|
HG
|
SS
|

|
Trap floor
|
|
21
|
Five
|
| B2F
|
|
|
HG
|
SS
|

|
Transmitter room
|
|
23
|
Three
|
| A colored background means that the Pokémon can be found in this location in the specified game. A white background with a colored letter means that the Pokémon cannot be found here.
|
|
B1F
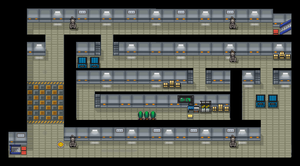
Each of the five Persian statues on this floor has a hidden camera that alerts the Rocket Grunts in the security center. Upon stepping in front of one, the same two Rockets show up to attack.
Take the first left and head south to the security center. Defeat Scientist Gregg, grab the Guard Spec., and examine the computer to deactivate the security cameras. Leave the room and turn east to find a Hyper Potion. Turn right and follow the south hallway. Collect the Nugget and take the stairs in the southwest.
B2F
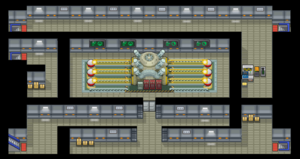
Lance is waiting here for you, and heals your Pokémon before running off. Fight the two Rocket Grunts nearby, and take the southeast stairs to the lowest floor.
B3F
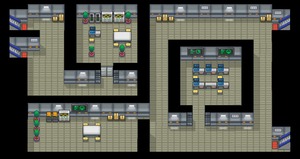
Lance informs you that shutting off the radio signal requires the voice of Petrel, one of Team Rocket's Executives. He is currently hiding out in the office to the northwest, which requires two passwords to enter. Grab the TM49 (Snatch) to the north, then battle Scientist Ross and the female Rocket in the southeast room. When defeated, she gives up the first password: SlowpokeTail. Continue on to the southwest room. Defeat the Rocket here to learn the second password, RaticateTail. Pick up the X Special and Protein near the potted plants, then head north. Grab the Full Heal in the hallway, and climb up the northeast stairs.
B2F
Examine the machinery to the south for a hidden X Sp. Def. Head west to fight another Rocket, then take the stairs back down to B3F.
B3F
Silver appears when you approach. Still reeling after being defeated by Lance, he insists that he is the one who will eliminate Team Rocket, before shoving you aside as he leaves. Take a quick detour up the south stairs to get TM46 (Thief), then input the two passwords to open the doors. Step inside to confront... Giovanni?! The real head of Team Rocket went into hiding after disbanding the group three years ago, and the copycat is Petrel, the second of the Executives. He is so confident that you will not defeat him that he reveals the password to the generator room: Hail Giovanni. Unfortunately, it only works when spoken in his voice.

|
|
Reward: $880
|
|
|
|
|
|
|
Defeated, he hurries off. After he leaves, the Murkrow that was sitting nearby demonstrates its ability to mimic voices before running off, as well. It leads you back to the generator room on B2F, then screams the password in Petrel's voice, fooling the voice-recognition system into opening the door. Murkrow leaves, and just as you enter the room, an Executive and another Rocket Grunt show up. This is Ariana, who attempts to force a 2-on-1 battle. Her plan is short-lived, as Lance shows up with his Dragonite to join the fight in a Multi Battle.

|
|
Reward: N/A
|
|
|
|
|
|
|

|
|

|
Reward: $2960
|
|
|
|
|
|
|
Ariana claims that the experiment was a total success, and that it does not matter what happens to the hideout now. She and the other Rockets flee the town to plan their next move, and Lance goes to inspect the generator. He finds that in order to shut it down, the six Electrode that power it must be removed. He takes care of the three on the right, leaving you to battle the three on the left. With the generator disabled, Lance rewards you with HM05 (Whirlpool). Climb back upstairs and take the warp back to the entrance. With Mahogany now free of Rockets, the Gym has finally reopened.
Mahogany Gym
Mahogany Town Pokémon Gym
Leader: Pryce
The Teacher of Winter's Harshness
| Items
|
| Item
|
Location
|
Games
|

|
TM07 (Hail)
|
From Pryce upon his defeat
|
HG SS
|
|
|
|
The Mahogany Gym specializes in Ice-type Pokémon. Fire-, Fighting, Rock-, and Steel-type attacks are the most effective against Ice Pokémon, but Electric-type attacks are also effective against the Seel and Shellder families. Avoid using Grass-, Flying-, Ground, or Dragon-type Pokémon.
Pryce's Gym is comprised of three different rooms, and he has installed frozen tiles in each to thwart all but the most determined Trainers. Reaching him will require moving the blocks to create better stopping points.
Entrance Room
Go north to the first block, sending it skidding off to the second. Slide left, up, right, then up to the door.
Center Room
Battle Skier Dana, then walk past her and head right across the ice to the two blocks. Slide up to reach the door.
Back Room
Walk past Boarder Deandre, and slide right to the two blocks. Head up to fight Skier Jill, then slide right, down, left, up, right, up, right, then up to battle Boarder Gerardo. From here, slide left then up to reach Pryce. His Seel and Piloswine both know Hail, which calls in a hailstorm that lasts for five turns. This storm damages all but Ice Pokémon every turn, makes Piloswine's Blizzard unable to miss, and raises its evasion due to its Snow Cloak Ability. His Seel and Dewgong can use Rest to restore health and cure status ailments, and can even attack while asleep with Snore and Sleep Talk.
Mahogany Gym

|
|

|
|
Reward: $4080
|
|
|
|
|
|
|
|
|
Defeated, Pryce awards you the Glacier Badge, which enables the use of Whirlpool in the field. He also hands over TM07 (Hail) as a prize.
The Rockets Return!
Upon earning your seventh Badge, Elm calls about strange radio broadcasts that mention Team Rocket. It seems that they have one more trick up their sleeve, so Fly back to Goldenrod City to finally put an end to their plans.
Route 43 (optional)
Before Flying away to battle Team Rocket, return to the gate on Route 43 and speak to the guard there to get TM36 (Sludge Bomb).
Lake of Rage (optional)
With team rocket defeated, the trainer Alton and four new items are accessible on Wednesdays when the lake isn't flooded. The two fishermen can also be fought except on Wednesdays.
| Trainers
|
| Trainer
|
Pokémon
|
| After clearing Team Rocket HQ
|
|
|
|
|
|
|
|
|
|
|
|
|
|
|
|
|
|
|
|
|
|
|
|
|
|
|
|
|
|
|
| Trainers with a telephone symbol by their names will give their Pokégear number to the player, and may call or be called for a rematch with higher-level Pokémon.
|
|
| Items
|
| Item
|
Location
|
Games
|
| After clearing Team Rocket HQ
|

|
Ether
|
From the Fishing Guru for showing him a larger Magikarp than the one listed (initially 41.9 inches)
|
HG SS
|
| On Wednesdays only, after clearing Team Rocket HQ
|

|
Black Belt
|
On the first meeting with Wesley
|
HG SS
|

|
Full Heal
|
South shore, near the sign (requires Surf)
|
HG SS
|

|
Max Revive
|
In the maze of trees (requires Cut)
|
HG SS
|

|
Full Restore
|
Northeast part of the tree maze (requires Cut)
|
HG SS
|
|
|
|


