Appendix:Red and Blue walkthrough/Section 9: Difference between revisions
Rockersk08 (talk | contribs) m (Proper links to Drink) |
Storm Aurora (talk | contribs) m (let's not rely on the default case when the default case has been removed :)) |
||
| (127 intermediate revisions by 37 users not shown) | |||
| Line 1: | Line 1: | ||
== Celadon City == | {{WalkthroughNotice|RB}} | ||
==Celadon City== | |||
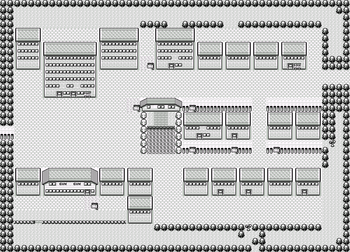
[[File:Celadon City RBY.png|thumb|350px|Celadon City]] | |||
[[Celadon City]] is the | [[Celadon City]] is located between {{rt|7|Kanto}} to the east and {{rt|16|Kanto}} to the west. The [[Celadon Department Store]] in the northwest offers all kinds of items for sale. The [[Celadon Condominiums|Celadon Mansion]] is a hotel, with a group known as [[Game Freak]] as its current occupants. Visitors can try their luck at the [[Celadon Game Corner|Game Corner]] in the heart of the city and redeem their winnings at the Prize Corner next door. The [[Celadon Gym]] stands on a hill in the southwest part of town. | ||
=== | {| class="expandable" align="center" style="background: #C0E7C2; {{roundy}}; border: 5px solid #D5EFD6;" | ||
|- align="center" | |||
! Trainers | |||
|- | |||
| | |||
{{Trainerheader|land}} | |||
{{catch/div|land|Game Corner}} | |||
{{Trainerentry|Spr RG Rocket.png|game=1|Rocket||600|2|020|Raticate||20||041|Zubat||20||}} | |||
{{Trainerfooter|land|1}} | |||
|} | |||
{| class="expandable" align="center" style="background: #C0E7C2; {{roundy}}; border: 5px solid #D5EFD6;" | |||
|- align="center" | |||
! Available Pokémon | |||
|- | |||
| | |||
{| class="expandable" | {{Catch/header|land|no}} | ||
|- | {{Catch/div|water|Fishing}} | ||
! | {{Catch/entry1|129|Magikarp|yes|yes|no|Fish Old|5|100%|type1=Water}} | ||
{{Catch/div|land|Gift Pokémon}} | |||
|- | {{Catch/entry1|133|Eevee|yes|yes|no|Gift|25|One|type1=Normal}} | ||
| | {{Catch/footer|land}} | ||
| | |||
| | |||
| | |||
| | |||
| | |||
| | |||
| | |||
| | |||
| | |||
| | |||
| | |||
| | |||
| | |||
| | |||
| | |||
| | |||
| | |||
| | |||
| | |||
|} | |} | ||
{| class="expandable" align="center" style="background: #C0E7C2; {{roundy}}; border: 5px solid #D5EFD6;" | |||
|- align="center" | |||
{| class="expandable" | ! Items | ||
|- | |- | ||
! | | | ||
{{itlisth|land}} | |||
|- | {{Itemlist|TM Fighting|Department Store; from a clerk on 3F|R=yes|B=yes|display={{TM|18|Counter}}}} | ||
| | {{Itemlist|TM Ice|Department Store; from a girl on the roof, after giving her a Fresh Water|R=yes|B=yes|display={{TM|13|Ice Beam}}}} | ||
{{Itemlist|TM Rock|Department Store; from a girl on the roof, after giving her a Soda Pop|R=yes|B=yes|display={{TM|48|Rock Slide}}}} | |||
| | {{Itemlist|TM Normal|Department Store; from a girl on the roof, after giving her a Lemonade|R=yes|B=yes|display={{TM|49|Tri Attack}}}} | ||
| | {{Itemlist|Coin Case|South side, from a man in the restaurant|R=yes|B=yes}} | ||
{{Itemlist|PP Up|East side, northeast of the {{m|Cut|small tree}} ''(hidden)''|R=yes|B=yes}} | |||
| | {{Itemlist|TM Grass|From Erika, after defeating her|R=yes|B=yes|display={{TM|21|Mega Drain}}}} | ||
| | {{catch/div|land|Later visit}} | ||
{{itemlist|TM Normal|From the man across the pond (requires {{m|Surf}})|R=yes|B=yes|display={{TM|41|Softboiled}}}} | |||
| | {{itlistfoot|land}} | ||
| | |||
| | |||
| | |||
| | |||
| | |||
| | |||
| | |||
| | |||
| | |||
| | |||
| | |||
| | |||
| | |||
|} | |} | ||
=== | ===Celadon Mansion=== | ||
The tall building in the north part of town is [[Celadon Condominiums|Celadon Mansion]]. On the third floor, [[Game Freak]]'s game designer promises a [[Diploma|reward]] for showing him your completed [[Pokédex]]. | |||
====The Amazing Eevee==== | |||
To further this goal of completing the Pokédex, leave an empty slot in your party and follow the path behind the Pokémon Center to find a break in the trees. Enter the mansion through the back door and climb to the top floor to obtain an {{p|Eevee}}. This Pokémon's unique genetic makeup allows it to evolve into one of several different forms. Exposure to a [[Water Stone]], [[Thunder Stone|ThunderStone]], or [[Fire Stone]] will cause it to evolve into {{p|Vaporeon}}, {{p|Jolteon}}, or {{p|Flareon}}, respectively. Any one will make a useful addition to your team, as they can cover your [[first partner Pokémon]]'s weakness. These [[Evolution stone|stones]] can only be purchased in the nearby Department Store. | |||
=== | ===Celadon Department Store=== | ||
The [[Celadon Department Store]] is the largest shop in [[Kanto]]. Nearly any item a Trainer could want can be found here. | |||
====2F==== | |||
The Trainer's Market is found on the second floor. Everyday items like [[Great Ball]]s and [[Super Potion]]s are offered here. | |||
{| | {| align="center" style="background: #88A; border: 3px solid #{{locationcolor/dark|building}}; {{roundy|15px}};" cellspacing="1" cellpadding="1" | ||
|- | |- valign="top" | ||
| | |||
{{shop|Left Cashier}} | |||
| | {{shoprow|{{shopitem|Great Ball|600}}|{{shopitem|Super Potion|700}}}} | ||
| | {{shoprow|{{shopitem|Revive|1500}}|{{shopitem|Antidote|100}}}} | ||
| {{ | {{shoprow|{{shopitem|Burn Heal|250}}|{{shopitem|Ice Heal|250}}}} | ||
| | {{shoprow|{{shopitem|Awakening|200}}|{{shopitem|Paralyze Heal|200|display=Parlyz Heal}}}} | ||
| | {{shoprow|{{shopitem|Super Repel|500}}}} | ||
| {{ | {{shopfooter}} | ||
| | | | ||
| | {{shop|Right Cashier}} | ||
| {{ | {{shoprow|{{shopitem|TM32|1000|PD||TM Normal|Double Team}}|{{shopitem|TM33|1000|PD||TM Psychic|Reflect}}}} | ||
| | {{shoprow|{{shopitem|TM02|2000|PD||TM Normal|Razor Wind}}|{{shopitem|TM07|2000|PD||TM Normal|Horn Drill}}}} | ||
| | {{shoprow|{{shopitem|TM37|2000|PD||TM Normal|Egg Bomb}}|{{shopitem|TM01|3000|PD||TM Normal|Mega Punch}}}} | ||
| {{ | {{shoprow|{{shopitem|TM05|3000|PD||TM Normal|Mega Kick}}|{{shopitem|TM09|3000|PD||TM Normal|Take Down}}}} | ||
| | {{shoprow|{{shopitem|TM17|3000|PD||TM Fighting|Submission}}}} | ||
| | {{shopfooter}} | ||
|} | |} | ||
==== | ====3F==== | ||
The third floor holds the TV Game Shop, with various video games on display. There are no items for sale, but the clerk behind the counter gives out {{TM|18|Counter}}. | |||
====4F==== | |||
Wiseman Gifts is located on the fourth floor. The [[Evolution stone|stones]] that cause certain Pokémon to evolve can be purchased here. Be sure to pick up a [[Poké Doll]] or two, as they are useful for running from wild Pokémon. | |||
| | |||
{| align="center" | |||
{| | | | ||
| | {{shop|}} | ||
{{shoprow|{{shopitem|Poké Doll|1000}}|{{shopitem|Fire Stone|2100}}}} | |||
{{shoprow|{{shopitem|Thunder Stone|2100|display=ThunderStone}}|{{shopitem|Water Stone|2100}}}} | |||
| | {{shoprow|{{shopitem|Leaf Stone|2100}}}} | ||
| | {{shopfooter}} | ||
| {{ | |||
| | |||
| | |||
| {{ | |||
| | |||
| | |||
|} | |} | ||
==== | ====5F==== | ||
The Drug Store can be found on the fifth floor. [[Battle item]]s and [[vitamin]]s are offered here. | |||
{| align="center" style="background: #88A; border: 3px solid #{{locationcolor/dark|building}}; {{roundy|15px}};" cellspacing="1" cellpadding="1" | |||
|- valign="top" | |||
| | |||
{{shop|Left Cashier}} | |||
{{shoprow|{{shopitem|HP Up|9800}}|{{shopitem|Protein|9800}}}} | |||
{{shoprow|{{shopitem|Iron|9800}}|{{shopitem|Calcium|9800}}}} | |||
{{shoprow|{{shopitem|Carbos|9800}}}} | |||
{{shopfooter}} | |||
| | |||
{{shop|Right Cashier}} | |||
{{shoprow|{{shopitem|X Attack|500}}|{{shopitem|X Defense|display=X Defend|550}}}} | |||
{{shoprow|{{shopitem|X Speed|350}}|{{shopitem|X Sp. Atk|350|display=X Special}}}} | |||
{{shoprow|{{shopitem|X Accuracy|950}}|{{shopitem|Guard Spec.|700}}}} | |||
{{shoprow|{{shopitem|Dire Hit|650}}}} | |||
{{shopfooter}} | |||
|} | |||
=== | ====Rooftop Square==== | ||
The Rooftop Square houses a picnic area and several [[vending machine]]s. Each machine offers [[Fresh Water]], [[Soda Pop]], and [[Lemonade]]. If you purchase one of each [[drink]] for the little girl nearby, she rewards you with {{TM|13|Ice Beam}}, {{TM|48|Rock Slide}}, and {{TM|49|Tri Attack}}, respectively. | |||
[[ | Be sure to pick up an extra drink for the [[Saffron City]] gatekeepers, as well. | ||
{| | {| align="center" | ||
| | | | ||
{{shop|[[Vending machine]]}} | |||
{{shoprow|{{shopitem|Fresh Water|200}}|{{shopitem|Soda Pop|300}}}} | |||
{{shoprow|{{shopitem|Lemonade|350}}|}} | |||
| | {{shopfooter}} | ||
|} | |} | ||
===Celadon Gym=== | |||
[[File:Celadon Gym RBY.png|thumb|Celadon Gym]] | |||
| | |||
| | |||
{{sign|RBY|header}} | {{sign|RBY|header}} | ||
{{sign|RBY|CELADON CITY | {{sign|RBY|title|CELADON CITY POKéMON GYM<br>LEADER: ERIKA}} | ||
{{sign|RBY|The Nature Loving Princess!}} | {{sign|RBY|The Nature Loving Princess!}} | ||
{{sign|RBY|footer}} | {{sign|RBY|footer}} | ||
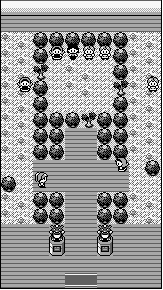
The [[Celadon Gym]] specializes in {{type|Grass}} Pokémon. This type is generally vulnerable against {{t|Fire}}-, {{t|Ice}}-, {{t|Flying}}-, {{t|Poison}}-, and {{type|Bug}} attacks. Most Pokémon inside are also part-Poison, which leaves them exposed to {{t|Psychic}} moves, as well. {{t|Water}}, {{t|Rock}}, and {{t|Ground}} Pokémon are best kept on the sidelines. Grass Pokémon tend to harass their target with status ailments, so it is a good idea to bring healing items like [[Antidote]], [[Paralyze Heal|Parlyz Heal]], and [[Awakening]]. Once the first few Gym Trainers have been defeated, have a Pokémon use {{m|Cut}} on one of the small trees to reach the clearing with the Gym Leader. | |||
{| | {| align="center" | ||
|- style="background: #{{grass color}};" | |- align="center" valign="top" | ||
! | | | ||
{| align="center" style="background: #{{grass color}}; {{roundy}}; border: 5px solid #{{grass color light}};" | |||
|- align="center" | |||
| | ! Celadon Gym<br>[[File:Rainbow Badge.png|35px|Rainbow Badge]]<br><br> | ||
| | |- | ||
| | | | ||
{| align="center" class="expandable" style="background: #{{grass color}}; {{roundy}}; border: 5px solid #{{grass color light}};" | |||
| | |- align="center" | ||
| | ! Trainers | ||
| | |- | ||
| | |||
| | {{Trainerheader|Grass}} | ||
| Beauty | {{Trainerentry|Spr RG Lass.png|game=1|Lass||345|2|069|Bellsprout||23|None|070|Weepinbell||23|None}} | ||
| | {{Trainerdiv|Grass}} | ||
{{Trainerentry|Spr RG Beauty.png|game=1|Beauty||1470|4|043|Oddish||21|None|069|Bellsprout||21|None|043|Oddish||21|None|069|Bellsprout||21|None}} | |||
| | {{Trainerdiv|Grass}} | ||
| | {{Trainerentry|Spr RG Beauty.png|game=1|Beauty||1680|2|069|Bellsprout||24|None|069|Bellsprout||24|None}} | ||
| | {{Trainerdiv|Grass}} | ||
| {{ | {{Trainerentry|Spr RG Jr Trainer F.png|game=1|Jr. Trainer♀||480|2|001|Bulbasaur||24|None|002|Ivysaur||24|None}} | ||
| | {{catch/div|Grass|Requires {{color2|000|Cut (move)|Cut}}}} | ||
| | {{Trainerentry|Spr RG Beauty.png|game=1|Beauty||1820|1|102|Exeggcute||26|None}} | ||
| | {{Trainerdiv|Grass}} | ||
{{Trainerentry|Spr RG Cooltrainer F.png|game=1|Cooltrainer||840|3|070|Weepinbell||24|None|044|Gloom||24|None|002|Ivysaur||24|None}} | |||
| | {{Trainerdiv|Grass}} | ||
| Lass | {{Trainerentry|Spr RG Lass.png|game=1|Lass||345|2|043|Oddish||23|None|044|Gloom||23|None}} | ||
| | {{Trainerfooter|Grass|1|inside}} | ||
| | |||
| | |||
| | |||
| | |||
|} | |} | ||
{| style="margin: auto;" | |||
| | |||
{{Party/Single | |||
|color={{grass color}} | |||
|headcolor={{grass color light}} | |||
|bordercolor={{grass color dark}} | |||
|sprite=Spr RG Erika.png | |||
|prize={{pdollar}}2871 | |||
|name={{color2|000|Erika}} | |||
|game=RGB | |||
|location=Celadon Gym | |||
|pokemon=3}} | |||
|{{Pokémon/1 | |||
|game=Red | |||
{{ | |ndex=071 | ||
|pokemon=Victreebel | |||
|level=29 | |||
|type1=Grass|type2=Poison | |||
|move1=Razor Leaf|move1type=Grass | |||
|move2=Wrap|move2type=Normal | |||
|move3=PoisonPowder|move3type=Poison | |||
|move4=Sleep Powder|move4type=Grass}} | |||
|{{Pokémon/1 | |||
|game=Red | |||
|ndex=114 | |||
|pokemon=Tangela | |||
|level=24 | |||
|type1=Grass | |||
|move1=Constrict|move1type=Normal | |||
|move2=Bind|move2type=Normal}} | |||
|{{Pokémon/1 | |||
|game=Red | |||
|ndex=045 | |||
|pokemon=Vileplume | |||
|level=29 | |||
|type1=Grass|type2=Poison | |||
|move1=Petal Dance|move1type=Grass | |||
|move2=PoisonPowder|move2type=Poison | |||
|move3=Mega Drain|move3type=Grass | |||
|move4=Sleep Powder|move4type=Grass}} | |||
{{Party/Footer}} | |||
|} | |||
|} | |||
|} | |||
After the battle, [[Erika]] awards you the {{badge|Rainbow}}, which ensures obedience from all Pokémon up to level 50 and enables the use of {{m|Strength}} in the field. She also gives you {{TM|21|Mega Drain}} as a prize. | |||
===Fickle Fortune=== | |||
Stop by the restaurant on the city's south side and talk to the man near the back wall. A string of bad luck at the slot machines has cost him all of his money, so he has no more use for his [[Coin Case]] and gives it to you. | |||
===Shady Dealings=== | |||
Several [[Team Rocket]] Grunts can be seen loitering around the city. Next door to the restaurant, there are workers organizing the transport of 2,000 Pokémon every month to the Game Corner to be used as prizes. Numbers like that mean money, and are sure to draw Team Rocket's attention. Whatever the group may be involved in, as one of the workers points out, it surely has nothing to do with a hidden switch in the Game Corner. | |||
== | ===Game Corner=== | ||
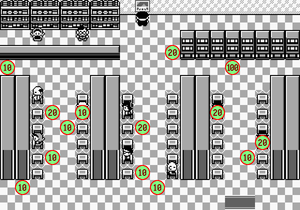
[[File:Game corner coins gen1.png|thumb|Locations of hidden coins]] | |||
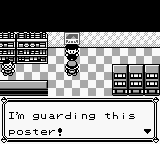
[[File:Game Corner Poster RBY.png|thumb|Confronting the Rocket]] | |||
The prizes offered next door are expensive, so it will require a large number of coins to receive all of them. Coins may be purchased at the counter in sets of 50 for {{pdollar}}1,000 each. Others can be obtained by speaking with other patrons, and even more can be found dropped on the ground. | |||
{| class="expandable" {{ | {| class="expandable" align="center" style="background: #{{locationcolor/med|building}}; {{roundy}}; border: 5px solid #{{locationcolor/light|building}};" | ||
| | |- align="center" | ||
! Items | |||
|- | |||
|- | | | ||
| [[ | {{itlisth|building}} | ||
| | {{Itemlist|Coin Case|From the {{tc|Fisherman}}|R=yes|B=yes|display=10 {{OBP|Coin|Game Corner}}s}} | ||
|- | {{Itemlist|Coin Case|From the {{tc|Gentleman}}|R=yes|B=yes|display=20 {{OBP|Coin|Game Corner}}s}} | ||
{{Itemlist|Coin Case|From the {{tc|Scientist}}|R=yes|B=yes|display=20 {{OBP|Coin|Game Corner}}s}} | |||
{{Itemlist|Coin Case|One tile to the north and two tiles to the east of the right-hand side of the top of the third cluster of slot machines from the west ''(hidden)''|R=yes|B=yes|display=100 {{OBP|Coin|Game Corner}}s}} | |||
{{Itemlist|Coin Case|One tile to the east of the second slot machine from the bottom of the first cluster of slot machines from the west ''(hidden)''|R=yes|B=yes|display=10 {{OBP|Coin|Game Corner}}s}} | |||
{{Itemlist|Coin Case|Two tiles to the north of the top slot machine on the left side of the second cluster of slot machines from the east ''(hidden)''|R=yes|B=yes|display=20 {{OBP|Coin|Game Corner}}s}} | |||
{{Itemlist|Coin Case|One tile south and one tile east of the [[Gym guide]] in the center aisle of slot machines ''(hidden)''|R=yes|B=yes|display=10 {{OBP|Coin|Game Corner}}s}} | |||
{{Itemlist|Coin Case|Two tiles south and two tiles east from the Gym guide ''(hidden)''|R=yes|B=yes|display=10 {{OBP|Coin|Game Corner}}s}} | |||
{{Itemlist|Coin Case|One tile west and one tile south of the Gentleman in the east-most aisle ''(hidden)''|R=yes|B=yes|display=10 {{OBP|Coin|Game Corner}}s}} | |||
{{Itemlist|Coin Case|One tile south and one tile east of the woman in the center aisle ''(hidden)''|R=yes|B=yes|display=20 {{OBP|Coin|Game Corner}}s}} | |||
{{Itemlist|Coin Case|One tile south and one tile east of the woman in the west-most aisle ''(hidden)''|R=yes|B=yes|display=10 {{OBP|Coin|Game Corner}}s}} | |||
{{Itemlist|Coin Case|Two tiles west of the Fisherman ''(hidden)''|R=yes|B=yes|display=20 {{OBP|Coin|Game Corner}}s}} | |||
{{Itemlist|Coin Case|One tile south and one tile west of the Fisherman ''(hidden)''|R=yes|B=yes|display=10 {{OBP|Coin|Game Corner}}s}} | |||
{{Itemlist|Coin Case|Between the counter and the west-most cluster of slot machines ''(hidden)''|R=yes|B=yes|display=10 {{OBP|Coin|Game Corner}}s}} | |||
{{itlistfoot|building}} | |||
|} | |} | ||
====A Secret Switch?==== | |||
Nothing seems out of the ordinary at first, but there is something off about the {{tc|Team Rocket Grunt|man in black}} who is fixated on a poster on the back wall. When you try to speak to him, he picks a fight with you. Defeat his two Pokémon and he retreats, leaving the poster unguarded. Inspect it to find a secret switch hidden underneath; press this switch and a hidden door opens to the right, revealing a secret stairway leading underground. | |||
===Prize Corner=== | |||
{| | {| align="center" style="background: #88A; border: 3px solid #{{locationcolor/dark|building}}; {{roundy|15px}};" cellspacing="1" cellpadding="1" | ||
|- | |- valign="top" | ||
| | |||
{{shop|Left Window{{sup/1|R}}}} | |||
{{shoprow|{{shopmon|Abra|063|180|lv=9}}|{{Shopmon|Clefairy|035|500|lv=8}}}} | |||
| | {{shoprow|{{shopmon|Nidorina|030|1200|lv=17}}}} | ||
| | {{shopfooter}} | ||
| | {{shop|Left Window{{sup/1|B}}}} | ||
| {{ | {{shoprow|{{shopmon|Abra|063|120|lv=6}}|{{Shopmon|Clefairy|035|750|lv=12}}}} | ||
{{shoprow|{{shopmon|Nidorino|033|1200|lv=17}}}} | |||
{{shopfooter}} | |||
| | |||
{{shop|Middle Window{{sup/1|R}}}} | |||
{{shoprow|{{shopmon|Dratini|147|2800|lv=18}}|{{shopmon|Scyther|123|5500|lv=25}}}} | |||
{{shoprow|{{shopmon|Porygon|137|9999|lv=26}}}} | |||
{{shopfooter}} | |||
{{shop|Middle Window{{sup/1|B}}}} | |||
{{shoprow|{{shopmon|Pinsir|127|2500|lv=20}}|{{shopmon|Dratini|147|4600|lv=24}}}} | |||
{{shoprow|{{shopmon|Porygon|137|6500|lv=18}}}} | |||
{{shopfooter}} | |||
| | |||
{{shop|Right Window}} | |||
{{shoprow|{{shopitem|TM23|3300|C||TM Dragon|Dragon Rage}}|{{shopitem|TM15|5500|C||TM Normal|Hyper Beam}}}} | |||
{{shoprow|{{shopitem|TM50|7700|C||TM Normal|Substitute}}}} | |||
{{shopfooter}} | |||
|} | |} | ||
===Rocket Hideout=== | |||
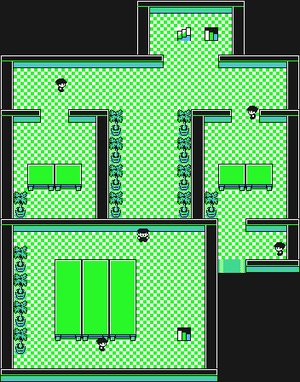
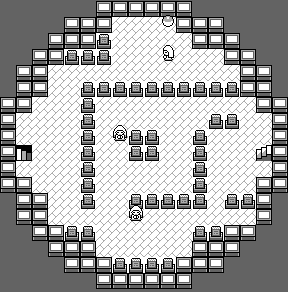
[[File:Rocket Hideout B1F RBY.png|thumb|Rocket Hideout, B1F]] | |||
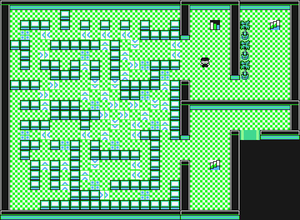
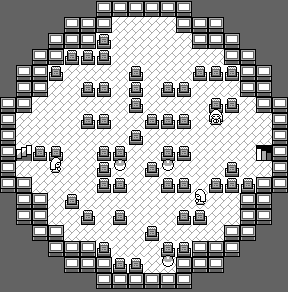
[[File:Rocket Hideout B2F RBY.png|thumb|Rocket Hideout, B2F]] | |||
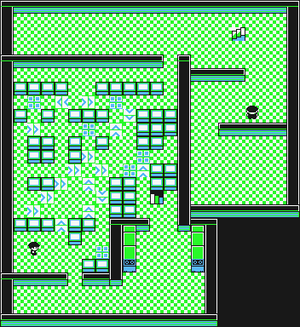
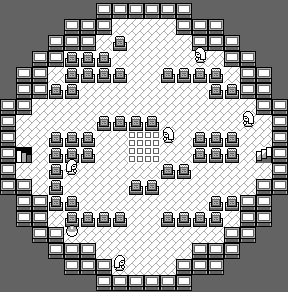
[[File:Rocket Hideout B3F RBY.png|thumb|Rocket Hideout, B3F]] | |||
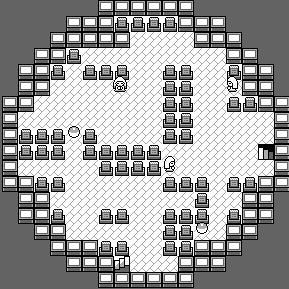
[[File:Rocket Hideout B4F RBY.png|thumb|Rocket Hideout, B4F]] | |||
The [[Team Rocket Hideout]] is a secret underground complex used by the group as their base of operations. Rumors point to a [[Silph Scope|certain item]] being located somewhere in {{ci|Celadon}} that can identify the ghosts of [[Pokémon Tower]]. It would not be surprising for [[Team Rocket]] to have acquired an item as valuable as this, so be sure to take it back if you can find it! | |||
{| class="expandable" align="center" style="background: #{{locationcolor/med|building}}; {{roundy}}; border: 5px solid #{{locationcolor/light|building}};" | |||
{| class="expandable" {{ | |- align="center" | ||
|- style="background: #{{ | ! Trainers | ||
! | |- | ||
| | |||
{| class="expandable" align="center" style="background: #{{locationcolor/med|building}}; {{roundy}}; border: 5px solid #{{locationcolor/light|building}};" | |||
| | |- align="center" | ||
| Rocket | ! B1F | ||
| | |- | ||
| {{ | | | ||
|- | {{Trainerheader|building}} | ||
| Rocket | {{Trainerentry|Spr RG Rocket.png|game=1|Rocket||630|2|096|Drowzee||21|None|066|Machop||21|None|}} | ||
| | {{Trainerdiv|building}} | ||
{{Trainerentry|Spr RG Rocket.png|game=1|Rocket||630|2|020|Raticate||21|None|020|Raticate||21|None|}} | |||
{{catch/div|building|South, via stairs from B2F}} | |||
{{Trainerentry|Spr RG Rocket.png|Rocket||570|4|019|game=1|Rattata||19|None|020|Raticate||19|None|020|Raticate||19|None|019|Rattata||19|None|}} | |||
{{Trainerdiv|building}} | |||
{{Trainerentry|Spr RG Rocket.png|game=1|Rocket||600|3|088|Grimer||20|None|109|Koffing||20|None|109|Koffing||20|None|}} | |||
{{catch/div|building|Southeast, requires Lift Key}} | |||
{{Trainerentry|Spr RG Rocket.png|game=1|Rocket||660|2|088|Grimer||22|None|109|Koffing||22|None|}} | |||
{{Trainerfooter|building|1}} | |||
|} | |||
{| class="expandable" align="center" style="background: #{{locationcolor/med|building}}; {{roundy}}; border: 5px solid #{{locationcolor/light|building}};" | |||
|- align="center" | |||
! B2F | |||
|- | |||
| | |||
{{Trainerheader|building}} | |||
{{Trainerentry|Spr RG Rocket.png|game=1|Rocket||510|5|041|Zubat||17|None|109|Koffing||17|None|088|Grimer||17|None|041|Zubat||17|None|020|Raticate||17|None|}} | |||
{{Trainerfooter|building|1}} | |||
|} | |||
{| class="expandable" align="center" style="background: #{{locationcolor/med|building}}; {{roundy}}; border: 5px solid #{{locationcolor/light|building}};" | |||
|- align="center" | |||
! B3F | |||
|- | |||
| | |||
{{Trainerheader|building}} | |||
{{Trainerentry|Spr RG Rocket.png|game=1|Rocket||630|2|066|Machop||21|None|066|Machop||21|None|}} | |||
{{Trainerdiv|building}} | |||
{{Trainerentry|Spr RG Rocket.png|game=1|Rocket||600|3|019|Rattata||20|None|020|Raticate||20|None|096|Drowzee||20|None|}} | |||
{{Trainerfooter|building|1}} | |||
|} | |} | ||
{| class="expandable" align="center" style="background: #{{locationcolor/med|building}}; {{roundy}}; border: 5px solid #{{locationcolor/light|building}};" | |||
|- align="center" | |||
! B4F | |||
|- | |||
| | |||
{{Trainerheader|building}} | |||
{| class="expandable" {{ | {{Trainerentry|Spr RG Rocket.png|game=1|Rocket||630|2|109|Koffing||21|None|041|Zubat||21|None|}} | ||
|- style="background: #{{ | {{catch/div|building|Southeast, requires Lift Key}} | ||
! | {{Trainerentry|Spr RG Rocket.png|game=1|Rocket||690|3|027|Sandshrew||23|None|023|Ekans||23|None|028|Sandslash||23|None|}} | ||
{{Trainerdiv|building}} | |||
{{Trainerentry|Spr RG Rocket.png|game=1|Rocket||690|3|023|Ekans||23|None|027|Sandshrew||23|None|024|Arbok||23|None|}} | |||
|- | {{Trainerfooter|building|1}} | ||
| | |} | ||
| | |} | ||
| {{ | {| class="expandable" align="center" style="background: #{{locationcolor/med|building}}; {{roundy}}; border: 5px solid #{{locationcolor/light|building}};" | ||
|- | |- align="center" | ||
| Rocket | ! Items | ||
| | |- | ||
| {{ | | | ||
{| class="expandable" align="center" style="background: #{{locationcolor/med|building}}; {{roundy}}; border: 5px solid #{{locationcolor/light|building}};" | |||
|- align="center" | |||
! B1F | |||
|- | |||
| | |||
{{itlisth|building}} | |||
{{Itemlist|PP Up|North; in the southeastern-most planter ''(hidden)''|R=yes|B=yes}} | |||
{{Itemlist|Escape Rope|North; in the western room|R=yes|B=yes}} | |||
{{Itemlist|Hyper Potion|East; in the room reached via B2F|R=yes|B=yes}} | |||
{{itlistfoot|building}} | |||
|} | |||
{| class="expandable" align="center" style="background: #{{locationcolor/med|building}}; {{roundy}}; border: 5px solid #{{locationcolor/light|building}};" | |||
|- align="center" | |||
! B2F | |||
|- | |||
| | |||
{{itlisth|building}} | |||
{{Itemlist|Nugget|Spinner maze, northeast corner|R=yes|B=yes}} | |||
{{Itemlist|Moon Stone|Spinner maze, near the west wall|R=yes|B=yes}} | |||
{{Itemlist|TM Normal|Spinner maze, near the middle|R=yes|B=yes|display={{TM|07|Horn Drill}}}} | |||
{{Itemlist|Super Potion|Spinner maze, southwest area|R=yes|B=yes}} | |||
{{itlistfoot|building}} | |||
|} | |||
{| class="expandable" align="center" style="background: #{{locationcolor/med|building}}; {{roundy}}; border: 5px solid #{{locationcolor/light|building}};" | |||
|- align="center" | |||
! B3F | |||
|- | |||
| | |||
{{itlisth|building}} | |||
{{Itemlist|TM Normal|East-central room|R=yes|B=yes|display={{TM|10|Double-Edge}}}} | |||
{{Itemlist|Nugget|East-central room ''(hidden)''|R=yes|B=yes}} | |||
{{Itemlist|Rare Candy|Spinner maze, east side|R=yes|B=yes}} | |||
{{itlistfoot|building}} | |||
|} | |||
{| class="expandable" align="center" style="background: #{{locationcolor/med|building}}; {{roundy}}; border: 5px solid #{{locationcolor/light|building}};" | |||
|- align="center" | |||
! B4F | |||
|- | |||
| | |||
{{itlisth|building}} | |||
{{Itemlist|HP Up|Northwest; on a table in the west-central room|R=yes|B=yes}} | |||
{{Itemlist|TM Normal|Northwest; in the northwest room|R=yes|B=yes|display={{TM|02|Razor Wind}}}} | |||
{{Itemlist|Lift Key III|Northwest; dropped by the Rocket Grunt, after defeating him and speaking to him|R=yes|B=yes|display=[[Lift Key]]}} | |||
{{Itemlist|Iron|Southeast; on a table to the west of the elevator|R=yes|B=yes}} | |||
{{Itemlist|Silph Scope III|Southeast; dropped by Giovanni after his defeat and disappearance|R=yes|B=yes|display=[[Silph Scope]]}} | |||
{{Itemlist|Super Potion|Southeast; on the machine behind Giovanni ''(hidden)''|R=yes|B=yes}} | |||
{{itlistfoot|building}} | |||
|} | |} | ||
|} | |} | ||
====B1F (North)==== | |||
Visit the western room to get an [[Escape Rope]], then take the stairs down to B2F. | |||
====B2F==== | |||
[[ | Go west to fight the next Team Rocket Grunt. Further west is a maze of [[spinner tile]]s meant to thwart any intruders; step on one of these arrow tiles to be sent spinning until you reach a stopper tile. | ||
Enter the maze and follow the spinner tiles to the stopper tile in the northwest. Backtrack carefully to reach a [[Nugget]] in the northeast corner. Collect the [[Moon Stone]], {{TM|07|Horn Drill}}, and [[Super Potion]] on the way southward. Step on the southernmost spinner tile to reach the maze exit and climb the stairs to the east. | |||
====B1F (West)==== | |||
Battle the two Rocket Grunts here and pick up the [[Hyper Potion]]. | |||
====B2F==== | |||
Backtrack through the east side of the maze and head down the stairs to the northeast. | |||
====B3F==== | |||
Go south past the lone Rocket Grunt to reach {{TM|10|Double-Edge}}, then head west to enter the second maze of spinner tiles. Collect the [[Rare Candy]] on the way southward, then battle another Rocket Grunt and go downstairs. | |||
====B4F (Northwest)==== | |||
On this first visit to B4F, it is only possible to reach the two rooms on the west side. Pick up the [[HP Up]] on a table to the south, then visit the northwest room. Pick up {{TM|02|Razor Wind}} and battle the nearby Rocket Grunt. Talk to him afterward and he drops the [[Lift Key]], which operates the elevator in the southeast part of the complex. | |||
Climb back up to B2F and make your way through the larger maze again to reach the elevator. Take it down to B4F. | |||
====B4F (Southeast)==== | |||
Exit the elevator and go west to reach an [[Iron]]. Defeat the last two Rocket Grunts and the electronic door that they are guarding opens. Step inside to confront the Rocket boss. | |||
=====VS Giovanni===== | |||
Both [[Giovanni]]'s {{p|Onix}} and {{p|Rhyhorn}} take massive damage from {{t|Grass}} and {{t|Water}} attacks. His {{p|Kangaskhan}} takes serious damage only from {{t|Fighting}} moves. Avoid using attacking moves if Onix or Kangaskhan use {{m|Rage}}, as it boosts their {{stat|Attack}} every time they take damage. | |||
{| | {| style="margin: auto;" | ||
| | | | ||
{{Party/Single | |||
|color=666666 | |||
|bordercolor=CC0000 | |||
| | |headcolor=CCCCCC | ||
| | |sprite=Spr RG Giovanni.png | ||
| | |prize={{PDollar}}2871 | ||
| {{ | |name={{color2|000|Giovanni}} | ||
|game=RGB | |||
|location=Team Rocket Hideout | |||
|locationname=Rocket Hideout | |||
|pokemon=3}} | |||
|{{Pokémon/1 | |||
|game=Red and Blue | |||
|ndex=095 | |||
|pokemon=Onix | |||
|level=25 | |||
|type1=Rock|type2=Ground | |||
|move1=Screech|move1type=Normal | |||
|move2=Bind|move2type=Normal | |||
|move3=Rock Throw|move3type=Rock | |||
|move4=Rage|move4type=Normal}} | |||
|{{Pokémon/1 | |||
|game=Red and Blue | |||
|ndex=111 | |||
|pokemon=Rhyhorn | |||
|level=24 | |||
|type1=Ground|type2=Rock | |||
|move1=Horn Attack|move1type=Normal}} | |||
|{{Pokémon/1 | |||
|game=Red and Blue | |||
|ndex=115 | |||
|pokemon=Kangaskhan | |||
|level=29 | |||
|type1=Normal | |||
|move1=Comet Punch|move1type=Normal | |||
|move2=Rage|move2type=Normal | |||
|move3=Bite|move3type=Normal}} | |||
{{Party/Footer}} | |||
|} | |} | ||
[[Giovanni]] cannot believe that he lost, but acknowledges that you raise your Pokémon with great care. He says that a child like you could never understand his goals, then he and most of the other Rockets disappear. Be sure to pick up the [[Silph Scope]] that he leaves behind. Ride the elevator to B1F and battle one last Rocket Grunt on the way out. | |||
===Over/Under=== | |||
If you still have an extra [[drink]] on hand, you can pass through [[Saffron City]] on the way back to [[Pokémon Tower]]. Enter Saffron's west gate and the guard sees that you have a beverage. If you give it to him, he shares it with the other three guards which now allows you to reach the city from any direction. Travel eastward through the city to return to {{rt|8|Kanto}} and [[Lavender Town]]. | |||
If not, take the [[Underground Path (Kanto Routes 7-8)|Underground Path]] back to {{rt|8|Kanto}} and continue eastward. | |||
=== Pokémon Tower === | ==Lavender Town== | ||
===Pokémon Tower=== | |||
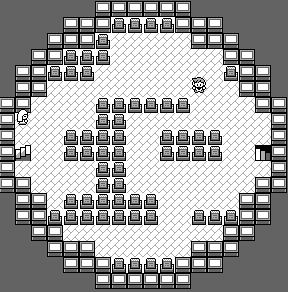
[[File:Pokémon Tower 2F RBY.png|thumb|Pokémon Tower, 2F]] | |||
[[File:Pokémon Tower 3F RBY.png|thumb|Pokémon Tower, 3F]] | |||
[[File:Pokémon Tower 4F RBY.png|thumb|Pokémon Tower, 4F]] | |||
[[File:Pokémon Tower 5F RBY.png|thumb|Pokémon Tower, 5F]] | |||
[[File:Pokémon Tower 6F RBY.png|thumb|Pokémon Tower, 6F]] | |||
[[File:Pokémon Tower 7F RBY.png|thumb|Pokémon Tower, 7F]] | |||
The {{t|Ghost}} | The {{t|Ghost}} Pokémon of [[Pokémon Tower]] are immune to {{t|Normal}}- and {{type|Fighting}} attacks, but as they are also {{t|Poison}} type, they are vulnerable to {{t|Psychic}} attacks. The spirits can be relentless, so it may be useful to bring a supply of Repels and Poké Dolls along to avoid them as much as possible. There are still many possessed Channelers here as well, so be sure to bring some Super Potions along. | ||
{| class="expandable" align="center" style="background: #{{ghost color}}; {{roundy}}; border: 5px solid #{{ghost color light}};" | |||
|- align="center" | |||
! Trainers | |||
|- | |||
| | |||
{| class="expandable" align="center" style="background: #{{ghost color}}; {{roundy}}; border: 5px solid #{{ghost color light}};" | |||
|- align="center" | |||
! 3F | |||
|- | |||
| | |||
{{trainerheader|ghost}} | |||
{{trainerentry|Spr RG Channeler.png|game=1|Channeler||690|1|092|Gastly||23|||}} | |||
{{trainerdiv|ghost}} | |||
{{trainerentry|Spr RG Channeler.png|game=1|Channeler||660|1|092|Gastly||22|||}} | |||
{{trainerdiv|ghost}} | |||
{{trainerentry|Spr RG Channeler.png|game=1|Channeler||720|1|092|Gastly||24|||}} | |||
{{trainerfooter|ghost|1}} | |||
|} | |||
{| class="expandable" align="center" style="background: #{{ghost color}}; {{roundy}}; border: 5px solid #{{ghost color light}};" | |||
|- align="center" | |||
! 4F | |||
|- | |||
| | |||
{{trainerheader|ghost}} | |||
{{trainerentry|Spr RG Channeler.png|game=1|Channeler||690|2|092|Gastly||23||092|Gastly||23|||}} | |||
{{trainerdiv|ghost}} | |||
{{trainerentry|Spr RG Channeler.png|game=1|Channeler||660|1|092|Gastly||22|||}} | |||
{{trainerdiv|ghost}} | |||
{{trainerentry|Spr RG Channeler.png|game=1|Channeler||720|1|092|Gastly||24|||}} | |||
{{trainerfooter|ghost|1}} | |||
|} | |||
{| class="expandable" align="center" style="background: #{{ghost color}}; {{roundy}}; border: 5px solid #{{ghost color light}};" | |||
|- align="center" | |||
! 5F | |||
|- | |||
| | |||
{{trainerheader|ghost}} | |||
{{trainerentry|Spr RG Channeler.png|game=1|Channeler||660|1|092|Gastly||22|||}} | |||
{{trainerdiv|ghost}} | |||
{{trainerentry|Spr RG Channeler.png|game=1|Channeler||690|1|093|Haunter||23|||}} | |||
{{trainerdiv|ghost}} | |||
{{trainerentry|Spr RG Channeler.png|game=1|Channeler||720|1|092|Gastly||24|||}} | |||
{{trainerdiv|ghost}} | |||
{{trainerentry|Spr RG Channeler.png|game=1|Channeler||660|1|093|Haunter||22|||}} | |||
{{trainerfooter|ghost|1}} | |||
|} | |||
{| class="expandable" align="center" style="background: #{{ghost color}}; {{roundy}}; border: 5px solid #{{ghost color light}};" | |||
|- align="center" | |||
! 6F | |||
|- | |||
| | |||
{{trainerheader|ghost}} | |||
{{trainerentry|Spr RG Channeler.png|game=1|Channeler||660|3|092|Gastly||22||092|Gastly||22||092|Gastly||22|||}} | |||
{{trainerdiv|ghost}} | |||
{{trainerentry|Spr RG Channeler.png|game=1|Channeler||720|1|092|Gastly||24|||}} | |||
{{trainerdiv|ghost}} | |||
{{trainerentry|Spr RG Channeler.png|game=1|Channeler||720|1|092|Gastly||24|||}} | |||
{{trainerfooter|ghost|1}} | |||
|} | |||
{| class="expandable" align="center" style="background: #{{ghost color}}; {{roundy}}; border: 5px solid #{{ghost color light}};" | |||
|- align="center" | |||
! 7F | |||
|- | |||
| | |||
{{trainerheader|ghost}} | |||
{{trainerentry|Spr RG Rocket.png|game=1|Rocket||750|3|041|Zubat||25||041|Zubat||25||042|Golbat||25|||}} | |||
{{trainerdiv|ghost}} | |||
{{trainerentry|Spr RG Rocket.png|game=1|Rocket||780|2|109|Koffing||26||096|Drowzee||26|||}} | |||
{{trainerdiv|ghost}} | |||
{{trainerentry|Spr RG Rocket.png|game=1|Rocket||690|4|041|Zubat||23||019|Rattata||23||020|Raticate||23||041|Zubat||23|||}} | |||
{{trainerfooter|ghost|1}} | |||
|} | |||
|} | |||
{| class="expandable" align="center" style="background: #{{ghost color}}; {{roundy}}; border: 5px solid #{{ghost color light}};" | |||
|- align="center" | |||
! Available Pokémon | |||
|- | |||
| | |||
{| class="expandable" align="center" style="background: #{{ghost color}}; {{roundy}}; border: 5px solid #{{ghost color light}};" | |||
|- align="center" | |||
! 3F | |||
|- | |||
| | |||
{{catch/header|ghost|no}} | |||
{{catch/entry1|092|Gastly|yes|yes|no|3F|18-24|90%|type1=ghost|type2=poison}} | |||
{{catch/entry1|104|Cubone|yes|yes|no|3F|20, 22|9%|type1=ground}} | |||
{{catch/entry1|093|Haunter|yes|yes|no|3F|25|1%|type1=ghost|type2=poison}} | |||
{{catch/footer|ghost}} | |||
|} | |||
{| class="expandable" align="center" style="background: #{{ghost color}}; {{roundy}}; border: 5px solid #{{ghost color light}};" | |||
|- align="center" | |||
! 4F | |||
|- | |||
| | |||
{{catch/header|ghost|no}} | |||
{{catch/entry1|092|Gastly|yes|yes|no|4F|18-24|86%|type1=ghost|type2=poison}} | |||
{{catch/entry1|104|Cubone|yes|yes|no|4F|20, 22|9%|type1=ground}} | |||
{{catch/entry1|093|Haunter|yes|yes|no|4F|25|5%|type1=ghost|type2=poison}} | |||
{{catch/footer|ghost}} | |||
|} | |||
{| class="expandable" align="center" style="background: #{{ghost color}}; {{roundy}}; border: 5px solid #{{ghost color light}};" | |||
|- align="center" | |||
! 5F | |||
|- | |||
| | |||
{{catch/header|ghost|no}} | |||
{{catch/entry1|092|Gastly|yes|yes|no|5F|18-24|86%|type1=ghost|type2=poison}} | |||
{{catch/entry1|104|Cubone|yes|yes|no|5F|20, 22|9%|type1=ground}} | |||
{{catch/entry1|093|Haunter|yes|yes|no|5F|25|5%|type1=ghost|type2=poison}} | |||
{{catch/footer|ghost}} | |||
|} | |||
{| class="expandable" align="center" style="background: #{{ghost color}}; {{roundy}}; border: 5px solid #{{ghost color light}};" | |||
|- align="center" | |||
! 6F | |||
|- | |||
| | |||
{{catch/header|ghost|no}} | |||
{{catch/entry1|092|Gastly|yes|yes|no|6F|19-24|85%|type1=ghost|type2=poison}} | |||
{{catch/entry1|104|Cubone|yes|yes|no|6F|22, 24|9%|type1=ground}} | |||
{{catch/entry1|093|Haunter|yes|yes|no|6F|26, 28|6%|type1=ghost|type2=poison}} | |||
{{catch/footer|ghost}} | |||
|} | |||
{| class="expandable" align="center" style="background: #{{ghost color}}; {{roundy}}; border: 5px solid #{{ghost color light}};" | |||
|- align="center" | |||
! 7F | |||
|- | |||
| | |||
{{catch/header|ghost|no}} | |||
{{catch/entry1|092|Gastly|yes|yes|no|7F|20-24|75%|type1=ghost|type2=poison}} | |||
{{catch/entry1|093|Haunter|yes|yes|no|7F|28, 30|15%|type1=ghost|type2=poison}} | |||
{{catch/entry1|104|Cubone|yes|yes|no|7F|22, 24|10%|type1=ground}} | |||
{{catch/footer|ghost}} | |||
|} | |||
|} | |||
{| class="expandable" align="center" style="background: #{{ghost color}}; {{roundy}}; border: 5px solid #{{ghost color light}};" | |||
|- align="center" | |||
! Items | |||
|- | |||
| | |||
{{itlisth|ghost}} | |||
{{catch/div|ghost|3F}} | |||
{{Itemlist|Escape Rope|Near the north wall|R=yes|B=yes}} | |||
{{catch/div|ghost|4F}} | |||
{{Itemlist|Elixir|West of the stairway from 3F|R=yes|B=yes|display=[[Elixir|Elixer]]}} | |||
{{Itemlist|Awakening|In the center of the room|R=yes|B=yes}} | |||
{{Itemlist|HP Up|Near the south wall|R=yes|B=yes}} | |||
{{catch/div|ghost|5F}} | |||
{{Itemlist|Elixir|Near the western stairway, on the southwest wall ''(hidden)''|R=yes|B=yes|display=[[Elixir|Elixer]]}} | |||
{{Itemlist|Nugget|Near the south wall|R=yes|B=yes}} | |||
{{catch/div|ghost|6F}} | |||
{{Itemlist|X Accuracy|Southwest of the stairway from 5F|R=yes|B=yes}} | |||
{{Itemlist|Rare Candy|West-central part of the room|R=yes|B=yes}} | |||
{{itlistfoot|ghost}} | |||
|} | |||
====2F==== | |||
=====Rival Battle 5===== | |||
By this point, {{ga|Blue}} has assembled a team that includes {{t|Grass}}, {{t|Fire}}, and {{t|Water}} Pokémon to cover his weaknesses. His [[first partner Pokémon]] takes the place of either {{p|Exeggcute}}, {{p|Growlithe}}, or {{p|Gyarados}}, whichever matches its type. His {{p|Pidgeotto}} still poses little threat, as it has no {{type|Flying}} moves and those it has are fairly weak. Exeggcute can induce {{status|Sleep}} with {{m|Hypnosis}}, so use [[Awakening]]s as necessary. Growlithe's {{m|Ember}} can deal a decent amount of damage and may cause a {{status|Burn}}. His Gyarados has the biggest offensive presence with {{m|Hydro Pump}}, so be sure to take it down quickly. {{p|Kadabra}} takes super effective damage only from {{t|Bug}} moves, but physical moves will wear it down as well. Blue's first Pokémon has grown to level 25 and learned some new moves, but it should not be too much to handle. Use super effective moves to send your rival packing and continue up the tower. | |||
| | |||
{{ | |||
{{ | |||
{{ | |||
{{ | |||
{{ | |||
{{ | |||
{{ | |||
{{ | |||
======{{MSP/6|001|Bulbasaur}} If the player chose {{p|Bulbasaur}}:====== | |||
{| style="margin: auto;" | |||
| | |||
{{Party/Single | |||
|color={{blue color}} | |||
|headcolor={{blue color light}} | |||
|bordercolor={{green color dark}} | |||
|sprite=Spr RG Blue 2.png | |||
|prize={{PDollar}}1625 | |||
|name=Blue | |||
|game=RGB | |||
|location=Pokémon Tower | |||
|pokemon=5 | |||
}} | |||
|{{Pokémon/1 | |||
|game=Blue | |||
|ndex=017 | |||
|pokemon=Pidgeotto | |||
|level=25 | |||
|type1=Normal | |||
|type2=Flying | |||
|move1=Gust | |||
|move1type=Normal | |||
|move1cat=Special | |||
|move2=Sand-Attack | |||
|move2type=Normal | |||
|move2cat=Special | |||
|move3=Quick Attack | |||
|move3type=Normal | |||
|move3cat=Physical | |||
|move4=Whirlwind | |||
|move4type=Normal | |||
|move4cat=Status}} | |||
|{{Pokémon/1 | |||
|game=Blue | |||
|ndex=102 | |||
|pokemon=Exeggcute | |||
|gender= | |||
|level=23 | |||
|type1=Grass | |||
|type2=Psychic | |||
|move1=Barrage | |||
|move1type=Normal | |||
|move1cat=Physical | |||
|move2=Hypnosis | |||
|move2type=Psychic | |||
|move2cat=Status}} | |||
|{{Pokémon/1 | |||
|game=Blue | |||
|ndex=130 | |||
|pokemon=Gyarados | |||
|gender= | |||
|level=22 | |||
|ability= | |||
|type1=Water | |||
|type2=Flying | |||
|move1=Leer | |||
|move1type=Normal | |||
|move1cat=Special | |||
|move2=Dragon Rage | |||
|move2type=Dragon | |||
|move2cat=Special | |||
|move3=Bite | |||
|move3type=Normal | |||
|move3cat=Physical | |||
|move4=Hydro Pump | |||
|move4type=Water | |||
|move4cat=Special}} | |||
{{Party/Div|color={{blue color}}}} | |||
| style="margin:auto" |{{Pokémon/1 | |||
|game=Blue | |||
|ndex=064 | |||
|pokemon=Kadabra | |||
|level=20 | |||
|type1=Psychic | |||
|move1=Teleport | |||
|move1type=Psychic | |||
|move1cat=Status | |||
|move2=Confusion | |||
|move2type=Psychic | |||
|move2cat=Special | |||
|move3=Disable | |||
|move3type=Normal | |||
|move3cat=Status}} | |||
| style="margin:auto" |{{Pokémon/1 | |||
|game=Blue | |||
|ndex=005 | |||
|pokemon=Charmeleon | |||
|level=25 | |||
|type1=Fire | |||
|move1=Growl | |||
|move1type=Normal | |||
|move1cat=Status | |||
|move2=Ember | |||
|move2type=Fire | |||
|move2cat=Special | |||
|move3=Leer | |||
|move3type=Normal | |||
|move3cat=Status | |||
|move4=Rage | |||
|move4type=Normal | |||
|move4cat=Physical}} | |||
{{Party/Footer}} | |||
|} | |||
======{{MSP/6|004|Charmander}} If the player chose {{p|Charmander}}:====== | |||
{| | {| style="margin: auto;" | ||
| | | | ||
{{Party/Single | |||
|color={{blue color}} | |||
|headcolor={{blue color light}} | |||
|- | |bordercolor={{green color dark}} | ||
| | |sprite=Spr RG Blue 2.png | ||
| | |prize={{PDollar}}1625 | ||
| {{ | |name=Blue | ||
| | |game=RGB | ||
| | |location=Pokémon Tower | ||
| | |pokemon=5 | ||
| {{ | }} | ||
| | |{{Pokémon/1 | ||
| | |game=Blue | ||
| | |ndex=017 | ||
| {{ | |pokemon=Pidgeotto | ||
|level=25 | |||
|type1=Normal | |||
|type2=Flying | |||
|move1=Gust | |||
|move1type=Normal | |||
|move1cat=Special | |||
|move2=Sand-Attack | |||
|move2type=Normal | |||
|move2cat=Special | |||
|move3=Quick Attack | |||
|move3type=Normal | |||
|move3cat=Physical | |||
|move4=Whirlwind | |||
|move4type=Normal | |||
|move4cat=Status}} | |||
|{{Pokémon/1 | |||
|game=Blue | |||
|ndex=058 | |||
|pokemon=Growlithe | |||
|level=23 | |||
|type1=Fire | |||
|move1=Bite | |||
|move1type=Normal | |||
|move1cat=Physical | |||
|move2=Roar | |||
|move2type=Normal | |||
|move2cat=Status | |||
|move3=Ember | |||
|move3type=Fire | |||
|move3cat=Special}} | |||
|{{Pokémon/1 | |||
|game=Blue | |||
|ndex=102 | |||
|pokemon=Exeggcute | |||
|gender= | |||
|level=22 | |||
|type1=Grass | |||
|type2=Psychic | |||
|move1=Barrage | |||
|move1type=Normal | |||
|move1cat=Physical | |||
|move2=Hypnosis | |||
|move2type=Psychic | |||
|move2cat=Status}} | |||
{{Party/Div|color={{blue color}}}} | |||
| style="margin:auto" |{{Pokémon/1 | |||
|game=Blue | |||
|ndex=064 | |||
|pokemon=Kadabra | |||
|level=20 | |||
|type1=Psychic | |||
|move1=Teleport | |||
|move1type=Psychic | |||
|move1cat=Status | |||
|move2=Confusion | |||
|move2type=Psychic | |||
|move2cat=Special | |||
|move3=Disable | |||
|move3type=Normal | |||
|move3cat=Status}} | |||
| style="margin:auto" |{{Pokémon/1 | |||
|game=Blue | |||
|ndex=008 | |||
|pokemon=Wartortle | |||
|level=25 | |||
|type1=Water | |||
|move1=Tail Whip | |||
|move1type=Normal | |||
|move1cat=Status | |||
|move2=Bubble | |||
|move2type=Water | |||
|move2cat=Special | |||
|move3=Water Gun | |||
|move3type=Water | |||
|move3cat=Special | |||
|move4=Bite | |||
|move4type=Normal | |||
|move4cat=Physical}} | |||
{{Party/Footer}} | |||
|} | |} | ||
======{{MSP/6|007|Squirtle}} If the player chose {{p|Squirtle}}:====== | |||
{| | {| style="margin: auto;" | ||
| | | | ||
{{Party/Single | |||
|color={{blue color}} | |||
|headcolor={{blue color light}} | |||
|- | |bordercolor={{green color dark}} | ||
| | |sprite=Spr RG Blue 2.png | ||
| | |prize={{PDollar}}1625 | ||
| {{ | |name=Blue | ||
| | |game=RGB | ||
| | |location=Pokémon Tower | ||
| | |pokemon=5 | ||
| | }} | ||
| | |{{Pokémon/1 | ||
| | |game=Blue | ||
| | |ndex=017 | ||
| | |pokemon=Pidgeotto | ||
| | |level=25 | ||
|type1=Normal | |||
| | |type2=Flying | ||
|move1=Gust | |||
|move1type=Normal | |||
| | |move1cat=Special | ||
| | |move2=Sand-Attack | ||
| | |move2type=Normal | ||
| | |move2cat=Special | ||
| | |move3=Quick Attack | ||
| | |move3type=Normal | ||
| | |move3cat=Physical | ||
| | |move4=Whirlwind | ||
| | |move4type=Normal | ||
|move4cat=Status}} | |||
|{{Pokémon/1 | |||
|game=Blue | |||
|ndex=130 | |||
|pokemon=Gyarados | |||
|gender= | |||
|level=23 | |||
|ability= | |||
|type1=Water | |||
|type2=Flying | |||
|move1=Leer | |||
|move1type=Normal | |||
|move1cat=Special | |||
|move2=Dragon Rage | |||
|move2type=Dragon | |||
|move2cat=Special | |||
|move3=Bite | |||
|move3type=Normal | |||
|move3cat=Physical | |||
|move4=Hydro Pump | |||
|move4type=Water | |||
|move4cat=Special}} | |||
|{{Pokémon/1 | |||
|game=Blue | |||
|ndex=058 | |||
|pokemon=Growlithe | |||
|level=22 | |||
|type1=Fire | |||
|move1=Bite | |||
|move1type=Normal | |||
|move1cat=Physical | |||
|move2=Roar | |||
|move2type=Normal | |||
|move2cat=Status | |||
|move3=Ember | |||
|move3type=Fire | |||
|move3cat=Special}} | |||
{{Party/Div|color={{blue color}}}} | |||
| style="margin:auto" |{{Pokémon/1 | |||
|game=Blue | |||
|ndex=064 | |||
|pokemon=Kadabra | |||
|level=20 | |||
|type1=Psychic | |||
|move1=Teleport | |||
|move1type=Psychic | |||
|move1cat=Status | |||
|move2=Confusion | |||
|move2type=Psychic | |||
|move2cat=Special | |||
|move3=Disable | |||
|move3type=Normal | |||
|move3cat=Status}} | |||
| style="margin:auto" |{{Pokémon/1 | |||
|game=Blue | |||
|ndex=002 | |||
|pokemon=Ivysaur | |||
|level=25 | |||
|type1=Grass | |||
|type2=Poison | |||
|move1=Growl | |||
|move1type=Normal | |||
|move1cat=Status | |||
|move2=Leech Seed | |||
|move2type=Grass | |||
|move2cat=Status | |||
|move3=Vine Whip | |||
|move3type=Grass | |||
|move3cat=Physical | |||
|move4=PoisonPowder | |||
|move4type=Poison | |||
|move4cat=Status}} | |||
{{Party/Footer}} | |||
|} | |} | ||
====3F==== | |||
Grab the [[Escape Rope]] by the north wall and climb the stairs to 4F. | |||
====4F==== | |||
Pick up the [[Elixir|Elixer]] and [[Awakening]] in the center of the room, and the [[HP Up]] near the south wall. Climb the western stairs. | |||
====5F==== | |||
A Channeler in the middle of the fifth floor has not been possessed and maintains a healing area with her white magic. When a Trainer enters this protected zone, all of their Pokémon will be fully healed. Battle another Channeler or two and grab the [[Nugget]] before taking the eastern stairs. | |||
====6F==== | |||
Collect the [[X Accuracy]] to the south, then northward past three more Channelers. Grab the [[Rare Candy]] in your path and proceed to the south stairway. As you approach, the {{OBP|Marowak|ghost|ghost}} attacks and the [[Silph Scope]] activates, revealing a level 30 {{p|Marowak}}. Unfortunately, this spirit cannot be caught and must be defeated. | |||
{| style="margin: auto;" | |||
{| | | | ||
{{Pokémon/1|game=Red | |||
|ndex=105|pokemon=Marowak | |||
|level=30 | |||
|type1=Ground | |||
|move1=Bone Club|move1type=Ground | |||
| | |move2=Growl|move2type=Normal | ||
|move3=Leer|move3type=Normal | |||
|move4=Focus Energy|move4type=Normal}} | |||
| | |||
| | |||
| | |||
| | |||
| | |||
| | |||
| | |||
| | |||
| | |||
| | |||
| | |||
|} | |} | ||
When the battle is over, the mother Marowak's spirit is calmed. Finally able to rest, she departs to the afterlife. | |||
Climb the final stairway to the seventh floor. | |||
== Mr. Fuji's | ====7F==== | ||
Defeat the three Rocket Grunts and speak to [[Mr. Fuji]]. He thanks you for calming Marowak's spirit and asks that you accompany him to his home, the Volunteer Pokémon House, at the foot of the tower. | |||
Speak | ===Mr. Fuji's house=== | ||
Speak to [[Mr. Fuji]] to receive the [[Poké Flute]] as thanks. This instrument awakens any {{status|Sleep|sleeping}} Pokémon who may hear its music. With this, you can finally wake the two {{p|Snorlax}} who have been blocking the way to southern [[Kanto]]. But first, head west to return to [[Saffron City]] and take on the next Gym. | |||
{{WalkthroughPrevNext | |||
|game=Red|game2=Blue | |||
|gamename=Red and Blue | |||
|prevsection=8 | |||
|prevname=Rock Tunnel, Route 10 (South), Lavender Town, Route 8, Route 7 | |||
|nextsection=10 | |||
|nextname=Saffron City, Silph Co., Saffron Gym | |||
}} | |||
[[Category:Red and Blue walkthrough]] | <br> | ||
{{Project Walkthroughs notice}} | |||
[[Category:Red and Blue walkthrough|R09]] | |||
Latest revision as of 20:45, 17 April 2024
These pages follow the original Game Boy iteration, not Pokémon FireRed and LeafGreen. The guide for those games can be found here.
Celadon City
Celadon City is located between Route 7 to the east and Route 16 to the west. The Celadon Department Store in the northwest offers all kinds of items for sale. The Celadon Mansion is a hotel, with a group known as Game Freak as its current occupants. Visitors can try their luck at the Game Corner in the heart of the city and redeem their winnings at the Prize Corner next door. The Celadon Gym stands on a hill in the southwest part of town.
| Trainers | ||||||||||||||||||||||||||||||||||
|---|---|---|---|---|---|---|---|---|---|---|---|---|---|---|---|---|---|---|---|---|---|---|---|---|---|---|---|---|---|---|---|---|---|---|
| ||||||||||||||||||||||||||||||||||
| Available Pokémon | ||||||||||||||||||||||||||||||||||||||||||||||||||||||||||||||||||||||||||||||||||||||||
|---|---|---|---|---|---|---|---|---|---|---|---|---|---|---|---|---|---|---|---|---|---|---|---|---|---|---|---|---|---|---|---|---|---|---|---|---|---|---|---|---|---|---|---|---|---|---|---|---|---|---|---|---|---|---|---|---|---|---|---|---|---|---|---|---|---|---|---|---|---|---|---|---|---|---|---|---|---|---|---|---|---|---|---|---|---|---|---|---|
| ||||||||||||||||||||||||||||||||||||||||||||||||||||||||||||||||||||||||||||||||||||||||
| Items | |||||||||||||||||||||||||||||||||||||||||||||||||||||||
|---|---|---|---|---|---|---|---|---|---|---|---|---|---|---|---|---|---|---|---|---|---|---|---|---|---|---|---|---|---|---|---|---|---|---|---|---|---|---|---|---|---|---|---|---|---|---|---|---|---|---|---|---|---|---|---|
| |||||||||||||||||||||||||||||||||||||||||||||||||||||||
Celadon Mansion
The tall building in the north part of town is Celadon Mansion. On the third floor, Game Freak's game designer promises a reward for showing him your completed Pokédex.
The Amazing Eevee
To further this goal of completing the Pokédex, leave an empty slot in your party and follow the path behind the Pokémon Center to find a break in the trees. Enter the mansion through the back door and climb to the top floor to obtain an Eevee. This Pokémon's unique genetic makeup allows it to evolve into one of several different forms. Exposure to a Water Stone, ThunderStone, or Fire Stone will cause it to evolve into Vaporeon, Jolteon, or Flareon, respectively. Any one will make a useful addition to your team, as they can cover your first partner Pokémon's weakness. These stones can only be purchased in the nearby Department Store.
Celadon Department Store
The Celadon Department Store is the largest shop in Kanto. Nearly any item a Trainer could want can be found here.
2F
The Trainer's Market is found on the second floor. Everyday items like Great Balls and Super Potions are offered here.
|
| ||||||||||||||||||||||||||||||||||||||||||||||||||||||||||||||||||||||||||||||
3F
The third floor holds the TV Game Shop, with various video games on display. There are no items for sale, but the clerk behind the counter gives out TM18 (Counter).
4F
Wiseman Gifts is located on the fourth floor. The stones that cause certain Pokémon to evolve can be purchased here. Be sure to pick up a Poké Doll or two, as they are useful for running from wild Pokémon.
| |||||||||||||||||||||||
5F
The Drug Store can be found on the fifth floor. Battle items and vitamins are offered here.
|
| ||||||||||||||||||||||||||||||||||||||||||||||||||||||
Rooftop Square
The Rooftop Square houses a picnic area and several vending machines. Each machine offers Fresh Water, Soda Pop, and Lemonade. If you purchase one of each drink for the little girl nearby, she rewards you with TM13 (Ice Beam), TM48 (Rock Slide), and TM49 (Tri Attack), respectively.
Be sure to pick up an extra drink for the Saffron City gatekeepers, as well.
| |||||||||||||||
Celadon Gym
CELADON CITY POKéMON GYM
LEADER: ERIKA
The Nature Loving Princess!
The Celadon Gym specializes in Grass-type Pokémon. This type is generally vulnerable against Fire-, Ice-, Flying-, Poison-, and Bug-type attacks. Most Pokémon inside are also part-Poison, which leaves them exposed to Psychic moves, as well. Water, Rock, and Ground Pokémon are best kept on the sidelines. Grass Pokémon tend to harass their target with status ailments, so it is a good idea to bring healing items like Antidote, Parlyz Heal, and Awakening. Once the first few Gym Trainers have been defeated, have a Pokémon use Cut on one of the small trees to reach the clearing with the Gym Leader.
| |||||||||||||||||||||||||||||||||||||||||||||||||||||||||||||||||||||||||||||||||||||||||||||||||||||||||||||||||||||||||||||||||||||||||||||||||||||||||||||||||||||||||||||||||||||||||||||||||||||||||||||||||||||||||||||||||||||||
After the battle, Erika awards you the Rainbow Badge, which ensures obedience from all Pokémon up to level 50 and enables the use of Strength in the field. She also gives you TM21 (Mega Drain) as a prize.
Fickle Fortune
Stop by the restaurant on the city's south side and talk to the man near the back wall. A string of bad luck at the slot machines has cost him all of his money, so he has no more use for his Coin Case and gives it to you.
Shady Dealings
Several Team Rocket Grunts can be seen loitering around the city. Next door to the restaurant, there are workers organizing the transport of 2,000 Pokémon every month to the Game Corner to be used as prizes. Numbers like that mean money, and are sure to draw Team Rocket's attention. Whatever the group may be involved in, as one of the workers points out, it surely has nothing to do with a hidden switch in the Game Corner.
Game Corner
The prizes offered next door are expensive, so it will require a large number of coins to receive all of them. Coins may be purchased at the counter in sets of 50 for $1,000 each. Others can be obtained by speaking with other patrons, and even more can be found dropped on the ground.
| Items | ||||||||||||||||||||||||||||||||||||||||||||||||||||||||||||||||
|---|---|---|---|---|---|---|---|---|---|---|---|---|---|---|---|---|---|---|---|---|---|---|---|---|---|---|---|---|---|---|---|---|---|---|---|---|---|---|---|---|---|---|---|---|---|---|---|---|---|---|---|---|---|---|---|---|---|---|---|---|---|---|---|---|
| ||||||||||||||||||||||||||||||||||||||||||||||||||||||||||||||||
A Secret Switch?
Nothing seems out of the ordinary at first, but there is something off about the man in black who is fixated on a poster on the back wall. When you try to speak to him, he picks a fight with you. Defeat his two Pokémon and he retreats, leaving the poster unguarded. Inspect it to find a secret switch hidden underneath; press this switch and a hidden door opens to the right, revealing a secret stairway leading underground.
Prize Corner
|
|
| |||||||||||||||||||||||||||||||||||||||||||||||||||||||||||||||||||||||||||
Rocket Hideout
The Team Rocket Hideout is a secret underground complex used by the group as their base of operations. Rumors point to a certain item being located somewhere in Celadon that can identify the ghosts of Pokémon Tower. It would not be surprising for Team Rocket to have acquired an item as valuable as this, so be sure to take it back if you can find it!
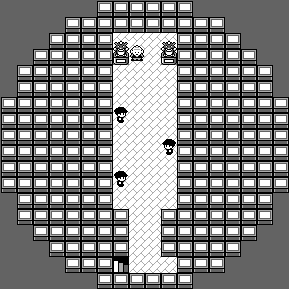
| Trainers | ||||||||||||||||||||||||||||||||||||||||||||||||||||||||||||||||||||||||||||||||||||||||||||||||||||||||||||||||||||||||||||||||||||||||||||||||||||||||||||||||||||||||||||||||||||||||||||||||||||||||||||||||||||||||||||||||||||||||||||||||||||||||||||||||||||||||||||||||||||||
|---|---|---|---|---|---|---|---|---|---|---|---|---|---|---|---|---|---|---|---|---|---|---|---|---|---|---|---|---|---|---|---|---|---|---|---|---|---|---|---|---|---|---|---|---|---|---|---|---|---|---|---|---|---|---|---|---|---|---|---|---|---|---|---|---|---|---|---|---|---|---|---|---|---|---|---|---|---|---|---|---|---|---|---|---|---|---|---|---|---|---|---|---|---|---|---|---|---|---|---|---|---|---|---|---|---|---|---|---|---|---|---|---|---|---|---|---|---|---|---|---|---|---|---|---|---|---|---|---|---|---|---|---|---|---|---|---|---|---|---|---|---|---|---|---|---|---|---|---|---|---|---|---|---|---|---|---|---|---|---|---|---|---|---|---|---|---|---|---|---|---|---|---|---|---|---|---|---|---|---|---|---|---|---|---|---|---|---|---|---|---|---|---|---|---|---|---|---|---|---|---|---|---|---|---|---|---|---|---|---|---|---|---|---|---|---|---|---|---|---|---|---|---|---|---|---|---|---|---|---|---|---|---|---|---|---|---|---|---|---|---|---|---|---|---|---|---|---|---|---|---|---|---|---|---|---|---|---|---|---|---|---|---|---|---|---|---|---|---|---|---|---|---|---|---|---|---|---|---|
| ||||||||||||||||||||||||||||||||||||||||||||||||||||||||||||||||||||||||||||||||||||||||||||||||||||||||||||||||||||||||||||||||||||||||||||||||||||||||||||||||||||||||||||||||||||||||||||||||||||||||||||||||||||||||||||||||||||||||||||||||||||||||||||||||||||||||||||||||||||||
| Items | ||||||||||||||||||||||||||||||||||||||||||||||||||||||||||||||||||||||||||||||||||||||||||||||||||||||||
|---|---|---|---|---|---|---|---|---|---|---|---|---|---|---|---|---|---|---|---|---|---|---|---|---|---|---|---|---|---|---|---|---|---|---|---|---|---|---|---|---|---|---|---|---|---|---|---|---|---|---|---|---|---|---|---|---|---|---|---|---|---|---|---|---|---|---|---|---|---|---|---|---|---|---|---|---|---|---|---|---|---|---|---|---|---|---|---|---|---|---|---|---|---|---|---|---|---|---|---|---|---|---|---|---|
| ||||||||||||||||||||||||||||||||||||||||||||||||||||||||||||||||||||||||||||||||||||||||||||||||||||||||
B1F (North)
Visit the western room to get an Escape Rope, then take the stairs down to B2F.
B2F
Go west to fight the next Team Rocket Grunt. Further west is a maze of spinner tiles meant to thwart any intruders; step on one of these arrow tiles to be sent spinning until you reach a stopper tile.
Enter the maze and follow the spinner tiles to the stopper tile in the northwest. Backtrack carefully to reach a Nugget in the northeast corner. Collect the Moon Stone, TM07 (Horn Drill), and Super Potion on the way southward. Step on the southernmost spinner tile to reach the maze exit and climb the stairs to the east.
B1F (West)
Battle the two Rocket Grunts here and pick up the Hyper Potion.
B2F
Backtrack through the east side of the maze and head down the stairs to the northeast.
B3F
Go south past the lone Rocket Grunt to reach TM10 (Double-Edge), then head west to enter the second maze of spinner tiles. Collect the Rare Candy on the way southward, then battle another Rocket Grunt and go downstairs.
B4F (Northwest)
On this first visit to B4F, it is only possible to reach the two rooms on the west side. Pick up the HP Up on a table to the south, then visit the northwest room. Pick up TM02 (Razor Wind) and battle the nearby Rocket Grunt. Talk to him afterward and he drops the Lift Key, which operates the elevator in the southeast part of the complex.
Climb back up to B2F and make your way through the larger maze again to reach the elevator. Take it down to B4F.
B4F (Southeast)
Exit the elevator and go west to reach an Iron. Defeat the last two Rocket Grunts and the electronic door that they are guarding opens. Step inside to confront the Rocket boss.
VS Giovanni
Both Giovanni's Onix and Rhyhorn take massive damage from Grass and Water attacks. His Kangaskhan takes serious damage only from Fighting moves. Avoid using attacking moves if Onix or Kangaskhan use Rage, as it boosts their Attack every time they take damage.
| ||||||||||||||||||||||||||||||||||||||||||||||||||||||||||||||||||||||||||||||||||||||||||
Giovanni cannot believe that he lost, but acknowledges that you raise your Pokémon with great care. He says that a child like you could never understand his goals, then he and most of the other Rockets disappear. Be sure to pick up the Silph Scope that he leaves behind. Ride the elevator to B1F and battle one last Rocket Grunt on the way out.
Over/Under
If you still have an extra drink on hand, you can pass through Saffron City on the way back to Pokémon Tower. Enter Saffron's west gate and the guard sees that you have a beverage. If you give it to him, he shares it with the other three guards which now allows you to reach the city from any direction. Travel eastward through the city to return to Route 8 and Lavender Town.
If not, take the Underground Path back to Route 8 and continue eastward.
Lavender Town
Pokémon Tower
The Ghost Pokémon of Pokémon Tower are immune to Normal- and Fighting-type attacks, but as they are also Poison type, they are vulnerable to Psychic attacks. The spirits can be relentless, so it may be useful to bring a supply of Repels and Poké Dolls along to avoid them as much as possible. There are still many possessed Channelers here as well, so be sure to bring some Super Potions along.
| Trainers | ||||||||||||||||||||||||||||||||||||||||||||||||||||||||||||||||||||||||||||||||||||||||||||||||||||||||||||||||||||||||||||||||||||||||||||||||||||||||||||||||||||||||||||||||||||||||||||||||||||||||||||||||||||||||||||||||||||||||||||||||||||||||||||||||||||||||
|---|---|---|---|---|---|---|---|---|---|---|---|---|---|---|---|---|---|---|---|---|---|---|---|---|---|---|---|---|---|---|---|---|---|---|---|---|---|---|---|---|---|---|---|---|---|---|---|---|---|---|---|---|---|---|---|---|---|---|---|---|---|---|---|---|---|---|---|---|---|---|---|---|---|---|---|---|---|---|---|---|---|---|---|---|---|---|---|---|---|---|---|---|---|---|---|---|---|---|---|---|---|---|---|---|---|---|---|---|---|---|---|---|---|---|---|---|---|---|---|---|---|---|---|---|---|---|---|---|---|---|---|---|---|---|---|---|---|---|---|---|---|---|---|---|---|---|---|---|---|---|---|---|---|---|---|---|---|---|---|---|---|---|---|---|---|---|---|---|---|---|---|---|---|---|---|---|---|---|---|---|---|---|---|---|---|---|---|---|---|---|---|---|---|---|---|---|---|---|---|---|---|---|---|---|---|---|---|---|---|---|---|---|---|---|---|---|---|---|---|---|---|---|---|---|---|---|---|---|---|---|---|---|---|---|---|---|---|---|---|---|---|---|---|---|---|---|---|---|---|---|---|---|---|---|---|---|---|---|---|---|---|---|---|---|
| ||||||||||||||||||||||||||||||||||||||||||||||||||||||||||||||||||||||||||||||||||||||||||||||||||||||||||||||||||||||||||||||||||||||||||||||||||||||||||||||||||||||||||||||||||||||||||||||||||||||||||||||||||||||||||||||||||||||||||||||||||||||||||||||||||||||||
| Available Pokémon | ||||||||||||||||||||||||||||||||||||||||||||||||||||||||||||||||||||||||||||||||||||||||||||||||||||||||||||||||||||||||||||||||||||||||||||||||||||||||||||||||||||||||||||||||||||||||||||||||||||||||||||||||||||||||||||||||||||||||||||||||||||||||||||||||||||||||||||||||||||||||||||||||||||||||||||||||||||||||||||||||||||||||||||||||||||||||||||||||||||||||||||||||||||||||||||
|---|---|---|---|---|---|---|---|---|---|---|---|---|---|---|---|---|---|---|---|---|---|---|---|---|---|---|---|---|---|---|---|---|---|---|---|---|---|---|---|---|---|---|---|---|---|---|---|---|---|---|---|---|---|---|---|---|---|---|---|---|---|---|---|---|---|---|---|---|---|---|---|---|---|---|---|---|---|---|---|---|---|---|---|---|---|---|---|---|---|---|---|---|---|---|---|---|---|---|---|---|---|---|---|---|---|---|---|---|---|---|---|---|---|---|---|---|---|---|---|---|---|---|---|---|---|---|---|---|---|---|---|---|---|---|---|---|---|---|---|---|---|---|---|---|---|---|---|---|---|---|---|---|---|---|---|---|---|---|---|---|---|---|---|---|---|---|---|---|---|---|---|---|---|---|---|---|---|---|---|---|---|---|---|---|---|---|---|---|---|---|---|---|---|---|---|---|---|---|---|---|---|---|---|---|---|---|---|---|---|---|---|---|---|---|---|---|---|---|---|---|---|---|---|---|---|---|---|---|---|---|---|---|---|---|---|---|---|---|---|---|---|---|---|---|---|---|---|---|---|---|---|---|---|---|---|---|---|---|---|---|---|---|---|---|---|---|---|---|---|---|---|---|---|---|---|---|---|---|---|---|---|---|---|---|---|---|---|---|---|---|---|---|---|---|---|---|---|---|---|---|---|---|---|---|---|---|---|---|---|---|---|---|---|---|---|---|---|---|---|---|---|---|---|---|---|---|---|---|---|---|---|---|---|---|---|---|---|---|---|---|---|---|---|---|---|---|---|---|---|---|---|---|---|---|---|---|---|---|---|---|---|---|---|---|---|---|---|---|---|---|---|---|---|---|---|---|---|---|---|---|
| ||||||||||||||||||||||||||||||||||||||||||||||||||||||||||||||||||||||||||||||||||||||||||||||||||||||||||||||||||||||||||||||||||||||||||||||||||||||||||||||||||||||||||||||||||||||||||||||||||||||||||||||||||||||||||||||||||||||||||||||||||||||||||||||||||||||||||||||||||||||||||||||||||||||||||||||||||||||||||||||||||||||||||||||||||||||||||||||||||||||||||||||||||||||||||||
| Items | ||||||||||||||||||||||||||||||||||||||||||||||||||||||||||||||||||||||||||||||||||||||||||||||||||||
|---|---|---|---|---|---|---|---|---|---|---|---|---|---|---|---|---|---|---|---|---|---|---|---|---|---|---|---|---|---|---|---|---|---|---|---|---|---|---|---|---|---|---|---|---|---|---|---|---|---|---|---|---|---|---|---|---|---|---|---|---|---|---|---|---|---|---|---|---|---|---|---|---|---|---|---|---|---|---|---|---|---|---|---|---|---|---|---|---|---|---|---|---|---|---|---|---|---|---|---|---|
| ||||||||||||||||||||||||||||||||||||||||||||||||||||||||||||||||||||||||||||||||||||||||||||||||||||
2F
Rival Battle 5
By this point, Blue has assembled a team that includes Grass, Fire, and Water Pokémon to cover his weaknesses. His first partner Pokémon takes the place of either Exeggcute, Growlithe, or Gyarados, whichever matches its type. His Pidgeotto still poses little threat, as it has no Flying-type moves and those it has are fairly weak. Exeggcute can induce Sleep with Hypnosis, so use Awakenings as necessary. Growlithe's Ember can deal a decent amount of damage and may cause a Burn. His Gyarados has the biggest offensive presence with Hydro Pump, so be sure to take it down quickly. Kadabra takes super effective damage only from Bug moves, but physical moves will wear it down as well. Blue's first Pokémon has grown to level 25 and learned some new moves, but it should not be too much to handle. Use super effective moves to send your rival packing and continue up the tower.
 If the player chose Bulbasaur:
| |||||||||||||||||||||||||||||||||||||||||||||||||||||||||||||||||||||||||||||||||||||||||||||||||||||||||||||||||||||||||||||||||||
 If the player chose Charmander:
| ||||||||||||||||||||||||||||||||||||||||||||||||||||||||||||||||||||||||||||||||||||||||||||||||||||||||||||||||||||||||||||||||||||
 If the player chose Squirtle:
| ||||||||||||||||||||||||||||||||||||||||||||||||||||||||||||||||||||||||||||||||||||||||||||||||||||||||||||||||||||||||||||||||
3F
Grab the Escape Rope by the north wall and climb the stairs to 4F.
4F
Pick up the Elixer and Awakening in the center of the room, and the HP Up near the south wall. Climb the western stairs.
5F
A Channeler in the middle of the fifth floor has not been possessed and maintains a healing area with her white magic. When a Trainer enters this protected zone, all of their Pokémon will be fully healed. Battle another Channeler or two and grab the Nugget before taking the eastern stairs.
6F
Collect the X Accuracy to the south, then northward past three more Channelers. Grab the Rare Candy in your path and proceed to the south stairway. As you approach, the ghost attacks and the Silph Scope activates, revealing a level 30 Marowak. Unfortunately, this spirit cannot be caught and must be defeated.
| ||||||||||||||||||||
When the battle is over, the mother Marowak's spirit is calmed. Finally able to rest, she departs to the afterlife.
Climb the final stairway to the seventh floor.
7F
Defeat the three Rocket Grunts and speak to Mr. Fuji. He thanks you for calming Marowak's spirit and asks that you accompany him to his home, the Volunteer Pokémon House, at the foot of the tower.
Mr. Fuji's house
Speak to Mr. Fuji to receive the Poké Flute as thanks. This instrument awakens any sleeping Pokémon who may hear its music. With this, you can finally wake the two Snorlax who have been blocking the way to southern Kanto. But first, head west to return to Saffron City and take on the next Gym.
|
Red and Blue walkthrough |
|

|
This article is part of Project Walkthroughs, a Bulbapedia project that aims to write comprehensive step-by-step guides on each Pokémon game. |
