Appendix:Diamond and Pearl walkthrough/Section 22: Difference between revisions
m (relinking Ether-like items, replaced: {{DL|Ether|Max Ether}} → Max Ether, {{DL|Ether|Max Elixir}} → Max Elixir, |display=Max Ether}} → }}, |display=Max Elixir}} → }}) |
(starter → first partner) |
||
| (11 intermediate revisions by 8 users not shown) | |||
| Line 11: | Line 11: | ||
***You may still need to buy many bottles of [[Hyper Potion]] and [[Full Restore]], though. | ***You may still need to buy many bottles of [[Hyper Potion]] and [[Full Restore]], though. | ||
***Buy [[Drink|Drinks]] (i.e. Fresh Water, Soda Pop, Lemonade, Moomoo Milk) instead of the Potions. You should know where to buy them, but in case you forgot: | ***Buy [[Drink|Drinks]] (i.e. Fresh Water, Soda Pop, Lemonade, Moomoo Milk) instead of the Potions. You should know where to buy them, but in case you forgot: | ||
****Fresh Water, Soda Pop, Lemonade: [[Vending | ****Fresh Water, Soda Pop, Lemonade: [[Vending machine|Vending Machines]] on [[Veilstone Department Store]]'s fifth floor | ||
****Moomoo Milk: Cafe Cabin, {{rt|210|Sinnoh}} | ****Moomoo Milk: Cafe Cabin, {{rt|210|Sinnoh}} | ||
*Buy a few bottles of Repel in any of the 3 versions to get some items more easily. | *Buy a few bottles of Repel in any of the 3 versions to get some items more easily. | ||
| Line 45: | Line 45: | ||
{{itlisth|cave}} | {{itlisth|cave}} | ||
{{itemlist|TM Dark|North of {{tc|Psychic}} Bryce|D=yes|P=yes|Pt=yes|display={{TM|41|Torment}}}} | {{itemlist|TM Dark|North of {{tc|Psychic}} Bryce|D=yes|P=yes|Pt=yes|display={{TM|41|Torment}}}} | ||
{{itemlist|Ultra Ball|On a rock south-east of Bird Keeper Hana ''(hidden)''|D=yes|P=yes | {{itemlist|Ultra Ball|On a rock south-east of Bird Keeper Hana ''(hidden)''|D=yes|P=yes}} | ||
{{itemlist|Full Heal|North of {{tc|Bird Keeper}} Hana|D=yes|P=yes | {{itemlist|Full Heal|North of {{tc|Bird Keeper}} Hana|D=yes|P=yes}}}} | ||
{{itemlist|Max Elixir|On a rock north of {{tc|Ace Trainer}} Mariah ''(hidden)''|D=yes|P=yes}} | {{itemlist|Max Elixir|On a rock north of {{tc|Ace Trainer}} Mariah ''(hidden)''|D=yes|P=yes}} | ||
{{itlistfoot|cave}} | {{itlistfoot|cave}} | ||
| Line 89: | Line 89: | ||
*0 = empty tiles | *0 = empty tiles | ||
*1 = wall | *1 = wall | ||
*2 = | *2 = unbreakable rocks | ||
*alphabets (A, B, C, etc.) = boulders / | *alphabets (A, B, C, etc.) = boulders / breakable rocks | ||
| Line 129: | Line 129: | ||
| | | | ||
{{itlisth|cave}} | {{itlisth|cave}} | ||
{{Itemlist|Full Restore|Behind the bike ramp west of the first stairs from 1F ''(hidden)''|D=yes|P=yes}} | |||
{{itemlist|Max Ether|North-west corner of 2F, end of first set of ramps|D=yes|P=yes}} | {{itemlist|Max Ether|North-west corner of 2F, end of first set of ramps|D=yes|P=yes}} | ||
{{itemlist|Rare Candy|East of {{tc|Ace Trainer}} Sydney, among movable boulders ''(hidden)''|D=yes|P=yes | {{itemlist|Rare Candy|East of {{tc|Ace Trainer}} Sydney, among movable boulders ''(hidden)''|D=yes|P=yes}} | ||
{{itlistfoot|cave}} | {{itlistfoot|cave}} | ||
|} | |} | ||
| Line 189: | Line 190: | ||
| | | | ||
{{itlisth|cave}} | {{itlisth|cave}} | ||
{{itemlist|Full Restore|At end of second set of bike ramps|D=yes|P=yes | {{itemlist|Full Restore|At end of second set of bike ramps|D=yes|P=yes}} | ||
{{itemlist|TM Rock|At end of third set of bike ramps|D=yes|P | {{itemlist|TM Rock|At end of third set of bike ramps|D=yes|P=yes|display={{TM|71|Stone Edge}}}} | ||
{{itlistfoot|cave}} | {{itlistfoot|cave}} | ||
|} | |} | ||
| Line 218: | Line 219: | ||
Head east, go down the stairs, and surf north. The left path is a one-way road, so take the right one and fight Psychic Valencia. Then surf again. The path directly north will be a shortcut, but you’ll miss out some items and Trainers. | Head east, go down the stairs, and surf north. The left path is a one-way road, so take the right one and fight Psychic Valencia. Then surf again. The path directly north will be a shortcut, but you’ll miss out some items and Trainers. | ||
Surf east and stop surfing behind Valencia. Then surf across the pond to the south. Grab the hidden | Surf east and stop surfing behind Valencia. Then surf across the pond to the south. Grab the hidden {{i|Pearl}} and go up the stairs. Fight Double Team Jo and Pat, then surf across another pond to the west. Go up the stairs. | ||
{| class="expandable" align="center" style="background: #{{Pearl color light}}; -moz-border-radius: 1em; border: 5px solid #{{Diamond color light}};" | {| class="expandable" align="center" style="background: #{{Pearl color light}}; -moz-border-radius: 1em; border: 5px solid #{{Diamond color light}};" | ||
|- align="center" | |- align="center" | ||
| Line 225: | Line 226: | ||
| | | | ||
{{itlisth|cave}} | {{itlisth|cave}} | ||
{{itemlist|Pearl|On rock north-west of Double Team Jo & Pat ''(hidden)''|D=yes|P=yes|display={{ | {{itemlist|Pearl|On rock north-west of Double Team Jo & Pat ''(hidden)''|D=yes|P=yes|display={{i|Pearl}}}} | ||
{{itlistfoot|cave}} | {{itlistfoot|cave}} | ||
|} | |} | ||
| Line 265: | Line 266: | ||
| | | | ||
{{itlisth|cave}} | {{itlisth|cave}} | ||
{{itemlist|Rare Candy|In an isolated area only reachable via the stairs in the south-west corner of B1F|D=yes|P=yes | {{itemlist|Rare Candy|In an isolated area only reachable via the stairs in the south-west corner of B1F|D=yes|P=yes}} | ||
{{itemlist|Max Revive|On a boulder south-west of Rare Candy ''(hidden)''|D=yes|P=yes | {{itemlist|Max Revive|On a boulder south-west of Rare Candy ''(hidden)''|D=yes|P=yes}} | ||
{{itlistfoot|cave}} | {{itlistfoot|cave}} | ||
|} | |} | ||
| Line 281: | Line 282: | ||
| | | | ||
{{itlisth|cave}} | {{itlisth|cave}} | ||
{{itemlist|TM Dragon|North-west of Psychic Valencia, accessible by the waterfall|D=yes|P | {{itemlist|TM Dragon|North-west of Psychic Valencia, accessible by the waterfall|D=yes|P=yes|display={{TM|59|Dragon Pulse}}}} | ||
{{itemlist|Big Mushroom|South-west of Dragon Tamer Ondrej on a boulder east of the next stairs leading up ''(hidden)''|D=yes|P=yes | {{itemlist|Big Mushroom|South-west of Dragon Tamer Ondrej on a boulder east of the next stairs leading up ''(hidden)''|D=yes|P=yes}} | ||
{{itlistfoot|cave}} | {{itlistfoot|cave}} | ||
|} | |} | ||
| Line 307: | Line 308: | ||
| | | | ||
{{itlisth|cave}} | {{itlisth|cave}} | ||
{{itemlist|Zinc|South of the entrance to the blocked area|D=yes|P=yes | {{itemlist|Zinc|South of the entrance to the blocked area|D=yes|P=yes}} | ||
{{itemlist|Razor Claw|South-west of {{tc|Veteran}} Edgar|D=yes|P=yes | {{itemlist|Razor Claw|South-west of {{tc|Veteran}} Edgar|D=yes|P=yes}} | ||
{{itlistfoot|cave}} | {{itlistfoot|cave}} | ||
|} | |} | ||
| Line 363: | Line 364: | ||
| | | | ||
{{itlisth|building}} | {{itlisth|building}} | ||
{{itemlist|Sky Plate|South of western Poké Ball statue at exit from Victory Road ''(hidden)''|D=yes|P=yes | {{itemlist|Sky Plate|South of western Poké Ball statue at exit from Victory Road ''(hidden)''|D=yes|P=yes}} | ||
{{itlistfoot|building}} | {{itlistfoot|building}} | ||
|} | |} | ||
| Line 380: | Line 381: | ||
{{catch/footer|road}} | {{catch/footer|road}} | ||
|} | |} | ||
The ground floor of the building is a mixture of a Pokémon | The ground floor of the building is a mixture of a Pokémon Center and a Poké Mart (although the theme is the one in Pokémon Centers). '''DO NOT go all the way forward!''' A tough battle awaits you. Instead, '''heal your Pokémon FIRST'''! Your Pokémon should be exhausted after the Victory Road journey. The Pokémon Center is on the left. Then buy items if you are running out of them. The Mart is on the right. | ||
'''MAKE SURE that you HEAL your Pokémon and have your Pokémon AT LEVEL 50 at the very least BEFORE PROCEEDING to the Ace Trainer!''' It is recommended that you train your Pokémon until they are around Level 55 before proceeding. | '''MAKE SURE that you HEAL your Pokémon and have your Pokémon AT LEVEL 50 at the very least BEFORE PROCEEDING to the Ace Trainer!''' It is recommended that you train your Pokémon until they are around Level 55 before proceeding. | ||
| Line 391: | Line 392: | ||
That "someone" is none other than Rival [[Barry (game)|Barry]]. He says, ''"Let’s see who’s more worthy of making the challenge with a battle!"'' then challenges you to the final rival battle in the main storyline! (Well, he rarely falls behind you, and he did, coming here after your arrival.) | That "someone" is none other than Rival [[Barry (game)|Barry]]. He says, ''"Let’s see who’s more worthy of making the challenge with a battle!"'' then challenges you to the final rival battle in the main storyline! (Well, he rarely falls behind you, and he did, coming here after your arrival.) | ||
{| align="center" | {| align="center" | ||
! {{MS|387|Turtwig (Pokémon)}} If the {{player}} chose {{p|Turtwig}}: | ! {{MS/3|387|Turtwig (Pokémon)}} If the {{player}} chose {{p|Turtwig}}: | ||
! {{MS|390|Chimchar (Pokémon)}} If the {{player}} chose {{p|Chimchar}}: | ! {{MS/3|390|Chimchar (Pokémon)}} If the {{player}} chose {{p|Chimchar}}: | ||
! {{MS|393|Piplup (Pokémon)}} If the {{player}} chose {{p|Piplup}}: | ! {{MS/3|393|Piplup (Pokémon)}} If the {{player}} chose {{p|Piplup}}: | ||
|- | |- | ||
| {{Party/Single|color=E08040|bordercolor=629C20|headcolor=FFE683|sprite=Spr DP Barry.png|prize={{PDollar}}5300|class={{PK}}{{MN}} Trainer|classlink=Pokémon Trainer|name=Barry|game=DP|location=Pokémon League (Sinnoh)|locationname=Pokémon League|pokemon=6}} | | {{Party/Single|color=E08040|bordercolor=629C20|headcolor=FFE683|sprite=Spr DP Barry.png|prize={{PDollar}}5300|class={{PK}}{{MN}} Trainer|classlink=Pokémon Trainer|name=Barry|game=DP|location=Pokémon League (Sinnoh)|locationname=Pokémon League|pokemon=6}} | ||
|{{Pokémon/4|game=Diamond|ndex=398|spritegender=male|pokemon=Staraptor|gender=male|ability=Intimidate|level=48|type1=Normal|type2=Flying|move1=Close Combat|move1type=Fighting|move1cat=Physical|move2=Aerial Ace|move2type=Flying|move2cat=Physical|move3=Steel Wing|move3type=Steel|move3cat=Physical|move4=U-turn|move4type=Bug|move4cat=Physical}} | |{{Pokémon/4|game=Diamond|ndex=398|spritegender=male|pokemon=Staraptor|gender=male|ability=Intimidate|level=48|type1=Normal|type2=Flying|move1=Close Combat|move1type=Fighting|move1cat=Physical|move2=Aerial Ace|move2type=Flying|move2cat=Physical|move3=Steel Wing|move3type=Steel|move3cat=Physical|move4=U-turn|move4type=Bug|move4cat=Physical}} | ||
|{{Pokémon/4|game=Diamond|ndex=214|spritegender=male|pokemon=Heracross|gender=male|ability=Swarm|level=50|type1=Bug|type2=Fighting|move1= | |{{Pokémon/4|game=Diamond|ndex=214|spritegender=male|pokemon=Heracross|gender=male|ability=Swarm|level=50|type1=Bug|type2=Fighting|move1=Rock Slide|move1type=Rock|move1cat=Physical|move2=Close Combat|move2type=Fighting|move2cat=Physical|move3=Night Slash|move3type=Dark|move3cat=Physical|move4=Aerial Ace|move4type=Flying|move4cat=Physical}} | ||
|{{Pokémon/4|game=Diamond|ndex=143|pokemon=Snorlax|gender=male|ability=Immunity|level=51|type1=Normal|move1=Rest|move1type=Psychic|move1cat=Status|move2=Crunch|move2type=Dark|move2cat=Physical|move3=Earthquake|move3type=Ground|move3cat=Physical|move4=Body Slam|move4type=Normal|move4cat=Physical}} | |{{Pokémon/4|game=Diamond|ndex=143|pokemon=Snorlax|gender=male|ability=Immunity|level=51|type1=Normal|move1=Rest|move1type=Psychic|move1cat=Status|move2=Crunch|move2type=Dark|move2cat=Physical|move3=Earthquake|move3type=Ground|move3cat=Physical|move4=Body Slam|move4type=Normal|move4cat=Physical}} | ||
{{Party/Div|color=E08040}} | {{Party/Div|color=E08040}} | ||
| Line 407: | Line 408: | ||
| {{Party/Single|color=E08040|bordercolor=629C20|headcolor=FFE683|sprite=Spr DP Barry.png|prize={{PDollar}}5300|class={{PK}}{{MN}} Trainer|classlink=Pokémon Trainer|name=Barry|game=DP|location=Pokémon League (Sinnoh)|locationname=Pokémon League|pokemon=6}} | | {{Party/Single|color=E08040|bordercolor=629C20|headcolor=FFE683|sprite=Spr DP Barry.png|prize={{PDollar}}5300|class={{PK}}{{MN}} Trainer|classlink=Pokémon Trainer|name=Barry|game=DP|location=Pokémon League (Sinnoh)|locationname=Pokémon League|pokemon=6}} | ||
|{{Pokémon/4|game=Diamond|ndex=398|spritegender=male|pokemon=Staraptor|gender=male|ability=Intimidate|level=48|type1=Normal|type2=Flying|move1=Close Combat|move1type=Fighting|move1cat=Physical|move2=Aerial Ace|move2type=Flying|move2cat=Physical|move3=Steel Wing|move3type=Steel|move3cat=Physical|move4=U-turn|move4type=Bug|move4cat=Physical}} | |{{Pokémon/4|game=Diamond|ndex=398|spritegender=male|pokemon=Staraptor|gender=male|ability=Intimidate|level=48|type1=Normal|type2=Flying|move1=Close Combat|move1type=Fighting|move1cat=Physical|move2=Aerial Ace|move2type=Flying|move2cat=Physical|move3=Steel Wing|move3type=Steel|move3cat=Physical|move4=U-turn|move4type=Bug|move4cat=Physical}} | ||
|{{Pokémon/4|game=Diamond|ndex=214|spritegender=male|pokemon=Heracross|gender=male|ability=Swarm|level=50|type1=Bug|type2=Fighting|move1= | |{{Pokémon/4|game=Diamond|ndex=214|spritegender=male|pokemon=Heracross|gender=male|ability=Swarm|level=50|type1=Bug|type2=Fighting|move1=Rock Slide|move1type=Rock|move1cat=Physical|move2=Close Combat|move2type=Fighting|move2cat=Physical|move3=Night Slash|move3type=Dark|move3cat=Physical|move4=Aerial Ace|move4type=Flying|move4cat=Physical}} | ||
|{{Pokémon/4|game=Diamond|ndex=143|pokemon=Snorlax|gender=male|ability=Immunity|level=51|type1=Normal|move1=Rest|move1type=Psychic|move1cat=Status|move2=Crunch|move2type=Dark|move2cat=Physical|move3=Earthquake|move3type=Ground|move3cat=Physical|move4=Body Slam|move4type=Normal|move4cat=Physical}} | |{{Pokémon/4|game=Diamond|ndex=143|pokemon=Snorlax|gender=male|ability=Immunity|level=51|type1=Normal|move1=Rest|move1type=Psychic|move1cat=Status|move2=Crunch|move2type=Dark|move2cat=Physical|move3=Earthquake|move3type=Ground|move3cat=Physical|move4=Body Slam|move4type=Normal|move4cat=Physical}} | ||
{{Party/Div|color=E08040}} | {{Party/Div|color=E08040}} | ||
|{{Pokémon/4|game=Diamond|ndex=078|pokemon=Rapidash|gender=male|ability= | |{{Pokémon/4|game=Diamond|ndex=078|pokemon=Rapidash|gender=male|ability=Run Away|level=49|type1=Fire|move1=Will-O-Wisp|move1type=Fire|move1cat=Status|move2=Sunny Day|move2type=Fire|move2cat=Status|move3=Bounce|move3type=Flying|move3cat=Physical|move4=Fire Blast|move4type=Fire|move4cat=Special}} | ||
|{{Pokémon/4|game=Diamond|ndex=407|spritegender=male|pokemon=Roserade|gender=male|ability=Natural Cure|level=49|type1=Grass|type2=Poison|move1=Poison Jab|move1type=Poison|move1cat=Physical|move2=Giga Drain|move2type=Grass|move2cat=Special|move3=Shadow Ball|move3type=Ghost|move3cat=Special|move4=GrassWhistle|move4type=Grass|move4cat=Status}} | |{{Pokémon/4|game=Diamond|ndex=407|spritegender=male|pokemon=Roserade|gender=male|ability=Natural Cure|level=49|type1=Grass|type2=Poison|move1=Poison Jab|move1type=Poison|move1cat=Physical|move2=Giga Drain|move2type=Grass|move2cat=Special|move3=Shadow Ball|move3type=Ghost|move3cat=Special|move4=GrassWhistle|move4type=Grass|move4cat=Status}} | ||
|{{Pokémon/4|game=Diamond|ndex=395|pokemon=Empoleon|gender=male|ability=Torrent|level=53|type1=Water|type2=Steel|move1=Brine|move1type=Water|move1cat=Special|move2=Metal Claw|move2type=Steel|move2cat=Physical|move3=Aerial Ace|move3type=Flying|move3cat=Physical|move4=Shadow Claw|move4type=Ghost|move4cat=Physical}} | |{{Pokémon/4|game=Diamond|ndex=395|pokemon=Empoleon|gender=male|ability=Torrent|level=53|type1=Water|type2=Steel|move1=Brine|move1type=Water|move1cat=Special|move2=Metal Claw|move2type=Steel|move2cat=Physical|move3=Aerial Ace|move3type=Flying|move3cat=Physical|move4=Shadow Claw|move4type=Ghost|move4cat=Physical}} | ||
| Line 417: | Line 418: | ||
| {{Party/Single|color=E08040|bordercolor=629C20|headcolor=FFE683|sprite=Spr DP Barry.png|prize={{PDollar}}5300|class={{PK}}{{MN}} Trainer|classlink=Pokémon Trainer|name=Barry|game=DP|location=Pokémon League (Sinnoh)|locationname=Pokémon League|pokemon=6}} | | {{Party/Single|color=E08040|bordercolor=629C20|headcolor=FFE683|sprite=Spr DP Barry.png|prize={{PDollar}}5300|class={{PK}}{{MN}} Trainer|classlink=Pokémon Trainer|name=Barry|game=DP|location=Pokémon League (Sinnoh)|locationname=Pokémon League|pokemon=6}} | ||
|{{Pokémon/4|game=Diamond|ndex=398|spritegender=male|pokemon=Staraptor|gender=male|ability=Intimidate|level=48|type1=Normal|type2=Flying|move1=Close Combat|move1type=Fighting|move1cat=Physical|move2=Aerial Ace|move2type=Flying|move2cat=Physical|move3=Steel Wing|move3type=Steel|move3cat=Physical|move4=U-turn|move4type=Bug|move4cat=Physical}} | |{{Pokémon/4|game=Diamond|ndex=398|spritegender=male|pokemon=Staraptor|gender=male|ability=Intimidate|level=48|type1=Normal|type2=Flying|move1=Close Combat|move1type=Fighting|move1cat=Physical|move2=Aerial Ace|move2type=Flying|move2cat=Physical|move3=Steel Wing|move3type=Steel|move3cat=Physical|move4=U-turn|move4type=Bug|move4cat=Physical}} | ||
|{{Pokémon/4|game=Diamond|ndex=214|spritegender=male|pokemon=Heracross|gender=male|ability=Swarm|level=50|type1=Bug|type2=Fighting|move1= | |{{Pokémon/4|game=Diamond|ndex=214|spritegender=male|pokemon=Heracross|gender=male|ability=Swarm|level=50|type1=Bug|type2=Fighting|move1=Rock Slide|move1type=Rock|move1cat=Physical|move2=Close Combat|move2type=Fighting|move2cat=Physical|move3=Night Slash|move3type=Dark|move3cat=Physical|move4=Aerial Ace|move4type=Flying|move4cat=Physical}} | ||
|{{Pokémon/4|game=Diamond|ndex=143|pokemon=Snorlax|gender=male|ability=Immunity|level=51|type1=Normal|move1=Rest|move1type=Psychic|move1cat=Status|move2=Crunch|move2type=Dark|move2cat=Physical|move3=Earthquake|move3type=Ground|move3cat=Physical|move4=Body Slam|move4type=Normal|move4cat=Physical}} | |{{Pokémon/4|game=Diamond|ndex=143|pokemon=Snorlax|gender=male|ability=Immunity|level=51|type1=Normal|move1=Rest|move1type=Psychic|move1cat=Status|move2=Crunch|move2type=Dark|move2cat=Physical|move3=Earthquake|move3type=Ground|move3cat=Physical|move4=Body Slam|move4type=Normal|move4cat=Physical}} | ||
{{Party/Div|color=E08040}} | {{Party/Div|color=E08040}} | ||
|{{Pokémon/4|game=Diamond|ndex=419|spritegender=male|pokemon=Floatzel|gender=male|ability=Swift Swim|level=49|type1=Water|move1=Aqua Jet|move1type=Water|move1cat=Physical|move2=Ice Fang|move2type=Ice|move2cat=Physical|move3=Crunch|move3type=Dark|move3cat=Physical|move4=Brick Break|move4type=Fighting|move4cat=Physical}} | |{{Pokémon/4|game=Diamond|ndex=419|spritegender=male|pokemon=Floatzel|gender=male|ability=Swift Swim|level=49|type1=Water|move1=Aqua Jet|move1type=Water|move1cat=Physical|move2=Ice Fang|move2type=Ice|move2cat=Physical|move3=Crunch|move3type=Dark|move3cat=Physical|move4=Brick Break|move4type=Fighting|move4cat=Physical}} | ||
|{{Pokémon/4|game=Diamond|ndex=078|pokemon=Rapidash|gender=male|ability= | |{{Pokémon/4|game=Diamond|ndex=078|pokemon=Rapidash|gender=male|ability=Run Away|level=49|type1=Fire|move1=Will-O-Wisp|move1type=Fire|move1cat=Status|move2=Sunny Day|move2type=Fire|move2cat=Status|move3=Bounce|move3type=Flying|move3cat=Physical|move4=Fire Blast|move4type=Fire|move4cat=Special}} | ||
|{{Pokémon/4|game=Diamond|ndex=389|pokemon=Torterra|gender=male|ability=Overgrow|level=53|type1=Grass|type2=Ground|move1=Leaf Storm|move1type=Grass|move1cat=Special|move2=Earthquake|move2type=Ground|move2cat=Physical|move3=Crunch|move3type=Dark|move3cat=Physical|move4=Synthesis|move4type=Grass|move4cat=Status}} | |{{Pokémon/4|game=Diamond|ndex=389|pokemon=Torterra|gender=male|ability=Overgrow|level=53|type1=Grass|type2=Ground|move1=Leaf Storm|move1type=Grass|move1cat=Special|move2=Earthquake|move2type=Ground|move2cat=Physical|move3=Crunch|move3type=Dark|move3cat=Physical|move4=Synthesis|move4type=Grass|move4cat=Status}} | ||
{{Party/Footer}} | {{Party/Footer}} | ||
|} | |} | ||
Barry’s team is now very strong -- far stronger than the team he has when you're in the [[Multi Battle]] on [[Spear Pillar]], [[Mt. Coronet]]. His strongest Pokémon is again his own | Barry’s team is now very strong -- far stronger than the team he has when you're in the [[Multi Battle]] on [[Spear Pillar]], [[Mt. Coronet]]. His strongest Pokémon is again his own first partner Pokémon at its final form, '''at Level 53'''. All of his Pokémon have evolved into their final forms. They also possess moves that deals a lot of damage. However, you cannot lose this fight -- if you lose, you’re not worthy to challenge the [[Elite Four]]! | ||
No matter which | No matter which first partner you chose, his team will always have the following 3 Pokémon: {{p|Staraptor}} (which he always starts with), {{p|Heracross}} and {{p|Snorlax}} (Evolved from his {{p|Munchlax}}. It seems that Barry treated it well). | ||
He’ll have 3 of the following 6 Pokémon, depending on your | He’ll have 3 of the following 6 Pokémon, depending on your first partner Pokémon: | ||
*2 of these 3: {{p|Rapidash}}, {{p|Roserade}}, {{p|Floatzel}} | *2 of these 3: {{p|Rapidash}}, {{p|Roserade}}, {{p|Floatzel}} | ||
*1 of the final forms of the 3 | *1 of the final forms of the 3 first partners ({{p|Torterra}}, {{p|Infernape}} and {{p|Empoleon}}, at '''Level 53''') | ||
His Pokémon can hit really hard. Their moves can also cover a variety of types, so watch out! He’ll also use type-advantage to attack and send out Pokémon depending on the situation (i.e. what Pokémon you’re using), so try to use your own type-advantage to hit back. | His Pokémon can hit really hard. Their moves can also cover a variety of types, so watch out! He’ll also use type-advantage to attack and send out Pokémon depending on the situation (i.e. what Pokémon you’re using), so try to use your own type-advantage to hit back. | ||
Latest revision as of 02:37, 19 March 2024
Before proceeding......
Make sure that you are fully prepared! Be warned— A tough and long journey is up ahead.
The Sinnoh Victory Road is very complicated. A lot of Trainers are there to challenge you. It is a very harsh test, but is a necessary training for the challenges of the Pokémon League.
Make sure that you have done the following things before going on:
- Buy a lot of medicines.
- Buy at least 30 of each necessary medicine, excluding different versions of Potions.
- Buying 35 to 40 of each is recommended.
- To save money, don't buy Super Potions, and don't buy too many bottles of Potion.
- You may still need to buy many bottles of Hyper Potion and Full Restore, though.
- Buy Drinks (i.e. Fresh Water, Soda Pop, Lemonade, Moomoo Milk) instead of the Potions. You should know where to buy them, but in case you forgot:
- Fresh Water, Soda Pop, Lemonade: Vending Machines on Veilstone Department Store's fifth floor
- Moomoo Milk: Cafe Cabin, Route 210
- Buy at least 30 of each necessary medicine, excluding different versions of Potions.
- Buy a few bottles of Repel in any of the 3 versions to get some items more easily.
- If you are buying Repels, buy at most 10 bottles.
- If you are buying Super Repels, buy no more than 8 bottles.
- If you are buying Max Repels, buy no more than 6 bottles.
- Heal your Pokémon.
- Always let your leading Pokémon hold Amulet Coin or Luck Incense to gain double prize after Trainer battles, especially if you're running out of money.
- Bring Pokémon with the following HM moves:
- Train your Pokémon until they are above Level 50.
- Having your Pokémon at about Level 55 is recommended.
- If your Pokémon are at or below Level 45, DO NOT even dare to proceed!
Sinnoh Victory Road
This is the final journey that you must take before challenging the Pokémon League. There are 3 levels that you can now access. Go inside when you are ready.
1F (Part 1)
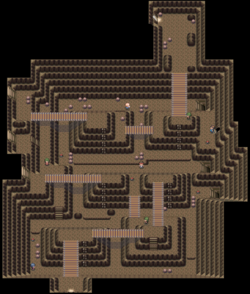
First, cross the bridge, climb down the wall, head west to fight Psychic Bryce and collect TM41 (Torment). Next, head east from Bryce and get the hidden Ultra Ball in one of the rocks at the southeast part. Then, head back to where you climbed down. Climb up and head east.
Cross the bridge and go down the stairs. Fight Bird Keeper Hana and head north to grab the Full Heal. After that, head back to the stairs and cross the bridge to the north. Then climb down the wall and head west.
Follow the path (be careful that you don’t jump down the ledge) and go up the stairs. Fight Ace Trainer Mariah and head north. Don’t go up the stairs yet -- collect the hidden Max Elixir in a rock at the north first. Then head back to the stairs and go up to 2F.
| Items (1F Part 1) | ||||||||||||||||||||||||
|---|---|---|---|---|---|---|---|---|---|---|---|---|---|---|---|---|---|---|---|---|---|---|---|---|
| ||||||||||||||||||||||||
| Available Pokémon (1F) | |||||||||||||||||||||||||||||||||||||||||||||||||||||||||||||||||||||||||||||||||||||||||||||||||||||||||||||||||||||||||||||
|---|---|---|---|---|---|---|---|---|---|---|---|---|---|---|---|---|---|---|---|---|---|---|---|---|---|---|---|---|---|---|---|---|---|---|---|---|---|---|---|---|---|---|---|---|---|---|---|---|---|---|---|---|---|---|---|---|---|---|---|---|---|---|---|---|---|---|---|---|---|---|---|---|---|---|---|---|---|---|---|---|---|---|---|---|---|---|---|---|---|---|---|---|---|---|---|---|---|---|---|---|---|---|---|---|---|---|---|---|---|---|---|---|---|---|---|---|---|---|---|---|---|---|---|---|---|
| |||||||||||||||||||||||||||||||||||||||||||||||||||||||||||||||||||||||||||||||||||||||||||||||||||||||||||||||||||||||||||||
| Trainers (1F Part 1) | |||||||||||||||||||||||||||||||||||||||||||||||||||||||||||||||||||||||
|---|---|---|---|---|---|---|---|---|---|---|---|---|---|---|---|---|---|---|---|---|---|---|---|---|---|---|---|---|---|---|---|---|---|---|---|---|---|---|---|---|---|---|---|---|---|---|---|---|---|---|---|---|---|---|---|---|---|---|---|---|---|---|---|---|---|---|---|---|---|---|---|
| |||||||||||||||||||||||||||||||||||||||||||||||||||||||||||||||||||||||
2F (Part 1)
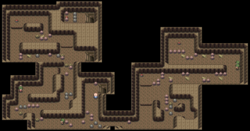
First, head west, smash the rock and push the boulder to the west. Next, push the boulder near the ramp to the east. Then, use a Repel, Super Repel or Max Repel, get on your bicycle, set it to the fourth gear and ride on the ramp to fly over the rock. After that, smash the rock near another ramp, switch to the third gear, ride on the ramp and head north, then west for a Max Ether. Jump down the ledge, switch back to the fourth gear, go all the way east and fly over the rock, then head south and smash the rock to proceed. You will then see 3 boulders in this pattern:
11001
10XY1
100Z1
10011
Legend:
- 0 = empty tiles
- 1 = wall
- 2 = unbreakable rocks
- alphabets (A, B, C, etc.) = boulders / breakable rocks
Push boulders in the following order:
- Boulder Y to the south
- Boulder X to the west
- Boulder Z all the way to the south
Follow the path, fight Ace Trainer Omar, and you’ll see rocks arranged in the following pattern:
11000000
100ABCDE
10200000
100G1110
10001110
Solve the puzzle in the following order:
- Push boulder A to the south
- Go around the rock F
- Smash rock G
- Push boulder A back to its original place
Ignore boulder B. Follow the path, smash the rock, head east and fight Ace Trainer Sydney. Then follow the path and you’ll see another 3 boulders:
02011
00H00
0I0J1
1R111
Solve the puzzle in the following order:
- Push boulder I to the east
- Grab the hidden Rare Candy (marked as R in the picture)
- Push boulder H all the way to the east
You cannot proceed deeper in this level yet due to the rock, so head north and fight Veteran Clayton, then head down the stairs.
| Items (2F Part 1) | ||||||||||||||||||||
|---|---|---|---|---|---|---|---|---|---|---|---|---|---|---|---|---|---|---|---|---|
| ||||||||||||||||||||
| Available Pokémon (2F) | |||||||||||||||||||||||||||||||||||||||||||||||||||||||||||||||||||||||||||||||||||||||||||||||||||||||||||||||||||||||||||||
|---|---|---|---|---|---|---|---|---|---|---|---|---|---|---|---|---|---|---|---|---|---|---|---|---|---|---|---|---|---|---|---|---|---|---|---|---|---|---|---|---|---|---|---|---|---|---|---|---|---|---|---|---|---|---|---|---|---|---|---|---|---|---|---|---|---|---|---|---|---|---|---|---|---|---|---|---|---|---|---|---|---|---|---|---|---|---|---|---|---|---|---|---|---|---|---|---|---|---|---|---|---|---|---|---|---|---|---|---|---|---|---|---|---|---|---|---|---|---|---|---|---|---|---|---|---|
| |||||||||||||||||||||||||||||||||||||||||||||||||||||||||||||||||||||||||||||||||||||||||||||||||||||||||||||||||||||||||||||
| Trainers (2F Part 1) | |||||||||||||||||||||||||||||||||||||||||||||||||||||||||||||||||||||||
|---|---|---|---|---|---|---|---|---|---|---|---|---|---|---|---|---|---|---|---|---|---|---|---|---|---|---|---|---|---|---|---|---|---|---|---|---|---|---|---|---|---|---|---|---|---|---|---|---|---|---|---|---|---|---|---|---|---|---|---|---|---|---|---|---|---|---|---|---|---|---|---|
| |||||||||||||||||||||||||||||||||||||||||||||||||||||||||||||||||||||||
Back to 1F
Immediately backtrack to 2F.
2F (Part 2)
Now you’re back to 2F, the boulders have been reset. Push boulder H to the south, then head east. Follow the path and you’ll see rocks arranged in the following pattern:
020K001
02L0101
00M1101
1101101
10N0000
1001100
Solve the puzzle in the following order:
- Push boulder N all the way to the east
- Head north and follow the path
- Push boulder K to the west
- Smash rock L
- Push boulder M to the south
Afterwards, head west, turn north and follow the path. You’ll see some ramps. Use another bottle of Repel, Super Repel or Max Repel (by now the previous one should have worn off). Get on your bicycle again and start from the far east. Make sure that it is at the fourth gear, then go all the way west, riding through the ramps and flying over the rock. You can get the Full Restore.
Head deeper and fight Double Team Al and Kay. Then ride through the ramps again (use a bottle of Repel/Super Repel/Max Repel again if the previous one wears off), but this one is tricky – you have to stop at the right time. If you succeed, you can get TM71 (Stone Edge). If you failed, try again and you’ll ultimately do it.
| Items (2F Part 2) | ||||||||||||||||
|---|---|---|---|---|---|---|---|---|---|---|---|---|---|---|---|---|
| ||||||||||||||||
| Trainers (2F Part 2) | |||||||||||||||||||||||
|---|---|---|---|---|---|---|---|---|---|---|---|---|---|---|---|---|---|---|---|---|---|---|---|
| |||||||||||||||||||||||
Now get back to the stairs leading back to 1F (the one near Veteran Clayton) and go down the stairs.
1F (Part 2)
You’re now at 1F again. Cross the bridge, climb down the wall, follow the path (be careful that you don’t jump down the ledge! Otherwise, you’ll need to go all the way through 2F again), fight Black Belt Miles, then go down the stairs.
| Trainers (1F Part 2) | |||||||||||||||||
|---|---|---|---|---|---|---|---|---|---|---|---|---|---|---|---|---|---|
| |||||||||||||||||
B1F (Part 1)
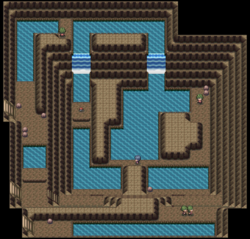
Head east, go down the stairs, and surf north. The left path is a one-way road, so take the right one and fight Psychic Valencia. Then surf again. The path directly north will be a shortcut, but you’ll miss out some items and Trainers.
Surf east and stop surfing behind Valencia. Then surf across the pond to the south. Grab the hidden Pearl and go up the stairs. Fight Double Team Jo and Pat, then surf across another pond to the west. Go up the stairs.
| Item (B1F Part 1) | ||||||||||||
|---|---|---|---|---|---|---|---|---|---|---|---|---|
| ||||||||||||
| Available Pokémon (B1F) | ||||||||||||||||||||||||||||||||||||||||||||||||||||||||||||||||||||||||||||||||||||||||||||||||||||||||||||||||||||||||||||||||||||||||||||||||||||||||||||||||||||||||||||||||||||||||||||
|---|---|---|---|---|---|---|---|---|---|---|---|---|---|---|---|---|---|---|---|---|---|---|---|---|---|---|---|---|---|---|---|---|---|---|---|---|---|---|---|---|---|---|---|---|---|---|---|---|---|---|---|---|---|---|---|---|---|---|---|---|---|---|---|---|---|---|---|---|---|---|---|---|---|---|---|---|---|---|---|---|---|---|---|---|---|---|---|---|---|---|---|---|---|---|---|---|---|---|---|---|---|---|---|---|---|---|---|---|---|---|---|---|---|---|---|---|---|---|---|---|---|---|---|---|---|---|---|---|---|---|---|---|---|---|---|---|---|---|---|---|---|---|---|---|---|---|---|---|---|---|---|---|---|---|---|---|---|---|---|---|---|---|---|---|---|---|---|---|---|---|---|---|---|---|---|---|---|---|---|---|---|---|---|---|---|---|---|---|
| ||||||||||||||||||||||||||||||||||||||||||||||||||||||||||||||||||||||||||||||||||||||||||||||||||||||||||||||||||||||||||||||||||||||||||||||||||||||||||||||||||||||||||||||||||||||||||||
| Trainers (B1F Part 1) | ||||||||||||||||||||||||||||||||||||||||||||
|---|---|---|---|---|---|---|---|---|---|---|---|---|---|---|---|---|---|---|---|---|---|---|---|---|---|---|---|---|---|---|---|---|---|---|---|---|---|---|---|---|---|---|---|---|
| ||||||||||||||||||||||||||||||||||||||||||||
1F (Part 3)
Grab the Rare Candy and a hidden Max Revive, then return to B1F.
| Items (1F Part 3) | ||||||||||||||||
|---|---|---|---|---|---|---|---|---|---|---|---|---|---|---|---|---|
| ||||||||||||||||
B1F (Part 2)
Head back to where you fought Double Team Jo and Pat. Go down the stairs, surf across the pond and take the easternmost path. Fight Ace Trainer Henry, then surf and climb the waterfall.
Follow the path and climb down another waterfall to collect TM59 (Dragon Pulse). Climb up the waterfall again and head west. Fight Dragon Tamer Ondrej, then surf west and follow the path.
Grab the hidden Big Mushroom. Finally, climb up the stairs. (There is nothing south of the small pond.)
| Items (B1F Part 2) | ||||||||||||||||
|---|---|---|---|---|---|---|---|---|---|---|---|---|---|---|---|---|
| ||||||||||||||||
| Trainers (B1F Part 2) | ||||||||||||||||||||||||||||||||||
|---|---|---|---|---|---|---|---|---|---|---|---|---|---|---|---|---|---|---|---|---|---|---|---|---|---|---|---|---|---|---|---|---|---|---|
| ||||||||||||||||||||||||||||||||||
1F (Part 4)
Head all the way west and turn south to grab a Razor Claw. Then backtrack, and you’ll find a set of stairs near Veteran Edgar. Go up the stairs and follow the path, crossing another bridge. You’ll find someone blocking a cave to a deeper area, saying that you’ll become even tougher, and eventually the world will grow bigger to you. The cave will only open up when you get the National Pokédex, so ignore it for now and grab the Zinc to the south.
After that, go back and fight Veteran Edgar, then head south through the gap. You’ll see a T-junction. Don’t go east yet -- go west first. Climb up the wall, cross the bridge to the west, and go up the stairs.
| Items (1F Part 4) | ||||||||||||||||
|---|---|---|---|---|---|---|---|---|---|---|---|---|---|---|---|---|
| ||||||||||||||||
| Trainer (1F Part 4) | |||||||||||||||||||||||||||||
|---|---|---|---|---|---|---|---|---|---|---|---|---|---|---|---|---|---|---|---|---|---|---|---|---|---|---|---|---|---|
| |||||||||||||||||||||||||||||
2F (Part 3)
You’ll see 3 boulders (yup, a puzzle with 3 boulders again) arranged in the following pattern:
20L0
T0M0
20N0
Don’t move boulder M yet, or you’ll mess up the puzzle. First, move both boulder L and N to the west. Now you can really move boulder M. Next, move boulder M to either the north or the south. Then, grab TM79 (Dark Pulse) (marked as T in the picture). After that, go down the stairs and return to 1F.
| Item (2F Part 3) | ||||||||||||
|---|---|---|---|---|---|---|---|---|---|---|---|---|
| ||||||||||||
1F (Part 5)
You are almost done with Victory Road!
Get back to the T-junction, but head east this time. (Be careful that you don’t jump off the ledge, or you’ll need to go all the way through B1F!) Climb up the wall and fight the last Trainer -- Dragon Tamer Clinton!
| Trainer (1F Part 5) | |||||||||||||||||||||||||||||
|---|---|---|---|---|---|---|---|---|---|---|---|---|---|---|---|---|---|---|---|---|---|---|---|---|---|---|---|---|---|
| |||||||||||||||||||||||||||||
Now cross the bridge and head north. You are finally at the exit! Head outside.
Pokémon League (Main Building)
That's it! You have done with Victory Road and you're now at the main part of the Sinnoh Pokémon League. The main building of the Pokémon League is above the biggest waterfall in the region. Check the statue, and it displays:
Pokémon League
The Pinnacle of Trainerdom!
Grab the hidden Sky Plate, then surf and climb up the waterfall, and finally head inside the building.
| Item | ||||||||||||
|---|---|---|---|---|---|---|---|---|---|---|---|---|
| ||||||||||||
| Available Pokémon | ||||||||||||||||||||||||||||||||||||||||||||||||||||||||||||||||||||||||||||||||||||||||||||||||||||||||||||||||||||||||||||
|---|---|---|---|---|---|---|---|---|---|---|---|---|---|---|---|---|---|---|---|---|---|---|---|---|---|---|---|---|---|---|---|---|---|---|---|---|---|---|---|---|---|---|---|---|---|---|---|---|---|---|---|---|---|---|---|---|---|---|---|---|---|---|---|---|---|---|---|---|---|---|---|---|---|---|---|---|---|---|---|---|---|---|---|---|---|---|---|---|---|---|---|---|---|---|---|---|---|---|---|---|---|---|---|---|---|---|---|---|---|---|---|---|---|---|---|---|---|---|---|---|---|---|---|---|
| ||||||||||||||||||||||||||||||||||||||||||||||||||||||||||||||||||||||||||||||||||||||||||||||||||||||||||||||||||||||||||||
The ground floor of the building is a mixture of a Pokémon Center and a Poké Mart (although the theme is the one in Pokémon Centers). DO NOT go all the way forward! A tough battle awaits you. Instead, heal your Pokémon FIRST! Your Pokémon should be exhausted after the Victory Road journey. The Pokémon Center is on the left. Then buy items if you are running out of them. The Mart is on the right.
MAKE SURE that you HEAL your Pokémon and have your Pokémon AT LEVEL 50 at the very least BEFORE PROCEEDING to the Ace Trainer! It is recommended that you train your Pokémon until they are around Level 55 before proceeding.
When you are ready, step forward to the Ace Trainer, and someone will burst in, saying:
"Hold it!
Don’t go off without me!"
Final Rival Battle
That "someone" is none other than Rival Barry. He says, "Let’s see who’s more worthy of making the challenge with a battle!" then challenges you to the final rival battle in the main storyline! (Well, he rarely falls behind you, and he did, coming here after your arrival.)
Barry’s team is now very strong -- far stronger than the team he has when you're in the Multi Battle on Spear Pillar, Mt. Coronet. His strongest Pokémon is again his own first partner Pokémon at its final form, at Level 53. All of his Pokémon have evolved into their final forms. They also possess moves that deals a lot of damage. However, you cannot lose this fight -- if you lose, you’re not worthy to challenge the Elite Four!
No matter which first partner you chose, his team will always have the following 3 Pokémon: Staraptor (which he always starts with), Heracross and Snorlax (Evolved from his Munchlax. It seems that Barry treated it well).
He’ll have 3 of the following 6 Pokémon, depending on your first partner Pokémon:
- 2 of these 3: Rapidash, Roserade, Floatzel
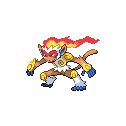
- 1 of the final forms of the 3 first partners (Torterra, Infernape and Empoleon, at Level 53)
His Pokémon can hit really hard. Their moves can also cover a variety of types, so watch out! He’ll also use type-advantage to attack and send out Pokémon depending on the situation (i.e. what Pokémon you’re using), so try to use your own type-advantage to hit back.
After beating him, he’ll say that he’s not ready, order you not to lose, and bolts off. Heal your Pokémon, but don't proceed further yet! You will have to do the most serious preparation ever!
|
Diamond and Pearl walkthrough |
|

|
This article is part of Project Walkthroughs, a Bulbapedia project that aims to write comprehensive step-by-step guides on each Pokémon game. |
