Appendix:Platinum walkthrough/Section 17: Difference between revisions
mNo edit summary |
m (→Catching Giratina: Correct multiplication signs, replaced: 5x → 5×) |
||
| (22 intermediate revisions by 12 users not shown) | |||
| Line 1: | Line 1: | ||
==Spear Pillar== | ==Spear Pillar== | ||
[[File:Spear Pillar Pt.png|left|thumb|180px|Spear Pillar]] | [[File:Spear Pillar Pt.png|left|thumb|180px|Spear Pillar]] | ||
| Line 334: | Line 11: | ||
|} | |} | ||
When you first arrive, you will have to deal with two Galactic Grunts in a [[Double Battle]]. Afterwards and you'll find that both [[Mars]] and [[Jupiter]] wish to challenge you. Luckily {{ga|Barry}} appears, making this into a [[ | When you first arrive at [[Spear Pillar]], you will have to deal with two Galactic Grunts in a [[Double Battle]]. Afterwards and you'll find that both [[Mars]] and [[Jupiter]] wish to challenge you. Luckily {{ga|Barry}} appears, making this into a [[Multi Battle]]. | ||
{| align="center" | {| align="center" | ||
! {{MS|387|Turtwig (Pokémon)}} If the {{player}} chose {{p|Turtwig}}: | ! {{MS/3|387|Turtwig (Pokémon)}} If the {{player}} chose {{p|Turtwig}}: | ||
! {{MS|390|Chimchar (Pokémon)}} If the {{player}} chose {{p|Chimchar}}: | ! {{MS/3|390|Chimchar (Pokémon)}} If the {{player}} chose {{p|Chimchar}}: | ||
! {{MS|393|Piplup (Pokémon)}} If the {{player}} chose {{p|Piplup}}: | ! {{MS/3|393|Piplup (Pokémon)}} If the {{player}} chose {{p|Piplup}}: | ||
|- | |- | ||
| {{Party/Single | |{{Party/Single | ||
|color=E08040 | |color=E08040 | ||
|bordercolor=629C20 | |bordercolor=629C20 | ||
| Line 347: | Line 24: | ||
|sprite=Pt Barry Back.png | |sprite=Pt Barry Back.png | ||
|prize=N/A | |prize=N/A | ||
|class=Pokémon Trainer | |class={{PK}}{{MN}} Trainer | ||
|name=Barry | |classlink=Pokémon Trainer | ||
|name={{color2|000000|Barry (game)|Barry}} | |||
|game=Pt | |game=Pt | ||
|location=Spear Pillar | |location=Spear Pillar | ||
|pokemon=6}} | |||
|pokemon=6 | |{{Pokémon/4 | ||
}}|{{Pokémon/4 | |||
|ndex=446 | |ndex=446 | ||
|back=yes | |back=yes | ||
| Line 359: | Line 36: | ||
|game=Platinum | |game=Platinum | ||
|gender=male | |gender=male | ||
|ability= | |ability=Pickup | ||
|type1=Normal | |type1=Normal | ||
|level=40 | |level=40 | ||
|move1=Body Slam|move1type=Normal|move1cat=Physical | |move1=Body Slam|move1type=Normal|move1cat=Physical | ||
|move2=Screech|move2type=Normal|move2cat=Status | |move2=Screech|move2type=Normal|move2cat=Status | ||
|move3=Stockpile|move3type=Normal|move3cat=Status | |move3=Stockpile|move3type=Normal|move3cat=Status | ||
|move4=Swallow|move4type=Normal|move4cat=Status}} | |move4=Swallow|move4type=Normal|move4cat=Status}} | ||
|{{Pokémon/4 | |{{Pokémon/4 | ||
| Line 377: | Line 54: | ||
|back=yes | |back=yes | ||
|move1=Giga Drain|move1type=Grass|move1cat=Special | |move1=Giga Drain|move1type=Grass|move1cat=Special | ||
|move2= | |move2=Ingrain|move2type=Grass|move2cat=Status | ||
|move3=GrassWhistle|move3type=Grass|move3cat=Status | |move3=GrassWhistle|move3type=Grass|move3cat=Status | ||
|move4= | |move4=Toxic|move4type=Poison|move4cat=Status}} | ||
|{{Pokémon/4 | |{{Pokémon/4 | ||
|ndex=214 | |ndex=214 | ||
| Line 394: | Line 71: | ||
|move2=Night Slash|move2type=Dark|move2cat=Physical | |move2=Night Slash|move2type=Dark|move2cat=Physical | ||
|move3=Brick Break|move3type=Fighting|move3cat=Physical | |move3=Brick Break|move3type=Fighting|move3cat=Physical | ||
|move4= | |move4=Aerial Ace|move4type=Flying|move4cat=Physical}} | ||
{{Party/Div|color=E08040}} | {{Party/Div|color=E08040}} | ||
|{{Pokémon/4 | |{{Pokémon/4 | ||
| Line 409: | Line 86: | ||
|move2=Iron Tail|move2type=Steel|move2cat=Physical | |move2=Iron Tail|move2type=Steel|move2cat=Physical | ||
|move3=Aqua Jet|move3type=Water|move3cat=Physical | |move3=Aqua Jet|move3type=Water|move3cat=Physical | ||
|move4= | |move4=Brick Break|move4type=Fighting|move4cat=Physical}} | ||
|{{Pokémon/4 | |{{Pokémon/4 | ||
|ndex=398 | |ndex=398 | ||
| Line 424: | Line 101: | ||
|move2=Close Combat|move2type=Fighting|move2cat=Physical | |move2=Close Combat|move2type=Fighting|move2cat=Physical | ||
|move3=Aerial Ace|move3type=Flying|move3cat=Physical | |move3=Aerial Ace|move3type=Flying|move3cat=Physical | ||
|move4=Take Down|move4type= | |move4=Take Down|move4type=Normal|move4cat=Physical}} | ||
|{{Pokémon/4 | |{{Pokémon/4 | ||
|ndex=392 | |ndex=392 | ||
| Line 432: | Line 109: | ||
|type1=Fire | |type1=Fire | ||
|type2=Fighting | |type2=Fighting | ||
|ability=Blaze | |ability=Blaze | ||
|level=44 | |level=44 | ||
| Line 438: | Line 114: | ||
|move1=Close Combat|move1type=Fighting|move1cat=Physical | |move1=Close Combat|move1type=Fighting|move1cat=Physical | ||
|move2=Flame Wheel|move2type=Fire|move2cat=Physical | |move2=Flame Wheel|move2type=Fire|move2cat=Physical | ||
|move3= | |move3=Punishment|move3type=Dark|move3cat=Physical | ||
|move4= | |move4=Will-O-Wisp|move4type=Fire|move4cat=Status}} | ||
{{Party/Footer}} | {{Party/Footer}} | ||
| Line 448: | Line 124: | ||
|sprite=Pt Barry Back.png | |sprite=Pt Barry Back.png | ||
|prize=N/A | |prize=N/A | ||
|class=Pokémon Trainer | |class={{PK}}{{MN}} Trainer | ||
|name=Barry | |classlink=Pokémon Trainer | ||
|name={{color2|000000|Barry (game)|Barry}} | |||
|game=Pt | |game=Pt | ||
|location=Spear Pillar | |location=Spear Pillar | ||
|pokemon=6}} | |||
|pokemon=6 | |{{Pokémon/4 | ||
}}|{{Pokémon/4 | |||
|ndex=446 | |ndex=446 | ||
|back=yes | |back=yes | ||
| Line 460: | Line 136: | ||
|game=Platinum | |game=Platinum | ||
|gender=male | |gender=male | ||
|ability= | |ability=Pickup | ||
|type1=Normal | |type1=Normal | ||
|level=40 | |level=40 | ||
|move1=Body Slam|move1type=Normal|move1cat=Physical | |move1=Body Slam|move1type=Normal|move1cat=Physical | ||
|move2=Screech|move2type=Normal|move2cat=Status | |move2=Screech|move2type=Normal|move2cat=Status | ||
|move3=Stockpile|move3type=Normal|move3cat=Status | |move3=Stockpile|move3type=Normal|move3cat=Status | ||
|move4=Swallow|move4type=Normal|move4cat=Status}} | |move4=Swallow|move4type=Normal|move4cat=Status}} | ||
|{{Pokémon/4 | |{{Pokémon/4 | ||
| Line 479: | Line 155: | ||
|move2=Will-O-Wisp|move2type=Fire|move2cat=Status | |move2=Will-O-Wisp|move2type=Fire|move2cat=Status | ||
|move3=Take Down|move3type=Normal|move3cat=Physical | |move3=Take Down|move3type=Normal|move3cat=Physical | ||
|move4= | |move4=Stomp|move4type=Normal|move4cat=Physical}} | ||
|{{Pokémon/4 | |{{Pokémon/4 | ||
|ndex=214 | |ndex=214 | ||
| Line 494: | Line 170: | ||
|move2=Night Slash|move2type=Dark|move2cat=Physical | |move2=Night Slash|move2type=Dark|move2cat=Physical | ||
|move3=Brick Break|move3type=Fighting|move3cat=Physical | |move3=Brick Break|move3type=Fighting|move3cat=Physical | ||
|move4= | |move4=Aerial Ace|move4type=Flying|move4cat=Physical}} | ||
{{Party/Div|color=E08040}} | {{Party/Div|color=E08040}} | ||
|{{Pokémon/4 | |{{Pokémon/4 | ||
| Line 507: | Line 183: | ||
|back=yes | |back=yes | ||
|move1=Giga Drain|move1type=Grass|move1cat=Special | |move1=Giga Drain|move1type=Grass|move1cat=Special | ||
|move2= | |move2=Ingrain|move2type=Grass|move2cat=Status | ||
|move3=GrassWhistle|move3type=Grass|move3cat=Status | |move3=GrassWhistle|move3type=Grass|move3cat=Status | ||
|move4= | |move4=Toxic|move4type=Poison|move4cat=Status}} | ||
|{{Pokémon/4 | |{{Pokémon/4 | ||
|ndex=398 | |ndex=398 | ||
| Line 524: | Line 200: | ||
|move2=Close Combat|move2type=Fighting|move2cat=Physical | |move2=Close Combat|move2type=Fighting|move2cat=Physical | ||
|move3=Aerial Ace|move3type=Flying|move3cat=Physical | |move3=Aerial Ace|move3type=Flying|move3cat=Physical | ||
|move4=Take Down|move4type= | |move4=Take Down|move4type=Normal|move4cat=Physical}} | ||
|{{Pokémon/4 | |{{Pokémon/4 | ||
|ndex=395 | |ndex=395 | ||
| Line 532: | Line 208: | ||
|type1=Water | |type1=Water | ||
|type2=Steel | |type2=Steel | ||
|ability=Torrent | |||
|ability=Torrent | |||
|level=44 | |level=44 | ||
|back=yes | |back=yes | ||
|move1=Aqua Jet|move1type=Water|move1cat=Physical | |move1=Aqua Jet|move1type=Water|move1cat=Physical | ||
|move2= | |move2=Swagger|move2type=Normal|move2cat=Status | ||
|move3=Aerial Ace|move3type=Flying|move3cat=Physical | |move3=Aerial Ace|move3type=Flying|move3cat=Physical | ||
|move4=Metal Claw|move4type=Steel|move4cat=Physical}} | |move4=Metal Claw|move4type=Steel|move4cat=Physical}} | ||
| Line 548: | Line 223: | ||
|sprite=Pt Barry Back.png | |sprite=Pt Barry Back.png | ||
|prize=N/A | |prize=N/A | ||
|class=Pokémon Trainer | |class={{PK}}{{MN}} Trainer | ||
|name=Barry | |classlink=Pokémon Trainer | ||
|name={{color2|000000|Barry (game)|Barry}} | |||
|game=Pt | |game=Pt | ||
|location=Spear Pillar | |location=Spear Pillar | ||
|pokemon=6}} | |||
|pokemon=6 | |{{Pokémon/4 | ||
}}|{{Pokémon/4 | |||
|ndex=446 | |ndex=446 | ||
|back=yes | |back=yes | ||
| Line 560: | Line 235: | ||
|game=Platinum | |game=Platinum | ||
|gender=male | |gender=male | ||
|ability= | |ability=Pickup | ||
|type1=Normal | |type1=Normal | ||
|level=40 | |level=40 | ||
|move1=Body Slam|move1type=Normal|move1cat=Physical | |move1=Body Slam|move1type=Normal|move1cat=Physical | ||
|move2=Screech|move2type=Normal|move2cat=Status | |move2=Screech|move2type=Normal|move2cat=Status | ||
|move3=Stockpile|move3type=Normal|move3cat=Status | |move3=Stockpile|move3type=Normal|move3cat=Status | ||
|move4=Swallow|move4type=Normal|move4cat=Status}} | |move4=Swallow|move4type=Normal|move4cat=Status}} | ||
|{{Pokémon/4 | |{{Pokémon/4 | ||
| Line 579: | Line 254: | ||
|move2=Will-O-Wisp|move2type=Fire|move2cat=Status | |move2=Will-O-Wisp|move2type=Fire|move2cat=Status | ||
|move3=Take Down|move3type=Normal|move3cat=Physical | |move3=Take Down|move3type=Normal|move3cat=Physical | ||
|move4= | |move4=Stomp|move4type=Normal|move4cat=Physical}} | ||
|{{Pokémon/4 | |{{Pokémon/4 | ||
|ndex=214 | |ndex=214 | ||
| Line 594: | Line 269: | ||
|move2=Night Slash|move2type=Dark|move2cat=Physical | |move2=Night Slash|move2type=Dark|move2cat=Physical | ||
|move3=Brick Break|move3type=Fighting|move3cat=Physical | |move3=Brick Break|move3type=Fighting|move3cat=Physical | ||
|move4= | |move4=Aerial Ace|move4type=Flying|move4cat=Physical}} | ||
{{Party/Div|color=E08040}} | {{Party/Div|color=E08040}} | ||
|{{Pokémon/4 | |{{Pokémon/4 | ||
| Line 609: | Line 284: | ||
|move2=Iron Tail|move2type=Steel|move2cat=Physical | |move2=Iron Tail|move2type=Steel|move2cat=Physical | ||
|move3=Aqua Jet|move3type=Water|move3cat=Physical | |move3=Aqua Jet|move3type=Water|move3cat=Physical | ||
|move4= | |move4=Brick Break|move4type=Fighting|move4cat=Physical}} | ||
|{{Pokémon/4 | |{{Pokémon/4 | ||
|ndex=398 | |ndex=398 | ||
| Line 624: | Line 299: | ||
|move2=Close Combat|move2type=Fighting|move2cat=Physical | |move2=Close Combat|move2type=Fighting|move2cat=Physical | ||
|move3=Aerial Ace|move3type=Flying|move3cat=Physical | |move3=Aerial Ace|move3type=Flying|move3cat=Physical | ||
|move4=Take Down|move4type= | |move4=Take Down|move4type=Normal|move4cat=Physical}} | ||
|{{Pokémon/4 | |{{Pokémon/4 | ||
|ndex=389 | |ndex=389 | ||
| Line 632: | Line 307: | ||
|type1=Grass | |type1=Grass | ||
|type2=Ground | |type2=Ground | ||
|ability=Overgrow | |ability=Overgrow | ||
|level=44 | |level=44 | ||
| Line 652: | Line 326: | ||
|headcolor1=F69C7B | |headcolor1=F69C7B | ||
|bordercolor1=9C2931 | |bordercolor1=9C2931 | ||
|headcolor2=EE8BCD | |headcolor2=EE8BCD | ||
|bordercolor2=D56AAC | |bordercolor2=D56AAC | ||
| Line 742: | Line 415: | ||
|move4=SmokeScreen|move4type=Normal|move4cat=Status}} | |move4=SmokeScreen|move4type=Normal|move4cat=Status}} | ||
{{Party/Footer}} | {{Party/Footer}} | ||
[[File:Red Chain Platinum.png|thumb|left|256px|Cyrus uses the Red Chain]] | |||
[[File:Spear Pillar Giratina Pt.png|thumb|right|256px|A mysterious Pokémon appears]] | |||
Both of the Commanders use {{p|Bronzor}}, {{p|Golbat}}, and their signature Pokémon: {{p|Purugly}} in Mars's case, and {{p|Skuntank}} in Jupiter's case. Quickly take down both Bronzor before they can use {{m|Reflect}} or {{m|Light Screen}} to reduce your attacks' damage. A powerful {{type|Fighting}} and {{type|Ground}} move will take out Purugly and Skuntank respectively, while an {{t|Electric}}- or {{t|Rock}}-type attack will take out their Golbat. | |||
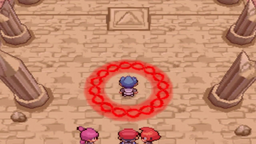
After the battle, Barry heals your Pokémon before leaving. You'll watch as [[Cyrus]] uses the [[Red Chain]] to summon both {{p|Dialga}} and {{p|Palkia}} in preparation to destroy the world, then recreate it in his image. {{p|Uxie}}, {{p|Mesprit}}, and {{p|Azelf}} then appear. While Cyrus says it's pointless since the [[Lake guardians]] can't match his power, the ground opens up! Another mysterious Pokémon has appeared. Cyrus finds this amusing and then all of a sudden both he and the Pokémon disappear, leaving a portal behind. | |||
[[Cynthia]] then arrives and you'll both watch as the three Lake guardians enter the portal. She then reveals that the mysterious Pokémon is {{p|Giratina}} and according to legends, it lives in a mysterious [[Distortion World]]. The portal connects to it, and if it isn't closed, it will spread and consume the whole world. Once you accept Cynthia's offer, both of you will head to the Distortion World. Also, at this point both Dialga and Palkia are counted as seen in your Pokédex. | |||
{{-}} | |||
==Distortion World== | |||
[[File:Distortion World 1F Pt.png|left|thumb|250px|Distortion World 1F]] | |||
[[File:Distortion World B1F Pt.png|right|thumb|250px|Distortion World B1F]] | |||
[[File:Distortion World B2F Pt.png|left|thumb|250px|Distortion World B2F]] | |||
[[File:Distortion World B3F Pt.png|right|thumb|250px|Distortion World B3F]] | |||
[[File:Distortion World B5F Pt.png|right|thumb|250px|Distortion World B5F]] | |||
[[File:Distortion World B4F lower Pt.png|left|thumb|180px|Distortion World lower B4F]] | |||
[[File:Distortion World B4F upper Pt.png|left|thumb|250px|Distortion World upper B4F]] | |||
[[File:Distortion World B6F Pt.png|right|thumb|250px|Distortion World B6F]] | |||
[[File:Distortion World B7F Pt.png|right|thumb|110px|Distortion World B7F]] | |||
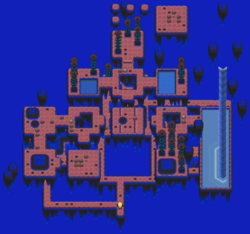
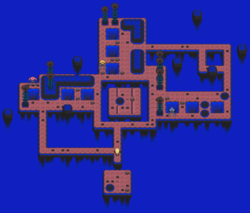
You'll quickly discover that in the [[Distortion World]], gravity works a little differently sometimes! Be careful when going through the Distortion World as it is easy to get lost, not to mention there are plenty of confusing puzzles. | |||
Starting from 1F, follow [[Cynthia]] to a small hovering square slab where she will mention stepping on the gray markers. This will cause it to descend to B1F; apparently these square slabs serve like elevators here in the Distortion World. At B1F, follow Cynthia across the small floating platforms to find another area with a platform hanging sideways above you. {{p|Mesprit}} will appear before floating away. Stand on the gray marker to manipulate gravity so you can stand on this floating platform. Travel across to the other side and use the gray marker there to jump off this floating platform and then follow the path that will take you to the elevator-platform down to B2F. | |||
On B2F, head to the first platform and stand on the gray marker located at the top to activate this platform and reach the next one. On the next platform, take the obvious marker on the left to reach another special floating platform with sideways gravity, where you will find Cynthia. After talking with her, follow the path that will take you to more moving platforms. Touch each correct marker in this order to progress: right, right, down, left (don't hop to the nearby platform in this area or you'll just find a dead end). Then, hop across the nearby platform in front of you and hit the upper marker, then the right-hand one, and lastly the center to activate the elevator-platform that leads to B3F. | |||
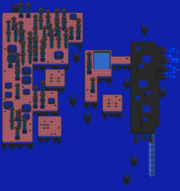
On B3F, head towards the lower gray marker on the elevator to expose some hidden platforms and travel down to meet [[Cyrus]]. He reveals that the shadowy Pokémon abandoned him and went further below, and talks about DNA and how one thing cannot exist without the other. He theorizes that if someone were to defeat the shadowy Pokémon, this world should disappear and no longer interfere with his plans. For the puzzle on this floor, you must touch the gray markers on the floor to expose hidden platforms. Only one path will get you to B5F, and platforms here sometimes become visible or invisible. | |||
First, head for the marker on the upper right and it will expose a hidden platform. Next, travel to the marker you see below you by traveling right, then down to find another hidden platform. Next travel right and you will reach the elevator that descends to B5F. On B5F, from the elevator, continue forward until you see {{p|Uxie}}, then use {{m|Strength}} to push a boulder to the platform below you on B6F. Then, head downwards to the elevator that leads to B6F, but do not take it yet. Instead, use the ledge that will take you to a platform to the left and Mesprit will appear. Here, you will have to push another boulder down to B6F. Then, take the elevator that will take you to B4F. Continue navigating forward and carefully go through the path of trees and rocks that can turn visible or invisible to reach a new elevator. That will take you to a new area of B3F. From here, use the nearby gray marker. Then, travel left then down to find an invisible platform, then travel right, then right again to get to an elevator that leads to another area of B4F. | |||
On your way down, you will see Cyrus again, but this time he mysteriously disappears. {{m|Surf}} across the water, then touch the gray markers to jump to a platform with sideways gravity. Then, use another set that leads to another platform with upside-down gravity. Now use Surf again and travel down the waterfall. This should get you back to B5F, where you can find {{p|Azelf}} along with another boulder to push down to B6F. Now, head to the nearby elevator and this time use it to descend to B6F. The secret to B6F's puzzle is to carefully push each of the boulders you pushed down from B5F into the special holes where each of the Lake Guardians are. If you mess up, you'll have to push them down from the various floors again. Now, go back to the elevator and travel south from it to find Cynthia and talk to her. If you've completed the puzzle correctly, a new elevator will appear that you can use to travel down to B7F. | |||
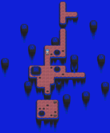
Here, you will both encounter Cyrus again, and Cynthia asks why he is so determined to create a new world. Cyrus refuses to listen. Talk to him, and he will challenge you to a battle. | |||
{{Party/Single | |||
|color={{silver color}} | |||
|headcolor={{silver color light}} | |||
|bordercolor={{dark color}} | |||
|sprite=Spr Pt Cyrus.png | |||
|prize={{PDollar}}8640 | |||
|class=Galactic Boss | |||
|classlink=Cyrus | |||
|name=Cyrus | |||
|game=Pt | |||
|location=Distortion World | |||
|pokemon=5}} | |||
|{{Pokémon/4 | |||
|game=Platinum | |||
|ndex=229 m | |||
|pokemon=Houndoom | |||
|gender=male | |||
|level=45 | |||
|ability=Flash Fire | |||
|type1=Dark|type2=Fire | |||
|move1=Flamethrower|move1type=Fire|move1cat=Special | |||
|move2=Dark Pulse|move2type=Dark|move2cat=Special | |||
|move3=Will-O-Wisp|move3type=Fire|move3cat=Status | |||
|move4=Thunder Fang|move4type=Electric|move4cat=Physical}} | |||
|{{Pokémon/4 | |||
|game=Platinum | |||
|ndex=430 | |||
|pokemon=Honchkrow | |||
|gender=male | |||
|level=47 | |||
|ability=Insomnia | |||
|type1=Dark|type2=Flying | |||
|move1=Drill Peck|move1type=Flying|move1cat=Physical | |||
|move2=Night Slash|move2type=Dark|move2cat=Physical | |||
|move3=Heat Wave|move3type=Fire|move3cat=Special | |||
|move4=Psychic|move4type=Psychic|move4cat=Special}} | |||
|{{Pokémon/4 | |||
|game=Platinum | |||
|ndex=169 | |||
|pokemon=Crobat | |||
|gender=male | |||
|level=46 | |||
|ability=Inner Focus | |||
|type1=Poison|type2=Flying | |||
|move1=Cross Poison|move1type=Poison|move1cat=Physical | |||
|move2=Air Slash|move2type=Flying|move2cat=Special | |||
|move3=Toxic|move3type=Poison|move3cat=Status | |||
|move4=Confuse Ray|move4type=Ghost|move4cat=Status}} | |||
{{Party/Div|color={{silver color}}}} | |||
| style="margin:auto" |{{Pokémon/4 | |||
|game=Platinum | |||
|ndex=130 m | |||
|pokemon=Gyarados | |||
|gender=male | |||
|level=46 | |||
|ability=Intimidate | |||
|type1=Water|type2=Flying | |||
|move1=Waterfall|move1type=Water|move1cat=Physical | |||
|move2=Ice Fang|move2type=Ice|move2cat=Physical | |||
|move3=Earthquake|move3type=Ground|move3cat=Physical | |||
|move4=Giga Impact|move4type=Normal|move4cat=Physical}} | |||
| style="margin:auto" |{{Pokémon/4 | |||
|game=Platinum | |||
|ndex=461 m | |||
|pokemon=Weavile | |||
|gender=male | |||
|level=48 | |||
|held=Sitrus Berry | |||
|ability=Pressure | |||
|type1=Dark|type2=Ice | |||
|move1=Night Slash|move1type=Dark|move1cat=Physical | |||
|move2=Ice Punch|move2type=Ice|move2cat=Physical | |||
|move3=X-Scissor|move3type=Bug|move3cat=Physical | |||
|move4=Fake Out|move4type=Normal|move4cat=Physical}} | |||
{{Party/Footer}} | |||
Cyrus is a lot tougher than in the last battle, since he added two Pokémon and his {{p|Sneasel}} has evolved. A fast {{type|Electric}} such as {{p|Jolteon}} is useful in this battle, since half of his team is weak to Electric-type moves. Additionally, his entire team is weak to {{t|Rock}} attacks. His first Pokémon, {{p|Houndoom}}, is quite fast and possesses {{m|Thunder Fang}} to counter {{type|Water}}s. {{m|Will-O-Wisp}} will inflict a {{Status|burn}} if it hits, halving your Pokémon's Attack stat. Take it down as quickly as you can and it won't be a problem. Be careful when Cyrus send out his {{p|Gyarados}}, as it can threaten Electric and {{t|Grass}} Pokémon with its various attacks. {{m|Giga Impact}} will do a lot of damage, but Gyarados must rest for one turn after using it. {{p|Crobat}}'s Speed is a problem, especially with its ability to use the status moves {{m|Toxic}} and {{m|Confuse Ray}}. Simply taking it out with super effective attacks and firstly {{Status|Paralysis|paralyzing}} it to cut down its Speed are both valid strategies. Against {{p|Honchkrow}}, the same strategy as before will work; just remember it uses {{m|Heat Wave}} to counter {{type|Ice}}s and {{type|Steel}}s. His main Pokémon, {{p|Weavile}}, is incredibly fast and can prevent your Pokémon from moving, not just from {{m|Fake Out}} on its first turn, but also with {{m|Ice Punch}}, which has a chance of {{Status|Freeze|freezing}} your Pokémon. A powerful {{type|Fighting}} move should easily defeat it, though Rock, Steel, or {{type|Fire}} moves can also help. | |||
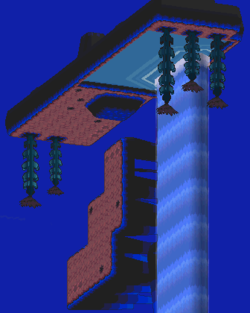
After the battle, Cyrus will think it is hopeless since if {{p|Giratina}} is defeated, this world will disappear. However, Cynthia points out the problems are due to the Distortion World being forcibly merged with the real one, and by defeating Giratina the connection can be severed. Cynthia will then heal your team. Before going forward to face Giratina, you need to decide if you want to catch it now or later. '''Save your game''' before using the platforms to reach it. Once you move forward and see Giratina fly by, move forward again and then some invisible platforms will become visible, allowing you to reach Giratina. | |||
===Catching Giratina=== | |||
[[File:Distortion World B7F Giratina Pt.png|thumb|180px|Giratina's area of the Distortion World]] | |||
{| style="margin: auto;" | |||
| | |||
{{Pokémon/4 | |||
|- align="center" | |||
|game=Platinum | |||
|ndex=487O | |||
|pokemon=Giratina | |||
|type1=Ghost | |||
|type2=Dragon | |||
|level=47 | |||
|ability=Levitate | |||
|move1=Ominous Wind|move1type=Ghost|move1cat=Special | |||
|move2=AncientPower|move2type=Rock|move2cat=Special | |||
|move3=Dragon Claw|move3type=Dragon|move3cat=Physical | |||
|move4=Shadow Force|move4type=Ghost|move4cat=Physical}} | |||
|} | |||
The [[Dusk Ball]] is the best Poké Ball variant to use in this fight, just make sure your game is set anywhere between 8:00 p.m. to 3:59 a.m to make use of its 3.5× catch rate modifier. [[Ultra Ball]]s and [[Timer Ball]]s can also be useful. It can take 10, 20, or even 30 Poké Balls to catch Giratina, so prepare for a long battle. Since you saved beforehand, you can turn off your game if something goes wrong and get another chance. Unlike Dialga and Palkia, Giratina's catch rate remained 3 (0.4% when using Poké Ball at full health). | |||
One thing which makes {{DL|List of Pokémon with form differences|Giratina|Origin Forme}} Giratina a difficult opponent is that in this form, it specializes more in offense over defense. If you have a status move that inflicts {{status|paralysis}} or {{status|sleep}}, you can use them to make Giratina easier to catch. Avoid or minimize use of {{t|Ice}}-, {{t|Ghost}}-, {{t|Dragon}}- or {{type|Dark}} moves as they carry the risk of knocking it out. After reducing its HP bar to the red zone, a good tactic is to bring out a Steel-type that has good defenses and resistances to all of Giratina's attacks. Be sure to keep an eye on how many turns have passed, though, as Giratina only has 35 PP, and it will start to use struggle after it uses all its PP up. | |||
[[ | Unlike in the previous Pokémon games, you do not have to catch Giratina right away, since [[Legendary Pokémon|legendaries]] that you failed to catch will reappear each time you defeat the [[Elite Four]] and [[Pokémon Champion]] during your playthrough of this game. If Giratina’s attacks are too much for you to deal with right now, just defeat it. You can face it later in [[Turnback Cave]] in its {{DL|List of Pokémon with form differences|Giratina|Altered Forme}}, which is more defense-oriented stat-wise. Also, if you run out of Poké Balls or so many turns of battle elapse that Giratina is forced to {{m|Struggle}}, it would also be okay to either reset (assuming you saved beforehand) or knock it out and try again later on. | ||
After the battle, Cynthia is happy that Giratina understood your intentions and will point out a nearby portal that will take you back to your world. Cyrus then appears and is surprised that Giratina was defeated or captured and that his perfect world will never be complete. After he and Cynthia express their different views about the world, Cyrus leaves, convinced they will never understand each other. Now enter the portal, which will take you to [[Sendoff Spring]], the fourth lake of [[Sinnoh]]. | |||
{{WalkthroughPrevNext | | {{WalkthroughPrevNext | | ||
| Line 758: | Line 563: | ||
prevsection=16 | | prevsection=16 | | ||
nextsection=18 | | nextsection=18 | | ||
prevname= | prevname=Mt. Coronet (south)| | ||
nextname= | nextname=Sendoff Spring to Sunyshore City | ||
}} | }} | ||
Latest revision as of 14:32, 20 November 2023
Spear Pillar
| Team Galactic | ||||||||||||||||||||||||||||||||||||||||||
|---|---|---|---|---|---|---|---|---|---|---|---|---|---|---|---|---|---|---|---|---|---|---|---|---|---|---|---|---|---|---|---|---|---|---|---|---|---|---|---|---|---|---|
| ||||||||||||||||||||||||||||||||||||||||||
When you first arrive at Spear Pillar, you will have to deal with two Galactic Grunts in a Double Battle. Afterwards and you'll find that both Mars and Jupiter wish to challenge you. Luckily Barry appears, making this into a Multi Battle.
Half of his team that will fight alongside you are determined by which starter he picked at the beginning of the game, but naturally all of them excluding Munchlax have evolved all the way to their final forms.
|
|||||||||||||||||||||||||||||||||||||||||||||||||||||||||||||||||||||||||||||||||||||||||||||||||||||||||||||||||||||||||||||||||||||||||||||||||||||||||||||||||||||||||||||||||||||||||||||||||||||||||||||||||
| |||||||||||||||||||||||||||||||||||||||||||||||||||||||||||||||||||||||||||||||||||||||||||||||||||||||||||||||||||||||||||||||||||||||||||||||||||||||||||||||||||||||||||||||||||||||||||||||||||||||||||||||||
Both of the Commanders use Bronzor, Golbat, and their signature Pokémon: Purugly in Mars's case, and Skuntank in Jupiter's case. Quickly take down both Bronzor before they can use Reflect or Light Screen to reduce your attacks' damage. A powerful Fighting-type and Ground-type move will take out Purugly and Skuntank respectively, while an Electric- or Rock-type attack will take out their Golbat.
After the battle, Barry heals your Pokémon before leaving. You'll watch as Cyrus uses the Red Chain to summon both Dialga and Palkia in preparation to destroy the world, then recreate it in his image. Uxie, Mesprit, and Azelf then appear. While Cyrus says it's pointless since the Lake guardians can't match his power, the ground opens up! Another mysterious Pokémon has appeared. Cyrus finds this amusing and then all of a sudden both he and the Pokémon disappear, leaving a portal behind.
Cynthia then arrives and you'll both watch as the three Lake guardians enter the portal. She then reveals that the mysterious Pokémon is Giratina and according to legends, it lives in a mysterious Distortion World. The portal connects to it, and if it isn't closed, it will spread and consume the whole world. Once you accept Cynthia's offer, both of you will head to the Distortion World. Also, at this point both Dialga and Palkia are counted as seen in your Pokédex.
Distortion World
You'll quickly discover that in the Distortion World, gravity works a little differently sometimes! Be careful when going through the Distortion World as it is easy to get lost, not to mention there are plenty of confusing puzzles.
Starting from 1F, follow Cynthia to a small hovering square slab where she will mention stepping on the gray markers. This will cause it to descend to B1F; apparently these square slabs serve like elevators here in the Distortion World. At B1F, follow Cynthia across the small floating platforms to find another area with a platform hanging sideways above you. Mesprit will appear before floating away. Stand on the gray marker to manipulate gravity so you can stand on this floating platform. Travel across to the other side and use the gray marker there to jump off this floating platform and then follow the path that will take you to the elevator-platform down to B2F.
On B2F, head to the first platform and stand on the gray marker located at the top to activate this platform and reach the next one. On the next platform, take the obvious marker on the left to reach another special floating platform with sideways gravity, where you will find Cynthia. After talking with her, follow the path that will take you to more moving platforms. Touch each correct marker in this order to progress: right, right, down, left (don't hop to the nearby platform in this area or you'll just find a dead end). Then, hop across the nearby platform in front of you and hit the upper marker, then the right-hand one, and lastly the center to activate the elevator-platform that leads to B3F.
On B3F, head towards the lower gray marker on the elevator to expose some hidden platforms and travel down to meet Cyrus. He reveals that the shadowy Pokémon abandoned him and went further below, and talks about DNA and how one thing cannot exist without the other. He theorizes that if someone were to defeat the shadowy Pokémon, this world should disappear and no longer interfere with his plans. For the puzzle on this floor, you must touch the gray markers on the floor to expose hidden platforms. Only one path will get you to B5F, and platforms here sometimes become visible or invisible.
First, head for the marker on the upper right and it will expose a hidden platform. Next, travel to the marker you see below you by traveling right, then down to find another hidden platform. Next travel right and you will reach the elevator that descends to B5F. On B5F, from the elevator, continue forward until you see Uxie, then use Strength to push a boulder to the platform below you on B6F. Then, head downwards to the elevator that leads to B6F, but do not take it yet. Instead, use the ledge that will take you to a platform to the left and Mesprit will appear. Here, you will have to push another boulder down to B6F. Then, take the elevator that will take you to B4F. Continue navigating forward and carefully go through the path of trees and rocks that can turn visible or invisible to reach a new elevator. That will take you to a new area of B3F. From here, use the nearby gray marker. Then, travel left then down to find an invisible platform, then travel right, then right again to get to an elevator that leads to another area of B4F.
On your way down, you will see Cyrus again, but this time he mysteriously disappears. Surf across the water, then touch the gray markers to jump to a platform with sideways gravity. Then, use another set that leads to another platform with upside-down gravity. Now use Surf again and travel down the waterfall. This should get you back to B5F, where you can find Azelf along with another boulder to push down to B6F. Now, head to the nearby elevator and this time use it to descend to B6F. The secret to B6F's puzzle is to carefully push each of the boulders you pushed down from B5F into the special holes where each of the Lake Guardians are. If you mess up, you'll have to push them down from the various floors again. Now, go back to the elevator and travel south from it to find Cynthia and talk to her. If you've completed the puzzle correctly, a new elevator will appear that you can use to travel down to B7F.
Here, you will both encounter Cyrus again, and Cynthia asks why he is so determined to create a new world. Cyrus refuses to listen. Talk to him, and he will challenge you to a battle.
|
||||||||||||||||||||||||||||||||||||||||||||||||||||||||||||||||||||||||||||||||||||||||||||||||||||||||||||||||||||||||||||||||||||||||||||||||||||||||||||||||||||||||||||||||
| ||||||||||||||||||||||||||||||||||||||||||||||||||||||||||||||||||||||||||||||||||||||||||||||||||||||||||||||||||||||||||||||||||||||||||||||||||||||||||||||||||||||||||||||||
Cyrus is a lot tougher than in the last battle, since he added two Pokémon and his Sneasel has evolved. A fast Electric-type such as Jolteon is useful in this battle, since half of his team is weak to Electric-type moves. Additionally, his entire team is weak to Rock attacks. His first Pokémon, Houndoom, is quite fast and possesses Thunder Fang to counter Water-types. Will-O-Wisp will inflict a burn if it hits, halving your Pokémon's Attack stat. Take it down as quickly as you can and it won't be a problem. Be careful when Cyrus send out his Gyarados, as it can threaten Electric and Grass Pokémon with its various attacks. Giga Impact will do a lot of damage, but Gyarados must rest for one turn after using it. Crobat's Speed is a problem, especially with its ability to use the status moves Toxic and Confuse Ray. Simply taking it out with super effective attacks and firstly paralyzing it to cut down its Speed are both valid strategies. Against Honchkrow, the same strategy as before will work; just remember it uses Heat Wave to counter Ice-types and Steel-types. His main Pokémon, Weavile, is incredibly fast and can prevent your Pokémon from moving, not just from Fake Out on its first turn, but also with Ice Punch, which has a chance of freezing your Pokémon. A powerful Fighting-type move should easily defeat it, though Rock, Steel, or Fire-type moves can also help.
After the battle, Cyrus will think it is hopeless since if Giratina is defeated, this world will disappear. However, Cynthia points out the problems are due to the Distortion World being forcibly merged with the real one, and by defeating Giratina the connection can be severed. Cynthia will then heal your team. Before going forward to face Giratina, you need to decide if you want to catch it now or later. Save your game before using the platforms to reach it. Once you move forward and see Giratina fly by, move forward again and then some invisible platforms will become visible, allowing you to reach Giratina.
Catching Giratina
| ||||||||||||||||||||||||||||||||||
The Dusk Ball is the best Poké Ball variant to use in this fight, just make sure your game is set anywhere between 8:00 p.m. to 3:59 a.m to make use of its 3.5× catch rate modifier. Ultra Balls and Timer Balls can also be useful. It can take 10, 20, or even 30 Poké Balls to catch Giratina, so prepare for a long battle. Since you saved beforehand, you can turn off your game if something goes wrong and get another chance. Unlike Dialga and Palkia, Giratina's catch rate remained 3 (0.4% when using Poké Ball at full health).
One thing which makes Origin Forme Giratina a difficult opponent is that in this form, it specializes more in offense over defense. If you have a status move that inflicts paralysis or sleep, you can use them to make Giratina easier to catch. Avoid or minimize use of Ice-, Ghost-, Dragon- or Dark-type moves as they carry the risk of knocking it out. After reducing its HP bar to the red zone, a good tactic is to bring out a Steel-type that has good defenses and resistances to all of Giratina's attacks. Be sure to keep an eye on how many turns have passed, though, as Giratina only has 35 PP, and it will start to use struggle after it uses all its PP up.
Unlike in the previous Pokémon games, you do not have to catch Giratina right away, since legendaries that you failed to catch will reappear each time you defeat the Elite Four and Pokémon Champion during your playthrough of this game. If Giratina’s attacks are too much for you to deal with right now, just defeat it. You can face it later in Turnback Cave in its Altered Forme, which is more defense-oriented stat-wise. Also, if you run out of Poké Balls or so many turns of battle elapse that Giratina is forced to Struggle, it would also be okay to either reset (assuming you saved beforehand) or knock it out and try again later on.
After the battle, Cynthia is happy that Giratina understood your intentions and will point out a nearby portal that will take you back to your world. Cyrus then appears and is surprised that Giratina was defeated or captured and that his perfect world will never be complete. After he and Cynthia express their different views about the world, Cyrus leaves, convinced they will never understand each other. Now enter the portal, which will take you to Sendoff Spring, the fourth lake of Sinnoh.
|
Platinum walkthrough |
|

|
This article is part of Project Walkthroughs, a Bulbapedia project that aims to write comprehensive step-by-step guides on each Pokémon game. |


