Appendix:HeartGold and SoulSilver walkthrough/Section 3: Difference between revisions
m (→Ilex Forest: Fixed the location of TinyMushroom #1 (Specifically, in "West of the flower patch on the way to the Move Tutor", changed "West" to "East")) |
|||
| (16 intermediate revisions by 8 users not shown) | |||
| Line 1: | Line 1: | ||
{{WalkthroughNotice|HGSS}} | {{WalkthroughNotice|HGSS}} | ||
==Slowpoke Well== | |||
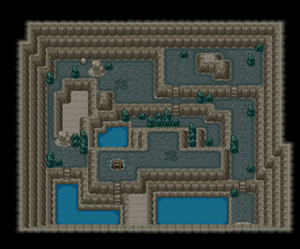
[[File:Slowpoke Well B1F HGSS.png|thumb|Slowpoke Well, B1F]] | [[File:Slowpoke Well B1F HGSS.png|thumb|Slowpoke Well, B1F]] | ||
Kurt scared off the guard outside, but slipped while entering the well and landed on his back. As he is temporarily incapacitated, it's up to you to chase off the other Rockets and save the group of {{p|Slowpoke}}. | Kurt scared off the guard outside, but slipped while entering the well and landed on his back. As he is temporarily incapacitated, it's up to you to chase off the other Rockets and save the group of {{p|Slowpoke}}. | ||
| Line 581: | Line 39: | ||
{{itlisth|cave}} | {{itlisth|cave}} | ||
{{catch/div|cave|Entrance}} | {{catch/div|cave|Entrance}} | ||
{{Itemlist|Great Ball|Entrance, top left of the puddle where Kurt stood (hidden)|HG=yes|SS=yes | {{Itemlist|Great Ball|Entrance, top left of the puddle, where Kurt stood ''(hidden)''|HG=yes|SS=yes}} | ||
{{catch/div|cave|B1F}} | {{catch/div|cave|B1F}} | ||
{{Itemlist|Super Potion| | {{Itemlist|Super Potion| | ||
* Northeast area, near the female Rocket | * Northeast area, near the female Rocket | ||
* On a rock, at the end of the lower-level path in the floor's center (hidden)|HG=yes|SS=yes|display=[[Super Potion]] ×2 | * On a rock, at the end of the lower-level path in the floor's center ''(hidden)''|HG=yes|SS=yes|display=[[Super Potion]] ×2}} | ||
{{itlistfoot|cave}} | {{itlistfoot|cave}} | ||
|} | |} | ||
After defeating the three other Rockets, you meet the first of the Rocket Executives. [[Proton]] introduces himself as the "scariest and cruelest" member of [[Team Rocket]] before challenging you to a battle. | After defeating the three other Rockets, you meet the first of the Rocket Executives. [[Proton]] introduces himself as the "scariest and cruelest" member of [[Team Rocket]] before challenging you to a battle. | ||
| Line 625: | Line 78: | ||
|} | |} | ||
Defeated, he and the others disappear. [[Kurt]]'s back is feeling better now, and after checking on the {{p|Slowpoke}}, shows you back to his home. | |||
==Azalea Town== | |||
As thanks for saving the {{p|Slowpoke}}, he rewards you with a [[Fast Ball]]. Kurt knows more about [[Apricorn]]s than anyone, and from this point on you can bring him any number of Apricorns to have them transformed into custom Poké Balls by the next day. His granddaughter offers his phone number as a way to check on his progress. Apricorns come in seven different colors, each perfect for a specific type of Poké Ball. | |||
{| colspan="3" style="margin: auto; background: #{{apricorn color}}; {{roundy}}; border: 2px solid #{{apricorn color dark}};" cellspacing="2" cellpadding="4" | {| colspan="3" style="margin: auto; background: #{{apricorn color}}; {{roundy}}; border: 2px solid #{{apricorn color dark}};" cellspacing="2" cellpadding="4" | ||
| Line 634: | Line 89: | ||
! style="background: #{{apricorn color light}}; {{roundytr|5px}};" | Effect | ! style="background: #{{apricorn color light}}; {{roundytr|5px}};" | Effect | ||
|- align="center" style="background: #FFF;" | |- align="center" style="background: #FFF;" | ||
| {{bag|Black Apricorn}} || [[Black Apricorn|Blk Apricorn]] || {{bag|Heavy Ball}} || | | {{bag|Black Apricorn}} || [[Black Apricorn|Blk Apricorn]] || {{bag|Heavy Ball}} || [[Heavy Ball]] || Better for [[List of Pokémon by weight|heavier]] Pokémon | ||
|- align="center" style="background: #FFF;" | |- align="center" style="background: #FFF;" | ||
| {{bag|Blue Apricorn}} || [[Blue Apricorn|Blu Apricorn]] || {{bag|Lure Ball IV}} || | | {{bag|Blue Apricorn}} || [[Blue Apricorn|Blu Apricorn]] || {{bag|Lure Ball IV}} || [[Lure Ball]] || Better for Pokémon hooked by a [[Fishing|fishing rod]] | ||
|- align="center" style="background: #FFF;" | |- align="center" style="background: #FFF;" | ||
| {{bag|Green Apricorn}} || [[Green Apricorn|Grn Apricorn]] || {{bag|Friend Ball}} || | | {{bag|Green Apricorn}} || [[Green Apricorn|Grn Apricorn]] || {{bag|Friend Ball}} || [[Friend Ball]] || Makes a Pokémon more [[Friendship|friendly]] | ||
|- align="center" style="background: #FFF;" | |- align="center" style="background: #FFF;" | ||
| {{bag|Pink Apricorn}} || [[Pink Apricorn|Pnk Apricorn]] || {{bag|Love Ball}} || | | {{bag|Pink Apricorn}} || [[Pink Apricorn|Pnk Apricorn]] || {{bag|Love Ball}} || [[Love Ball]] || Better for Pokémon of the opposite gender, but same species | ||
|- align="center" style="background: #FFF;" | |- align="center" style="background: #FFF;" | ||
| {{bag|Red Apricorn}} || [[Red Apricorn]] || {{bag|Level Ball}} || | | {{bag|Red Apricorn}} || [[Red Apricorn]] || {{bag|Level Ball}} || [[Level Ball]] || Better for lower-leveled Pokémon | ||
|- align="center" style="background: #FFF;" | |- align="center" style="background: #FFF;" | ||
| {{bag|White Apricorn}} || [[White Apricorn|Wht Apricorn]] || {{bag|Fast Ball}} || | | {{bag|White Apricorn}} || [[White Apricorn|Wht Apricorn]] || {{bag|Fast Ball}} || [[Fast Ball]] || Better for faster Pokémon | ||
|- align="center" style="background: #FFF;" | |- align="center" style="background: #FFF;" | ||
| {{bag|Yellow Apricorn}} || [[Yellow Apricorn|Ylw Apricorn]] || {{bag|Moon Ball}} || | | {{bag|Yellow Apricorn}} || [[Yellow Apricorn|Ylw Apricorn]] || {{bag|Moon Ball}} || [[Moon Ball]] || Better for Pokémon that evolve with a [[Moon Stone]] | ||
|- | |- | ||
| colspan="5" style="background: #{{apricorn color light}}; {{roundybottom|5px}};" | | | colspan="5" style="background: #{{apricorn color light}}; {{roundybottom|5px}};" | | ||
|} | |} | ||
With the Rockets gone, it is now possible to challenge the [[Azalea Gym]]. | |||
===Azalea Gym=== | |||
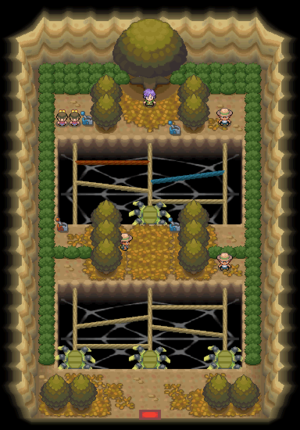
[[File:Azalea Gym HGSS.png|thumb|Azalea Gym]] | |||
{{sign|DPcity|header}} | |||
{{sign|DPcity|title|Azalea Town Pokémon Gym<br>Leader: Bugsy}} | |||
{{sign|DPcity|The Walking Bug Pokémon Encyclopedia}} | |||
{{sign|DPcity|footer}} | |||
The [[Azalea Gym]] is crawling with {{type|Bug}} Pokémon. {{t|Fire}}-, {{t|Flying}}-, and {{type|Rock}} attacks all have an advantage when battling insects. The Gym's design includes several {{p|Spinarak}}-like lifts that crawl across planks suspended over large spider webs. At the entrance, take the southwest lift to reach the center platform. Ignore the blue switch here, and take the next lift to the northwest corner. Flip the switch here and take the lift to the west side of the center platform. Flip the red switch and ride the lift to the Gym Leader. | |||
The biggest challenge with [[Bugsy]] is his {{p|Scyther}}. This mantis' high {{stat|Attack}} lets it hit hard with {{m|U-turn}} before switching out. When used after {{m|Leer}}, this move inflicts even greater damage. Scyther's worst weakness is Rock. If none of your Pokémon know any Rock attacks, then you can use the [[TM39]] from [[Union Cave]] to teach {{m|Rock Tomb}}, a move that lowers the target's {{stat|Speed}}. | |||
{{User:TylerGray/Gymtag | |||
|gym=Azalea | |||
|badge=Hive | |||
|type=Bug | |||
|trainers={{Trainerheader|Bug}} | |||
{{Trainerentry|Spr HGSS Bug Catcher.png|Bug Catcher|Al|192|2|010|Caterpie|♂|12|None|013|Weedle|♂|12|None}} | |||
{{Trainerdiv|Bug}} | |||
{{Trainerentry|Spr HGSS Bug Catcher.png|Bug Catcher|Benny|192|3|013|Weedle|♂|7|None|014|Kakuna|♂|9|None|015|Beedrill|♂|12|None}} | |||
{{Trainerdiv|Bug}} | |||
{{Trainerentry|Spr HGSS Bug Catcher.png|Bug Catcher|Josh|208|1|046|Paras|♂|13|None}} | |||
{{Trainerdiv|Bug}} | |||
{{Trainerentry|Spr HGSS Twins.png|Twins|Amy & Mimi|320|2|165|Ledyba|♀|10|None|167|Spinarak|♀|10|None}} | |||
{{Trainerfooter|Bug|I}} | |||
|leader={{Party|color={{bug color}}|headcolor={{bug color light}}|bordercolor={{bug color dark}} | |||
|sprite=Spr HGSS Bugsy.png | |||
|prize={{pdollar}}1800 | |||
|class=Leader|name=Bugsy | |||
|game=HGSS|location=Azalea Gym | |||
|pokemon=3 | |||
|pokemon1={{Pokémon/4|game=HeartGold | |||
|ndex=123 f|pokemon=Scyther | |||
|type1=Bug|type2=Flying | |||
|level=17|gender=female | |||
|ability=Technician | |||
|held=Sitrus Berry | |||
|move1=Quick Attack|move1type=Normal|move1cat=Physical | |||
|move2=Leer|move2type=Normal|move2cat=Status | |||
|move3=U-turn|move3type=Bug|move3cat=Physical | |||
|move4=Focus Energy|move4type=Normal|move4cat=Status}} | |||
|pokemon2={{Pokémon/4|game=HeartGold | |||
|ndex=011|pokemon=Metapod | |||
|type1=Bug | |||
|level=15|gender=female|ability=Shed Skin | |||
|move1=Tackle|move1type=Normal|move1cat=Physical}} | |||
|pokemon3={{Pokémon/4|game=HeartGold | |||
|ndex=014|pokemon=Kakuna | |||
|type1=Bug|type2=Poison | |||
|level=15|gender=female | |||
|ability=Shed Skin | |||
|move1=Poison Sting|move1type=Poison|move1cat=Physical}} | |||
}} | |||
}} | |||
Defeated, [[Bugsy]] awards you the {{badge|Hive}}, which ensures obedience from all Pokémon up to level 30, and enables the use of {{m|Cut}} in the field. He also hands over {{TM|89|U-turn}} as a prize. | |||
===Rival battle 2=== | |||
Be sure to rest up after defeating the Gym, as {{ga|Silver}} ambushes you near the western gate. | |||
{{MSP/3|152|Chikorita}} If the {{player}} chose {{p|Chikorita}}: | |||
{{Party/Single | |||
|color={{silver color}} | |||
|headcolor={{silver color light}} | |||
|bordercolor={{silver color dark}} | |||
|sprite=Spr HGSS Silver.png | |||
|prize={{pdollar}}1152 | |||
|class=Rival | |||
|classlink=Rival | |||
|name=Silver | |||
|game=HGSS | |||
|location=Azalea Town | |||
|pokemon=3}} | |||
|{{Pokémon/4 | |||
|game=HeartGold | |||
|ndex=092 | |||
|pokemon=Gastly | |||
|gender=male | |||
|level=14 | |||
|type1=Ghost|type2=Poison | |||
|ability=Levitate | |||
|move1=Lick|move1type=Ghost|move1cat=Physical | |||
|move2=Spite|move2type=Ghost|move2cat=Status | |||
|move3=Mean Look|move3type=Normal|move3cat=Status | |||
|move4=Curse|move4type=???|move4cat=Status}} | |||
|{{Pokémon/4 | |||
|game=HeartGold | |||
|ndex=041 m | |||
|pokemon=Zubat | |||
|gender=male | |||
|level=16 | |||
|type1=Poison|type2=Flying | |||
|ability=Inner Focus | |||
|move1=Leech Life|move1type=Bug|move1cat=Physical | |||
|move2=Supersonic|move2type=Normal|move2cat=Status | |||
|move3=Astonish|move3type=Ghost|move3cat=Physical | |||
|move4=Bite|move4type=Dark|move4cat=Physical}} | |||
|{{Pokémon/4 | |||
|game=HeartGold | |||
|ndex=156 | |||
|pokemon=Quilava | |||
|gender=male | |||
|level=18 | |||
|type1=Fire | |||
|ability=Blaze | |||
|move1=Leer|move1type=Normal|move1cat=Status | |||
|move2=SmokeScreen|move2type=Normal|move2cat=Status | |||
|move3=Ember|move3type=Fire|move3cat=Special | |||
|move4=Quick Attack|move4type=Normal|move4cat=Physical}} | |||
{{Party/Footer}} | |||
{{MSP/3|155|Cyndaquil}} If the {{player}} chose {{p|Cyndaquil}}: | |||
{{Party/Single | |||
|color={{silver color}} | |||
|headcolor={{silver color light}} | |||
|bordercolor={{silver color dark}} | |||
|sprite=Spr HGSS Silver.png | |||
|prize={{pdollar}}1152 | |||
|class=Rival | |||
|classlink=Rival | |||
|name=Silver | |||
|game=HGSS | |||
|location=Azalea Town | |||
|pokemon=3}} | |||
|{{Pokémon/4 | |||
|game=HeartGold | |||
|ndex=092 | |||
|pokemon=Gastly | |||
|gender=male | |||
|level=14 | |||
|type1=Ghost|type2=Poison | |||
|ability=Levitate | |||
|move1=Lick|move1type=Ghost|move1cat=Physical | |||
|move2=Spite|move2type=Ghost|move2cat=Status | |||
|move3=Mean Look|move3type=Normal|move3cat=Status | |||
|move4=Curse|move4type=???|move4cat=Status}} | |||
|{{Pokémon/4 | |||
|game=HeartGold | |||
|ndex=041 m | |||
|pokemon=Zubat | |||
|gender=male | |||
|level=16 | |||
|type1=Poison|type2=Flying | |||
|ability=Inner Focus | |||
|move1=Leech Life|move1type=Bug|move1cat=Physical | |||
|move2=Supersonic|move2type=Normal|move2cat=Status | |||
|move3=Astonish|move3type=Ghost|move3cat=Physical | |||
|move4=Bite|move4type=Dark|move4cat=Physical}} | |||
|{{Pokémon/4 | |||
|game=HeartGold | |||
|ndex=159 | |||
|pokemon=Croconaw | |||
|gender=male | |||
|level=18 | |||
|type1=Water | |||
|ability=Torrent | |||
|move1=Water Gun|move1type=Water|move1cat=Special | |||
|move2=Rage|move2type=Normal|move2cat=Physical | |||
|move3=Bite|move3type=Dark|move3cat=Physical | |||
|move4=Scary Face|move4type=Normal|move4cat=Status}} | |||
{{Party/Footer}} | |||
{{MSP/3|158|Totodile}} If the {{player}} chose {{p|Totodile}}: | |||
{{Party/Single | |||
|color={{silver color}} | |||
|headcolor={{silver color light}} | |||
|bordercolor={{silver color dark}} | |||
|sprite=Spr HGSS Silver.png | |||
|prize={{pdollar}}1152 | |||
|class=Rival | |||
|classlink=Rival | |||
|name=Silver | |||
|game=HGSS | |||
|location=Azalea Town | |||
|pokemon=3}} | |||
|{{Pokémon/4 | |||
|game=HeartGold | |||
|ndex=092 | |||
|pokemon=Gastly | |||
|gender=male | |||
|level=14 | |||
|type1=Ghost|type2=Poison | |||
|ability=Levitate | |||
|move1=Lick|move1type=Ghost|move1cat=Physical | |||
|move2=Spite|move2type=Ghost|move2cat=Status | |||
|move3=Mean Look|move3type=Normal|move3cat=Status | |||
|move4=Curse|move4type=???|move4cat=Status}} | |||
|{{Pokémon/4 | |||
|game=HeartGold | |||
|ndex=041 m | |||
|pokemon=Zubat | |||
|gender=male | |||
|level=16 | |||
|type1=Poison|type2=Flying | |||
|ability=Inner Focus | |||
|move1=Leech Life|move1type=Bug|move1cat=Physical | |||
|move2=Supersonic|move2type=Normal|move2cat=Status | |||
|move3=Astonish|move3type=Ghost|move3cat=Physical | |||
|move4=Bite|move4type=Dark|move4cat=Physical}} | |||
|{{Pokémon/4 | |||
|game=HeartGold | |||
|ndex=153 | |||
|pokemon=Bayleef | |||
|gender=male | |||
|level=18 | |||
|type1=Grass | |||
|ability=Overgrow | |||
|move1=PoisonPowder|move1type=Poison|move1cat=Status | |||
|move2=Reflect|move2type=Psychic|move2cat=Status | |||
|move3=Synthesis|move3type=Grass|move3cat=Status | |||
|move4=Razor Leaf|move4type=Grass|move4cat=Physical}} | |||
{{Party/Footer}} | |||
==Ilex Forest== | |||
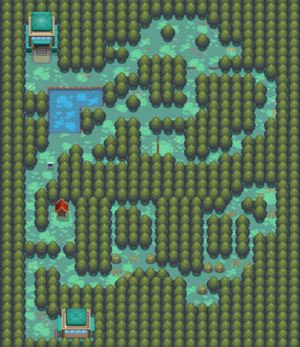
[[File:Ilex Forest HGSS.png|thumb|Ilex Forest]] | |||
[[Ilex Forest]] is a natural maze. The large, shadowy forest has become so overgrown in recent years that many young trees have taken root. One of these wayward saplings blocks the trail leading past the [[Ilex Shrine]]. Without {{HM|01|Cut}}, it is impossible to reach the other side. | |||
{| class="expandable" align="center" style="background: #{{locationcolor/med|forest}}; {{roundy}}; border: 5px solid #{{locationcolor/light|forest}};" | |||
|- align="center" | |||
! Available Pokémon | |||
|- | |||
| | |||
{{catch/header|forest}} | |||
{{Catch/entryhs|010|Caterpie|yes|no|Grass|5-6|50%|60%|0%|type1=bug}} | |||
{{Catch/entryhs|013|Weedle|no|yes|Grass|5-6|50%|60%|0%|type1=bug|type2=poison}} | |||
{{Catch/entryhs|011|Metapod|yes|no|Grass|5-6|30%|30%|0%|type1=bug}} | |||
{{Catch/entryhs|014|Kakuna|no|yes|Grass|5-6|30%|30%|0%|type1=bug|type2=poison}} | |||
{{Catch/entryhs|041|Zubat|yes|yes|Grass|5-6|5%|5%|25%|type1=poison|type2=flying}} | |||
{{Catch/entryhs|046|Paras|yes|yes|Grass|5-6|15%|5%|15%|type1=bug|type2=grass}} | |||
{{Catch/entryhs|043|Oddish|yes|yes|Grass|5-6|0%|0%|60%|type1=grass|type2=poison}} | |||
{{catch/div|forest|Headbutt}} | |||
{{Catch/entryhs|010|Caterpie|yes|no|Headbutt|3-5|all=30%|type1=bug|10=j}} | |||
{{Catch/entryhs|013|Weedle|no|yes|Headbutt|3-5|all=30%|type1=bug|type2=poison|10=j}} | |||
{{Catch/entryhs|011|Metapod|yes|no|Headbutt|3-5|all=10%|type1=bug|10=j}} | |||
{{Catch/entryhs|014|Kakuna|no|yes|Headbutt|3-5|all=10%|type1=bug|type2=poison|10=j}} | |||
{{Catch/entryhs|012|Butterfree|yes|no|Headbutt|6-8|all=10%|type1=bug|type2=flying|10=j}} | |||
{{Catch/entryhs|015|Beedrill|no|yes|Headbutt|6-8|all=10%|type1=bug|type2=poison|10=j}} | |||
{{Catch/entryhs|163|Hoothoot|yes|yes|Headbutt|3-5|all=60%|type1=normal|type2=flying|10=j}} | |||
{{Catch/entryhs|163|Hoothoot|yes|yes|Headbutt|6-8|all=50%|type1=normal|type2=flying|10=j}} | |||
{{Catch/entryhs|164|Noctowl|yes|yes|Headbutt|6-8|all=10%|type1=normal|type2=flying|10=j}} | |||
{{Catch/entryhs|204|Pineco|yes|yes|Headbutt|6-8|all=30%|type1=bug|10=j}} | |||
{{catch/div|water|Fishing}} | |||
{{catch/entryhs|129|Magikarp|yes|yes|Fish Old|10|all=95%|type1=water}} | |||
{{catch/entryhs|060|Poliwag|yes|yes|Fish Old|10|all=5%|type1=water}} | |||
{{catch/footer|forest}} | |||
|} | |||
{| class="expandable" align="center" style="background: #{{locationcolor/med|forest}}; {{roundy}}; border: 5px solid #{{locationcolor/light|forest}};" | |||
|- align="center" | |||
! Items | |||
|- | |||
| | |||
{{itlisth|forest}} | |||
{{Itemlist|Revive|Southeast part of the forest|HG=yes|SS=yes}} | |||
{{Itemlist|Tiny Mushroom|In the flower patch near where the second Farfetch'd was caught ''(hidden)''|HG=yes|SS=yes|display=[[Tiny Mushroom|TinyMushroom]]}} | |||
{{Itemlist|HM Normal|From the Charcoal Man's assistant, after rescuing the two {{p|Farfetch'd}}|HG=yes|SS=yes|display={{HM|01|Cut}}}} | |||
{{catch/div|forest|Requires {{mcolor|Cut|000}}}} | |||
{{Itemlist|X Attack|Dead-end path east of the Trainer Tips sign (obscured by trees)|HG=yes|SS=yes}} | |||
{{Itemlist|Antidote|Near the southwest corner of the pond ''(hidden)''|HG=yes|SS=yes}} | |||
{{Itemlist|Antidote|On the peninsula, between the pond and the trees (obscured by trees)|HG=yes|SS=yes}} | |||
{{Itemlist|Repel|In the flower patch just east of the pond ''(hidden)''|HG=yes|SS=yes}} | |||
{{Itemlist|Super Potion|In the left-side empty path North of the Move Tutor ''(hidden)''|HG=yes|SS=yes}} | |||
{{Itemlist|Ether|Northeast part of the forest|HG=yes|SS=yes}} | |||
{{Itemlist|Full Heal|Northwest of the second northernmost isolated tree ''(hidden)''|HG=yes|SS=yes}} | |||
{{Itemlist|Ether|West of the northernmost isolated tree ''(hidden)''|HG=yes|SS=yes}} | |||
{{Itemlist|Tiny Mushroom| | |||
* East of the flower patch on the way to the Move Tutor ''(hidden)'' | |||
* Southeast of the second northernmost isolated tree ''(hidden)''|HG=yes|SS=yes|display=[[Tiny Mushroom|TinyMushroom]] ×2}} | |||
{{Itemlist|TM Dark|From the woman with her {{p|Butterfree}} in the north gate|HG=yes|SS=yes|display={{TM|12|Taunt}}}} | |||
{{itlistfoot|forest}} | |||
|} | |||
===Rescue the Farfetch'd!=== | |||
{{to|Azalea}}'s Charcoal Man has not seen his apprentice since he went into the forest. He can be found just north of the entrance, and it seems that the two {{p|Farfetch'd}} that cut down trees for them have wandered off and gotten lost. They get spooked easily, so you must sneak up from behind to catch them. | |||
* The first duck is located a short distance to the east of the apprentice. Step on the pile of twigs south of it to attract its attention, then loop around the grove of trees to reach it. | |||
* The second duck is a bit more difficult to catch. It begins in the northwest, but needs to be chased into the northeast corner, into a group of three trees. Step on the twigs to the east, avoid the twigs to the north, and approach it from the west. | |||
Once Far and Fetch'd have been rounded up, the Charcoal Man shows up and rewards you with {{HM|01|Cut}}. Return to the Charcoal Kiln afterwards to receive a [[Charcoal]] from the apprentice as thanks. | |||
==Now that you have Cut (Optional)== | |||
Now that you have recieved the HM for {{m|Cut}} and can use it outside of battle, there are a couple of items you can get from Route 32. | |||
{| class="expandable" align="center" style="background: #{{locationcolor/med|cave}}; {{roundy}}; border: 5px solid #{{locationcolor/light|cave}};" | |||
|- align="center" | |||
! Items | |||
|- | |||
| | |||
{{itlisth|cave}} | |||
{{Itemlist|TM Normal|From the man on the ledge on the northern side of the route (requires {{m|Cut}})|HG=yes|SS=yes|display={{TM|05|Roar}}}} | |||
{{Itemlist|Super Potion|Next to the trees west of the man who gives {{TM|05|Roar}} (requires {{m|Cut}}) ''(hidden)'' |HG=yes|SS=yes}} | |||
{{itlistfoot|cave}} | |||
|} | |||
===Move Tutor=== | |||
In the center of the forest, east of the pond, is a man who offers to teach {{m|Headbutt}} to a Pokémon. In battle, Headbutt has a power of 70 and a 30% chance of causing the target to {{DL|Status ailment|flinch}}. In the field, it can be used on any tree in an attempt to knock down a Pokémon. This is the only way to find {{p|Pineco}}, {{p|Heracross}}, and {{p|Aipom}}. In every game, only certain trees will yield Pokémon, and those trees have 100% of finding Pokémon. Just headbutt trees until you get a Pokémon, then repeatedly headbutt that. | |||
===Kimono Girl 2=== | |||
In the northeast part of the forest, you meet the second of the [[Kimono Girls]], who seems to be lost. Agree to help her, and your lead Pokémon shows her the way out. | |||
===Lured into Action=== | |||
Inside the forest's northern gate, behind the counter, is a woman with her {{p|Butterfree}}. Speak to her to receive {{TM|12|Taunt}}. Taunt prevents the target from using [[status moves]] for several turns. | |||
==Route 34== | |||
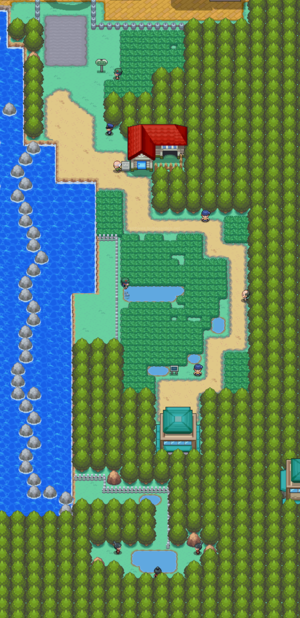
[[File:Johto Route 34 HGSS.png|thumb|left|Route 34]] | |||
{{rt|34|Johto}} is a seaside route stretching between [[Ilex Forest]] and [[Goldenrod City]]. The [[Pokémon Day Care]], where an elderly couple care for Trainers' Pokémon, is located here. | |||
{| class="expandable" align="center" style="background: #{{locationcolor/med|land}}; {{roundy}}; border: 5px solid #{{locationcolor/light|land}};" | |||
|- align="center" | |||
! Trainers | |||
|- | |||
| | |||
{{Trainerheader|land}} | |||
{{Trainerentry|Spr HGSS Youngster.png|Youngster|Samuel|128|4|019|Rattata|♂|7|None|027|Sandshrew|♂|10|None|021|Spearow|♂|8|None|021|Spearow|♂|8|None}} | |||
{{Trainerdiv|land}} | |||
{{Trainerentry|Spr DP Pokéfan M.png|Pokéfan|Brandon|832|2|209|Snubbull|♀|13|None|179|Mareep|♂|13|None}} | |||
{{Trainerdiv|land}} | |||
{{Trainerentry|Spr DP Picnicker.png|Picnicker|Gina|192|3|187|Hoppip|♀|9|None|187|Hoppip|♀|9|None|001|Bulbasaur|♂|12|None|38=phone}} | |||
{{Trainerdiv|land}} | |||
{{Trainerentry|Spr HGSS Youngster.png|Youngster|Ian|192|2|056|Mankey|♂|10|None|050|Diglett|♂|12|None|38=phone}} | |||
{{Trainerdiv|land}} | |||
{{Trainerentry|Spr DP Officer.png|Policeman|Keith<br><small>({{DL|Time|Night 2|Night}} only)</small>|680|1|058|Growlithe|♂|17|None}} | |||
{{Trainerdiv|land}} | |||
{{Trainerentry|Spr DP Camper.png|Camper|Todd|224|1|054|Psyduck|♂|14|None|38=phone}} | |||
{{Trainerfooter|land|II}} | |||
|} | |||
{| class="expandable" align="center" style="background: #{{locationcolor/med|land}}; {{roundy}}; border: 5px solid #{{locationcolor/light|land}};" | |||
|- align="center" | |||
! Available Pokémon | |||
|- | |||
| | |||
{{Catch/header|land|yes}} | |||
{{catch/entryhs|096|Drowzee|yes|yes|Grass|10-12|all=50%|type1=Psychic}} | |||
{{catch/entryhs|019|Rattata|yes|yes|Grass|11-13|all=35%|type1=Normal}} | |||
{{catch/entryhs|063|Abra|yes|yes|Grass|10|all=10%|type1=Psychic}} | |||
{{catch/entryhs|132|Ditto|yes|yes|Grass|10|all=5%|type1=Normal}} | |||
{{Catch/div|water|Fishing}} | |||
{{catch/entryhs|129|Magikarp|yes|yes|Fish Old|10|all=95%|type1=Water}} | |||
{{catch/entryhs|098|Krabby|yes|yes|Fish Old|10|all=5%|type1=Water}} | |||
{{catch/div|land|Headbutt}} | |||
{{catch/entryhs|102|Exeggcute|yes|yes|Headbutt|9-12|all=20%|type1=Grass|type2=Psychic|10=j}} | |||
{{catch/entryhs|163|Hoothoot|yes|yes|Headbutt|9-12|all=50%|type1=Normal|type2=Flying|10=j}} | |||
{{catch/entryhs|165|Ledyba|no|yes|Headbutt|11-12|all=30%|type1=Bug|type2=Flying|10=j}} | |||
{{catch/entryhs|167|Spinarak|yes|no|Headbutt|11-12|all=30%|type1=Bug|type2=Poison|10=j}} | |||
{{catch/entryhs|204|Pineco|yes|yes|Headbutt|9-10|all=30%|type1=Bug|10=j}} | |||
{{Catch/footer|land}} | |||
|} | |||
{| class="expandable" align="center" style="background: #{{locationcolor/med|land}}; {{roundy}}; border: 5px solid #{{locationcolor/light|land}};" | |||
|- align="center" | |||
! Items | |||
|- | |||
| | |||
{{itlisth}} | |||
{{Itemlist|Super Potion|Northeast of Youngster Ian, on the tree in the corner ''(hidden)''|HG=yes|SS=yes}} | |||
{{Itemlist|TM Dark|North of the Day Care, in the tall grass|HG=yes|SS=yes|display={{TM|63|Embargo}}}} | |||
{{itlistfoot}} | |||
|} | |||
===Pokémon Day Care=== | |||
As you approach from the south, Lyra/Ethan approaches from the north to visit the couple, who turn out to be her/his grandparents. She/He gives you her/his phone number before leaving, and the Day-Care Man gives out both his and his wife's numbers. This allows you to check up on your Pokémon at any time. | |||
Any Pokémon left here will gain one [[Experience|experience point]] for every step taken. However, the Johto Day Care accepts up to two Pokémon to raise at once. If both a male and female are left together, the old couple may find an [[Pokémon Egg|Egg]]. Travel with the Egg for a while, and it will eventually hatch. This is the only way to get more members of certain species that only one are available in-game, like {{p|Eevee}}, and baby Pokémon, like {{p|Pichu}}. In place of a compatible pair, a shape-shifting {{p|Ditto}} makes a great substitute. | |||
{{WalkthroughPrevNext | {{WalkthroughPrevNext | ||
| Line 661: | Line 483: | ||
|gamename=HeartGold and SoulSilver | |gamename=HeartGold and SoulSilver | ||
|prevsection=2 | |prevsection=2 | ||
|prevname= | |prevname=Violet City, Sprout Tower, Route 32, Union Cave, Route 33, Azalea Town | ||
|nextsection=4 | |nextsection=4 | ||
|nextname= | |nextname=Goldenrod City, Route 35 | ||
}} | }} | ||
Latest revision as of 00:24, 26 January 2024
These pages follow the remade Nintendo DS iteration, not Pokémon Gold and Silver. The guide for those games can be found here.
Slowpoke Well
Kurt scared off the guard outside, but slipped while entering the well and landed on his back. As he is temporarily incapacitated, it's up to you to chase off the other Rockets and save the group of Slowpoke.
| Trainers | |||||||||||||||||||||||||||||||||||||||||||||||||||||||||||||||||||||||
|---|---|---|---|---|---|---|---|---|---|---|---|---|---|---|---|---|---|---|---|---|---|---|---|---|---|---|---|---|---|---|---|---|---|---|---|---|---|---|---|---|---|---|---|---|---|---|---|---|---|---|---|---|---|---|---|---|---|---|---|---|---|---|---|---|---|---|---|---|---|---|---|
| |||||||||||||||||||||||||||||||||||||||||||||||||||||||||||||||||||||||
| Available Pokémon | |||||||||||||||||||||||||||||||||||||||||||||||||||||||||||||||||||||||||||||||||||||||||||||||||||||||||
|---|---|---|---|---|---|---|---|---|---|---|---|---|---|---|---|---|---|---|---|---|---|---|---|---|---|---|---|---|---|---|---|---|---|---|---|---|---|---|---|---|---|---|---|---|---|---|---|---|---|---|---|---|---|---|---|---|---|---|---|---|---|---|---|---|---|---|---|---|---|---|---|---|---|---|---|---|---|---|---|---|---|---|---|---|---|---|---|---|---|---|---|---|---|---|---|---|---|---|---|---|---|---|---|---|---|
| |||||||||||||||||||||||||||||||||||||||||||||||||||||||||||||||||||||||||||||||||||||||||||||||||||||||||
| Items | ||||||||||||||||||||||||||||||||||||||||||||||
|---|---|---|---|---|---|---|---|---|---|---|---|---|---|---|---|---|---|---|---|---|---|---|---|---|---|---|---|---|---|---|---|---|---|---|---|---|---|---|---|---|---|---|---|---|---|---|
| ||||||||||||||||||||||||||||||||||||||||||||||
After defeating the three other Rockets, you meet the first of the Rocket Executives. Proton introduces himself as the "scariest and cruelest" member of Team Rocket before challenging you to a battle.
| |||||||||||||||||||||||||||||||||||||||||||||||||||||||||||||||||||||||||||||||||||
Defeated, he and the others disappear. Kurt's back is feeling better now, and after checking on the Slowpoke, shows you back to his home.
Azalea Town
As thanks for saving the Slowpoke, he rewards you with a Fast Ball. Kurt knows more about Apricorns than anyone, and from this point on you can bring him any number of Apricorns to have them transformed into custom Poké Balls by the next day. His granddaughter offers his phone number as a way to check on his progress. Apricorns come in seven different colors, each perfect for a specific type of Poké Ball.
| Apricorn | Ball | Effect | ||
|---|---|---|---|---|
| Blk Apricorn | Heavy Ball | Better for heavier Pokémon | ||
| Blu Apricorn | Lure Ball | Better for Pokémon hooked by a fishing rod | ||
| Grn Apricorn | Friend Ball | Makes a Pokémon more friendly | ||
| Pnk Apricorn | Love Ball | Better for Pokémon of the opposite gender, but same species | ||
| Red Apricorn | Level Ball | Better for lower-leveled Pokémon | ||
| Wht Apricorn | Fast Ball | Better for faster Pokémon | ||
| Ylw Apricorn | Moon Ball | Better for Pokémon that evolve with a Moon Stone | ||
With the Rockets gone, it is now possible to challenge the Azalea Gym.
Azalea Gym
The Azalea Gym is crawling with Bug-type Pokémon. Fire-, Flying-, and Rock-type attacks all have an advantage when battling insects. The Gym's design includes several Spinarak-like lifts that crawl across planks suspended over large spider webs. At the entrance, take the southwest lift to reach the center platform. Ignore the blue switch here, and take the next lift to the northwest corner. Flip the switch here and take the lift to the west side of the center platform. Flip the red switch and ride the lift to the Gym Leader.
The biggest challenge with Bugsy is his Scyther. This mantis' high Attack lets it hit hard with U-turn before switching out. When used after Leer, this move inflicts even greater damage. Scyther's worst weakness is Rock. If none of your Pokémon know any Rock attacks, then you can use the TM39 from Union Cave to teach Rock Tomb, a move that lowers the target's Speed.
| |||||||||||||||||||||||||||||||||||||||||||||||||||||||||||||||||||||||||||||||||||||||||||||||||||||||||||||||||||||||||||||||||||||||||||||||||||||||||||||||||||||||||||||||||||||||||||||||||||||||||||||||||||||
Defeated, Bugsy awards you the Hive Badge, which ensures obedience from all Pokémon up to level 30, and enables the use of Cut in the field. He also hands over TM89 (U-turn) as a prize.
Rival battle 2
Be sure to rest up after defeating the Gym, as Silver ambushes you near the western gate.
![]() If the player chose Chikorita:
If the player chose Chikorita:
|
||||||||||||||||||||||||||||||||||||||||||||||||||||||||||||||||||||||||||||||||||||||||||||||||||||||||
| ||||||||||||||||||||||||||||||||||||||||||||||||||||||||||||||||||||||||||||||||||||||||||||||||||||||||
![]() If the player chose Cyndaquil:
If the player chose Cyndaquil:
|
||||||||||||||||||||||||||||||||||||||||||||||||||||||||||||||||||||||||||||||||||||||||||||||||||||||||
| ||||||||||||||||||||||||||||||||||||||||||||||||||||||||||||||||||||||||||||||||||||||||||||||||||||||||
|
||||||||||||||||||||||||||||||||||||||||||||||||||||||||||||||||||||||||||||||||||||||||||||||||||||||||
| ||||||||||||||||||||||||||||||||||||||||||||||||||||||||||||||||||||||||||||||||||||||||||||||||||||||||
Ilex Forest
Ilex Forest is a natural maze. The large, shadowy forest has become so overgrown in recent years that many young trees have taken root. One of these wayward saplings blocks the trail leading past the Ilex Shrine. Without HM01 (Cut), it is impossible to reach the other side.
| Available Pokémon | |||||||||||||||||||||||||||||||||||||||||||||||||||||||||||||||||||||||||||||||||||||||||||||||||||||||||||||||||||||||||||||||||||||||||||||||||||||||||||||||||||||||||||||||||||||||||||||||||||||||||||||||||||||||||||||||||||||||||||||||||||||||||||||||||||||||||||||||||||||||||||||||||||||||||||||||||||||||||||||||||||||||||||||||||||||||||||||||||||||||||||
|---|---|---|---|---|---|---|---|---|---|---|---|---|---|---|---|---|---|---|---|---|---|---|---|---|---|---|---|---|---|---|---|---|---|---|---|---|---|---|---|---|---|---|---|---|---|---|---|---|---|---|---|---|---|---|---|---|---|---|---|---|---|---|---|---|---|---|---|---|---|---|---|---|---|---|---|---|---|---|---|---|---|---|---|---|---|---|---|---|---|---|---|---|---|---|---|---|---|---|---|---|---|---|---|---|---|---|---|---|---|---|---|---|---|---|---|---|---|---|---|---|---|---|---|---|---|---|---|---|---|---|---|---|---|---|---|---|---|---|---|---|---|---|---|---|---|---|---|---|---|---|---|---|---|---|---|---|---|---|---|---|---|---|---|---|---|---|---|---|---|---|---|---|---|---|---|---|---|---|---|---|---|---|---|---|---|---|---|---|---|---|---|---|---|---|---|---|---|---|---|---|---|---|---|---|---|---|---|---|---|---|---|---|---|---|---|---|---|---|---|---|---|---|---|---|---|---|---|---|---|---|---|---|---|---|---|---|---|---|---|---|---|---|---|---|---|---|---|---|---|---|---|---|---|---|---|---|---|---|---|---|---|---|---|---|---|---|---|---|---|---|---|---|---|---|---|---|---|---|---|---|---|---|---|---|---|---|---|---|---|---|---|---|---|---|---|---|---|---|---|---|---|---|---|---|---|---|---|---|---|---|---|---|---|---|---|---|---|---|---|---|---|---|---|---|---|---|---|---|---|---|---|---|---|---|---|---|---|---|---|---|---|---|---|---|---|---|---|---|---|---|---|---|---|---|---|---|---|---|---|---|---|---|---|
| |||||||||||||||||||||||||||||||||||||||||||||||||||||||||||||||||||||||||||||||||||||||||||||||||||||||||||||||||||||||||||||||||||||||||||||||||||||||||||||||||||||||||||||||||||||||||||||||||||||||||||||||||||||||||||||||||||||||||||||||||||||||||||||||||||||||||||||||||||||||||||||||||||||||||||||||||||||||||||||||||||||||||||||||||||||||||||||||||||||||||||
| Items | |||||||||||||||||||||||||||||||||||||||||||||||||||||||||||||||||||||||||||
|---|---|---|---|---|---|---|---|---|---|---|---|---|---|---|---|---|---|---|---|---|---|---|---|---|---|---|---|---|---|---|---|---|---|---|---|---|---|---|---|---|---|---|---|---|---|---|---|---|---|---|---|---|---|---|---|---|---|---|---|---|---|---|---|---|---|---|---|---|---|---|---|---|---|---|---|
| |||||||||||||||||||||||||||||||||||||||||||||||||||||||||||||||||||||||||||
Rescue the Farfetch'd!
Azalea's Charcoal Man has not seen his apprentice since he went into the forest. He can be found just north of the entrance, and it seems that the two Farfetch'd that cut down trees for them have wandered off and gotten lost. They get spooked easily, so you must sneak up from behind to catch them.
- The first duck is located a short distance to the east of the apprentice. Step on the pile of twigs south of it to attract its attention, then loop around the grove of trees to reach it.
- The second duck is a bit more difficult to catch. It begins in the northwest, but needs to be chased into the northeast corner, into a group of three trees. Step on the twigs to the east, avoid the twigs to the north, and approach it from the west.
Once Far and Fetch'd have been rounded up, the Charcoal Man shows up and rewards you with HM01 (Cut). Return to the Charcoal Kiln afterwards to receive a Charcoal from the apprentice as thanks.
Now that you have Cut (Optional)
Now that you have recieved the HM for Cut and can use it outside of battle, there are a couple of items you can get from Route 32.
| Items | ||||||||||||||||
|---|---|---|---|---|---|---|---|---|---|---|---|---|---|---|---|---|
| ||||||||||||||||
Move Tutor
In the center of the forest, east of the pond, is a man who offers to teach Headbutt to a Pokémon. In battle, Headbutt has a power of 70 and a 30% chance of causing the target to flinch. In the field, it can be used on any tree in an attempt to knock down a Pokémon. This is the only way to find Pineco, Heracross, and Aipom. In every game, only certain trees will yield Pokémon, and those trees have 100% of finding Pokémon. Just headbutt trees until you get a Pokémon, then repeatedly headbutt that.
Kimono Girl 2
In the northeast part of the forest, you meet the second of the Kimono Girls, who seems to be lost. Agree to help her, and your lead Pokémon shows her the way out.
Lured into Action
Inside the forest's northern gate, behind the counter, is a woman with her Butterfree. Speak to her to receive TM12 (Taunt). Taunt prevents the target from using status moves for several turns.
Route 34
Route 34 is a seaside route stretching between Ilex Forest and Goldenrod City. The Pokémon Day Care, where an elderly couple care for Trainers' Pokémon, is located here.
| Trainers | ||||||||||||||||||||||||||||||||||||||||||||||||||||||||||||||||||||||||||||||||||||||||||||||||||||||||||||||||||||||||||||||||||||||
|---|---|---|---|---|---|---|---|---|---|---|---|---|---|---|---|---|---|---|---|---|---|---|---|---|---|---|---|---|---|---|---|---|---|---|---|---|---|---|---|---|---|---|---|---|---|---|---|---|---|---|---|---|---|---|---|---|---|---|---|---|---|---|---|---|---|---|---|---|---|---|---|---|---|---|---|---|---|---|---|---|---|---|---|---|---|---|---|---|---|---|---|---|---|---|---|---|---|---|---|---|---|---|---|---|---|---|---|---|---|---|---|---|---|---|---|---|---|---|---|---|---|---|---|---|---|---|---|---|---|---|---|---|---|---|
| ||||||||||||||||||||||||||||||||||||||||||||||||||||||||||||||||||||||||||||||||||||||||||||||||||||||||||||||||||||||||||||||||||||||
| Available Pokémon | |||||||||||||||||||||||||||||||||||||||||||||||||||||||||||||||||||||||||||||||||||||||||||||||||||||||||||||||||||||||||||||||||||||||||||||||||||||||||||||||||||||||||||||||||||||||||||||||||||||||||||||||||||||||||||||||||||||||||||
|---|---|---|---|---|---|---|---|---|---|---|---|---|---|---|---|---|---|---|---|---|---|---|---|---|---|---|---|---|---|---|---|---|---|---|---|---|---|---|---|---|---|---|---|---|---|---|---|---|---|---|---|---|---|---|---|---|---|---|---|---|---|---|---|---|---|---|---|---|---|---|---|---|---|---|---|---|---|---|---|---|---|---|---|---|---|---|---|---|---|---|---|---|---|---|---|---|---|---|---|---|---|---|---|---|---|---|---|---|---|---|---|---|---|---|---|---|---|---|---|---|---|---|---|---|---|---|---|---|---|---|---|---|---|---|---|---|---|---|---|---|---|---|---|---|---|---|---|---|---|---|---|---|---|---|---|---|---|---|---|---|---|---|---|---|---|---|---|---|---|---|---|---|---|---|---|---|---|---|---|---|---|---|---|---|---|---|---|---|---|---|---|---|---|---|---|---|---|---|---|---|---|---|---|---|---|---|---|---|---|---|---|---|---|---|---|---|---|---|---|---|---|---|---|---|---|---|---|---|---|---|---|---|---|---|---|
| |||||||||||||||||||||||||||||||||||||||||||||||||||||||||||||||||||||||||||||||||||||||||||||||||||||||||||||||||||||||||||||||||||||||||||||||||||||||||||||||||||||||||||||||||||||||||||||||||||||||||||||||||||||||||||||||||||||||||||
| Items | ||||||||||||||||
|---|---|---|---|---|---|---|---|---|---|---|---|---|---|---|---|---|
| ||||||||||||||||
Pokémon Day Care
As you approach from the south, Lyra/Ethan approaches from the north to visit the couple, who turn out to be her/his grandparents. She/He gives you her/his phone number before leaving, and the Day-Care Man gives out both his and his wife's numbers. This allows you to check up on your Pokémon at any time.
Any Pokémon left here will gain one experience point for every step taken. However, the Johto Day Care accepts up to two Pokémon to raise at once. If both a male and female are left together, the old couple may find an Egg. Travel with the Egg for a while, and it will eventually hatch. This is the only way to get more members of certain species that only one are available in-game, like Eevee, and baby Pokémon, like Pichu. In place of a compatible pair, a shape-shifting Ditto makes a great substitute.
|
HeartGold and SoulSilver walkthrough |
|

|
This article is part of Project Walkthroughs, a Bulbapedia project that aims to write comprehensive step-by-step guides on each Pokémon game. |
