Appendix:Gold and Silver walkthrough/Section 11: Difference between revisions
No edit summary |
mNo edit summary |
||
| (40 intermediate revisions by 21 users not shown) | |||
| Line 1: | Line 1: | ||
{{WalkthroughNotice|GS}} | |||
==Mahogany Town== | |||
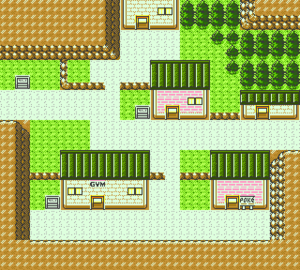
[[File:Mahogany Town GSC.png|thumb|Mahogany Town]] | |||
[[Mahogany Town]] is a quiet mountain town located at the intersection of Routes {{rtn|42|Johto}}, {{rtn|43|Johto}}, and {{rtn|44|Johto}}. The entire town has a suspicious air to it, as it used to serve as the hiding place of ninjas. There is no official Poké Mart in this small town, but a souvenir shop offers an assortment of items for sale. The [[Mahogany Gym|seventh Gym]] can be found here. | |||
{| class="expandable" align="center" style="background: #B6503D; {{roundy}}; border: 5px solid #D16654;" | |||
|- align="center" | |||
! Items | |||
|- | |||
| | |||
{{itlisth|mountain}} | |||
{{Itemlist|Rage Candy Bar|From the man near the east exit; may be purchased for {{pdollar}}300 each|G=yes|S=yes|display=[[Rage Candy Bar|RageCandyBar]]}} | |||
{{catch/div|mountain|Later visit}} | |||
{{Itemlist|TM Ice|From [[Gym Leader]] [[Pryce]], after defeating him|G=yes|S=yes|display={{TM|16|Icy Wind}}}} | |||
{{itlistfoot|mountain}} | |||
|} | |||
===The Pushy Salesman=== | |||
There is a man on the east side of town that stops anyone from reaching {{rt|44|Johto}}. He states that as you are new in town, you should definitely try a [[Rage Candy Bar|RageCandyBar]] for the low price of {{pdollar}}300. The item is a local specialty, named for the nearby [[Lake of Rage]]. Its cost, and its effect when used, are identical to that of a [[Potion]]. | |||
===The Shady Sightseer=== | |||
== | A second man blocks the entrance to the [[Mahogany Gym]] as well. He says that you should take the time for some sightseeing, and tells you to check out the [[Lake of Rage]]. The lake is located to the north, beyond {{rt|43|Johto}}. | ||
[[ | ==Route 43== | ||
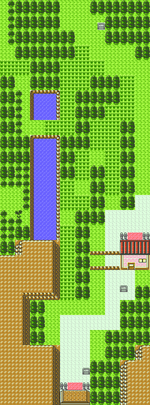
[[File:Johto Route 43 GS.png|thumb|150px|Route 43]] | |||
{{rt|43|Johto}} | {{rt|43|Johto}} connects [[Mahogany Town]] to the [[Lake of Rage]]. The main road passes through a gate, while a grassy trail winds its way through the trees. | ||
{| class="expandable" align="center" style="background: #{{ | {| class="expandable" align="center" style="background: #{{locationcolor/med|lake}}; {{roundy}}; border: 5px solid #{{locationcolor/light|lake}};" | ||
|- align="center" | |- align="center" | ||
! Trainers | ! Trainers | ||
|- | |- | ||
| | | | ||
{{trainerheader}} | {{trainerheader|lake}} | ||
{{Trainerentry| | {{Trainerentry|Spr GS Camper.png|Camper|Spencer|380|3|027|Sandshrew|♂|17|None|028|Sandslash|♂|17|None|041|Zubat|♂|19|None}} | ||
{{Trainerdiv}} | {{Trainerdiv|lake}} | ||
{{Trainerentry| | {{Trainerentry|Spr GS Picnicker.png|Picnicker|Tiffany|400|1|035|Clefairy|♀|20|None|38=phone}} | ||
{{Trainerdiv}} | {{Trainerdiv|lake}} | ||
{{Trainerentry| | {{Trainerentry|Spr GS Fisher.png|Fisher|Marvin|600|4|129|Magikarp|♂|10|None|130|Gyarados|♂|10|None|129|Magikarp|♂|15|None|130|Gyarados|♂|15|None}} | ||
{{Trainerdiv}} | {{Trainerdiv|lake}} | ||
{{Trainerentry| | {{Trainerentry|Spr GS PokéManiac.png|PokéManiac|Ron|1140|1|034|Nidoking|♂|19|None}} | ||
{{Trainerdiv}} | {{Trainerdiv|lake}} | ||
{{Trainerentry| | {{Trainerentry|Spr GS PokéManiac.png|PokéManiac|Brent|1140|1|108|Lickitung|♂|19|None|38=phone}} | ||
{{Trainerdiv}} | {{Trainerdiv|lake}} | ||
{{Trainerentry| | {{Trainerentry|Spr GS PokéManiac.png|PokéManiac|Ben|1140|1|080|Slowbro|♂|19|None}} | ||
{{Trainerfooter| | {{Trainerfooter|lake|II}} | ||
|} | |} | ||
{| class="expandable" align="center" style="background: #{{ | {| class="expandable" align="center" style="background: #{{locationcolor/med|lake}}; {{roundy}}; border: 5px solid #{{locationcolor/light|lake}};" | ||
|- align="center" | |- align="center" | ||
! Available Pokémon | ! Available Pokémon | ||
|- | |- | ||
| | | | ||
{{ | {{Catch/header|lake}} | ||
{{Catch/entry2|017|Pidgeotto|yes|yes|no|Grass|17|25%|20%|0%|type1=Normal|type2=Flying}} | |||
{{Catch/entry2|048|Venonat|yes|yes|no|Grass|16|5%|0%|15%|type1=Bug|type2=Poison}} | |||
{{Catch/entry2|164|Noctowl|yes|yes|no|Grass|17|0%|0%|20%|type1=Normal|type2=Flying}} | |||
{{ | {{Catch/entry2|179|Mareep|yes|yes|no|Grass|15|10%|10%|5%|type1=Electric}} | ||
{{ | {{Catch/entry2|180|Flaaffy|yes|yes|no|Grass|15|30%|0%|30%|type1=Electric}} | ||
{{ | {{Catch/entry2|180|Flaaffy|yes|yes|no|Grass|15,17|0%|40%|0%|type1=Electric}} | ||
{{ | {{Catch/entry2|203|Girafarig|yes|yes|no|Grass|15|all=30%|type1=Normal|type2=Psychic}} | ||
{{Catch/div|lake|Surfing}} | |||
{{ | {{Catch/entry2|129|Magikarp|yes|yes|no|Surf|10-24|all=100%|type1=Water}} | ||
{{ | {{Catch/div|lake|Fishing}} | ||
{{ | {{Catch/entry2|129|Magikarp|yes|yes|no|Fish Old|10|all=85%|type1=Water}} | ||
{{ | {{Catch/entry2|060|Poliwag|yes|yes|no|Fish Old|10|all=15%|type1=Water}} | ||
{{ | {{Catch/entry2|060|Poliwag|yes|yes|no|Fish Good|20|all=65%|type1=Water}} | ||
{{ | {{Catch/entry2|129|Magikarp|yes|yes|no|Fish Good|20|all=35%|type1=Water}} | ||
{{ | {{Catch/div|lake|{{color2|000|Headbutt tree}}<br><small>(Moderate chances of battle)</small>}} | ||
{{ | {{Catch/entry2|021|Spearow|yes|yes|no|Headbutt|10|all=80%|type1=Normal|type2=Flying}} | ||
{{ | {{Catch/entry2|190|Aipom|yes|yes|no|Headbutt|10|all=20%|type1=Normal}} | ||
{{ | {{Catch/div|lake|{{color2|000|Headbutt tree}}<br><small>(Low chances of battle)</small>}} | ||
{{ | {{Catch/entry2|021|Spearow|yes|yes|no|Headbutt|10|all=50%|type1=Normal|type2=Flying}} | ||
{{ | {{Catch/entry2|214|Heracross|yes|yes|no|Headbutt|10|all=30%|type1=Bug|type2=Fighting}} | ||
{{ | {{Catch/entry2|190|Aipom|yes|yes|no|Headbutt|10|all=20%|type1=Normal}} | ||
{{ | {{Catch/footer|lake}} | ||
{{ | |||
{{ | |||
{{ | |||
{{ | |||
|} | |} | ||
{| class="expandable" align="center" style="background: #{{ | {| class="expandable" align="center" style="background: #{{locationcolor/med|lake}}; {{roundy}}; border: 5px solid #{{locationcolor/light|lake}};" | ||
|- align="center" | |- align="center" | ||
! Items | ! Items | ||
|- | |- | ||
| | | | ||
{{itlisth}} | {{itlisth|lake}} | ||
{{ | {{Itemlist|None|West of the larger pond, on the tree (daily; requires {{m|Surf}}, {{m|Cut}})|G=yes|S=yes|display=[[Bitter Berry]]}} | ||
{{ | {{Itemlist|Max Ether|West of the gate, on the upper ledge|G=yes|S=yes}} | ||
{{ | {{catch/div|lake|Later visit}} | ||
{{Itemlist|TM Poison|In the gate; from the guard, after Team Rocket is defeated in [[Mahogany Town]]|G=yes|S=yes|display={{TM|36|Sludge Bomb}}}} | |||
{{itlistfoot|lake}} | |||
|} | |} | ||
[[ | ===The Greedy Guards=== | ||
Travelers who wish to take the easier path to the lake and stay on the main road are forced to pass through the gate. [[Team Rocket]] knows this, and has dispatched two Grunts here. Anyone who enters the gate is immediately confronted by the pair, and forced to pay {{pdollar}}1,000 as a toll. They mention how their assignment has been very profitable, as everyone wants to see whatever is happening at the [[Lake of Rage]]. | |||
==Lake of Rage== | |||
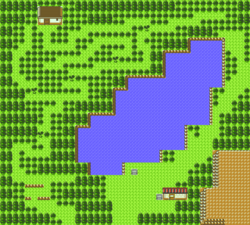
[[File:Lake of Rage GSC.png|thumb|250px|Lake of Rage]] | |||
{| class="expandable" align="center" style="background: #{{ | The [[Lake of Rage]], also known as {{p|Gyarados}} Lake, is the largest lake in [[Johto]]. According to a local Fishing Guru, the lake was created when rampaging Gyarados altered the landscape and the resulting crater eventually filled with rainwater. The lake has not been the same since [[Team Rocket|the men dressed in black]] appeared, and there have even been sightings of a [[Red Gyarados|strangely-colored Gyarados]]. | ||
{| class="expandable" align="center" style="background: #{{locationcolor/med|lake}}; {{roundy}}; border: 5px solid #{{locationcolor/light|lake}};" | |||
|- align="center" | |- align="center" | ||
! Available Pokémon | ! Available Pokémon | ||
|- | |- | ||
| | | | ||
{{ | {{Catch/header|lake|4}} | ||
{{ | {{Catch/div|lake|Surfing}} | ||
{{ | {{Catch/entry2|129|Magikarp|yes|yes|no|Surf|10–19|all=90%|type1=Water}} | ||
{{ | {{Catch/entry2|130|Gyarados|yes|yes|no|Surf|15–19|all=10%|type1=Water|type2=Flying}} | ||
{{ | {{Catch/div|lake|Fishing}} | ||
{{ | {{Catch/entry2|129|Magikarp|yes|yes|no|Fish Old|10|all=100%|type1=Water}} | ||
{{ | {{Catch/entry2|129|Magikarp|yes|yes|no|Fish Good|20|all=90%|type1=Water}} | ||
{{ | {{Catch/entry2|130|Gyarados|yes|yes|no|Fish Good|20|all=10%|type1=Water|type2=Flying}} | ||
{{ | {{Catch/div|lake|{{color2|000|Headbutt tree}}<br><small>(Moderate chances of battle)</small>}} | ||
{{ | {{Catch/entry2|010|Caterpie|yes|no|no|Headbutt|10|all=65%|type1=Bug}} | ||
{{ | {{Catch/entry2|013|Weedle|no|yes|no|Headbutt|10|all=65%|type1=Bug|type2=Poison}} | ||
{{Catch/entry2|011|Metapod|yes|no|no|Headbutt|10|all=15%|type1=Bug}} | |||
{{Catch/entry2|014|Kakuna|no|yes|no|Headbutt|10|all=15%|type1=Bug|type2=Poison}} | |||
{{Catch/entry2|102|Exeggcute|yes|yes|no|Headbutt|10|all=15%|type1=Grass|type2=Psychic}} | |||
{{Catch/entry2|012|Butterfree|yes|no|no|Headbutt|10|all=5%|type1=Bug|type2=Flying}} | |||
{{Catch/entry2|015|Beedrill|no|yes|no|Headbutt|10|all=5%|type1=Bug|type2=Poison}} | |||
{{Catch/div|lake|{{color2|000|Headbutt tree}}<br><small>(Low chances of battle)</small>}} | |||
{{Catch/entry2|010|Caterpie|yes|no|no|Headbutt|10|all=50%|type1=Bug}} | |||
{{Catch/entry2|013|Weedle|no|yes|no|Headbutt|10|all=50%|type1=Bug|type2=Poison}} | |||
{{Catch/entry2|204|Pineco|yes|yes|no|Headbutt|10|all=30%|type1=Bug}} | |||
{{Catch/entry2|102|Exeggcute|yes|yes|no|Headbutt|10|all=15%|type1=Grass|type2=Psychic}} | |||
{{Catch/entry2|012|Butterfree|yes|no|no|Headbutt|10|all=5%|type1=Bug|type2=Flying}} | |||
{{Catch/entry2|015|Beedrill|no|yes|no|Headbutt|10|all=5%|type1=Bug|type2=Poison}} | |||
{{Catch/footer|lake}} | |||
|} | |} | ||
{| class="expandable" align="center" style="background: #{{ | {| class="expandable" align="center" style="background: #{{locationcolor/med|lake}}; {{roundy}}; border: 5px solid #{{locationcolor/light|lake}};" | ||
|- align="center" | |- align="center" | ||
! Items | ! Items | ||
|- | |- | ||
| | | | ||
{{itlisth| | {{itlisth|lake}} | ||
{{ | {{catch/div|lake|Eastern lake}} | ||
{{ | {{Itemlist|Max Potion|One step north of the lake's northeast corner (hidden)|G=yes|S=yes}} | ||
{{ | {{Itemlist|Red Scale|Automatically obtained after battling the [[Red Gyarados]] (requires {{m|Surf}})|G=yes|S=yes}} | ||
{{ | {{Itemlist|Ether|Southeast house; from the Fishing Guru, after showing him a record-breaking {{p|Magikarp}}|G=yes|S=yes}} | ||
{{ | {{catch/div|lake|Western woods}} | ||
{{ | {{Itemlist|Full Restore|Dead-end path, southwest of the lake (hidden)|G=yes|S=yes}} | ||
{{ | {{Itemlist|Rare Candy|Dead-end path, west of the secluded house (hidden; requires {{m|Cut}})|G=yes|S=yes}} | ||
{{ | {{Itemlist|Black Belt|Dead-end path, west of the secluded house; from [[Week Siblings|Wesley]]{{dotw|We}}|G=yes|S=yes|display={{OBP|Black Belt|item|BlackBelt}}}} | ||
{{itlistfoot| | {{Itemlist|Max Ether|Dead-end path, south of the secluded house (requires {{m|Cut}})|G=yes|S=yes}} | ||
{{Itemlist|TM Fighting|Dead-end path, north of the lake's northeast corner (requires {{m|Cut}})|G=yes|S=yes|display={{TM|43|Detect}}}} | |||
{{Itemlist|TM Normal|From the man in the secluded house|G=yes|S=yes|display={{TM|10|Hidden Power}}}} | |||
{{itlistfoot|lake}} | |||
|} | |} | ||
===Peace Disturbed=== | |||
Something has been disturbing the Pokémon living in the lake, and now the {{p|Gyarados}} are angry. One of them can be seen just offshore. Unlike others of its species, this individual seems to have evolved under mysterious circumstances that resulted in its [[Shiny Pokémon|unusual coloring]]. It will not calm itself, so it must be caught or defeated. | |||
== | ====VS Gyarados==== | ||
As a {{2t|Water|Flying}}-type Pokémon, {{p|Gyarados}} is vulnerable to {{t|Electric}}- and {{type|Rock}} attacks. Using these moves first will wear it down quickly. Follow up with {{t|Fire}}-, Water-, {{t|Fighting}}-, {{t|Bug}}-, or {{type|Steel}} moves to further chip away at its health. | |||
{| style="margin: auto;" | |||
| | |||
{{Pokémon/2|game=Gold | |||
|ndex=130 s|pokemon=Gyarados | |||
{{ | |type1=Water|type2=Flying | ||
{{ | |level=30 | ||
{{ | |move1=Thrash|move1type=Normal | ||
{{ | |move2=Bite|move2type=Dark | ||
{ | |move3=Dragon Rage|move3type=Dragon | ||
|move4=Leer|move4type=Normal}} | |||
|} | |} | ||
When the battle ends, you find a [[Red Scale]] floating on the water. Climb back onto shore and speak to the man reading the sign. He has been investigating rumors that all of the {{p|Magikarp}} in the lake are being forced to evolve prematurely. He introduces himself as [[Lance]], and asks for your help. He believes that a mysterious radio signal originating in [[Mahogany Town]] is the cause, and sets off to find the source. | |||
{| class="expandable" align="center" style="background: # | ==Mahogany Town== | ||
===Souvenir Shop=== | |||
Upon entering the shady shop, you see [[Lance]]'s {{p|Dragonite}} using {{m|Hyper Beam}} to attack one of the workers. Lance confirms that the strange radio signal is coming from this location, and pushes past the shopkeeper to reveal a hidden stairway leading underground. | |||
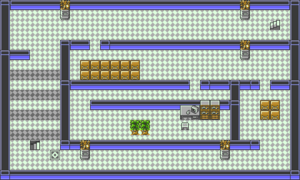
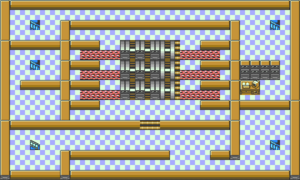
[[File:Rocket Hideout B1F GSC.png|thumb|Team Rocket's Hideout, B1F]] | |||
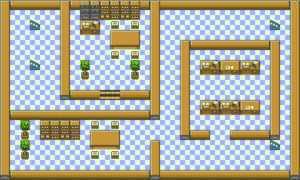
[[File:Rocket Hideout B2F GSC.png|thumb|Team Rocket's Hideout, B2F]] | |||
[[File:Rocket Hideout B3F GSC.png|thumb|Team Rocket's Hideout, B3F]] | |||
===Team Rocket's Hideout=== | |||
[[Team Rocket HQ|Team Rocket's hideout]] is a large complex hidden beneath [[Mahogany Town]]. Formerly the base of operations for a ninja clan, [[Team Rocket]] has put the old traps to use to thwart anyone attempting to interfere with their plans. | |||
{| class="expandable" align="center" style="background: #{{locationcolor/med|building}}; {{roundy}}; border: 5px solid #{{locationcolor/light|building}};" | |||
|- align="center" | |||
! Trainers | |||
|- | |||
| | |||
{| class="expandable" align="center" style="background: #{{locationcolor/med|building}}; {{roundy}}; border: 5px solid #{{locationcolor/light|building}};" | |||
|- align="center" | |- align="center" | ||
! | ! B1F | ||
|- | |- | ||
| | | | ||
{{trainerheader}} | {{trainerheader|building}} | ||
{{Trainerentry| | {{Trainerentry|Spr GS Rocket Grunt M.png|Rocket Grunt||640|4|019|Rattata|♂|16|None|019|Rattata|♂|16|None|019|Rattata|♂|16|None|019|Rattata|♂|16|None}} | ||
{{Trainerdiv}} | {{Trainerdiv|building}} | ||
{{Trainerentry| | {{Trainerentry|Spr GS Scientist.png|Scientist|Jed|2000|3|081|Magnemite||20|None|081|Magnemite||20|None|081|Magnemite||20|None}} | ||
{{Trainerfooter| | {{Trainerfooter|building|I}} | ||
|} | |} | ||
{| class="expandable" align="center" style="background: #{{locationcolor/med|building}}; {{roundy}}; border: 5px solid #{{locationcolor/light|building}};" | |||
{| class="expandable" align="center" style="background: # | |||
|- align="center" | |- align="center" | ||
! | ! B2F | ||
|- | |- | ||
| | | | ||
{{trainerheader}} | {{trainerheader|building}} | ||
{{Trainerentry| | {{Trainerentry|Spr GS Rocket Grunt M.png|Rocket Grunt||720|2|048|Venonat|♂|18|None|048|Venonat|♂|18|None}} | ||
{{Trainerdiv}} | {{Trainerdiv|building}} | ||
{{Trainerentry| | {{Trainerentry|Spr GS Rocket Grunt M.png|Rocket Grunt||720|1|042|Golbat|♂|18|None}} | ||
{{Trainerfooter| | {{Trainerdiv|building}} | ||
{{Trainerentry|Spr GS Rocket Grunt M.png|Rocket Grunt||680|3|019|Rattata|♂|17|None|041|Zubat|♂|17|None|019|Rattata|♂|17|None}} | |||
{{Trainerfooter|building|I}} | |||
|} | |} | ||
{| class="expandable" align="center" style="background: #{{locationcolor/med|building}}; {{roundy}}; border: 5px solid #{{locationcolor/light|building}};" | |||
{| class="expandable" align="center" style="background: # | |||
|- align="center" | |- align="center" | ||
! | ! B3F | ||
|- | |- | ||
| | | | ||
{{trainerheader}} | {{trainerheader|building}} | ||
{{Trainerentry| | {{Trainerentry|Spr GS Rocket Grunt F.png|Rocket Grunt||720|2|023|Ekans|♀|18|None|044|Gloom|♀|18|None}} | ||
{{Trainerdiv}} | {{Trainerdiv|building}} | ||
{{Trainerentry| | {{Trainerentry|Spr GS Rocket Grunt M.png|Rocket Grunt||760|1|020|Raticate|♂|19|None}} | ||
{{Trainerfooter| | {{Trainerdiv|building}} | ||
{{Trainerentry|Spr GS Scientist.png|Scientist|Ross|2200|2|109|Koffing|♂|22|None|109|Koffing|♂|22|None}} | |||
{{Trainerdiv|building}} | |||
{{Trainerentry|Spr GS Scientist.png|Scientist|Mitch|2400|1|132|Ditto||24|None}} | |||
{{Trainerfooter|building|I}} | |||
|} | |} | ||
|} | |||
{| class="expandable" align="center" style="background: #{{locationcolor/med|building}}; {{roundy}}; border: 5px solid #{{locationcolor/light|building}};" | |||
{| class="expandable" align="center" style="background: # | |||
|- align="center" | |- align="center" | ||
! | ! Items | ||
|- | |- | ||
| | | | ||
{{ | {{itlisth|building}} | ||
{{ | {{catch/div|building|B1F}} | ||
{{ | {{Itemlist|X Accuracy|Interior room; east of Scientist Jed|G=yes|S=yes}} | ||
{{ | {{Itemlist|Hyper Potion|Interior northern hallway, east of the statue|G=yes|S=yes}} | ||
{{Itemlist|Nugget|Southern hallway|G=yes|S=yes}} | |||
{{ | {{catch/div|building|B2F}} | ||
{{ | {{Itemlist|Full Heal|North; on the machine to the right of the computer (hidden)|G=yes|S=yes}} | ||
{{ | {{Itemlist|TM Dark|West; accessed via B3F (Northwest)|G=yes|S=yes|display={{TM|46|Thief}}}} | ||
{{ | {{Itemlist|HM Water|South; from Lance, after disabling the machine|G=yes|S=yes|display={{HM|06|Whirlpool}}}} | ||
{{catch/div|building|B3F}} | |||
{{Itemlist|Protein|Eastern hallway|G=yes|S=yes}} | |||
{{Itemlist|Dire Hit|Southwest room; east of the potted plants|G=yes|S=yes}} | |||
{{Itemlist|Full Heal|Southwest room; west of the potted plants|G=yes|S=yes}} | |||
{{Itemlist|Ice Heal|North end of the central hallway|G=yes|S=yes}} | |||
{{itlistfoot|building}} | |||
|} | |} | ||
====B1F==== | |||
When you step in front of the first Pokémon statue, you are forced to battle two Grunts in quick succession. It turns out that each Pokémon statue on this floor is equipped with a hidden security camera, and passing in front of one causes the same two Grunts to confront you. | |||
{| class="expandable" align="center" style="background: # | {| class="expandable" align="center" style="background: #{{locationcolor/med|building}}; {{roundy}}; border: 5px solid #{{locationcolor/light|building}};" | ||
|- align="center" | |- align="center" | ||
! | ! Trainers | ||
|- | |- | ||
| | | | ||
{{ | {{trainerheader|building}} | ||
{{Trainerentry| | {{Trainerentry|Spr GS Rocket Grunt M.png|Rocket Grunt||760|2|096|Drowzee|♂|17|None|041|Zubat|♂|19|None}} | ||
{{Trainerdiv}} | {{Trainerdiv|building}} | ||
{{Trainerentry| | {{Trainerentry|Spr GS Rocket Grunt M.png|Rocket Grunt||720|3|041|Zubat|♂|16|None|088|Grimer|♂|17|None|019|Rattata|♂|18|None}} | ||
{{Trainerfooter| | {{Trainerfooter|building|I}} | ||
|} | |} | ||
{| | Continue west and take the first doorway to head south. Defeat Scientist Jed in the interior room, then grab the [[X Accuracy]] and examine the computer to disable the security cameras. Leave the room and head east to reach a [[Hyper Potion]]. Go south and follow the hallway westward to get a [[Nugget]], then take the stairs in the southwest. | ||
| | |||
====B2F (South)==== | |||
[[Lance]] is waiting for you here, and heals your Pokémon before continuing on. The nearby door needs a password to open, so continue eastward to fight another two Rocket Grunts. Take the stairs down to the lowest floor. | |||
====B3F (Southeast)==== | |||
[[Lance]] informs you that reaching the boss requires two passwords, which are only known by a few trusted Rockets. Pick up the [[Protein]] near the east wall, then battle Scientist Ross and the female Rocket Grunt in the eastern room. Defeated, she gives up the first password: "[[Slowpoke Tail|SlowpokeTail]]". Move on to the southwest room to fight Scientist Mitch, then defeat another Rocket Grunt to learn the second password: "{{p|Raticate|RaticateTail}}." Collect the [[Dire Hit]] and [[Full Heal]] near the potted plants, then head north. Pick up the [[Ice Heal]] near the north wall, then climb the northeast stairs. | |||
====B2F (North)==== | |||
Head all the way to the west, where you are challenged by another Rocket Grunt. Go down the stairs to reach the boss's room. | |||
====B3F (Northwest)==== | |||
When you approach the executive's room, {{ga|Silver}} appears. He insists that he will be the one to eliminate [[Team Rocket]], then runs off. Before opening the door, climb the southern stairs to a separate area of B2F. | |||
====B2F (West)==== | |||
Pick up the item, {{TM|46|Thief}}, then go back downstairs. | |||
====B3F (Northwest)==== | |||
Examine the door to enter the two passwords, and the door opens. The Rocket Executive inside demands to know who you are and why you are in [[Giovanni]]'s office. He reveals that Giovanni disappeared after disbanding [[Team Rocket]] [[Generation I|three years ago]], but that the group has continued on since then, planning for his eventual return. | |||
{| style="margin: auto;" | |||
| | |||
{{Party/Single|color=666666|bordercolor=CC0000|headcolor=CCCCCC | |||
|sprite=Spr GS Rocket Executive M.png | |||
|prize={{PDollar}}1584 | |||
|class=Rocket|name=Executive | |||
|game=GSC|location=Team Rocket HQ|locationname=Rocket Hideout | |||
|pokemon=3}} | |||
|{{Pokémon/2|game=Gold | |||
|ndex=041|pokemon=Zubat | |||
|type1=Poison|type2=Flying | |||
|level=22|gender=male | |||
|move1=Leech Life|move1type=Bug | |||
|move2=Bite|move2type=Dark | |||
|move3=Supersonic|move3type=Normal | |||
|move4=Confuse Ray|move4type=Ghost}} | |||
|{{Pokémon/2|game=Gold | |||
|ndex=109|pokemon=Koffing | |||
|type1=Poison | |||
|level=22|gender=male | |||
|move1=Smog|move1type=Poison | |||
|move2=Tackle|move2type=Normal | |||
|move3=Sludge|move3type=Poison | |||
|move4=Selfdestruct|move4type=Normal}} | |||
|{{Pokémon/2|game=Gold | |||
|ndex=020|pokemon=Raticate | |||
|type1=Normal | |||
|level=24|gender=male | |||
|move1=Hyper Fang|move1type=Normal | |||
|move2=Quick Attack|move2type=Normal | |||
|move3=Scary Face|move3type=Normal | |||
|move4=Tail Whip|move4type=Normal}} | |||
{{Party/Footer}} | |||
|} | |||
Shocked at his defeat, he rushes off to warn the others that their plans are in danger. Speak to the {{p|Murkrow}} in the corner to learn the password for the final locked door: "Hail [[Giovanni]]". Backtrack to the southern part of B2F. | |||
====B2F (South)==== | |||
Examine the door to enter the password, and the door opens. When you step inside, a Rocket Executive and a Rocket Grunt ambush you in an attempt to force you into a 2-on-1 battle, but their plan is short-lived. [[Lance]] and his {{p|Dragonite}} show up just in time, and each of you battle a single Rocket instead. | |||
{| style="margin: auto;" | |||
| | |||
{{Party/Single|color=666666|bordercolor=CC0000|headcolor=CCCCCC | |||
|sprite=Spr GS Rocket Executive F.png | |||
|prize={{pdollar}}1800 | |||
|class=Rocket|name=Executive | |||
|game=GSC|location=Team Rocket HQ|locationname=Rocket Hideout | |||
|pokemon=3}} | |||
|{{Pokémon/2|game=Gold | |||
|ndex=024|pokemon=Arbok | |||
|type1=Poison | |||
|level=23|gender=female | |||
|move1=Leer|move1type=Normal | |||
|move2=Bite|move2type=Dark | |||
|move3=Wrap|move3type=Normal | |||
|move4=Poison Sting|move4type=Poison}} | |||
|{{Pokémon/2|game=Gold | |||
|ndex=044|pokemon=Gloom | |||
|type1=Grass|type2=Poison | |||
|level=23|gender=female | |||
|move1=Sweet Scent|move1type=Normal | |||
|move2=Absorb|move2type=Grass | |||
|move3=Acid|move3type=Poison | |||
|move4=Sleep Powder|move4type=Grass}} | |||
|{{Pokémon/2|game=Gold | |||
|ndex=198|pokemon=Murkrow | |||
|type1=Dark|type2=Flying | |||
|level=25|gender=female | |||
|move1=Peck|move1type=Flying | |||
|move2=Haze|move2type=Ice | |||
|move3=Pursuit|move3type=Dark}} | |||
{{Party/Footer}} | |||
|} | |||
Afterward, she claims that their broadcasting experiment is a success, despite their defeat here. They are unconcerned what happens to their hideout, as they apparently have bigger plans. [[Team Rocket]] flees the building, and [[Lance]] inspects the generator. He cannot find a power switch, and determines that to shut it down, the six {{p|Electrode}} that power it must be removed. The two of you split the task, so catch or defeat the three on the left side to put an end to Team Rocket's plan. | |||
{| style="margin: auto;" | |||
| | |||
{{Pokémon/2|game=Gold and Silver | |||
|ndex=101|pokemon=Electrode | |||
|type1=Electric | |||
|level=23 | |||
|move1=Tackle|move1type=Normal | |||
|move2=Screech|move2type=Normal | |||
|move3=SonicBoom|move3type=Normal | |||
|move4=Selfdestruct|move4type=Normal | |||
}} | |||
|} | |||
With the machine disabled, the radio signal has finally stopped. The [[Lake of Rage]] can now return to normal, and [[Lance]] thanks you with an item that he found here: {{HM|06|Whirlpool}}. Follow him back upstairs, then step on the nearby [[warp tile]] for a shortcut to the entrance. | |||
===Mahogany Gym=== | |||
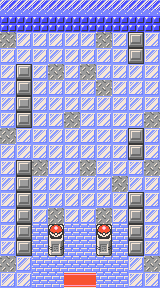
[[File:Mahogany Gym GSC.png|thumb|Mahogany Gym]] | |||
{| class="roundy" style="background: linear-gradient(135deg, #{{ice color}} 50%, #{{ice color light}} 50%); padding: 0.5em;" | |||
|- | |- | ||
| | ! colspan=2 style="font-size: 1.3em; color: #000;" | | ||
|- style="background: #FFF;" | |||
| style="padding: 0.5em;" | '''Mahogany Town Pokémon Gym<br>Leader: Pryce'''<br>The Teacher of Winter's Harshness | |||
|} | |} | ||
The [[Mahogany Gym]] specializes in {{type|Ice}} Pokémon. Ice-type moves are super effective against {{t|Dragon}}-, {{t|Flying}}-, {{t|Grass}}-, and {{type|Ground}} Pokémon, while Ice-type Pokémon are weak to {{t|Fighting}}-, {{t|Fire}}-, {{t|Rock}}-, and {{type|Steel}} moves. | |||
The Gym is filled with slippery, ice-like tiles. When stepped on, the challenger is sent sliding until they reach a patch of normal flooring or some other obstacle. Begin by standing between the left Poké Ball statue and the interior wall, then move northward twice to reach Boarder Douglas. Slide to the east, then south to stop behind the Poké Ball statue on the right. Move westward, then northward again to stop next to Boarder Doulgas again. Slide eastward one last time to reach the [[Gym Leader]]. | |||
{{ | [[Pryce]]'s {{p|Seel}} is vulnerable to {{t|Grass}}- and {{type|Electric}} moves. Despite being a {{type|Water}} Pokémon, it can still fight back against unsuspecting Grass Pokémon with {{t|Ice}} attacks. His {{p|Dewgong}} is much the same, but also takes serious damage from {{t|Rock}}- and {{type|Fighting}} moves. His [[Piloswine]] can use {{m|Blizzard}}, the strongest {{type|Ice}} attack, but its {{2t|Ice|Ground}} typing leaves it with the most weaknesses of Pryce's team, with five: Fighting-, {{t|Steel}}-, {{t|Fire}}-, {{t|Water}}-, and Grass-type moves. | ||
{{ | |||
{{ | |||
[[ | |||
{| align="center" | {| align="center" | ||
|- align="center" valign="top" | |- align="center" valign="top" | ||
| | | | ||
{| align="center" style="background: #{{ice color}}; {{ | {| align="center" style="background: #{{ice color}}; {{roundy}}; border: 5px solid #{{ice color light}};" | ||
|- align="center" | |- align="center" | ||
! Mahogany Gym <br> [[ | ! Mahogany Gym<br>[[File:Glacier Badge.png|35px|Glacier Badge]]<br><br /> | ||
|- | |- | ||
| | | | ||
{| align="center" class="expandable" style="background: #{{ice color}}; {{ | {| align="center" class="expandable" style="background: #{{ice color}}; {{roundy}}; border: 5px solid #{{ice color light}};" | ||
|- align="center" | |- align="center" | ||
! Trainers | ! Trainers | ||
| Line 269: | Line 416: | ||
| | | | ||
{{Trainerheader|Ice}} | {{Trainerheader|Ice}} | ||
{{Trainerentry| | {{Trainerentry|Spr GS Skier.png|Skier|Roxanne|2016|1|124|Jynx|♀|28|None}} | ||
{{Trainerdiv|Ice}} | {{Trainerdiv|Ice}} | ||
{{Trainerentry| | {{Trainerentry|Spr GS Boarder.png|Boarder|Ronald|1728|3|086|Seel|♂|24|None|086|Seel|♂|24|None|087|Dewgong|♂|25|None}} | ||
{{Trainerdiv|Ice}} | {{Trainerdiv|Ice}} | ||
{{Trainerentry| | {{Trainerentry|Spr GS Skier.png|Skier|Clarissa|2016|1|087|Dewgong|♂|28|None}} | ||
{{Trainerdiv|Ice}} | {{Trainerdiv|Ice}} | ||
{{Trainerentry| | {{Trainerentry|Spr GS Boarder.png|Boarder|Brad|1872|2|220|Swinub|♂|26|None|220|Swinub|♂|26|None}} | ||
{{Trainerdiv|Ice}} | {{Trainerdiv|Ice}} | ||
{{Trainerentry| | {{Trainerentry|Spr GS Boarder.png|Boarder|Douglas|1728|3|090|Shellder|♂|24|None|090|Shellder|♂|24|None|091|Cloyster|♂|25|None}} | ||
{{Trainerfooter|Ice| | {{Trainerfooter|Ice|I}} | ||
|} | |} | ||
{| | {| style="margin: auto;" | ||
| | | | ||
{{Party|color={{ice color}}|bordercolor={{ice color dark}}|headcolor={{ice color light}} | {{Party/Single | ||
|sprite= | |color={{ice color}} | ||
|bordercolor={{ice color dark}} | |||
|headcolor={{ice color light}} | |||
|sprite=Spr GS Pryce.png | |||
|prize={{pdollar}}3100 | |prize={{pdollar}}3100 | ||
|class=Leader | |class=Leader|classlink=Gym Leader | ||
|name=Pryce | |name={{color2|000|Pryce}} | ||
|game=GSC | |game=GSC|location=Mahogany Gym | ||
|location=Mahogany Gym | |pokemon=3}} | ||
|pokemon=3 | |||
| | |{{Pokémon/2|game=Gold | ||
|level=27|gender=male | |ndex=086|pokemon=Seel | ||
|type1=Water | |||
|level=27|gender=male | |||
|move1=Headbutt|move1type=Normal | |move1=Headbutt|move1type=Normal | ||
|move2=Icy Wind|move2type=Ice | |move2=Icy Wind|move2type=Ice | ||
| Line 301: | Line 452: | ||
|move4=Rest|move4type=Psychic}} | |move4=Rest|move4type=Psychic}} | ||
| | |{{Pokémon/2|game=Gold | ||
|level=29|gender=male | |ndex=087|pokemon=Dewgong | ||
|type1=Water|type2=Ice | |||
|level=29|gender=male | |||
|move1=Headbutt|move1type=Normal | |move1=Headbutt|move1type=Normal | ||
|move2=Icy Wind|move2type=Ice | |move2=Icy Wind|move2type=Ice | ||
| Line 308: | Line 461: | ||
|move4=Rest|move4type=Psychic}} | |move4=Rest|move4type=Psychic}} | ||
| | |{{Pokémon/2|game=Gold | ||
|level=31|gender=male | |ndex=221|pokemon=Piloswine | ||
|type1=Ice|type2=Ground | |||
|level=31|gender=male | |||
|move1=Icy Wind|move1type=Ice | |move1=Icy Wind|move1type=Ice | ||
|move2=Fury Attack|move2type=Normal | |move2=Fury Attack|move2type=Normal | ||
|move3= | |move3=Mist|move3type=Ice | ||
|move4=Blizzard|move4type=Ice}} | |move4=Blizzard|move4type=Ice}} | ||
}} | {{Party/Footer}} | ||
|} | |} | ||
|} | |} | ||
|} | |} | ||
After the battle, [[Pryce]] awards you the {{badge|Glacier}}, which gives your Pokémon a slight {{stat|Special Attack}} and {{stat|Special Defense}} boost during battle and enables the use of {{m|Whirlpool}} in the field. He also gives you {{TM|16|Icy Wind}} as a prize. | |||
===Desperate Times=== | |||
Upon leaving the Gym, you receive a call from [[Professor Elm]]. He informs you of strange radio broadcasts that mention [[Team Rocket]]. It seems that the group has one more card to play, so hurry back to [[Goldenrod City]]'s [[Goldenrod Radio Tower|Radio Tower]] to finally put a stop to their plans. | |||
{{WalkthroughPrevNext|game=Gold|game2=Silver|gamename=Gold and Silver | |||
{{WalkthroughPrevNext | |||
|game=Gold|game2=Silver | |||
|gamename=Gold and Silver | |||
|prevsection=10 | |||
|prevname=Cianwood City, Olivine Gym, Route 42, Mt. Mortar | |||
|nextsection=12 | |||
|nextname=Radio Tower, Goldenrod Underground, Route 44, Ice Path | |||
}} | |||
<br> | <br> | ||
{{Project Walkthroughs notice}} | {{Project Walkthroughs notice}} | ||
[[Category:Gold and Silver walkthrough]] | [[Category:Gold and Silver walkthrough]] | ||
Latest revision as of 14:16, 27 May 2024
These pages follow the original Game Boy Color iteration, not Pokémon HeartGold and SoulSilver. The guide for those games can be found here.
Mahogany Town
Mahogany Town is a quiet mountain town located at the intersection of Routes 42, 43, and 44. The entire town has a suspicious air to it, as it used to serve as the hiding place of ninjas. There is no official Poké Mart in this small town, but a souvenir shop offers an assortment of items for sale. The seventh Gym can be found here.
| Items | |||||||||||||||||||||||||||||||
|---|---|---|---|---|---|---|---|---|---|---|---|---|---|---|---|---|---|---|---|---|---|---|---|---|---|---|---|---|---|---|---|
| |||||||||||||||||||||||||||||||
The Pushy Salesman
There is a man on the east side of town that stops anyone from reaching Route 44. He states that as you are new in town, you should definitely try a RageCandyBar for the low price of $300. The item is a local specialty, named for the nearby Lake of Rage. Its cost, and its effect when used, are identical to that of a Potion.
The Shady Sightseer
A second man blocks the entrance to the Mahogany Gym as well. He says that you should take the time for some sightseeing, and tells you to check out the Lake of Rage. The lake is located to the north, beyond Route 43.
Route 43
Route 43 connects Mahogany Town to the Lake of Rage. The main road passes through a gate, while a grassy trail winds its way through the trees.
| Trainers | ||||||||||||||||||||||||||||||||||||||||||||||||||||||||||||||||||||||||||||||||||||||||||||||||||||||||||||||||||||||||||
|---|---|---|---|---|---|---|---|---|---|---|---|---|---|---|---|---|---|---|---|---|---|---|---|---|---|---|---|---|---|---|---|---|---|---|---|---|---|---|---|---|---|---|---|---|---|---|---|---|---|---|---|---|---|---|---|---|---|---|---|---|---|---|---|---|---|---|---|---|---|---|---|---|---|---|---|---|---|---|---|---|---|---|---|---|---|---|---|---|---|---|---|---|---|---|---|---|---|---|---|---|---|---|---|---|---|---|---|---|---|---|---|---|---|---|---|---|---|---|---|---|---|---|
| ||||||||||||||||||||||||||||||||||||||||||||||||||||||||||||||||||||||||||||||||||||||||||||||||||||||||||||||||||||||||||
| Available Pokémon | |||||||||||||||||||||||||||||||||||||||||||||||||||||||||||||||||||||||||||||||||||||||||||||||||||||||||||||||||||||||||||||||||||||||||||||||||||||||||||||||||||||||||||||||||||||||||||||||||||||||||||||||||||||||||||||||||||||||||||||||||||||||||||||||||||||||||||||||||||||||||||||||||||||||||||||||||||||||||||||||||||||||||||||||||||||||||||||||||||||||||
|---|---|---|---|---|---|---|---|---|---|---|---|---|---|---|---|---|---|---|---|---|---|---|---|---|---|---|---|---|---|---|---|---|---|---|---|---|---|---|---|---|---|---|---|---|---|---|---|---|---|---|---|---|---|---|---|---|---|---|---|---|---|---|---|---|---|---|---|---|---|---|---|---|---|---|---|---|---|---|---|---|---|---|---|---|---|---|---|---|---|---|---|---|---|---|---|---|---|---|---|---|---|---|---|---|---|---|---|---|---|---|---|---|---|---|---|---|---|---|---|---|---|---|---|---|---|---|---|---|---|---|---|---|---|---|---|---|---|---|---|---|---|---|---|---|---|---|---|---|---|---|---|---|---|---|---|---|---|---|---|---|---|---|---|---|---|---|---|---|---|---|---|---|---|---|---|---|---|---|---|---|---|---|---|---|---|---|---|---|---|---|---|---|---|---|---|---|---|---|---|---|---|---|---|---|---|---|---|---|---|---|---|---|---|---|---|---|---|---|---|---|---|---|---|---|---|---|---|---|---|---|---|---|---|---|---|---|---|---|---|---|---|---|---|---|---|---|---|---|---|---|---|---|---|---|---|---|---|---|---|---|---|---|---|---|---|---|---|---|---|---|---|---|---|---|---|---|---|---|---|---|---|---|---|---|---|---|---|---|---|---|---|---|---|---|---|---|---|---|---|---|---|---|---|---|---|---|---|---|---|---|---|---|---|---|---|---|---|---|---|---|---|---|---|---|---|---|---|---|---|---|---|---|---|---|---|---|---|---|---|---|---|---|---|---|---|---|---|---|---|---|---|---|---|---|---|---|---|---|---|---|---|
| |||||||||||||||||||||||||||||||||||||||||||||||||||||||||||||||||||||||||||||||||||||||||||||||||||||||||||||||||||||||||||||||||||||||||||||||||||||||||||||||||||||||||||||||||||||||||||||||||||||||||||||||||||||||||||||||||||||||||||||||||||||||||||||||||||||||||||||||||||||||||||||||||||||||||||||||||||||||||||||||||||||||||||||||||||||||||||||||||||||||||
| Items | |||||||||||||||||||||||||||||||||||
|---|---|---|---|---|---|---|---|---|---|---|---|---|---|---|---|---|---|---|---|---|---|---|---|---|---|---|---|---|---|---|---|---|---|---|---|
| |||||||||||||||||||||||||||||||||||
The Greedy Guards
Travelers who wish to take the easier path to the lake and stay on the main road are forced to pass through the gate. Team Rocket knows this, and has dispatched two Grunts here. Anyone who enters the gate is immediately confronted by the pair, and forced to pay $1,000 as a toll. They mention how their assignment has been very profitable, as everyone wants to see whatever is happening at the Lake of Rage.
Lake of Rage
The Lake of Rage, also known as Gyarados Lake, is the largest lake in Johto. According to a local Fishing Guru, the lake was created when rampaging Gyarados altered the landscape and the resulting crater eventually filled with rainwater. The lake has not been the same since the men dressed in black appeared, and there have even been sightings of a strangely-colored Gyarados.
| Available Pokémon | ||||||||||||||||||||||||||||||||||||||||||||||||||||||||||||||||||||||||||||||||||||||||||||||||||||||||||||||||||||||||||||||||||||||||||||||||||||||||||||||||||||||||||||||||||||||||||||||||||||||||||||||||||||||||||||||||||||||||||||||||||||||||||||||||||||||||||||||||||||||||||||||||||||||||||||||||||||||||||||||||||||||||||||||||||||||||||||||||||||||||||||||||||||||
|---|---|---|---|---|---|---|---|---|---|---|---|---|---|---|---|---|---|---|---|---|---|---|---|---|---|---|---|---|---|---|---|---|---|---|---|---|---|---|---|---|---|---|---|---|---|---|---|---|---|---|---|---|---|---|---|---|---|---|---|---|---|---|---|---|---|---|---|---|---|---|---|---|---|---|---|---|---|---|---|---|---|---|---|---|---|---|---|---|---|---|---|---|---|---|---|---|---|---|---|---|---|---|---|---|---|---|---|---|---|---|---|---|---|---|---|---|---|---|---|---|---|---|---|---|---|---|---|---|---|---|---|---|---|---|---|---|---|---|---|---|---|---|---|---|---|---|---|---|---|---|---|---|---|---|---|---|---|---|---|---|---|---|---|---|---|---|---|---|---|---|---|---|---|---|---|---|---|---|---|---|---|---|---|---|---|---|---|---|---|---|---|---|---|---|---|---|---|---|---|---|---|---|---|---|---|---|---|---|---|---|---|---|---|---|---|---|---|---|---|---|---|---|---|---|---|---|---|---|---|---|---|---|---|---|---|---|---|---|---|---|---|---|---|---|---|---|---|---|---|---|---|---|---|---|---|---|---|---|---|---|---|---|---|---|---|---|---|---|---|---|---|---|---|---|---|---|---|---|---|---|---|---|---|---|---|---|---|---|---|---|---|---|---|---|---|---|---|---|---|---|---|---|---|---|---|---|---|---|---|---|---|---|---|---|---|---|---|---|---|---|---|---|---|---|---|---|---|---|---|---|---|---|---|---|---|---|---|---|---|---|---|---|---|---|---|---|---|---|---|---|---|---|---|---|---|---|---|---|---|---|---|---|---|---|---|---|---|---|---|---|---|---|---|---|
| ||||||||||||||||||||||||||||||||||||||||||||||||||||||||||||||||||||||||||||||||||||||||||||||||||||||||||||||||||||||||||||||||||||||||||||||||||||||||||||||||||||||||||||||||||||||||||||||||||||||||||||||||||||||||||||||||||||||||||||||||||||||||||||||||||||||||||||||||||||||||||||||||||||||||||||||||||||||||||||||||||||||||||||||||||||||||||||||||||||||||||||||||||||||
| Items | ||||||||||||||||||||||||||||||||||||||||||||||||||||||||||||||||||||||||||
|---|---|---|---|---|---|---|---|---|---|---|---|---|---|---|---|---|---|---|---|---|---|---|---|---|---|---|---|---|---|---|---|---|---|---|---|---|---|---|---|---|---|---|---|---|---|---|---|---|---|---|---|---|---|---|---|---|---|---|---|---|---|---|---|---|---|---|---|---|---|---|---|---|---|---|
| ||||||||||||||||||||||||||||||||||||||||||||||||||||||||||||||||||||||||||
Peace Disturbed
Something has been disturbing the Pokémon living in the lake, and now the Gyarados are angry. One of them can be seen just offshore. Unlike others of its species, this individual seems to have evolved under mysterious circumstances that resulted in its unusual coloring. It will not calm itself, so it must be caught or defeated.
VS Gyarados
As a Water/Flying-type Pokémon, Gyarados is vulnerable to Electric- and Rock-type attacks. Using these moves first will wear it down quickly. Follow up with Fire-, Water-, Fighting-, Bug-, or Steel-type moves to further chip away at its health.
| ||||||||||||||||||||||||
When the battle ends, you find a Red Scale floating on the water. Climb back onto shore and speak to the man reading the sign. He has been investigating rumors that all of the Magikarp in the lake are being forced to evolve prematurely. He introduces himself as Lance, and asks for your help. He believes that a mysterious radio signal originating in Mahogany Town is the cause, and sets off to find the source.
Mahogany Town
Souvenir Shop
Upon entering the shady shop, you see Lance's Dragonite using Hyper Beam to attack one of the workers. Lance confirms that the strange radio signal is coming from this location, and pushes past the shopkeeper to reveal a hidden stairway leading underground.
Team Rocket's Hideout
Team Rocket's hideout is a large complex hidden beneath Mahogany Town. Formerly the base of operations for a ninja clan, Team Rocket has put the old traps to use to thwart anyone attempting to interfere with their plans.
| Trainers | |||||||||||||||||||||||||||||||||||||||||||||||||||||||||||||||||||||||||||||||||||||||||||||||||||||||||||||||||||||||||||||||||||||||||||||||||||||||||||||||||||||||||||||||||||||||||||||||||||||||||||||||
|---|---|---|---|---|---|---|---|---|---|---|---|---|---|---|---|---|---|---|---|---|---|---|---|---|---|---|---|---|---|---|---|---|---|---|---|---|---|---|---|---|---|---|---|---|---|---|---|---|---|---|---|---|---|---|---|---|---|---|---|---|---|---|---|---|---|---|---|---|---|---|---|---|---|---|---|---|---|---|---|---|---|---|---|---|---|---|---|---|---|---|---|---|---|---|---|---|---|---|---|---|---|---|---|---|---|---|---|---|---|---|---|---|---|---|---|---|---|---|---|---|---|---|---|---|---|---|---|---|---|---|---|---|---|---|---|---|---|---|---|---|---|---|---|---|---|---|---|---|---|---|---|---|---|---|---|---|---|---|---|---|---|---|---|---|---|---|---|---|---|---|---|---|---|---|---|---|---|---|---|---|---|---|---|---|---|---|---|---|---|---|---|---|---|---|---|---|---|---|---|---|---|---|---|---|---|---|---|
| |||||||||||||||||||||||||||||||||||||||||||||||||||||||||||||||||||||||||||||||||||||||||||||||||||||||||||||||||||||||||||||||||||||||||||||||||||||||||||||||||||||||||||||||||||||||||||||||||||||||||||||||
| Items | |||||||||||||||||||||||||||||||||||||||||||||||||||||||||||||||||||||||||||||||||||||||||||||
|---|---|---|---|---|---|---|---|---|---|---|---|---|---|---|---|---|---|---|---|---|---|---|---|---|---|---|---|---|---|---|---|---|---|---|---|---|---|---|---|---|---|---|---|---|---|---|---|---|---|---|---|---|---|---|---|---|---|---|---|---|---|---|---|---|---|---|---|---|---|---|---|---|---|---|---|---|---|---|---|---|---|---|---|---|---|---|---|---|---|---|---|---|---|
| |||||||||||||||||||||||||||||||||||||||||||||||||||||||||||||||||||||||||||||||||||||||||||||
B1F
When you step in front of the first Pokémon statue, you are forced to battle two Grunts in quick succession. It turns out that each Pokémon statue on this floor is equipped with a hidden security camera, and passing in front of one causes the same two Grunts to confront you.
| Trainers | ||||||||||||||||||||||||||||||||||||||||||||||||||
|---|---|---|---|---|---|---|---|---|---|---|---|---|---|---|---|---|---|---|---|---|---|---|---|---|---|---|---|---|---|---|---|---|---|---|---|---|---|---|---|---|---|---|---|---|---|---|---|---|---|---|
| ||||||||||||||||||||||||||||||||||||||||||||||||||
Continue west and take the first doorway to head south. Defeat Scientist Jed in the interior room, then grab the X Accuracy and examine the computer to disable the security cameras. Leave the room and head east to reach a Hyper Potion. Go south and follow the hallway westward to get a Nugget, then take the stairs in the southwest.
B2F (South)
Lance is waiting for you here, and heals your Pokémon before continuing on. The nearby door needs a password to open, so continue eastward to fight another two Rocket Grunts. Take the stairs down to the lowest floor.
B3F (Southeast)
Lance informs you that reaching the boss requires two passwords, which are only known by a few trusted Rockets. Pick up the Protein near the east wall, then battle Scientist Ross and the female Rocket Grunt in the eastern room. Defeated, she gives up the first password: "SlowpokeTail". Move on to the southwest room to fight Scientist Mitch, then defeat another Rocket Grunt to learn the second password: "RaticateTail." Collect the Dire Hit and Full Heal near the potted plants, then head north. Pick up the Ice Heal near the north wall, then climb the northeast stairs.
B2F (North)
Head all the way to the west, where you are challenged by another Rocket Grunt. Go down the stairs to reach the boss's room.
B3F (Northwest)
When you approach the executive's room, Silver appears. He insists that he will be the one to eliminate Team Rocket, then runs off. Before opening the door, climb the southern stairs to a separate area of B2F.
B2F (West)
Pick up the item, TM46 (Thief), then go back downstairs.
B3F (Northwest)
Examine the door to enter the two passwords, and the door opens. The Rocket Executive inside demands to know who you are and why you are in Giovanni's office. He reveals that Giovanni disappeared after disbanding Team Rocket three years ago, but that the group has continued on since then, planning for his eventual return.
| |||||||||||||||||||||||||||||||||||||||||||||||||||||||||||||||||||||||||||||||||||
Shocked at his defeat, he rushes off to warn the others that their plans are in danger. Speak to the Murkrow in the corner to learn the password for the final locked door: "Hail Giovanni". Backtrack to the southern part of B2F.
B2F (South)
Examine the door to enter the password, and the door opens. When you step inside, a Rocket Executive and a Rocket Grunt ambush you in an attempt to force you into a 2-on-1 battle, but their plan is short-lived. Lance and his Dragonite show up just in time, and each of you battle a single Rocket instead.
| ||||||||||||||||||||||||||||||||||||||||||||||||||||||||||||||||||||||||||||||||||||||||
Afterward, she claims that their broadcasting experiment is a success, despite their defeat here. They are unconcerned what happens to their hideout, as they apparently have bigger plans. Team Rocket flees the building, and Lance inspects the generator. He cannot find a power switch, and determines that to shut it down, the six Electrode that power it must be removed. The two of you split the task, so catch or defeat the three on the left side to put an end to Team Rocket's plan.
| ||||||||||||||||||||||
With the machine disabled, the radio signal has finally stopped. The Lake of Rage can now return to normal, and Lance thanks you with an item that he found here: HM06 (Whirlpool). Follow him back upstairs, then step on the nearby warp tile for a shortcut to the entrance.
Mahogany Gym
| Mahogany Town Pokémon Gym Leader: Pryce The Teacher of Winter's Harshness | |
The Mahogany Gym specializes in Ice-type Pokémon. Ice-type moves are super effective against Dragon-, Flying-, Grass-, and Ground-type Pokémon, while Ice-type Pokémon are weak to Fighting-, Fire-, Rock-, and Steel-type moves.
The Gym is filled with slippery, ice-like tiles. When stepped on, the challenger is sent sliding until they reach a patch of normal flooring or some other obstacle. Begin by standing between the left Poké Ball statue and the interior wall, then move northward twice to reach Boarder Douglas. Slide to the east, then south to stop behind the Poké Ball statue on the right. Move westward, then northward again to stop next to Boarder Doulgas again. Slide eastward one last time to reach the Gym Leader.
Pryce's Seel is vulnerable to Grass- and Electric-type moves. Despite being a Water-type Pokémon, it can still fight back against unsuspecting Grass Pokémon with Ice attacks. His Dewgong is much the same, but also takes serious damage from Rock- and Fighting-type moves. His Piloswine can use Blizzard, the strongest Ice-type attack, but its Ice/Ground typing leaves it with the most weaknesses of Pryce's team, with five: Fighting-, Steel-, Fire-, Water-, and Grass-type moves.
| |||||||||||||||||||||||||||||||||||||||||||||||||||||||||||||||||||||||||||||||||||||||||||||||||||||||||||||||||||||||||||||||||||||||||||||||||||||||||||||||||||||||||||||||||||||||||||||||||||||
After the battle, Pryce awards you the Glacier Badge, which gives your Pokémon a slight Special Attack and Special Defense boost during battle and enables the use of Whirlpool in the field. He also gives you TM16 (Icy Wind) as a prize.
Desperate Times
Upon leaving the Gym, you receive a call from Professor Elm. He informs you of strange radio broadcasts that mention Team Rocket. It seems that the group has one more card to play, so hurry back to Goldenrod City's Radio Tower to finally put a stop to their plans.
|
Gold and Silver walkthrough |
|

|
This article is part of Project Walkthroughs, a Bulbapedia project that aims to write comprehensive step-by-step guides on each Pokémon game. |
