Mt. Mortar: Difference between revisions
m (→Generation IV) |
|||
| (142 intermediate revisions by 60 users not shown) | |||
| Line 1: | Line 1: | ||
{{Infobox location | {{Infobox location | ||
|image=HGSS_Mt._Mortar-{{#switch: {{#time: G}}|4|5|6|7|8|9=Morning|10|11|12|13|14|15|16=Day|17|18|19=Evening|20|21|22|23|0|1|2|3=Night}}.png | |image=HGSS_Mt._Mortar-{{#switch: {{#time: G}}|4|5|6|7|8|9=Morning|10|11|12|13|14|15|16=Day|17|18|19=Evening|20|21|22|23|0|1|2|3=Night}}.png | ||
|type= | |image_size=256 | ||
|type=mountain | |||
|mapdesc=A naturally large cavern that is incredibly spacious. | |||
|location_name=Mt. Mortar | |location_name=Mt. Mortar | ||
|japanese_name= | |japanese_name=スリバチ{{tt|山|やま}} | ||
|translated_name=Mt. Suribachi | |translated_name=Mt. Suribachi | ||
|location={{rt|42|Johto}}, between [[Ecruteak City]] and [[Mahogany Town]] | |location={{rt|42|Johto}}, between [[Ecruteak City]] and [[Mahogany Town]] | ||
| Line 10: | Line 12: | ||
|map=Johto Mt Mortar Map.png | |map=Johto Mt Mortar Map.png | ||
}} | }} | ||
'''Mt. Mortar''' (Japanese: ''' | '''Mt. Mortar''' (Japanese: '''スリバチ{{tt|山|やま}}''' ''Mt. Suribachi'') is a large [[cave]] in [[Johto]] with three entrances on {{rt|42|Johto}}. Part of the large range of mountains north of the Johto [[region]], it is known to be a confusing maze-like area with an interior cave known as the Waterfall Cave. It is an optional cave to enter, but contains many valuable items and Pokémon. The {{player}} can pass through the mountain caves to bypass the lakes on Route 42. It is the training place of [[Kiyo]], the Karate King from [[Saffron City]]. He will reward the player with a level 10 {{p|Tyrogue}} upon defeat. | ||
==Geography== | ==Geography== | ||
Mt. Mortar has three entrances and is huge inside, one of the largest of all caves in the games. It has four floors, and its high Pokémon-encounter rate makes getting lost very costly. It has {{m|Surf}}able waterways, {{m|Waterfall}}s, {{m|Strength}} puzzles, and multiple levels. It is usually considered to be one of the toughest caves to navigate. The cave also | Mt. Mortar has three entrances and is huge inside, one of the largest of all caves in the games. It has four floors, and its high Pokémon-encounter rate makes getting lost very costly. It has {{m|Surf}}able waterways, {{m|Waterfall}}s, {{m|Strength}} puzzles, and multiple levels. It is usually considered to be one of the toughest caves to navigate. The cave also provides limited vision in Gold and Silver unless {{m|Flash}} is used, but is already lit in Crystal, HeartGold, and SoulSilver. | ||
===The Karate King=== | ===The Karate King=== | ||
The Karate King, [[Kiyo]], is the leader of the [[Fighting Dojo]] in [[Saffron City]]. In {{3v2|Gold|Silver|Crystal}}, he has gone to Mt. Mortar to train. In order to find him, the player must use the center entrance which offers access to water, then {{m|Surf}} ahead and climb a {{ | The Karate King, [[Kiyo]], is the leader of the [[Fighting Dojo]] in [[Saffron City]]. In {{3v2|Gold|Silver|Crystal}}, he has gone to Mt. Mortar to train. In order to find him, the player must use the center entrance which offers access to water, then {{m|Surf}} ahead and climb a {{OBP|waterfall|obstacle}}. Then they must make their way to the bottom of the cave, where they will eventually find him waiting to be challenged. Kiyo uses a {{p|Hitmonchan}} and a {{p|Hitmonlee}}, and once they are defeated, he will give the player a {{p|Tyrogue}} as a reward. However, if the player does not have an empty slot in their party, Kiyo will tell them to make room for it, then come back. | ||
==Items== | ==Items== | ||
===1F (entrance)=== | |||
=== | {{Itlisth|mountain}} | ||
{{Itlisth| | {{Itemlist|Hyper Potion|West side, east of the entrance on a small rock ''(hidden)''|HG=yes|SS=yes}} | ||
{{Itemlist|Hyper Potion| | {{Itemlist|Ether|West side, accessible from the southwestern ladder from 1F (back)|HG=yes|SS=yes|G=yes|S=yes|C=yes}} | ||
{{Itemlist|Ether| | {{Itemlist|Guard Spec.|East side, accessible from the southeastern ladder from 1F (back)|G=yes|S=yes}} | ||
{{Itemlist|Revive|East side, accessible from the southeastern ladder from 1F (back)|C=yes|HG=yes|SS=yes}} | |||
{{Itemlist| | {{Itemlist|Hyper Potion|East side, on a rock west of the entrance to 1F (back) ''(hidden)''|G=yes|S=yes|C=yes}} | ||
{{Itemlist| | {{Itemlist|Revive|East side, north of the upper exit to Route 42 (requires {{m|Rock Climb}}) ''(hidden)''|HG=yes|SS=yes}} | ||
{{Itemlist| | {{itlistfoot|mountain}} | ||
{{Itemlist|Revive|East side, north of | |||
{{itlistfoot| | |||
=== | ===1F (back)=== | ||
{{Itlisth| | {{Itlisth|mountain}} | ||
{{Itemlist|Hyper Potion| | {{Itemlist|Hyper Potion|Central area, north of the central platforms, at the bottom of the western ledge (requires {{m|Strength}})|G=yes|S=yes}} | ||
{{Itemlist| | {{Itemlist|Escape Rope|Central area, northeast of the central platforms, at the bottom of the northeastern ledge (requires {{m|Strength}})|G=yes|S=yes}} | ||
{{Itemlist|Max Repel| | {{Itemlist|Hyper Potion|Central area, atop the western platform (requires {{m|Strength}})|C=yes}} | ||
{{Itemlist| | {{Itemlist|Ultra Ball|Central area, atop the northern platform (requires {{m|Strength}})|C=yes|display=[[Ultra Ball]]}} | ||
{{Itemlist| | {{Itemlist|Nugget|Central area, northeast of the central platform (requires {{m|Strength}})|C=yes}} | ||
{{Itemlist|Escape Rope| | {{Itemlist|Escape Rope|Central area, southeast of the central platform, at the bottom of a series of ledges (requires {{m|Strength}})|C=yes}} | ||
{{Itemlist|Nugget| | {{Itemlist|Max Repel|Central area, in the crater just north of the movable boulder (requires {{m|Strength}}) ''(hidden)''|HG=yes|SS=yes}} | ||
{{Itemlist| | {{Itemlist|Ultra Ball|Central area, atop the western platform (requires {{m|Strength}})|HG=yes|SS=yes|display=[[Ultra Ball]]}} | ||
{{Itemlist|Ether| | {{Itemlist|Max Potion|Central area, north of the central platform, just below the raised path (requires {{m|Strength}})|HG=yes|SS=yes}} | ||
{{Itemlist|Iron | {{Itemlist|Escape Rope|Central area, east of the central platform, at the southern end of the raised path (requires {{m|Strength}})|HG=yes|SS=yes}} | ||
{{Itemlist| | {{Itemlist|Nugget|Central area, atop the northeastern platform (requires {{m|Strength}})|HG=yes|SS=yes}} | ||
{{Itemlist| | {{Itemlist|Max Repel|Northern area, on a rock in the eastern corner (requires {{m|Surf}} and {{m|Waterfall}}) ''(hidden)''|G=yes|S=yes|C=yes}} | ||
{{Itemlist| | {{Itemlist|Max Revive|Northern area, in the indent east of the ladder from 2F (requires {{m|Surf}} and {{m|Waterfall}})|G=yes|S=yes|C=yes}} | ||
{{Itemlist| | {{Itemlist|Max Potion|Northern area, at the southwestern end of the path in the eastern corner (requires {{m|Surf}} and {{m|Waterfall}})|C=yes}} | ||
{{Itemlist| | {{Itemlist|Ether|Northern area, on a platform southeast of the ladder from 2F (requires {{m|Surf}} and {{m|Waterfall}}) ''(hidden)'' |HG=yes|SS=yes}} | ||
{{Itemlist| | {{Itemlist|Iron|Northern area, on a platform south of the ladder from 2F (requires {{m|Surf}} and {{m|Waterfall}})|C=yes|HG=yes|SS=yes}} | ||
{{itlistfoot| | {{Itemlist|Iron Ball|Northern area, on the southeastern platform (requires {{m|Surf}} and {{m|Waterfall}})|HG=yes|SS=yes}} | ||
{{Itemlist|Max Revive|Northern area, on the platform west of the ladder to B1F (requires {{m|Surf}} and {{m|Waterfall}})|HG=yes|SS=yes}} | |||
{{Itemlist|Ultra Ball|On a rock on the raised path in the west (requires {{m|Rock Climb}}) ''(hidden)''|HG=yes|SS=yes|display=[[Ultra Ball]]}} | |||
{{Itemlist|Protector|North of the western entrance (requires {{m|Rock Climb}})|HG=yes|SS=yes}} | |||
{{Itemlist|Rare Candy|North of the western entrance, west of the Protector (requires {{m|Rock Climb}}) ''(hidden)''|HG=yes|SS=yes}} | |||
{{Itemlist|Full Incense|North of the southeastern ladder to 2F (requires {{m|Rock Climb}})|HG=yes|SS=yes}} | |||
{{Itemlist|Nugget|West of the southeastern ladder to 2F, at the southern end of the path (requires {{m|Rock Climb}}) ''(hidden)''|HG=yes|SS=yes}} | |||
{{itlistfoot|mountain}} | |||
=== | ===2F=== | ||
''{{ | ''{{m|Surf}} and {{m|Waterfall}} are required to reach this area.'' | ||
{{itlisth| | {{itlisth|mountain}} | ||
{{Itemlist|TM Normal| | {{Itemlist|TM Normal|In the center, on the L-shaped raised section|G=yes|S=yes|C=yes|display={{TM|40|Defense Curl}}}} | ||
{{Itemlist|Escape Rope| | {{Itemlist|Escape Rope|On the raised section in the northeast corner|G=yes|S=yes|C=yes}} | ||
{{Itemlist|Full Restore| | {{Itemlist|Full Restore|The right tile in-between the ledges east of the Dragon Scale ''(hidden)''|G=yes|S=yes}} | ||
{{Itemlist|Dragon Scale| | {{Itemlist|Full Restore|Northern area, on a rock east of the T-shaped raised platform ''(hidden)''|C=yes}} | ||
{{Itemlist| | {{Itemlist|Dragon Scale|On the raised section in the northwest corner|G=yes|S=yes|C=yes}} | ||
{{Itemlist| | {{Itemlist|Elixer|In the northwest corner, southeast of the ladder leading to 1F (back)|G=yes|S=yes|C=yes|display=[[Elixir|Elixer]]|sprite=Bag Elixir Sprite}} | ||
{{Itemlist| | {{Itemlist|Rare Candy|In the southwest corner, east of a ledge and below two rocks|G=yes|S=yes}} | ||
{{Itemlist| | {{Itemlist|Rare Candy|Southwest corner|C=yes|HG=yes|SS=yes}} | ||
{{Itemlist| | {{Itemlist|Max Potion|Northeast of the entrance, below the second ledge from the bottom and east of the rectangular raised section|G=yes|S=yes|C=yes}} | ||
{{Itemlist| | {{Itemlist|Max Potion|Northeast of the entrance|HG=yes|SS=yes}} | ||
{{Itemlist| | {{Itemlist|Hyper Potion|Southeast, in a wall south of the Max Potion ''(hidden)''|HG=yes|SS=yes}} | ||
{{Itemlist|Escape Rope|Near | {{Itemlist|Full Restore|On a stalagmite north of a pond on the eastern edge of the room ''(hidden)''|HG=yes|SS=yes}} | ||
{{Itemlist|Full Heal|On a stalagmite east of the ladder to | {{Itemlist|HP Up|On a large rock near the center, southeast of TM40 ''(hidden)''|HG=yes|SS=yes}} | ||
{{Itemlist| | {{Itemlist|TM Flying|Northeast of Super Nerd Hugh|HG=yes|SS=yes|display={{TM|40|Aerial Ace}}}} | ||
{{Itemlist| | {{Itemlist|Escape Rope|Near northeast corner|HG=yes|SS=yes}} | ||
{{itlistfoot| | {{Itemlist|Full Heal|On a stalagmite east of the ladder to 1F (back) ''(hidden)''|HG=yes|SS=yes}} | ||
{{Itemlist|Dragon Scale|East of the ladder to 1F (back)|HG=yes|SS=yes}} | |||
{{Itemlist|Elixir|Southeast of the ladder to the 1F (back)|HG=yes|SS=yes}} | |||
{{itlistfoot|mountain}} | |||
=== | ===B1F=== | ||
{{Itlisth| | {{Itlisth|mountain}} | ||
{{Itemlist| | {{Itemlist|Full Restore|On the platform east of the ladder from 1F (entrance) (requires {{m|Surf}})|C=yes|HG=yes|SS=yes}} | ||
{{Itemlist| | {{Itemlist|Hyper Potion|On the patch of land{{sup/2|GS}}/platform{{sup/2|C}} northeast of the ladder from 1F (entrance) (requires {{m|Surf}})|G=yes|S=yes|C=yes}} | ||
{{ | {{Itemlist|Max Ether|On the patch of land northeast of the ladder from 1F (entrance) (requires {{m|Surf}})|C=yes|HG=yes|SS=yes}} | ||
{{Itemlist| | {{Itemlist|Hyper Potion|On the patch of land north of the ladder from 1F (entrance) (requires {{m|Surf}})|HG=yes|SS=yes}} | ||
{{Itemlist| | {{Itemlist|PP Up|North of the ladder from 1F (entrance) (requires {{m|Surf}})|C=yes|HG=yes|SS=yes}} | ||
{{Itemlist| | {{Itemlist|Ultra Ball|West of the ladder from 1F (entrance) in the northern wall between the rocks (requires {{m|Surf}}) ''(hidden)'' |HG=yes|SS=yes}} | ||
{{Itemlist| | {{Itemlist|Full Heal|On the patch of land across the water, west of the ladder from 1F (requires {{m|Surf}})|G=yes|S=yes}} | ||
{{Itemlist| | {{Itemlist|Carbos|On the patch of land across the water, west of the ladder from 1F (entrance) (requires {{m|Surf}})|C=yes|HG=yes|SS=yes}} | ||
{{Itemlist|Carbos| | {{Itemlist|Max Revive|On a lone rock south{{sup/2|GSC}}/east{{sup/4|HGSS}} of the ladder from 2F (requires {{m|Surf}} and {{m|Waterfall}}) ''(hidden)''|G=yes|S=yes|C=yes|HG=yes|SS=yes}} | ||
{{Itemlist|Max Revive|On a | {{itlistfoot|mountain}} | ||
{{itlistfoot| | |||
==Pokémon== | ==Pokémon== | ||
===Generation II=== | ===Generation II=== | ||
==== | ====1F (entrance)==== | ||
{{ | {{Catch/header|mountain}} | ||
{{ | {{Catch/entry2|019|Rattata|yes|yes|no|Cave|14,16|all=14%|type1=Normal}} | ||
{{ | {{Catch/entry2|019|Rattata|no|no|yes|Cave|14|all=30%|type1=Normal}} | ||
{{ | {{Catch/entry2|020|Raticate|no|no|yes|Cave|16|all=5%|type1=Normal}} | ||
{{ | {{Catch/entry2|041|Zubat|yes|yes|no|Cave|13,15|all=60%|type1=Poison|type2=Flying}} | ||
{{ | {{Catch/entry2|041|Zubat|no|no|yes|Cave|13|all=30%|type1=Poison|type2=Flying}} | ||
{{ | {{Catch/entry2|042|Golbat|no|no|yes|Cave|13|all=10%|type1=Poison|type2=Flying}} | ||
{{ | {{Catch/entry2|066|Machop|yes|yes|no|Cave|14|all=20%|type1=Fighting}} | ||
{{ | {{Catch/entry2|066|Machop|no|no|yes|Cave|14|20%|20%|0%|type1=Fighting}} | ||
{{ | {{Catch/entry2|074|Geodude|yes|yes|yes|Cave|14|all=5%|type1=Rock|type2=Ground}} | ||
{{ | {{Catch/entry2|183|Marill|yes|yes|no|Cave|15|all=1%|type1=Water}} | ||
{{ | {{Catch/entry2|183|Marill|no|no|yes|Cave|14|0%|0%|20%|type1=Water}} | ||
{{ | {{Catch/div|water|Surfing}} | ||
{{ | {{Catch/entry2|118|Goldeen|yes|yes|no|Surf|15-24|all=90%|type1=Water}} | ||
{{ | {{Catch/entry2|118|Goldeen|no|no|yes|Surf|15-19|all=60%|type1=Water}} | ||
{{ | {{Catch/entry2|119|Seaking|yes|yes|yes|Surf|20-24|all=10%|type1=Water}} | ||
{{ | {{Catch/entry2|183|Marill|no|no|yes|Surf|20-24|all=30%|type1=Water}} | ||
{{ | {{Catch/div|water|Fishing}} | ||
{{ | {{Catch/entry2|118|Goldeen|yes|yes|yes|Fish Old|10|all=15%|type1=Water}} | ||
{{ | {{Catch/entry2|129|Magikarp|yes|yes|yes|Fish Old|10|all=85%|type1=Water}} | ||
{{ | {{Catch/entry2|118|Goldeen|yes|yes|yes|Fish Good|20|all=65%|type1=Water}} | ||
{{ | {{Catch/entry2|129|Magikarp|yes|yes|yes|Fish Good|20|all=35%|type1=Water}} | ||
{{ | {{Catch/entry2|118|Goldeen|yes|yes|yes|Fish Super|40|all=70%|type1=Water}} | ||
{{ | {{Catch/entry2|119|Seaking|yes|yes|yes|Fish Super|40|all=10%|type1=Water}} | ||
{{ | {{Catch/entry2|129|Magikarp|yes|yes|yes|Fish Super|40|all=20%|type1=Water}} | ||
{{ | {{Catch/div|mountain|During a Marill swarm}} | ||
{{Catch/entry2|019|Rattata|yes|yes|no|Swarm|16|all=5%|type1=Normal}} | |||
{{Catch/entry2|041|Zubat|yes|yes|no|Swarm|15|all=30%|type1=Poison|type2=Flying}} | |||
{{Catch/entry2|066|Machop|yes|yes|no|Swarm|14|all=20%|type1=Fighting}} | |||
{{Catch/entry2|074|Geodude|yes|yes|no|Swarm|14|all=5%|type1=Rock|type2=Ground}} | |||
{{Catch/entry2|183|Marill|yes|yes|no|Swarm|13-15|all=40%|type1=Water}} | |||
{{Catch/footer|mountain}} | |||
==== | ====1F (back)==== | ||
{{ | {{Catch/header|mountain}} | ||
{{ | {{Catch/entry2|019|Rattata|yes|yes|no|Cave|14|all=10%|type1=Normal}} | ||
{{ | {{Catch/entry2|019|Rattata|no|no|yes|Cave|14|all=30%|type1=Normal}} | ||
{{ | {{Catch/entry2|020|Raticate|no|no|yes|Cave|14|10%|10%|0%|type1=Normal}} | ||
{{ | {{Catch/entry2|020|Raticate|no|no|yes|Cave|15|0%|0%|20%|type1=Normal}} | ||
{{ | {{Catch/entry2|041|Zubat|yes|yes|no|Cave|14|all=5%|type1=Poison|type2=Flying}} | ||
{{ | {{Catch/entry2|041|Zubat|no|no|yes|Cave|15|5%|5%|0%|type1=Poison|type2=Flying}} | ||
{{ | {{Catch/entry2|041|Zubat|no|no|yes|Cave|14|0%|0%|10%|type1=Poison|type2=Flying}} | ||
{{ | {{Catch/entry2|042|Golbat|no|no|yes|Cave|15|all=5%|type1=Poison|type2=Flying}} | ||
{{ | {{Catch/entry2|066|Machop|yes|yes|no|Cave|13,15|all=35%|type1=Fighting}} | ||
{{ | {{Catch/entry2|066|Machop|no|no|yes|Cave|15|20%|20%|0%|type1=Fighting}} | ||
{{ | {{Catch/entry2|074|Geodude|yes|yes|no|Cave|13,15|all=50%|type1=Rock|type2=Ground}} | ||
{{ | {{Catch/entry2|074|Geodude|no|no|yes|Cave|13|all=30%|type1=Rock|type2=Ground}} | ||
{{Catch/entry2|183|Marill|no|no|yes|Cave|15|0%|0%|5%|type1=Water}} | |||
{{Catch/footer|mountain}} | |||
==== | ====2F==== | ||
{{ | {{Catch/header|mountain}} | ||
{{ | {{Catch/entry2|020|Raticate|yes|yes|no|Cave|30|all=10%|type1=Normal}} | ||
{{ | {{Catch/entry2|020|Raticate|no|no|yes|Cave|30|10%|10%|20%|type1=Normal}} | ||
{{ | {{Catch/entry2|042|Golbat|yes|yes|no|Cave|30|all=5%|type1=Poison|type2=Flying}} | ||
{{ | {{Catch/entry2|042|Golbat|no|no|yes|Cave|30|5%|5%|0%|type1=Poison|type2=Flying}} | ||
{{ | {{Catch/entry2|042|Golbat|no|no|yes|Cave|30,32|0%|0%|15%|type1=Poison|type2=Flying}} | ||
{{ | {{Catch/entry2|066|Machop|yes|yes|no|Cave|28|all=5%|type1=Fighting}} | ||
{{ | {{Catch/entry2|066|Machop|no|no|yes|Cave|28|5%|5%|0%|type1=Fighting}} | ||
{{ | {{Catch/entry2|067|Machoke|yes|yes|no|Cave|32|all=30%|type1=Fighting}} | ||
{{ | {{Catch/entry2|067|Machoke|no|no|yes|Cave|32|30%|30%|0%|type1=Fighting}} | ||
{{ | {{Catch/entry2|074|Geodude|yes|yes|no|Cave|31|all=20%|type1=Rock|type2=Ground}} | ||
{{ | {{Catch/entry2|074|Geodude|no|no|yes|Cave|31|20%|20%|30%|type1=Rock|type2=Ground}} | ||
{{ | {{Catch/entry2|075|Graveler|yes|yes|yes|Cave|31|all=30%|type1=Rock|type2=Ground}} | ||
{{ | {{Catch/entry2|183|Marill|no|no|yes|Cave|28|0%|0%|5%|type1=Water}} | ||
{{ | {{Catch/div|water|Surfing}} | ||
{{ | {{Catch/entry2|118|Goldeen|yes|yes|no|Surf|20-29|all=90%|type1=Water}} | ||
{{ | {{Catch/entry2|118|Goldeen|no|no|yes|Surf|20-24|all=60%|type1=Water}} | ||
{{ | {{Catch/entry2|119|Seaking|yes|yes|yes|Surf|25-29|all=10%|type1=Water}} | ||
{{ | {{Catch/entry2|183|Marill|no|no|yes|Surf|25-29|all=30%|type1=Water}} | ||
{{ | {{Catch/div|water|Fishing}} | ||
{{ | {{Catch/entry2|118|Goldeen|yes|yes|yes|Fish Old|10|all=15%|type1=Water}} | ||
{{ | {{Catch/entry2|129|Magikarp|yes|yes|yes|Fish Old|10|all=85%|type1=Water}} | ||
{{ | {{Catch/entry2|118|Goldeen|yes|yes|yes|Fish Good|20|all=65%|type1=Water}} | ||
{{ | {{Catch/entry2|129|Magikarp|yes|yes|yes|Fish Good|20|all=35%|type1=Water}} | ||
{{ | {{Catch/entry2|118|Goldeen|yes|yes|yes|Fish Super|40|all=70%|type1=Water}} | ||
{{ | {{Catch/entry2|119|Seaking|yes|yes|yes|Fish Super|40|all=10%|type1=Water}} | ||
{{ | {{Catch/entry2|129|Magikarp|yes|yes|yes|Fish Super|40|all=20%|type1=Water}} | ||
{{Catch/footer|mountain}} | |||
==== | ====B1F==== | ||
{{ | {{Catch/header|mountain}} | ||
{{ | {{Catch/entry2|019|Rattata|yes|yes|no|Cave|16|all=20%|type1=Normal}} | ||
{{ | {{Catch/entry2|020|Raticate|yes|yes|no|Cave|16|all=5%|type1=Normal}} | ||
{{ | {{Catch/entry2|020|Raticate|no|no|yes|Cave|18|all=5%|type1=Normal}} | ||
{{ | {{Catch/entry2|041|Zubat|yes|yes|yes|Cave|15,17|all=60%|type1=Poison|type2=Flying}} | ||
{{ | {{Catch/entry2|042|Golbat|no|no|yes|Cave|17|all=20%|type1=Poison|type2=Flying}} | ||
{{ | {{Catch/entry2|066|Machop|yes|yes|no|Cave|16|all=10%|type1=Fighting}} | ||
{{ | {{Catch/entry2|066|Machop|no|no|yes|Cave|16|10%|10%|0%|type1=Fighting}} | ||
{{ | {{Catch/entry2|074|Geodude|yes|yes|yes|Cave|16|all=5%|type1=Rock|type2=Ground}} | ||
{{ | {{Catch/entry2|183|Marill|no|no|yes|Cave|16|0%|0%|10%|type1=Water}} | ||
{{ | {{Catch/div|water|Surfing}} | ||
{{ | {{Catch/entry2|118|Goldeen|yes|yes|no|Surf|15-24|all=90%|type1=Water}} | ||
{{ | {{Catch/entry2|118|Goldeen|no|no|yes|Surf|15-19|all=60%|type1=Water}} | ||
{{ | {{Catch/entry2|119|Seaking|yes|yes|yes|Surf|20-24|all=10%|type1=Water}} | ||
{{ | {{Catch/entry2|183|Marill|no|no|yes|Surf|20-24|all=30%|type1=Water}} | ||
{{ | {{Catch/div|water|Fishing}} | ||
{{ | {{Catch/entry2|118|Goldeen|yes|yes|yes|Fish Old|10|all=15%|type1=Water}} | ||
{{ | {{Catch/entry2|129|Magikarp|yes|yes|yes|Fish Old|10|all=85%|type1=Water}} | ||
{{ | {{Catch/entry2|118|Goldeen|yes|yes|yes|Fish Good|20|all=65%|type1=Water}} | ||
{{ | {{Catch/entry2|129|Magikarp|yes|yes|yes|Fish Good|20|all=35%|type1=Water}} | ||
{{ | {{Catch/entry2|118|Goldeen|yes|yes|yes|Fish Super|40|all=70%|type1=Water}} | ||
{{ | {{Catch/entry2|119|Seaking|yes|yes|yes|Fish Super|40|all=10%|type1=Water}} | ||
{{ | {{Catch/entry2|129|Magikarp|yes|yes|yes|Fish Super|40|all=20%|type1=Water}} | ||
{{ | {{Catch/div|mountain|Gift Pokémon}} | ||
{{ | {{Catch/entry2|236|Tyrogue|yes|yes|yes|Gift|10|all={{tt|One|Gift from Kiyo after defeating him}}|type1=Fighting}} | ||
{{ | {{Catch/footer|mountain}} | ||
===Generation IV=== | ===Generation IV=== | ||
==== | ====1F (entrance)==== | ||
{{ | {{Catch/header|mountain|4}} | ||
{{ | {{Catch/entryhs|019|Rattata|yes|yes|Cave|14, 16|all=14%|type1=Normal}} | ||
{{ | {{Catch/entryhs|041|Zubat|yes|yes|Cave|13, 15|all=60%|type1=Poison|type2=Flying}} | ||
{{ | {{Catch/entryhs|066|Machop|yes|yes|Cave|14|all=20%|type1=Fighting}} | ||
{{ | {{Catch/entryhs|074|Geodude|yes|yes|Cave|14|all=5%|type1=Rock|type2=Ground}} | ||
{{ | {{Catch/entryhs|183|Marill|yes|yes|Cave|15|all=1%|type1=Water}} | ||
{{ | {{Catch/div|water|Surfing}} | ||
{{ | {{Catch/entryhs|118|Goldeen|yes|yes|Surf|10-25|all=90%|type1=Water}} | ||
{{ | {{Catch/entryhs|119|Seaking|yes|yes|Surf|15-25|all=10%|type1=Water}} | ||
{{ | {{Catch/div|water|Fishing}} | ||
{{ | {{Catch/entryhs|118|Goldeen|yes|yes|Fish Old|10|all=15%|type1=Water}} | ||
{{ | {{Catch/entryhs|129|Magikarp|yes|yes|Fish Old|10|all=85%|type1=Water}} | ||
{{ | {{Catch/entryhs|118|Goldeen|yes|yes|Fish Good|20|all=60%|type1=Water}} | ||
{{ | {{Catch/entryhs|129|Magikarp|yes|yes|Fish Good|20|all=40%|type1=Water}} | ||
{{ | {{Catch/entryhs|118|Goldeen|yes|yes|Fish Super|40|all=70%|type1=Water}} | ||
{{ | {{Catch/entryhs|119|Seaking|yes|yes|Fish Super|40|all=10%|type1=Water}} | ||
{{ | {{Catch/entryhs|129|Magikarp|yes|yes|Fish Super|40|all=20%|type1=Water}} | ||
{{ | {{Catch/div|mountain|Swarm}} | ||
{{ | {{Catch/entryhs|183|Marill|yes|yes|Swarm|13-15|all=40%|type1=Water}} | ||
{{ | {{Catch/div|mountain|Special}} | ||
{{ | {{Catch/entryhs|296|Makuhita|yes|yes|Hoenn|14|all=20%|type1=Fighting}} | ||
{{ | {{Catch/entryhs|359|Absol|yes|yes|Hoenn|13, 15|all=20%|type1=Dark}} | ||
{{ | {{Catch/entryhs|433|Chingling|yes|yes|Sinnoh|14|all=20%|type1=Psychic}} | ||
{{Catch/entryhs|436|Bronzor|yes|yes|Sinnoh|13, 15|all=20%|type1=Steel|type2=Psychic}} | |||
{{Catch/footer|mountain}} | |||
==== | ====1F (back)==== | ||
{{ | {{Catch/header|mountain|4}} | ||
{{ | {{Catch/entryhs|019|Rattata|yes|yes|Cave|14|all=10%|type1=Normal}} | ||
{{ | {{Catch/entryhs|041|Zubat|yes|yes|Cave|14|all=5%|type1=Poison|type2=Flying}} | ||
{{ | {{Catch/entryhs|066|Machop|yes|yes|Cave|13, 15|all=35%|type1=Fighting}} | ||
{{ | {{Catch/entryhs|074|Geodude|yes|yes|Cave|13, 15|all=50%|type1=Rock|type2=Ground}} | ||
{{ | {{Catch/div|mountain|Special}} | ||
{{ | {{Catch/entryhs|296|Makuhita|yes|yes|Hoenn|15|all=20%|type1=Fighting}} | ||
{{ | {{Catch/entryhs|359|Absol|yes|yes|Hoenn|13|all=20%|type1=Dark}} | ||
{{ | {{Catch/entryhs|433|Chingling|yes|yes|Sinnoh|15|all=20%|type1=Psychic}} | ||
{{ | {{Catch/entryhs|436|Bronzor|yes|yes|Sinnoh|13|all=20%|type1=Steel|type2=Psychic}} | ||
{{ | {{Catch/footer|mountain}} | ||
==== | ====2F==== | ||
{{ | {{Catch/header|mountain|4}} | ||
{{ | {{Catch/entryhs|020|Raticate|yes|yes|Cave|30|all=10%|type1=Normal}} | ||
{{ | {{Catch/entryhs|042|Golbat|yes|yes|Cave|30|all=5%|type1=Poison|type2=Flying}} | ||
{{ | {{Catch/entryhs|066|Machop|yes|yes|Cave|28|all=5%|type1=Fighting}} | ||
{{ | {{Catch/entryhs|067|Machoke|yes|yes|Cave|32|all=30%|type1=Fighting}} | ||
{{ | {{Catch/entryhs|074|Geodude|yes|yes|Cave|31|all=20%|type1=Rock|type2=Ground}} | ||
{{ | {{Catch/entryhs|075|Graveler|yes|yes|Cave|31|all=30%|type1=Rock|type2=Ground}} | ||
{{ | {{Catch/div|water|Surfing}} | ||
{{ | {{Catch/entryhs|118|Goldeen|yes|yes|Surf|15-30|all=90%|type1=Water}} | ||
{{ | {{Catch/entryhs|119|Seaking|yes|yes|Surf|20-30|all=10%|type1=Water}} | ||
{{ | {{Catch/div|water|Fishing}} | ||
{{ | {{Catch/entryhs|118|Goldeen|yes|yes|Fish Old|10|all=15%|type1=Water}} | ||
{{ | {{Catch/entryhs|129|Magikarp|yes|yes|Fish Old|10|all=85%|type1=Water}} | ||
{{ | {{Catch/entryhs|118|Goldeen|yes|yes|Fish Good|20|all=60%|type1=Water}} | ||
{{ | {{Catch/entryhs|129|Magikarp|yes|yes|Fish Good|20|all=40%|type1=Water}} | ||
{{ | {{Catch/entryhs|118|Goldeen|yes|yes|Fish Super|40|all=70%|type1=Water}} | ||
{{ | {{Catch/entryhs|119|Seaking|yes|yes|Fish Super|40|all=10%|type1=Water}} | ||
{{ | {{Catch/entryhs|129|Magikarp|yes|yes|Fish Super|40|all=20%|type1=Water}} | ||
{{ | {{Catch/div|mountain|Special}} | ||
{{ | {{Catch/entryhs|296|Makuhita|yes|yes|Hoenn|31|all=20%|type1=Fighting}} | ||
{{ | {{Catch/entryhs|359|Absol|yes|yes|Hoenn|31-32|all=20%|type1=Dark}} | ||
{{ | {{Catch/entryhs|433|Chingling|yes|yes|Sinnoh|31|all=20%|type1=Psychic}} | ||
{{ | {{Catch/entryhs|436|Bronzor|yes|yes|Sinnoh|31-32|all=20%|type1=Steel|type2=Psychic}} | ||
{{ | {{Catch/footer|mountain}} | ||
==== | ====B1F==== | ||
{{ | {{Catch/header|mountain|4}} | ||
{{ | {{Catch/entryhs|019|Rattata|yes|yes|Cave|16|all=20%|type1=Normal}} | ||
{{ | {{Catch/entryhs|020|Raticate|yes|yes|Cave|16|all=5%|type1=Normal}} | ||
{{ | {{Catch/entryhs|041|Zubat|yes|yes|Cave|15, 17|all=60%|type1=Poison|type2=Flying}} | ||
{{ | {{Catch/entryhs|066|Machop|yes|yes|Cave|16|all=10%|type1=Fighting}} | ||
{{ | {{Catch/entryhs|074|Geodude|yes|yes|Cave|16|all=5%|type1=Rock|type2=Ground}} | ||
{{ | {{Catch/div|water|Surfing}} | ||
{{ | {{Catch/entryhs|118|Goldeen|yes|yes|Surf|10-25|all=90%|type1=Water}} | ||
{{ | {{Catch/entryhs|119|Seaking|yes|yes|Surf|15-25|all=10%|type1=Water}} | ||
{{ | {{Catch/div|water|Fishing}} | ||
{{ | {{Catch/entryhs|118|Goldeen|yes|yes|Fish Old|10|all=15%|type1=Water}} | ||
{{ | {{Catch/entryhs|129|Magikarp|yes|yes|Fish Old|10|all=85%|type1=Water}} | ||
{{ | {{Catch/entryhs|118|Goldeen|yes|yes|Fish Good|20|all=60%|type1=Water}} | ||
{{ | {{Catch/entryhs|129|Magikarp|yes|yes|Fish Good|20|all=40%|type1=Water}} | ||
{{ | {{Catch/entryhs|118|Goldeen|yes|yes|Fish Super|40|all=70%|type1=Water}} | ||
{{ | {{Catch/entryhs|119|Seaking|yes|yes|Fish Super|40|all=10%|type1=Water}} | ||
{{ | {{Catch/entryhs|129|Magikarp|yes|yes|Fish Super|40|all=20%|type1=Water}} | ||
{{ | {{Catch/div|mountain|Special}} | ||
{{ | {{Catch/entryhs|296|Makuhita|yes|yes|Hoenn|16|all=20%|type1=Fighting}} | ||
{{ | {{Catch/entryhs|359|Absol|yes|yes|Hoenn|15, 17|all=20%|type1=Dark}} | ||
{{ | {{Catch/entryhs|433|Chingling|yes|yes|Sinnoh|16|all=20%|type1=Psychic}} | ||
{{ | {{Catch/entryhs|436|Bronzor|yes|yes|Sinnoh|15, 17|all=20%|type1=Steel|type2=Psychic}} | ||
{{ | {{Catch/div|mountain|Gift Pokémon}} | ||
{{ | {{Catch/entryhs|236|Tyrogue|yes|yes|Gift|10|all={{tt|One|Gift from Kiyo after defeating him}}|type1=Fighting}} | ||
{{ | {{Catch/footer|mountain}} | ||
==Trainers== | ==Trainers== | ||
===Generation II=== | ===Generation II=== | ||
{{trainerheader| | ====1F==== | ||
{{Trainerentry|Spr | {{trainerheader|mountain}} | ||
{{Trainerdiv| | {{Trainerentry|Spr GS PokéManiac.png|PokéManiac|Miller{{sup/2|C}}|1020|2|034|Nidoking|♂|17||031|Nidoqueen|♀|17||36=ナオト|37=Naoto}} | ||
{{Trainerentry|Spr | {{Trainerdiv|mountain|Requires Strength ''or'' Surf and Waterfall}} | ||
{{ | {{Trainerentry|Spr GS Super Nerd.png|Super Nerd|Markus{{sup/2|C}}|608|1|079|Slowpoke|♂|19||36=ガクジ|37=Gakuji}} | ||
{{Trainerfooter|mountain|II}} | |||
{{Trainerfooter| | |||
{{Party|color={{fighting color}}|bordercolor={{fighting color dark}}|headcolor={{fighting color light}} | ====2F==== | ||
|sprite=Spr | {{trainerheader|mountain}} | ||
{{Trainerdiv|mountain|Requires Surf and Waterfall}} | |||
{{Trainerentry|Spr GS Super Nerd.png|Super Nerd|Hugh{{sup/2|C}}|1248|1|117|Seadra|♂|39||36=タカフミ|37=Takafumi}} | |||
{{Trainerfooter|mountain|II}} | |||
====B1F==== | |||
;Requires {{m|Surf}} and {{m|Waterfall}} | |||
{{Party/Single | |||
|color={{fighting color}} | |||
|bordercolor={{fighting color dark}} | |||
|headcolor={{fighting color light}} | |||
|sprite=Spr GS Blackbelt.png | |||
|prize={{pdollar}}816 | |prize={{pdollar}}816 | ||
|class=Blackbelt | |class=Blackbelt | ||
|name={{color2| | |classlink=Black Belt (Trainer class) | ||
|name={{color2|000|Kiyo}} | |||
|game=GSC | |game=GSC | ||
|location=Mt. Mortar | |location=Mt. Mortar | ||
|pokemon=2 | |pokemon=2}} | ||
| | |{{Pokémon/2 | ||
|level=34|gender=male|type1=Fighting | |game=Crystal | ||
|ndex=106 | |||
|pokemon=Hitmonlee | |||
|level=34 | |||
|gender=male | |||
|type1=Fighting | |||
|move1=Jump Kick|move1type=Fighting | |move1=Jump Kick|move1type=Fighting | ||
|move2=Hi Jump Kick|move2type=Fighting | |move2=Hi Jump Kick|move2type=Fighting | ||
|move3=Focus Energy|move3type=Normal | |move3=Focus Energy|move3type=Normal | ||
|move4=Mind Reader|move4type=Normal}} | |move4=Mind Reader|move4type=Normal}} | ||
| | |{{Pokémon/2 | ||
|game=Crystal | |||
|ndex=107 | |||
|pokemon=Hitmonchan | |||
|level=34|gender=male|type1=Fighting | |level=34|gender=male|type1=Fighting | ||
|move1=Mach Punch|move1type=Fighting | |move1=Mach Punch|move1type=Fighting | ||
|move2=ThunderPunch|move2type=Electric | |move2=ThunderPunch|move2type=Electric | ||
|move3=Ice Punch|move3type=Ice | |move3=Ice Punch|move3type=Ice | ||
|move4=Fire Punch|move4type=Fire}}}} | |move4=Fire Punch|move4type=Fire}} | ||
{{Party/Footer}} | |||
===Generation IV=== | ===Generation IV=== | ||
{{trainerheader| | ====1F==== | ||
{{Trainerentry|Spr | {{trainerheader|mountain}} | ||
{{Trainerdiv| | {{Trainerentry|Spr HGSS Poké Maniac.png|Poké Maniac|Harrison|1088|2|034|Nidoking|♂|17||031|Nidoqueen|♀|17||36=ナオト|37=Naoto}} | ||
{{Trainerentry|Spr | {{Trainerdiv|mountain|Requires Strength or Rock Climb ''or'' Surf and Waterfall}} | ||
{{Trainerdiv| | {{Trainerentry|Spr HGSS Super Nerd.png|Super Nerd|Markus|912|1|079|Slowpoke|♂|19||36=ガクジ|37=Gakuji}} | ||
{{Trainerentry|Spr | {{Trainerfooter|mountain|II}} | ||
{{Trainerfooter| | ====2F==== | ||
{{trainerheader|mountain}} | |||
{{Trainerdiv|mountain|Requires Surf and Waterfall}} | |||
{{Trainerentry|Spr HGSS Super Nerd.png|Super Nerd|Hugh|1872|1|117|Seadra|♂|39||36=タカフミ|37=Takafumi}} | |||
{{Trainerfooter|mountain|II}} | |||
{{Party | ====B1F==== | ||
;Requires {{m|Surf}} and {{m|Waterfall}} | |||
{{Party/Single | |||
|color={{fighting color}} | |color={{fighting color}} | ||
|bordercolor={{fighting color dark}} | |bordercolor={{fighting color dark}} | ||
|headcolor={{fighting color light}} | |headcolor={{fighting color light}} | ||
|sprite=Spr | |sprite=Spr HGSS Black Belt.png | ||
|prize={{pdollar}}816 | |prize={{pdollar}}816 | ||
|class=Black Belt | |class=Black Belt | ||
|name={{color2| | |name={{color2|000|Kiyo}} | ||
|game=HGSS | |game=HGSS | ||
|location=Mt. Mortar | |location=Mt. Mortar | ||
|pokemon=2 | |pokemon=2}} | ||
| | |{{Pokémon/4 | ||
|ndex=106 | |ndex=106 | ||
|pokemon=Hitmonlee | |pokemon=Hitmonlee | ||
| Line 341: | Line 385: | ||
|level=34 | |level=34 | ||
|gender=male | |gender=male | ||
|move1=Focus Energy | |move1=Focus Energy|move1type=Normal|move1cat=Status|move2=Mind Reader | ||
|move1type=Normal|move1cat=Status | |||
|move2=Mind Reader | |||
|move2type=Normal|move2cat=Status | |move2type=Normal|move2cat=Status | ||
|move3=Hi Jump Kick | |move3=Hi Jump Kick|move3type=Fighting|move3cat=Physical | ||
|move3type=Fighting|move3cat=Physical | |move4=Feint|move4type=Normal|move4cat=Physical}} | ||
|move4=Feint | |{{Pokémon/4 | ||
|move4type=Normal|move4cat=Physical | |||
}} | |||
| | |||
|ndex=107 | |ndex=107 | ||
|pokemon=Hitmonchan | |pokemon=Hitmonchan | ||
| Line 358: | Line 397: | ||
|level=34 | |level=34 | ||
|gender=male | |gender=male | ||
|move1=Vacuum Wave | |move1=Vacuum Wave|move1type=Fighting|move1cat=Special | ||
|move1type=Fighting|move1cat=Special | |move2=ThunderPunch|move2type=Electric|move2cat=Physical|move3=Ice Punch | ||
|move2=ThunderPunch | |||
|move2type=Electric|move2cat=Physical | |||
|move3=Ice Punch | |||
|move3type=Ice|move3cat=Physical | |move3type=Ice|move3cat=Physical | ||
|move4=Fire Punch | |move4=Fire Punch|move4type=Fire|move4cat=Physical}} | ||
|move4type=Fire|move4cat=Physical}} | {{Party/Footer}} | ||
}} | |||
== | ==[[Location preview|Preview]]== | ||
<gallery> | <gallery> | ||
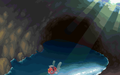
File: | File:HGSS Mt. Mortar-Morning.png|Morning (Seaking) | ||
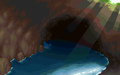
File: | File:HGSS Mt. Mortar-Day.png|Day (Marill) | ||
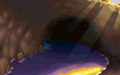
File: | File:HGSS Mt. Mortar-Evening.png|Evening (Marill) | ||
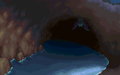
File: | File:HGSS Mt. Mortar-Night.png|Night (Golbat) | ||
</gallery> | </gallery> | ||
==Layout== | ==Layout== | ||
{{ | {| class="roundy" style="margin:auto; background:#000; border:3px solid #{{locationcolor/dark|mountain}}" | ||
{| | |- | ||
! style="background:#{{locationcolor/light|mountain}}; {{roundytl|5px}}" | Version | |||
! style="background:#{{locationcolor/light|mountain}}" | 1F (entrance) | |||
! style="background:#{{locationcolor/light|mountain}}" | 1F (back) | |||
! style="background:#{{locationcolor/light|mountain}}" | 2F | |||
! style="background:#{{locationcolor/light|mountain}}; {{roundytr|5px}}" | B1F | |||
|- | |- | ||
! | ! style="background:#{{gold color}}" | {{color2|000|Pokémon Gold and Silver Versions|Gold}} | ||
| rowspan="3" | [[File:Mt Mortar Entrance GSC.png|175px]] | |||
| rowspan="2" | [[File:Mt Mortar Lower Cave GS.png|120px]] | |||
| rowspan="3" | [[File:Mt Mortar Entrance GSC.png| | |||
| rowspan="2" | [[File:Mt Mortar Lower Cave GS.png| | |||
| rowspan="2" | [[File:Mt Mortar Upper Cave GS.png|150px]] | | rowspan="2" | [[File:Mt Mortar Upper Cave GS.png|150px]] | ||
| rowspan="2" | [[File:Mt Mortar Basement GS.png|150px]] | | rowspan="2" | [[File:Mt Mortar Basement GS.png|150px]] | ||
|- | |- | ||
! | ! style="background:#{{silver color}}" | {{color2|000|Pokémon Gold and Silver Versions|Silver}} | ||
|- | |||
! style="background:#{{crystal color}}" | {{color2|000|Pokémon Crystal Version|Crystal}} | |||
| [[File:Mt Mortar Lower Cave C.png|120px]] | |||
| [[File:Mt Mortar Upper Cave C.png|150px]] | |||
| [[File:Mt Mortar Basement C.png|150px]] | |||
|- | |||
! style="background:#{{heartgold color}}" | {{color2|000|Pokémon HeartGold and SoulSilver Versions|HeartGold}} | |||
| rowspan="2" | |[[File:Mt Mortar Entrance HGSS.png|175px]] | |||
| rowspan="2" | |[[File:Mt Mortar Lower Cave HGSS.png|120px]] | |||
| rowspan="2" | |[[File:Mt Mortar Upper Cave HGSS.png|150px]] | |||
| rowspan="2" | |[[File:Mt Mortar Basement HGSS.png|150px]] | |||
|- | |- | ||
! | ! style="background:#{{soulsilver color}}" | {{color2|000|Pokémon HeartGold and SoulSilver Versions|SoulSilver}} | ||
|- | |- | ||
| colspan="5" style="background:#{{ | | colspan="5" style="background:#{{locationcolor/light|mountain}}; {{roundybottom|5px}}" | | ||
|} | |} | ||
==In the manga== | |||
[[File:Mt Mortar Adventures.png|thumb|150px|Mt. Mortar in [[Pokémon Adventures]]]] | |||
===Pokémon Adventures=== | |||
===={{MangaArc|Gold, Silver & Crystal}}==== | |||
Years before the chapter, {{adv|Crystal}} had trained on Mt. Mortar to develop her [[Caught Pokémon|Pokémon catching]] skills. During her training, she was attacked by a {{pkmn2|wild}} {{p|Arcanine}}, but a group of other wild Pokémon helped her recover. While her hands were covered in bandages as they recovered, Crystal learned to launch [[Poké Ball]]s more effectively by kicking them instead of throwing them. When the wild Arcanine appeared again, Crystal noticed an injury next to one of its eyes, and used the wild Pokémon she had befriended to help treat Arcanine's wound. Subsequently, Arcanine and the other wild Pokémon joined Crystal, forming her main [[party|team]]. | |||
In ''[[PS133|Absolutely Azumarill]]'', [[Mirei]] sent Crystal to Mt. Mortar to relearn her Pokémon catching skills, which she had suddenly lost after failing to catch {{p|Suicune}}. In ''[[PS135|Lively Larvitar]]'', Crystal was attacked by a wild {{p|Larvitar}} a few days into her training. As it kept attacking Crystal's Arcanine, [[Archy]], only from its blind side, Crystal was able to figure out that this Larvitar was the Pokémon that had attacked Archy years earlier. Thanks to Crystal's {{p|Chikorita}}, [[Megaree]], evolving into {{p|Bayleef}}, Crystal was able to capture Larvitar, showing that she had recovered her ability to catch Pokémon. | |||
{{-}} | |||
==Trivia== | ==Trivia== | ||
* There is a volcano | * There is a real-life volcano also called {{wp|Iwo Jima|Mt. Suribachi}} in Iwo Jima, Japan. However, Mt. Mortar itself is likely based on Mt. Hiei in Shiga, Japan. | ||
* In the Japanese version of the {{pkmn|anime}}, {{an|Casey}} mentions the cave in the first line of her {{p|Electabuzz}} [[baseball]] team theme song. | |||
* {{wp|Pitchstone}} is present here, as revealed in {{DL|Mossdeep City|Steven's house|Steven Stone's house}} in [[Pokémon Omega Ruby and Alpha Sapphire]]. | |||
===Name origin=== | |||
Mt. Mortar is named after a {{wp|Mortar and pestle|mortar bowl}} used for grinding and mixing substances. A {{wp|suribachi}} is the Japanese equivalent of a mortar bowl. {{wp|Mortar (masonry)|Mortar}} is also a mixture of cement and water that is used to bind and fill gaps between construction bricks. | Mt. Mortar is named after a {{wp|Mortar and pestle|mortar bowl}} used for grinding and mixing substances. A {{wp|suribachi}} is the Japanese equivalent of a mortar bowl. {{wp|Mortar (masonry)|Mortar}} is also a mixture of cement and water that is used to bind and fill gaps between construction bricks. | ||
==In other languages== | ==In other languages== | ||
{{Langtable|color={{ | {{Langtable|color={{locationcolor/light|mountain}}|bordercolor={{locationcolor/dark|mountain}} | ||
| | |zh_yue=擂鉢山 ''Lèuihbut Sāan'' {{tt|*|GS Pokédex, GS Guidebook}}<br>斯里巴吉山 ''Sīlǐbājí Shān'' {{tt|*|Anime}} | ||
| | |zh_cmn=擂鉢山 / 擂钵山 ''Léibō Shān'' {{tt|*|Manga}}<br>斯里巴吉山 ''Sīlǐbājí Shān'' {{tt|*|Anime}} | ||
|cs=Hmoždířová hora | |||
|fr=Mont Creuset | |||
|de=Kesselberg | |de=Kesselberg | ||
|it=Monte Scodella | |it=Monte Scodella | ||
|ko=절구산 ''Jeolgu San'' | |ko=절구산 ''Jeolgu San'' | ||
| | |pt_br=Monte Mortar<br>Mt. Mortar | ||
|es=Mt. Mortero | |||
|vi=Núi Suribachi | |||
}} | |||
==References== | ==References== | ||
*[http://www.psypokes.com/dex/index.php Psypoke Psydex] - Pokémon catch rates | *[http://www.psypokes.com/dex/index.php Psypoke Psydex] - Pokémon catch rates | ||
{{Johto}}<br> | {{Johto}}<br/> | ||
{{Project Locations notice}} | {{Project Locations notice}} | ||
[[Category:Johto locations]] | [[Category:Johto locations]] | ||
[[Category:Gold, Silver and Crystal locations]] | [[Category:Gold, Silver and Crystal locations]] | ||
[[Category:HeartGold and SoulSilver locations]] | [[Category:HeartGold and SoulSilver locations]] | ||
[[Category:Mountains]] | [[Category:Mountains|Mortar]] | ||
[[de:Kesselberg]] | [[de:Kesselberg]] | ||
[[es:Monte Mortero]] | |||
[[fr:Mont Creuset]] | [[fr:Mont Creuset]] | ||
[[it:Monte Scodella]] | |||
[[ja:スリバチやま]] | [[ja:スリバチやま]] | ||
[[zh:擂钵山]] | |||
Latest revision as of 11:58, 8 December 2023
| ||||
| ||||
| Map description: | A naturally large cavern that is incredibly spacious. | |||
|---|---|---|---|---|
| Location: | Route 42, between Ecruteak City and Mahogany Town | |||
| Region: | Johto | |||
| Generations: | II, IV | |||
 Location of Mt. Mortar in Johto. | ||||
| Pokémon world locations | ||||

Mt. Mortar (Japanese: スリバチ山 Mt. Suribachi) is a large cave in Johto with three entrances on Route 42. Part of the large range of mountains north of the Johto region, it is known to be a confusing maze-like area with an interior cave known as the Waterfall Cave. It is an optional cave to enter, but contains many valuable items and Pokémon. The player can pass through the mountain caves to bypass the lakes on Route 42. It is the training place of Kiyo, the Karate King from Saffron City. He will reward the player with a level 10 Tyrogue upon defeat.
Geography
Mt. Mortar has three entrances and is huge inside, one of the largest of all caves in the games. It has four floors, and its high Pokémon-encounter rate makes getting lost very costly. It has Surfable waterways, Waterfalls, Strength puzzles, and multiple levels. It is usually considered to be one of the toughest caves to navigate. The cave also provides limited vision in Gold and Silver unless Flash is used, but is already lit in Crystal, HeartGold, and SoulSilver.
The Karate King
The Karate King, Kiyo, is the leader of the Fighting Dojo in Saffron City. In Gold, Silver, and Crystal, he has gone to Mt. Mortar to train. In order to find him, the player must use the center entrance which offers access to water, then Surf ahead and climb a waterfall. Then they must make their way to the bottom of the cave, where they will eventually find him waiting to be challenged. Kiyo uses a Hitmonchan and a Hitmonlee, and once they are defeated, he will give the player a Tyrogue as a reward. However, if the player does not have an empty slot in their party, Kiyo will tell them to make room for it, then come back.
Items
1F (entrance)
| Item | Location | Games | |
|---|---|---|---|
| Hyper Potion | West side, east of the entrance on a small rock (hidden) | HG SS | |
| Ether | West side, accessible from the southwestern ladder from 1F (back) | G S C HG SS | |
| Guard Spec. | East side, accessible from the southeastern ladder from 1F (back) | G S | |
| Revive | East side, accessible from the southeastern ladder from 1F (back) | C HG SS | |
| Hyper Potion | East side, on a rock west of the entrance to 1F (back) (hidden) | G S C | |
| Revive | East side, north of the upper exit to Route 42 (requires Rock Climb) (hidden) | HG SS | |
1F (back)
| Item | Location | Games | |
|---|---|---|---|
| Hyper Potion | Central area, north of the central platforms, at the bottom of the western ledge (requires Strength) | G S | |
| Escape Rope | Central area, northeast of the central platforms, at the bottom of the northeastern ledge (requires Strength) | G S | |
| Hyper Potion | Central area, atop the western platform (requires Strength) | C | |
| Ultra Ball | Central area, atop the northern platform (requires Strength) | C | |
| Nugget | Central area, northeast of the central platform (requires Strength) | C | |
| Escape Rope | Central area, southeast of the central platform, at the bottom of a series of ledges (requires Strength) | C | |
| Max Repel | Central area, in the crater just north of the movable boulder (requires Strength) (hidden) | HG SS | |
| Ultra Ball | Central area, atop the western platform (requires Strength) | HG SS | |
| Max Potion | Central area, north of the central platform, just below the raised path (requires Strength) | HG SS | |
| Escape Rope | Central area, east of the central platform, at the southern end of the raised path (requires Strength) | HG SS | |
| Nugget | Central area, atop the northeastern platform (requires Strength) | HG SS | |
| Max Repel | Northern area, on a rock in the eastern corner (requires Surf and Waterfall) (hidden) | G S C | |
| Max Revive | Northern area, in the indent east of the ladder from 2F (requires Surf and Waterfall) | G S C | |
| Max Potion | Northern area, at the southwestern end of the path in the eastern corner (requires Surf and Waterfall) | C | |
| Ether | Northern area, on a platform southeast of the ladder from 2F (requires Surf and Waterfall) (hidden) | HG SS | |
| Iron | Northern area, on a platform south of the ladder from 2F (requires Surf and Waterfall) | C HG SS | |
| Iron Ball | Northern area, on the southeastern platform (requires Surf and Waterfall) | HG SS | |
| Max Revive | Northern area, on the platform west of the ladder to B1F (requires Surf and Waterfall) | HG SS | |
| Ultra Ball | On a rock on the raised path in the west (requires Rock Climb) (hidden) | HG SS | |
| Protector | North of the western entrance (requires Rock Climb) | HG SS | |
| Rare Candy | North of the western entrance, west of the Protector (requires Rock Climb) (hidden) | HG SS | |
| Full Incense | North of the southeastern ladder to 2F (requires Rock Climb) | HG SS | |
| Nugget | West of the southeastern ladder to 2F, at the southern end of the path (requires Rock Climb) (hidden) | HG SS | |
2F
Surf and Waterfall are required to reach this area.
| Item | Location | Games | |
|---|---|---|---|
| TM40 (Defense Curl) | In the center, on the L-shaped raised section | G S C | |
| Escape Rope | On the raised section in the northeast corner | G S C | |
| Full Restore | The right tile in-between the ledges east of the Dragon Scale (hidden) | G S | |
| Full Restore | Northern area, on a rock east of the T-shaped raised platform (hidden) | C | |
| Dragon Scale | On the raised section in the northwest corner | G S C | |
| Elixer | In the northwest corner, southeast of the ladder leading to 1F (back) | G S C | |
| Rare Candy | In the southwest corner, east of a ledge and below two rocks | G S | |
| Rare Candy | Southwest corner | C HG SS | |
| Max Potion | Northeast of the entrance, below the second ledge from the bottom and east of the rectangular raised section | G S C | |
| Max Potion | Northeast of the entrance | HG SS | |
| Hyper Potion | Southeast, in a wall south of the Max Potion (hidden) | HG SS | |
| Full Restore | On a stalagmite north of a pond on the eastern edge of the room (hidden) | HG SS | |
| HP Up | On a large rock near the center, southeast of TM40 (hidden) | HG SS | |
| TM40 (Aerial Ace) | Northeast of Super Nerd Hugh | HG SS | |
| Escape Rope | Near northeast corner | HG SS | |
| Full Heal | On a stalagmite east of the ladder to 1F (back) (hidden) | HG SS | |
| Dragon Scale | East of the ladder to 1F (back) | HG SS | |
| Elixir | Southeast of the ladder to the 1F (back) | HG SS | |
B1F
| Item | Location | Games | |
|---|---|---|---|
| Full Restore | On the platform east of the ladder from 1F (entrance) (requires Surf) | C HG SS | |
| Hyper Potion | On the patch of landGS/platformC northeast of the ladder from 1F (entrance) (requires Surf) | G S C | |
| Max Ether | On the patch of land northeast of the ladder from 1F (entrance) (requires Surf) | C HG SS | |
| Hyper Potion | On the patch of land north of the ladder from 1F (entrance) (requires Surf) | HG SS | |
| PP Up | North of the ladder from 1F (entrance) (requires Surf) | C HG SS | |
| Ultra Ball | West of the ladder from 1F (entrance) in the northern wall between the rocks (requires Surf) (hidden) | HG SS | |
| Full Heal | On the patch of land across the water, west of the ladder from 1F (requires Surf) | G S | |
| Carbos | On the patch of land across the water, west of the ladder from 1F (entrance) (requires Surf) | C HG SS | |
| Max Revive | On a lone rock southGSC/eastHGSS of the ladder from 2F (requires Surf and Waterfall) (hidden) | G S C HG SS | |
Pokémon
Generation II
1F (entrance)
| Pokémon | Games | Location | Levels | Rate | |||||||||||
|---|---|---|---|---|---|---|---|---|---|---|---|---|---|---|---|
|
G | S | C |
|
14,16 | 14% | |||||||||
|
G | S | C |
|
14 | 30% | |||||||||
|
G | S | C |
|
16 | 5% | |||||||||
|
G | S | C |
|
13,15 | 60% | |||||||||
|
G | S | C |
|
13 | 30% | |||||||||
|
G | S | C |
|
13 | 10% | |||||||||
|
G | S | C |
|
14 | 20% | |||||||||
|
G | S | C |
|
14 | 20% | 20% | 0% | |||||||
|
G | S | C |
|
14 | 5% | |||||||||
|
G | S | C |
|
15 | 1% | |||||||||
|
G | S | C |
|
14 | 0% | 0% | 20% | |||||||
| Surfing | |||||||||||||||
|
G | S | C |
|
15-24 | 90% | |||||||||
|
G | S | C |
|
15-19 | 60% | |||||||||
|
G | S | C |
|
20-24 | 10% | |||||||||
|
G | S | C |
|
20-24 | 30% | |||||||||
| Fishing | |||||||||||||||
|
G | S | C |
|
10 | 15% | |||||||||
|
G | S | C |
|
10 | 85% | |||||||||
|
G | S | C |
|
20 | 65% | |||||||||
|
G | S | C |
|
20 | 35% | |||||||||
|
G | S | C |
|
40 | 70% | |||||||||
|
G | S | C |
|
40 | 10% | |||||||||
|
G | S | C |
|
40 | 20% | |||||||||
| During a Marill swarm | |||||||||||||||
|
G | S | C |
|
16 | 5% | |||||||||
|
G | S | C |
|
15 | 30% | |||||||||
|
G | S | C |
|
14 | 20% | |||||||||
|
G | S | C |
|
14 | 5% | |||||||||
|
G | S | C |
|
13-15 | 40% | |||||||||
| A colored background means that the Pokémon can be found in this location in the specified game. A white background with a colored letter means that the Pokémon cannot be found here. | |||||||||||||||
1F (back)
| Pokémon | Games | Location | Levels | Rate | |||||||||||
|---|---|---|---|---|---|---|---|---|---|---|---|---|---|---|---|
|
G | S | C |
|
14 | 10% | |||||||||
|
G | S | C |
|
14 | 30% | |||||||||
|
G | S | C |
|
14 | 10% | 10% | 0% | |||||||
|
G | S | C |
|
15 | 0% | 0% | 20% | |||||||
|
G | S | C |
|
14 | 5% | |||||||||
|
G | S | C |
|
15 | 5% | 5% | 0% | |||||||
|
G | S | C |
|
14 | 0% | 0% | 10% | |||||||
|
G | S | C |
|
15 | 5% | |||||||||
|
G | S | C |
|
13,15 | 35% | |||||||||
|
G | S | C |
|
15 | 20% | 20% | 0% | |||||||
|
G | S | C |
|
13,15 | 50% | |||||||||
|
G | S | C |
|
13 | 30% | |||||||||
|
G | S | C |
|
15 | 0% | 0% | 5% | |||||||
| A colored background means that the Pokémon can be found in this location in the specified game. A white background with a colored letter means that the Pokémon cannot be found here. | |||||||||||||||
2F
| Pokémon | Games | Location | Levels | Rate | |||||||||||
|---|---|---|---|---|---|---|---|---|---|---|---|---|---|---|---|
|
G | S | C |
|
30 | 10% | |||||||||
|
G | S | C |
|
30 | 10% | 10% | 20% | |||||||
|
G | S | C |
|
30 | 5% | |||||||||
|
G | S | C |
|
30 | 5% | 5% | 0% | |||||||
|
G | S | C |
|
30,32 | 0% | 0% | 15% | |||||||
|
G | S | C |
|
28 | 5% | |||||||||
|
G | S | C |
|
28 | 5% | 5% | 0% | |||||||
|
G | S | C |
|
32 | 30% | |||||||||
|
G | S | C |
|
32 | 30% | 30% | 0% | |||||||
|
G | S | C |
|
31 | 20% | |||||||||
|
G | S | C |
|
31 | 20% | 20% | 30% | |||||||
|
G | S | C |
|
31 | 30% | |||||||||
|
G | S | C |
|
28 | 0% | 0% | 5% | |||||||
| Surfing | |||||||||||||||
|
G | S | C |
|
20-29 | 90% | |||||||||
|
G | S | C |
|
20-24 | 60% | |||||||||
|
G | S | C |
|
25-29 | 10% | |||||||||
|
G | S | C |
|
25-29 | 30% | |||||||||
| Fishing | |||||||||||||||
|
G | S | C |
|
10 | 15% | |||||||||
|
G | S | C |
|
10 | 85% | |||||||||
|
G | S | C |
|
20 | 65% | |||||||||
|
G | S | C |
|
20 | 35% | |||||||||
|
G | S | C |
|
40 | 70% | |||||||||
|
G | S | C |
|
40 | 10% | |||||||||
|
G | S | C |
|
40 | 20% | |||||||||
| A colored background means that the Pokémon can be found in this location in the specified game. A white background with a colored letter means that the Pokémon cannot be found here. | |||||||||||||||
B1F
| Pokémon | Games | Location | Levels | Rate | |||||||||||
|---|---|---|---|---|---|---|---|---|---|---|---|---|---|---|---|
|
G | S | C |
|
16 | 20% | |||||||||
|
G | S | C |
|
16 | 5% | |||||||||
|
G | S | C |
|
18 | 5% | |||||||||
|
G | S | C |
|
15,17 | 60% | |||||||||
|
G | S | C |
|
17 | 20% | |||||||||
|
G | S | C |
|
16 | 10% | |||||||||
|
G | S | C |
|
16 | 10% | 10% | 0% | |||||||
|
G | S | C |
|
16 | 5% | |||||||||
|
G | S | C |
|
16 | 0% | 0% | 10% | |||||||
| Surfing | |||||||||||||||
|
G | S | C |
|
15-24 | 90% | |||||||||
|
G | S | C |
|
15-19 | 60% | |||||||||
|
G | S | C |
|
20-24 | 10% | |||||||||
|
G | S | C |
|
20-24 | 30% | |||||||||
| Fishing | |||||||||||||||
|
G | S | C |
|
10 | 15% | |||||||||
|
G | S | C |
|
10 | 85% | |||||||||
|
G | S | C |
|
20 | 65% | |||||||||
|
G | S | C |
|
20 | 35% | |||||||||
|
G | S | C |
|
40 | 70% | |||||||||
|
G | S | C |
|
40 | 10% | |||||||||
|
G | S | C |
|
40 | 20% | |||||||||
| Gift Pokémon | |||||||||||||||
|
G | S | C |
|
10 | One | |||||||||
| A colored background means that the Pokémon can be found in this location in the specified game. A white background with a colored letter means that the Pokémon cannot be found here. | |||||||||||||||
Generation IV
1F (entrance)
| Pokémon | Games | Location | Levels | Rate | |||||||||||
|---|---|---|---|---|---|---|---|---|---|---|---|---|---|---|---|
|
HG | SS |
|
14, 16 | 14% | ||||||||||
|
HG | SS |
|
13, 15 | 60% | ||||||||||
|
HG | SS |
|
14 | 20% | ||||||||||
|
HG | SS |
|
14 | 5% | ||||||||||
|
HG | SS |
|
15 | 1% | ||||||||||
| Surfing | |||||||||||||||
|
HG | SS |
|
10-25 | 90% | ||||||||||
|
HG | SS |
|
15-25 | 10% | ||||||||||
| Fishing | |||||||||||||||
|
HG | SS |
|
10 | 15% | ||||||||||
|
HG | SS |
|
10 | 85% | ||||||||||
|
HG | SS |
|
20 | 60% | ||||||||||
|
HG | SS |
|
20 | 40% | ||||||||||
|
HG | SS |
|
40 | 70% | ||||||||||
|
HG | SS |
|
40 | 10% | ||||||||||
|
HG | SS |
|
40 | 20% | ||||||||||
| Swarm | |||||||||||||||
|
HG | SS |
|
13-15 | 40% | ||||||||||
| Special Pokémon | |||||||||||||||
|
HG | SS |
|
14 | 20% | ||||||||||
|
HG | SS |
|
13, 15 | 20% | ||||||||||
|
HG | SS |
|
14 | 20% | ||||||||||
|
HG | SS |
|
13, 15 | 20% | ||||||||||
| A colored background means that the Pokémon can be found in this location in the specified game. A white background with a colored letter means that the Pokémon cannot be found here. | |||||||||||||||
1F (back)
| Pokémon | Games | Location | Levels | Rate | |||||||||||
|---|---|---|---|---|---|---|---|---|---|---|---|---|---|---|---|
|
HG | SS |
|
14 | 10% | ||||||||||
|
HG | SS |
|
14 | 5% | ||||||||||
|
HG | SS |
|
13, 15 | 35% | ||||||||||
|
HG | SS |
|
13, 15 | 50% | ||||||||||
| Special Pokémon | |||||||||||||||
|
HG | SS |
|
15 | 20% | ||||||||||
|
HG | SS |
|
13 | 20% | ||||||||||
|
HG | SS |
|
15 | 20% | ||||||||||
|
HG | SS |
|
13 | 20% | ||||||||||
| A colored background means that the Pokémon can be found in this location in the specified game. A white background with a colored letter means that the Pokémon cannot be found here. | |||||||||||||||
2F
| Pokémon | Games | Location | Levels | Rate | |||||||||||
|---|---|---|---|---|---|---|---|---|---|---|---|---|---|---|---|
|
HG | SS |
|
30 | 10% | ||||||||||
|
HG | SS |
|
30 | 5% | ||||||||||
|
HG | SS |
|
28 | 5% | ||||||||||
|
HG | SS |
|
32 | 30% | ||||||||||
|
HG | SS |
|
31 | 20% | ||||||||||
|
HG | SS |
|
31 | 30% | ||||||||||
| Surfing | |||||||||||||||
|
HG | SS |
|
15-30 | 90% | ||||||||||
|
HG | SS |
|
20-30 | 10% | ||||||||||
| Fishing | |||||||||||||||
|
HG | SS |
|
10 | 15% | ||||||||||
|
HG | SS |
|
10 | 85% | ||||||||||
|
HG | SS |
|
20 | 60% | ||||||||||
|
HG | SS |
|
20 | 40% | ||||||||||
|
HG | SS |
|
40 | 70% | ||||||||||
|
HG | SS |
|
40 | 10% | ||||||||||
|
HG | SS |
|
40 | 20% | ||||||||||
| Special Pokémon | |||||||||||||||
|
HG | SS |
|
31 | 20% | ||||||||||
|
HG | SS |
|
31-32 | 20% | ||||||||||
|
HG | SS |
|
31 | 20% | ||||||||||
|
HG | SS |
|
31-32 | 20% | ||||||||||
| A colored background means that the Pokémon can be found in this location in the specified game. A white background with a colored letter means that the Pokémon cannot be found here. | |||||||||||||||
B1F
| Pokémon | Games | Location | Levels | Rate | |||||||||||
|---|---|---|---|---|---|---|---|---|---|---|---|---|---|---|---|
|
HG | SS |
|
16 | 20% | ||||||||||
|
HG | SS |
|
16 | 5% | ||||||||||
|
HG | SS |
|
15, 17 | 60% | ||||||||||
|
HG | SS |
|
16 | 10% | ||||||||||
|
HG | SS |
|
16 | 5% | ||||||||||
| Surfing | |||||||||||||||
|
HG | SS |
|
10-25 | 90% | ||||||||||
|
HG | SS |
|
15-25 | 10% | ||||||||||
| Fishing | |||||||||||||||
|
HG | SS |
|
10 | 15% | ||||||||||
|
HG | SS |
|
10 | 85% | ||||||||||
|
HG | SS |
|
20 | 60% | ||||||||||
|
HG | SS |
|
20 | 40% | ||||||||||
|
HG | SS |
|
40 | 70% | ||||||||||
|
HG | SS |
|
40 | 10% | ||||||||||
|
HG | SS |
|
40 | 20% | ||||||||||
| Special Pokémon | |||||||||||||||
|
HG | SS |
|
16 | 20% | ||||||||||
|
HG | SS |
|
15, 17 | 20% | ||||||||||
|
HG | SS |
|
16 | 20% | ||||||||||
|
HG | SS |
|
15, 17 | 20% | ||||||||||
| Gift Pokémon | |||||||||||||||
|
HG | SS |
|
10 | One | ||||||||||
| A colored background means that the Pokémon can be found in this location in the specified game. A white background with a colored letter means that the Pokémon cannot be found here. | |||||||||||||||
Trainers
Generation II
1F
| Trainer | Pokémon | |||||||||||
|---|---|---|---|---|---|---|---|---|---|---|---|---|
|
| |||||||||||
| ||||||||||||
| Requires Strength or Surf and Waterfall | ||||||||||||
|
| |||||||||||
| Trainers with a telephone symbol by their names will give their Pokégear number to the player, and may call or be called for a rematch with higher-level Pokémon. | ||||||||||||


2F
| Trainer | Pokémon | |||||||||||
|---|---|---|---|---|---|---|---|---|---|---|---|---|
| Requires Surf and Waterfall | ||||||||||||
|
| |||||||||||
| Trainers with a telephone symbol by their names will give their Pokégear number to the player, and may call or be called for a rematch with higher-level Pokémon. | ||||||||||||
B1F
|
|||||||||||||||||||||||||||||||||||||||||||||||
| |||||||||||||||||||||||||||||||||||||||||||||||


Generation IV
1F
| Trainer | Pokémon | |||||||||||
|---|---|---|---|---|---|---|---|---|---|---|---|---|
|
| |||||||||||
| ||||||||||||
| Requires Strength or Rock Climb or Surf and Waterfall | ||||||||||||
|
| |||||||||||
| Trainers with a telephone symbol by their names will give their Pokégear number to the player, and may call or be called for a rematch with higher-level Pokémon. | ||||||||||||


2F
| Trainer | Pokémon | |||||||||||
|---|---|---|---|---|---|---|---|---|---|---|---|---|
| Requires Surf and Waterfall | ||||||||||||
|
| |||||||||||
| Trainers with a telephone symbol by their names will give their Pokégear number to the player, and may call or be called for a rematch with higher-level Pokémon. | ||||||||||||
B1F
|
|||||||||||||||||||||||||||||||||||||||||||||||||||||||||||||||||||
| |||||||||||||||||||||||||||||||||||||||||||||||||||||||||||||||||||


Preview
Morning (Seaking)
Day (Marill)
Evening (Marill)
Night (Golbat)


Layout
| Version | 1F (entrance) | 1F (back) | 2F | B1F |
|---|---|---|---|---|
| Gold | 
|

|

|

|
| Silver | ||||
| Crystal | 
|

|

| |
| HeartGold | |
|
|
|
|
|
|
|
| SoulSilver | ||||
In the manga

Pokémon Adventures
Gold, Silver & Crystal arc
Years before the chapter, Crystal had trained on Mt. Mortar to develop her Pokémon catching skills. During her training, she was attacked by a wild Arcanine, but a group of other wild Pokémon helped her recover. While her hands were covered in bandages as they recovered, Crystal learned to launch Poké Balls more effectively by kicking them instead of throwing them. When the wild Arcanine appeared again, Crystal noticed an injury next to one of its eyes, and used the wild Pokémon she had befriended to help treat Arcanine's wound. Subsequently, Arcanine and the other wild Pokémon joined Crystal, forming her main team.
In Absolutely Azumarill, Mirei sent Crystal to Mt. Mortar to relearn her Pokémon catching skills, which she had suddenly lost after failing to catch Suicune. In Lively Larvitar, Crystal was attacked by a wild Larvitar a few days into her training. As it kept attacking Crystal's Arcanine, Archy, only from its blind side, Crystal was able to figure out that this Larvitar was the Pokémon that had attacked Archy years earlier. Thanks to Crystal's Chikorita, Megaree, evolving into Bayleef, Crystal was able to capture Larvitar, showing that she had recovered her ability to catch Pokémon.
Trivia
- There is a real-life volcano also called Mt. Suribachi in Iwo Jima, Japan. However, Mt. Mortar itself is likely based on Mt. Hiei in Shiga, Japan.
- In the Japanese version of the anime, Casey mentions the cave in the first line of her Electabuzz baseball team theme song.
- Pitchstone is present here, as revealed in Steven Stone's house in Pokémon Omega Ruby and Alpha Sapphire.
Name origin
Mt. Mortar is named after a mortar bowl used for grinding and mixing substances. A suribachi is the Japanese equivalent of a mortar bowl. Mortar is also a mixture of cement and water that is used to bind and fill gaps between construction bricks.
In other languages
| |||||||||||||||||||||||||||||||||||
References
- Psypoke Psydex - Pokémon catch rates
| Johto | ||||||||
|---|---|---|---|---|---|---|---|---|
|
| ||||||||
|
| This article is part of Project Locations, a Bulbapedia project that aims to write comprehensive articles on every location in the Pokémon world. |