|
|
| Line 30: |
Line 30: |
| * Under the westernmost green umbrella ''(hidden)'' | | * Under the westernmost green umbrella ''(hidden)'' |
| * Directly north of the old man with the Zigzagoon ''(hidden)'' | | * Directly north of the old man with the Zigzagoon ''(hidden)'' |
| * On the island with the couple on the far west end, requires {{m|Surf}} ''(hidden)''|Ru=yes|Sa=yes|E=yes|display={{DL|Exchangeable item|Heart Scale}}}} | | * On the island with the couple on the far west end (requires {{m|Surf}}) ''(hidden)''|Ru=yes|Sa=yes|E=yes|display={{DL|Exchangeable item|Heart Scale}} ×3}} |
| {{Itemlist|Great Ball|Under the westernmost blue beach chair ''(hidden)''|Ru=yes|Sa=yes|E=yes|display={{ball|Great}}}} | | {{Itemlist|Great Ball|Under the westernmost blue beach chair ''(hidden)''|Ru=yes|Sa=yes|E=yes|display={{ball|Great}}}} |
| {{Itemlist|Soda Pop|Seashore House (reward for beating all Trainers in the house)|Ru=yes|Sa=yes|E=yes|display={{DL|Drink|Soda Pop}} ×6}} | | {{Itemlist|Soda Pop|Seashore House (reward for beating all Trainers in the house)|Ru=yes|Sa=yes|E=yes|display={{DL|Drink|Soda Pop}} ×6}} |
| {{Itemlist|PP Up|On the eastern empty sandbar, requires {{m|Surf}}|Ru=yes|Sa=yes|E=yes|display={{DL|Vitamin|PP Up}}}} | | {{Itemlist|PP Up|On the eastern empty sandbar (requires {{m|Surf}})|Ru=yes|Sa=yes|E=yes|display={{DL|Vitamin|PP Up}}}} |
| {{Itlistfoot|ocean}} | | {{Itlistfoot|ocean}} |
|
| |
|
| Line 52: |
Line 52: |
|
| |
|
| ==Trainers== | | ==Trainers== |
| ===Pokémon Ruby and Sapphire=== | | ==={{game|Ruby and Sapphire|s}}=== |
| {{trainerheader|ocean}} | | {{trainerheader|ocean}} |
| {{trainerentry|Spr RS Sailor.png|Sailor|Huey|448|1|066|Machop|♂|14|no||36=タツロウ|37=Tatsurō}} | | {{trainerentry|Spr RS Sailor.png|Sailor|Huey|448|1|066|Machop|♂|14|no||36=タツロウ|37=Tatsurō}} |
| Line 84: |
Line 84: |
| {{trainerentry|Spr RS Tuber F.png|Tuber|Lola{{tt|*|First, second and third rematch}}|{{tt|104|First rematch}}/{{tt|116|Second rematch}}/{{tt|128|Third rematch}}|2|183|Marill|♀|{{tt|26|First rematch}}/{{tt|29|Second rematch}}/{{tt|32|Third rematch}}|no|183|Marill|♀|{{tt|26|First rematch}}/{{tt|29|Second reamtch}}/{{tt|32|Third rematch}}|no||36=アユミ|37=Ayumi|38=Nav}} | | {{trainerentry|Spr RS Tuber F.png|Tuber|Lola{{tt|*|First, second and third rematch}}|{{tt|104|First rematch}}/{{tt|116|Second rematch}}/{{tt|128|Third rematch}}|2|183|Marill|♀|{{tt|26|First rematch}}/{{tt|29|Second rematch}}/{{tt|32|Third rematch}}|no|183|Marill|♀|{{tt|26|First rematch}}/{{tt|29|Second reamtch}}/{{tt|32|Third rematch}}|no||36=アユミ|37=Ayumi|38=Nav}} |
| {{trainerentry|Spr RS Tuber F.png|Tuber|Lola{{tt|*|Fourth rematch onwards}}|140|2|184|Azumarill|♀|35|no|184|Azumarill|♀|35|no||36=アユミ|37=Ayumi|38=Nav}} | | {{trainerentry|Spr RS Tuber F.png|Tuber|Lola{{tt|*|Fourth rematch onwards}}|140|2|184|Azumarill|♀|35|no|184|Azumarill|♀|35|no||36=アユミ|37=Ayumi|38=Nav}} |
| {{trainerfooter|ocean|3||}} | | {{trainerfooter|ocean|3}} |
|
| |
|
| ===Pokémon Emerald=== | | ==={{game|Emerald}}=== |
| {{trainerheader|ocean}} | | {{trainerheader|ocean}} |
| {{trainerentry|Spr RS Sailor.png|Sailor|Huey|384|2|278|Wingull|♂|12|no|066|Machop|♂|12|no||36=タツロウ|37=Tatsurō}} | | {{trainerentry|Spr RS Sailor.png|Sailor|Huey|384|2|278|Wingull|♂|12|no|066|Machop|♂|12|no||36=タツロウ|37=Tatsurō}} |
| Line 120: |
Line 120: |
| {{trainerentry|Spr RS Tuber F.png|Tuber|Lola{{tt|*|First, second and third rematch}}|{{tt|104|First rematch}}/{{tt|116|Second rematch}}/{{tt|128|Third rematch}}|2|183|Marill|♀|{{tt|26|First rematch}}/{{tt|29|Second rematch}}/{{tt|32|Third rematch}}|no|183|Marill|♀|{{tt|26|First rematch}}/{{tt|29|Second reamtch}}/{{tt|32|Third rematch}}|no||36=アユミ|37=Ayumi|38=Nav}} | | {{trainerentry|Spr RS Tuber F.png|Tuber|Lola{{tt|*|First, second and third rematch}}|{{tt|104|First rematch}}/{{tt|116|Second rematch}}/{{tt|128|Third rematch}}|2|183|Marill|♀|{{tt|26|First rematch}}/{{tt|29|Second rematch}}/{{tt|32|Third rematch}}|no|183|Marill|♀|{{tt|26|First rematch}}/{{tt|29|Second reamtch}}/{{tt|32|Third rematch}}|no||36=アユミ|37=Ayumi|38=Nav}} |
| {{trainerentry|Spr RS Tuber F.png|Tuber|Lola{{tt|*|Fourth rematch onwards}}|140|2|184|Azumarill|♀|35|no|184|Azumarill|♀|35|no||36=アユミ|37=Ayumi|38=Nav}} | | {{trainerentry|Spr RS Tuber F.png|Tuber|Lola{{tt|*|Fourth rematch onwards}}|140|2|184|Azumarill|♀|35|no|184|Azumarill|♀|35|no||36=アユミ|37=Ayumi|38=Nav}} |
| {{trainerfooter|ocean|3||}} | | {{trainerfooter|ocean|3}} |
|
| |
|
| ==In the anime== | | ==In the anime== |
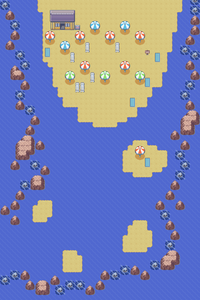
Route 109 in Ruby and Sapphire
Route 109 (Japanese: 109ばんすいどう Water Route 109) is a partial water route in southern Hoenn, connecting Route 108 and Slateport City.
Route description
The route is comprised mostly of a large beach on the shore of Slateport, where there are many Trainers for the player to face. Once the player has Surf, he or she can travel the water as wanted, encountering Pokémon native to Hoenn's seas and Trainers on the way to and from the Abandoned Ship. Along the aquatic part of the route, there are a few small islands, with more Trainers to face than on the beach. Unlike other water routes, Swimmers are not very common here.
On the beach area of the route is a small house, the Seashore House, that offers the challenge of battling three Trainers. The prize is six cans of Soda Pop. Soda Pop is also available to buy for $300, though you can only buy one at a time.
The southern portion of the route runs east-west to match the alignment of Route 108.
Items
| Item
|
Location
|
Games
|

|
Revive
|
Western tip of the shoreline slightly northwest of Mr. Briney (hidden)
|
R S E
|

|
Ether
|
Southeast of the girl who gives away the Soft Sand (hidden)
|
R S E
|

|
Soft Sand
|
From a young girl on the southeast of the shore
|
R S E
|

|
Heart Scale ×3
|
- Under the westernmost green umbrella (hidden)
- Directly north of the old man with the Zigzagoon (hidden)
- On the island with the couple on the far west end (requires Surf) (hidden)
|
R S E
|

|
Great Ball
|
Under the westernmost blue beach chair (hidden)
|
R S E
|

|
Soda Pop ×6
|
Seashore House (reward for beating all Trainers in the house)
|
R S E
|

|
PP Up
|
On the eastern empty sandbar (requires Surf)
|
R S E
|
|
|
Pokémon
| Pokémon
|
Games
|
Location
|
Levels
|
Rate
|
| Surfing
|
|
|
R
|
S
|
E
|
|
5-35
|
60%
|
|
|
R
|
S
|
E
|
|
10-30
|
35%
|
|
|
R
|
S
|
E
|
|
25-30
|
5%
|
| Fishing
|
|
|
R
|
S
|
E
|
|
5-10
|
30%
|
|
|
R
|
S
|
E
|
|
5-10
|
70%
|
|
|
R
|
S
|
E
|
|
10-30
|
20%
|
|
|
R
|
S
|
E
|
|
10-30
|
60%
|
|
|
R
|
S
|
E
|
|
10-30
|
20%
|
|
|
R
|
S
|
E
|
|
20-45
|
100%
|
| A colored background means that the Pokémon can be found in this location in the specified game. A white background with a colored letter means that the Pokémon cannot be found here.
|
Trainers
| Trainer
|
Pokémon
|

|
|
|
Sailor Huey
タツロウ Tatsurō
Reward: $448
|
|
|
|
|
|
|
|
|
|
Sailor Edmond
カツヤ Katsuya
Reward: $384
|
|
|
|
|
|
|
|
|
|

|
|
|
Tuber Ricky
ユウタ Yūta
Reward: $56
|

|
|
|
|
|

|
|
|
Tuber Lola
アユミ Ayumi
Reward: $52
|
|
|
|
|
|
| Seashore House
|
|
|
|
|
Tuber Simon
ヤスノブ Yasunobu
Reward: $48
|
|
|
|
|
|
|
|

|
|
|
Beauty Johanna
アツコ Atsuko
Reward: $1040
|
|
|
|
|
|
|
|
|
|
Sailor Dwayne
タツヒコ Tatsuhiko
Reward: $352
|
|
|
|
|
|
|
|
| Requires Surf
|
|
|
|
|
Tuber Gwen
ミチコ Michiko
Reward: $108
|
|
|
|
|
|
|
|
|
|
Tuber Carmen
ノゾミ Nozomi
Reward: $104
|
|
|
|
|
|
|
|
|
|
|
|
|
|
|
|
|
|
|
|
|
|
|
|
|
|
|
|
|
|
|
|
|
|
|
|
|
|
| Rematch
|
|
|
|
|
Tuber Ricky
ユウタ Yūta
Reward: $108/120/132/144
|
|
|
|
|
|
|
|
|
|
Tuber Lola*
アユミ Ayumi
Reward: $104/116/128
|
|
|
|
|
|
|
|
|
|
Tuber Lola*
アユミ Ayumi
Reward: $140
|
|
|
|
|
|
| Trainers with a PokéNav by their names will be registered in the Trainer's Eyes or Match Call function after the first battle, and may have a rematch with the player with higher-level Pokémon.
|
| Trainer
|
Pokémon
|
|
|
|
|
Sailor Huey
タツロウ Tatsurō
Reward: $384
|
|
|
|
|
|
|
|
|
|
|
|
|
|
|
|
|
|
|
|
|
|
|
|
|
|
|
|
|
| Seashore House
|
|
|
|
|
Beauty Johanna
アツコ Atsuko
Reward: $1040
|
|
|
|
|
|
|
|
|
|
Tuber Simon
ヤスノブ Yasunobu
Reward: $48
|
|
|
|
|
|
|
|
|
|
|
|
Sailor Dwayne
タツヒコ Tatsuhiko
Reward: $352
|
|
|
|
|
|
|
|
| Requires Surf
|
|
|
|
|
Tuber Austina
ヒロミ Hiromi
Reward: $104
|
|
|
|
|
|
|
|
|
|
Tuber Gwen
ノゾミ Nozomi
Reward: $104
|
|
|
|
|
|
|
|
|
|
|
|
|
|
|
|
|
|
|
|
|
|
|
|
|
|
|
|
|
|
|
|
|
|
|
|
|
|
|
| Rematch
|
|
|
|
|
Tuber Ricky
ユウタ Yūta
Reward: $108/120/132/144
|
|
|
|
|
|
|
|
|
|
Tuber Lola*
アユミ Ayumi
Reward: $104/116/128
|
|
|
|
|
|
|
|
|
|
Tuber Lola*
アユミ Ayumi
Reward: $140
|
|
|
|
|
|
| Trainers with a PokéNav by their names will be registered in the Trainer's Eyes or Match Call function after the first battle, and may have a rematch with the player with higher-level Pokémon.
|
In the anime
Route 109 briefly appears at the end of Abandon Ship! when Ash and his friends are speeding toward Slateport City.
Trainer Tips
TRAINER TIPS
Pokémon at the same level may not always have identical stats.
Pokémon raised by Trainers are said to be stronger than wild Pokémon.


