Appendix:Gold and Silver walkthrough/Section 28: Difference between revisions
m (→1F: replaced: {{ball|Ultra}} → Ultra Ball, removed: |display={{ball|Ultra}}) |
mNo edit summary |
||
| (7 intermediate revisions by 3 users not shown) | |||
| Line 1: | Line 1: | ||
{{WalkthroughNotice|GS}} | {{WalkthroughNotice|GS}} | ||
==Mt. Silver== | ==Mt. Silver Cave== | ||
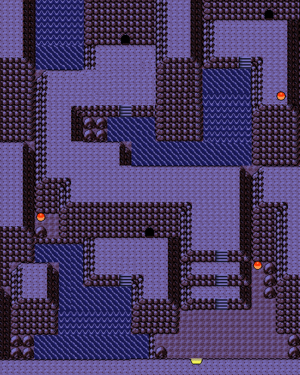
[[File:Mt Silver 1F GSC.png|thumb|Mt. Silver, 1F]] | [[File:Mt Silver 1F GSC.png|thumb|Mt. Silver, 1F]] | ||
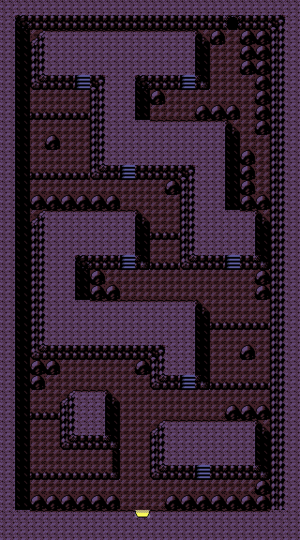
[[File:Mt Silver 2F GSC.png|thumb|Mt. Silver, 2F{{sup/2|C}}<!--3 visible items not present in GS-->]] | |||
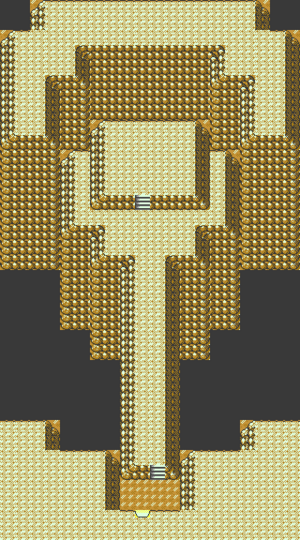
[[File:Mt. Silver Summit GSC.png|thumb|Mt Silver, 3F]] | |||
[[Mt. Silver Cave|Mt. Silver]] is a hallowed mountain that rises up between [[Johto]] and [[Kanto]]. [[Mt. Silver Cave|These caves]] are home to powerful Pokémon, so only certain Trainers deemed up to the challenge are permitted to enter. | |||
{| class="expandable" align="center" style="background: #{{locationcolor/med|cave}}; {{roundy}}; border: 5px solid #{{locationcolor/light|cave}};" | {| class="expandable" align="center" style="background: #{{locationcolor/med|cave}}; {{roundy}}; border: 5px solid #{{locationcolor/light|cave}};" | ||
| Line 10: | Line 12: | ||
|- | |- | ||
| | | | ||
{{ | {| class="expandable" align="center" style="background: #{{locationcolor/med|cave}}; {{roundy}}; border: 5px solid #{{locationcolor/light|cave}};" | ||
{{ | |- align="center" | ||
{{ | ! 1F | ||
{{ | |- | ||
{{ | | | ||
{{ | {{Catch/header|cave}} | ||
{{ | {{Catch/entry2|042|Golbat|yes|yes|no|Cave|45|all=5%|type1=Poison|type2=Flying}} | ||
{{ | {{Catch/entry2|075|Graveler|yes|yes|yes|Cave|43|all=30%|type1=Rock|type2=Ground}} | ||
{{Catch/entry2|095|Onix|yes|yes|no|Cave|42|all=30%|type1=Rock|type2=Ground}} | |||
{{Catch/entry2|217|Ursaring|yes|no|no|Cave|44|all=30%|type1=Normal}} | |||
{{Catch/entry2|232|Donphan|no|yes|no|Cave|44|all=30%|type1=Ground}} | |||
{{Catch/entry2|246|Larvitar|yes|yes|no|Cave|15, 20|all=5%|type1=Rock|type2=Ground}} | |||
{{Catch/footer|cave}} | |||
|} | |} | ||
{| class="expandable" align="center" style="background: #{{locationcolor/med|cave}}; {{roundy}}; border: 5px solid #{{locationcolor/light|cave}};" | {| class="expandable" align="center" style="background: #{{locationcolor/med|cave}}; {{roundy}}; border: 5px solid #{{locationcolor/light|cave}};" | ||
|- align="center" | |- align="center" | ||
! | ! 2F | ||
|- | |- | ||
| | | | ||
{{ | {{Catch/header|cave}} | ||
{{ | {{Catch/entry2|042|Golbat|yes|yes|no|Cave|48|all=5%|type1=Poison|type2=Flying}} | ||
{{ | {{Catch/entry2|055|Golduck|yes|yes|no|Cave|48|all=30%|type1=Water}} | ||
{{ | {{Catch/entry2|195|Quagsire|yes|yes|no|Cave|45|40%|40%|30%|type1=Water|type2=Ground}} | ||
{{ | {{Catch/entry2|200|Misdreavus|yes|yes|no|Cave|45|0%|0%|10%|type1=Ghost}} | ||
{{ | {{Catch/entry2|217|Ursaring|yes|no|no|Cave|47|all=20%|type1=Normal}} | ||
{{ | {{Catch/entry2|232|Donphan|no|yes|no|Cave|47|all=20%|type1=Ground}} | ||
{{Catch/entry2|246|Larvitar|yes|yes|no|Cave|15, 20|all=5%|type1=Rock|type2=Ground}} | |||
{{Catch/div|water|Surfing}} | |||
{{Catch/entry2|119|Seaking|yes|yes|no|Surf|35-44|all=90%|type1=Water}} | |||
{{Catch/entry2|118|Goldeen|yes|yes|no|Surf|35-39|all=10%|type1=Water}} | |||
{{Catch/div|water|Fishing}} | |||
{{Catch/entry2|129|Magikarp|yes|yes|no|Fish Old|10|all=85%|type1=Water}} | |||
{{Catch/entry2|118|Goldeen|yes|yes|no|Fish Old|10|all=15%|type1=Water}} | |||
{{Catch/entry2|118|Goldeen|yes|yes|no|Fish Good|20|all=65%|type1=Water}} | |||
{{Catch/entry2|129|Magikarp|yes|yes|no|Fish Good|20|all=35%|type1=Water}} | |||
{{Catch/entry2|118|Goldeen|yes|yes|no|Fish Super|40|all=70%|type1=Water}} | |||
{{Catch/entry2|129|Magikarp|yes|yes|no|Fish Super|40|all=20%|type1=Water}} | |||
{{Catch/entry2|119|Seaking|yes|yes|no|Fish Super|40|all=10%|type1=Water}} | |||
{{Catch/footer|cave}} | |||
|} | |} | ||
{| class="expandable" align="center" style="background: #{{locationcolor/med|cave}}; {{roundy}}; border: 5px solid #{{locationcolor/light|cave}};" | {| class="expandable" align="center" style="background: #{{locationcolor/med|cave}}; {{roundy}}; border: 5px solid #{{locationcolor/light|cave}};" | ||
|- align="center" | |- align="center" | ||
! | ! Summit | ||
|- | |- | ||
| | | | ||
{{ | {{Catch/header|cave}} | ||
{{ | {{Catch/entry2|042|Golbat|yes|yes|no|Cave|48, 51|all=50%|type1=Poison|type2=Flying}} | ||
{{Catch/entry2|055|Golduck|yes|yes|no|Cave|51|all=5%|type1=Water}} | |||
{{ | {{Catch/entry2|095|Onix|yes|yes|no|Cave|48|all=30%|type1=Rock|type2=Ground}} | ||
{{Catch/entry2|217|Ursaring|yes|no|no|Cave|50|all=10%|type1=Normal}} | |||
{{ | {{Catch/entry2|232|Donphan|no|yes|no|Cave|50|all=10%|type1=Ground}} | ||
{{Catch/entry2|246|Larvitar|yes|yes|no|Cave|15, 20|all=5%|type1=Rock|type2=Ground}} | |||
{{Catch/footer|cave}} | |||
{{ | |} | ||
{{ | |||
{{ | |||
{{ | |||
|} | |} | ||
{| class="expandable" align="center" style="background: #{{locationcolor/med|cave}}; {{roundy}}; border: 5px solid #{{locationcolor/light|cave}};" | {| class="expandable" align="center" style="background: #{{locationcolor/med|cave}}; {{roundy}}; border: 5px solid #{{locationcolor/light|cave}};" | ||
| Line 70: | Line 73: | ||
| | | | ||
{{itlisth|cave}} | {{itlisth|cave}} | ||
{{Itemlist|Max Revive| | {{catch/div|cave|1F}} | ||
{{Itemlist|Full Restore| | {{Itemlist|X Accuracy|Rocky ridge in the southeast corner|G=yes|S=yes}} | ||
{{Itemlist|Escape Rope|Southeast corner, between two ledges|G=yes|S=yes}} | |||
{{Itemlist|Dire Hit|Southeast area, on a rock between two ledges (hidden)|G=yes|S=yes}} | |||
{{Itemlist|Max Elixir|Northwest area, between two ledges|G=yes|S=yes|display=[[Max Elixir|Max Elixer]]}} | |||
{{Itemlist|Ultra Ball|Dead-end path in the northeast area (hidden)|G=yes|S=yes}} | |||
{{catch/div|cave|2F}} | |||
{{Itemlist|Max Potion|South-central area, on the lone rock (hidden)|G=yes|S=yes}} | |||
{{Itemlist|Max Revive|Lower dead-end chamber, accessed via southern-most cave opening (requires {{m|Surf}}, {{m|Waterfall}})|G=yes|S=yes}} | |||
{{Itemlist|Full Restore|Upper dead-end chamber, accessed via northeastern cave opening (requires {{m|Surf}}, {{m|Waterfall}})|G=yes|S=yes}} | |||
{{itlistfoot|cave}} | {{itlistfoot|cave}} | ||
|} | |} | ||
{{ | |||
[[ | ===1F=== | ||
The first chamber is the only part of the cave that is dark enough that {{m|Flash}} is usable. Grab the [[Protein]] from the southeast ridge, then jump the ledge to the west to pick up an [[Escape Rope]]. Go north and walk along the C-shaped ridge to reach the center of the chamber. The northern-most ridge becomes a three-way intersection; take the western path to get a [[Max Elixir|Max Elixer]], then turn east and walk through the cave opening into the next chamber. | |||
===2F=== | |||
{{m|Surf}} out into the water to the west, then use {{m|Waterfall}}. Climb onto the ridge and enter the cave opening to find a small, dead-end chamber with a [[Max Revive]]. Back in the main chamber, climb up the three stairways and continue northward along the rocky ridge. Pass by the north-central cave opening, then climb the second waterfall to reach the northeast area. The second dead-end tunnel holds a [[Full Restore]]. Sail back westward and enter the final cave opening. | |||
===Summit=== | ===Summit=== | ||
Cross the land bridge to meet | Cross over the rocky land bridge to finally meet {{ga|Red}}, former Champion of the [[Kanto]] region. He and his Pokémon have been in training here since he gave up his Champion title, and that training has resulted in each of his Pokémon reaching sky-high levels. Even with a type advantage, Red's Pokémon will not go down without a fight. | ||
Red | ====VS Red==== | ||
{{ga|Red}} leads with his {{p|Pikachu}}, which has already grown to level 81. Its powerful {{type|Electric}} attacks will inflict a great deal of damage to an unprepared target, but it is still vulnerable to {{type|Ground}} moves, like {{m|Earthquake}}. His {{p|Espeon}} is dangerous for any Pokémon with low {{stat|Special Defense}}, so hit it with {{t|Bug}}-, {{t|Ghost}}-, or {{type|Dark}} attacks to knock it out quickly. {{p|Snorlax}} can restore its health with {{m|Rest}}, and even attack while asleep with {{m|Snore}}. {{m|Amnesia}} boosts its Special Defense, but {{type|Fighting}} attacks, its only weakness, are classified as [[physical move]]s anyway. {{p|Venusaur}}'s {{m|Sunny Day}} lets it recover even more health with {{m|Synthesis}} and launch {{m|SolarBeam}} without charging. A {{type|Grass}} Pokémon, it fares poorly in extreme heat or cold, so use {{t|Fire}} and {{t|Ice}} moves to wear it down. His {{p|Charizard}} takes massive damage from {{type|Rock}} attacks, but is also vulnerable to {{t|Water}} and Electric moves. Finally, his {{p|Blastoise}} falters against Grass and Electric attacks, but can retaliate against Grass Pokémon with {{m|Blizzard}}. | |||
{| | {| style="margin: auto;" | ||
| | | | ||
{{Party/Single|color={{red color}}|headcolor={{red color light}}|bordercolor={{red color dark}} | {{Party/Single | ||
|sprite=Spr GS Red. | |color={{red color}} | ||
|headcolor={{red color light}} | |||
|bordercolor={{red color dark}} | |||
|sprite=Spr GS Red.png | |||
|prize={{PDollar}}7700 | |prize={{PDollar}}7700 | ||
|class=Pokémon Trainer|name=Red | |class={{PK}}{{MN}} Trainer | ||
|game=GSC|location=Mt. Silver | |classlink=Pokémon Trainer | ||
|name={{color2|000|Red (game)|Red}} | |||
|game=GSC | |||
|location=Mt. Silver Cave | |||
|locationname=Silver Cave | |||
|pokemon=6}} | |pokemon=6}} | ||
|{{Pokémon/2|game= | |{{Pokémon/2 | ||
|ndex=025|pokemon=Pikachu | |game=Crystal | ||
|ndex=025 | |||
|pokemon=Pikachu | |||
|gender=male | |||
|level=81 | |||
|type1=Electric | |type1=Electric | ||
|move1=Charm|move1type=Normal | |move1=Charm|move1type=Normal | ||
|move2=Quick Attack|move2type=Normal | |move2=Quick Attack|move2type=Normal | ||
|move3=Thunderbolt|move3type=Electric | |move3=Thunderbolt|move3type=Electric | ||
|move4=Thunder|move4type=Electric}} | |move4=Thunder|move4type=Electric}} | ||
|{{Pokémon/2 | |||
|{{Pokémon/2|game= | |game=Crystal | ||
|ndex=196|pokemon=Espeon | |ndex=196 | ||
|pokemon=Espeon | |||
|gender=male | |||
|level=73 | |||
|type1=Psychic | |type1=Psychic | ||
|move1=Mud-Slap|move1type=Ground | |move1=Mud-Slap|move1type=Ground | ||
|move2=Swift|move2type=Normal | |move2=Swift|move2type=Normal | ||
|move3=Reflect|move3type=Psychic | |move3=Reflect|move3type=Psychic | ||
|move4=Psychic|move4type=Psychic}} | |move4=Psychic|move4type=Psychic}} | ||
|{{Pokémon/2 | |||
|{{Pokémon/2|game= | |game=Crystal | ||
|ndex=143|pokemon=Snorlax | |ndex=143 | ||
|pokemon=Snorlax | |||
|gender=male | |||
|level=75 | |||
|type1=Normal | |type1=Normal | ||
|move1=Amnesia|move1type=Psychic | |move1=Amnesia|move1type=Psychic | ||
|move2=Snore|move2type=Normal | |move2=Snore|move2type=Normal | ||
|move3=Rest|move3type=Psychic | |move3=Rest|move3type=Psychic | ||
|move4=Body Slam|move4type=Normal}} | |move4=Body Slam|move4type=Normal}} | ||
{{Party/Div|color={{red color}}}} | {{Party/Div|color={{red color}}}} | ||
|{{Pokémon/2|game= | |{{Pokémon/2 | ||
|ndex=003|pokemon=Venusaur | |game=Crystal | ||
|ndex=003 | |||
|pokemon=Venusaur | |||
|gender=male | |||
|level=77 | |||
|type1=Grass|type2=Poison | |type1=Grass|type2=Poison | ||
|move1=Sunny Day|move1type=Fire | |move1=Sunny Day|move1type=Fire | ||
|move2=Giga Drain|move2type=Grass | |move2=Giga Drain|move2type=Grass | ||
|move3=Synthesis|move3type=Grass | |move3=Synthesis|move3type=Grass | ||
|move4=SolarBeam|move4type=Grass}} | |move4=SolarBeam|move4type=Grass}} | ||
|{{Pokémon/2 | |||
|{{Pokémon/2|game= | |game=Crystal | ||
|ndex=006|pokemon=Charizard | |ndex=006 | ||
|pokemon=Charizard | |||
|gender=male | |||
|level=77 | |||
|type1=Fire|type2=Flying | |type1=Fire|type2=Flying | ||
|move1=Flamethrower|move1type=Fire | |move1=Flamethrower|move1type=Fire | ||
|move2=Wing Attack|move2type=Flying | |move2=Wing Attack|move2type=Flying | ||
|move3=Slash|move3type=Normal | |move3=Slash|move3type=Normal | ||
|move4=Fire Spin|move4type=Fire}} | |move4=Fire Spin|move4type=Fire}} | ||
|{{Pokémon/2 | |||
|{{Pokémon/2|game= | |game=Crystal | ||
|ndex=009|pokemon=Blastoise | |ndex=009 | ||
|pokemon=Blastoise | |||
|gender=male | |||
|level=77 | |||
|type1=Water | |type1=Water | ||
|move1=Rain Dance|move1type=Water | |move1=Rain Dance|move1type=Water | ||
|move2=Blizzard|move2type=Ice | |move2=Blizzard|move2type=Ice | ||
| Line 148: | Line 185: | ||
After the battle, {{ga|Red}} pauses for a moment in stunned silence. Then, in the blink of an eye, he disappears. He is not gone for good though, as defeating the Elite Four and Champion again will cause him to reappear here. The credits roll for the second time, and you resume your adventure in front of the [[Mt. Silver]] Pokémon Center. | |||
Having scaled | Having scaled the mountain and defeated the legendary Trainer, the final remaining task is to complete the Pokédex. {{game|Gold and Silver|s}} brought the total number of Pokémon up to 251, so there is plenty of training left to do! | ||
{{WalkthroughPrevNext | {{WalkthroughPrevNext | ||
|game=Gold | |game=Gold|game2=Silver | ||
|game2=Silver | |||
|gamename=Gold and Silver | |gamename=Gold and Silver | ||
|prevsection=27 | |prevsection=27 | ||
|prevname=Route 22, Route 28 | |prevname=Route 22, Route 28 | ||
| | |nextsection=29 | ||
|nextname=Tying Loose Ends: Tin Tower, Whirl Islands, Mt. Mortar | |||
}} | }} | ||
Latest revision as of 19:57, 24 August 2024
These pages follow the original Game Boy Color iteration, not Pokémon HeartGold and SoulSilver. The guide for those games can be found here.
Mt. Silver Cave

Mt. Silver is a hallowed mountain that rises up between Johto and Kanto. These caves are home to powerful Pokémon, so only certain Trainers deemed up to the challenge are permitted to enter.
| Available Pokémon | |||||||||||||||||||||||||||||||||||||||||||||||||||||||||||||||||||||||||||||||||||||||||||||||||||||||||||||||||||||||||||||||||||||||||||||||||||||||||||||||||||||||||||||||||||||||||||||||||||||||||||||||||||||||||||||||||||||||||||||||||||||||||||||||||||||||||||||||||||||||||||||||||||||||||||||||||||||||||||||||||||||||||||||||||||||||||||||||||||||||||||||||||||||||||||||||||||||||||||||||||||||||||||||||||||||||||||||||||||||||||||||||||||||||||||||||||||||||||||||||||||||||||||||||||||||||||||||||||||||||||||||||||||||||||||||||||||||||||||||||||||||||||||
|---|---|---|---|---|---|---|---|---|---|---|---|---|---|---|---|---|---|---|---|---|---|---|---|---|---|---|---|---|---|---|---|---|---|---|---|---|---|---|---|---|---|---|---|---|---|---|---|---|---|---|---|---|---|---|---|---|---|---|---|---|---|---|---|---|---|---|---|---|---|---|---|---|---|---|---|---|---|---|---|---|---|---|---|---|---|---|---|---|---|---|---|---|---|---|---|---|---|---|---|---|---|---|---|---|---|---|---|---|---|---|---|---|---|---|---|---|---|---|---|---|---|---|---|---|---|---|---|---|---|---|---|---|---|---|---|---|---|---|---|---|---|---|---|---|---|---|---|---|---|---|---|---|---|---|---|---|---|---|---|---|---|---|---|---|---|---|---|---|---|---|---|---|---|---|---|---|---|---|---|---|---|---|---|---|---|---|---|---|---|---|---|---|---|---|---|---|---|---|---|---|---|---|---|---|---|---|---|---|---|---|---|---|---|---|---|---|---|---|---|---|---|---|---|---|---|---|---|---|---|---|---|---|---|---|---|---|---|---|---|---|---|---|---|---|---|---|---|---|---|---|---|---|---|---|---|---|---|---|---|---|---|---|---|---|---|---|---|---|---|---|---|---|---|---|---|---|---|---|---|---|---|---|---|---|---|---|---|---|---|---|---|---|---|---|---|---|---|---|---|---|---|---|---|---|---|---|---|---|---|---|---|---|---|---|---|---|---|---|---|---|---|---|---|---|---|---|---|---|---|---|---|---|---|---|---|---|---|---|---|---|---|---|---|---|---|---|---|---|---|---|---|---|---|---|---|---|---|---|---|---|---|---|---|---|---|---|---|---|---|---|---|---|---|---|---|---|---|---|---|---|---|---|---|---|---|---|---|---|---|---|---|---|---|---|---|---|---|---|---|---|---|---|---|---|---|---|---|---|---|---|---|---|---|---|---|---|---|---|---|---|---|---|---|---|---|---|---|---|---|---|---|---|---|---|---|---|---|---|---|---|---|---|---|---|---|---|---|---|---|---|---|---|---|---|---|---|---|---|---|---|---|---|---|---|---|---|---|---|---|---|---|---|---|---|---|---|---|---|---|---|---|---|---|---|---|---|---|---|---|---|---|---|---|---|---|---|---|---|---|---|---|---|---|---|---|---|---|---|---|---|---|---|---|---|---|---|---|---|---|---|---|---|---|---|---|---|---|---|---|---|---|---|---|---|---|---|---|---|---|---|---|---|---|---|---|---|---|---|---|---|---|---|---|---|---|---|---|---|---|---|---|---|---|---|---|---|---|---|---|---|---|
| |||||||||||||||||||||||||||||||||||||||||||||||||||||||||||||||||||||||||||||||||||||||||||||||||||||||||||||||||||||||||||||||||||||||||||||||||||||||||||||||||||||||||||||||||||||||||||||||||||||||||||||||||||||||||||||||||||||||||||||||||||||||||||||||||||||||||||||||||||||||||||||||||||||||||||||||||||||||||||||||||||||||||||||||||||||||||||||||||||||||||||||||||||||||||||||||||||||||||||||||||||||||||||||||||||||||||||||||||||||||||||||||||||||||||||||||||||||||||||||||||||||||||||||||||||||||||||||||||||||||||||||||||||||||||||||||||||||||||||||||||||||||||||
| Items | ||||||||||||||||||||||||||||||||||||||||||||||||||||||||||||||||||||||
|---|---|---|---|---|---|---|---|---|---|---|---|---|---|---|---|---|---|---|---|---|---|---|---|---|---|---|---|---|---|---|---|---|---|---|---|---|---|---|---|---|---|---|---|---|---|---|---|---|---|---|---|---|---|---|---|---|---|---|---|---|---|---|---|---|---|---|---|---|---|---|
| ||||||||||||||||||||||||||||||||||||||||||||||||||||||||||||||||||||||
1F
The first chamber is the only part of the cave that is dark enough that Flash is usable. Grab the Protein from the southeast ridge, then jump the ledge to the west to pick up an Escape Rope. Go north and walk along the C-shaped ridge to reach the center of the chamber. The northern-most ridge becomes a three-way intersection; take the western path to get a Max Elixer, then turn east and walk through the cave opening into the next chamber.
2F
Surf out into the water to the west, then use Waterfall. Climb onto the ridge and enter the cave opening to find a small, dead-end chamber with a Max Revive. Back in the main chamber, climb up the three stairways and continue northward along the rocky ridge. Pass by the north-central cave opening, then climb the second waterfall to reach the northeast area. The second dead-end tunnel holds a Full Restore. Sail back westward and enter the final cave opening.
Summit
Cross over the rocky land bridge to finally meet Red, former Champion of the Kanto region. He and his Pokémon have been in training here since he gave up his Champion title, and that training has resulted in each of his Pokémon reaching sky-high levels. Even with a type advantage, Red's Pokémon will not go down without a fight.
VS Red
Red leads with his Pikachu, which has already grown to level 81. Its powerful Electric-type attacks will inflict a great deal of damage to an unprepared target, but it is still vulnerable to Ground-type moves, like Earthquake. His Espeon is dangerous for any Pokémon with low Special Defense, so hit it with Bug-, Ghost-, or Dark-type attacks to knock it out quickly. Snorlax can restore its health with Rest, and even attack while asleep with Snore. Amnesia boosts its Special Defense, but Fighting-type attacks, its only weakness, are classified as physical moves anyway. Venusaur's Sunny Day lets it recover even more health with Synthesis and launch SolarBeam without charging. A Grass-type Pokémon, it fares poorly in extreme heat or cold, so use Fire and Ice moves to wear it down. His Charizard takes massive damage from Rock-type attacks, but is also vulnerable to Water and Electric moves. Finally, his Blastoise falters against Grass and Electric attacks, but can retaliate against Grass Pokémon with Blizzard.
| ||||||||||||||||||||||||||||||||||||||||||||||||||||||||||||||||||||||||||||||||||||||||||||||||||||||||||||||||||||||||||||||||||||||||||||||||||||||||||
After the battle, Red pauses for a moment in stunned silence. Then, in the blink of an eye, he disappears. He is not gone for good though, as defeating the Elite Four and Champion again will cause him to reappear here. The credits roll for the second time, and you resume your adventure in front of the Mt. Silver Pokémon Center.
Having scaled the mountain and defeated the legendary Trainer, the final remaining task is to complete the Pokédex. Pokémon Gold and Silver brought the total number of Pokémon up to 251, so there is plenty of training left to do!
|
Gold and Silver walkthrough |
|

|
This article is part of Project Walkthroughs, a Bulbapedia project that aims to write comprehensive step-by-step guides on each Pokémon game. |


