Hoenn Route 133: Difference between revisions
Ruixiang95 (talk | contribs) No edit summary |
|||
| (7 intermediate revisions by 6 users not shown) | |||
| Line 26: | Line 26: | ||
Pokémon Emerald saw the addition of two Trainers to the island containing the Big Pearl. | Pokémon Emerald saw the addition of two Trainers to the island containing the Big Pearl. | ||
Pokémon {{2v2|Omega Ruby|Alpha Sapphire}} adds an island to a previously inaccessible area on the eastern side of the route. This island can be [[Fly|flown]] to and contains a single Max Revive. | |||
==Items== | ==Items== | ||
| Line 63: | Line 65: | ||
{{Catch/div|ocean|Surfing (exclusively as {{color2|000|DexNav#Hidden Pokémon|hidden Pokémon}})<br><small>After defeating or capturing {{pcolor|Groudon|000}}/{{pcolor|Kyogre|000}}</small>}} | {{Catch/div|ocean|Surfing (exclusively as {{color2|000|DexNav#Hidden Pokémon|hidden Pokémon}})<br><small>After defeating or capturing {{pcolor|Groudon|000}}/{{pcolor|Kyogre|000}}</small>}} | ||
{{Catch/entryoras|456|Finneon|yes|yes|Surf|30|??%|type1=Water}} | {{Catch/entryoras|456|Finneon|yes|yes|Surf|30|??%|type1=Water}} | ||
{{Catch/entryoras|{{#ifexpr: ({{#time: H}} mod 2) = 0| | {{Catch/entryoras|592{{#ifexpr: ({{#time: H}} mod 2)=0||F}}|Frillish|yes|yes|Surf|30|??%|type1=Water|type2=Ghost}} | ||
{{Catch/entryoras|594|Alomomola|yes|yes|Surf|30|??%|type1=Water}} | {{Catch/entryoras|594|Alomomola|yes|yes|Surf|30|??%|type1=Water}} | ||
{{Catch/div|ocean|Fishing}} | {{Catch/div|ocean|Fishing}} | ||
| Line 107: | Line 109: | ||
==={{g|Omega Ruby and Alpha Sapphire|s}}=== | ==={{g|Omega Ruby and Alpha Sapphire|s}}=== | ||
{{trainerheader|ocean}} | {{trainerheader|ocean}} | ||
{{trainerentry|VSFisherman ORAS.png{{!}}150px|Fisherman|River|1,248|1|117|Seadra|♂|39|36=ハルオ|37=Haruo}} | {{trainerdiv|ocean|Requires Surf}} | ||
{{trainerentry|VSFisherman ORAS.png{{!}}150px|game=6|Fisherman|River|1,248|1|117|Seadra|♂|39|36=ハルオ|37=Haruo}} | |||
{{trainerdiv|ocean}} | {{trainerdiv|ocean}} | ||
{{trainerentry|VSBird Keeper.png{{!}}150px|Bird Keeper|Beck|1,560|1|227|Skarmory|♂|39|36=トシアキ|37=Toshiaki}} | {{trainerentry|VSBird Keeper.png{{!}}150px|game=6|Bird Keeper|Beck|1,560|1|227|Skarmory|♂|39|36=トシアキ|37=Toshiaki}} | ||
{{trainerdiv|ocean}} | {{trainerdiv|ocean}} | ||
{{trainerentry|VSAce Trainer M ORAS.png{{!}}150px|Ace Trainer|Warren|2,280|3|305|Lairon|♂|38||065|Alakazam|♂|38||310|Manectric|♂|38|36=レイジ|37=Reiji}} | {{trainerentry|VSAce Trainer M ORAS.png{{!}}150px|game=6|Ace Trainer|Warren|2,280|3|305|Lairon|♂|38||065|Alakazam|♂|38||310|Manectric|♂|38|36=レイジ|37=Reiji}} | ||
{{trainerdiv|ocean}} | {{trainerdiv|ocean}} | ||
{{trainerentry|VSBackpacker.png{{!}}150px|Backpacker|Grayson|936|1|203|Girafarig|♂|39|36=コウダイ|37=Kōdai}} | {{trainerentry|VSBackpacker.png{{!}}150px|game=6|Backpacker|Grayson|936|1|203|Girafarig|♂|39|36=コウダイ|37=Kōdai}} | ||
{{trainerdiv|ocean}} | {{trainerdiv|ocean}} | ||
{{trainerentry|VSSwimmer F ORAS.png{{!}}150px|Swimmer ♀|Debra|624|1|222|Corsola|♀|39|36=リカコ|37=Rikako}} | {{trainerentry|VSSwimmer F ORAS.png{{!}}150px|game=6|Swimmer ♀|Debra|624|1|222|Corsola|♀|39|36=リカコ|37=Rikako}} | ||
{{trainerdiv|ocean}} | {{trainerdiv|ocean}} | ||
{{trainerentry|VSSwimmer M.png{{!}}150px|Swimmer ♂|Franklin|576|2|340|Whiscash|♂|36||117|Seadra|♂|36|36=シゲオ|37=Shigeo}} | {{trainerentry|VSSwimmer M VI.png{{!}}150px|game=6|Swimmer ♂|Franklin|576|2|340|Whiscash|♂|36||117|Seadra|♂|36|36=シゲオ|37=Shigeo}} | ||
{{trainerdiv|ocean}} | {{trainerdiv|ocean}} | ||
{{trainerentry|VSSwimmer F ORAS.png{{!}}150px|Swimmer ♀|Linda|592|2|279|Pelipper|♀|37||119|Seaking|♀|37|36=ハルミ|37=Harumi}} | {{trainerentry|VSSwimmer F ORAS.png{{!}}150px|game=6|Swimmer ♀|Linda|592|2|279|Pelipper|♀|37||119|Seaking|♀|37|36=ハルミ|37=Harumi}} | ||
{{trainerdiv|ocean}} | {{trainerdiv|ocean}} | ||
{{trainerentry|VSSwimmer F ORAS.png{{!}}150px|Swimmer ♀|Sheryl|608|2|370|Luvdisc|♀|36||279|Pelipper|♀|38|36=ミユキ|37=Miyuki}} | {{trainerentry|VSSwimmer F ORAS.png{{!}}150px|game=6|Swimmer ♀|Sheryl|608|2|370|Luvdisc|♀|36||279|Pelipper|♀|38|36=ミユキ|37=Miyuki}} | ||
{{trainerfooter|ocean|3}} | {{trainerfooter|ocean|3}} | ||
== | ==Layout== | ||
{| class="roundy" style="margin:auto; background: #000; border: 3px solid #{{Locationcolor/dark|ocean}}" | {| class="roundy" style="margin:auto; background: #000; border: 3px solid #{{Locationcolor/dark|ocean}}" | ||
|- | |- | ||
| Line 137: | Line 140: | ||
|- | |- | ||
| colspan="5" style="background:#{{locationcolor/light|ocean}}; {{roundybottom|5px}}" | | | colspan="5" style="background:#{{locationcolor/light|ocean}}; {{roundybottom|5px}}" | | ||
|} | |||
==Music== | |||
{| class="roundtable" style="margin:auto; text-align: center; background: #{{locationcolor/med|road}}; border: 3px solid #{{locationcolor/dark|road}}" | |||
|- style="background:#{{locationcolor/light|road}}" | |||
! Games | |||
! Situation | |||
! Song name (Japanese) | |||
! Song name (English) | |||
! Composition | |||
! Arrangement | |||
|- style="background:#FFF" | |||
! {{GameIcon|R}}{{GameIcon|Sa}}{{GameIcon|E}} | |||
| Overworld | |||
| 119番道路 | |||
| [[Pokémon Ruby & Pokémon Sapphire: Super Music Collection|Route 119]] | |||
| [[Go Ichinose]] | |||
| Go Ichinose | |||
|- style="background:#FFF" | |||
! {{GameIcon|OR}}{{GameIcon|AS}} | |||
| Overworld | |||
| 119番道路 | |||
| [[Pokémon Omega Ruby & Pokémon Alpha Sapphire: Super Music Collection|Route 119]] | |||
| Go Ichinose | |||
| [[Minako Adachi]]<br>[[Hideaki Kuroda]] | |||
|} | |} | ||
| Line 143: | Line 171: | ||
[[Category:Hoenn locations|Route 133]] | [[Category:Hoenn locations|Route 133]] | ||
[[Category:Routes|Route 133]] | [[Category:Routes|Route 133]] | ||
[[Category:Ruby and Sapphire locations|Route 133]] | [[Category:Ruby and Sapphire locations|Route 133]] | ||
[[Category:Emerald locations|Route 133]] | [[Category:Emerald locations|Route 133]] | ||
| Line 149: | Line 177: | ||
[[de:Route 133 (Hoenn)]] | [[de:Route 133 (Hoenn)]] | ||
[[es:Ruta 133]] | |||
[[fr:Chenal 133]] | [[fr:Chenal 133]] | ||
[[it:Percorso 133 (Hoenn)]] | [[it:Percorso 133 (Hoenn)]] | ||
[[ja:133ばんすいどう (ホウエン地方)]] | [[ja:133ばんすいどう (ホウエン地方)]] | ||
[[zh:133号水路(丰缘)]] | [[zh:133号水路(丰缘)]] | ||
Latest revision as of 18:19, 1 November 2024

|
The picture used in this article is unsatisfactory. Please feel free to replace it so it conforms to Bulbapedia conventions. Reason: Guidebook labels |
| ||||||||
| ||||||||
Map description
| ||||||||
| Required for navigation
| ||||||||
Connecting locations
| ||||||||
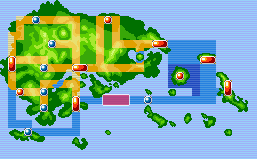
Location  Location of Route 133 in Hoenn. | ||||||||
Pokémon world routes
| ||||||||
Route 133 (Japanese: 133番水道 Water Route 133) is a water route in south-central Hoenn, connecting Route 132 and Route 134. The route is dominated for most of its length by a rapid current that prohibits any controlled movement while Surfing, thus making it a westbound route only.
Route description
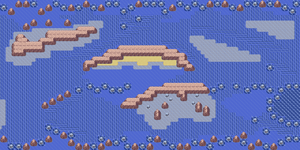
At its eastern terminus, Route 133 is separated into two paths by way of a large rock formation that begins on Route 132. The northern path passes two shallow islands, one containing a Big Pearl, before being separated into a pair of paths by a large island in the center of the route. The south branch leads to one of the calm water areas of the route near the shore of the beach, which is home to a Trainer, while the north path bypasses the beach to the north. The two paths merge just west of the island. Northwest of this point is another large but shallow island containing a lone Trainer and a Star Piece.
The southern-most path from Route 132 travels along the southern edge of the rock formation as it crosses the path of a pair of Trainers. West of this spot is a large, shallow island that is barren in Pokémon Ruby and Sapphire but contains a Max Revive in Emerald. Directly to the west of the landmass, the two main paths of the route converge for the first time since the western edge of Pacifidlog Town as the route flows into Route 134.
The eastern edge of a shallow island that is used to access the Sealed Chamber on Route 134 is visible in the southwest corner of the route.
Pokémon Emerald saw the addition of two Trainers to the island containing the Big Pearl.
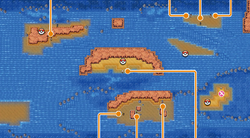
Pokémon Omega Ruby and Alpha Sapphire adds an island to a previously inaccessible area on the eastern side of the route. This island can be flown to and contains a single Max Revive.
Items
| Item | Location | Games | |
|---|---|---|---|
| Big Pearl | On the southern of the two islands in the northeast of the route (requires Surf) | R S E OR AS | |
| Max Revive | In the center of the island in the south of the route (requires Surf) | E | |
| Max Revive | On the island with the route sign in the southeast of the route | OR AS | |
| Calcium | On the island with the crescent rock formation in the middle of the route (requires Surf) | OR AS | |
| Star Piece | On the north side of the island in the northwest of the route (requires Surf) | R S E OR AS | |
| TM77 (Psych Up) | From a Psychic on the north side of the island in the northwest of the route (requires Surf) | OR AS | |
Pokémon
Generation III
| Pokémon | Games | Location | Levels | Rate | |||||||||||
|---|---|---|---|---|---|---|---|---|---|---|---|---|---|---|---|
| Surfing | |||||||||||||||
|
R | S | E |
|
5-35 | 60% | |||||||||
|
R | S | E |
|
10-30 | 35% | |||||||||
|
R | S | E |
|
25-30 | 5% | |||||||||
| Fishing | |||||||||||||||
|
R | S | E |
|
5-10 | 30% | |||||||||
|
R | S | E |
|
5-10 | 70% | |||||||||
|
R | S | E |
|
10-30 | 20% | |||||||||
|
R | S | E |
|
10-30 | 60% | |||||||||
|
R | S | E |
|
10-30 | 20% | |||||||||
|
R | S | E |
|
25-30 | 15% | |||||||||
|
R | S | E |
|
30-35 | 40% | |||||||||
|
R | S | E |
|
30-45 | 45% | |||||||||
| A colored background means that the Pokémon can be found in this location in the specified game. A white background with a colored letter means that the Pokémon cannot be found here. | |||||||||||||||
Generation VI
| Pokémon | Games | Location | Levels | Rate | ||||||||||||
|---|---|---|---|---|---|---|---|---|---|---|---|---|---|---|---|---|
| Surfing | ||||||||||||||||
|
OR | AS |
|
25 | 50% | |||||||||||
|
OR | AS |
|
30 | 15% | |||||||||||
|
OR | AS |
|
25, 30, 35 | 35% | |||||||||||
| Surfing (exclusively as hidden Pokémon) After defeating or capturing Groudon/Kyogre | ||||||||||||||||
|
OR | AS |
|
30 | ??% | |||||||||||
|
OR | AS |
|
30 | ??% | |||||||||||
|
OR | AS |
|
30 | ??% | |||||||||||
| Fishing | ||||||||||||||||
|
OR | AS |
|
5 | 35% | |||||||||||
|
OR | AS |
|
10, 15 | 65% | |||||||||||
|
OR | AS |
|
25 | 35% | |||||||||||
|
OR | AS |
|
25 | 60% | |||||||||||
|
OR | AS |
|
25 | 5% | |||||||||||
|
OR | AS |
|
30 | 35% | |||||||||||
|
OR | AS |
|
40 | 5% | |||||||||||
|
OR | AS |
|
35 | 60% | |||||||||||
| A colored background means that the Pokémon can be found in this location in the specified game. A white background with a colored letter means that the Pokémon cannot be found here. | ||||||||||||||||
Trainers
Pokémon Ruby and Sapphire
| Trainer | Pokémon | |||||||||||
|---|---|---|---|---|---|---|---|---|---|---|---|---|
|
| |||||||||||
| ||||||||||||
|
| |||||||||||
| ||||||||||||
| ||||||||||||
|
| |||||||||||
| ||||||||||||
|
| |||||||||||
| ||||||||||||
|
| |||||||||||
| ||||||||||||
| Trainers with a PokéNav by their names will be registered in the Trainer's Eyes or Match Call function after the first battle, and may have a rematch with the player with higher-level Pokémon. | ||||||||||||
Pokémon Emerald
| Trainer | Pokémon | |||||||||||
|---|---|---|---|---|---|---|---|---|---|---|---|---|
|
| |||||||||||
| ||||||||||||
|
| |||||||||||
|
| |||||||||||
| ||||||||||||
|
| |||||||||||
| ||||||||||||
|
| |||||||||||
| ||||||||||||
|
| |||||||||||
|
| |||||||||||
| Trainers with a PokéNav by their names will be registered in the Trainer's Eyes or Match Call function after the first battle, and may have a rematch with the player with higher-level Pokémon. | ||||||||||||
Pokémon Omega Ruby and Alpha Sapphire
| Trainer | Pokémon | |||||||||||
|---|---|---|---|---|---|---|---|---|---|---|---|---|
| Requires Surf | ||||||||||||
|
| |||||||||||
|
| |||||||||||
|
| |||||||||||
| ||||||||||||
| ||||||||||||
|
| |||||||||||
|
| |||||||||||
|
| |||||||||||
| ||||||||||||
|
| |||||||||||
| ||||||||||||
|
| |||||||||||
| ||||||||||||
| Trainers with a PokéNav by their names will be registered in the Trainer's Eyes or Match Call function after the first battle, and may have a rematch with the player with higher-level Pokémon. | ||||||||||||
Layout
| Ruby | Sapphire | Emerald | Omega Ruby | Alpha Sapphire |
|---|---|---|---|---|

|

| |||
Music
| Games | Situation | Song name (Japanese) | Song name (English) | Composition | Arrangement |
|---|---|---|---|---|---|
| R S E | Overworld | 119番道路 | Route 119 | Go Ichinose | Go Ichinose |
| OR AS | Overworld | 119番道路 | Route 119 | Go Ichinose | Minako Adachi Hideaki Kuroda |

|
This article is part of Project Routes, a Bulbapedia project that aims to write comprehensive articles on every route in the Pokémon world. |


