|
|
| (5 intermediate revisions by 4 users not shown) |
| Line 3: |
Line 3: |
| |image_size=256 | | |image_size=256 |
| |type=cave | | |type=cave |
| |mapdesc=A mysterious cave that is filled with terribly tough <sc>Pok</sc>é<sc>mon</sc>. It is so dangerous, the <sc>Pok</sc>é<sc>mon League</sc> is in charge of it.{{sup/3|FRLG}}<br><br>A cave that had collapsed once. It has been reconstructed.{{sup/4|HGSS}} | | |mapdesc=A mysterious cave that is filled with terribly tough <sc>Pok</sc>é<sc>mon</sc>. It is so dangerous, the <sc>Pok</sc>é<sc>mon League</sc> is in charge of it.{{sup/3|FRLG}}<br/>A cave that had collapsed once. It has been reconstructed.{{sup/4|HGSS}} |
| |location_name=Cerulean Cave | | |location_name=Cerulean Cave |
| |japanese_name=ハナダのどうくつ | | |japanese_name=ハナダのどうくつ |
| Line 11: |
Line 11: |
| |region=Kanto | | |region=Kanto |
| |generation={{gen|I}}, {{gen|III}}, {{gen|IV}} | | |generation={{gen|I}}, {{gen|III}}, {{gen|IV}} |
| |map=Kanto Cerulean Cave Map.png
| |
| }} | | }} |
|
| |
|
| Line 21: |
Line 20: |
| Cerulean Cave is home to a wide variety of high-[[level]] [[wild Pokémon]]. {{p|Mewtwo}} inhabits the deepest part of the cave. | | Cerulean Cave is home to a wide variety of high-[[level]] [[wild Pokémon]]. {{p|Mewtwo}} inhabits the deepest part of the cave. |
|
| |
|
| The [[Pokémon League]] only permits {{pkmn|Trainer}}s who have entered the [[Hall of Fame]] to enter. In {{game|FireRed and LeafGreen|s}}, {{player}}s must further prove themselves before entering the cave, which is done by completing the quest on [[Sevii Islands]] and restoring the [[Network Machine]] to operational status. | | The [[Pokémon League]] only permits {{pkmn|Trainer}}s who have entered the [[Hall of Fame]] to enter. In {{game|FireRed and LeafGreen|s}}, {{player}}s must further prove themselves before entering the cave, which is done by completing the quest on [[Sevii Islands]] and restoring the [[Network Machine]] of the [[Pokémon Network Center]] to operational status. |
|
| |
|
| In Pokémon FireRed and LeafGreen, more Pokémon can be found only by [[fishing]], while there are fewer different species of wild Pokémon found by walking around in the cave. | | In Pokémon FireRed and LeafGreen, more Pokémon can be found only by [[fishing]], while there are fewer different species of wild Pokémon found by walking around in the cave. |
| Line 42: |
Line 41: |
| {{Itlisth|cave}} | | {{Itlisth|cave}} |
| {{Itemlist|Full Restore| | | {{Itemlist|Full Restore| |
| * On the riverbank near the southwest corner of the first floor | | * 1F; on the riverbank in the southwest corner |
| * Center of the second floor|R=yes|B=yes|display={{DL|Potion|Full Restore}} ×2}} | | * 2F; middle of the floor|R=yes|B=yes|display={{DL|Potion|Full Restore}} ×2}} |
| {{Itemlist|Rare Candy|On a rock on the central plateau ''(hidden)''|R=yes|B=yes|display={{DL|Vitamin|Rare Candy}}}} | | {{Itemlist|Rare Candy|1F; on a rock on the central plateau ''(hidden)''|R=yes|B=yes|display={{DL|Vitamin|Rare Candy}}}} |
| {{Itemlist|Max Elixir|On the riverbank on the first floor|R=yes|B=yes|display={{DL|Ether|Max Elixir}}}} | | {{Itemlist|Max Elixir|1F; on the riverbank|R=yes|B=yes|display={{DL|Ether|Max Elixir}}}} |
| {{Itemlist|Max Revive|North edge of the basement|R=yes|B=yes|display={{DL|Revive|Max Revive}}}} | | {{Itemlist|Max Revive|B1F; north edge|R=yes|B=yes|display={{DL|Revive|Max Revive}}}} |
| {{Itemlist|Nugget|Near the northwest corner of the first floor|R=yes|B=yes|display={{DL|Valuable item|Nugget}}}} | | {{Itemlist|Nugget|1F; near the northwest corner|R=yes|B=yes|display={{DL|Valuable item|Nugget}}}} |
| {{Itemlist|PP Up|East edge of the second floor|R=yes|B=yes|display={{DL|Vitamin|PP Up}}}} | | {{Itemlist|PP Up|2F; east edge|R=yes|B=yes|display={{DL|Vitamin|PP Up}}}} |
| {{Itemlist|Ultra Ball| | | {{Itemlist|Ultra Ball| |
| * Southwest corner of the second floor | | * 2F; southwest corner |
| * Center of the basement | | * B1F; center |
| * On the rock that stands out right before the water to Mewtwo ''(hidden)'' |R=yes|B=yes|display={{ball|Ultra}} ×3}} | | * B1F; on the rock that stands out right before the water to Mewtwo ''(hidden)'' |R=yes|B=yes|display={{ball|Ultra}} ×3}} |
| {{Itemlist|Max Elixir| | | {{Itemlist|Max Elixir| |
| * West of the entrance on the first floor | | * 1F; west of the entrance |
| * North edge of the basement|Y=yes|display={{DL|Ether|Max Elixir}} ×2}} | | * B1F; north edge|Y=yes|display={{DL|Ether|Max Elixir}} ×2}} |
| {{Itemlist|Full Restore|East edge of the second floor|Y=yes|display={{DL|Potion|Full Restore}}}} | | {{Itemlist|Full Restore|2F; east edge|Y=yes|display={{DL|Potion|Full Restore}}}} |
| {{Itemlist|Max Revive| | | {{Itemlist|Max Revive| |
| * East edge of the first floor | | * 1F; east edge |
| * Southeast of the second floor's center | | * 2F; southeast of the center |
| * Center of an elevated area in the basement|Y=yes|display={{DL|Revive|Max Revive}} ×3}} | | * B1F; center of an elevated area|Y=yes|display={{DL|Revive|Max Revive}} ×3}} |
| {{Itemlist|Rare Candy| | | {{Itemlist|Rare Candy| |
| * Southeast corner of the first floor | | * 1F; southeast corner |
| * West edge of the second floor|Y=yes|display={{DL|Vitamin|Rare Candy}} ×2}} | | * 2F; west edge|Y=yes|display={{DL|Vitamin|Rare Candy}} ×2}} |
| {{Itemlist|Ultra Ball| | | {{Itemlist|Ultra Ball| |
| * Center of the first floor | | * 1F; center |
| * Center of the second floor | | * 2F; center |
| * Center of an elevated area in the basement | | * B1F; center of an elevated area |
| * Northeast corner of the basement|Y=yes|display={{ball|Ultra}} ×4}} | | * B1F; northeast corner|Y=yes|display={{ball|Ultra}} ×4}} |
| {{Itemlist|PP Up| | | {{Itemlist|PP Up| |
| * On a single rock just east of center on the first floor ''(hidden)'' | | * 1F; on a single rock just east of the center ''(hidden)'' |
| * On a single rock a bit south of center of the second floor ''(hidden)'' | | * 2F; on a single rock a bit south of the center ''(hidden)'' |
| * On the rock that stands out close to the waterway to the plateau with two visible items ''(hidden)''|Y=yes|display={{DL|Vitamin|PP Up}} ×3}} | | * B1F; on the rock that stands out close to the waterway to the plateau with two visible items ''(hidden)''|Y=yes|display={{DL|Vitamin|PP Up}} ×3}} |
| {{Itemlist|Full Restore| | | {{Itemlist|Full Restore| |
| * On the riverbank near the southwest corner of the first floor | | * 1F; on the riverbank near the southwest corner |
| * Against the eastern edge of the second floor (requires {{m|Rock Smash}})|FR=yes|LG=yes|display={{DL|Potion|Full Restore}} ×2}} | | * 2F; against the eastern edge (requires {{m|Rock Smash}})|FR=yes|LG=yes|display={{DL|Potion|Full Restore}} ×2}} |
| {{Itemlist|Max Elixir|Near the center of the first floor|FR=yes|LG=yes|display={{DL|Ether|Max Elixir}}}} | | {{Itemlist|Max Elixir|1F; near the center|FR=yes|LG=yes|display={{DL|Ether|Max Elixir}}}} |
| {{Itemlist|Max Revive|In the northeast corner of the basement|FR=yes|LG=yes|display={{DL|Revive|Max Revive}}}} | | {{Itemlist|Max Revive|B1F; in the northeast corner|FR=yes|LG=yes|display={{DL|Revive|Max Revive}}}} |
| {{Itemlist|Nugget|In the northwest corner of the first floor|FR=yes|LG=yes|display={{DL|Valuable item|Nugget}}}} | | {{Itemlist|Nugget|1F; In the northwest corner|FR=yes|LG=yes|display={{DL|Valuable item|Nugget}}}} |
| {{Itemlist|PP Up|Near the southwest corner of the second floor (requires {{m|Rock Smash}})|FR=yes|LG=yes|display={{DL|Vitamin|PP Up}}}} | | {{Itemlist|PP Up|2F; near the southwest corner (requires {{m|Rock Smash}})|FR=yes|LG=yes|display={{DL|Vitamin|PP Up}}}} |
| {{Itemlist|Ultra Ball| | | {{Itemlist|Ultra Ball| |
| * Near the southeast corner of the second floor (requires {{m|Rock Smash}}) | | * 2F; near the southeast corner (requires {{m|Rock Smash}}) |
| * Near the Nugget on 1F ''(hidden)'' | | * 1F; near the Nugget ''(hidden)'' |
| * At the center of the basement on the central rock ledge |FR=yes|LG=yes|display={{ball|Ultra}} ×3}} | | * B1F; in the middle of the central rock ledge |FR=yes|LG=yes|display={{ball|Ultra}} ×3}} |
| {{Itemlist|TM Electric|North-east corner of 2F (requires {{m|Rock Smash}})|HG=yes|SS=yes|display={{TM|24|Thunderbolt}}}} | | {{Itemlist|TM Electric|2F; northeast corner (requires {{m|Rock Smash}})|HG=yes|SS=yes|display={{TM|24|Thunderbolt}}}} |
| {{Itemlist|Nugget| | | {{Itemlist|Nugget| |
| * Near the northwest corner of 1F | | * 1F; near the northwest corner |
| * Behind a lone {{m|Rock Smash|smashable rock}} north-east of the rocks in the center of B1F ''(hidden)''|HG=yes|SS=yes|display={{DL|Valuable item|Nugget}} ×2}} | | * B1F; behind a lone {{m|Rock Smash|smashable rock}} northeast of the rocks in the center ''(hidden)''|HG=yes|SS=yes|display={{DL|Valuable item|Nugget}} ×2}} |
| {{Itemlist|PP Up| | | {{Itemlist|PP Up| |
| * West side of 2F | | * 2F; west side of 2F |
| * In the large open area on the east side of 2F, in the isolated crystal in the bottom left ''(hidden)''|HG=yes|SS=yes|display={{DL|Vitamin|PP Up}} ×2}} | | * 2F; in the isolated crystal in the bottom left ''(hidden)''|HG=yes|SS=yes|display={{DL|Vitamin|PP Up}} ×2}} |
| {{Itemlist|Hyper Potion|1F, on the wall behind the {{m|Rock Smash|smashable rocks}} in the south-west corner ''(hidden)''|HG=yes|SS=yes|display={{DL|Potion|Hyper Potion}}}} | | {{Itemlist|Hyper Potion|1F; on the wall behind the {{m|Rock Smash|smashable rocks}} in the southwest corner ''(hidden)''|HG=yes|SS=yes|display={{DL|Potion|Hyper Potion}}}} |
| {{Itemlist|Full Restore|Along south wall of 1F|HG=yes|SS=yes|display={{DL|Potion|Full Restore}}}} | | {{Itemlist|Full Restore|1F; along the south wall|HG=yes|SS=yes|display={{DL|Potion|Full Restore}}}} |
| {{Itemlist|Zinc|In the large open area on the east side of 2F ''(hidden)''|HG=yes|SS=yes|display={{DL|Vitamin|Zinc}}}} | | {{Itemlist|Zinc|2F; in the large open area on the east side ''(hidden)''|HG=yes|SS=yes|display={{DL|Vitamin|Zinc}}}} |
| {{Itemlist|Full Heal|In the large open area on the east side of 2F ''(hidden)''|HG=yes|SS=yes|display={{DL|Status ailment healing item|Full Heal}}}} | | {{Itemlist|Full Heal|2F; in the large open area on the east side ''(hidden)''|HG=yes|SS=yes|display={{DL|Status ailment healing item|Full Heal}}}} |
| {{Itemlist|Big Pearl|In the large open area on the east side of 2F ''(hidden)''|HG=yes|SS=yes|display={{DL|Valuable item|Big Pearl}}}} | | {{Itemlist|Big Pearl|2F; in the large open area on the east side ''(hidden)''|HG=yes|SS=yes|display={{DL|Valuable item|Big Pearl}}}} |
| {{Itemlist|Revive|On a small crystal in the middle of 1F ''(hidden)''|HG=yes|SS=yes|display={{DL|Revive|Revive}}}} | | {{Itemlist|Revive|1F; on a small crystal in the middle ''(hidden)''|HG=yes|SS=yes|display={{DL|Revive|Revive}}}} |
| {{Itemlist|Max Elixir|Near the center of the first floor at the end of a bridge|HG=yes|SS=yes|display={{DL|Ether|Max Elixir}}}} | | {{Itemlist|Max Elixir|1F; near the center, at the end of a bridge|HG=yes|SS=yes|display={{DL|Ether|Max Elixir}}}} |
| {{Itemlist|Sea Incense|North edge of 1F|HG=yes|SS=yes|display={{DL|Incense|Sea Incense}}}} | | {{Itemlist|Sea Incense|1F; north edge|HG=yes|SS=yes|display={{DL|Incense|Sea Incense}}}} |
| {{Itemlist|Rare Candy|In the far south-east corner of 1F ''(hidden)''|HG=yes|SS=yes|display={{DL|Vitamin|Rare Candy}}}} | | {{Itemlist|Rare Candy|1F; in the far southeast corner ''(hidden)''|HG=yes|SS=yes|display={{DL|Vitamin|Rare Candy}}}} |
| {{Itemlist|Ultra Ball| | | {{Itemlist|Ultra Ball| |
| * West side of 2F | | * 2F; west side |
| * In the large open area on the east side of 2F ''(hidden)'' | | * 2F; in the large open area on the east side ''(hidden)'' |
| * West of the {{m|Rock Smash|smashable rocks}} in the center of B1F ''(hidden)'' | | * B1F; west of the {{m|Rock Smash|smashable rocks}} in the center ''(hidden)'' |
| * Near south-west corner of B1F|HG=yes|SS=yes|display={{ball|Ultra}} ×4}} | | * B1F; near the southwest corner|HG=yes|SS=yes|display={{ball|Ultra}} ×4}} |
| {{Itemlist|Odd Incense|Near the center of the second floor (requires {{m|Rock Smash}})|HG=yes|SS=yes|display={{DL|Incense|Odd Incense}}}} | | {{Itemlist|Odd Incense|2F; near the center (requires {{m|Rock Smash}})|HG=yes|SS=yes|display={{DL|Incense|Odd Incense}}}} |
| {{Itemlist|Protein|Near north-west corner of 2F ''(hidden)''|HG=yes|SS=yes|display={{DL|Vitamin|Protein}}}} | | {{Itemlist|Protein|2F; near the northwest corner ''(hidden)''|HG=yes|SS=yes|display={{DL|Vitamin|Protein}}}} |
| {{Itemlist|Max Revive| | | {{Itemlist|Max Revive| |
| * Among the {{m|Rock Smash|smashable rocks}} on the west side of B1F ''(hidden)'' | | * B1F; among the {{m|Rock Smash|smashable rocks}} on the west side ''(hidden)'' |
| * Center of northwest of the {{m|Rock Smash|smashable rocks}} in the center of B1F|HG=yes|SS=yes|display={{DL|Revive|Max Revive}} ×2}} | | * B1F; northwest of the {{m|Rock Smash|smashable rocks}} in the center|HG=yes|SS=yes|display={{DL|Revive|Max Revive}} ×2}} |
| {{Itemlist|Dusk Stone|Center of basement (requires {{m|Rock Climb}})|HG=yes|SS=yes|display={{evostone|Dusk Stone}}}} | | {{Itemlist|Dusk Stone|B1F; center (requires {{m|Rock Climb}})|HG=yes|SS=yes|display={{evostone|Dusk Stone}}}} |
| {{Itemlist|Electirizer|North-east corner of B1F (requires {{m|Rock Climb}})|HG=yes|SS=yes|display={{DL|Evolution-inducing held item|Electirizer}}}} | | {{Itemlist|Electirizer|B1F; northeast corner (requires {{m|Rock Climb}})|HG=yes|SS=yes|display={{DL|Evolution-inducing held item|Electirizer}}}} |
| {{Itemlist|Black Sludge|South-east corner of basement|HG=yes|SS=yes|display={{DL|In-battle effect item|Black Sludge}}}} | | {{Itemlist|Black Sludge|B1F; southeast corner|HG=yes|SS=yes|display={{DL|In-battle effect item|Black Sludge}}}} |
| {{Itlistfoot|cave}} | | {{Itlistfoot|cave}} |
|
| |
|
| Line 133: |
Line 132: |
| =====1F===== | | =====1F===== |
| {{catch/header|cave|no}} | | {{catch/header|cave|no}} |
| {{catch/entry1|042|Golbat|yes|yes|no|Cave|46|20%|type1=Poison|type2=Flying}}
| |
| {{catch/entry1|042|Golbat|no|no|yes|Cave|50-55|40%|type1=Poison|type2=Flying}}
| |
| {{catch/entry1|097|Hypno|yes|yes|no|Cave|46|20%|type1=Psychic}}
| |
| {{catch/entry1|082|Magneton|yes|yes|no|Cave|46|15%|type1=Electric}}
| |
| {{catch/entry1|075|Graveler|no|no|yes|Cave|45|15%|type1=Rock|type2=Ground}}
| |
| {{catch/entry1|024|Arbok|yes|no|no|Cave|52|10%|type1=Poison}} | | {{catch/entry1|024|Arbok|yes|no|no|Cave|52|10%|type1=Poison}} |
| | {{catch/entry1|026|Raichu|yes|yes|no|Cave|53|4%|type1=Electric}} |
| {{catch/entry1|028|Sandslash|no|yes|yes|Cave|52|10%|type1=Ground}} | | {{catch/entry1|028|Sandslash|no|yes|yes|Cave|52|10%|type1=Ground}} |
| {{catch/entry1|049|Venomoth|yes|yes|no|Cave|49|10%|type1=Bug|type2=Poison}} | | {{catch/entry1|042|Golbat|yes|yes|no|Cave|46|25%|type1=Poison|type2=Flying}} |
| {{catch/entry1|049|Venomoth|no|no|yes|Cave|54|5%|type1=Bug|type2=Poison}} | | {{catch/entry1|042|Golbat|no|no|yes|Cave|50, 55|40%|type1=Poison|type2=Flying}} |
| {{catch/entry1|085|Dodrio|yes|yes|no|Cave|49|10%|type1=Normal|type2=Flying}}
| |
| {{catch/entry1|044|Gloom|no|no|yes|Cave|55|10%|type1=Grass|type2=Poison}} | | {{catch/entry1|044|Gloom|no|no|yes|Cave|55|10%|type1=Grass|type2=Poison}} |
| {{catch/entry1|070|Weepinbell|no|no|yes|Cave|55|10%|type1=Grass|type2=Poison}}
| |
| {{catch/entry1|047|Parasect|yes|yes|no|Cave|52|5%|type1=Bug|type2=Grass}} | | {{catch/entry1|047|Parasect|yes|yes|no|Cave|52|5%|type1=Bug|type2=Grass}} |
| {{catch/entry1|047|Parasect|no|no|yes|Cave|54|5%|type1=Bug|type2=Grass}} | | {{catch/entry1|047|Parasect|no|no|yes|Cave|54|5%|type1=Bug|type2=Grass}} |
| | {{catch/entry1|049|Venomoth|yes|yes|no|Cave|49|10%|type1=Bug|type2=Poison}} |
| | {{catch/entry1|049|Venomoth|no|no|yes|Cave|54|5%|type1=Bug|type2=Poison}} |
| {{catch/entry1|064|Kadabra|yes|yes|no|Cave|49|5%|type1=Psychic}} | | {{catch/entry1|064|Kadabra|yes|yes|no|Cave|49|5%|type1=Psychic}} |
| {{catch/entry1|026|Raichu|yes|yes|no|Cave|53|4%|type1=Electric}} | | {{catch/entry1|070|Weepinbell|no|no|yes|Cave|55|10%|type1=Grass|type2=Poison}} |
| | {{catch/entry1|097|Hypno|yes|yes|no|Cave|46|15%|type1=Psychic}} |
| | {{catch/entry1|075|Graveler|no|no|yes|Cave|45|15%|type1=Rock|type2=Ground}} |
| | {{catch/entry1|082|Magneton|yes|yes|no|Cave|46|15%|type1=Electric}} |
| | {{catch/entry1|085|Dodrio|yes|yes|no|Cave|49|10%|type1=Normal|type2=Flying}} |
| {{catch/entry1|132|Ditto|yes|yes|no|Cave|53|1%|type1=Normal}} | | {{catch/entry1|132|Ditto|yes|yes|no|Cave|53|1%|type1=Normal}} |
| {{catch/entry1|132|Ditto|no|no|yes|Cave|55-60|5%|type1=Normal}} | | {{catch/entry1|132|Ditto|no|no|yes|Cave|55, 60|5%|type1=Normal}} |
| {{catch/div|water|Fishing}} | | {{catch/div|water|Fishing}} |
| {{catch/entry1|129|Magikarp|yes|yes|yes|Fish Old|5|100%|type1=Water}} | | {{catch/entry1|129|Magikarp|yes|yes|yes|Fish Old|5|100%|type1=Water}} |
| Line 165: |
Line 164: |
| =====2F===== | | =====2F===== |
| {{catch/header|cave|no}} | | {{catch/header|cave|no}} |
| {{catch/entry1|042|Golbat|no|no|yes|Cave|52-57|40%|type1=Poison|type2=Flying}} | | {{catch/entry1|028|Sandslash|no|no|yes|Cave|56|10%|type1=Ground}} |
| {{catch/entry1|085|Dodrio|yes|yes|no|Cave|51|20%|type1=Normal|type2=Flying}} | | {{catch/entry1|040|Wigglytuff|yes|yes|no|Cave|54|5%|type1=Normal}} |
| {{catch/entry1|049|Venomoth|yes|yes|no|Cave|51|20%|type1=Bug|type2=Poison}} | | {{catch/entry1|042|Golbat|no|no|yes|Cave|52, 57|40%|type1=Poison|type2=Flying}} |
| | {{catch/entry1|044|Gloom|no|no|yes|Cave|58|5%|type1=Grass|type2=Poison}} |
| | {{catch/entry1|049|Venomoth|yes|yes|no|Cave|51|15%|type1=Bug|type2=Poison}} |
| {{catch/entry1|064|Kadabra|yes|yes|no|Cave|51|15%|type1=Psychic}} | | {{catch/entry1|064|Kadabra|yes|yes|no|Cave|51|15%|type1=Psychic}} |
| | {{catch/entry1|070|Weepinbell|no|no|yes|Cave|58|5%|type1=Grass|type2=Poison}} |
| {{catch/entry1|075|Graveler|no|no|yes|Cave|50|15%|type1=Rock|type2=Ground}} | | {{catch/entry1|075|Graveler|no|no|yes|Cave|50|15%|type1=Rock|type2=Ground}} |
| | {{catch/entry1|085|Dodrio|yes|yes|no|Cave|51|25%|type1=Normal|type2=Flying}} |
| {{catch/entry1|101|Electrode|yes|yes|no|Cave|52|10%|type1=Electric}} | | {{catch/entry1|101|Electrode|yes|yes|no|Cave|52|10%|type1=Electric}} |
| {{catch/entry1|105|Marowak|yes|yes|no|Cave|52|10%|type1=Ground}} | | {{catch/entry1|105|Marowak|yes|yes|no|Cave|52|10%|type1=Ground}} |
| | {{catch/entry1|111|Rhyhorn|no|no|yes|Cave|50|10%|type1=Rock|type2=Ground}} |
| {{catch/entry1|112|Rhydon|yes|yes|no|Cave|52|10%|type1=Rock|type2=Ground}} | | {{catch/entry1|112|Rhydon|yes|yes|no|Cave|52|10%|type1=Rock|type2=Ground}} |
| {{catch/entry1|112|Rhydon|no|no|yes|Cave|58-60|5%|type1=Rock|type2=Ground}} | | {{catch/entry1|112|Rhydon|no|no|yes|Cave|58, 60|5%|type1=Rock|type2=Ground}} |
| {{catch/entry1|028|Sandslash|no|no|yes|Cave|56|10%|type1=Ground}}
| |
| {{catch/entry1|111|Rhyhorn|no|no|yes|Cave|50|10%|type1=Rock|type2=Ground}}
| |
| {{catch/entry1|040|Wigglytuff|yes|yes|no|Cave|54|5%|type1=Normal}}
| |
| {{catch/entry1|113|Chansey|yes|yes|no|Cave|56|5%|type1=Normal}} | | {{catch/entry1|113|Chansey|yes|yes|no|Cave|56|5%|type1=Normal}} |
| {{catch/entry1|132|Ditto|yes|yes|no|Cave|55-60|5%|type1=Normal}} | | {{catch/entry1|132|Ditto|yes|yes|no|Cave|55, 60|5%|type1=Normal}} |
| {{catch/entry1|132|Ditto|no|no|yes|Cave|60|10%|type1=Normal}} | | {{catch/entry1|132|Ditto|no|no|yes|Cave|60|10%|type1=Normal}} |
| {{catch/entry1|044|Gloom|no|no|yes|Cave|58|5%|type1=Grass|type2=Poison}}
| |
| {{catch/entry1|070|Weepinbell|no|no|yes|Cave|58|5%|type1=Grass|type2=Poison}}
| |
| {{catch/footer|cave}} | | {{catch/footer|cave}} |
|
| |
|
| =====B1F===== | | =====B1F===== |
| {{catch/header|cave|no}} | | {{catch/header|cave|no}} |
| {{catch/entry1|042|Golbat|no|no|yes|Cave|54-59|40%|type1=Poison|type2=Flying}} | | {{catch/entry1|024|Arbok|yes|no|no|Cave|57|5%|type1=Poison}} |
| {{catch/entry1|112|Rhydon|yes|yes|no|Cave|55|20%|type1=Rock|type2=Ground}}
| |
| {{catch/entry1|112|Rhydon|no|no|yes|Cave|62|10%|type1=Rock|type2=Ground}}
| |
| {{catch/entry1|105|Marowak|yes|yes|no|Cave|55|20%|type1=Ground}}
| |
| {{catch/entry1|101|Electrode|yes|yes|no|Cave|55|15%|type1=Electric}}
| |
| {{catch/entry1|075|Graveler|no|no|yes|Cave|55|15%|type1=Rock|type2=Ground}}
| |
| {{catch/entry1|026|Raichu|yes|yes|no|Cave|64|10%|type1=Electric}} | | {{catch/entry1|026|Raichu|yes|yes|no|Cave|64|10%|type1=Electric}} |
| | {{catch/entry1|028|Sandslash|no|yes|no|Cave|57|5%|type1=Ground}} |
| | {{catch/entry1|042|Golbat|no|no|yes|Cave|54, 59|40%|type1=Poison|type2=Flying}} |
| {{catch/entry1|047|Parasect|yes|yes|no|Cave|64|10%|type1=Bug|type2=Grass}} | | {{catch/entry1|047|Parasect|yes|yes|no|Cave|64|10%|type1=Bug|type2=Grass}} |
| | {{catch/entry1|075|Graveler|no|no|yes|Cave|55|15%|type1=Rock|type2=Ground}} |
| | {{catch/entry1|101|Electrode|yes|yes|no|Cave|55|15%|type1=Electric}} |
| | {{catch/entry1|105|Marowak|yes|yes|no|Cave|55|15%|type1=Ground}} |
| | {{catch/entry1|108|Lickitung|no|no|yes|Cave|50, 55|5%|type1=Normal}} |
| | {{catch/entry1|111|Rhyhorn|no|no|yes|Cave|52|10%|type1=Rock|type2=Ground}} |
| | {{catch/entry1|112|Rhydon|yes|yes|no|Cave|55|25%|type1=Rock|type2=Ground}} |
| | {{catch/entry1|112|Rhydon|no|no|yes|Cave|62|10%|type1=Rock|type2=Ground}} |
| {{catch/entry1|113|Chansey|yes|yes|no|Cave|64|10%|type1=Normal}} | | {{catch/entry1|113|Chansey|yes|yes|no|Cave|64|10%|type1=Normal}} |
| {{catch/entry1|113|Chansey|no|no|yes|Cave|56|5%|type1=Normal}} | | {{catch/entry1|113|Chansey|no|no|yes|Cave|56|5%|type1=Normal}} |
| {{catch/entry1|132|Ditto|yes|yes|no|Cave|63-67|10%|type1=Normal}} | | {{catch/entry1|132|Ditto|yes|yes|no|Cave|63, 65, 67|10%|type1=Normal}} |
| {{catch/entry1|132|Ditto|no|no|yes|Cave|60-65|15%|type1=Normal}} | | {{catch/entry1|132|Ditto|no|no|yes|Cave|60, 65|15%|type1=Normal}} |
| {{catch/entry1|111|Rhyhorn|no|no|yes|Cave|52|10%|type1=Rock|type2=Ground}}
| |
| {{catch/entry1|024|Arbok|yes|no|no|Cave|57|5%|type1=Poison}}
| |
| {{catch/entry1|028|Sandslash|no|yes|no|Cave|57|5%|type1=Ground}}
| |
| {{catch/entry1|108|Lickitung|no|no|yes|Cave|50-55|5%|type1=Normal}}
| |
| {{catch/div|water|Fishing}} | | {{catch/div|water|Fishing}} |
| {{catch/entry1|129|Magikarp|yes|yes|yes|Fish Old|5|100%|type1=Water}} | | {{catch/entry1|129|Magikarp|yes|yes|yes|Fish Old|5|100%|type1=Water}} |
| Line 388: |
Line 387: |
| In {{game|HeartGold and SoulSilver|s}}, the layout of the first and second floors is based on the equivalent layout from Pokémon FireRed and LeafGreen, while the layout of the basement is based on the respective layout from {{game|Yellow}}. Rock Smash boulders are also present and {{m|Rock Climb}} surfaces were added. | | In {{game|HeartGold and SoulSilver|s}}, the layout of the first and second floors is based on the equivalent layout from Pokémon FireRed and LeafGreen, while the layout of the basement is based on the respective layout from {{game|Yellow}}. Rock Smash boulders are also present and {{m|Rock Climb}} surfaces were added. |
|
| |
|
| {| style="margin:auto; background: #000; {{roundy|10px}} border: 5px solid #{{Locationcolor/med|cave}}" | | {| class="roundy" style="margin:auto; background: #000; border: 5px solid #{{Locationcolor/med|cave}}" |
| |- | | |- |
| ! style="background:#{{Locationcolor/light|cave}}; {{roundytl|5px}}" | Version | | ! style="background:#{{Locationcolor/light|cave}}; {{roundytl|5px}}" | Version |
| Line 394: |
Line 393: |
| ! style="background:#{{Locationcolor/light|cave}}" | 2F | | ! style="background:#{{Locationcolor/light|cave}}" | 2F |
| ! style="background:#{{Locationcolor/light|cave}}; {{roundytr|5px}}" | B1F | | ! style="background:#{{Locationcolor/light|cave}}; {{roundytr|5px}}" | B1F |
| |- style="background:#000" | | |- |
| ! style="background:#{{red color}}" | {{color2|000|Pokémon Red and Green Versions|Red (Ja)}} | | ! style="background:#{{red color}}" | {{color2|000|Pokémon Red and Green Versions|Red (Ja)}} |
| | rowspan="2" | [[File:Unknown Dungeon 1F RG.png|180px]] | | | rowspan="2" | [[File:Unknown Dungeon 1F RG.png|180px]] |
| Line 428: |
Line 427: |
| ! style="background:#{{soulsilver color}}" | {{color2|000|Pokémon HeartGold and SoulSilver Versions|SoulSilver}} | | ! style="background:#{{soulsilver color}}" | {{color2|000|Pokémon HeartGold and SoulSilver Versions|SoulSilver}} |
| |- | | |- |
|
| |
| | colspan="4" style="background:#{{Locationcolor/light|cave}}; {{roundybottom|5px}}" | | | | colspan="4" style="background:#{{Locationcolor/light|cave}}; {{roundybottom|5px}}" | |
| |} | | |} |
|
| |
|
| ===Eyecatch=== | | ===[[Location preview|Preview]]=== |
| <gallery> | | <gallery> |
| File:FL Cerulean Cave.png|FRLG | | File:FL Cerulean Cave.png|FRLG |
| Line 442: |
Line 440: |
| ==In the anime== | | ==In the anime== |
| ===In Pokémon Origins=== | | ===In Pokémon Origins=== |
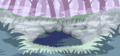
| [[File:Cerulean Cave entrance PO.png|thumb|left|Cerulean Cave's entrance]] | | [[File:Cerulean Cave entrance PO.png|thumb|230px|left|Cerulean Cave's entrance]] |
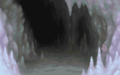
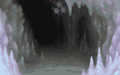
| [[File:Cerulean Cave inside PO.png|thumb|Cerulean Cave's interior]] | | [[File:Cerulean Cave inside PO.png|thumb|230px|Cerulean Cave's interior]] |
| Cerulean Cave appeared in the [[Pokémon Origins]] episode ''[[PO04|File 4 - Charizard]]''. It was first mentioned by {{OBP|Blue|Origins}}, who had went to the cave after hearing rumors of an extremely strong Pokémon living in there. He intended to catch it, but got badly injured while battling it when his {{p|Blastoise}} was sent flying and crashed on top of him. After he had told [[Professor Oak]] and {{OBP|Red|Origins}} about this, Red soon recalled the {{FB|Pokémon Mansion|journals}} he had found at the {{ka|Pokémon Mansion}} at [[Cinnabar Island]], and understood that the mysterious Pokémon was in fact {{p|Mewtwo}}, an [[artificial Pokémon]] created by enhanching the powers of {{p|Mew}}. Wanting to help Professor Oak to complete the [[Pokédex]], Red then headed to Cerulean Cave, where he encountered Mewtwo. Being amazingly strong and {{m|Recover|durable}}, Mewtwo was capable of defeating almost all of Red's Pokémon, excluding only Charizard. At first, even Charizard was losing, and was sent into the waters of the cave, along with Red. However, Red's [[Mega Stone]]s then activated, [[Mega Evolution|Mega Evolving]] Charizard into Mega Charizard X and making it able to defeat Mewtwo, allowing Red to catch it. | | Cerulean Cave appeared in the [[Pokémon Origins]] episode ''[[PO04|File 4 - Charizard]]''. It was first mentioned by {{OBP|Blue|Origins}}, who had went to the cave after hearing rumors of an extremely strong Pokémon living in there. He intended to catch it, but got badly injured while battling it when his {{p|Blastoise}} was sent flying and crashed on top of him. After he had told [[Professor Oak]] and {{OBP|Red|Origins}} about this, Red soon recalled the {{FB|Pokémon Mansion|journals}} he had found at the {{ka|Pokémon Mansion}} at [[Cinnabar Island]], and understood that the mysterious Pokémon was in fact {{p|Mewtwo}}, an [[artificial Pokémon]] created by enhanching the powers of {{p|Mew}}. Wanting to help Professor Oak to complete the [[Pokédex]], Red then headed to Cerulean Cave, where he encountered Mewtwo. Being amazingly strong and {{m|Recover|durable}}, Mewtwo was capable of defeating almost all of Red's Pokémon, excluding only his {{TP|Red|Charizard}}. At first, even Charizard was losing, and was sent into the waters of the cave, along with Red. However, Red's [[Mega Stone]]s then activated, [[Mega Evolution|Mega Evolving]] Charizard into Mega Charizard X and making it able to defeat Mewtwo, allowing Red to catch it. |
| | {{-}} |
|
| |
|
| ==In other languages== | | ==In other languages== |
| Line 450: |
Line 449: |
| |zh_cmn={{tt|華藍洞窟|Huálán Dòngkū}} ''Huálán Cave'' | | |zh_cmn={{tt|華藍洞窟|Huálán Dòngkū}} ''Huálán Cave'' |
| |da=Det Ukendte Tårn{{tt|*|Danish version of The Official Pokémon Handbook}} | | |da=Det Ukendte Tårn{{tt|*|Danish version of The Official Pokémon Handbook}} |
| |fr_ca=Grotte Inconnue{{sup/1|RBY}}<br>Grotte Azurée | | |fr_ca=Grotte Inconnue{{sup/1|RBY}}<br/>Grotte Azurée |
| |fr_eu=Grotte Inconnue{{sup/1|RBY}}<br>Grotte Azurée | | |fr_eu=Grotte Inconnue{{sup/1|RBY}}<br/>Grotte Azurée |
| |de=Geheimdungeon{{sup/1|RBY}}<br>Azuria-Höhle | | |de=Geheimdungeon{{sup/1|RBY}}<br/>Azuria-Höhle |
| |it=Grotta Ignota{{sup/1|RBY}}<br>Grotta Celeste | | |it=Grotta Ignota{{sup/1|RBY}}<br/>Grotta Celeste |
| |ko={{tt|블루시티동굴|Blue City Donggul}} ''Blue City Cave'' | | |ko={{tt|블루시티동굴|Blue City Donggul}} ''Blue City Cave'' |
| |es=Mazmorra Rara{{sup/1|RBY}}<br>Cueva Celeste}} | | |es=Mazmorra Rara{{sup/1|RBY}}<br/>Cueva Celeste}} |
|
| |
|
| {{League}} | | {{League}} |
| {{Kanto}} | | {{Kanto}} |
| {{legendarylocations|kanto}}<br> | | {{legendarylocations|kanto}}<br/> |
| {{Project Locations notice}} | | {{Project Locations notice}} |
|
| |
|