Sea Mauville: Difference between revisions
m (Undo revision 2249647 by Team Magma Zangoose (talk) The point of redlinks are for them to be created) |
Tiddlywinks (talk | contribs) m ("Hull" is not correct/useful terminology... And the rooms need directions /somewhere/, because they're only labeled until you use the key) |
||
| Line 21: | Line 21: | ||
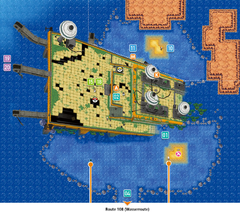
In Omega Ruby, a portal appears at the end of the beam that extends a significant distance west and upwards from the platform if the player has the {{key|VI|Clear Bell}}; interacting with this portal will initiate a battle with {{p|Ho-Oh}}. In Alpha Sapphire, a portal appears at control desk in the submerged control room if the player has the {{key|VI|Tidal Bell}}; interacting with this portal will initiate a battle with {{p|Lugia}}. | In Omega Ruby, a portal appears at the end of the beam that extends a significant distance west and upwards from the platform if the player has the {{key|VI|Clear Bell}}; interacting with this portal will initiate a battle with {{p|Ho-Oh}}. In Alpha Sapphire, a portal appears at control desk in the submerged control room if the player has the {{key|VI|Tidal Bell}}; interacting with this portal will initiate a battle with {{p|Lugia}}. | ||
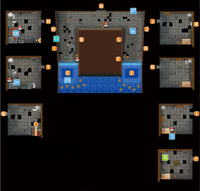
After defeating or capturing {{p|Kyogre}}/{{p|Groudon}}, in the lower left room of the right | After defeating or capturing {{p|Kyogre}}/{{p|Groudon}}, in the first (southeastern/lower left) room of the northern (right-hand) dry corridor, when the player enters the room the message "It feels as though you're being watched" will be displayed. If the player examines the left section of the bookcase in the upper-lefthand corner of the room, they will find a blotched out report regarding the history of the facility, after reading which the same message appears. After this, if the player opens a menu such that they cannot see the overworld, upon returning the screen to display the overworld the [[Odd Keystone]] appears, enabling the player to battle {{p|Spiritomb}}. | ||
==History== | ==History== | ||
| Line 27: | Line 27: | ||
===Letters=== | ===Letters=== | ||
Five letters, a photograph, and a drawing are found in the | Five letters, a photograph, and a drawing are found in the northeastern (lower-right) room in the northern (right-hand) dry corridor: | ||
* First: | * First: | ||
| Line 70: | Line 70: | ||
{{Itlisth|water}} | {{Itlisth|water}} | ||
{{itemlist|Escape Rope|Deck, to the south (left) of the scientist|OR=yes|AS=yes}} | {{itemlist|Escape Rope|Deck, to the south (left) of the scientist|OR=yes|AS=yes}} | ||
{{itemlist|TM Water VI|Deck, northeast (lower right) of the scientist|OR=yes|AS=yes|display={{TM|18|Rain Dance}}}} | {{itemlist|TM Water VI|Deck, northeast (to the lower right) of the scientist|OR=yes|AS=yes|display={{TM|18|Rain Dance}}}} | ||
{{itemlist|Max Repel|Southern (left) | {{itemlist|Max Repel|Southern (left-hand) dry corridor, near the pool of {{m|Dive|deep water}}|OR=yes|AS=yes|display={{DL|Repel|Max Repel}}}} | ||
{{itemlist|Rm. 1 Key|Northern (right) | {{itemlist|Rm. 1 Key|Northern (right-hand) dry corridor, from female {{tc|Tuber}} (requires {{m|Dive}})|OR=yes|AS=yes|display={{key|VI|Key to Room 1}}}} | ||
{{itemlist|White Herb| | {{itemlist|White Herb|On the north (right-hand) side of the boxes separating the sides of the dry corridor (requires {{m|Dive}})|OR=yes|AS=yes|display={{DL|In-battle effect item|White Herb}}}} | ||
{{itemlist|Dive Ball|Room 1, across from the door|OR=yes|AS=yes|display={{ball|Dive}}}} | {{itemlist|Dive Ball|Room 1 (south dry corridor, southwest room), across from the door|OR=yes|AS=yes|display={{ball|Dive}}}} | ||
{{itemlist|Rm. 2 Key|Room 1, inside a filing cabinet opposite the door ''(hidden)''|OR=yes|AS=yes|display={{key|VI|Key to Room 2}}}} | {{itemlist|Rm. 2 Key|Room 1 (south dry corridor, southwest room), inside a filing cabinet opposite the door ''(hidden, does not react to Dowsing Machine)''|OR=yes|AS=yes|display={{key|VI|Key to Room 2}}}} | ||
{{itemlist|Rm. 6 Key|Room 2, from the {{tc|Teammates}}|OR=yes|AS=yes|display={{key|VI|Key to Room 6}}}} | {{itemlist|Rm. 6 Key|Room 2 (south dry corridor, southeast room), from the {{tc|Teammates}}|OR=yes|AS=yes|display={{key|VI|Key to Room 6}}}} | ||
{{itemlist|Revive|Room 2, to the southeast (lower left) of the Teammates|OR=yes|AS=yes|display={{DL|Revive|Revive}}}} | {{itemlist|Revive|Room 2 (south dry corridor, southeast room), to the southeast (lower left) of the Teammates|OR=yes|AS=yes|display={{DL|Revive|Revive}}}} | ||
{{itemlist|Storage Key VI|Room 4, next to the bed (requires {{m|Dive}})|OR=yes|AS=yes|display={{key|VI|Storage Key}}}} | {{itemlist|Storage Key VI|Room 4 (north dry corridor, southwest room), next to the bed (requires {{m|Dive}})|OR=yes|AS=yes|display={{key|VI|Storage Key}}}} | ||
{{itemlist|Destiny Knot|10% chance of receiving one after a rematch with {{tc|Young Couple}} Lois & Hal|OR=yes|AS=yes|display={{DL|In-battle effect item|Destiny Knot}}}} | {{itemlist|Destiny Knot|10% chance of receiving one after a rematch with {{tc|Young Couple}} Lois & Hal|OR=yes|AS=yes|display={{DL|In-battle effect item|Destiny Knot}}}} | ||
{{itemlist|Dawn Stone|5% chance of receiving one after a rematch with {{tc|Mysterious Sisters}} Scall & Ion|OR=yes|AS=yes|display={{evostone|Dawn Stone}}}} | {{itemlist|Dawn Stone|5% chance of receiving one after a rematch with {{tc|Mysterious Sisters}} Scall & Ion|OR=yes|AS=yes|display={{evostone|Dawn Stone}}}} | ||
| Line 98: | Line 98: | ||
*Southwest (upper left) item ball in group of three in corner east of (below) {{TM|13|Ice Beam}}, accessed via the western (upper) pathway among the boxes | *Southwest (upper left) item ball in group of three in corner east of (below) {{TM|13|Ice Beam}}, accessed via the western (upper) pathway among the boxes | ||
*Southeast (lower left) item ball in group of three in corner east of (below) {{TM|13|Ice Beam}}, accessed via the western (upper) pathway among the boxes | *Southeast (lower left) item ball in group of three in corner east of (below) {{TM|13|Ice Beam}}, accessed via the western (upper) pathway among the boxes | ||
*Southeast (lower left) of entrance, blocking one of the ways into the western (upper) pathway among the boxes | *Southeast (to the lower left) of entrance, blocking one of the ways into the western (upper) pathway among the boxes | ||
*Northeast (lower right) item ball in group of three in the back of the eastern (lower) pathway among the boxes | *Northeast (lower right) item ball in group of three in the back of the eastern (lower) pathway among the boxes | ||
*Southeast (lower left) item ball in group of three in the back of the eastern (lower) pathway among the boxes | *Southeast (lower left) item ball in group of three in the back of the eastern (lower) pathway among the boxes | ||
*South ( | *South (downwards) from the entrance, near the water|OR=yes|AS=yes|display={{DL|Valuable item|Big Nugget}} ×8}} | ||
{{itemlist|Nugget| | {{itemlist|Nugget| | ||
*East (lower side) of {{TM|13|Ice Beam}}, accessed via the western (upper) pathway among the boxes | *East (lower side) of {{TM|13|Ice Beam}}, accessed via the western (upper) pathway among the boxes | ||
*Northeast (lower | *Northeast (to the lower right) of {{TM|13|Ice Beam}}, accessed via the western (upper) pathway among the boxes | ||
*Southeast (lower left) of entrance in the open, accessed via the western (upper) pathway among the boxes | *Southeast (to the lower left) of entrance in the open, accessed via the western (upper) pathway among the boxes | ||
*Southeast (lower left) of entrance, blocking one of the ways into the eastern (lower) pathway among the boxes|OR=yes|AS=yes|display={{DL|Valuable item|Nugget}} ×4}} | *Southeast (to the lower left) of entrance, blocking one of the ways into the eastern (lower) pathway among the boxes|OR=yes|AS=yes|display={{DL|Valuable item|Nugget}} ×4}} | ||
{{itemlist|Luxury Ball|Southwest (upper left) item ball in group of three in the back of the eastern (lower) pathway among the boxes|OR=yes|AS=yes|display={{ball|Luxury}}}} | {{itemlist|Luxury Ball|Southwest (upper left) item ball in group of three in the back of the eastern (lower) pathway among the boxes|OR=yes|AS=yes|display={{ball|Luxury}}}} | ||
{{itemlist|Beedrillite|In southeast (lower left) corner of boxes, accessed via {{m|Surf}}|OR=yes|AS=yes|display={{DL|Mega Stone|Beedrillite}}}} | {{itemlist|Beedrillite|In southeast (lower left) corner of boxes, accessed via {{m|Surf}}|OR=yes|AS=yes|display={{DL|Mega Stone|Beedrillite}}}} | ||
| Line 146: | Line 146: | ||
{{Catch/entryoras|320|Wailmer|yes|yes|Fish Super|30, 35, 40|100%|type1=Water}} | {{Catch/entryoras|320|Wailmer|yes|yes|Fish Super|30, 35, 40|100%|type1=Water}} | ||
{{Catch/div|water|Special}} | {{Catch/div|water|Special}} | ||
{{Catch/entryoras|442|Spiritomb|yes|yes|Special|50|{{tt|One|Hidden in the first room on the southern (left) side of the northern (right) | {{Catch/entryoras|442|Spiritomb|yes|yes|Special|50|{{tt|One|Hidden in the first room on the southern (left-hand) side of the northern (right-hand) dry corridor}}|type1=Ghost|type2=Dark}} | ||
{{Catch/entryoras|249|Lugia|no|yes|Special|50|{{tt|One|Requires Tidal Bell}}|type1=Psychic|type2=Flying}} | {{Catch/entryoras|249|Lugia|no|yes|Special|50|{{tt|One|Requires Tidal Bell}}|type1=Psychic|type2=Flying}} | ||
{{Catch/footer|water}} | {{Catch/footer|water}} | ||
| Line 157: | Line 157: | ||
{{trainerdiv|water}} | {{trainerdiv|water}} | ||
{{trainerentry|VSTuber M.png{{!}}150px|Tuber|Charlie|112|1|341|Corphish|♂|28||36=マナブ|37=Manabu}} | {{trainerentry|VSTuber M.png{{!}}150px|Tuber|Charlie|112|1|341|Corphish|♂|28||36=マナブ|37=Manabu}} | ||
{{trainerdiv|water| | {{trainerdiv|water|Inside}} | ||
{{trainerentry|VSYoung Couple.png{{!}}150px|Young Couple|Lois & Hal|1,856|2|314|Illumise|♀|29||313|Volbeat|♂|29||36=アヤとフミ|37=Aya and Fumi|38=Nav}} | {{trainerentry|VSYoung Couple.png{{!}}150px|Young Couple|Lois & Hal|1,856|2|314|Illumise|♀|29||313|Volbeat|♂|29||36=アヤとフミ|37=Aya and Fumi|38=Nav}} | ||
{{trainerdiv|water}} | {{trainerdiv|water}} | ||
| Line 177: | Line 177: | ||
! style="background:#{{locationcolor/light|water}}; {{roundytl|5px}}" | Game | ! style="background:#{{locationcolor/light|water}}; {{roundytl|5px}}" | Game | ||
! style="background:#{{locationcolor/light|water}}" | Surface | ! style="background:#{{locationcolor/light|water}}" | Surface | ||
! style="background:#{{locationcolor/light|water}}" | | ! style="background:#{{locationcolor/light|water}}" | Dry corridor and rooms | ||
! style="background:#{{locationcolor/light|water}}" | Storage hold | ! style="background:#{{locationcolor/light|water}}" | Storage hold | ||
! style="background:#{{locationcolor/light|water}}" | Underwater corridor | ! style="background:#{{locationcolor/light|water}}" | Underwater corridor | ||
Revision as of 13:42, 25 February 2015

|
The picture used in this article is unsatisfactory. Please feel free to replace it so it conforms to Bulbapedia conventions. Reason: Guidebook labels |
| ||||
| ||||
| Map description: | A facility that was decommissioned dozens of years ago. It is now maintained as a natural preserve. | |||
|---|---|---|---|---|
| Location: | North of Route 108 | |||
| Region: | Hoenn | |||
| Generations: | VI | |||
 Location of Sea Mauville in Hoenn. | ||||
| Pokémon world locations | ||||
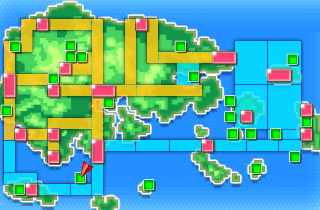
Sea Mauville (Japanese: シーキンセツ Sea Kinsetsu) is a decrepit research facility in the Hoenn region located to the north of Route 108. The second part of the structure can only be accessed by using Dive and contains the Scanner.
Sea Mauville includes both the decrepit platform itself as well as the water area and sandbar outside of the ship; the northern exterior can only be accessed by travelling underwater inside the platform using Dive.
Sea Mauville takes the place of the Abandoned Ship from Pokémon Ruby, Sapphire, and Emerald.
Geography
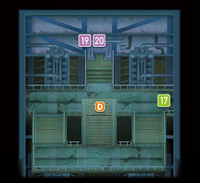
In Omega Ruby, a portal appears at the end of the beam that extends a significant distance west and upwards from the platform if the player has the Clear Bell; interacting with this portal will initiate a battle with Ho-Oh. In Alpha Sapphire, a portal appears at control desk in the submerged control room if the player has the Tidal Bell; interacting with this portal will initiate a battle with Lugia.
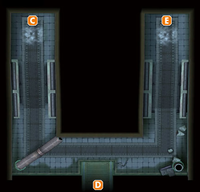
After defeating or capturing Kyogre/Groudon, in the first (southeastern/lower left) room of the northern (right-hand) dry corridor, when the player enters the room the message "It feels as though you're being watched" will be displayed. If the player examines the left section of the bookcase in the upper-lefthand corner of the room, they will find a blotched out report regarding the history of the facility, after reading which the same message appears. After this, if the player opens a menu such that they cannot see the overworld, upon returning the screen to display the overworld the Odd Keystone appears, enabling the player to battle Spiritomb.
History
Sea Mauville was a facility commissioned by Greater Mauville Holdings and led by Wattson to extract the natural resources of the ocean. Members of the staff included Captain Stern, Dock, and Professor Cozmo's father Raizoh. Due to several incidents, such as the closure of New Mauville, the facility was closed. After its closure, an environmental survey discovered that the ruins had created a unique habitat for Pokémon and plants, such as mangroves, which only grow there and in Mossdeep City. Because of this, its demolition was canceled, and the ruin was revived as a natural preserve.
Letters
Five letters, a photograph, and a drawing are found in the northeastern (lower-right) room in the northern (right-hand) dry corridor:
- First:
- "Dear Daddy,
- "How are you? Are you working really hard? I'm doing well. I'm doing all my homework, and I'm helping at home, too. Mommy's working hard and makes us dinner every night. Do you have to work this weekend? Are you going to come home? If you come home, take me to see the star show, OK?
- "—Takao Cozmo
- "P. S. I'm going to send you the picture I drew at the Trainers' School."
- Second:
- It looked like another letter, but it's a drawing. The drawing is of a boy's face, and written next to it are the words "I love you, Daddy."
- Third:
- "Dear Daddy,
- "How are you? Are you working really hard? I was sad that you didn't come last weekend. But Mommy didn't seem so sad. She went out with her friend. I finally got that telescope that I've been wanting. It was from you, wasn't it? Thanks, Daddy. I really, really wanted it. I like looking at the sky, Daddy. When I look at the stars, I wonder if you are looking at the same stars, too. Let's look at the stars together, next time you come home.
- "—Takao Cozmo"
- Fourth:
- "Dear Daddy,
- "How are you? You aren't working too hard, are you? You never come home anymore. I'm worried if you're OK. Mommy goes out with her friends a lot. It seems like fun, so I guess she's doing OK. The Shelgon that you gave me evolved the other day. But I liked it better when it was a Shelgon and it looked like a Meteorite. Salamence was kind of a letdown, so I asked a friend to trade it for his Solrock. I'm sorry, Daddy. I know it was a present, but I think Solrock is cooler. When it gets dark tonight, I'm going to look at the stars again. I'll think of you when I do.
- "—Takao Cozmo"
- Fifth:
- "Dear Daddy,
- "I was really, really happy to get to meet you the other day. It was so fun playing together again and going to see the star show, too, even if it was just the two of us. It was sad that Mommy couldn't go, and even more sad when you and Mommy fought that night. I'll study hard, just like you told me, and I'll be a good boy, so don't fight. But let me keep watching the stars, even if I have to do all my homework, too. When I grow up, I want to be a professor and study the stars.
- "—Takao Cozmo"
- Sixth:
- "Dear Daddy,
- "Thank you for writing to me. I'm doing really well here, so please don't worry about me. I hope I'll see you again someday. I dream about it all the time. I brought the telescope you bought me to our new house. Please don't work too hard, Daddy. I hope you are OK. I will always, always love the stars, and I will always, always love you.
- "—Takao Cozmo
- "P. S. I'll give you my Hi Skitty doll. Please take care of it for me."
- Seventh:
- It looked like another letter, but it's a photo. There's a little boy holding a telescope, with a woman beside him, looking bored.
Items
Due to the rotation of the camera upon stepping on the platform from the southern exterior, the player needs to press left on the D-pad or circle pad to move north, with all other cardinal directions rotated accordingly. While the camera is not oriented this way while the player is in the southern exterior, it is while in the northern exterior.
Apart from the small sandbar which the player can land by Flying or soaring (which contains no items), Sea Mauville cannot be accessed without Surf, so all items located here require Surf to obtain.
Inside
| Item | Location | Games | |
|---|---|---|---|
| Escape Rope | Deck, to the south (left) of the scientist | OR AS | |
| TM18 (Rain Dance) | Deck, northeast (to the lower right) of the scientist | OR AS | |
| Max Repel | Southern (left-hand) dry corridor, near the pool of deep water | OR AS | |
| Rm. 1 Key | Key to Room 1 | Northern (right-hand) dry corridor, from female Tuber (requires Dive) | OR AS |
| White Herb | On the north (right-hand) side of the boxes separating the sides of the dry corridor (requires Dive) | OR AS | |
| Dive Ball | Room 1 (south dry corridor, southwest room), across from the door | OR AS | |
| Rm. 2 Key | Key to Room 2 | Room 1 (south dry corridor, southwest room), inside a filing cabinet opposite the door (hidden, does not react to Dowsing Machine) | OR AS |
| Rm. 6 Key | Key to Room 6 | Room 2 (south dry corridor, southeast room), from the Teammates | OR AS |
| Revive | Room 2 (south dry corridor, southeast room), to the southeast (lower left) of the Teammates | OR AS | |
| Storage Key VI | Storage Key | Room 4 (north dry corridor, southwest room), next to the bed (requires Dive) | OR AS |
| Destiny Knot | 10% chance of receiving one after a rematch with Young Couple Lois & Hal | OR AS | |
| Dawn Stone | 5% chance of receiving one after a rematch with Mysterious Sisters Scall & Ion | OR AS | |
Submerged control room
The control room is underwater, so all items found here require Dive due to it being required to go underwater.
| Item | Location | Games | |
|---|---|---|---|
| Scanner | Northern (right) end, after catching or defeating GroudonOR/KyogreAS (hidden) | OR AS | |
Storage hold
The storage hold can only be accessed from the northern exterior of the platform, so Dive is required to access the room.
| Item | Location | Games | |
|---|---|---|---|
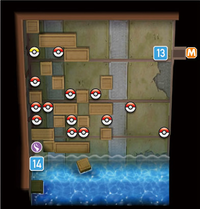
| TM13 (Ice Beam) | Storage hold, against the wall opposite the door, accessed via the western (upper) pathway among the boxes | OR AS | |
| Big Nugget ×8 |
|
OR AS | |
| Nugget ×4 |
|
OR AS | |
| Luxury Ball | Southwest (upper left) item ball in group of three in the back of the eastern (lower) pathway among the boxes | OR AS | |
| Beedrillite | In southeast (lower left) corner of boxes, accessed via Surf | OR AS | |
Outside
| Item | Location | Games | |
|---|---|---|---|
| Rm. 4 Key | Key to Room 4 | Northern exterior, from a Fisherman (requires Dive) | OR AS |
Pokémon
Outside
| Pokémon | Games | Location | Levels | Rate | ||||||||||||
|---|---|---|---|---|---|---|---|---|---|---|---|---|---|---|---|---|
| Surfing | ||||||||||||||||
|
OR | AS |
|
15, 20 | 65% | |||||||||||
|
OR | AS |
|
15, 20 | 34% | |||||||||||
|
OR | AS |
|
25 | 1% | |||||||||||
| Fishing | ||||||||||||||||
|
OR | AS |
|
5 | 35% | |||||||||||
|
OR | AS |
|
10, 15 | 65% | |||||||||||
|
OR | AS |
|
25 | 35% | |||||||||||
|
OR | AS |
|
25 | 60% | |||||||||||
|
OR | AS |
|
25 | 5% | |||||||||||
|
OR | AS |
|
30, 35, 40 | 100% | |||||||||||
| Special Pokémon | ||||||||||||||||
|
OR | AS |
|
50 | One | |||||||||||
| A colored background means that the Pokémon can be found in this location in the specified game. A white background with a colored letter means that the Pokémon cannot be found here. | ||||||||||||||||
Inside
| Pokémon | Games | Location | Levels | Rate | ||||||||||||
|---|---|---|---|---|---|---|---|---|---|---|---|---|---|---|---|---|
| Surfing | ||||||||||||||||
|
OR | AS |
|
15, 20, 25 | 100% | |||||||||||
| Fishing | ||||||||||||||||
|
OR | AS |
|
5 | 35% | |||||||||||
|
OR | AS |
|
10, 15 | 65% | |||||||||||
|
OR | AS |
|
25 | 35% | |||||||||||
|
OR | AS |
|
25 | 60% | |||||||||||
|
OR | AS |
|
25 | 5% | |||||||||||
|
OR | AS |
|
30, 35, 40 | 100% | |||||||||||
| Special Pokémon | ||||||||||||||||
|
OR | AS |
|
50 | One | |||||||||||
|
OR | AS |
|
50 | One | |||||||||||
| A colored background means that the Pokémon can be found in this location in the specified game. A white background with a colored letter means that the Pokémon cannot be found here. | ||||||||||||||||
Trainers
Pokémon Omega Ruby and Alpha Sapphire
| Trainer | Pokémon | |||||||||||
|---|---|---|---|---|---|---|---|---|---|---|---|---|
| Outside | ||||||||||||
|
| |||||||||||
| ||||||||||||
|
| |||||||||||
| Inside | ||||||||||||
|
| |||||||||||
| ||||||||||||
|
| |||||||||||
| ||||||||||||
| Rematch | ||||||||||||
|
| |||||||||||
| ||||||||||||
|
| |||||||||||
| ||||||||||||
|
| |||||||||||
| ||||||||||||
|
| |||||||||||
| ||||||||||||
|
| |||||||||||
| ||||||||||||
|
| |||||||||||
| ||||||||||||
|
| |||||||||||
| ||||||||||||
| Trainers with a PokéNav by their names will be registered in the Trainer's Eyes or Match Call function after the first battle, and may have a rematch with the player with higher-level Pokémon. | ||||||||||||
Layout
| Game | Surface | Dry corridor and rooms | Storage hold | Underwater corridor | Underwater control room |
|---|---|---|---|---|---|
| Omega Ruby | 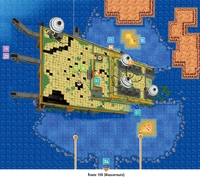
|
|
|
|
|
| Alpha Sapphire | |||||
Trivia
- The music that plays when battling Ho-Oh and Lugia is the same as in Pokémon HeartGold and SoulSilver.
- The bookshelf that the player examines in order to fight Spiritomb holds papers describing that Raizoh Cozmo was held responsible for losing an Odd Keystone that was donated to the Sea Mauville by the Oreburgh Mine in Sinnoh.
- The file folder holds a stack of ragged papers.
- "Official Statem-- of Apolog--"
- "I, --izo-- Co--mo, am respon-- for the los-- of the Odd Keystone dona---d...by the Oreb--gh Mine..."
- The rest is too damaged to make out...
- Both the Prima game guide and game data contain rematch data for Mysterious Sisters Scall & Ion that cannot be accessed in regular gameplay due to Dive (and thus the Mind Badge) being required to find their room key. The battle, which would have been available after the Feather Badge like another rematch here, would have featured a level 34 Chingling and a level 33 Gardevoir.
In other languages
| |||||||||||||||||||||
| Game locations of Legendary and Mythical Pokémon | ||||||||||||||||||||||||||
|---|---|---|---|---|---|---|---|---|---|---|---|---|---|---|---|---|---|---|---|---|---|---|---|---|---|---|
| ||||||||||||||||||||||||||

|
This article is part of Project Locations, a Bulbapedia project that aims to write comprehensive articles on every location in the Pokémon world. |
