Appendix:Gold and Silver walkthrough/Section 3: Difference between revisions
m (→Violet City) |
m (Text replacement - "45deg" to "135deg") |
||
| (32 intermediate revisions by 13 users not shown) | |||
| Line 1: | Line 1: | ||
{{WalkthroughNotice|GS}} | |||
==Route 31== | |||
[[File:Johto Route 31 GSC.png|thumb|300px|Route 31]] | |||
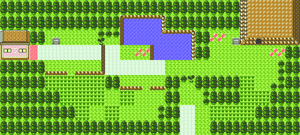
{{rt|31|Johto}} is a short, winding path, linking {{rt|30|Johto}} with [[Violet City]] to the west. A cave entrance on the route's east side leads to [[Dark Cave]], but the area is difficult to navigate without certain field moves. | |||
{| class="expandable" align="center" style="background: #{{locationcolor/med|land}}; {{roundy}}; border: 5px solid #{{locationcolor/light|land}};" | |||
{| class="expandable" align="center" style="background: #{{ | |||
|- align="center" | |- align="center" | ||
! Trainers | ! Trainers | ||
|- | |- | ||
| | |||
| | |||
{{Trainerheader|land}} | {{Trainerheader|land}} | ||
{{Trainerentry| | {{Trainerentry|Spr GS Bug Catcher.png|Bug Catcher|Wade|32|4|010|Caterpie|M|2|None|010|Caterpie|M|2|None|013|Weedle|M|3|None|010|Caterpie|M|2|None|38=phone}} | ||
{{Trainerfooter|land|II}} | {{Trainerfooter|land|II}} | ||
|} | |} | ||
{| class="expandable" align="center" style="background: #{{ | {| class="expandable" align="center" style="background: #{{locationcolor/med|land}}; {{roundy}}; border: 5px solid #{{locationcolor/light|land}};" | ||
|- align="center" | |- align="center" | ||
! Available Pokémon | ! Available Pokémon | ||
|- | |- | ||
| | | | ||
{{ | {{Catch/header|land}} | ||
{{ | {{Catch/entry2|010|Caterpie|yes|no|no|Grass|4-5|35%|35%|0%|type1=Bug}} | ||
{{ | {{Catch/entry2|011|Metapod|yes|no|no|Grass|5|15%|0%|0%|type1=Bug}} | ||
{{ | {{Catch/entry2|011|Metapod|yes|no|no|Grass|5-6|0%|15%|0%|type1=Bug}} | ||
{{ | {{Catch/entry2|013|Weedle|no|yes|no|Grass|4|30%|0%|0%|type1=Bug|type2=Poison}} | ||
{{ | {{Catch/entry2|013|Weedle|no|yes|no|Grass|4-5|0%|35%|0%|type1=Bug|type2=Poison}} | ||
{{ | {{Catch/entry2|014|Kakuna|no|yes|no|Grass|5|10%|0%|0%|type1=Bug|type2=Poison}} | ||
{{ | {{Catch/entry2|014|Kakuna|no|yes|no|Grass|5-6|0%|15%|0%|type1=Bug|type2=Poison}} | ||
{{ | {{Catch/entry2|016|Pidgey|yes|no|no|Grass|3|30%|30%|0%|type1=Normal|type2=Flying}} | ||
{{ | {{Catch/entry2|016|Pidgey|no|yes|no|Grass|5|10%|0%|0%|type1=Normal|type2=Flying}} | ||
{{ | {{Catch/entry2|016|Pidgey|no|yes|no|Grass|3|0%|30%|0%|type1=Normal|type2=Flying}} | ||
{{ | {{Catch/entry2|019|Rattata|yes|yes|no|Grass|4-5|0%|0%|40%|type1=Normal}} | ||
{{ | {{Catch/entry2|069|Bellsprout|yes|yes|no|Grass|3|all=20%|type1=Grass|type2=Poison}} | ||
{{ | {{Catch/entry2|163|Hoothoot|yes|no|no|Grass|5|0%|0%|10%|type1=Normal|type2=Flying}} | ||
{{Catch/entry2|163|Hoothoot|no|yes|no|Grass|3,5|0%|0%|40%|type1=Normal|type2=Flying}} | |||
{{Catch/entry2|165|Ledyba|no|yes|no|Grass|4|30%|0%|0%|type1=Bug|type2=Flying}} | |||
{{Catch/entry2|167|Spinarak|yes|no|no|Grass|4|0%|0%|30%|type1=Bug|type2=Poison}} | |||
{{Catch/footer|land}} | |||
|} | |} | ||
{| class="expandable" align="center" style="background: #{{ | {| class="expandable" align="center" style="background: #{{locationcolor/med|land}}; {{roundy}}; border: 5px solid #{{locationcolor/light|land}};" | ||
|- align="center" | |- align="center" | ||
! Items | ! Items | ||
|- | |- | ||
| | | | ||
{{Itlisth}} | {{Itlisth|land}} | ||
{{ | {{Itemlist|Antidote|Near the sign outside Dark Cave|G=yes|S=yes}} | ||
{{ | {{Itemlist|None|Southwest side of the pond, on the tree ''(daily)''|G=yes|S=yes|display=[[Bitter Berry]]}} | ||
{{ | {{Itemlist|Poké Ball|South of the pond and the ledge|G=yes|S=yes|display={{i|Poké Ball}}}} | ||
{{ | {{catch/div|land|Later visit}} | ||
{{Itlistfoot}} | {{Itemlist|TM Ghost|From the man near the pond, after delivering his friend's {{p|Spearow}} from {{rt|35|Johto}}|G=yes|S=yes|display={{TM|50|Nightmare}}}} | ||
{{Itlistfoot|land}} | |||
|} | |} | ||
{{-}} | {{-}} | ||
== Violet City == | ==Violet City== | ||
[[File: | [[File:Violet City GS.png|thumb|250px|Violet City]] | ||
[[File:Sprout Tower 1F GS.png|thumb|Sprout Tower, 1F]] | |||
[[File:Sprout Tower 2F GS.png|thumb|Sprout Tower, 2F]] | |||
[[File:Sprout Tower 3F GS.png|thumb|Sprout Tower, 3F]] | |||
[[Violet City]] is an old village surrounded by trees. The city stands between {{rt|31|Johto}} to the east, {{rt|32|Johto}} to the south, and {{rt|36|Johto}} to the west. It is a common destination for new Pokémon Trainers, as a [[Pokémon academy]] and the [[Violet Gym]] are both located here. A tall building known as [[Sprout Tower]] stands on the north side of town. | |||
{| class="expandable" align="center" style="background: # | {| class="expandable" style="margin: auto; background: #BB30FF; {{roundy}}; border: 5px solid #A217FF;" | ||
|- align="center" | |||
! Available Pokémon | |||
|- | |||
| | |||
{{catch/header|poison|4}} | |||
{{Catch/div|poison|Gift Pokémon}} | |||
{{catch/entry2|175|Togepi|yes|yes|no|Egg|5|all={{tt|One|Obtained from Professor Elm's assistant after receiving the Zephyr Badge}}|type1=Normal}} | |||
{{Catch/div|poison|Special}} | |||
{{Catch/entry2|095|Onix|yes|yes|no|Trade|The same as the traded Pokémon|all=One|tradenum=069|tradename=Bellsprout|type1=Rock|type2=Ground}} | |||
{{catch/footer|poison}} | |||
|} | |||
{| class="expandable" style="margin: auto; background: #BB30FF; {{roundy}}; border: 5px solid #A217FF;" | |||
|- align="center" | |- align="center" | ||
! Items | ! Items | ||
|- | |- | ||
| | | | ||
{{ | {{Itlisth|poison}} | ||
{{ | {{Itemlist|None|Held by Rocky, an {{p|Onix}} received through a trade|G=yes|S=yes|display=[[Bitter Berry]]}} | ||
{{ | {{Itemlist|None|In the clearing near the southern exit, on the tree ''(daily)''|G=yes|S=yes|display=[[PRZCureBerry]]}} | ||
{{catch/div| | {{Itemlist|TM Ground|From Falkner, after defeating him|G=yes|S=yes|display={{TM|31|Mud-Slap}}}} | ||
{{ | {{catch/div|poison|Later visit}} | ||
{{ | {{Itemlist|Hyper Potion|End of the path behind the Pokémon Center ''(hidden)'' (requires {{m|Cut}})|G=yes|S=yes}} | ||
{{ | {{Itemlist|Rare Candy|In the clearing beyond the eastern lake (requires Surf)|G=yes|S=yes}} | ||
{{Itemlist|PP Up|In the clearing beyond the western lake (requires {{m|Surf}})|G=yes|S=yes}} | |||
{{Itlistfoot|poison}} | |||
|} | |} | ||
=== | ===Time for a Trade=== | ||
Visit the house to the southwest of the Pokémon Center to find a boy who would like to [[trade]] Pokémon. He is willing to part with his {{p|Onix}} in exchange for a {{p|Bellsprout}}. Bellsprout can be found nearby on Routes {{rtn|31|Johto}} and {{rtn|32|Johto}}. | |||
===Earl's Pokémon Academy=== | |||
The local [[Pokémon academy]] is run by a man named [[Earl Dervish]], who is initially found standing between the Gym and Poké Mart. Speak to him, and he asks if you have defeated the local Gym; say no, and he leads you to the school while he twirls around at every turn along the way. The school teaches inexperienced Trainers about the basics of battle. A blackboard in the front of the room describes the five status ailments that can affect a Pokémon. | |||
{| colspan="3" style="margin: auto; background: #D9D9D9; {{roundy}}; border: 2px solid #CCCCCC;" cellspacing="2" cellpadding="4" | |||
|- | |||
! colspan="2" style="background: #E6E6E6; {{roundytl|5px}};" | Ailment | |||
! style="background: #E6E6E6; {{roundytr|5px}};" | Effect(s) | |||
|- align="center" style="background: #FFF;" | |||
| style="background: #{{fire color}};" | '''{{color|FFF|BRN}}''' | |||
| {{status|Burn}} | |||
| {{stat|Attack}} drops to 50%; inflicts damage equal to 1/8 of maximum {{stat|HP}} every turn. | |||
|- align="center" style="background: #FFF;" | |||
| style="background: #{{ice color}};" | '''{{color|FFF|FRZ}}''' | |||
| {{status|Freeze}} | |||
| Cannot move until thawed (~10% chance of recovery per turn) | |||
|- align="center" style="background: #FFF;" | |||
| style="background: #{{electric color}};" | '''{{color|FFF|PAR}}''' | |||
| {{status|Paralysis}} | |||
| {{stat|Speed}} drops to 25%; cannot attack 1/4 of the time | |||
|- align="center" style="background: #FFF;" | |||
| style="background: #{{poison color}};" | '''{{color|FFF|PSN}}''' | |||
| {{status|Poison}} | |||
| Inflicts damage equal to 1/8 of maximum {{stat|HP}} every turn; loses 1 HP for every four steps taken outside of battle | |||
|- align="center" style="background: #FFF;" | |||
| style="background: #{{status color}};" | '''{{color|FFF|SLP}}''' | |||
| {{status|Sleep}} | |||
| Cannot move for one to six turns | |||
|- | |||
| colspan="3" style="background: #E6E6E6; {{roundybottom|5px}};" | | |||
|} | |||
=== Sprout Tower === | ===Sprout Tower=== | ||
[[Sprout Tower]] is a large pagoda held together by a flexible pillar that sways from side to side. This flexibility protects the tower from earthquakes and symbolizes the battles occurring on the upper floors. It is inhabited by Sages who study diligently and teach that all living beings coexist through cooperation. It is said that the swaying pillar was once a 100-foot-tall {{p|Bellsprout}}. | |||
{| class="expandable | {| class="expandable" style="margin: auto; background: #{{locationcolor/med|building}}; {{roundy}}; border: 5px solid #{{locationcolor/light|building}};" | ||
|- align="center" | |- align="center" | ||
! Trainers | ! Trainers | ||
|- | |- | ||
| | | | ||
{{Trainerheader|building}} | {{Trainerheader|building}} | ||
{{Trainerentry| | {{catch/div|building|2F}} | ||
{{Trainerdiv| | {{Trainerentry|Spr GS Sage.png|Sage|Nico|96|3|069|Bellsprout|♂|3|None|069|Bellsprout|♂|3|None|069|Bellsprout|♂|3|None}} | ||
{{Trainerentry| | {{Trainerdiv|building}} | ||
{{Trainerdiv| | {{Trainerentry|Spr GS Sage.png|Sage|Chow|96|3|069|Bellsprout|♂|3|None|069|Bellsprout|♂|3|None|069|Bellsprout|♂|3|None}} | ||
{{Trainerentry| | {{Trainerdiv|building}} | ||
{{Trainerdiv| | {{Trainerentry|Spr GS Sage.png|Sage|Edmond|96|3|069|Bellsprout|♂|3|None|069|Bellsprout|♂|3|None|069|Bellsprout|♂|3|None}} | ||
{{Trainerentry| | {{Trainerdiv|building}} | ||
{{Trainerdiv| | {{Trainerentry|Spr GS Sage.png|Sage|Jin|192|1|069|Bellsprout|♂|6|None}} | ||
{{Trainerentry| | {{Trainerdiv|building}} | ||
{{Trainerdiv| | {{Trainerentry|Spr GS Sage.png|Sage|Neal|192|1|069|Bellsprout|♂|6|None}} | ||
{{Trainerentry| | {{Trainerdiv|building}} | ||
{{Trainerentry|Spr GS Sage.png|Sage|Troy|224|2|069|Bellsprout|♂|7|None|163|Hoothoot|♂|7|None}} | |||
{{Trainerfooter|building|II}} | {{Trainerfooter|building|II}} | ||
|} | |} | ||
{| class="expandable | {| class="expandable" style="margin: auto; background: #{{locationcolor/med|building}}; {{roundy}}; border: 5px solid #{{locationcolor/light|building}};" | ||
|- align="center" | |- align="center" | ||
! Available Pokémon | ! Available Pokémon | ||
|- | |- | ||
| | | | ||
{{Catch/header|building}} | {{Catch/header|building|yes}} | ||
{{Catch/entry2|019|Rattata|yes|yes|no| | {{Catch/div|building|2F-3F}} | ||
{{Catch/entry2|092|Gastly|yes|yes|no| | {{Catch/entry2|019|Rattata|yes|yes|no|2F-3F|3-6|100%|100%|0%}} | ||
{{Catch/entry2|019|Rattata|yes|yes|no|2F-3F|3,5|0%|0%|15%}} | |||
{{Catch/entry2|092|Gastly|yes|yes|no|2F-3F|3-6|0%|0%|85%|type1=Ghost|type2=Poison}} | |||
{{catch/footer|building}} | {{catch/footer|building}} | ||
|} | |} | ||
{| class="expandable | {| class="expandable" style="margin: auto; background: #{{locationcolor/med|building}}; {{roundy}}; border: 5px solid #{{locationcolor/light|building}};" | ||
|- align="center" | |- align="center" | ||
! Items | ! Items | ||
| Line 136: | Line 166: | ||
| | | | ||
{{itlisth|building}} | {{itlisth|building}} | ||
{{ | {{catch/div|building|1F}} | ||
{{ | {{itemlist|Paralyze Heal|North; south of the northeast stairway|G=yes|S=yes|display=[[Paralyze Heal|Parlyz Heal]]}} | ||
{{ | {{catch/div|building|2F}} | ||
{{ | {{itemlist|X Defense|Southwest; north of the western stairway|G=yes|S=yes|display=[[X Defense|X Defend]]}} | ||
{{ | {{catch/div|building|3F}} | ||
{{itemlist|Potion|West of the stairway|G=yes|S=yes}} | |||
{{itemlist|Escape Rope|Northeast of the pillar|G=yes|S=yes}} | |||
{{itemlist|HM Normal|From Sage Li, after defeating him|G=yes|S=yes|display={{HM|05|Flash}}}} | |||
{{itlistfoot|building}} | {{itlistfoot|building}} | ||
|} | |} | ||
=== Violet Gym === | ====1F (Center)==== | ||
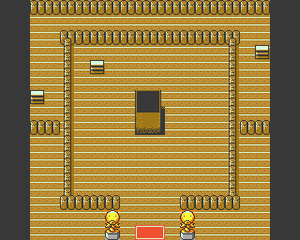
[[File:Violet Gym | The tower is three stories tall. The ground floor is open to tourists, who visit to see the unique style in which the tower is built. Pass by the swaying pillar and climb the stairs to 2F. | ||
====2F (Northeast)==== | |||
Go east to battle Sage Nico and take the stairs back down to 1F. | |||
====1F (North)==== | |||
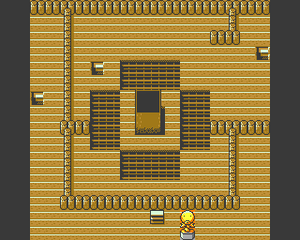
Pick up the [[Paralyze Heal|Parlyz Heal]] to the south. Head west to battle Sage Chow, then climb up the western stairway. | |||
====2F (Southwest)==== | |||
Grab the [[X Defense|X Defend]] to the north, then battle Sage Edmond in the southwest corner. Climb the southern stairway to 3F. | |||
====3F==== | |||
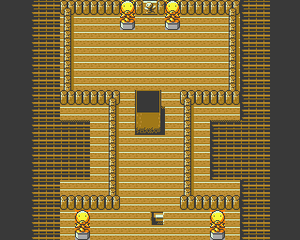
Collect the [[Potion]] to the west. Continue northward to battle Sages Jin, Neal, and Troy. | |||
When you pass the swaying pillar, you find that {{ga|Silver}} has just defeated the elder Sage, Li. He acknowledges Silver's skill as a Pokémon Trainer and hands him an [[HM]], but warns that he should not treat his Pokémon so harshly. Silver notices you at this point, and complains about the elder Sage being weak. He clearly has no intention of heeding the Sage's warning, as he is only interested in strong Pokémon that can win. He then uses an Escape Rope to leave the tower. | |||
Pick up the [[Escape Rope]] in the northeast corner, then speak to Sage Li. He welcomes you to the tower, and offers to test the bonds between you and your Pokémon. | |||
=====VS Sage Li===== | |||
Li's two {{p|Bellsprout}} can both boost their {{stat|Special Attack}} with {{m|Growth}}, which lets them deal extra damage with {{m|Vine Whip}}. {{type|Grass}} Pokémon like these are vulnerable to {{t|Fire}}- and {{type|Flying}} attacks, so {{p|Pidgey}}, {{p|Hoothoot}}, and {{p|Cyndaquil}} will have little trouble getting past them. His Hoothoot, a Flying-type Pokémon, takes serious damage from {{type|Rock}} attacks. | |||
{| style="margin: auto;" | |||
| | |||
{{Party/Single | |||
|color={{grass color}} | |||
|headcolor={{grass color light}} | |||
|bordercolor={{poison color dark}} | |||
|sprite=Spr GS Sage.png | |||
|prize={{pdollar}}320 | |||
|class=Sage | |||
|name={{color2|000|Li}} | |||
|game=GSC | |||
|location=Sprout Tower | |||
|pokemon=3}} | |||
|{{Pokémon/2 | |||
|game=Crystal | |||
|ndex=069 | |||
|pokemon=Bellsprout | |||
|gender=male | |||
|level=7 | |||
|type1=Grass|type2=Poison | |||
|move1=Vine Whip|move1type=Grass | |||
|move2=Growth|move2type=Normal}} | |||
|{{Pokémon/2 | |||
|game=Crystal | |||
|ndex=069 | |||
|pokemon=Bellsprout | |||
|gender=male | |||
|level=7 | |||
|type1=Grass|type2=Poison | |||
|move1=Vine Whip|move1type=Grass | |||
|move2=Growth|move2type=Normal}} | |||
|{{Pokémon/2 | |||
|game=Crystal | |||
|ndex=163|pokemon=Hoothoot | |||
|gender=male | |||
|level=10 | |||
|type1=Normal|type2=Flying | |||
|move1=Tackle|move1type=Normal | |||
|move2=Growl|move2type=Normal | |||
|move3=Foresight|move3type=Normal}} | |||
{{Party/Footer}} | |||
|} | |||
When the battle is over, Li rewards you with {{HM|05|Flash}}. This field move lights up even the darkest caves, but to use it outside of battle, you must first defeat the [[Violet Gym]]. | |||
===Violet Gym=== | |||
[[File:Violet Gym GSC.png|thumb|Violet Gym]] | |||
{| class="roundy" style="background: linear-gradient(135deg, #{{flying color}} 50%, #{{flying color light}} 50%); padding: 0.5em;" | |||
|- | |||
! colspan=2 style="font-size: 1.3em; color: #000;" | | |||
|- style="background: #FFF;" | |||
| style="padding: 0.5em;" | '''Violet City Pokémon Gym<br>Leader: Falkner'''<br>The Elegant Master of Flying Pokémon | |||
|} | |||
The [[Violet Gym]] specializes in {{type|Flying}} Pokémon. Flying-type moves are super effective against {{t|Bug}}-, {{t|Fighting}}-, and {{type|Grass}} Pokémon, while Flying-type Pokémon are weak to {{t|Electric}}-, {{t|Ice}}-, and {{type|Rock}} moves. | |||
The Gym has a simple layout, and features a winding walkway that passes over a seemingly bottomless pit. There are two Gym Trainers that must be defeated in order to reach the [[Gym Leader]]. | |||
Both of [[Falkner]]'s Pokémon can use {{m|Mud-Slap}}, a {{type|Ground}} attack that lowers the target's {{stat|Accuracy}}. Despite its low power, it still deals increased damage to {{t|Fire}} Pokémon like {{p|Cyndaquil}}. His {{p|Pidgeotto}}'s {{m|Gust}} attack does well against {{t|Bug}} Pokémon, and {{type|Grass}} Pokémon like {{p|Chikorita}}. Flying Pokémon can do little against the high {{stat|Defense}} of {{type|Rock}} Pokémon; if you traded for the boy's {{p|Onix}}, counterattack with {{m|Rock Throw}} for an easy victory. | |||
{| align="center" | {| align="center" | ||
| Line 159: | Line 268: | ||
{| align="center" style="background: #{{flying color}}; {{roundy}}; border: 5px solid #{{flying color light}};" | {| align="center" style="background: #{{flying color}}; {{roundy}}; border: 5px solid #{{flying color light}};" | ||
|- align="center" | |- align="center" | ||
! Violet Gym <br> [[ | ! Violet Gym<br>[[File:Zephyr Badge.png|35px|Zephyr Badge]]<br><br /> | ||
|- | |- | ||
| | | | ||
| Line 168: | Line 277: | ||
| | | | ||
{{Trainerheader|Flying}} | {{Trainerheader|Flying}} | ||
{{Trainerentry| | {{Trainerentry|Spr GS Bird Keeper.png|Bird Keeper|Abe|216|1|021|Spearow|♂|9|None}} | ||
{{Trainerdiv|Flying}} | {{Trainerdiv|Flying}} | ||
{{Trainerentry| | {{Trainerentry|Spr GS Bird Keeper.png|Bird Keeper|Rod|168|2|016|Pidgey|♂|7|None|016|Pidgey|♂|7|None}} | ||
{{Trainerfooter|Flying| | {{Trainerfooter|Flying|I}} | ||
|} | |} | ||
{| | {| style="margin: auto;" | ||
| | | | ||
{{Party | {{Party/Single | ||
|color={{flying color}} | |color={{flying color}} | ||
|headcolor={{flying color light}} | |headcolor={{flying color light}} | ||
|bordercolor={{flying color dark}} | |bordercolor={{flying color dark}} | ||
|sprite= | |sprite=Spr GS Falkner.png | ||
|prize={{pdollar}}900 | |prize={{pdollar}}900 | ||
|class=Leader | |class=Leader | ||
|name=Falkner | |classlink=Gym Leader | ||
|name={{color2|000|Falkner}} | |||
|game=GSC | |game=GSC | ||
|location=Violet Gym | |location=Violet Gym | ||
|pokemon=2 | |pokemon=2}} | ||
|{{Pokémon/2|game=Gold and Silver | |||
| | |ndex=016 |pokemon=Pidgey | ||
|type1=Normal|type2=Flying | |||
|game=Gold | |level=7 | ||
|ndex=016 | |||
|pokemon=Pidgey | |||
|gender=male | |gender=male | ||
|move1=Tackle|move1type=Normal | |move1=Tackle|move1type=Normal | ||
|move2=Mud-Slap|move2type=Ground}} | |move2=Mud-Slap|move2type=Ground}} | ||
|{{Pokémon/2|game=Gold and Silver | |||
| | |ndex=017|pokemon=Pidgeotto | ||
|type1=Normal|type2=Flying | |||
|game=Gold | |level=9 | ||
|ndex=017 | |||
|pokemon=Pidgeotto | |||
|gender=male | |gender=male | ||
|move1=Tackle|move1type=Normal | |move1=Tackle|move1type=Normal | ||
|move2=Mud-Slap|move2type=Ground | |move2=Mud-Slap|move2type=Ground | ||
|move3=Gust|move3type=Flying}} | |move3=Gust|move3type=Flying}} | ||
}} | {{Party/Footer}} | ||
|} | |} | ||
|} | |} | ||
| Line 218: | Line 320: | ||
After battle, Falkner | After the battle, [[Falkner]] awards you the {{badge|Zephyr}}, which gives your Pokémon a slight {{stat|Attack}} boost during battle and enables the use of {{m|Flash}} in the field. He also gives you {{TM|31|Mud-Slap}} as a prize. | ||
Professor Elm calls you | ===Elm and the Egg=== | ||
[[Professor Elm]] calls when you step outside the Gym, and says that they have discovered something about the [[Mystery Egg]]. He informs you that his aide is in the nearby Pokémon Center, and asks that you pay him a visit. | |||
===Pokémon Center=== | |||
{{prof|Elm}}'s aide is waiting for you near the counter. Speak to him to receive a message from the professor, asking that you take the [[Mystery Egg]]. The aide explains that in order for a Pokémon to grow and hatch from an Egg, it must spend time with other active Pokémon. He asks that you call the professor when it hatches, then leaves. | |||
{{WalkthroughPrevNext | {{WalkthroughPrevNext | ||
|game=Gold | |game=Gold|game2=Silver | ||
|game2=Silver | |||
|gamename=Gold and Silver | |gamename=Gold and Silver | ||
|prevsection=2 | |prevsection=2 | ||
|prevname=Cherrygrove City, Mr. Pokémon's house | |prevname=Cherrygrove City, Route 30, Mr. Pokémon's house | ||
|nextsection=4 | |nextsection=4 | ||
|nextname=Route 32, Union Cave, Route 33 | |nextname=Route 32, Ruins of Alph, Union Cave, Route 33 | ||
}} | }} | ||
Revision as of 15:09, 28 April 2024
These pages follow the original Game Boy Color iteration, not Pokémon HeartGold and SoulSilver. The guide for those games can be found here.
Route 31
Route 31 is a short, winding path, linking Route 30 with Violet City to the west. A cave entrance on the route's east side leads to Dark Cave, but the area is difficult to navigate without certain field moves.
| Trainers | |||||||||||||||||||||||||||||||||||
|---|---|---|---|---|---|---|---|---|---|---|---|---|---|---|---|---|---|---|---|---|---|---|---|---|---|---|---|---|---|---|---|---|---|---|---|
| |||||||||||||||||||||||||||||||||||
| Available Pokémon | |||||||||||||||||||||||||||||||||||||||||||||||||||||||||||||||||||||||||||||||||||||||||||||||||||||||||||||||||||||||||||||||||||||||||||||||||||||||||||||||||||||||||||||||||||||||||||||||||||||||||||||||||||||||||||||||||||||||||||||||||||||||||||||||||||||||||||||||||||||||||||||
|---|---|---|---|---|---|---|---|---|---|---|---|---|---|---|---|---|---|---|---|---|---|---|---|---|---|---|---|---|---|---|---|---|---|---|---|---|---|---|---|---|---|---|---|---|---|---|---|---|---|---|---|---|---|---|---|---|---|---|---|---|---|---|---|---|---|---|---|---|---|---|---|---|---|---|---|---|---|---|---|---|---|---|---|---|---|---|---|---|---|---|---|---|---|---|---|---|---|---|---|---|---|---|---|---|---|---|---|---|---|---|---|---|---|---|---|---|---|---|---|---|---|---|---|---|---|---|---|---|---|---|---|---|---|---|---|---|---|---|---|---|---|---|---|---|---|---|---|---|---|---|---|---|---|---|---|---|---|---|---|---|---|---|---|---|---|---|---|---|---|---|---|---|---|---|---|---|---|---|---|---|---|---|---|---|---|---|---|---|---|---|---|---|---|---|---|---|---|---|---|---|---|---|---|---|---|---|---|---|---|---|---|---|---|---|---|---|---|---|---|---|---|---|---|---|---|---|---|---|---|---|---|---|---|---|---|---|---|---|---|---|---|---|---|---|---|---|---|---|---|---|---|---|---|---|---|---|---|---|---|---|---|---|---|---|---|---|---|---|---|---|---|---|---|---|---|---|---|---|---|---|---|---|---|---|---|
| |||||||||||||||||||||||||||||||||||||||||||||||||||||||||||||||||||||||||||||||||||||||||||||||||||||||||||||||||||||||||||||||||||||||||||||||||||||||||||||||||||||||||||||||||||||||||||||||||||||||||||||||||||||||||||||||||||||||||||||||||||||||||||||||||||||||||||||||||||||||||||||
| Items | |||||||||||||||||||||||||||||||||||||||
|---|---|---|---|---|---|---|---|---|---|---|---|---|---|---|---|---|---|---|---|---|---|---|---|---|---|---|---|---|---|---|---|---|---|---|---|---|---|---|---|
| |||||||||||||||||||||||||||||||||||||||
Violet City
Violet City is an old village surrounded by trees. The city stands between Route 31 to the east, Route 32 to the south, and Route 36 to the west. It is a common destination for new Pokémon Trainers, as a Pokémon academy and the Violet Gym are both located here. A tall building known as Sprout Tower stands on the north side of town.
| Available Pokémon | ||||||||||||||||||||||||||||||||||||||||||||||||||||||||||||||||||||||||||||||||||||||||
|---|---|---|---|---|---|---|---|---|---|---|---|---|---|---|---|---|---|---|---|---|---|---|---|---|---|---|---|---|---|---|---|---|---|---|---|---|---|---|---|---|---|---|---|---|---|---|---|---|---|---|---|---|---|---|---|---|---|---|---|---|---|---|---|---|---|---|---|---|---|---|---|---|---|---|---|---|---|---|---|---|---|---|---|---|---|---|---|---|
| ||||||||||||||||||||||||||||||||||||||||||||||||||||||||||||||||||||||||||||||||||||||||
| Items | |||||||||||||||||||||||||||||||||||||||||||||||
|---|---|---|---|---|---|---|---|---|---|---|---|---|---|---|---|---|---|---|---|---|---|---|---|---|---|---|---|---|---|---|---|---|---|---|---|---|---|---|---|---|---|---|---|---|---|---|---|
| |||||||||||||||||||||||||||||||||||||||||||||||
Time for a Trade
Visit the house to the southwest of the Pokémon Center to find a boy who would like to trade Pokémon. He is willing to part with his Onix in exchange for a Bellsprout. Bellsprout can be found nearby on Routes 31 and 32.
Earl's Pokémon Academy
The local Pokémon academy is run by a man named Earl Dervish, who is initially found standing between the Gym and Poké Mart. Speak to him, and he asks if you have defeated the local Gym; say no, and he leads you to the school while he twirls around at every turn along the way. The school teaches inexperienced Trainers about the basics of battle. A blackboard in the front of the room describes the five status ailments that can affect a Pokémon.
| Ailment | Effect(s) | |
|---|---|---|
| BRN | Burn | Attack drops to 50%; inflicts damage equal to 1/8 of maximum HP every turn. |
| FRZ | Freeze | Cannot move until thawed (~10% chance of recovery per turn) |
| PAR | Paralysis | Speed drops to 25%; cannot attack 1/4 of the time |
| PSN | Poison | Inflicts damage equal to 1/8 of maximum HP every turn; loses 1 HP for every four steps taken outside of battle |
| SLP | Sleep | Cannot move for one to six turns |
Sprout Tower
Sprout Tower is a large pagoda held together by a flexible pillar that sways from side to side. This flexibility protects the tower from earthquakes and symbolizes the battles occurring on the upper floors. It is inhabited by Sages who study diligently and teach that all living beings coexist through cooperation. It is said that the swaying pillar was once a 100-foot-tall Bellsprout.
| Trainers | |||||||||||||||||||||||||||||||||||||||||||||||||||||||||||||||||||||||||||||||||||||||||||||||||||||||||||||||||||||||||||||||||||||||||||||||||||||
|---|---|---|---|---|---|---|---|---|---|---|---|---|---|---|---|---|---|---|---|---|---|---|---|---|---|---|---|---|---|---|---|---|---|---|---|---|---|---|---|---|---|---|---|---|---|---|---|---|---|---|---|---|---|---|---|---|---|---|---|---|---|---|---|---|---|---|---|---|---|---|---|---|---|---|---|---|---|---|---|---|---|---|---|---|---|---|---|---|---|---|---|---|---|---|---|---|---|---|---|---|---|---|---|---|---|---|---|---|---|---|---|---|---|---|---|---|---|---|---|---|---|---|---|---|---|---|---|---|---|---|---|---|---|---|---|---|---|---|---|---|---|---|---|---|---|---|---|---|---|
| |||||||||||||||||||||||||||||||||||||||||||||||||||||||||||||||||||||||||||||||||||||||||||||||||||||||||||||||||||||||||||||||||||||||||||||||||||||
| Available Pokémon | ||||||||||||||||||||||||||||||||||||||||||||||||||||||||||||||||||||||||||||||||||||||||||||
|---|---|---|---|---|---|---|---|---|---|---|---|---|---|---|---|---|---|---|---|---|---|---|---|---|---|---|---|---|---|---|---|---|---|---|---|---|---|---|---|---|---|---|---|---|---|---|---|---|---|---|---|---|---|---|---|---|---|---|---|---|---|---|---|---|---|---|---|---|---|---|---|---|---|---|---|---|---|---|---|---|---|---|---|---|---|---|---|---|---|---|---|---|
| ||||||||||||||||||||||||||||||||||||||||||||||||||||||||||||||||||||||||||||||||||||||||||||
| Items | |||||||||||||||||||||||||||||||||||||||||||||||||||||||||||||||||||||||||
|---|---|---|---|---|---|---|---|---|---|---|---|---|---|---|---|---|---|---|---|---|---|---|---|---|---|---|---|---|---|---|---|---|---|---|---|---|---|---|---|---|---|---|---|---|---|---|---|---|---|---|---|---|---|---|---|---|---|---|---|---|---|---|---|---|---|---|---|---|---|---|---|---|---|
| |||||||||||||||||||||||||||||||||||||||||||||||||||||||||||||||||||||||||
1F (Center)
The tower is three stories tall. The ground floor is open to tourists, who visit to see the unique style in which the tower is built. Pass by the swaying pillar and climb the stairs to 2F.
2F (Northeast)
Go east to battle Sage Nico and take the stairs back down to 1F.
1F (North)
Pick up the Parlyz Heal to the south. Head west to battle Sage Chow, then climb up the western stairway.
2F (Southwest)
Grab the X Defend to the north, then battle Sage Edmond in the southwest corner. Climb the southern stairway to 3F.
3F
Collect the Potion to the west. Continue northward to battle Sages Jin, Neal, and Troy.
When you pass the swaying pillar, you find that Silver has just defeated the elder Sage, Li. He acknowledges Silver's skill as a Pokémon Trainer and hands him an HM, but warns that he should not treat his Pokémon so harshly. Silver notices you at this point, and complains about the elder Sage being weak. He clearly has no intention of heeding the Sage's warning, as he is only interested in strong Pokémon that can win. He then uses an Escape Rope to leave the tower.
Pick up the Escape Rope in the northeast corner, then speak to Sage Li. He welcomes you to the tower, and offers to test the bonds between you and your Pokémon.
VS Sage Li
Li's two Bellsprout can both boost their Special Attack with Growth, which lets them deal extra damage with Vine Whip. Grass-type Pokémon like these are vulnerable to Fire- and Flying-type attacks, so Pidgey, Hoothoot, and Cyndaquil will have little trouble getting past them. His Hoothoot, a Flying-type Pokémon, takes serious damage from Rock-type attacks.
| ||||||||||||||||||||||||||||||||||||||||||||||||||||||||||||||||||||||||||||||||||||||||||||||||||||||
When the battle is over, Li rewards you with HM05 (Flash). This field move lights up even the darkest caves, but to use it outside of battle, you must first defeat the Violet Gym.
Violet Gym
| Violet City Pokémon Gym Leader: Falkner The Elegant Master of Flying Pokémon | |
The Violet Gym specializes in Flying-type Pokémon. Flying-type moves are super effective against Bug-, Fighting-, and Grass-type Pokémon, while Flying-type Pokémon are weak to Electric-, Ice-, and Rock-type moves.
The Gym has a simple layout, and features a winding walkway that passes over a seemingly bottomless pit. There are two Gym Trainers that must be defeated in order to reach the Gym Leader.
Both of Falkner's Pokémon can use Mud-Slap, a Ground-type attack that lowers the target's Accuracy. Despite its low power, it still deals increased damage to Fire Pokémon like Cyndaquil. His Pidgeotto's Gust attack does well against Bug Pokémon, and Grass-type Pokémon like Chikorita. Flying Pokémon can do little against the high Defense of Rock-type Pokémon; if you traded for the boy's Onix, counterattack with Rock Throw for an easy victory.
| ||||||||||||||||||||||||||||||||||||||||||||||||||||||||||||||||||||||||||||||||||||||||||||||||||||||||||||||||||
After the battle, Falkner awards you the Zephyr Badge, which gives your Pokémon a slight Attack boost during battle and enables the use of Flash in the field. He also gives you TM31 (Mud-Slap) as a prize.
Elm and the Egg
Professor Elm calls when you step outside the Gym, and says that they have discovered something about the Mystery Egg. He informs you that his aide is in the nearby Pokémon Center, and asks that you pay him a visit.
Pokémon Center
Elm's aide is waiting for you near the counter. Speak to him to receive a message from the professor, asking that you take the Mystery Egg. The aide explains that in order for a Pokémon to grow and hatch from an Egg, it must spend time with other active Pokémon. He asks that you call the professor when it hatches, then leaves.
|
Gold and Silver walkthrough |
|

|
This article is part of Project Walkthroughs, a Bulbapedia project that aims to write comprehensive step-by-step guides on each Pokémon game. |


