From Bulbapedia, the community-driven Pokémon encyclopedia.
Route 123 (optional)
Route 123 slopes downhill as it runs westward, from Route 122 back to Route 118. Before heading onto this route make sure you that to have Pokémon on your team know Cut, and also has at least one Grass type pokemon.
| Trainers
|
| Trainer
|
Pokémon
|
| Accessed via Route 122
|
|
|
|
|
|
|
|
|
|
|
|
|
|
|
|
|
|
|
|
|
|
|
|
|
|
|
|
|
|
|
|
|
|
|
|
|
|
|
|
|
|
|
|
|
|
|
|
|
|
|
|
|
|
|
|
|
|
|
|
|
|
|
| Requires Cut
|
|
|
|
|
|
|
|
|
|
|
|
| Rematch
|
|
|
|
|
|
|
|
|
|
|
|
|
|
|
|
|
|
|
|
|
|
|
|
|
|
|
|
|
|
|

|
|
|
Psychic Jacki*
シホミ Shihomi
Reward: $816/888/960
|

|
|
|
|
|
|
|
|
|
|
|
|
|
|
|
|
|
|
|
|
|
|
| Trainers with a PokéNav by their names will be registered in the Trainer's Eyes or Match Call function after the first battle, and may have a rematch with the player with higher-level Pokémon.
|
|
| Available Pokémon
|
| Pokémon
|
Games
|
Location
|
Levels
|
Rate
|
|
|
R
|
S
|
E
|
|
26, 28
|
30%
|
|
|
R
|
S
|
E
|
|
26
|
20%
|
|
|
R
|
S
|
E
|
|
26, 28
|
20%
|
|
|
R
|
S
|
E
|
|
26, 28
|
15%
|
|
|
R
|
S
|
E
|
|
26-28
|
9%
|
|
|
R
|
S
|
E
|
|
28
|
5%
|
|
|
R
|
S
|
E
|
|
25
|
1%
|
| Surfing
|
|
|
R
|
S
|
E
|
|
5-35
|
60%
|
|
|
R
|
S
|
E
|
|
10-30
|
35%
|
|
|
R
|
S
|
E
|
|
25-30
|
5%
|
| Fishing
|
|
|
R
|
S
|
E
|
|
5-10
|
70%
|
|
|
R
|
S
|
E
|
|
5-10
|
30%
|
|
|
R
|
S
|
E
|
|
10-30
|
60%
|
|
|
R
|
S
|
E
|
|
10-30
|
20%
|
|
|
R
|
S
|
E
|
|
10-30
|
20%
|
| A colored background means that the Pokémon can be found in this location in the specified game. A white background with a colored letter means that the Pokémon cannot be found here.
|
|
| Items
|
| Item
|
Location
|
Games
|
| Accessible via Route 122
|

|
PP Up ×2
|
- East of the pier, at the end of the dead-end center path (hidden, requires Cut)
- West of Psychic Jacki and Expert Frederick
|
E
|

|
Rare Candy
|
East of the pier, near the trees (hidden, requires Cut)
|
E
|

|
TM19 (Giga Drain)
|
From a girl southwest of the pier, if shown a Grass Pokémon
|
E
|

|
Pecha Berry ×2
|
Soft soil patch west of the pier
|
E
|

|
Rawst Berry ×2
|
Soft soil patch west of the pier
|
E
|

|
Sitrus Berry ×2
|
Soft soil patch west of the pier
|
E
|

|
Hyper Potion
|
On a rock, east of Hex Maniac Kindra (hidden)
|
E
|

|
Leppa Berry ×4
|
Soft soil patch on the north side
|
E
|

|
Elixir
|
On a ledge, northeast of Cooltrainer Wendy
|
E
|

|
Super Repel
|
In a clearing in a grass patch along the north treeline (hidden)
|
E
|

|
Revival Herb
|
South of the rock outcropping, west of Guitarist Fernando
|
E
|

|
Calcium
|
West of the pond
|
E
|
|
|
|
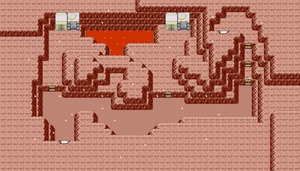
Jagged Pass (second visit)
Having received the Magma Emblem from the caretakers atop Mt. Pyre, the next step is to use it. Fly back to Lavaridge Town and Route 112, then either enter Jagged Pass from the south and use the Acro Bike to scale the cliffs, or ride the cable car to the summit and descend. Hike through the area until you reach the halfway point, where you passed that Magma Grunt on your first visit. Just then, a suspicious-looking part of the cliffside begins shaking in response to the Magma Emblem. By the time the tremor subsides, a gaping hole has appeared in the rock!
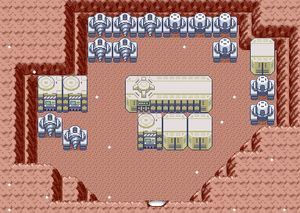
Magma Hideout
Magma Hideout, 2F (Room 2)
Magma Hideout, 3F (Room 2)
Magma Hideout, 3F (Room 3)

Magma Hideout, 2F (Room 3)
Located deep in the side of Mt. Chimney, the Magma Hideout serves as the terrestrial team's base of operations. Many strange machines can be found inside, and one chamber even holds excavation equipment for further expansion.
| Trainers
|
| Trainer
|
Pokémon
|
| 1F
|
|
|
|
| 1F (elevated level)
|
|
|
|
| 2F
|
|
|
|
|
|
|
|
|
|
|
|
|
|
|
|
|
|
|
|
|
|
|
| 2F (Room 2)
|
|
|
|
|
|
|
|
|
|
|
|
|
|
|
|
|
| 3F
|
|
|
|
|
|
|
|
|
| 3F (Room 3)
|
|
|
|
| 4F
|
|
|
|
|
|
|
|
|
|
|
|
|
|
|
|
|
| Available Pokémon
|
| Pokémon
|
Games
|
Location
|
Levels
|
Rate
|
|
|
R
|
S
|
E
|
|
27-30
|
55%
|
|
|
R
|
S
|
E
|
|
28, 30
|
30%
|
|
|
R
|
S
|
E
|
|
30-33
|
15%
|
| A colored background means that the Pokémon can be found in this location in the specified game. A white background with a colored letter means that the Pokémon cannot be found here.
|
|
1F
Enter the base, turn the corner, and use Strength to move past the group of boulders. Continue on to battle the Grunt on the east side of the chamber, then take the southeast doorway.
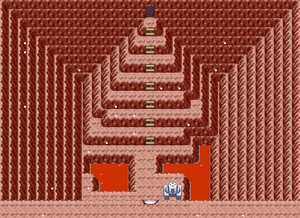
2F
Make your way down the cliffside, battling four more Grunts along the way. After that, head through the mid-level doorway to detour for a handful of items.
2F (Room 2)
Go north to fight a couple of Grunts in a Double Battle, then collect the Full Restore just beyond them. Head back south, then turn east to battle another two Grunts and grab the Max Elixir to the northwest. Continue eastward and head through the northeast doorway.
Back on 1F, follow the elevated path to the southwest, battling a single Grunt along the way to the path's end, where you find a Rare Candy. Backtrack through 2F (Room 2) to the southwest doorway to return to 2F.
2F
Continue down the cliffside and go through the doorway at the bottom.
3F
Head west around the lava pool to battle the first Grunt. Walk down the stairway and go through the doorway to the east.
3F (Room 2)
Pick up a PP Max to the northwest and battle the Grunt to the northeast, then return to the previous chamber.
3F
Walk down the stairway and fight the second Grunt. Go west and collect the Nugget before heading south through the doorway.
4F
Head down the stairway and go west, battling three more Grunts along the way. Continue westward and you are stopped by Magma Admin Tabitha. He tells you that Maxie is up ahead, and draws you into battle to buy some time for his boss.
VS Tabitha

|
|
Reward: $1320
|
|
|
|
|
|
|
Collect a Max Revive from the northwest corner, then turn south. Up ahead, you find Maxie standing on the edge of a lava pool, talking to the sleeping form of the super-ancient Pokémon, Groudon. He holds the Blue Orb high, and its light awakens the ancient beast, which immediately escapes. Maxie blames you, accusing you of some "cheap stunt", and prepares for battle!
VS Maxie

|
|
Reward: $3120
|
|
|
|
|
|
|
Defeated, Maxie flees to search for Groudon. Take the south doorway for a shortcut back to the entrance, and collect the Escape Rope along the way through 3F (Room 3) and 2F (Room 3).


