Virbank Complex: Difference between revisions
Lady Ariel (talk | contribs) (→Intro) |
Thespeon196 (talk | contribs) m (→In animation) |
||
| (87 intermediate revisions by 40 users not shown) | |||
| Line 1: | Line 1: | ||
{{incomplete|2= | {{incomplete|2=Needs full layout maps for all seasons}} | ||
{{Infobox location | {{Infobox location | ||
|image=Virbank Complex {{#switch: {{#expr: {{#time: n}} mod 4}}|0=Winter|1=Spring|2=Summer|3=Autumn}}.png | |image=Virbank Complex exterior Summer<!--{{#switch: {{#expr: {{#time: n}} mod 4}}|0=Winter|1=Spring|2=Summer|3=Autumn}}--> B2W2.png | ||
|location_name=Virbank Complex | |location_name=Virbank Complex | ||
|japanese_name={{tt|タチワキコンビナート|Tachiwaki Konbināto}} | |japanese_name={{tt|タチワキコンビナート|Tachiwaki Konbināto}} | ||
|translated_name=Tachiwaki Industrial Complex | |translated_name=Tachiwaki Industrial Complex | ||
|type= | |type=road | ||
|mapdesc=A complex that is designed so Pokémon can work there easily. | |mapdesc=A complex that is designed so Pokémon can work there easily. | ||
|location=South of [[Virbank City]] | |location=South of [[Virbank City]] | ||
| Line 12: | Line 11: | ||
|generation={{Gen|V}} | |generation={{Gen|V}} | ||
}} | }} | ||
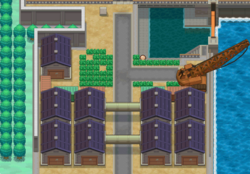
The '''Virbank Complex''' (Japanese: '''{{tt|タチワキコンビナート|Tachiwaki Konbināto}}''' ''{{tt|Tachiwaki|Virbank}} Industrial Complex'') is | The '''Virbank Complex''' (Japanese: '''{{tt|タチワキコンビナート|Tachiwaki Konbināto}}''' ''{{tt|Tachiwaki|Virbank}} Industrial Complex'') is an industrial complex located in southwestern [[Unova]], appearing only in {{2v2|Black|White|2}}. It connects to [[Virbank City]] in the north. | ||
==Description== | |||
{{sign|bwbuilding|Virbank Complex|Where Fire Meets Steel}} | |||
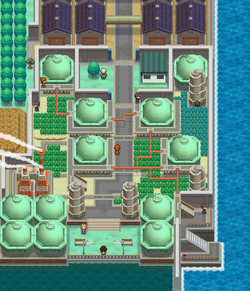
Virbank Complex is an industrial area that also serves as a training place for {{pkmn|Trainer}}s. There is a wooden dam that separates the waterway of Virbank City from the rest of the sea. A male {{tc|Scientist}} describes the function of many aspects of the complex: a distillation tower, or topper, separates crude oil into different components, the smokestacks burn up waste gas, and the gas holders are a symbol of harmony, being spherical in shape in order to optimize the pressure of the gas within them. | |||
If the {{player}} talks to a man by the entrance of the inner area, he will request that they get the three new {{tc|Worker}}s in the complex fired up. After agreeing to this, the player will be able to battle the Workers located around the complex. Once all three have been defeated, the man will give the player {{TM|94|Rock Smash}} as a sign of gratitude. | |||
==Items== | ==Items== | ||
=== | ===Entrance=== | ||
{{Itlisth| | {{Itlisth|road}} | ||
{{Itemlist|X Accuracy| | {{Itemlist|X Accuracy|In the grass south of the complex's sign|B2=yes|W2=yes}} | ||
{{Itemlist|Great Ball| | {{Itemlist|Great Ball|From a {{tc|Roughneck}} down by the water, in exchange for a {{i|Poké Ball}} (daily)|B2=yes|W2=yes}} | ||
{{Itemlist|Silk Scarf| | {{Itemlist|Silk Scarf|At the end of the waterside path continuing past the Roughneck|B2=yes|W2=yes}} | ||
{{Itemlist|Pearl| | {{Itemlist|Pearl|At the end of the waterside path opposite the Roughneck, accessible from the [[Virbank City|city]] ''(hidden)''|B2=yes|W2=yes|display={{i|Pearl}}}} | ||
{{Itlistfoot| | {{Itlistfoot|road}} | ||
=== | ===Inside=== | ||
{{Itlisth| | {{Itlisth|road}} | ||
{{Itemlist|TM Dark| | {{Itemlist|TM Dark|In the southeastern-most corner of the complex|B2=yes|W2=yes|display={{TM|46|Thief}}}} | ||
{{Itemlist|TM Fighting|From the man at the entrance, after defeating all three Workers|B2=yes|W2=yes|display={{TM|94|Rock Smash}}}} | {{Itemlist|TM Fighting|From the man at the entrance, after defeating all three Workers|B2=yes|W2=yes|display={{TM|94|Rock Smash}}}} | ||
{{Itemlist|Ether|From a {{tc|Scientist}}, after talking to him three times|B2=yes|W2=yes}} | {{Itemlist|Ether|From a {{tc|Scientist}}, after talking to him three times|B2=yes|W2=yes}} | ||
{{Itemlist|Great Ball| | {{Itemlist|Great Ball| | ||
*From a girl at the southernmost end | * From a girl at the southernmost end after filling up the complex's [[Habitat List]] (×5) | ||
* | * In the blank patch in the grass southeast of Youngster Masahiro ''(hidden)''|B2=yes|W2=yes|display=[[Great Ball]] ×6}} | ||
{{Itemlist|Super Potion| | {{Itemlist|Super Potion|At the end of the narrow passageway west of the entrance (requires {{m|Cut}})|B2=yes|W2=yes}} | ||
{{Itemlist| | {{Itemlist|Tiny Mushroom|In the dark grass on the east of the complex, in the blank patch at the north ''(hidden, [[Item#Recurring items|reappears occasionally]])''|B2=yes|W2=yes|display=[[Tiny Mushroom|TinyMushroom]]}} | ||
{{Itlistfoot| | {{Itlistfoot|road}} | ||
==Pokémon== | ==Pokémon== | ||
=== | ===Entrance=== | ||
{{catch/header| | {{catch/header|road|2}} | ||
{{catch/entry5-2|081|Magnemite|yes|yes|Grass|10-11|all=%|type1=Electric|type2=Steel}} | {{catch/entry5-2|081|Magnemite|yes|yes|Grass|10-11|all=15%|type1=Electric|type2=Steel}} | ||
{{catch/entry5-2|239|Elekid|no|yes|Grass|10 | {{catch/entry5-2|239|Elekid|no|yes|Grass|10-12|all=15%|type1=Electric}} | ||
{{catch/entry5-2|240|Magby|yes|no|Grass|10-12|all=%|type1=Fire}} | {{catch/entry5-2|240|Magby|yes|no|Grass|10-12|all=15%|type1=Fire}} | ||
{{catch/entry5-2|504|Patrat|yes|yes|Grass|10 | {{catch/entry5-2|504|Patrat|yes|yes|Grass|10-13|all=35%|type1=Normal}} | ||
{{catch/entry5-2|519|Pidove|yes|yes|Grass|10- | {{catch/entry5-2|519|Pidove|yes|yes|Grass|10-13|all=35%|type1=Normal|type2=Flying}} | ||
{{catch/div| | {{catch/div|road|Rustling grass}} | ||
{{catch/entry5-2|531|Audino|yes|yes| | {{catch/entry5-2|531|Audino|yes|yes|Rustling|10-13|all=100%|type1=Normal}} | ||
{{catch/div|water|Surfing}} | {{catch/div|water|Surfing}} | ||
{{catch/entry5-2|{{#ifexpr: ({{#time: H}} mod 2) = 0| | {{catch/entry5-2|592{{#ifexpr: ({{#time: H}} mod 2)=0||F}}|Frillish|yes|yes|Surf|5-15|all=100%|type1=Water|type2=Ghost}} | ||
{{catch/div|water| | {{catch/div|water|Surfing in rippling water}} | ||
{{catch/entry5-2|594|Alomomola|yes|yes| | {{catch/entry5-2|594|Alomomola|yes|yes|Rippling|5-15|all=95%|type1=Water}} | ||
{{catch/entry5-2|593{{#ifexpr: ({{#time: H}} mod 2)=0||F}}|Jellicent|yes|yes|Rippling|5-15|all=5%|type1=Water|type2=Ghost}} | |||
{{catch/div|water|Fishing}} | {{catch/div|water|Fishing}} | ||
{{catch/entry5-2|098|Krabby|yes|yes|Fish Super|40 | {{catch/entry5-2|098|Krabby|yes|yes|Fish Super|40-60|all=30%|type1=Water}} | ||
{{catch/entry5-2|456|Finneon|yes|yes|Fish Super|40- | {{catch/entry5-2|456|Finneon|yes|yes|Fish Super|40-70|all=65%|type1=Water}} | ||
{{catch/div|water|Rippling | {{catch/entry5-2|211|Qwilfish|yes|yes|Fish Super|50-70|all=5%|type1=Water|type2=Poison}} | ||
{{catch/entry5-2|099|Kingler|yes|yes| | {{catch/div|water|Fishing in rippling water}} | ||
{{catch/entry5-2|457|Lumineon|yes|yes| | {{catch/entry5-2|098|Krabby|yes|yes|Rippling|40-60|all=60%|type1=Water}} | ||
{{catch/footer| | {{catch/entry5-2|099|Kingler|yes|yes|Rippling|50-70|all=10%|type1=Water}} | ||
{{catch/entry5-2|457|Lumineon|yes|yes|Rippling|40-60|all=30%|type1=Water}} | |||
{{catch/footer|road}} | |||
=== | ===Inside=== | ||
{{catch/header| | {{catch/header|road|2}} | ||
{{catch/entry5-2|058|Growlithe|yes|yes|Grass|11 | {{catch/entry5-2|058|Growlithe|yes|yes|Grass|11-13|all=20%|type1=Fire}} | ||
{{catch/entry5-2|081|Magnemite|yes|yes|Grass|10- | {{catch/entry5-2|081|Magnemite|yes|yes|Grass|10-12|all=25%|type1=Electric|type2=Steel}} | ||
{{catch/entry5-2|109|Koffing|yes|yes|Grass|10 | {{catch/entry5-2|109|Koffing|yes|yes|Grass|10-13|all=15%|type1=Poison}} | ||
{{catch/entry5-2|239|Elekid|no|yes|Grass|10 | {{catch/entry5-2|239|Elekid|no|yes|Grass|10-12|all=25%|type1=Electric}} | ||
{{catch/entry5-2|240|Magby|yes|no|Grass|10-12|all=%|type1=Fire}} | {{catch/entry5-2|240|Magby|yes|no|Grass|10-12|all=25%|type1=Fire}} | ||
{{catch/entry5-2|504|Patrat|yes|yes|Grass|10 | {{catch/entry5-2|504|Patrat|yes|yes|Grass|10-13|all=15%|type1=Normal}} | ||
{{catch/div| | {{catch/div|road|Dark grass}} | ||
{{catch/entry5-2|058|Growlithe|yes|yes|Dark|12 | {{catch/entry5-2|058|Growlithe|yes|yes|Dark|12-14|all=20%|type1=Fire}} | ||
{{catch/entry5-2|081|Magnemite|yes|yes|Dark|11 | {{catch/entry5-2|081|Magnemite|yes|yes|Dark|11-13|all=25%|type1=Electric|type2=Steel}} | ||
{{catch/entry5-2|109|Koffing|yes|yes|Dark|11 | {{catch/entry5-2|109|Koffing|yes|yes|Dark|11-14|all=15%|type1=Poison}} | ||
{{catch/entry5-2|239|Elekid|no|yes|Dark|11|all=%|type1=Electric}} | {{catch/entry5-2|239|Elekid|no|yes|Dark|11-13|all=25%|type1=Electric}} | ||
{{catch/entry5-2|240|Magby|yes|no|Dark|11|all=%|type1=Fire}} | {{catch/entry5-2|240|Magby|yes|no|Dark|11-13|all=25%|type1=Fire}} | ||
{{catch/entry5-2|504|Patrat|yes|yes|Dark|11 | {{catch/entry5-2|504|Patrat|yes|yes|Dark|11-14|all=15%|type1=Normal}} | ||
{{catch/div| | {{catch/div|road|Rustling grass}} | ||
{{catch/entry5-2|531|Audino|yes|yes| | {{catch/entry5-2|531|Audino|yes|yes|Rustling|10-13|all=100%|type1=Normal}} | ||
{{catch/footer| | {{catch/footer|road}} | ||
==Trainers== | ==Trainers== | ||
The {{tc|Worker}}s here can only be battled after talking with the man at the entrance. | |||
{{trainerheader| | {{trainerheader|road}} | ||
{{Trainerentry|Spr B2W2 Youngster.png|Youngster|Masahiro|208|1|506|Lillipup|♂|13|None|36=マサヒロ|37=Masahiro}} | {{Trainerentry|Spr B2W2 Youngster.png|Youngster|Masahiro|{{tt|208|192 in Easy Mode, 224 in Challenge Mode}}|1|506|Lillipup|♂|{{tt|13|12 in Easy Mode, 14 in Challenge Mode}}|None|36=マサヒロ|37=Masahiro}} | ||
{{Trainerentry|Spr B2W2 Worker.png|Worker|Mitchell|480|2|504|Patrat|♂|12|None|239|Elekid|♂|12|None|36=ミツハル|37=Mitsuharu}} | {{trainerdiv|road}} | ||
{{Trainerentry|Spr B2W2 Youngster.png|Youngster|Waylon|208|1|504|Patrat|♂|13|None|36=クニユキ|37=Kuniyuki}} | {{Trainerentry|Spr B2W2 Worker.png|Worker|Mitchell|{{tt|480|440 in Easy Mode, 520 in Challenge Mode}}|2|504|Patrat|♂|{{tt|12|12 in Easy Mode, 13 in Challenge Mode}}|None|239|Elekid|♂|{{tt|12|12 in Easy Mode, 13 in Challenge Mode}}|None|36=ミツハル|37=Mitsuharu}} | ||
{{Trainerentry|Spr B2W2 Worker.png|Worker|Nathan|480|2|447|Riolu|♂|12|None|506|Lillipup|♂|12|None|36=ヤスオ|37=Yasuo}} | {{trainerdiv|road}} | ||
{{Trainerentry|Spr B2W2 Worker.png|Worker|Isaac|480|2|240|Magby|♂|12|None|109|Koffing|♂|12|None|36=マサシ|37=Masashi}} | {{Trainerentry|Spr B2W2 Youngster.png|Youngster|Waylon|{{tt|208|192 in Easy Mode, 224 in Challenge Mode}}|1|504|Patrat|♂|{{tt|13|12 in Easy Mode, 14 in Challenge Mode}}|None|36=クニユキ|37=Kuniyuki}} | ||
{{Trainerentry|Spr B2W2 Lass.png|Lass|Daya|208|1|527|Woobat|♀|13|None|36=タカコ|37=Takako}} | {{trainerdiv|road}} | ||
{{trainerfooter| | {{Trainerentry|Spr B2W2 Worker.png|Worker|Nathan|{{tt|480|440 in Easy Mode, 520 in Challenge Mode}}|2|447|Riolu|♂|{{tt|12|11 in Easy Mode, 13 in Challenge Mode}}|None|506|Lillipup|♂|{{tt|12|11 in Easy Mode, 13 in Challenge Mode}}|None|36=ヤスオ|37=Yasuo}} | ||
{{trainerdiv|road}} | |||
{{Trainerentry|Spr B2W2 Worker.png|Worker|Isaac|{{tt|480|440 in Easy Mode, 520 in Challenge Mode}}|2|240|Magby|♂|{{tt|12|11 in Easy Mode, 13 in Challenge Mode}}|None|109|Koffing|♂|{{tt|12|11 in Easy Mode, 13 in Challenge Mode}}|None|36=マサシ|37=Masashi}} | |||
{{trainerdiv|road}} | |||
{{Trainerentry|Spr B2W2 Lass.png|Lass|Daya|{{tt|208|192 in Easy Mode, 224 in Challenge Mode}}|1|527|Woobat|♀|{{tt|13|12 in Easy Mode, 14 in Challenge Mode}}|None|36=タカコ|37=Takako}} | |||
{{trainerfooter|road|5}} | |||
==Layout== | |||
{| class="roundy" style="margin:auto; background:#000; border:3px solid #{{locationcolor/dark|road}}" | |||
! style="background:#{{locationcolor/light|road}}; {{roundytl|5px}}" | Version | |||
! style="background:#{{locationcolor/light|road}}" | Entrance | |||
! style="background:#{{locationcolor/light|road}}; {{roundytr|5px}}" | Inside | |||
|- | |||
! style="background:#{{black 2 color}}" | {{color2|FFF|Pokémon Black and White Versions 2|Black 2}} | |||
| rowspan="2" | [[File:Virbank Complex exterior Summer<!--{{#switch: {{#expr: {{#time: n}} mod 4}}|0=Winter|1=Spring|2=Summer|3=Autumn}}--> B2W2.png|250px]] | |||
| rowspan="2" | [[File:Virbank Complex interior Summer<!--{{#switch: {{#expr: {{#time: n}} mod 4}}|0=Winter|1=Spring|2=Summer|3=Autumn}}--> B2W2.png|250px]] | |||
|- | |||
! style="background:#{{white 2 color}}" | {{color2|000|Pokémon Black and White Versions 2|White 2}} | |||
|- | |||
! colspan="3" style="background:#{{locationcolor/light|road}}; {{roundybottom|5px}}" | | |||
|} | |||
==In animation== | |||
[[File:Virbank Complex anime.png|thumb|250px|Virbank Complex in {{aniseries|BW}}]] | |||
===''Pokémon the Series''=== | |||
===={{aniseries|BW}}==== | |||
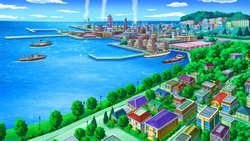
The Virbank Complex appeared in ''[[BW115|The Pokémon Harbor Patrol!]]''. {{Ash}}, {{ashfr}}, and {{an|N}} encountered a young man named [[Halsey]], who was in charge of the Pokémon Harbor Patrol, which helps out those in need in the case of an emergency. When a fire broke out at the complex, Halsey hurried to the scene. Although he managed to organize the evacuation of people and put out the fire, {{TRT}}'s actions on the ground caused a power generator to burst into flames, resulting in Halsey and his team getting locked inside. | |||
With the help of Halsey's {{p|Watchog}} (which stayed outside to handle its guard duty) and N's ability to understand Pokémon, [[Iris's Excadrill]] was able to dig a tunnel to the room where Halsey was trapped and save him. After the crisis was over, Ash and his friends bid goodbye to Halsey and continued their journey to the {{an|White Ruins}}. | |||
==In the TCG== | |||
This listing is of cards mentioning or featuring the Virbank Complex in the [[Pokémon Trading Card Game]]. | |||
{{Cardlist/header|Related cards|Lightning|char=yes}} | |||
{{cardlist/entry|cardname={{TCG ID|Boundaries Crossed|Electabuzz|53}}|type=Lightning|expanded=yes|enset=Boundaries Crossed|enrarity=Common|ennum=53/149|jpset=Cold Flare|jprarity=C|jpnum=020/059}} | |||
{{cardlist/entry|cardname={{TCG ID|Plasma Storm|Magnemite|42}}|type=Lightning|expanded=yes|enset=Plasma Storm|enrarity=Common|ennum=42/135|jpset=Plasma Gale|jprarity=C|jpnum=023/070}} | |||
{{cardlist/entry|cardname={{TCG ID|Plasma Freeze|Voltorb|32}}|type=Lightning|expanded=yes|enset=Plasma Freeze|enrarity=Common|ennum=32/116|jpset=Thunder Knuckle|jprarity=C|jpnum=017/051}} | |||
{{cardlist/entry|cardname={{TCG ID|Dragons Exalted|Hydreigon|97}}|type=Dragon|expanded=yes|enset=Legendary Treasures|enrarity=Rare Holo|ennum=99/113|jpset=EX Battle Boost|jpnum=083/093}} | |||
{{cardlist/footer|Lightning}} | |||
==In other languages== | |||
{{Langtable|color={{locationcolor/light|road}}|bordercolor={{locationcolor/dark|road}} | |||
|zh_yue=立湧聯合工業區 ''{{tt|Lahpyúng Lyùhnhahp-Gūngyihpkēui|Virbank Joint Industrial Complex}}'' {{tt|*|Games}}<br>立湧聯合企業 ''{{tt|Lahpyúng Lyùhnhahp Kéihyihp|Virbank Joint Corporation}}'' {{tt|*|Anime}} | |||
|zh_cmn=立湧聯合工業區 / 立涌联合工业区 ''{{tt|Lìyǒng Liánhé-gōngyèqū|Virbank Joint Industrial Complex}}'' | |||
|fi=Virbankin teollisuusalue | |||
|fr=Z.I. d'Ondes-sur-Mer | |||
|de=Vapydro-Werke | |||
|it=Cantiere di Zondopoli | |||
|ko=모란만콤비나트 ''Moranman Kombinateu'' | |||
|pl=Kompleks Virbank | |||
|pt_br=Complexo de Virbank | |||
|es=Polígono Hormigón | |||
}} | |||
{{Unova}}<br> | {{Unova}}<br> | ||
{{Project Locations notice}} | {{Project Locations notice}} | ||
[[Category:Black 2 and White 2 locations]] | [[Category:Black 2 and White 2 locations]] | ||
[[it: | [[de:Vapydro-Werke]] | ||
[[es:Polígono Hormigón]] | |||
[[fr:Z.I. d'Ondes-sur-Mer]] | |||
[[it:Cantiere Zondopoli]] | |||
[[ja:タチワキコンビナート]] | |||
[[zh:立湧聯合工業區]] | |||
Latest revision as of 16:12, 22 October 2024

|
This article is incomplete. Please feel free to edit this article to add missing information and complete it. Reason: Needs full layout maps for all seasons |
| ||||
| ||||
| Map description: | A complex that is designed so Pokémon can work there easily. | |||
|---|---|---|---|---|
| Location: | South of Virbank City | |||
| Region: | Unova | |||
| Generations: | V | |||
 Location of Virbank Complex in Unova. | ||||
| Pokémon world locations | ||||
The Virbank Complex (Japanese: タチワキコンビナート Tachiwaki Industrial Complex) is an industrial complex located in southwestern Unova, appearing only in Black 2 and White 2. It connects to Virbank City in the north.
Description
|
||||
Virbank Complex is an industrial area that also serves as a training place for Trainers. There is a wooden dam that separates the waterway of Virbank City from the rest of the sea. A male Scientist describes the function of many aspects of the complex: a distillation tower, or topper, separates crude oil into different components, the smokestacks burn up waste gas, and the gas holders are a symbol of harmony, being spherical in shape in order to optimize the pressure of the gas within them.
If the player talks to a man by the entrance of the inner area, he will request that they get the three new Workers in the complex fired up. After agreeing to this, the player will be able to battle the Workers located around the complex. Once all three have been defeated, the man will give the player TM94 (Rock Smash) as a sign of gratitude.
Items
Entrance
| Item | Location | Games | |
|---|---|---|---|
| X Accuracy | In the grass south of the complex's sign | B2 W2 | |
| Great Ball | From a Roughneck down by the water, in exchange for a Poké Ball (daily) | B2 W2 | |
| Silk Scarf | At the end of the waterside path continuing past the Roughneck | B2 W2 | |
| Pearl | At the end of the waterside path opposite the Roughneck, accessible from the city (hidden) | B2 W2 | |
Inside
| Item | Location | Games | |
|---|---|---|---|
| TM46 (Thief) | In the southeastern-most corner of the complex | B2 W2 | |
| TM94 (Rock Smash) | From the man at the entrance, after defeating all three Workers | B2 W2 | |
| Ether | From a Scientist, after talking to him three times | B2 W2 | |
| Great Ball ×6 |
|
B2 W2 | |
| Super Potion | At the end of the narrow passageway west of the entrance (requires Cut) | B2 W2 | |
| TinyMushroom | In the dark grass on the east of the complex, in the blank patch at the north (hidden, reappears occasionally) | B2 W2 | |
Pokémon
Entrance
| Pokémon | Games | Location | Levels | Rate | ||||||||||||
|---|---|---|---|---|---|---|---|---|---|---|---|---|---|---|---|---|
|
B2 | W2 |
|
10-11 | 15% | |||||||||||
|
B2 | W2 |
|
10-12 | 15% | |||||||||||
|
B2 | W2 |
|
10-12 | 15% | |||||||||||
|
B2 | W2 |
|
10-13 | 35% | |||||||||||
|
B2 | W2 |
|
10-13 | 35% | |||||||||||
| Rustling grass | ||||||||||||||||
|
B2 | W2 |
|
10-13 | 100% | |||||||||||
| Surfing | ||||||||||||||||
|
B2 | W2 |
|
5-15 | 100% | |||||||||||
| Surfing in rippling water | ||||||||||||||||
|
B2 | W2 |
|
5-15 | 95% | |||||||||||
|
B2 | W2 |
|
5-15 | 5% | |||||||||||
| Fishing | ||||||||||||||||
|
B2 | W2 |
|
40-60 | 30% | |||||||||||
|
B2 | W2 |
|
40-70 | 65% | |||||||||||
|
B2 | W2 |
|
50-70 | 5% | |||||||||||
| Fishing in rippling water | ||||||||||||||||
|
B2 | W2 |
|
40-60 | 60% | |||||||||||
|
B2 | W2 |
|
50-70 | 10% | |||||||||||
|
B2 | W2 |
|
40-60 | 30% | |||||||||||
| A colored background means that the Pokémon can be found in this location in the specified game. A white background with a colored letter means that the Pokémon cannot be found here. | ||||||||||||||||
Inside
| Pokémon | Games | Location | Levels | Rate | ||||||||||||
|---|---|---|---|---|---|---|---|---|---|---|---|---|---|---|---|---|
|
B2 | W2 |
|
11-13 | 20% | |||||||||||
|
B2 | W2 |
|
10-12 | 25% | |||||||||||
|
B2 | W2 |
|
10-13 | 15% | |||||||||||
|
B2 | W2 |
|
10-12 | 25% | |||||||||||
|
B2 | W2 |
|
10-12 | 25% | |||||||||||
|
B2 | W2 |
|
10-13 | 15% | |||||||||||
| Dark grass | ||||||||||||||||
|
B2 | W2 |
|
12-14 | 20% | |||||||||||
|
B2 | W2 |
|
11-13 | 25% | |||||||||||
|
B2 | W2 |
|
11-14 | 15% | |||||||||||
|
B2 | W2 |
|
11-13 | 25% | |||||||||||
|
B2 | W2 |
|
11-13 | 25% | |||||||||||
|
B2 | W2 |
|
11-14 | 15% | |||||||||||
| Rustling grass | ||||||||||||||||
|
B2 | W2 |
|
10-13 | 100% | |||||||||||
| A colored background means that the Pokémon can be found in this location in the specified game. A white background with a colored letter means that the Pokémon cannot be found here. | ||||||||||||||||
Trainers
The Workers here can only be battled after talking with the man at the entrance.
| Trainer | Pokémon | |||||||||||
|---|---|---|---|---|---|---|---|---|---|---|---|---|
|
| |||||||||||
|
| |||||||||||
| ||||||||||||
|
| |||||||||||
|
| |||||||||||
| ||||||||||||
|
| |||||||||||
| ||||||||||||
|
| |||||||||||
Layout
| Version | Entrance | Inside |
|---|---|---|
| Black 2 | 
|

|
| White 2 | ||
In animation

Pokémon the Series
Pokémon the Series: Black & White
The Virbank Complex appeared in The Pokémon Harbor Patrol!. Ash, his friends, and N encountered a young man named Halsey, who was in charge of the Pokémon Harbor Patrol, which helps out those in need in the case of an emergency. When a fire broke out at the complex, Halsey hurried to the scene. Although he managed to organize the evacuation of people and put out the fire, Team Rocket's actions on the ground caused a power generator to burst into flames, resulting in Halsey and his team getting locked inside.
With the help of Halsey's Watchog (which stayed outside to handle its guard duty) and N's ability to understand Pokémon, Iris's Excadrill was able to dig a tunnel to the room where Halsey was trapped and save him. After the crisis was over, Ash and his friends bid goodbye to Halsey and continued their journey to the White Ruins.
In the TCG
This listing is of cards mentioning or featuring the Virbank Complex in the Pokémon Trading Card Game.
| Related cards Cards listed with a blue background are only legal to use in the current Expanded format. Cards listed with a green background are legal to use in both the current Standard and Expanded formats. | |||||||
|---|---|---|---|---|---|---|---|
| Card | Type | English Expansion |
Rarity | # | Japanese Expansion |
Rarity | # |
| Electabuzz | Boundaries Crossed | 53/149 | Cold Flare | 020/059 | |||
| Magnemite | Plasma Storm | 42/135 | Plasma Gale | 023/070 | |||
| Voltorb | Plasma Freeze | 32/116 | Thunder Knuckle | 017/051 | |||
| Hydreigon | Legendary Treasures | 99/113 | EX Battle Boost | 083/093 | |||
In other languages
| |||||||||||||||||||||||||||||||||||

|
This article is part of Project Locations, a Bulbapedia project that aims to write comprehensive articles on every location in the Pokémon world. |


