Appendix:Omega Ruby and Alpha Sapphire walkthrough/Section 9: Difference between revisions
mNo edit summary |
No edit summary |
||
| (6 intermediate revisions by 4 users not shown) | |||
| Line 2: | Line 2: | ||
==Mauville City== | ==Mauville City== | ||
===Rydel's Cycles=== | ===Rydel's Cycles=== | ||
Whether you returned to {{ci|Mauville}} with {{ga|May}}/{{ga|Brendan}} or took the long way through {{rt|115|Hoenn}} and [[Rusturf Tunnel]], it is a good idea to visit [[Rydel's Cycles]] to swap your | Whether you returned to {{ci|Mauville}} with {{ga|May}}/{{ga|Brendan}} or took the long way through {{rt|115|Hoenn}} and [[Rusturf Tunnel]], it is a good idea to visit [[Rydel's Cycles]] to swap your [[Mach Bike]] for the [[Acro Bike]]. The upcoming terrain is harsh, and while the Mach Bike can reach some areas, the Acro Bike allows you to fully explore the rough landscape without making multiple visits. | ||
==Route 112 (south)== | ==Route 112 (south)== | ||
[[Team Magma]]{{sup/6|OR}}/[[Team Aqua]]{{sup/6|AS}} has taken [[Professor Cozmo]]'s Meteorite to [[Mt. Chimney]], and the only way to follow is by Cable Car. When you arrive, you find that the guards are no longer guarding the building. Collect the | [[Team Magma]]{{sup/6|OR}}/[[Team Aqua]]{{sup/6|AS}} has taken [[Professor Cozmo]]'s Meteorite to [[Mt. Chimney]], and the only way to follow is by Cable Car. When you arrive, you find that the guards are no longer guarding the building. Collect the [[Guard Spec.]] to the east, then enter the station and take the Cable Car up to the summit. | ||
==Mt. Chimney== | ==Mt. Chimney== | ||
| Line 18: | Line 18: | ||
| | | | ||
{{trainerheader|volcano}} | {{trainerheader|volcano}} | ||
{{ | {{Trainerentry|game=6|VSTeam Magma Grunt M.png{{!}}150px|Team Magma Grunt|{{sup/6|OR}}|880|2|261|Poochyena|♂|22||109|Koffing|♂|22}} | ||
{{trainerdiv|volcano}} | {{trainerdiv|volcano}} | ||
{{ | {{Trainerentry|game=6|VSTeam Aqua Grunt M.png{{!}}150px|Team Aqua Grunt|{{sup/6|AS}}|880|2|261|Poochyena|♂|22||088|Grimer|♂|22}} | ||
{{trainerfooter|volcano|I}} | {{trainerfooter|volcano|I}} | ||
|} | |} | ||
| Line 29: | Line 29: | ||
| | | | ||
{{itlisth|volcano}} | {{itlisth|volcano}} | ||
{{itemlist|Zinc|Dead-end path behind the Cable Car station (hidden)|OR=yes|AS=yes | {{itemlist|Zinc|Dead-end path behind the Cable Car station (hidden)|OR=yes|AS=yes}} | ||
{{itemlist|TM Fire|Dead-end path in the northwest, underneath the glass bridge|OR=yes|AS=yes|display={{TM|59|Incinerate}}}} | {{itemlist|TM Fire|Dead-end path in the northwest, underneath the glass bridge|OR=yes|AS=yes|display={{TM|59|Incinerate}}}} | ||
{{catch/div|volcano|After defeating Maxie/Archie}} | {{catch/div|volcano|After defeating Maxie/Archie}} | ||
{{itemlist|Meteorite|From Maxie{{sup/6|OR}}/Archie{{sup/6|AS}} upon his defeat|OR=yes|AS=yes | {{itemlist|Meteorite|From Maxie{{sup/6|OR}}/Archie{{sup/6|AS}} upon his defeat|OR=yes|AS=yes}} | ||
{{itemlist|Protein|East side of the crater (hidden)|OR=yes|AS=yes | {{itemlist|Protein|East side of the crater (hidden)|OR=yes|AS=yes}} | ||
{{itlistfoot|volcano}} | {{itlistfoot|volcano}} | ||
|} | |} | ||
| Line 121: | Line 121: | ||
| | | | ||
{{Party/Single|color={{ruby color light}}|bordercolor={{ruby color}}|headcolor={{ground color}} | {{Party/Single|color={{ruby color light}}|bordercolor={{ruby color}}|headcolor={{ground color}} | ||
|sprite= | |sprite=VSMaxie.png | ||
|size=150px | |||
|prize={{pdollar}}4,320 | |prize={{pdollar}}4,320 | ||
|class=Magma Leader|classlink=Maxie|name={{color2|000|Maxie}} | |class=Magma Leader|classlink=Maxie|name={{color2|000|Maxie}} | ||
| Line 155: | Line 156: | ||
{{Party/Footer}} | {{Party/Footer}} | ||
|} | |} | ||
====VS Archie==== | ====VS Archie==== | ||
| Line 161: | Line 161: | ||
| | | | ||
{{Party/Single|color={{sapphire color light}}|bordercolor={{sapphire color}}|headcolor={{water color}} | {{Party/Single|color={{sapphire color light}}|bordercolor={{sapphire color}}|headcolor={{water color}} | ||
|sprite= | |sprite=VSArchie.png | ||
|size=150px | |||
|prize={{pdollar}}4,320 | |prize={{pdollar}}4,320 | ||
|class=Aqua Leader|classlink=Archie|name={{color2|000|Archie}} | |class=Aqua Leader|classlink=Archie|name={{color2|000|Archie}} | ||
| Line 197: | Line 198: | ||
With his defeat, Maxie{{sup/6|OR}}/Archie{{sup/6|AS}} threatens to [[Mega Evolution|Mega Evolve]] his Pokémon. But before he is able to draw you into another battle, he suddenly receives a call. After muttering something about [[Mt. Pyre]], he unexpectedly gives up the | With his defeat, Maxie{{sup/6|OR}}/Archie{{sup/6|AS}} threatens to [[Mega Evolution|Mega Evolve]] his Pokémon. But before he is able to draw you into another battle, he suddenly receives a call. After muttering something about [[Mt. Pyre]], he unexpectedly gives up the [[Meteorite]] and leaves. | ||
As you turn to leave, you are stopped by Archie{{sup/6|OR}}/Maxie{{sup/6|AS}}. He is shocked that his rival would hand over the Meteorite so easily, and seems fearful that the opposing team may have discovered where some important-sounding "orbs" are hidden. He then sets off to plan his team's next move. | As you turn to leave, you are stopped by Archie{{sup/6|OR}}/Maxie{{sup/6|AS}}. He is shocked that his rival would hand over the Meteorite so easily, and seems fearful that the opposing team may have discovered where some important-sounding "orbs" are hidden. He then sets off to plan his team's next move. | ||
| Line 212: | Line 213: | ||
| | | | ||
{{trainerheader|volcano}} | {{trainerheader|volcano}} | ||
{{ | {{Trainerentry|game=6|VSExpert F.png{{!}}150px|Expert|Shelby|2080|2|307|Meditite|♀|24||297|Hariyama|♂|26||38=Nav}} | ||
{{trainerdiv|volcano}} | {{trainerdiv|volcano}} | ||
{{ | {{Trainerentry|game=6|VSHiker.png{{!}}150px|Hiker|Eric|800|1|075|Graveler|♂|25|}} | ||
{{trainerdiv|volcano}} | {{trainerdiv|volcano}} | ||
{{ | {{Trainerentry|game=6|VSCamper.png{{!}}150px|Camper|Ethan|384|1|316|Gulpin|♂|24||38=Nav}} | ||
{{trainerdiv|volcano}} | {{trainerdiv|volcano}} | ||
{{ | {{Trainerentry|game=6|VSFairy Tale Girl.png{{!}}150px|Fairy Tale Girl|Nellie|368|2|300|Skitty|♀|21||039|Jigglypuff|♀|23|}} | ||
{{trainerdiv|volcano}} | {{trainerdiv|volcano}} | ||
{{ | {{Trainerentry|game=6|VSPicnicker.png{{!}}150px|Picnicker|Diana|352|2|044|Gloom|♀|22||333|Swablu|♀|22||38=Nav}}<!-- | ||
{{catch/div|volcano|Rematch}} | {{catch/div|volcano|Rematch}} | ||
{{ | {{Trainerentry|game=6|VSExpert F.png{{!}}150px|Expert|Shelby|???|2|307|Meditite|♀|33||297|Hariyama|♂|35|}} | ||
{{ | {{Trainerentry|game=6|VSExpert F.png{{!}}150px|Expert|Shelby|???|2|308|Medicham|♀|40||297|Hariyama|♂|42|}} | ||
{{ | {{Trainerentry|game=6|VSExpert F.png{{!}}150px|Expert|Shelby|???|3|308|Medicham|♀|44||297|Hariyama|♂|44||447|Riolu||44|}} | ||
{{ | {{Trainerentry|game=6|VSExpert F.png{{!}}150px|Expert|Shelby|???|3|308|Medicham|♀|54||297|Hariyama|♂|55||448|Lucario||56|}} | ||
{{trainerdiv|volcano}} | {{trainerdiv|volcano}} | ||
{{ | {{Trainerentry|game=6|VSCamper.png{{!}}150px|Camper|Ethan|???|1|317|Swalot|♂|28|}} | ||
{{ | {{Trainerentry|game=6|VSCamper.png{{!}}150px|Camper|Ethan|???|2|317|Swalot|♂|31||042|Golbat||31|}} | ||
{{ | {{Trainerentry|game=6|VSCamper.png{{!}}150px|Camper|Ethan|???|2|317|Swalot|♂|38||042|Golbat||38|}} | ||
{{ | {{Trainerentry|game=6|VSCamper.png{{!}}150px|Camper|Ethan|???|3|317|Swalot|♂|47||169|Crobat||47||435|Skuntank||47|}} | ||
{{trainerdiv|volcano}} | {{trainerdiv|volcano}} | ||
{{ | {{Trainerentry|game=6|VSPicnicker.png{{!}}150px|Picnicker|Diana|???|2|044|Gloom|♀|26||333|Swablu|♀|26|}} | ||
{{ | {{Trainerentry|game=6|VSPicnicker.png{{!}}150px|Picnicker|Diana|???|2|044|Gloom|♀|31||333|Swablu|♀|31|}} | ||
{{ | {{Trainerentry|game=6|VSPicnicker.png{{!}}150px|Picnicker|Diana|???|2|044|Gloom|♀|38||334|Altaria|♀|38|}} | ||
{{ | {{Trainerentry|game=6|VSPicnicker.png{{!}}150px|Picnicker|Diana|???|2|045|Vileplume|♀|48||334|Altaria|♀|48|}}--> | ||
{{trainerfooter|volcano|3}} | {{trainerfooter|volcano|3}} | ||
|} | |} | ||
| Line 258: | Line 259: | ||
| | | | ||
{{itlisth|volcano}} | {{itlisth|volcano}} | ||
{{itemlist|TM Fire|Northeast corner (requires | {{itemlist|TM Fire|Northeast corner (requires [[Acro Bike]])|OR=yes|AS=yes|display={{TM|43|Flame Charge}}}} | ||
{{itemlist|Super Repel|Northwest corner (requires | {{itemlist|Super Repel|Northwest corner (requires [[Acro Bike]])|OR=yes|AS=yes}} | ||
{{itemlist|TM Rock|Northwest hill, near a [[Secret Base|Secret Spot]] (requires | {{itemlist|TM Rock|Northwest hill, near a [[Secret Base|Secret Spot]] (requires [[Acro Bike]] or [[Mach Bike]])|OR=yes|AS=yes|display={{TM|69|Rock Polish}}}} | ||
{{itemlist|Full Heal| | {{itemlist|Full Heal| | ||
* On a small rock, between Expert Shelby and Hiker Eric (hidden) | * On a small rock, between Expert Shelby and Hiker Eric (hidden) | ||
* South of Hiker Eric, on the middle slope|OR=yes|AS=yes|display=[[Full Heal]] ×2}} | * South of Hiker Eric, on the middle slope|OR=yes|AS=yes|display=[[Full Heal]] ×2}} | ||
{{itemlist|Great Ball|East of Camper Ethan (hidden)|OR=yes|AS=yes | {{itemlist|Great Ball|East of Camper Ethan (hidden)|OR=yes|AS=yes}} | ||
{{itemlist|Max Ether|South of Camper Ethan|OR=yes|AS=yes}} | {{itemlist|Max Ether|South of Camper Ethan|OR=yes|AS=yes}} | ||
{{itemlist|X Defense|Southwest corner (requires | {{itemlist|X Defense|Southwest corner (requires [[Acro Bike]])|OR=yes|AS=yes}} | ||
{{itemlist|Tiny Mushroom|Occasionally received from Camper Ethan after a rematch|OR=yes|AS=yes | {{itemlist|Tiny Mushroom|Occasionally received from Camper Ethan after a rematch|OR=yes|AS=yes}} | ||
{{catch/div|volcano|Return trip}} | {{catch/div|volcano|Return trip}} | ||
{{itemlist|Tyranitarite|Near the southernmost grass patch, after capturing or defeating {{p|Groudon}}{{sup/6|OR}}/{{p|Kyogre}}{{sup/6|AS}}|OR=yes|AS=yes | {{itemlist|Tyranitarite|Near the southernmost grass patch, after capturing or defeating {{p|Groudon}}{{sup/6|OR}}/{{p|Kyogre}}{{sup/6|AS}}|OR=yes|AS=yes}} | ||
{{itlistfoot|volcano}} | {{itlistfoot|volcano}} | ||
|} | |} | ||
| Line 275: | Line 276: | ||
===With the Acro Bike=== | ===With the Acro Bike=== | ||
Jump the first two ledges and go west. Use the | Jump the first two ledges and go west. Use the [[Acro Bike]] to {{DL|Acro Bike|Tricks|bunny-hop}} down the circular stones to reach a [[Super Repel]]. Backtrack and head east from the entrance. Execute the same trick in the northeast corner to reach {{TM|43|Flame Charge}}. Go south, then turn west before reaching Expert Shelby. A hill on the west side features circular stones and a muddy slope; {{TM|69|Rock Polish}} and a [[Secret Base|Secret Spot]] can be found at the top. Go south past Hiker Eric and slide down the middle slope for a [[Full Heal]]. Head east, then hop back up the hill to Camper Ethan; collect the hidden [[Great Ball]] and the [[Max Ether]] before continuing southward. Pass by Picnicker Diana and hop down the hill to reach an [[X Defense]]. | ||
===With the Mach Bike=== | ===With the Mach Bike=== | ||
Jump the first two ledges and go down the stairway. Slide down either of the two {{DL|Bike obstacles|muddy slope}}s and jump another two ledges before turning west. Scale the small slope on the west side to find {{TM|69|Rock Polish}} near a [[Secret Base|Secret Spot]]. Head back east to Expert Shelby, inspect the small rock to the west for a hidden [[Full Heal]], then turn south. Search near Camper Ethan for a hidden | Jump the first two ledges and go down the stairway. Slide down either of the two {{DL|Bike obstacles|muddy slope}}s and jump another two ledges before turning west. Scale the small slope on the west side to find {{TM|69|Rock Polish}} near a [[Secret Base|Secret Spot]]. Head back east to Expert Shelby, inspect the small rock to the west for a hidden [[Full Heal]], then turn south. Search near Camper Ethan for a hidden [[Great Ball]], then jump another ledge for a [[Max Ether]]. Go southwest to Fairy Tale Girl Nellie, then scale the middle slope to the north to get another Full Heal. | ||
==Lavaridge Town== | ==Lavaridge Town== | ||
| Line 306: | Line 307: | ||
{{itemlist|TM Normal|From a Black Belt outside the Poké Mart|OR=yes|AS=yes|display={{TM|75|Swords Dance}}}} | {{itemlist|TM Normal|From a Black Belt outside the Poké Mart|OR=yes|AS=yes|display={{TM|75|Swords Dance}}}} | ||
{{itemlist|Ice Heal|In the female side of the hot spring (hidden)|OR=yes|AS=yes}} | {{itemlist|Ice Heal|In the female side of the hot spring (hidden)|OR=yes|AS=yes}} | ||
{{itemlist|Charcoal|From an old man in the Herb Shop|OR=yes|AS=yes|display= | {{itemlist|Charcoal|From an old man in the Herb Shop|OR=yes|AS=yes|display=[[Charcoal]]}} | ||
{{catch/div|volcano|After defeating the Lavaridge Gym}} | {{catch/div|volcano|After defeating the Lavaridge Gym}} | ||
{{itemlist|TM Fire|From Flannery upon her defeat|OR=yes|AS=yes|display={{TM|50|Overheat}}}} | {{itemlist|TM Fire|From Flannery upon her defeat|OR=yes|AS=yes|display={{TM|50|Overheat}}}} | ||
{{itemlist|Go-Goggles VI|From May/Brendan outside the Gym|OR=yes|AS=yes|display= | {{itemlist|Go-Goggles VI|From May/Brendan outside the Gym|OR=yes|AS=yes|display=[[Go-Goggles]]}} | ||
{{catch/div|volcano|Return trip}} | {{catch/div|volcano|Return trip}} | ||
{{itemlist|Houndoominite|Near the sand baths, after capturing or defeating {{p|Groudon}}{{sup/6|OR}}/{{p|Kyogre}}{{sup/6|AS}}|OR=yes|AS=yes | {{itemlist|Houndoominite|Near the sand baths, after capturing or defeating {{p|Groudon}}{{sup/6|OR}}/{{p|Kyogre}}{{sup/6|AS}}|OR=yes|AS=yes}} | ||
{{itlistfoot|volcano}} | {{itlistfoot|volcano}} | ||
|} | |} | ||
| Line 320: | Line 321: | ||
===Pokémon Center and Hot Springs=== | ===Pokémon Center and Hot Springs=== | ||
A Pokémon Breeder standing next to the counter is selling bottles of | A Pokémon Breeder standing next to the counter is selling bottles of [[Moomoo Milk]] for {{pdollar}}500 each. Bottles can be purchased individually, or by the dozen for {{pdollar}}6,000. This nutritious milk restores 100 HP and is cheaper than a Super Potion, which only restores 50 points. | ||
The building's two back doors lead to the steamy hot springs. Take a dip if you wish, and use the Dowsing Machine to find a hidden [[Ice Heal]] behind the door on the right. Afterward, use the PC to organize your party so that you are carrying no more than five Pokémon. Step outside and talk to the old woman near the sand baths, and she offers you a Pokémon Egg to take with you on your travels! | The building's two back doors lead to the steamy hot springs. Take a dip if you wish, and use the Dowsing Machine to find a hidden [[Ice Heal]] behind the door on the right. Afterward, use the PC to organize your party so that you are carrying no more than five Pokémon. Step outside and talk to the old woman near the sand baths, and she offers you a Pokémon Egg to take with you on your travels! | ||
===Herb Shop=== | ===Herb Shop=== | ||
At the [[Herb Shop]], a woman sells [[herbal medicine]]s for Pokémon. These natural remedies are just as effective as their traditional counterparts and less expensive, but their bitter taste make them difficult for Pokémon to take, leaving them less [[Friendship|friendly]] toward you. As | At the [[Herb Shop]], a woman sells [[herbal medicine]]s for Pokémon. These natural remedies are just as effective as their traditional counterparts and less expensive, but their bitter taste make them difficult for Pokémon to take, leaving them less [[Friendship|friendly]] toward you. As [[Max Revive]]s cannot be purchased anywhere, it may be useful to buy a few [[Revival Herb]]s to have in case of an emergency. | ||
{| style="margin: auto;" | {| style="margin: auto;" | ||
| Line 336: | Line 337: | ||
Be sure to talk to the old man near the counter, as well. Doing so gets you a | Be sure to talk to the old man near the counter, as well. Doing so gets you a [[Charcoal]], which boosts the power of {{type|Fire}} moves by 20% when held. | ||
===Lavaridge Gym=== | ===Lavaridge Gym=== | ||
| Line 367: | Line 368: | ||
| | | | ||
{{Trainerheader|Fire}} | {{Trainerheader|Fire}} | ||
{{Trainerentry|VSKindler.png{{!}}150px|Kindler|Cole|736|2|322|Numel|♂|23||218|Slugma|♂|23|}} | {{Trainerentry|game=6|VSKindler.png{{!}}150px|Kindler|Cole|736|2|322|Numel|♂|23||218|Slugma|♂|23|}} | ||
{{Trainerdiv|Fire}} | {{Trainerdiv|Fire}} | ||
{{Trainerentry|VSNinja Boy.png{{!}}150px|Ninja Boy|Hiromichi|384|1|109|Koffing|♂|24|}} | {{Trainerentry|game=6|VSNinja Boy.png{{!}}150px|Ninja Boy|Hiromichi|384|1|109|Koffing|♂|24|}} | ||
{{Trainerdiv|Fire}} | {{Trainerdiv|Fire}} | ||
{{Trainerentry|VSKindler.png{{!}}150px|Kindler|Axle|800|1|218|Slugma|♂|25|}} | {{Trainerentry|game=6|VSKindler.png{{!}}150px|Kindler|Axle|800|1|218|Slugma|♂|25|}} | ||
{{Trainerdiv|Fire}} | {{Trainerdiv|Fire}} | ||
{{Trainerentry|VSBattle Girl ORAS.png{{!}}150px|Battle Girl|Sadie|832|1|307|Meditite|♀|26|}} | {{Trainerentry|game=6|VSBattle Girl ORAS.png{{!}}150px|Battle Girl|Sadie|832|1|307|Meditite|♀|26|}} | ||
{{Trainerdiv|Fire}} | {{Trainerdiv|Fire}} | ||
{{Trainerentry|VSNinja Boy.png{{!}}150px|Ninja Boy|Shoji|384|1|109|Koffing|♂|24|}} | {{Trainerentry|game=6|VSNinja Boy.png{{!}}150px|Ninja Boy|Shoji|384|1|109|Koffing|♂|24|}} | ||
{{Trainerdiv|Fire}} | {{Trainerdiv|Fire}} | ||
{{Trainerentry|VSAce Trainer M ORAS.png{{!}}150px|Ace Trainer|Zane|1,560|2|218|Slugma|♂|24||352|Kecleon|♂|26|}} | {{Trainerentry|game=6|VSAce Trainer M ORAS.png{{!}}150px|Ace Trainer|Zane|1,560|2|218|Slugma|♂|24||352|Kecleon|♂|26|}} | ||
{{Trainerdiv|Fire}} | {{Trainerdiv|Fire}} | ||
{{Trainerentry|VSKindler.png{{!}}150px|Kindler|Andy|800|1|322|Numel|♂|25|}} | {{Trainerentry|game=6|VSKindler.png{{!}}150px|Kindler|Andy|800|1|322|Numel|♂|25|}} | ||
{{Trainerfooter|Fire|I}} | {{Trainerfooter|Fire|I}} | ||
|} | |} | ||
| Line 429: | Line 430: | ||
After the battle, Flannery awards you the {{badge|Heat}}, which ensures obedience of all Pokémon up to level 50 and enables the use of {{m|Strength}} in the field. She also hands out {{TM|50|Overheat}} as a prize. Hop down the ledges in front of Flannery to quickly return to the entrance. Outside, May/Brendan is shocked that you managed to defeat Team Magma{{sup/6|OR}}/Team Aqua{{sup/6|AS}} on your own at [[Mt. Chimney]]. She/He hands you the | After the battle, Flannery awards you the {{badge|Heat}}, which ensures obedience of all Pokémon up to level 50 and enables the use of {{m|Strength}} in the field. She also hands out {{TM|50|Overheat}} as a prize. Hop down the ledges in front of Flannery to quickly return to the entrance. Outside, May/Brendan is shocked that you managed to defeat Team Magma{{sup/6|OR}}/Team Aqua{{sup/6|AS}} on your own at [[Mt. Chimney]]. She/He hands you the [[Go-Goggles]], which allow you to explore the desert of {{rt|111|Hoenn}} in spite of the raging sandstorm. Seeing your shiny new Badge, your friend concludes that your next stop is the Gym in [[Petalburg City]]. She/He happens to be headed to the same place, and invites you to travel with her/him. If you decline, you will have a chance to do some optional things before continuing on, and your friend will wait here patiently for a while if you change your mind. | ||
Latest revision as of 18:02, 18 September 2022
These pages follow the remade Nintendo 3DS iteration, not Pokémon Ruby and Sapphire. The guide for those games can be found here.
Mauville City
Rydel's Cycles
Whether you returned to Mauville with May/Brendan or took the long way through Route 115 and Rusturf Tunnel, it is a good idea to visit Rydel's Cycles to swap your Mach Bike for the Acro Bike. The upcoming terrain is harsh, and while the Mach Bike can reach some areas, the Acro Bike allows you to fully explore the rough landscape without making multiple visits.
Route 112 (south)
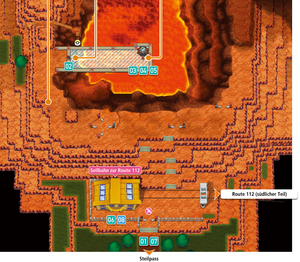
Team MagmaOR/Team AquaAS has taken Professor Cozmo's Meteorite to Mt. Chimney, and the only way to follow is by Cable Car. When you arrive, you find that the guards are no longer guarding the building. Collect the Guard Spec. to the east, then enter the station and take the Cable Car up to the summit.
Mt. Chimney
Located in the heart of Hoenn, Mt. Chimney is a monstrous volcano that seethes with incredible power. Although their intentions are not yet clear, Team MagmaOR/Team AquaAS is determined to use Professor Cozmo's Meteorite here in the next stage of their campaign.
| Trainers | ||||||||||||||||||||||||||||||||||||||||||||
|---|---|---|---|---|---|---|---|---|---|---|---|---|---|---|---|---|---|---|---|---|---|---|---|---|---|---|---|---|---|---|---|---|---|---|---|---|---|---|---|---|---|---|---|---|
| ||||||||||||||||||||||||||||||||||||||||||||
| Items | |||||||||||||||||||||||||||||||||||||||
|---|---|---|---|---|---|---|---|---|---|---|---|---|---|---|---|---|---|---|---|---|---|---|---|---|---|---|---|---|---|---|---|---|---|---|---|---|---|---|---|
| |||||||||||||||||||||||||||||||||||||||
Steer Clear of the Grunts
Normally, visitors to the mountaintop would be able to head south through Jagged Pass to reach Lavaridge Town. But Team Magma and Team Aqua are locked in battle all over the summit, including the entrance to the mountain pass. Let their Pokémon fight it out while you climb up north to the crater.
West of the stairway, you find Aqua Leader ArchieOR/Magma Leader MaxieAS in a skirmish against a group of opposing Grunts. You're only here for Cozmo's Meteorite, though, so slip past the battle and work your way to the northwest.
Spotted!
There is a single Grunt ahead standing guard, and you are quickly drawn into battle. But you're more than a match for one lowly Grunt, so finish him off quickly and continue northward.
Detour for a TM
Farther ahead is a glass bridge that extends over the mouth of the volcano. Ignore it for a moment and follow the narrow stairway instead. Loop around under the bridge to find TM59 (Incinerate).
Challenge Accepted!
Make your way to the glass bridge and you'll be stopped by TabithaOR/ShellyAS, who isn't about to let you pass by so easily!
VS Tabitha
| ||||||||||||||||||||||||||||||||||||||||||||||||||||||||||||||||||||||||||||||||
VS Shelly
| ||||||||||||||||||||||||||||||||||||||||||||||||||||||||||||||||||||||||||||||||
Battle with the Boss
TabithaOR/ShellyAS is defeated, but the real threat still lurks ahead. Continue along the bridge to find the leader of Team MagmaOR/Team AquaAS standing near some sort of high-tech device. After revealing a bit more about his organization's plans, he draws you into battle!
VS Maxie
| |||||||||||||||||||||||||||||||||||||||||||||||||||||||||||||||||||||||||||||||||||||||||||||||||||||||||||||||||||
VS Archie
| |||||||||||||||||||||||||||||||||||||||||||||||||||||||||||||||||||||||||||||||||||||||||||||||||||||||||||||||||||
With his defeat, MaxieOR/ArchieAS threatens to Mega Evolve his Pokémon. But before he is able to draw you into another battle, he suddenly receives a call. After muttering something about Mt. Pyre, he unexpectedly gives up the Meteorite and leaves.
As you turn to leave, you are stopped by ArchieOR/MaxieAS. He is shocked that his rival would hand over the Meteorite so easily, and seems fearful that the opposing team may have discovered where some important-sounding "orbs" are hidden. He then sets off to plan his team's next move.
Jagged Pass
Jagged Pass was formed as the result of an ancient volcanic eruption. When the lava cooled, it proved to be suitable for an alternate route to the summit. Many parts are too rough or slippery to traverse without a Bicycle.
| Trainers | |||||||||||||||||||||||||||||||||||||||||||||||||||||||||||||||||||||||||||||||||||||||||||||||
|---|---|---|---|---|---|---|---|---|---|---|---|---|---|---|---|---|---|---|---|---|---|---|---|---|---|---|---|---|---|---|---|---|---|---|---|---|---|---|---|---|---|---|---|---|---|---|---|---|---|---|---|---|---|---|---|---|---|---|---|---|---|---|---|---|---|---|---|---|---|---|---|---|---|---|---|---|---|---|---|---|---|---|---|---|---|---|---|---|---|---|---|---|---|---|---|
| |||||||||||||||||||||||||||||||||||||||||||||||||||||||||||||||||||||||||||||||||||||||||||||||
| Available Pokémon | ||||||||||||||||||||||||||||||||||||||||||||||||||||||||||||||||||||||||||||||||||||||||||||||||||||||||||||||||||||||||||||||
|---|---|---|---|---|---|---|---|---|---|---|---|---|---|---|---|---|---|---|---|---|---|---|---|---|---|---|---|---|---|---|---|---|---|---|---|---|---|---|---|---|---|---|---|---|---|---|---|---|---|---|---|---|---|---|---|---|---|---|---|---|---|---|---|---|---|---|---|---|---|---|---|---|---|---|---|---|---|---|---|---|---|---|---|---|---|---|---|---|---|---|---|---|---|---|---|---|---|---|---|---|---|---|---|---|---|---|---|---|---|---|---|---|---|---|---|---|---|---|---|---|---|---|---|---|---|---|
| ||||||||||||||||||||||||||||||||||||||||||||||||||||||||||||||||||||||||||||||||||||||||||||||||||||||||||||||||||||||||||||||
| Items | |||||||||||||||||||||||||||||||||||||||||||||||||||||||||||
|---|---|---|---|---|---|---|---|---|---|---|---|---|---|---|---|---|---|---|---|---|---|---|---|---|---|---|---|---|---|---|---|---|---|---|---|---|---|---|---|---|---|---|---|---|---|---|---|---|---|---|---|---|---|---|---|---|---|---|---|
| |||||||||||||||||||||||||||||||||||||||||||||||||||||||||||
With the Acro Bike
Jump the first two ledges and go west. Use the Acro Bike to bunny-hop down the circular stones to reach a Super Repel. Backtrack and head east from the entrance. Execute the same trick in the northeast corner to reach TM43 (Flame Charge). Go south, then turn west before reaching Expert Shelby. A hill on the west side features circular stones and a muddy slope; TM69 (Rock Polish) and a Secret Spot can be found at the top. Go south past Hiker Eric and slide down the middle slope for a Full Heal. Head east, then hop back up the hill to Camper Ethan; collect the hidden Great Ball and the Max Ether before continuing southward. Pass by Picnicker Diana and hop down the hill to reach an X Defense.
With the Mach Bike
Jump the first two ledges and go down the stairway. Slide down either of the two muddy slopes and jump another two ledges before turning west. Scale the small slope on the west side to find TM69 (Rock Polish) near a Secret Spot. Head back east to Expert Shelby, inspect the small rock to the west for a hidden Full Heal, then turn south. Search near Camper Ethan for a hidden Great Ball, then jump another ledge for a Max Ether. Go southwest to Fairy Tale Girl Nellie, then scale the middle slope to the north to get another Full Heal.
Lavaridge Town
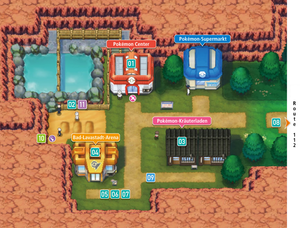
Nestled at the foot of Mt. Chimney, Lavaridge Town is a welcome sight for travelers and tourists alike. It is well-known throughout Hoenn for its soothing hot springs, said to cure any ailment, and also features a specialty shop that sells bitter but beneficial herbs for Pokémon. The Lavaridge Gym, fourth in the Hoenn League, stands in the southwest part of town.
| Available Pokémon | |||||||||||||||||||||||||||||||||||||||||||||||||||||||||||||||||||||||||||||||||||||||||||||||||||||||||||
|---|---|---|---|---|---|---|---|---|---|---|---|---|---|---|---|---|---|---|---|---|---|---|---|---|---|---|---|---|---|---|---|---|---|---|---|---|---|---|---|---|---|---|---|---|---|---|---|---|---|---|---|---|---|---|---|---|---|---|---|---|---|---|---|---|---|---|---|---|---|---|---|---|---|---|---|---|---|---|---|---|---|---|---|---|---|---|---|---|---|---|---|---|---|---|---|---|---|---|---|---|---|---|---|---|---|---|---|
| |||||||||||||||||||||||||||||||||||||||||||||||||||||||||||||||||||||||||||||||||||||||||||||||||||||||||||
| Items | ||||||||||||||||||||||||||||||||||||||||||||||||||||||||||||||
|---|---|---|---|---|---|---|---|---|---|---|---|---|---|---|---|---|---|---|---|---|---|---|---|---|---|---|---|---|---|---|---|---|---|---|---|---|---|---|---|---|---|---|---|---|---|---|---|---|---|---|---|---|---|---|---|---|---|---|---|---|---|---|
| ||||||||||||||||||||||||||||||||||||||||||||||||||||||||||||||
Communicating Through Dance
As you enter the town, you find a Black Belt standing outside the Poké Mart. He has a passion for dancing and karate, but his communication skills leave something to be desired. Disagree when he asks if you understand his words, and he will give you TM75 (Swords Dance) in the hopes that the "Suh-words Dance" move will help you comprehend.
Pokémon Center and Hot Springs
A Pokémon Breeder standing next to the counter is selling bottles of Moomoo Milk for $500 each. Bottles can be purchased individually, or by the dozen for $6,000. This nutritious milk restores 100 HP and is cheaper than a Super Potion, which only restores 50 points.
The building's two back doors lead to the steamy hot springs. Take a dip if you wish, and use the Dowsing Machine to find a hidden Ice Heal behind the door on the right. Afterward, use the PC to organize your party so that you are carrying no more than five Pokémon. Step outside and talk to the old woman near the sand baths, and she offers you a Pokémon Egg to take with you on your travels!
Herb Shop
At the Herb Shop, a woman sells herbal medicines for Pokémon. These natural remedies are just as effective as their traditional counterparts and less expensive, but their bitter taste make them difficult for Pokémon to take, leaving them less friendly toward you. As Max Revives cannot be purchased anywhere, it may be useful to buy a few Revival Herbs to have in case of an emergency.
| ||||||||||||||||||
Be sure to talk to the old man near the counter, as well. Doing so gets you a Charcoal, which boosts the power of Fire-type moves by 20% when held.
Lavaridge Gym
Like the name suggests, the Lavaridge Gym specializes in Fire-type Pokémon. Grass-, Bug-, Ice-, and Steel-type Pokémon are most vulnerable to their scorching attacks, while Water, Ground, and Rock moves will give you the upper hand. Wingull and Pelipper are great Pokémon to bring to this Gym; not only are they Water types, but as Flying types they also have an advantage against Battle Girl Sadie's Meditite. The Psychic-type Ralts can also help wear down the occasional Koffing found here. The humid Gym features two floors; stepping on a wooden panel will cause you to fall to the basement, and doing the same there will send you back to the first floor atop a geyser.
Step on the first trapdoor to fall through, then step on the panel to the right to return to 1F. Fight Kindler Cole and drop through the next trapdoor. Go west to battle Ninja Boy Hiromichi and take the far-left geyser. Head north past Kindler Axle and Battle Girl Sadie and drop through the northern-most trapdoor to B1F. Pass by the concealed Ninja Boy Shoji and ride the far-right geyser. Drop through the trapdoor south of Ace Trainer Zane. Battle Kindler Andy, then take the last geyser up to meet the Gym Leader.
Flannery has only recently begun serving as Gym Leader, and is intent on proving her worth. Given the chance, her Pokémon can unleash powerful moves that can reduce a challenger's party to cinders. Sunny Day gives a 50% power boost to all Fire attacks, which makes her Pokémon's strongest move, Overheat, even more devastating. Its only drawback is that it harshly lowers the user's Special Attack after each use, but once is usually enough! In addition, the harsh sunlight temporarily cuts the power of Water attacks in half.
| |||||||||||||||||||||||||||||||||||||||||||||||||||||||||||||||||||||||||||||||||||||||||||||||||||||||||||||||||||||||||||||||||||||||||||||||||||||||||||||||||||||||||||||||||||||||||||||||||||||||||||||||||||||||||||||||||||||||||||||
After the battle, Flannery awards you the Heat Badge, which ensures obedience of all Pokémon up to level 50 and enables the use of Strength in the field. She also hands out TM50 (Overheat) as a prize. Hop down the ledges in front of Flannery to quickly return to the entrance. Outside, May/Brendan is shocked that you managed to defeat Team MagmaOR/Team AquaAS on your own at Mt. Chimney. She/He hands you the Go-Goggles, which allow you to explore the desert of Route 111 in spite of the raging sandstorm. Seeing your shiny new Badge, your friend concludes that your next stop is the Gym in Petalburg City. She/He happens to be headed to the same place, and invites you to travel with her/him. If you decline, you will have a chance to do some optional things before continuing on, and your friend will wait here patiently for a while if you change your mind.

|
This article is part of Project Walkthroughs, a Bulbapedia project that aims to write comprehensive step-by-step guides on each Pokémon game. |
