Appendix:FireRed and LeafGreen walkthrough/Section 13: Difference between revisions
m (replaced: {{OBP|Pearl|item}} → {{i|Pearl}}, {{ball|Ultra}} → Ultra Ball) |
mNo edit summary |
||
| Line 1: | Line 1: | ||
{{WalkthroughNotice|FRLG}} | {{WalkthroughNotice|FRLG}} | ||
== | ==Cinnabar Island== | ||
[[File: | [[File:Cinnabar Island FRLG.png|thumb|Cinnabar Island]] | ||
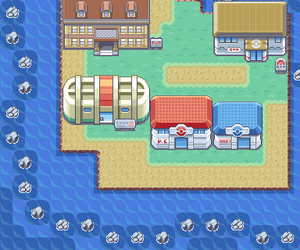
{{isl|Cinnabar}} is a large island to the southwest of mainland [[Kanto]], between Routes {{rtn|20|Kanto}} and {{rtn|21|Kanto}}. The [[Cinnabar Lab]], where researchers have developed a way to revive ancient Pokémon, stands to the west. A broken-down building known as {{ka|Pokémon Mansion}} is located on the island's northwest side. The [[Cinnabar Gym]] can be found to the northeast, but is currently locked up tight. | |||
{| class="expandable" align="center" style="background: # | {| class="expandable" align="center" style="background: #C46C65; {{roundy}}; border: 5px solid #D89D98;" | ||
|- align="center" | |- align="center" | ||
! Available Pokémon | ! Available Pokémon | ||
|- | |- | ||
| | | | ||
{{ | {{catch/header|volcano|no}} | ||
{{Catch/div|ocean|Surfing}} | {{Catch/div|ocean|Surfing}} | ||
{{Catch/entryfl|072|Tentacool|yes|yes|Surf|5-40|100%|type1=Water|type2=Poison}} | {{Catch/entryfl|072|Tentacool|yes|yes|Surf|5-40|100%|type1=Water|type2=Poison}} | ||
| Line 43: | Line 17: | ||
{{Catch/entryfl|116|Horsea|yes|no|Fish Good|5-15|60%|type1=Water}} | {{Catch/entryfl|116|Horsea|yes|no|Fish Good|5-15|60%|type1=Water}} | ||
{{Catch/entryfl|098|Krabby|no|yes|Fish Good|5-15|60%|type1=Water}} | {{Catch/entryfl|098|Krabby|no|yes|Fish Good|5-15|60%|type1=Water}} | ||
{{Catch/entryfl|116|Horsea|no|yes|Fish Good|5-15|20%|type1=Water}} | |||
{{Catch/entryfl|098|Krabby|yes|no|Fish Good|5-15|20%|type1=Water}} | {{Catch/entryfl|098|Krabby|yes|no|Fish Good|5-15|20%|type1=Water}} | ||
{{Catch/entryfl|129|Magikarp|yes|yes|Fish Good|5-15|20%|type1=Water}} | {{Catch/entryfl|129|Magikarp|yes|yes|Fish Good|5-15|20%|type1=Water}} | ||
{{Catch/entryfl|116|Horsea|yes|no|Fish Super|15-25| | {{catch/entryfl|090|Shellder|yes|no|Fish Super|15-25|40%|type1=Water}} | ||
{{Catch/entryfl|098|Krabby|no|yes|Fish Super|15-25| | {{Catch/entryfl|116|Horsea|yes|no|Fish Super|15-25|40%|type1=Water}} | ||
{{Catch/entryfl|098|Krabby|no|yes|Fish Super|15-25|40%|type1=Water}} | |||
{{catch/entryfl|120|Staryu|no|yes|Fish Super|15-25|40%|type1=Water}} | |||
{{Catch/entryfl|130|Gyarados|yes|yes|Fish Super|15-25|15%|type1=Water|type2=Flying}} | {{Catch/entryfl|130|Gyarados|yes|yes|Fish Super|15-25|15%|type1=Water|type2=Flying}} | ||
{{Catch/entryfl|117|Seadra|yes|no|Fish Super|25-35|4%|type1=Water}} | {{Catch/entryfl|117|Seadra|yes|no|Fish Super|25-35|4%|type1=Water}} | ||
{{Catch/entryfl| | {{Catch/entryfl|080|Slowbro|no|yes|Fish Super|25-35|4%|type1=Water|type2=Psychic}} | ||
{{Catch/entryfl|054|Psyduck|yes|no|Fish Super|25-35|1%|type1=Water}} | {{Catch/entryfl|054|Psyduck|yes|no|Fish Super|25-35|1%|type1=Water}} | ||
{{Catch/entryfl|079|Slowpoke|no|yes|Fish Super|25-35|1%|type1=Water|type2=Psychic}} | {{Catch/entryfl|079|Slowpoke|no|yes|Fish Super|25-35|1%|type1=Water|type2=Psychic}} | ||
{{Catch/footer| | {{Catch/div|building|Gift Pokémon}} | ||
{{Catch/entryfl|138|Omanyte|yes|yes|Helix|5|One|type1=Rock|type2=Water}} | |||
{{Catch/entryfl|140|Kabuto|yes|yes|Dome|5|One|type1=Rock|type2=Water}} | |||
{{Catch/entryfl|142|Aerodactyl|yes|yes|Amber|5|One|type1=Rock|type2=Flying}} | |||
{{Catch/div|building|Special Pokémon}} | |||
{{Catch/entryfl|086|Seel|yes|yes|Trade|tradenum=077|tradename=Ponyta|The same as the traded Pokémon|One|type1=Water}} | |||
{{Catch/entryfl|101|Electrode|yes|yes|Trade|tradenum=026|tradename=Raichu|The same as the traded Pokémon|One|type1=Electric}} | |||
{{Catch/entryfl|114|Tangela|yes|yes|Trade|tradenum=048|tradename=Venonat|The same as the traded Pokémon|One|type1=Grass}} | |||
{{catch/footer|volcano}} | |||
|} | |} | ||
{| class="expandable" align="center" style="background: # | {| class="expandable" align="center" style="background: #C46C65; {{roundy}}; border: 5px solid #D89D98;" | ||
|- align="center" | |- align="center" | ||
! Items | ! Items | ||
|- | |- | ||
| | | | ||
{{itlisth| | {{itlisth|volcano}} | ||
{{Itemlist| | {{itemlist|Stardust|Cinnabar Lab; held by Tangeny, a {{p|Tangela}} received through a trade|FR=yes|LG=yes}} | ||
{{itlistfoot| | {{Itemlist|TM Fire|From Blaine, after defeating him|FR=yes|LG=yes|display={{TM|38|Fire Blast}}}} | ||
{{itlistfoot|volcano}} | |||
|} | |} | ||
{{-}} | |||
== | ===Cinnabar Lab=== | ||
{| | ====Meeting Room==== | ||
| | =====Time for a Trade===== | ||
In the Meeting Room, two of the three people are looking to trade. The old man offers to trade his {{p|Electrode}} for a {{p|Raichu}}, and the woman offers her {{p|Tangela}} for a {{p|Venonat}}. Electrode can be evolved from {{p|Voltorb}} but are rare in the wild. Tangela only makes its home in one area and is difficult to find. | |||
====R-and-D Room==== | |||
In the Research-and-Development Room, speak to the Super Nerd. This [[Move Tutor]] offers to teach {{m|Metronome}} to a compatible Pokémon. When used, Metronome executes a randomly selected move. | |||
====Testing Room==== | |||
=====Time for a Trade===== | |||
In the Testing Room, one of the Scientists is willing to trade his {{p|Seel}} for a {{p|Ponyta}}. As Seel would have been a common sight in the [[Seafoam Islands]], it is likely that you have caught one already, potentially making this trade less useful than others. | |||
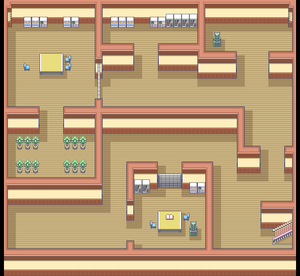
[[File:Pokémon Mansion 1F FRLG.png|thumb|Pokémon Mansion, 1F]] | |||
[[File:Pokémon Mansion 2F FRLG.png|thumb|Pokémon Mansion, 2F]] | |||
[[File:Pokémon Mansion 3F FRLG.png|thumb|Pokémon Mansion, 3F]] | |||
[[File:Pokémon Mansion B1F FRLG.png|thumb|Pokémon Mansion, B1F]] | |||
=====Fossil Regeneration===== | |||
The Scientist near the back wall runs the [[fossil]] regeneration procedure. Speak to him to hand over the [[Helix Fossil]], [[Dome Fossil]], or [[Old Amber]]. The procedure takes a moment to complete, so leave the room and return a short time later to receive the ancient Pokémon. The Helix Fossil and Dome Fossil become {{p|Omanyte}} and {{p|Kabuto}}, respectively; both are {{2t|Rock|Water}} Pokémon that swam the primordial seas. The Old Amber becomes the {{2t|Rock|Flying}} {{p|Aerodactyl}}, a terror of the prehistoric skies. | |||
{| style="margin: auto; background: #D9D9D9; {{roundy}}; border: 2px solid #CCCCCC;" | |||
|- | |||
! colspan="3" style="background: #E6E6E6; {{roundytop|5px}}; padding 5px;" | {{color2|000|Fossil|Fossil Pokémon}} | |||
|- | |||
| align="center" style="background: #{{rock color light}}; padding: 5px;" | [[File:Bag Helix Fossil Sprite.png]] → {{MSP/3|138|Omanyte}} | |||
| align="center" style="background: #{{rock color light}}; padding: 5px;" | [[File:Bag Dome Fossil Sprite.png]] → {{MSP/6|140|Kabuto}} | |||
| align="center" style="background: #{{rock color light}}; padding: 5px;" | [[File:Bag Old Amber Sprite.png]] → {{MSP/6|142|Aerodactyl}} | |||
|- | |- | ||
| | | style="background: #{{water color light}}; {{roundybl|5px}}; padding: 5px;" | {{color2|000|Helix Fossil}} → {{color2|000|Omanyte (Pokémon)|Omanyte}} | ||
{{ | | style="background: #{{water color light}}; padding: 5px;" | {{color2|000|Dome Fossil}} → {{color2|000|Kabuto (Pokémon)|Kabuto}} | ||
{{ | | style="background: #{{flying color light}}; {{roundybr|5px}}; padding: 5px;" | {{color2|000|Old Amber}} → {{color2|000|Aerodactyl (Pokémon)|Aerodactyl}} | ||
{{ | |||
{{ | |||
{{ | |||
{{ | |||
{{ | |||
{{ | |||
{{ | |||
{{ | |||
{{ | |||
|} | |} | ||
{| class="expandable" align="center" style="background: #{{locationcolor/med| | ===Pokémon Mansion=== | ||
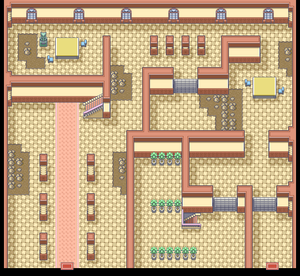
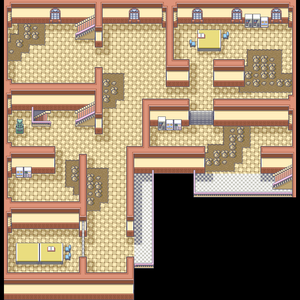
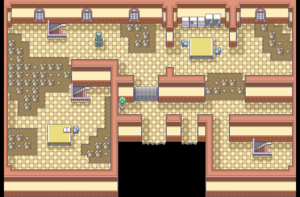
The {{ka|Pokémon Mansion}} is the decrepit, burned-down former home of a famous Pokémon researcher. The building uses several hidden switches to lock and unlock doors, and Burglars prowl the ruins for valuable items. A series of [[Pokémon Mansion journals|journal entries]] can be found scattered around the mansion that describe the birth and escape of {{p|Mewtwo|a genetically-engineered Pokémon}}. | |||
{| class="expandable" align="center" style="background: #{{locationcolor/med|ruins}}; {{roundy}}; border: 5px solid #{{locationcolor/light|ruins}};" | |||
|- align="center" | |- align="center" | ||
! Trainers | ! Trainers | ||
|- | |- | ||
| | | | ||
{{trainerheader| | {{trainerheader|ruins}} | ||
{{ | {{trainerentry|Spr FRLG Youngster.png|Youngster|Johnson|544|3|023|Ekans|♂|33|None|023|Ekans|♂|33|None|020|Raticate|♂|34|None}} | ||
{{trainerfooter| | {{trainerdiv|ruins}} | ||
{{trainerentry|Spr FRLG Burglar.png|Burglar|Arnie|2992|2|004|Charmander|♂|34|None|005|Charmeleon|♂|34|None}} | |||
{{trainerdiv|ruins}} | |||
{{trainerentry|Spr FRLG Burglar.png|Burglar|Simon|3344|1|038|Ninetales|♀|38|None}} | |||
{{trainerdiv|ruins}} | |||
{{trainerentry|Spr FRLG Scientist.png|Scientist|Braydon|1584|3|081|Magnemite||33|None|082|Magneton||33|None|100|Voltorb||33|None}} | |||
{{trainerdiv|ruins}} | |||
{{trainerentry|Spr FRLG Scientist.png|Scientist|Ted|1392|2|101|Electrode||29|None|110|Weezing|♂|29|None}} | |||
{{trainerdiv|ruins}} | |||
{{trainerentry|Spr FRLG Burglar.png|Burglar|Lewis|2992|2|058|Growlithe|♂|34|None|077|Ponyta|♂|34|None}} | |||
{{trainerdiv|ruins}} | |||
{{trainerentry|Spr FRLG Scientist.png|Scientist|Ivan|1632|2|081|Magnemite||34|None|101|Electrode||34|None}} | |||
{{trainerfooter|ruins|FRLG}} | |||
|} | |} | ||
{| class="expandable" align="center" style="background: #{{locationcolor/med| | {| class="expandable" align="center" style="background: #{{locationcolor/med|ruins}}; {{roundy}}; border: 5px solid #{{locationcolor/light|ruins}};" | ||
|- align="center" | |- align="center" | ||
! Available Pokémon | ! Available Pokémon | ||
|- | |- | ||
| | | | ||
{{catch/header| | {{catch/header|ruins|no}} | ||
{{ | {{catch/div|ruins|1F-3F}} | ||
{{ | {{catch/entryfl|020|Raticate|yes|yes|1F-3F|32, 36|30%|type1=Normal}} | ||
{{ | {{catch/entryfl|088|Grimer|no|yes|1F-3F|28, 30|30%|type1=Poison}} | ||
{{ | {{catch/entryfl|109|Koffing|yes|no|1F-3F|28, 30|30%|type1=Poison}} | ||
{{ | {{catch/entryfl|019|Rattata|yes|yes|1F-3F|26, 28|15%|type1=Normal}} | ||
{{ | {{catch/entryfl|037|Vulpix|no|yes|1F-3F|30, 32|15%|type1=Fire}} | ||
{{catch/ | {{catch/entryfl|058|Growlithe|yes|no|1F-3F|30, 32|15%|type1=Fire}} | ||
{{ | {{catch/entryfl|088|Grimer|yes|no|1F-3F|28|5%|type1=Poison}} | ||
{{ | {{catch/entryfl|089|Muk|no|yes|1F-3F|32|5%|type1=Poison}} | ||
{{ | {{catch/entryfl|109|Koffing|no|yes|1F-3F|28|5%|type1=Poison}} | ||
{{catch/entryfl|110|Weezing|yes|no|1F-3F|32|5%|type1=Poison}} | |||
{{catch/div|ruins|B1F}} | |||
{{catch/entryfl|020|Raticate|yes|yes|B1F|34, 38|30%|type1=Normal}} | |||
{{catch/entryfl|088|Grimer|no|yes|B1F|28, 30|30%|type1=Poison}} | |||
{{catch/entryfl|109|Koffing|yes|no|B1F|28, 30|30%|type1=Poison}} | |||
{{catch/entryfl|037|Vulpix|no|yes|B1F|30, 32|15%|type1=Fire}} | |||
{{catch/entryfl|058|Growlithe|yes|no|B1F|30, 32|15%|type1=Fire}} | |||
{{catch/entryfl|132|Ditto|yes|yes|B1F|30|10%|type1=Normal}} | |||
{{catch/entryfl|019|Rattata|yes|yes|B1F|26|5%|type1=Normal}} | |||
{{catch/entryfl|088|Grimer|yes|no|B1F|28|5%|type1=Poison}} | |||
{{catch/entryfl|089|Muk|no|yes|B1F|34|5%|type1=Poison}} | |||
{{catch/entryfl|109|Koffing|no|yes|B1F|28|5%|type1=Poison}} | |||
{{catch/entryfl|110|Weezing|yes|no|B1F|34|5%|type1=Poison}} | |||
{{catch/footer|ruins}} | |||
|} | |} | ||
{| class="expandable" align="center" style="background: #{{locationcolor/med| | {| class="expandable" align="center" style="background: #{{locationcolor/med|ruins}}; {{roundy}}; border: 5px solid #{{locationcolor/light|ruins}};" | ||
|- align="center" | |- align="center" | ||
! Items | ! Items | ||
|- | |- | ||
| | | | ||
{{itlisth| | {{itlisth|ruins}} | ||
{{ | {{Itemlist|Moon Stone|1F; one step north, three steps west of the northwest entryway ''(hidden)''|FR=yes|LG=yes}} | ||
{{Itemlist| | {{Itemlist|Escape Rope|1F; among the pillars near the north wall|FR=yes|LG=yes}} | ||
{{ | {{Itemlist|Protein|1F; northeast room, west side|FR=yes|LG=yes}} | ||
{{Itemlist| | {{Itemlist|Carbos|1F (South); among the potted plants|FR=yes|LG=yes}} | ||
{{Itemlist| | {{Itemlist|Calcium|2F; northeast room among the rubble|FR=yes|LG=yes}} | ||
{{Itemlist| | {{Itemlist|HP Up|2F (East); accessed via the stairs to 3F|FR=yes|LG=yes}} | ||
{{Itemlist| | {{Itemlist|Zinc|2F; on the western balcony|FR=yes|LG=yes}} | ||
{{Itemlist| | {{Itemlist|Iron|3F; in the northeast room|FR=yes|LG=yes}} | ||
{{Itemlist|Rare Candy|3F; at the end of the east-central hallway ''(hidden)''|FR=yes|LG=yes}} | |||
{{Itemlist|Max Potion|3F (Southwest); accessed via 2F|FR=yes|LG=yes}} | |||
{{Itemlist| | {{Itemlist|Full Restore|B1F; southwest corner|FR=yes|LG=yes}} | ||
{{ | {{Itemlist|Elixir|B1F; northeast room, eight steps east of the statue ''(hidden)''|FR=yes|LG=yes}} | ||
{{Itemlist| | {{Itemlist|TM Ice|B1F; in the north-central room|FR=yes|LG=yes|display={{TM|14|Blizzard}}}} | ||
{{Itemlist|Secret Key III|B1F; on a table in the northwestern room|FR=yes|LG=yes|display={{ka|Secret Key}}}} | |||
{{Itemlist|TM Grass|B1F; in the the west-central room|FR=yes|LG=yes|display={{TM|22|SolarBeam}}}} | |||
{{itlistfoot| | {{itlistfoot|ruins}} | ||
|} | |} | ||
====1F==== | |||
Go to the northwest room and battle Youngster Johnson, then inspect the stone statue to flip a hidden switch. Head east to reach an [[Escape Rope]] at the four pillars, then turn south; pass through the newly-opened door to reach a [[Protein]] in the central room. Return to the entrance and climb the stairs at the end of the entryway. | |||
====2F==== | |||
Visit the west-southwest room to fight Burglar Arnie. Follow the hallway to the southwest room to find the first journal entry, and a [[Zinc]] on the southern balcony. Return to the stairs and inspect the nearest statue to flip the switch. Go northeast to find a second journal entry and a [[Calcium]] beyond that. Climb up the stairs in the northwest room. | |||
====3F==== | |||
Head east to reach an [[Iron]] in the northeast room. Inspect the statue and flip the switch to open the south door, then battle Scientist Braydon. Take the southeast staircase down to a separate area of 2F. | |||
Grab the [[HP Up]] to the north, then head back upstairs. | |||
Jump off the smaller balcony to the right, near Scientist Braydon. | |||
====2F==== | |||
Go north and climb up the stairs near the statue to a separate area of the third floor. | |||
====3F (Southwest)==== | |||
This dead-end area of the third floor holds Burglar Simon and a third journal entry. Collect the [[Max Potion]] and head back downstairs. | |||
====2F==== | |||
Flip the switch and climb the stairs in the northwest room again. | |||
====3F==== | |||
Inspect the statue and flip the switch to open the south door. Approach Scientist Braydon again, and this time jump off the larger balcony to the left. | |||
== | ====1F (South)==== | ||
Battle Scientist Ted, grab the [[Carbos]], and take the stairs to the basement. | |||
====B1F==== | |||
=== | Visit the southern room to fight Burglar Lewis. The final journal entry can be found on the table here. Inspect the statue and flip the switch. Go west to grab the [[Full Restore]]. Follow the narrow hallway in the northeast to battle Scientist Ivan, then flip the switch on the statue in the northeast room. Pick up {{TM|14|Blizzard}} in the north-central room. The {{ka|Secret Key}} is located on a table in the northwest room, and {{TM|22|SolarBeam}} can be found in the west-central room. | ||
[[ | |||
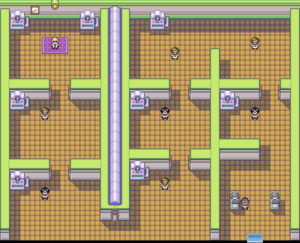
[[File:Cinnabar Gym FRLG.png|thumb|Cinnabar Gym]] | |||
===Cinnabar Gym=== | |||
{{sign|FRLG|header}} | {{sign|FRLG|header}} | ||
{{sign|FRLG|title| | {{sign|FRLG|title|CINNABAR ISLAND POKéMON GYM<br>LEADER: BLAINE}} | ||
{{sign|FRLG|The Hot-Headed Quiz Master!}} | |||
{{sign|FRLG|footer}} | {{sign|FRLG|footer}} | ||
The [[Cinnabar Gym]] specializes in {{type|Fire}} Pokémon. Fire-type moves are super effective against {{t|Bug}}-, {{t|Grass}}-, {{t|Ice}}-, and {{type|Steel}} Pokémon, while Fire-type Pokémon are weak to {{t|Ground}}-, {{t|Rock}}-, and {{type|Water}} moves. When playing with fire there is always the chance of getting {{status|Burn}}ed, so be sure to bring some [[Burn Heal]]s. The [[Gym Leader]] enjoys riddles and has equipped his Gym with machines that display a quiz when examined. When each question is answered correctly, the door to the next room unlocks. This allows challengers to reach the Gym Leader sooner, but gives up the rewards of defeating his Gym Trainers. | |||
{| style="margin: auto; background: #{{fire color}}; {{roundy}}; border: 2px solid #{{fire color dark}};" | |||
|- | |||
! style="background: #{{fire color light}}; {{roundytl|5px}}; padding: 5px;" | Question | |||
! style="background: #{{fire color light}}; {{roundytr|5px}}; padding: 5px;" | Answers | |||
|- | |||
| rowspan="2" style="background: #FFF; padding: 5px;" | 1. {{p|Caterpie}} evolves into {{p|Butterfree}}? | |||
| style="background: #FFF; padding: 5px;" | '''Yes''' | |||
|- | |||
| style="background: #FFF; padding: 5px;" | No | |||
|- | |||
| rowspan="2" style="background: #FFF; padding: 5px;" | 2. There are nine certified Pokémon League [[Badge]]s? | |||
| style="background: #FFF; padding: 5px;" | Yes | |||
|- | |||
| style="background: #FFF; padding: 5px;" | '''No''' | |||
|- | |||
| rowspan="2" style="background: #FFF; padding: 5px;" | 3. {{p|Poliwag}} evolves three times? | |||
| style="background: #FFF; padding: 5px;" | Yes | |||
|- | |||
| style="background: #FFF; padding: 5px;" | '''No''' | |||
|- | |||
| rowspan="2" style="background: #FFF; padding: 5px;" | 4. Are {{t|Electric}} moves effective against {{type|Ground}} Pokémon? | |||
| style="background: #FFF; padding: 5px;" | Yes | |||
|- | |||
| style="background: #FFF; padding: 5px;" | '''No''' | |||
|- | |||
| rowspan="2" style="background: #FFF; padding: 5px;" | 5. Pokémon of the same [[Pokémon (species)|kind]] and [[level]] are not identical? | |||
| style="background: #FFF; padding: 5px;" | '''Yes''' | |||
|- | |||
| style="background: #FFF; padding: 5px;" | No | |||
|- | |||
| rowspan="2" style="background: #FFF; padding: 5px;" | 6. [[TM28]] contains Tombstony? | |||
| style="background: #FFF; padding: 5px;" | Yes | |||
|- | |||
| style="background: #FFF; padding: 5px;" | '''No''' | |||
|- | |||
| colspan="2" style="background: #{{fire color light}}; {{roundybottom|5px}};" | | |||
<center><small>Correct answers are marked in '''bold'''.</small></center> | |||
|} | |||
| | {| style="margin: auto;" | ||
| | |- align="center" valign="top" | ||
| | | | ||
| | {| align="center" style="background: #{{fire color}}; {{roundy}}; border: 5px solid #{{fire color light}};" | ||
| | |- align="center" | ||
| | ! Cinnabar Gym<br>[[File:Volcano Badge.png|35px|The Volcano Badge]]<br><br /> | ||
{{ | |- | ||
| | | | ||
| | {| align="center" class="expandable" style="background: #{{fire color}}; {{roundy}}; border: 5px solid #{{fire color light}};" | ||
| | |- align="center" | ||
| | ! Trainers | ||
| | |- | ||
| | | | ||
| | {{Trainerheader|Fire}} | ||
| | {{Trainerentry|Spr FRLG Burglar.png|Burglar|Quinn|3168|3|058|Growlithe|♂|36|None|037|Vulpix|♀|36|None|038|Ninetales|♀|36|None}} | ||
{{Trainerdiv|Fire}} | |||
{{Trainerentry|Spr FRLG Super Nerd.png|Super Nerd|Erik|864|3|037|Vulpix|♀|36|None|037|Vulpix|♀|36|None|038|Ninetales|♀|36|None}} | |||
{{Trainerdiv|Fire}} | |||
{{Trainerentry|Spr FRLG Super Nerd.png|Super Nerd|Avery|816|4|077|Ponyta|♂|34|None|004|Charmander|♂|34|None|037|Vulpix|♀|34|None|058|Growlithe|♂|34|None}} | |||
{{Trainerdiv|Fire}} | |||
{{Trainerentry|Spr FRLG Burglar.png|Burglar|Ramon|3608|1|077|Ponyta|♂|41|None}} | |||
{{Trainerdiv|Fire}} | |||
{{Trainerentry|Spr FRLG Super Nerd.png|Super Nerd|Derek|984|1|078|Rapidash|♂|41|None}} | |||
{{Trainerdiv|Fire}} | |||
{{Trainerentry|Spr FRLG Burglar.png|Burglar|Dusty|3256|2|037|Vulpix|♀|37|None|058|Growlithe|♂|37|None}} | |||
{{Trainerdiv|Fire}} | |||
{{Trainerentry|Spr FRLG Super Nerd.png|Super Nerd|Zac|888|2|058|Growlithe|♂|37|None|037|Vulpix|♀|37|None}} | |||
{{Trainerfooter|Fire|I}} | |||
|} | |||
{{Party/ | {| style="margin: auto;" | ||
{{ | | | ||
|ndex= | {{Party/Single | ||
|type1= | |color={{fire color}} | ||
| | |bordercolor={{fire color dark}} | ||
|ability= | |headcolor={{fire color light}} | ||
|move1= | |sprite=Spr FRLG Blaine.png| | ||
|move2= | |prize={{pdollar}}4700 | ||
|move3= | |class=Leader | ||
|move4= | |classlink=Gym Leader | ||
|name={{color2|000|Blaine}} | |||
{{ | |game=FRLG | ||
|ndex= | |location=Cinnabar Gym | ||
|type1= | |pokemon=4}} | ||
| | |{{Pokémon/3 | ||
|ability= | |game=FireRed | ||
|move1= | |ndex=058 | ||
|move2= | |pokemon=Growlithe | ||
|move3= | |gender=male | ||
|move4= | |ability=Intimidate | ||
|level=42 | |||
|type1=Fire | |||
|move1=Bite|move1type=Dark | |||
|move2=Roar|move2type=Normal | |||
|move3=Take Down|move3type=Normal | |||
|move4=Fire Blast|move4type=Fire}} | |||
|{{Pokémon/3 | |||
|game=FireRed | |||
|ndex=077 | |||
|pokemon=Ponyta | |||
|gender=male | |||
|ability=Flash Fire | |||
|level=40 | |||
|type1=Fire | |||
|move1=Stomp|move1type=Normal | |||
|move2=Bounce|move2type=Flying | |||
|move3=Fire Spin|move3type=Fire | |||
|move4=Fire Blast|move4type=Fire}} | |||
{{Party/Div|color={{fire color}}}} | |||
|{{Pokémon/3 | |||
|game=FireRed | |||
|ndex=078 | |||
|pokemon=Rapidash | |||
|gender=male | |||
|ability=Flash Fire | |||
|level=42 | |||
|type1=Fire | |||
|move1=Stomp|move1type=Normal | |||
|move2=Bounce|move2type=Flying | |||
|move3=Fire Spin|move3type=Fire | |||
|move4=Fire Blast|move4type=Fire}} | |||
|{{Pokémon/3 | |||
|game=FireRed | |||
|ndex=059 | |||
|pokemon=Arcanine | |||
|gender=male | |||
|ability=Intimidate | |||
|level=47 | |||
|type1=Fire | |||
|move1=Bite|move1type=Dark | |||
|move2=Roar|move2type=Normal | |||
|move3=Take Down|move3type=Normal | |||
|move4=Fire Blast|move4type=Fire}} | |||
{{Party/Footer}} | {{Party/Footer}} | ||
}} | |} | ||
|} | |||
|} | |||
After the battle, [[Blaine]] awards you the {{badge|Volcano}}, which gives your Pokémon a slight {{stat|Special Attack}} and {{stat|Special Defense}} boost during battle and enables the use of {{m|Waterfall}} in the field. He also gives you {{TM|38|Fire Blast}} as a prize. | |||
===Set Sail for the Sevii Islands!=== | |||
When you leave the Gym, you find [[Bill]] waiting outside. A friend of his has invited him to visit [[One Island]], part of an island chain far to the south of the [[Kanto]] mainland. He is on his way there now, and decides to invite you along, as well. Decline his offer at first and he will wait for you inside the Pokémon Center. His friend's ship has not yet arrived, so take a moment to prepare as PC services on these remote islands will be unavailable. Speak to him to board the ferry for the [[Sevii Islands]]! | |||
{{WalkthroughPrevNext | {{WalkthroughPrevNext | ||
|game=FireRed | |game=FireRed|game2=LeafGreen | ||
|game2=LeafGreen | |||
|gamename=FireRed and LeafGreen | |gamename=FireRed and LeafGreen | ||
|prevsection=12 | |prevsection=12 | ||
|prevname= | |prevname=Routes 12, 13, 14 and 15, Fuchsia City, Route 19, Route 20, Seafoam Islands | ||
|nextsection=14 | |nextsection=14 | ||
|nextname= | |nextname=One Island, Two Island, Three Island | ||
}} | }} | ||
Latest revision as of 14:26, 13 March 2024
These pages follow the remade Game Boy Advance iteration, not Pokémon Red and Blue. The guide for those games can be found here.
Cinnabar Island
Cinnabar is a large island to the southwest of mainland Kanto, between Routes 20 and 21. The Cinnabar Lab, where researchers have developed a way to revive ancient Pokémon, stands to the west. A broken-down building known as Pokémon Mansion is located on the island's northwest side. The Cinnabar Gym can be found to the northeast, but is currently locked up tight.
| Available Pokémon | ||||||||||||||||||||||||||||||||||||||||||||||||||||||||||||||||||||||||||||||||||||||||||||||||||||||||||||||||||||||||||||||||||||||||||||||||||||||||||||||||||||||||||||||||||||||||||||||||||||||||||||||||||||||||||||||||||||||||||||||||||||||||||||||||||||||||||||||||||||||||||||||||||||||||||||||||||||||||||||||||||||||||||||||||||||||||||||||||||||||||||||||||||||||||||||||||||||||||||||||||||||||||||||||||||||||||||||||||||||||
|---|---|---|---|---|---|---|---|---|---|---|---|---|---|---|---|---|---|---|---|---|---|---|---|---|---|---|---|---|---|---|---|---|---|---|---|---|---|---|---|---|---|---|---|---|---|---|---|---|---|---|---|---|---|---|---|---|---|---|---|---|---|---|---|---|---|---|---|---|---|---|---|---|---|---|---|---|---|---|---|---|---|---|---|---|---|---|---|---|---|---|---|---|---|---|---|---|---|---|---|---|---|---|---|---|---|---|---|---|---|---|---|---|---|---|---|---|---|---|---|---|---|---|---|---|---|---|---|---|---|---|---|---|---|---|---|---|---|---|---|---|---|---|---|---|---|---|---|---|---|---|---|---|---|---|---|---|---|---|---|---|---|---|---|---|---|---|---|---|---|---|---|---|---|---|---|---|---|---|---|---|---|---|---|---|---|---|---|---|---|---|---|---|---|---|---|---|---|---|---|---|---|---|---|---|---|---|---|---|---|---|---|---|---|---|---|---|---|---|---|---|---|---|---|---|---|---|---|---|---|---|---|---|---|---|---|---|---|---|---|---|---|---|---|---|---|---|---|---|---|---|---|---|---|---|---|---|---|---|---|---|---|---|---|---|---|---|---|---|---|---|---|---|---|---|---|---|---|---|---|---|---|---|---|---|---|---|---|---|---|---|---|---|---|---|---|---|---|---|---|---|---|---|---|---|---|---|---|---|---|---|---|---|---|---|---|---|---|---|---|---|---|---|---|---|---|---|---|---|---|---|---|---|---|---|---|---|---|---|---|---|---|---|---|---|---|---|---|---|---|---|---|---|---|---|---|---|---|---|---|---|---|---|---|---|---|---|---|---|---|---|---|---|---|---|---|---|---|---|---|---|---|---|---|---|---|---|---|---|---|---|---|---|---|---|---|---|---|---|---|---|---|---|---|---|---|---|---|---|---|---|---|---|---|---|---|---|---|---|---|---|---|---|---|---|---|---|---|---|---|---|---|---|---|---|---|---|---|---|
| ||||||||||||||||||||||||||||||||||||||||||||||||||||||||||||||||||||||||||||||||||||||||||||||||||||||||||||||||||||||||||||||||||||||||||||||||||||||||||||||||||||||||||||||||||||||||||||||||||||||||||||||||||||||||||||||||||||||||||||||||||||||||||||||||||||||||||||||||||||||||||||||||||||||||||||||||||||||||||||||||||||||||||||||||||||||||||||||||||||||||||||||||||||||||||||||||||||||||||||||||||||||||||||||||||||||||||||||||||||||
| Items | ||||||||||||||||
|---|---|---|---|---|---|---|---|---|---|---|---|---|---|---|---|---|
| ||||||||||||||||
Cinnabar Lab
Meeting Room
Time for a Trade
In the Meeting Room, two of the three people are looking to trade. The old man offers to trade his Electrode for a Raichu, and the woman offers her Tangela for a Venonat. Electrode can be evolved from Voltorb but are rare in the wild. Tangela only makes its home in one area and is difficult to find.
R-and-D Room
In the Research-and-Development Room, speak to the Super Nerd. This Move Tutor offers to teach Metronome to a compatible Pokémon. When used, Metronome executes a randomly selected move.
Testing Room
Time for a Trade
In the Testing Room, one of the Scientists is willing to trade his Seel for a Ponyta. As Seel would have been a common sight in the Seafoam Islands, it is likely that you have caught one already, potentially making this trade less useful than others.
Fossil Regeneration
The Scientist near the back wall runs the fossil regeneration procedure. Speak to him to hand over the Helix Fossil, Dome Fossil, or Old Amber. The procedure takes a moment to complete, so leave the room and return a short time later to receive the ancient Pokémon. The Helix Fossil and Dome Fossil become Omanyte and Kabuto, respectively; both are Rock/Water Pokémon that swam the primordial seas. The Old Amber becomes the Rock/Flying Aerodactyl, a terror of the prehistoric skies.
| Fossil Pokémon | ||
|---|---|---|
| Helix Fossil → Omanyte | Dome Fossil → Kabuto | Old Amber → Aerodactyl |
Pokémon Mansion
The Pokémon Mansion is the decrepit, burned-down former home of a famous Pokémon researcher. The building uses several hidden switches to lock and unlock doors, and Burglars prowl the ruins for valuable items. A series of journal entries can be found scattered around the mansion that describe the birth and escape of a genetically-engineered Pokémon.
| Trainers | |||||||||||||||||||||||||||||||||||||||||||||||||||||||||||||||||||||||||||||||||||||||||||||||||||||||||||||||||||||||||||||||||||||||||||||||||||||||||||
|---|---|---|---|---|---|---|---|---|---|---|---|---|---|---|---|---|---|---|---|---|---|---|---|---|---|---|---|---|---|---|---|---|---|---|---|---|---|---|---|---|---|---|---|---|---|---|---|---|---|---|---|---|---|---|---|---|---|---|---|---|---|---|---|---|---|---|---|---|---|---|---|---|---|---|---|---|---|---|---|---|---|---|---|---|---|---|---|---|---|---|---|---|---|---|---|---|---|---|---|---|---|---|---|---|---|---|---|---|---|---|---|---|---|---|---|---|---|---|---|---|---|---|---|---|---|---|---|---|---|---|---|---|---|---|---|---|---|---|---|---|---|---|---|---|---|---|---|---|---|---|---|---|---|---|---|
| |||||||||||||||||||||||||||||||||||||||||||||||||||||||||||||||||||||||||||||||||||||||||||||||||||||||||||||||||||||||||||||||||||||||||||||||||||||||||||
| Available Pokémon | ||||||||||||||||||||||||||||||||||||||||||||||||||||||||||||||||||||||||||||||||||||||||||||||||||||||||||||||||||||||||||||||||||||||||||||||||||||||||||||||||||||||||||||||||||||||||||||||||||||||||||||||||||||||||||||||||||||||||||||||||||||||||||||||||||||||||||||||||||||||||||||||||||||||||||||||||||||||||||||||||||||||||||||||||||||||||||||||||||||||||||||||||||||||||||||||||||||||||
|---|---|---|---|---|---|---|---|---|---|---|---|---|---|---|---|---|---|---|---|---|---|---|---|---|---|---|---|---|---|---|---|---|---|---|---|---|---|---|---|---|---|---|---|---|---|---|---|---|---|---|---|---|---|---|---|---|---|---|---|---|---|---|---|---|---|---|---|---|---|---|---|---|---|---|---|---|---|---|---|---|---|---|---|---|---|---|---|---|---|---|---|---|---|---|---|---|---|---|---|---|---|---|---|---|---|---|---|---|---|---|---|---|---|---|---|---|---|---|---|---|---|---|---|---|---|---|---|---|---|---|---|---|---|---|---|---|---|---|---|---|---|---|---|---|---|---|---|---|---|---|---|---|---|---|---|---|---|---|---|---|---|---|---|---|---|---|---|---|---|---|---|---|---|---|---|---|---|---|---|---|---|---|---|---|---|---|---|---|---|---|---|---|---|---|---|---|---|---|---|---|---|---|---|---|---|---|---|---|---|---|---|---|---|---|---|---|---|---|---|---|---|---|---|---|---|---|---|---|---|---|---|---|---|---|---|---|---|---|---|---|---|---|---|---|---|---|---|---|---|---|---|---|---|---|---|---|---|---|---|---|---|---|---|---|---|---|---|---|---|---|---|---|---|---|---|---|---|---|---|---|---|---|---|---|---|---|---|---|---|---|---|---|---|---|---|---|---|---|---|---|---|---|---|---|---|---|---|---|---|---|---|---|---|---|---|---|---|---|---|---|---|---|---|---|---|---|---|---|---|---|---|---|---|---|---|---|---|---|---|---|---|---|---|---|---|---|---|---|---|---|---|---|---|---|---|---|---|---|---|---|---|---|---|---|---|---|---|---|---|---|---|---|---|---|---|---|---|---|---|---|---|---|---|---|---|---|---|---|---|---|---|---|
| ||||||||||||||||||||||||||||||||||||||||||||||||||||||||||||||||||||||||||||||||||||||||||||||||||||||||||||||||||||||||||||||||||||||||||||||||||||||||||||||||||||||||||||||||||||||||||||||||||||||||||||||||||||||||||||||||||||||||||||||||||||||||||||||||||||||||||||||||||||||||||||||||||||||||||||||||||||||||||||||||||||||||||||||||||||||||||||||||||||||||||||||||||||||||||||||||||||||||
| Items | ||||||||||||||||||||||||||||||||||||||||||||||||||||||||||||||||||||
|---|---|---|---|---|---|---|---|---|---|---|---|---|---|---|---|---|---|---|---|---|---|---|---|---|---|---|---|---|---|---|---|---|---|---|---|---|---|---|---|---|---|---|---|---|---|---|---|---|---|---|---|---|---|---|---|---|---|---|---|---|---|---|---|---|---|---|---|---|
| ||||||||||||||||||||||||||||||||||||||||||||||||||||||||||||||||||||
1F
Go to the northwest room and battle Youngster Johnson, then inspect the stone statue to flip a hidden switch. Head east to reach an Escape Rope at the four pillars, then turn south; pass through the newly-opened door to reach a Protein in the central room. Return to the entrance and climb the stairs at the end of the entryway.
2F
Visit the west-southwest room to fight Burglar Arnie. Follow the hallway to the southwest room to find the first journal entry, and a Zinc on the southern balcony. Return to the stairs and inspect the nearest statue to flip the switch. Go northeast to find a second journal entry and a Calcium beyond that. Climb up the stairs in the northwest room.
3F
Head east to reach an Iron in the northeast room. Inspect the statue and flip the switch to open the south door, then battle Scientist Braydon. Take the southeast staircase down to a separate area of 2F.
Grab the HP Up to the north, then head back upstairs.
Jump off the smaller balcony to the right, near Scientist Braydon.
2F
Go north and climb up the stairs near the statue to a separate area of the third floor.
3F (Southwest)
This dead-end area of the third floor holds Burglar Simon and a third journal entry. Collect the Max Potion and head back downstairs.
2F
Flip the switch and climb the stairs in the northwest room again.
3F
Inspect the statue and flip the switch to open the south door. Approach Scientist Braydon again, and this time jump off the larger balcony to the left.
1F (South)
Battle Scientist Ted, grab the Carbos, and take the stairs to the basement.
B1F
Visit the southern room to fight Burglar Lewis. The final journal entry can be found on the table here. Inspect the statue and flip the switch. Go west to grab the Full Restore. Follow the narrow hallway in the northeast to battle Scientist Ivan, then flip the switch on the statue in the northeast room. Pick up TM14 (Blizzard) in the north-central room. The Secret Key is located on a table in the northwest room, and TM22 (SolarBeam) can be found in the west-central room.
Cinnabar Gym
The Cinnabar Gym specializes in Fire-type Pokémon. Fire-type moves are super effective against Bug-, Grass-, Ice-, and Steel-type Pokémon, while Fire-type Pokémon are weak to Ground-, Rock-, and Water-type moves. When playing with fire there is always the chance of getting Burned, so be sure to bring some Burn Heals. The Gym Leader enjoys riddles and has equipped his Gym with machines that display a quiz when examined. When each question is answered correctly, the door to the next room unlocks. This allows challengers to reach the Gym Leader sooner, but gives up the rewards of defeating his Gym Trainers.
| Question | Answers |
|---|---|
| 1. Caterpie evolves into Butterfree? | Yes |
| No | |
| 2. There are nine certified Pokémon League Badges? | Yes |
| No | |
| 3. Poliwag evolves three times? | Yes |
| No | |
| 4. Are Electric moves effective against Ground-type Pokémon? | Yes |
| No | |
| 5. Pokémon of the same kind and level are not identical? | Yes |
| No | |
| 6. TM28 contains Tombstony? | Yes |
| No | |
|
| |
| ||||||||||||||||||||||||||||||||||||||||||||||||||||||||||||||||||||||||||||||||||||||||||||||||||||||||||||||||||||||||||||||||||||||||||||||||||||||||||||||||||||||||||||||||||||||||||||||||||||||||||||||||||||||||||||||||||||||||||||||||||||||||||||||||||||||||||||||||||||||
After the battle, Blaine awards you the Volcano Badge, which gives your Pokémon a slight Special Attack and Special Defense boost during battle and enables the use of Waterfall in the field. He also gives you TM38 (Fire Blast) as a prize.
Set Sail for the Sevii Islands!
When you leave the Gym, you find Bill waiting outside. A friend of his has invited him to visit One Island, part of an island chain far to the south of the Kanto mainland. He is on his way there now, and decides to invite you along, as well. Decline his offer at first and he will wait for you inside the Pokémon Center. His friend's ship has not yet arrived, so take a moment to prepare as PC services on these remote islands will be unavailable. Speak to him to board the ferry for the Sevii Islands!
|
FireRed and LeafGreen walkthrough |
|

|
This article is part of Project Walkthroughs, a Bulbapedia project that aims to write comprehensive step-by-step guides on each Pokémon game. |
