Appendix:Emerald walkthrough/Section 9: Difference between revisions
m (replaced: {{ball|Dive}} → Dive Ball, removed: |display={{ball|Dive}} (3)) |
Thespeon196 (talk | contribs) m (→Route 123 (optional): Changed Route 123 link) |
||
| (14 intermediate revisions by 5 users not shown) | |||
| Line 3: | Line 3: | ||
[[File:Abandoned Ship 1F and rooms RSE.png|thumb|left|Abandoned Ship, 1F]] | [[File:Abandoned Ship 1F and rooms RSE.png|thumb|left|Abandoned Ship, 1F]] | ||
[[File:Abandoned Ship B1F and rooms RSE.png|thumb|left|Abandoned Ship, B1F]] | [[File:Abandoned Ship B1F and rooms RSE.png|thumb|left|Abandoned Ship, B1F]] | ||
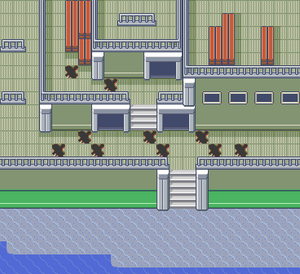
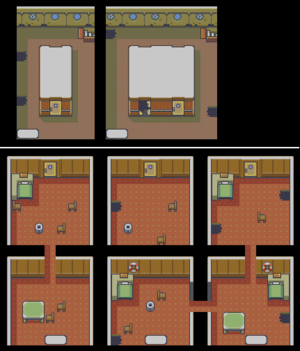
Located on {{rt|108|Hoenn}}, the [[Abandoned Ship]] is all that remains from when the S.S. Cactus ran aground. The old vessel has many rusted holes, broken doors, and furniture scattered around. Once slated for demolition, the half-sunken vessel now exists as a refuge for water-dwelling Pokémon. Navigating the structure requires the use of {{m|Dive|a certain field move}} in addition to {{m|Surf}}, so some parts will be inaccessible for now. | Located on {{rt|108|Hoenn}}, the [[Abandoned Ship]] is all that remains from when the S.S. Cactus ran aground. The old vessel has many rusted holes, broken doors, and furniture scattered around. Once slated for demolition, the half-sunken vessel now exists as a refuge for water-dwelling Pokémon. Navigating the structure requires the use of {{m|Dive|a certain field move}} in addition to {{m|Surf}}, so some parts will be inaccessible for now. | ||
| Line 47: | Line 45: | ||
{{Catch/entry3|129|Magikarp|no|no|yes|Fish Old|5-10|70%|type1=Water}} | {{Catch/entry3|129|Magikarp|no|no|yes|Fish Old|5-10|70%|type1=Water}} | ||
{{Catch/entry3|072|Tentacool|no|no|yes|Fish Old|5-10|30%|type1=Water|type2=Poison}} | {{Catch/entry3|072|Tentacool|no|no|yes|Fish Old|5-10|30%|type1=Water|type2=Poison}} | ||
{{Catch/footer|ocean}} | {{Catch/footer|ocean}} | ||
|} | |} | ||
| Line 65: | Line 59: | ||
{{itemlist|Dive Ball|In the cabin with the broken door|E=yes}} | {{itemlist|Dive Ball|In the cabin with the broken door|E=yes}} | ||
{{itemlist|Escape Rope|Southwest cabin|E=yes}} | {{itemlist|Escape Rope|Southwest cabin|E=yes}} | ||
{{itemlist|TM Ice|Northeast room (requires | {{itemlist|TM Ice|Northeast room (requires {{ho|Storage Key}})|E=yes|display={{TM|13|Ice Beam}}}} | ||
{{catch/div|ocean|2F}} | {{catch/div|ocean|2F}} | ||
{{itemlist|Storage Key III|Captain's office|E=yes|display= | {{itemlist|Storage Key III|Captain's office|E=yes|display={{ho|Storage Key}}}} | ||
{{ | |||
{{itlistfoot|ocean}} | {{itlistfoot|ocean}} | ||
|} | |} | ||
| Line 90: | Line 75: | ||
===Captain's Office=== | ===Captain's Office=== | ||
The Scientist inside is investigating the ship on [[Captain Stern]]'s behalf. Stern asked him to find a Scanner, but he hasn't had much success. Pick up the nearby | The Scientist inside is investigating the ship on [[Captain Stern]]'s behalf. Stern asked him to find a Scanner, but he hasn't had much success. Pick up the nearby {{ho|Storage Key}} and return to the basement floor. | ||
===B1F=== | ===B1F=== | ||
Inspect the locked door to the northeast cabin to insert the Storage Key. The key becomes stuck in the lock, but the door opens. Inside, you find {{TM|13|Ice Beam}}. After that, head for the south-central cabin. Seawater has flooded into the room, so you can come back and {{m|Dive|go underwater}} later in the game. | Inspect the locked door to the northeast cabin to insert the Storage Key. The key becomes stuck in the lock, but the door opens. Inside, you find {{TM|13|Ice Beam}}. After that, head for the south-central cabin. Seawater has flooded into the room, so you can come back and {{m|Dive|go underwater}} later in the game. | ||
==Trick House - Puzzle 4 (optional)== | |||
In [[Trick House]] now you can complete the puzzle 4. First, make sure you have a Pokémon that knows {{m|Strength}}. | |||
==Mauville City (optional)== | ==Mauville City (optional)== | ||
When you return to {{ci|Mauville}}, you find [[Wattson]] standing near the Pokémon Center. He asks for a favor, and explains that the city has an underground sector known as [[New Mauville]]. There's a generator inside that hasn't been functioning properly, and he needs you to go and turn it off before the situation gets out of control. He gives you the | When you return to {{ci|Mauville}}, you find [[Wattson]] standing near the Pokémon Center. He asks for a favor, and explains that the city has an underground sector known as [[New Mauville]]. There's a generator inside that hasn't been functioning properly, and he needs you to go and turn it off before the situation gets out of control. He gives you the {{ho|Basement Key}} and directs you to the facility's entrance on {{rt|110|Hoenn}}. {{m|Surf}} eastward under the north end of [[Seaside Cycling Road]] to reach the facility. | ||
{| class="expandable" style="margin: auto; background: #DC8FEA; {{roundy}}; border: 5px solid #E0B0FF;" | |||
|- align="center" | |||
! Items | |||
|- | |||
| | |||
{{itlisth|road}} | |||
{{itemlist|Basement Key III|From Wattson, after agreeing to help shut down New Mauville's generator|E=yes|display={{ho|Basement Key}}}} | |||
{{itemlist|TM Electric|From Wattson, after shutting down New Mauville's generator|E=yes|display={{TM|24|Thunderbolt}}}} | |||
{{itlistfoot|road}} | |||
|} | |||
==New Mauville (optional)== | ==New Mauville (optional)== | ||
| Line 128: | Line 126: | ||
{{itlisth|building}} | {{itlisth|building}} | ||
{{itemlist|Escape Rope|Near the center of the floor, on a blue switch|E=yes}} | {{itemlist|Escape Rope|Near the center of the floor, on a blue switch|E=yes}} | ||
{{itemlist|Ultra Ball|East-southeast room, north of the entrance|E=yes}} | |||
{{itemlist|Paralyze Heal|Northwest part of the floor, on a green switch|E=yes|display=[[Paralyze Heal|Parlyz Heal]]}} | {{itemlist|Paralyze Heal|Northwest part of the floor, on a green switch|E=yes|display=[[Paralyze Heal|Parlyz Heal]]}} | ||
{{itemlist|Full Heal|North-central room, on a green switch|E=yes}} | {{itemlist|Full Heal|North-central room, on a green switch|E=yes}} | ||
{{itemlist|Thunder Stone|East of the generator in the northeast room|E=yes|display=[[Thunder Stone|Thunderstone]]}} | {{itemlist|Thunder Stone|East of the generator in the northeast room|E=yes|display=[[Thunder Stone|Thunderstone]]}} | ||
{{catch/div|building|Fake Items}} | {{catch/div|building|Fake Items}} | ||
{{itemlist|None| | {{itemlist|None| | ||
| Line 144: | Line 142: | ||
===B1F=== | ===B1F=== | ||
The lower floor uses a series of colored buttons as a security measure; when stepped on, all similarly-colored doors open while all others close. Step on the blue button in the entrance room and go west. Press the green button in the next room and continue on. Pass by the third button and head north to reach an [[Escape Rope]]; collect the item and press the blue button beneath it. Go northwest to find a room with two items, a [[Paralyze Heal|Parlyz Heal]] to the left and a {{p|Voltorb}} to the right. Follow the hallway eastward to the north-central room and another pair of items, a Voltorb to the left and a [[Full Heal]] to the right; collect the item and step on the green button beneath it. The generator is located in the northeast room; press the red button to shut it down and collect the [[Thunder Stone|ThunderStone]] before leaving the area. | The lower floor uses a series of colored buttons as a security measure; when stepped on, all similarly-colored doors open while all others close. Step on the blue button in the entrance room and go west. Press the green button in the next room and continue on. Pass by the third button and head north to reach an [[Escape Rope]]; collect the item, go to the right to reach an [[Ultra Ball]], back and press the blue button beneath it. Go northwest to find a room with two items, a [[Paralyze Heal|Parlyz Heal]] to the left and a {{p|Voltorb}} to the right. Follow the hallway eastward to the north-central room and another pair of items, a Voltorb to the left and a [[Full Heal]] to the right; collect the item and step on the green button beneath it. The generator is located in the northeast room; press the red button to shut it down and collect the [[Thunder Stone|ThunderStone]] before leaving the area walking or using an Escape Rope. | ||
===Done=== | ===Done=== | ||
| Line 152: | Line 150: | ||
[[File:Hoenn Route 118 E.png|thumb|350px|Route 118]] | [[File:Hoenn Route 118 E.png|thumb|350px|Route 118]] | ||
The seaside {{rt|118|Hoenn}} links the west and east sides of the region together. Several new species of Pokémon can be found here, including {{ | You can now fully explore the route by using {{m|Surf}}. The seaside {{rt|118|Hoenn}} links the west and east sides of the region together. Several new species of Pokémon can be found here, including {{p|Manectric}}, which might be of great value in the upcoming Gym. | ||
{| class="expandable" style="margin: auto; background: #{{locationcolor/med|land}}; {{roundy}}; border: 5px solid #{{locationcolor/light|land}};" | {| class="expandable" style="margin: auto; background: #{{locationcolor/med|land}}; {{roundy}}; border: 5px solid #{{locationcolor/light|land}};" | ||
| Line 160: | Line 158: | ||
| | | | ||
{{trainerheader|land}} | {{trainerheader|land}} | ||
{{catch/div|land|Eastern side}} | {{catch/div|land|Eastern side}} | ||
{{trainerentry|Spr RS Interviewer.png|Interviewer|[[Gabby and Ty|Gabby & Ty]]|2592|2|081|Magnemite||27||294|Loudred|♂|27|}} | {{trainerentry|Spr RS Interviewer.png|Interviewer|[[Gabby and Ty|Gabby & Ty]]|2592|2|081|Magnemite||27||294|Loudred|♂|27|}} | ||
| Line 175: | Line 166: | ||
{{trainerdiv|land}} | {{trainerdiv|land}} | ||
{{trainerentry|Spr RS Bird Keeper.png|Bird Keeper|Perry|832|1|278|Wingull|♂|26|}} | {{trainerentry|Spr RS Bird Keeper.png|Bird Keeper|Perry|832|1|278|Wingull|♂|26|}} | ||
{{trainerfooter|land|3}} | {{trainerfooter|land|3}} | ||
|} | |} | ||
| Line 216: | Line 198: | ||
| | | | ||
{{itlisth|land}} | {{itlisth|land}} | ||
{{catch/div|land|East side}} | {{catch/div|land|East side}} | ||
{{itemlist|Good Rod|From the Fisherman on the north end of the beach|E=yes}} | {{itemlist|Good Rod III|From the Fisherman on the north end of the beach|E=yes|display=[[Good Rod]]}} | ||
{{itemlist|Iron|On the beach, on a rock to the northwest of Fisherman Barny (hidden)|E=yes}} | {{itemlist|Iron|On the beach, on a rock to the northwest of Fisherman Barny (hidden)|E=yes}} | ||
{{itemlist|Sitrus Berry|From the soft soil patch, west of the exit to Route 119|E=yes|display=[[Sitrus Berry]] ×4}} | {{itemlist|Sitrus Berry|From the soft soil patch, west of the exit to Route 119|E=yes|display=[[Sitrus Berry]] ×4}} | ||
| Line 235: | Line 215: | ||
As you leave the beach, you are noticed by {{Steven}}. He hasn't seen you since your first meeting in [[Granite Cave]], and is pleased to see how much you have grown as a Trainer. He wonders if you will raise Pokémon of all types, or only a certain one. | As you leave the beach, you are noticed by {{Steven}}. He hasn't seen you since your first meeting in [[Granite Cave]], and is pleased to see how much you have grown as a Trainer. He wonders if you will raise Pokémon of all types, or only a certain one. | ||
==Route 123 (optional)== | |||
Before heading north to Route 119, let's head east to {{rt|123|Hoenn}} for a quick stop. The [[Berry Master]]'s house, and his extensive backyard garden, can be found on the route's west side. | |||
{| class="expandable" style="margin: auto; background: #{{locationcolor/med|land}}; {{roundy}}; border: 5px solid #{{locationcolor/light|land}};" | |||
|- align="center" | |||
! Trainers | |||
|- | |||
| | |||
{{trainerheader|land}} | |||
{{catch/div|land|Accessed via Route 118, Route 122}} | |||
{{trainerentry|Spr RS Bug Catcher.png|Bug Catcher|Davis|432<br><small>Potential [[Double Battle]] with Jazmyn</small>|1|127|Pinsir|♂|27|}} | |||
{{trainerdiv|land}} | |||
{{trainerentry|Spr RS Cooltrainer F.png|Cooltrainer|Jazmyn|540<br><small>Potential [[Double Battle]] with Davis</small>|1|359|Absol|♀|27|}} | |||
{{trainerdiv|land}} | |||
{{trainerentry|Spr RS Aroma Lady.png|Aroma Lady|Violet|1040|2|315|Roselia|♀|26||044|Gloom|♀|26|}} | |||
{{trainerdiv|land}} | |||
{{trainerentry|Spr RS Twins.png|Twins|Miu & Yuki|624|2|267|Beautifly|♂|26|None|269|Dustox|♂|26|}} | |||
{{trainerfooter|land|3}} | |||
|} | |||
{| class="expandable" style="margin: auto; background: #{{locationcolor/med|land}}; {{roundy}}; border: 5px solid #{{locationcolor/light|land}};" | |||
|- align="center" | |||
! Items | |||
|- | |||
| | |||
{{itlisth|land}} | |||
{{catch/div|land|Accessible from Routes 118 or 122}} | |||
{{itemlist|Ultra Ball|South of the Berry Master's house|E=yes}} | |||
{{itemlist|Revive|North of the Berry Master's garden (hidden)|E=yes}} | |||
{{itlistfoot|land}} | |||
|} | |||
===Berry Master's House=== | |||
The [[Berry Master]]'s house, and {{DL|Hoenn Route 123|Berry Master's garden|the Berry garden he tends}}, are located near the route's west end. | |||
{| class="expandable" style="margin: auto; background: #{{locationcolor/med|land}}; {{roundy}}; border: 5px solid #{{locationcolor/light|land}};" | |||
|- align="center" | |||
! Items | |||
|- | |||
| | |||
{{itlisth|land}} | |||
{{itemlist|Grepa Berry|In the soft soil bed in the Berry Master's garden|E=yes|display=[[Grepa Berry]] ×8}} | |||
{{itemlist|Pomeg Berry|In the soft soil bed in the Berry Master's garden|E=yes|display=[[Pomeg Berry]] ×8}} | |||
{{itemlist|Qualot Berry|In the soft soil bed in the Berry Master's garden|E=yes|display=[[Qualot Berry]] ×8}} | |||
{{itlistfoot|land}} | |||
|} | |||
====Berry Master==== | |||
Talk to Berry Master to receive two Berries from a group of ten every day, chosen randomly (the berries can be two identical or different). | |||
{| style="margin: auto; background: #{{berries color}}; {{roundy}}; border: 3px solid #{{berries color dark}};" cellspacing="2" cellpadding="4" | |||
|- | |||
! colspan="5" style="background: #{{berries color light}}; {{roundytop|5px}};" | Berry | |||
|- style="background: #FFF;" | |||
| {{bag|Pomeg Berry}} || [[Pomeg Berry]] || {{bag|Kelpsy Berry}} || [[Kelpsy Berry]] | |||
|- style="background: #FFF;" | |||
| {{bag|Qualot Berry}} || [[Qualot Berry]] || {{bag|Hondew Berry}} || [[Hondew Berry]] | |||
|- style="background: #FFF;" | |||
| {{bag|Grepa Berry}} || [[Grepa Berry]] || {{bag|Tamato Berry}} || [[Tamato Berry]] | |||
|- style="background: #FFF;" | |||
| {{bag|Cornn Berry}} || [[Cornn Berry]] || {{bag|Magost Berry}} || [[Magost Berry]] | |||
|- style="background: #FFF;" | |||
| {{bag|Rabuta Berry}} || [[Rabuta Berry]] || {{bag|Nomel Berry}} || [[Nomel Berry]] | |||
|} | |||
====Berry Master's Wife==== | |||
The {{DL|Hoenn Route 123|Berry Master's wife}} will give out a Berry each day as well, but the type depends on whether or not you tell her a special phrase. Most answers will result in a common type of Berry, while certain answers will earn a rarer variety. After hearing all five phrases, she will hand out one common Berry from a group of ten every day. At this moment, you can only get the rare [[Spelon Berry]]. | |||
{| style="margin: auto; background: #{{berries color}}; {{roundy}}; border: 2px solid #{{berries color dark}};" cellspacing="2" cellpadding="4" | |||
|- | |||
! style="background: #{{berries color light}}; {{roundytl|5px}};" | Phrase | |||
! colspan="2" style="background: #{{berries color light}}; {{roundytr|5px}};" | Berry Received | |||
|- style="background: #FFF;" | |||
| GREAT BATTLE|| {{bag|Spelon Berry}} || [[Spelon Berry]] | |||
|- | |||
| colspan="3" style="background: #{{berries color light}}; {{roundybottom|5px}};" | | |||
|} | |||
If you do not qualify for a special Berry: | |||
{| style="margin: auto; background: #{{berries color}}; {{roundy}}; border: 3px solid #{{berries color dark}};" cellspacing="2" cellpadding="4" | |||
|- | |||
! colspan="5" style="background: #{{berries color light}}; {{roundytop|5px}};" | Berry | |||
|- style="background: #FFF;" | |||
| {{bag|Cheri Berry}} || [[Cheri Berry]] || {{bag|Chesto Berry}} || [[Chesto Berry]] | |||
|- style="background: #FFF;" | |||
| {{bag|Pecha Berry}} || [[Pecha Berry]] || {{bag|Rawst Berry}} || [[Rawst Berry]] | |||
|- style="background: #FFF;" | |||
| {{bag|Aspear Berry}} || [[Aspear Berry]] || {{bag|Leppa Berry}} || [[Leppa Berry]] | |||
|- style="background: #FFF;" | |||
| {{bag|Oran Berry}} || [[Oran Berry]] || {{bag|Persim Berry}} || [[Persim Berry]] | |||
|- style="background: #FFF;" | |||
| {{bag|Lum Berry}} || [[Lum Berry]] || {{bag|Sitrus Berry}} || [[Sitrus Berry]] | |||
|} | |||
| Line 241: | Line 313: | ||
|gamename=Emerald | |gamename=Emerald | ||
|prevsection=8 | |prevsection=8 | ||
|prevname=Route 111, Mirage Tower, Petalburg City, Route 115, Route 105, Route 107, Route 108 | |prevname=Route 111 (desert), Mirage Tower, Petalburg City, Route 115, Route 105, Route 107, Route 108 | ||
|nextsection=10 | |nextsection=10 | ||
|nextname=Route 119, Fortree City, | |nextname=Route 119, Weather Institute, Fortree City, Route 120 | ||
}} | }} | ||
Revision as of 14:43, 19 January 2023
Abandoned Ship (optional)
Located on Route 108, the Abandoned Ship is all that remains from when the S.S. Cactus ran aground. The old vessel has many rusted holes, broken doors, and furniture scattered around. Once slated for demolition, the half-sunken vessel now exists as a refuge for water-dwelling Pokémon. Navigating the structure requires the use of a certain field move in addition to Surf, so some parts will be inaccessible for now.
| Trainers | |||||||||||||||||||||||||||||||||||||||||||||||||||||||||||||||||||||||||||||||||||||||||||||||||||||||||||||||||||||||||||||||||||||||||||||||||||||||||||||||||||||||||||||||||||||||||||||||||||||||||||||||||||||||||||||||||||||||||||||||||||||||||||||||||||||||||||||||||||||
|---|---|---|---|---|---|---|---|---|---|---|---|---|---|---|---|---|---|---|---|---|---|---|---|---|---|---|---|---|---|---|---|---|---|---|---|---|---|---|---|---|---|---|---|---|---|---|---|---|---|---|---|---|---|---|---|---|---|---|---|---|---|---|---|---|---|---|---|---|---|---|---|---|---|---|---|---|---|---|---|---|---|---|---|---|---|---|---|---|---|---|---|---|---|---|---|---|---|---|---|---|---|---|---|---|---|---|---|---|---|---|---|---|---|---|---|---|---|---|---|---|---|---|---|---|---|---|---|---|---|---|---|---|---|---|---|---|---|---|---|---|---|---|---|---|---|---|---|---|---|---|---|---|---|---|---|---|---|---|---|---|---|---|---|---|---|---|---|---|---|---|---|---|---|---|---|---|---|---|---|---|---|---|---|---|---|---|---|---|---|---|---|---|---|---|---|---|---|---|---|---|---|---|---|---|---|---|---|---|---|---|---|---|---|---|---|---|---|---|---|---|---|---|---|---|---|---|---|---|---|---|---|---|---|---|---|---|---|---|---|---|---|---|---|---|---|---|---|---|---|---|---|---|---|---|---|---|---|---|---|---|---|---|---|---|---|---|---|---|---|---|---|---|---|---|---|---|---|
| |||||||||||||||||||||||||||||||||||||||||||||||||||||||||||||||||||||||||||||||||||||||||||||||||||||||||||||||||||||||||||||||||||||||||||||||||||||||||||||||||||||||||||||||||||||||||||||||||||||||||||||||||||||||||||||||||||||||||||||||||||||||||||||||||||||||||||||||||||||
| Available Pokémon | ||||||||||||||||||||||||||||||||||||||||||||||||||||||||||||||||||||||||||||||||||||||||||||||||||||||||||||||||||||||||
|---|---|---|---|---|---|---|---|---|---|---|---|---|---|---|---|---|---|---|---|---|---|---|---|---|---|---|---|---|---|---|---|---|---|---|---|---|---|---|---|---|---|---|---|---|---|---|---|---|---|---|---|---|---|---|---|---|---|---|---|---|---|---|---|---|---|---|---|---|---|---|---|---|---|---|---|---|---|---|---|---|---|---|---|---|---|---|---|---|---|---|---|---|---|---|---|---|---|---|---|---|---|---|---|---|---|---|---|---|---|---|---|---|---|---|---|---|---|---|---|---|
| ||||||||||||||||||||||||||||||||||||||||||||||||||||||||||||||||||||||||||||||||||||||||||||||||||||||||||||||||||||||||
| Items | |||||||||||||||||||||||||||||||||||||||||||||||||||||||||||||||||||||||||||||
|---|---|---|---|---|---|---|---|---|---|---|---|---|---|---|---|---|---|---|---|---|---|---|---|---|---|---|---|---|---|---|---|---|---|---|---|---|---|---|---|---|---|---|---|---|---|---|---|---|---|---|---|---|---|---|---|---|---|---|---|---|---|---|---|---|---|---|---|---|---|---|---|---|---|---|---|---|---|
| |||||||||||||||||||||||||||||||||||||||||||||||||||||||||||||||||||||||||||||
1F (east)
Three of the four cabins here are connected. Visit the isolated northwest cabin for a Harbor Mail and head downstairs.
B1F
Fight Sailor Duncan and collect a Dive Ball from the north-central cabin. Visit the southwest cabin for an Escape Rope and climb the stairs in the northwest corner.
1F (west)
Pass through the north cabin to get a Revive, then go through the south door to reach the outside of the ship. Climb the stairway there to reach the Captain's office.
Captain's Office
The Scientist inside is investigating the ship on Captain Stern's behalf. Stern asked him to find a Scanner, but he hasn't had much success. Pick up the nearby Storage Key and return to the basement floor.
B1F
Inspect the locked door to the northeast cabin to insert the Storage Key. The key becomes stuck in the lock, but the door opens. Inside, you find TM13 (Ice Beam). After that, head for the south-central cabin. Seawater has flooded into the room, so you can come back and go underwater later in the game.
Trick House - Puzzle 4 (optional)
In Trick House now you can complete the puzzle 4. First, make sure you have a Pokémon that knows Strength.
Mauville City (optional)
When you return to Mauville, you find Wattson standing near the Pokémon Center. He asks for a favor, and explains that the city has an underground sector known as New Mauville. There's a generator inside that hasn't been functioning properly, and he needs you to go and turn it off before the situation gets out of control. He gives you the Basement Key and directs you to the facility's entrance on Route 110. Surf eastward under the north end of Seaside Cycling Road to reach the facility.
| Items | ||||||||||||||||
|---|---|---|---|---|---|---|---|---|---|---|---|---|---|---|---|---|
| ||||||||||||||||
New Mauville (optional)
New Mauville was intended to be an underground city extending dozens of floors below the surface. However, the project died in development when it was discovered to be a habitat for wild Pokémon.
| Available Pokémon | |||||||||||||||||||||||||||||||||||||||||||||||||||||||||||||||||||||||||||||||||||||||||||||||||||||||||||||||||||||||||||||||||||||||||||||||||||||||||||||||||||||||||||||||||||||||
|---|---|---|---|---|---|---|---|---|---|---|---|---|---|---|---|---|---|---|---|---|---|---|---|---|---|---|---|---|---|---|---|---|---|---|---|---|---|---|---|---|---|---|---|---|---|---|---|---|---|---|---|---|---|---|---|---|---|---|---|---|---|---|---|---|---|---|---|---|---|---|---|---|---|---|---|---|---|---|---|---|---|---|---|---|---|---|---|---|---|---|---|---|---|---|---|---|---|---|---|---|---|---|---|---|---|---|---|---|---|---|---|---|---|---|---|---|---|---|---|---|---|---|---|---|---|---|---|---|---|---|---|---|---|---|---|---|---|---|---|---|---|---|---|---|---|---|---|---|---|---|---|---|---|---|---|---|---|---|---|---|---|---|---|---|---|---|---|---|---|---|---|---|---|---|---|---|---|---|---|---|---|---|---|
| |||||||||||||||||||||||||||||||||||||||||||||||||||||||||||||||||||||||||||||||||||||||||||||||||||||||||||||||||||||||||||||||||||||||||||||||||||||||||||||||||||||||||||||||||||||||
| Items | |||||||||||||||||||||||||||||||||||||||||||||||
|---|---|---|---|---|---|---|---|---|---|---|---|---|---|---|---|---|---|---|---|---|---|---|---|---|---|---|---|---|---|---|---|---|---|---|---|---|---|---|---|---|---|---|---|---|---|---|---|
| |||||||||||||||||||||||||||||||||||||||||||||||
Entrance
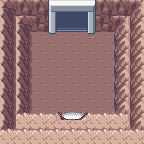
Use the Basement Key to unlock the door, and step inside to reach the southeast room.
B1F
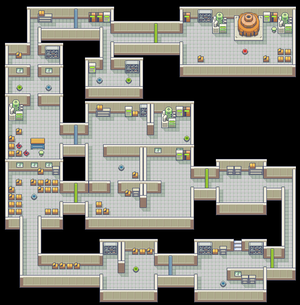
The lower floor uses a series of colored buttons as a security measure; when stepped on, all similarly-colored doors open while all others close. Step on the blue button in the entrance room and go west. Press the green button in the next room and continue on. Pass by the third button and head north to reach an Escape Rope; collect the item, go to the right to reach an Ultra Ball, back and press the blue button beneath it. Go northwest to find a room with two items, a Parlyz Heal to the left and a Voltorb to the right. Follow the hallway eastward to the north-central room and another pair of items, a Voltorb to the left and a Full Heal to the right; collect the item and step on the green button beneath it. The generator is located in the northeast room; press the red button to shut it down and collect the ThunderStone before leaving the area walking or using an Escape Rope.
Done
With your task complete, return to Wattson outside the Pokémon Center. Inform him that everything is all right in New Mauville, and the grateful Gym Leader rewards you with TM24 (Thunderbolt).
Route 118
You can now fully explore the route by using Surf. The seaside Route 118 links the west and east sides of the region together. Several new species of Pokémon can be found here, including Manectric, which might be of great value in the upcoming Gym.
| Trainers | |||||||||||||||||||||||||||||||||||||||||||||||||||||||||||||||||||||||||||||||||||||||||||||||
|---|---|---|---|---|---|---|---|---|---|---|---|---|---|---|---|---|---|---|---|---|---|---|---|---|---|---|---|---|---|---|---|---|---|---|---|---|---|---|---|---|---|---|---|---|---|---|---|---|---|---|---|---|---|---|---|---|---|---|---|---|---|---|---|---|---|---|---|---|---|---|---|---|---|---|---|---|---|---|---|---|---|---|---|---|---|---|---|---|---|---|---|---|---|---|---|
| |||||||||||||||||||||||||||||||||||||||||||||||||||||||||||||||||||||||||||||||||||||||||||||||
| Available Pokémon | ||||||||||||||||||||||||||||||||||||||||||||||||||||||||||||||||||||||||||||||||||||||||||||||||||||||||||||||||||||||||||||||||||||||||||||||||||||||||||||||||||||||||||||||||||||||||||||||||||||||||||||||||||||||||||||||||||||||||||||||||||||||||||||||||||||||||||||||||||||||||
|---|---|---|---|---|---|---|---|---|---|---|---|---|---|---|---|---|---|---|---|---|---|---|---|---|---|---|---|---|---|---|---|---|---|---|---|---|---|---|---|---|---|---|---|---|---|---|---|---|---|---|---|---|---|---|---|---|---|---|---|---|---|---|---|---|---|---|---|---|---|---|---|---|---|---|---|---|---|---|---|---|---|---|---|---|---|---|---|---|---|---|---|---|---|---|---|---|---|---|---|---|---|---|---|---|---|---|---|---|---|---|---|---|---|---|---|---|---|---|---|---|---|---|---|---|---|---|---|---|---|---|---|---|---|---|---|---|---|---|---|---|---|---|---|---|---|---|---|---|---|---|---|---|---|---|---|---|---|---|---|---|---|---|---|---|---|---|---|---|---|---|---|---|---|---|---|---|---|---|---|---|---|---|---|---|---|---|---|---|---|---|---|---|---|---|---|---|---|---|---|---|---|---|---|---|---|---|---|---|---|---|---|---|---|---|---|---|---|---|---|---|---|---|---|---|---|---|---|---|---|---|---|---|---|---|---|---|---|---|---|---|---|---|---|---|---|---|---|---|---|---|---|---|---|---|---|---|---|---|---|---|---|---|---|---|---|---|---|---|---|---|---|---|---|---|---|---|---|---|---|---|
| ||||||||||||||||||||||||||||||||||||||||||||||||||||||||||||||||||||||||||||||||||||||||||||||||||||||||||||||||||||||||||||||||||||||||||||||||||||||||||||||||||||||||||||||||||||||||||||||||||||||||||||||||||||||||||||||||||||||||||||||||||||||||||||||||||||||||||||||||||||||||
| Items | |||||||||||||||||||||||||||||||||||||||
|---|---|---|---|---|---|---|---|---|---|---|---|---|---|---|---|---|---|---|---|---|---|---|---|---|---|---|---|---|---|---|---|---|---|---|---|---|---|---|---|
| |||||||||||||||||||||||||||||||||||||||
Get Good with a Good Rod
The Fisherman on the river's eastern bank believes that Good Rods are really good. Agree with his statement to receive your very own Good Rod, a mid-level fishing rod that can catch even more kinds of Pokémon than the Old Rod.
Gabby and Ty
After your first interview on the south side of Route 111, the intrepid news team can be found searching for their next story on the eastern bank of Route 118's river. Accept their challenge to another Double Battle and be sure to give them a great interview when the dust settles!
Meet up with Steven
As you leave the beach, you are noticed by Steven. He hasn't seen you since your first meeting in Granite Cave, and is pleased to see how much you have grown as a Trainer. He wonders if you will raise Pokémon of all types, or only a certain one.
Route 123 (optional)
Before heading north to Route 119, let's head east to Route 123 for a quick stop. The Berry Master's house, and his extensive backyard garden, can be found on the route's west side.
| Trainers | |||||||||||||||||||||||||||||||||||||||||||||||||||||||||||||||||||||||||||||||||||||||||
|---|---|---|---|---|---|---|---|---|---|---|---|---|---|---|---|---|---|---|---|---|---|---|---|---|---|---|---|---|---|---|---|---|---|---|---|---|---|---|---|---|---|---|---|---|---|---|---|---|---|---|---|---|---|---|---|---|---|---|---|---|---|---|---|---|---|---|---|---|---|---|---|---|---|---|---|---|---|---|---|---|---|---|---|---|---|---|---|---|---|
| |||||||||||||||||||||||||||||||||||||||||||||||||||||||||||||||||||||||||||||||||||||||||
| Items | |||||||||||||||||||||||||||||||
|---|---|---|---|---|---|---|---|---|---|---|---|---|---|---|---|---|---|---|---|---|---|---|---|---|---|---|---|---|---|---|---|
| |||||||||||||||||||||||||||||||
Berry Master's House
The Berry Master's house, and the Berry garden he tends, are located near the route's west end.
| Items | ||||||||||||||||||||
|---|---|---|---|---|---|---|---|---|---|---|---|---|---|---|---|---|---|---|---|---|
| ||||||||||||||||||||
Berry Master
Talk to Berry Master to receive two Berries from a group of ten every day, chosen randomly (the berries can be two identical or different).
| Berry | ||||
|---|---|---|---|---|
| Pomeg Berry | Kelpsy Berry | |||
| Qualot Berry | Hondew Berry | |||
| Grepa Berry | Tamato Berry | |||
| Cornn Berry | Magost Berry | |||
| Rabuta Berry | Nomel Berry | |||
Berry Master's Wife
The Berry Master's wife will give out a Berry each day as well, but the type depends on whether or not you tell her a special phrase. Most answers will result in a common type of Berry, while certain answers will earn a rarer variety. After hearing all five phrases, she will hand out one common Berry from a group of ten every day. At this moment, you can only get the rare Spelon Berry.
| Phrase | Berry Received | |
|---|---|---|
| GREAT BATTLE | Spelon Berry | |
If you do not qualify for a special Berry:
| Berry | ||||
|---|---|---|---|---|
| Cheri Berry | Chesto Berry | |||
| Pecha Berry | Rawst Berry | |||
| Aspear Berry | Leppa Berry | |||
| Oran Berry | Persim Berry | |||
| Lum Berry | Sitrus Berry | |||
|
Emerald walkthrough |
|

|
This article is part of Project Walkthroughs, a Bulbapedia project that aims to write comprehensive step-by-step guides on each Pokémon game. |


