Appendix:HeartGold and SoulSilver walkthrough/Section 10: Difference between revisions
mNo edit summary |
No edit summary |
||
| (45 intermediate revisions by 19 users not shown) | |||
| Line 1: | Line 1: | ||
{{WalkthroughNotice|HGSS}} | {{WalkthroughNotice|HGSS}} | ||
==Route 44== | |||
[[File:Johto Route 44 HGSS.png|thumb|350px|Route 44]] | |||
{ | {{rt|44|Johto}} is a quiet mountain road that serves as the only path into [[Blackthorn City]]. Both the north and south paths lack any tall grass, but Pokémon like {{p|Tangela}} and {{p|Lickitung}} can be found in the grass between the two lakes. The [[Ice Path]] is located in the east. | ||
| | |||
| | |||
{{ | |||
{{ | |||
The [[ | |||
{| class="expandable" align="center" style="background: #{{locationcolor/med|lake}}; {{roundy}}; border: 5px solid #{{locationcolor/light|lake}};" | {| class="expandable" align="center" style="background: #{{locationcolor/med|lake}}; {{roundy}}; border: 5px solid #{{locationcolor/light|lake}};" | ||
| Line 98: | Line 12: | ||
| | | | ||
{{trainerheader|lake}} | {{trainerheader|lake}} | ||
{{ | {{Trainerentry|Spr DP Psychic M.png|Psychic|Phil|928|2|177|Natu|♂|27|None|064|Kadabra|♂|29|None}} | ||
{{Trainerentry|Spr DP Fisherman.png|Fisherman| | {{Trainerdiv|lake}} | ||
{{Trainerentry|Spr DP Fisherman.png|Fisherman|Edgar|896|2|223|Remoraid|♂|28|None|223|Remoraid|♂|28|None}} | |||
{{Trainerdiv|lake}} | {{Trainerdiv|lake}} | ||
{{Trainerentry|Spr | {{Trainerentry|Spr HGSS Ace Trainer F.png|Ace Trainer|Cybil|1740|2|179|Mareep|♀|29|None|182|Bellossom|♀|29|None}} | ||
{{Trainerdiv|lake}} | {{Trainerdiv|lake}} | ||
{{Trainerentry|Spr HGSS Ace Trainer | {{Trainerentry|Spr HGSS Ace Trainer M.png|Ace Trainer|Allen|1740|2|005|Charmeleon|♂|29|None|081|Magnemite||29|None}} | ||
{{Trainerdiv|lake}} | {{Trainerdiv|lake}} | ||
{{Trainerentry|Spr HGSS | {{Trainerentry|Spr HGSS Poké Maniac.png|Poké Maniac|Zach|1920|1|111|Rhyhorn|♂|30|None}} | ||
{{Trainerdiv|lake}} | |||
{{Trainerentry|Spr DP Fisherman.png|Fisherman|[[Wilton]]|896|3|118|Goldeen|♂|26|None|118|Goldeen|♂|26|None|119|Seaking|♂|28|None|38=phone}} | |||
{{Trainerdiv|lake}} | |||
{{Trainerentry|Spr HGSS Bird Keeper.png|Bird Keeper|Vance|896|2|163|Hoothoot|♂|28|None|017|Pidgeotto|♂|28|None|38=phone}} | |||
{{Trainerfooter|lake|II}} | {{Trainerfooter|lake|II}} | ||
|} | |} | ||
| Line 113: | Line 32: | ||
|- | |- | ||
| | | | ||
{{catch/header|lake| | {{catch/header|lake}} | ||
{{ | {{catch/entryhs|070|Weepinbell|yes|yes|Grass|22-24|all=35%|type1=Grass|type2=Poison}} | ||
{{catch/entryhs| | {{catch/entryhs|114|Tangela|yes|yes|Grass|23|all=30%|type1=Grass}} | ||
{{catch/entryhs| | {{catch/entryhs|069|Bellsprout|yes|yes|Grass|22|all=20%|type1=Grass|type2=Poison}} | ||
{{ | {{catch/entryhs|108|Lickitung|yes|yes|Grass|24-26|all=15%|type1=Normal}} | ||
{{catch/entryhs|129|Magikarp|yes|yes|Fish Old|10|all= | {{catch/div|lake|Surfing}} | ||
{{catch/entryhs|129|Magikarp|yes|yes|Fish Good|20|all= | {{catch/entryhs|060|Poliwag|yes|yes|Surf|10-29|all=90%|type1=Water}} | ||
{{catch/entryhs| | {{catch/entryhs|061|Poliwhirl|yes|yes|Surf|15-32|all=10%|type1=Water}} | ||
{{catch/div|lake|Fishing}} | |||
{{catch/entryhs|129|Magikarp|yes|yes|Fish Old|10|all=95%|type1=Water}} | |||
{{catch/entryhs|060|Poliwag|yes|yes|Fish Old|10|all=5%|type1=Water}} | |||
{{catch/entryhs|129|Magikarp|yes|yes|Fish Good|20|all=60%|type1=Water}} | |||
{{catch/entryhs|060|Poliwag|yes|yes|Fish Good|20|all=38%|type1=Water}} | |||
{{catch/entryhs|223|Remoraid|yes|yes|Fish Good|20|all=2%|type1=Water}} | |||
{{Catch/div|lake|Headbutt}} | {{Catch/div|lake|Headbutt}} | ||
{{catch/entryhs| | {{catch/entryhs|021|Spearow|yes|yes|Headbutt|21-24|all=50%|type1=Normal|type2=Flying|10=j}} | ||
{{catch/entryhs|214|Heracross|yes|yes|Headbutt|21-24|all=30%|type1=Bug|type2=Fighting|10=j}} | |||
{{catch/entryhs|190|Aipom|yes|yes|Headbutt|21-24|all=20%|type1=Normal|10=j}} | |||
{{catch/entryhs| | |||
{{catch/entryhs| | |||
{{catch/footer|lake}} | {{catch/footer|lake}} | ||
|} | |} | ||
| Line 137: | Line 58: | ||
| | | | ||
{{itlisth|lake}} | {{itlisth|lake}} | ||
{{itemlist| | {{itemlist|Red Apricorn|On the tree outside Mahogany Town|HG=yes|SS=yes}} | ||
{{itemlist|Max Repel|Southeast of the Apricorn tree|HG=yes|SS=yes}} | |||
{{itemlist|Max Revive|In the grass between the two lakes (requires {{m|Surf}})|HG=yes|SS=yes}} | |||
{{itemlist|Max | {{itemlist|Ultra Ball|Northeast of the two lakes|HG=yes|SS=yes}} | ||
{{itemlist|Elixir|In the dead-end path, east of the northern lake (hidden)|HG=yes|SS=yes}} | |||
{{itemlist| | |||
{{itemlist| | |||
{{itemlist| | |||
{{itlistfoot|lake}} | {{itlistfoot|lake}} | ||
|} | |} | ||
==Ice Path== | |||
[[File:Ice Path 1F HGSS.png|thumb|left|Ice Path, 1F]] | |||
[[File:Ice Path B1F HGSS.png|thumb|Ice Path, B1F]] | |||
[[File:Ice Path B2F HGSS.png|thumb|left|Ice Path, B2F]] | |||
[[File:Ice Path B3F HGSS.png|thumb|Ice Path, B3F]] | |||
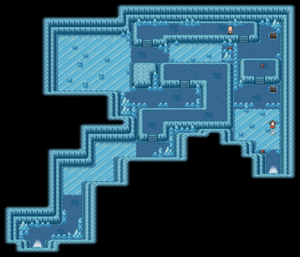
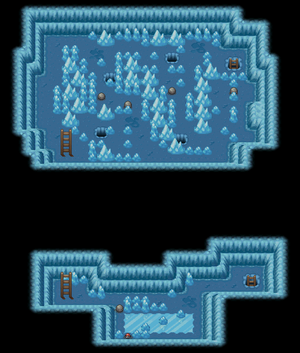
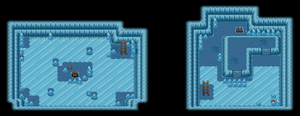
[[Ice Path]] is a mid-sized cave that connects {{rt|44|Johto}} directly to [[Blackthorn City]]. Navigation can be difficult, as some areas of the cave are covered by a layer of ice. It is also the only location where wild {{p|Swinub}} and {{p|Delibird}}{{sup/4|SS}} can be found. | |||
=== | {| class="expandable" align="center" style="background: #{{locationcolor/med|ice}}; {{roundy}}; border: 5px solid #{{locationcolor/light|ice}};" | ||
|- align="center" | |||
{{ | ! Available Pokémon | ||
|- | |||
| | | | ||
{| class="expandable" align="center" style="background: #{{locationcolor/med|ice}}; {{roundy}}; border: 5px solid #{{locationcolor/light|ice}};" | |||
{| class="expandable" align="center" style="background: #{{locationcolor/med| | |||
|- align="center" | |- align="center" | ||
! | ! 1F | ||
|- | |- | ||
| | | | ||
{| class="expandable" align="center" style="background: #{{locationcolor/med| | {{catch/header|ice}} | ||
{{catch/entryhs|220|Swinub|yes|yes|Cave|21-24|all=40%|type1=Ice|type2=Ground}} | |||
{{catch/entryhs|042|Golbat|yes|yes|Cave|22|all=30%|type1=Poison|type2=Flying}} | |||
{{catch/entryhs|041|Zubat|yes|no|Cave|22|25%|20%|25%|type1=Poison|type2=Flying}} | |||
{{catch/entryhs|225|Delibird|no|yes|Cave|22|all=20%|type1=Ice|type2=Flying}} | |||
{{catch/entryhs|124|Jynx|yes|yes|Cave|22|5%|10%|5%|type1=Ice|type2=Psychic}} | |||
{{catch/entryhs|041|Zubat|no|yes|Cave|22|5%|0%|5%|type1=Poison|type2=Flying}} | |||
{{catch/footer|ice}} | |||
|} | |||
{| class="expandable" align="center" style="background: #{{locationcolor/med|ice}}; {{roundy}}; border: 5px solid #{{locationcolor/light|ice}};" | |||
|- align="center" | |- align="center" | ||
! B1F | ! B1F | ||
|- | |- | ||
| | | | ||
{{ | {{catch/header|ice}} | ||
{{catch/ | {{catch/entryhs|220|Swinub|yes|yes|Cave|21-24|all=40%|type1=Ice|type2=Ground}} | ||
{{catch/entryhs|042|Golbat|yes|yes|Cave|22|all=30%|type1=Poison|type2=Flying}} | |||
{{catch/entryhs|041|Zubat|yes|no|Cave|22|25%|20%|25%|type1=Poison|type2=Flying}} | |||
{{ | {{catch/entryhs|225|Delibird|no|yes|Cave|22|all=20%|type1=Ice|type2=Flying}} | ||
{{catch/ | {{catch/entryhs|124|Jynx|yes|yes|Cave|22|5%|10%|5%|type1=Ice|type2=Psychic}} | ||
{{catch/entryhs|041|Zubat|no|yes|Cave|22|5%|0%|5%|type1=Poison|type2=Flying}} | |||
{{ | {{catch/footer|ice}} | ||
{{ | |||
|} | |} | ||
{| class="expandable" align="center" style="background: #{{locationcolor/med| | {| class="expandable" align="center" style="background: #{{locationcolor/med|ice}}; {{roundy}}; border: 5px solid #{{locationcolor/light|ice}};" | ||
|- align="center" | |- align="center" | ||
! B2F | ! B2F | ||
|- | |- | ||
| | | | ||
{{ | {{catch/header|ice}} | ||
{{ | {{catch/entryhs|220|Swinub|yes|yes|Cave|21-24|all=40%|type1=Ice|type2=Ground}} | ||
{{ | {{catch/entryhs|042|Golbat|yes|yes|Cave|22|all=30%|type1=Poison|type2=Flying}} | ||
{{catch/entryhs|041|Zubat|yes|no|Cave|22|25%|20%|25%|type1=Poison|type2=Flying}} | |||
{{ | {{catch/entryhs|225|Delibird|no|yes|Cave|22-23|all=20%|type1=Ice|type2=Flying}} | ||
{{ | {{catch/entryhs|124|Jynx|yes|yes|Cave|22|5%|10%|5%|type1=Ice|type2=Psychic}} | ||
{{ | {{catch/entryhs|041|Zubat|no|yes|Cave|22|5%|0%|5%|type1=Poison|type2=Flying}} | ||
{{catch/footer|ice}} | |||
|} | |} | ||
{| class="expandable" align="center" style="background: #{{locationcolor/med| | {| class="expandable" align="center" style="background: #{{locationcolor/med|ice}}; {{roundy}}; border: 5px solid #{{locationcolor/light|ice}};" | ||
|- align="center" | |- align="center" | ||
! B3F | ! B3F | ||
|- | |- | ||
| | | | ||
{{ | {{catch/header|ice}} | ||
{{ | {{catch/entryhs|220|Swinub|yes|yes|Cave|21-24|all=40%|type1=Ice|type2=Ground}} | ||
{{catch/entryhs|042|Golbat|yes|yes|Cave|22|all=30%|type1=Poison|type2=Flying}} | |||
{{ | {{catch/entryhs|041|Zubat|yes|no|Cave|22|25%|20%|25%|type1=Poison|type2=Flying}} | ||
{{ | {{catch/entryhs|225|Delibird|no|yes|Cave|22|all=20%|type1=Ice|type2=Flying}} | ||
{{ | {{catch/entryhs|124|Jynx|yes|yes|Cave|22|5%|10%|5%|type1=Ice|type2=Psychic}} | ||
{{ | {{catch/entryhs|041|Zubat|no|yes|Cave|22|5%|0%|5%|type1=Poison|type2=Flying}} | ||
{{catch/footer|ice}} | |||
{{ | |||
|} | |} | ||
|} | |} | ||
{| class="expandable" align="center" style="background: #{{locationcolor/med| | {| class="expandable" align="center" style="background: #{{locationcolor/med|ice}}; {{roundy}}; border: 5px solid #{{locationcolor/light|ice}};" | ||
|- align="center" | |- align="center" | ||
! | ! Items | ||
|- | |- | ||
| | | | ||
{{ | {{itlisth|ice}} | ||
{{catch/div| | {{catch/div|ice|1F West}} | ||
{{ | {{Itemlist|Max Potion|In the southwest rock on the second, largest patch of ice ''(hidden)''|HG=yes|SS=yes}} | ||
{{ | {{itemlist|HM Water|On the other side of the third ice patch|HG=yes|SS=yes|display={{HM|07|Waterfall}}}} | ||
{{ | {{itemlist|Ice Heal|Northwest, in a rock above the man who dropped HM07''(hidden)''|HG=yes|SS=yes}} | ||
{{catch/div| | {{catch/div|ice|1F East}} | ||
{{ | {{itemlist|Protein|On the east platform, north of the exit|HG=yes|SS=yes}} | ||
{{ | {{itemlist|PP Up|Over the last ice patch, north of the exit|HG=yes|SS=yes}} | ||
{{catch/div|ice|B1F South}} | |||
{{itemlist|Iron|South of the ice patch (requires {{m|Strength}})|HG=yes|SS=yes}} | |||
{{itemlist|Revive|Two steps east of the Iron ''(hidden)''|HG=yes|SS=yes}} | |||
{{catch/div|ice|B2F West}} | |||
{{itemlist|Max Potion|Northwest corner on the ice|HG=yes|SS=yes}} | |||
{{itemlist|Carbos|In the wall in the southeast corner ''(hidden)''|HG=yes|SS=yes}} | |||
{{itemlist|Full Heal|Center area|HG=yes|SS=yes}} | |||
{{catch/div|ice|B2F East}} | |||
{{itemlist|TM Ice|Southeast corner|HG=yes|SS=yes|display={{TM|72|Avalanche}}}} | |||
{{catch/div|ice|B3F}} | |||
{{itemlist|NeverMeltIce|South side, behind the [[breakable rock]]|HG=yes|SS=yes|display=[[Never-Melt Ice|NeverMeltIce]]}} | |||
{{itlistfoot|ice}} | |||
|} | |} | ||
{| | |||
|- | ====1F (northwest)==== | ||
! | Pass over the first patch of ice and continue on to the second. This one is larger, and the large pieces of ice make travel more difficult. | ||
{| style="margin: auto; background: #{{ice color}}; {{roundy}}; border: 2px solid #{{ice color dark}};" cellspacing="2" cellpadding="4" | |||
|- | |||
! style="background: #{{ice color light}}; {{roundytl|5px}};" | Puzzle | |||
! style="background: #{{ice color light}}; {{roundytr|5px}};" | Solution | |||
|- | |- | ||
| | | style="background: #FFFFFF; {{roundybl|5px}};" | #1 | ||
| style="background: #FFFFFF; {{roundybr|5px}};" | Up, Left, Up, Left, Down, Left, Up, Right | |||
|} | |} | ||
After that, go east to reach the next ice patch. This one is smaller, and there is an item, {{HM|07|Waterfall}}, lying on the far side of the ice. After that, cross over the platform to reach the northeast ladder. | |||
{| style="margin: auto; background: #{{ice color}}; {{roundy}}; border: 2px solid #{{ice color dark}};" cellspacing="2" cellpadding="4" | |||
|- | |||
! style="background: #{{ice color light}}; {{roundytl|5px}};" | Puzzle | |||
! style="background: #{{ice color light}}; {{roundytr|5px}};" | Solution | |||
|- | |||
| style="background: #FFFFFF; {{roundybl|5px}};" | #2 | |||
| style="background: #FFFFFF; {{roundybr|5px}};" | Right, Down, Left, Up, Left, Down, Left, Up, Right | |||
|} | |||
==== | ====B1F (north)==== | ||
There are four boulders scattered around this floor, and each one must be dropped through a different hole to form a path on the floor below. Go north and loop around to find the first two boulders. | |||
{| style="margin: auto; background: #{{rock color}}; {{roundy}}; border: 2px solid #{{rock color dark}};" cellspacing="2" cellpadding="4" | |||
|- | |||
! style="background: #{{rock color light}}; {{roundytl|5px}};" | Boulder | |||
! style="background: #{{rock color light}}; {{roundytr|5px}};" | Solution | |||
|- style="background: #FFFFFF;" | |||
| #1 (southwest) || Right 1, Down 3, Left 5, Down 1, Right 1 | |||
|- style="background: #FFFFFF;" | |||
| #2 (west) || Up 4, Right 1, Down 1 | |||
|- style="background: #FFFFFF;" | |||
| #3 (east) || Left 1, Down 5, Left 1, Down 2, Left 4 | |||
|- | |||
| style="background: #FFFFFF; {{roundybl|5px}};" | #4 (north) | |||
| style="background: #FFFFFF; {{roundybr|5px}};" | Up 2, Right 2, Up 3, Left 2 | |||
|} | |||
Start off with the southernmost boulder. Use {{m|Strength}} to move it southward and drop it through the southwest hole. Go back and move the second boulder as far north as possible. Head to the east side to reach the third boulder, and drop it through the southeast hole. Go north and drop the fourth boulder through the north hole. Finally, move the second boulder to the northwest hole. Climb down the ladder in the northeast. | |||
====B2F (west)==== | |||
The boulders from the floor above have formed a convenient spiral that leads to the center of the room. Check the corners for items, including a [[Max Potion]], and a hidden [[Carbos]]. Follow the boulders to the room's center, pick up the [[Full Heal]], and climb down the ladder. | |||
====B3F==== | ====B3F==== | ||
{{m|Rock Smash|Smash}} the rock, or loop around to the right, to reach the [[Never-Melt Ice|NeverMeltIce]]. Climb up the east ladder. | |||
====B2F (east)==== | |||
Go south, then head east across the platform. Stand two steps east of the platform, and slide south then east to reach {{TM|72|Avalanche}}. Turn around and slide west to reach the ladder. | |||
====B1F (south)==== | |||
Inspect the stalagmite on the south edge of the ice for a hidden [[Revive]]. Head northwest, and move the boulder one space southward. Slide west over the ice, then south to reach the [[Iron]]. Climb up the western ladder. | |||
====1F (southeast)==== | |||
Grab the [[Protein]] on the platform and head south. Another of the [[Kimono Girls]] can be found to the south; it seems that she got stuck on the ice. Slide down, left, down, then right to reach her. After a quick shove to clear ground, she thanks you and leaves. Slide left, up, right, down, right, and down to reach the [[PP Up]], then head south to reach the exit. Welcome to [[Blackthorn City]]! | |||
==Blackthorn City== | |||
[[File:Blackthorn City HGSS.png|thumb|300px|Blackthorn City]] | |||
| | |||
| | |||
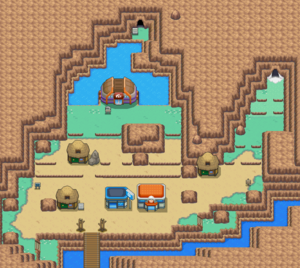
The quiet mountain retreat known as [[Blackthorn City]] lies isolated in the northeast. The main attraction is the [[Blackthorn Gym]], the final Gym in the region. North of the Gym is [[Dragon's Den]], a training ground for {{type|Dragon}} specialists. On Saturdays, Santos of the [[Week Siblings]] can be found here. | |||
{| class="expandable" align="center" style="background: #606060; {{roundy}}; border: 5px solid #474747;" | |||
|- align="center" | |||
{| style=" | ! Available Pokémon | ||
|- | |||
| | |||
{{Catch/header|mountain|4}} | |||
{{Catch/div|water|Surfing}} | |||
{{Catch/entryhs|129|Magikarp|yes|yes|Surf|2-20|all=100%|type1=Water}} | |||
{{Catch/div|water|Fishing}} | |||
{{Catch/entryhs|129|Magikarp|yes|yes|Fish Old|10|all=95%|type1=Water}} | |||
{{Catch/entryhs|060|Poliwag|yes|yes|Fish Old|10|all=5%|type1=Water}} | |||
{{Catch/entryhs|129|Magikarp|yes|yes|Fish Good|20|all=60%|type1=Water}} | |||
{{Catch/entryhs|060|Poliwag|yes|yes|Fish Good|20|all=40%|type1=Water}} | |||
{{Catch/div|mountain|Special}} | |||
{{Catch/entryhs|085|Dodrio|yes|yes|Trade|The same as the Traded Pokémon|all=One|tradenum=148|tradename=Dragonair|tradegender=female|type1=Normal|type2=Flying}} | |||
{{Catch/footer|mountain}} | |||
|} | |||
{| class="expandable" align="center" style="background: #606060; {{roundy}}; border: 5px solid #474747;" | |||
|- align="center" | |||
! Items | |||
|- | |||
| | | | ||
{{ | {{itlisth|mountain}} | ||
{{itemlist|Smoke Ball|Held by Doris, the traded {{p|Dodrio}}|HG=yes|SS=yes}} | |||
{{itemlist|Soft Sand|On the first meeting with Santos{{dotw|Sa}}|HG=yes|SS=yes}} | |||
{{itlistfoot|mountain}} | |||
| | |||
| | |||
| | |||
| | |||
| | |||
}} | |||
|} | |} | ||
===Time for a Trade=== | |||
The girl in the eastern house is looking to trade. She offers her {{p|Dodrio}} in exchange for a female {{p|Dragonair}}. The Dodrio arrives holding a [[Smoke Ball]]. | |||
===The Move Tutor House=== | |||
There are four people in the southwest house, all of which provide valuable services regarding a Pokémon's moves. | |||
* Move Deleter: He can help a Pokémon forget any move, even [[HM]] moves. | |||
* Move Maniac: In exchange for a [[Heart Scale]], he helps a Pokémon remember any move it had previously forgotten. | |||
* Grandma Wilma: When shown a {{t|Dragon}} Pokémon that is [[Friendship|happy]] with its Trainer, she will teach it the ultimate Dragon-type move, {{m|Draco Meteor}}. | |||
* Ultimate Move Tutor: He teaches any fully-evolved starter Pokémon the ultimate move of its type; {{m|Frenzy Plant}}, {{m|Blast Burn}}, or {{m|Hydro Cannon}}. | |||
=== | ===Blackthorn Gym=== | ||
[[File: | [[File:Blackthorn Gym HGSS.png|thumb|Blackthorn Gym]] | ||
{{sign|DPcity|header}} | {{sign|DPcity|header}} | ||
{{sign|DPcity|title| | {{sign|DPcity|title|Blackthorn City Pokémon Gym<br>Leader: Clair}} | ||
{{sign|DPcity|The | {{sign|DPcity|The Blessed User of Dragon Pokémon}} | ||
{{sign|DPcity|footer}} | {{sign|DPcity|footer}} | ||
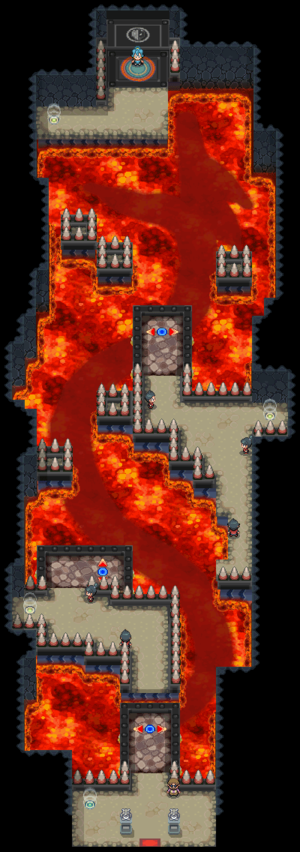
The [[ | The [[Blackthorn Gym]] uses mostly {{type|Water}} and {{type|Dragon}} Pokémon. Waters resist {{t|Ice}} and {{t|Fire}} attacks and are weak to {{t|Electric}}. Dragons take less damage from {{t|Grass}}, Fire, Water, and Electric moves, and are more vulnerable to Dragon- and Ice-type attacks. The floor has become unstable due to the lava bubbling underfoot, forcing your lead Pokémon to return to its Poké Ball. Reaching the Gym Leader requires crossing the lava on movable platforms. These platforms each have a blue tile, which causes it to rotate, and two arrow tiles, which move it in the respective direction. | ||
{| style="margin: auto; background: #{{dragon color}}; {{roundy}}; border: 3px solid #{{dragon color dark}};" cellpadding="4" cellspacing="2" | |||
|- style="margin: left;" | |||
==== | | style="background: #{{dragon color light}}; {{roundytl|5px}};" | Puzzle | ||
| style="background: #FFFFFF;" | Platform 1 | |||
| style="background: #FFFFFF;" | Platform 2 | |||
=== | | style="background: #FFFFFF; {{roundytr|5px}};" | Platform 3 | ||
|- style="margin: left;" | |||
| style="background: #{{dragon color light}}; {{roundybl|5px}};" | Solution | |||
| style="background: #FFFFFF;" | 1. ←<br>2. Button<br>3. Button<br>4. → | |||
| style="background: #FFFFFF;" | 1. ↑<br>2. Button<br>3. →<br>4. Button<br>5. Button<br>6. → | |||
| style="background: #FFFFFF; {{roundybr|5px}};" | 1. ←<br>2. Button<br>3. Button<br>4. →<br>5. Button<br>6. ↑<br>7. ↑<br>8. ↑<br>9. Button<br>10. →<br>11. Button<br>12. ↑<br>13. ↑ | |||
|} | |||
[[Clair]]'s {{p|Gyarados}} can lower its opponent's Attack with its {{a|Intimidate}} Ability. It cannot make good use of its {{m|Twister}} and {{m|Dragon Pulse}} moves due to its lower Special Attack, but {{m|Bite}} builds on its already-high Attack. Both of her {{p|Dragonair}} can inflict {{status|paralysis}} with {{m|Thunder Wave}}, before executing strong moves like Dragon Pulse, {{m|Fire Blast}}, and {{m|Aqua Tail}}. {{TM|25|Thunder}} from the [[Goldenrod Department Store]] deals serious damage to Gyarados, while {{TM|14|Blizzard}} from the [[Goldenrod Department Store]] or {{tm|72|Avalanche}} from [[Ice Path]] can help against her two Dragonair. Her {{p|Kingdra}}'s only weakness is Dragon-type attacks, and can beat its target down with the powerful {{m|Hydro Pump}}, Dragon Pulse, and {{m|Hyper Beam}} attacks. Unless your Pokémon happen to know a Dragon attack, you likely have to hammer it with strong, neutrally effective moves. | |||
{{User:TylerGray/Gymtag | {{User:TylerGray/Gymtag | ||
|gym= | |gym=Blackthorn | ||
|badge=Rising | |||
|type=Dragon | |||
|trainers={{Trainerheader| | |trainers={{Trainerheader|Dragon}} | ||
{{Trainerentry|Spr HGSS | {{Trainerentry|Spr HGSS Ace Trainer M.png|Ace Trainer|Paulo|2100|3|147|Dratini|♂|35|None|147|Dratini|♂|35|None|117|Seadra|♂|35|None}} | ||
{{Trainerdiv| | {{Trainerdiv|Dragon}} | ||
{{Trainerentry|Spr HGSS | {{Trainerentry|Spr HGSS Ace Trainer F.png|Ace Trainer|Lola|2220|2|147|Dratini|♀|35|None|148|Dragonair|♀|37|None}} | ||
{{Trainerdiv| | {{Trainerdiv|Dragon}} | ||
{{Trainerentry|Spr HGSS | {{Trainerentry|Spr HGSS Ace Trainer M.png|Ace Trainer|Cody|2220|2|116|Horsea|♂|35|None|117|Seadra|♂|37|None}} | ||
{{Trainerdiv| | {{Trainerdiv|Dragon}} | ||
{{Trainerentry|Spr HGSS | {{Trainerentry|Spr HGSS Ace Trainer F.png|Ace Trainer|Fran|2280|1|117|Seadra|♀|38|None}} | ||
{{Trainerdiv| | {{Trainerdiv|Dragon}} | ||
{{Trainerentry|Spr HGSS | {{Trainerentry|Spr HGSS Ace Trainer M.png|Ace Trainer|Mike|2280|1|148|Dragonair|♂|38|None}} | ||
{{Trainerfooter| | {{Trainerfooter|Dragon|I}} | ||
|leader={{Party|color={{ | |leader={{Party||color={{dragon color}}|bordercolor={{dragon color dark}}|headcolor={{dragon color light}} | ||
|sprite=Spr HGSS | |sprite=Spr HGSS Clair.png | ||
|prize={{pdollar}} | |prize={{pdollar}}4920 | ||
|class=Leader|name={{color2|000000| | |class=Leader|name={{color2|000000|Clair}} | ||
|game=HGSS|location= | |game=HGSS|location=Blackthorn Gym | ||
|pokemon= | |pokemon=4 | ||
|pokemon1={{Pokémon/4|game=HeartGold | |pokemon1={{Pokémon/4|game=HeartGold | ||
|ndex= | |ndex=130 f|pokemon=Gyarados | ||
|type1=Water | |type1=Water|type2=Flying | ||
|level= | |level=38|gender=female | ||
|ability= | |ability=Intimidate | ||
|move1= | |move1=Dragon Rage|move1type=Dragon|move1cat=Special | ||
|move2= | |move2=Twister|move2type=Dragon|move2cat=Special | ||
|move3= | |move3=Bite|move3type=Dark|move3cat=Physical | ||
|move4= | |move4=Dragon Pulse|move4type=Dragon|move4cat=Special}} | ||
|pokemon2={{Pokémon/4|game=HeartGold | |pokemon2={{Pokémon/4|game=HeartGold | ||
|ndex= | |ndex=148|pokemon=Dragonair | ||
|type1= | |type1=Dragon | ||
|level= | |level=38|gender=female | ||
|ability= | |ability=Shed Skin | ||
|move1= | |move1=Dragon Pulse|move1type=Dragon|move1cat=Special | ||
|move2= | |move2=Thunder Wave|move2type=Electric|move2cat=Status | ||
|move3= | |move3=Slam|move3type=Normal|move3cat=Physical | ||
|move4= | |move4=Fire Blast|move4type=Fire|move4cat=Special}} | ||
|pokemon3={{Pokémon/4|game=HeartGold | |pokemon3={{Pokémon/4|game=HeartGold | ||
|ndex= | |ndex=148|pokemon=Dragonair | ||
|type1= | |type1=Dragon | ||
|level= | |level=38|gender=female | ||
|ability= | |ability=Shed Skin | ||
|held=Sitrus Berry | |move1=Dragon Pulse|move1type=Dragon|move1cat=Special | ||
|move1= | |move2=Thunder Wave|move2type=Electric|move2cat=Status | ||
|move2= | |move3=Slam|move3type=Normal|move3cat=Physical | ||
|move3= | |move4=Aqua Tail|move4type=Water|move4cat=Physical}} | ||
|move4= | |||
|pokemon4={{Pokémon/4|game=HeartGold | |||
|ndex=230|pokemon=Kingdra | |||
|type1=Water|type2=Dragon | |||
|level=41|gender=female | |||
|held=Sitrus Berry|ability=Sniper | |||
|move1=Hydro Pump|move1type=Water|move1cat=Special | |||
|move2=Dragon Pulse|move2type=Dragon|move2cat=Special | |||
|move3=Hyper Beam|move3type=Normal|move3cat=Special | |||
|move4=SmokeScreen|move4type=Normal|move4cat=Status}} | |||
}} | }} | ||
}} | }} | ||
Clair refuses to accept defeat. She claims that you are still not ready for the Pokémon League, and directs you to take the "Dragon-master challenge". There is a small shrine in the [[Dragon's Den]], a large cave located underneath the city. If you can reach it, she will give up the Rising Badge. Bring along a Pokémon with {{m|Surf}} and {{m|Whirlpool}}, and cross the lake behind the Gym. | |||
{{WalkthroughPrevNext | {{WalkthroughPrevNext | ||
| Line 499: | Line 361: | ||
|gamename=HeartGold and SoulSilver | |gamename=HeartGold and SoulSilver | ||
|prevsection=9 | |prevsection=9 | ||
|prevname= | |prevname=Lake of Rage, Goldenrod City | ||
|nextsection=11 | |nextsection=11 | ||
|nextname= | |nextname=Route 45, Dark Cave, Route 46, Dragon's Den | ||
}} | }} | ||
Latest revision as of 16:05, 27 February 2021
These pages follow the remade Nintendo DS iteration, not Pokémon Gold and Silver. The guide for those games can be found here.
Route 44
Route 44 is a quiet mountain road that serves as the only path into Blackthorn City. Both the north and south paths lack any tall grass, but Pokémon like Tangela and Lickitung can be found in the grass between the two lakes. The Ice Path is located in the east.
| Trainers | |||||||||||||||||||||||||||||||||||||||||||||||||||||||||||||||||||||||||||||||||||||||||||||||||||||||||||||||||||||||||||||||||||||||||||||||||||||
|---|---|---|---|---|---|---|---|---|---|---|---|---|---|---|---|---|---|---|---|---|---|---|---|---|---|---|---|---|---|---|---|---|---|---|---|---|---|---|---|---|---|---|---|---|---|---|---|---|---|---|---|---|---|---|---|---|---|---|---|---|---|---|---|---|---|---|---|---|---|---|---|---|---|---|---|---|---|---|---|---|---|---|---|---|---|---|---|---|---|---|---|---|---|---|---|---|---|---|---|---|---|---|---|---|---|---|---|---|---|---|---|---|---|---|---|---|---|---|---|---|---|---|---|---|---|---|---|---|---|---|---|---|---|---|---|---|---|---|---|---|---|---|---|---|---|---|---|---|---|
| |||||||||||||||||||||||||||||||||||||||||||||||||||||||||||||||||||||||||||||||||||||||||||||||||||||||||||||||||||||||||||||||||||||||||||||||||||||
| Available Pokémon | ||||||||||||||||||||||||||||||||||||||||||||||||||||||||||||||||||||||||||||||||||||||||||||||||||||||||||||||||||||||||||||||||||||||||||||||||||||||||||||||||||||||||||||||||||||||||||||||||||||||||||||||||||||||||||||||||||||||||||||||||||||||||||||||||||||||||||||||||||||||||||||||||||||||||||
|---|---|---|---|---|---|---|---|---|---|---|---|---|---|---|---|---|---|---|---|---|---|---|---|---|---|---|---|---|---|---|---|---|---|---|---|---|---|---|---|---|---|---|---|---|---|---|---|---|---|---|---|---|---|---|---|---|---|---|---|---|---|---|---|---|---|---|---|---|---|---|---|---|---|---|---|---|---|---|---|---|---|---|---|---|---|---|---|---|---|---|---|---|---|---|---|---|---|---|---|---|---|---|---|---|---|---|---|---|---|---|---|---|---|---|---|---|---|---|---|---|---|---|---|---|---|---|---|---|---|---|---|---|---|---|---|---|---|---|---|---|---|---|---|---|---|---|---|---|---|---|---|---|---|---|---|---|---|---|---|---|---|---|---|---|---|---|---|---|---|---|---|---|---|---|---|---|---|---|---|---|---|---|---|---|---|---|---|---|---|---|---|---|---|---|---|---|---|---|---|---|---|---|---|---|---|---|---|---|---|---|---|---|---|---|---|---|---|---|---|---|---|---|---|---|---|---|---|---|---|---|---|---|---|---|---|---|---|---|---|---|---|---|---|---|---|---|---|---|---|---|---|---|---|---|---|---|---|---|---|---|---|---|---|---|---|---|---|---|---|---|---|---|---|---|---|---|---|---|---|---|---|---|---|---|---|---|---|---|---|---|---|---|---|---|---|---|---|---|
| ||||||||||||||||||||||||||||||||||||||||||||||||||||||||||||||||||||||||||||||||||||||||||||||||||||||||||||||||||||||||||||||||||||||||||||||||||||||||||||||||||||||||||||||||||||||||||||||||||||||||||||||||||||||||||||||||||||||||||||||||||||||||||||||||||||||||||||||||||||||||||||||||||||||||||
| Items | ||||||||||||||||||||||||||||
|---|---|---|---|---|---|---|---|---|---|---|---|---|---|---|---|---|---|---|---|---|---|---|---|---|---|---|---|---|
| ||||||||||||||||||||||||||||
Ice Path
Ice Path is a mid-sized cave that connects Route 44 directly to Blackthorn City. Navigation can be difficult, as some areas of the cave are covered by a layer of ice. It is also the only location where wild Swinub and DelibirdSS can be found.
| Available Pokémon | ||||||||||||||||||||||||||||||||||||||||||||||||||||||||||||||||||||||||||||||||||||||||||||||||||||||||||||||||||||||||||||||||||||||||||||||||||||||||||||||||||||||||||||||||||||||||||||||||||||||||||||||||||||||||||||||||||||||||||||||||||||||||||||||||||||||||||||||||||||||||||||||||||||||||||||||||||||||||||||||||||||||||||||||||||||||||||||||||||||||||||||||||||||||||||||||||||||||||||||||||||||||||||||||||||||||||||||||||||||||||||||||||||||||||||||||||||||||||||||||||||||||||||||||||||||||||||||
|---|---|---|---|---|---|---|---|---|---|---|---|---|---|---|---|---|---|---|---|---|---|---|---|---|---|---|---|---|---|---|---|---|---|---|---|---|---|---|---|---|---|---|---|---|---|---|---|---|---|---|---|---|---|---|---|---|---|---|---|---|---|---|---|---|---|---|---|---|---|---|---|---|---|---|---|---|---|---|---|---|---|---|---|---|---|---|---|---|---|---|---|---|---|---|---|---|---|---|---|---|---|---|---|---|---|---|---|---|---|---|---|---|---|---|---|---|---|---|---|---|---|---|---|---|---|---|---|---|---|---|---|---|---|---|---|---|---|---|---|---|---|---|---|---|---|---|---|---|---|---|---|---|---|---|---|---|---|---|---|---|---|---|---|---|---|---|---|---|---|---|---|---|---|---|---|---|---|---|---|---|---|---|---|---|---|---|---|---|---|---|---|---|---|---|---|---|---|---|---|---|---|---|---|---|---|---|---|---|---|---|---|---|---|---|---|---|---|---|---|---|---|---|---|---|---|---|---|---|---|---|---|---|---|---|---|---|---|---|---|---|---|---|---|---|---|---|---|---|---|---|---|---|---|---|---|---|---|---|---|---|---|---|---|---|---|---|---|---|---|---|---|---|---|---|---|---|---|---|---|---|---|---|---|---|---|---|---|---|---|---|---|---|---|---|---|---|---|---|---|---|---|---|---|---|---|---|---|---|---|---|---|---|---|---|---|---|---|---|---|---|---|---|---|---|---|---|---|---|---|---|---|---|---|---|---|---|---|---|---|---|---|---|---|---|---|---|---|---|---|---|---|---|---|---|---|---|---|---|---|---|---|---|---|---|---|---|---|---|---|---|---|---|---|---|---|---|---|---|---|---|---|---|---|---|---|---|---|---|---|---|---|---|---|---|---|---|---|---|---|---|---|---|---|---|---|---|---|---|---|---|---|---|---|---|---|---|---|---|---|---|---|---|---|---|---|---|---|---|---|---|---|---|---|---|---|---|---|---|---|---|---|---|---|---|---|---|---|---|---|---|---|---|---|---|---|---|---|---|---|---|---|---|---|---|---|---|---|---|---|---|---|---|---|---|---|---|---|---|---|---|---|---|---|---|---|---|---|---|---|---|---|---|---|---|---|---|---|---|---|---|---|---|---|---|---|---|---|---|
| ||||||||||||||||||||||||||||||||||||||||||||||||||||||||||||||||||||||||||||||||||||||||||||||||||||||||||||||||||||||||||||||||||||||||||||||||||||||||||||||||||||||||||||||||||||||||||||||||||||||||||||||||||||||||||||||||||||||||||||||||||||||||||||||||||||||||||||||||||||||||||||||||||||||||||||||||||||||||||||||||||||||||||||||||||||||||||||||||||||||||||||||||||||||||||||||||||||||||||||||||||||||||||||||||||||||||||||||||||||||||||||||||||||||||||||||||||||||||||||||||||||||||||||||||||||||||||||
| Items | ||||||||||||||||||||||||||||||||||||||||||||||||||||||||||||||||||||||||||||||||||||||||||||||||||||||||||||||||||||||||||||||||||||||||||||||||||
|---|---|---|---|---|---|---|---|---|---|---|---|---|---|---|---|---|---|---|---|---|---|---|---|---|---|---|---|---|---|---|---|---|---|---|---|---|---|---|---|---|---|---|---|---|---|---|---|---|---|---|---|---|---|---|---|---|---|---|---|---|---|---|---|---|---|---|---|---|---|---|---|---|---|---|---|---|---|---|---|---|---|---|---|---|---|---|---|---|---|---|---|---|---|---|---|---|---|---|---|---|---|---|---|---|---|---|---|---|---|---|---|---|---|---|---|---|---|---|---|---|---|---|---|---|---|---|---|---|---|---|---|---|---|---|---|---|---|---|---|---|---|---|---|---|---|---|
| ||||||||||||||||||||||||||||||||||||||||||||||||||||||||||||||||||||||||||||||||||||||||||||||||||||||||||||||||||||||||||||||||||||||||||||||||||
1F (northwest)
Pass over the first patch of ice and continue on to the second. This one is larger, and the large pieces of ice make travel more difficult.
| Puzzle | Solution |
|---|---|
| #1 | Up, Left, Up, Left, Down, Left, Up, Right |
After that, go east to reach the next ice patch. This one is smaller, and there is an item, HM07 (Waterfall), lying on the far side of the ice. After that, cross over the platform to reach the northeast ladder.
| Puzzle | Solution |
|---|---|
| #2 | Right, Down, Left, Up, Left, Down, Left, Up, Right |
B1F (north)
There are four boulders scattered around this floor, and each one must be dropped through a different hole to form a path on the floor below. Go north and loop around to find the first two boulders.
| Boulder | Solution |
|---|---|
| #1 (southwest) | Right 1, Down 3, Left 5, Down 1, Right 1 |
| #2 (west) | Up 4, Right 1, Down 1 |
| #3 (east) | Left 1, Down 5, Left 1, Down 2, Left 4 |
| #4 (north) | Up 2, Right 2, Up 3, Left 2 |
Start off with the southernmost boulder. Use Strength to move it southward and drop it through the southwest hole. Go back and move the second boulder as far north as possible. Head to the east side to reach the third boulder, and drop it through the southeast hole. Go north and drop the fourth boulder through the north hole. Finally, move the second boulder to the northwest hole. Climb down the ladder in the northeast.
B2F (west)
The boulders from the floor above have formed a convenient spiral that leads to the center of the room. Check the corners for items, including a Max Potion, and a hidden Carbos. Follow the boulders to the room's center, pick up the Full Heal, and climb down the ladder.
B3F
Smash the rock, or loop around to the right, to reach the NeverMeltIce. Climb up the east ladder.
B2F (east)
Go south, then head east across the platform. Stand two steps east of the platform, and slide south then east to reach TM72 (Avalanche). Turn around and slide west to reach the ladder.
B1F (south)
Inspect the stalagmite on the south edge of the ice for a hidden Revive. Head northwest, and move the boulder one space southward. Slide west over the ice, then south to reach the Iron. Climb up the western ladder.
1F (southeast)
Grab the Protein on the platform and head south. Another of the Kimono Girls can be found to the south; it seems that she got stuck on the ice. Slide down, left, down, then right to reach her. After a quick shove to clear ground, she thanks you and leaves. Slide left, up, right, down, right, and down to reach the PP Up, then head south to reach the exit. Welcome to Blackthorn City!
Blackthorn City
The quiet mountain retreat known as Blackthorn City lies isolated in the northeast. The main attraction is the Blackthorn Gym, the final Gym in the region. North of the Gym is Dragon's Den, a training ground for Dragon-type specialists. On Saturdays, Santos of the Week Siblings can be found here.
| Available Pokémon | |||||||||||||||||||||||||||||||||||||||||||||||||||||||||||||||||||||||||||||||||||||||||||||||||||||||||||||||||||||||||||||||||||||||||||||||||||||||||||||||||||||||
|---|---|---|---|---|---|---|---|---|---|---|---|---|---|---|---|---|---|---|---|---|---|---|---|---|---|---|---|---|---|---|---|---|---|---|---|---|---|---|---|---|---|---|---|---|---|---|---|---|---|---|---|---|---|---|---|---|---|---|---|---|---|---|---|---|---|---|---|---|---|---|---|---|---|---|---|---|---|---|---|---|---|---|---|---|---|---|---|---|---|---|---|---|---|---|---|---|---|---|---|---|---|---|---|---|---|---|---|---|---|---|---|---|---|---|---|---|---|---|---|---|---|---|---|---|---|---|---|---|---|---|---|---|---|---|---|---|---|---|---|---|---|---|---|---|---|---|---|---|---|---|---|---|---|---|---|---|---|---|---|---|---|---|---|---|---|---|---|
| |||||||||||||||||||||||||||||||||||||||||||||||||||||||||||||||||||||||||||||||||||||||||||||||||||||||||||||||||||||||||||||||||||||||||||||||||||||||||||||||||||||||
| Items | ||||||||||||||||
|---|---|---|---|---|---|---|---|---|---|---|---|---|---|---|---|---|
| ||||||||||||||||
Time for a Trade
The girl in the eastern house is looking to trade. She offers her Dodrio in exchange for a female Dragonair. The Dodrio arrives holding a Smoke Ball.
The Move Tutor House
There are four people in the southwest house, all of which provide valuable services regarding a Pokémon's moves.
- Move Deleter: He can help a Pokémon forget any move, even HM moves.
- Move Maniac: In exchange for a Heart Scale, he helps a Pokémon remember any move it had previously forgotten.
- Grandma Wilma: When shown a Dragon Pokémon that is happy with its Trainer, she will teach it the ultimate Dragon-type move, Draco Meteor.
- Ultimate Move Tutor: He teaches any fully-evolved starter Pokémon the ultimate move of its type; Frenzy Plant, Blast Burn, or Hydro Cannon.
Blackthorn Gym
The Blackthorn Gym uses mostly Water-type and Dragon-type Pokémon. Waters resist Ice and Fire attacks and are weak to Electric. Dragons take less damage from Grass, Fire, Water, and Electric moves, and are more vulnerable to Dragon- and Ice-type attacks. The floor has become unstable due to the lava bubbling underfoot, forcing your lead Pokémon to return to its Poké Ball. Reaching the Gym Leader requires crossing the lava on movable platforms. These platforms each have a blue tile, which causes it to rotate, and two arrow tiles, which move it in the respective direction.
| Puzzle | Platform 1 | Platform 2 | Platform 3 |
| Solution | 1. ← 2. Button 3. Button 4. → |
1. ↑ 2. Button 3. → 4. Button 5. Button 6. → |
1. ← 2. Button 3. Button 4. → 5. Button 6. ↑ 7. ↑ 8. ↑ 9. Button 10. → 11. Button 12. ↑ 13. ↑ |
Clair's Gyarados can lower its opponent's Attack with its Intimidate Ability. It cannot make good use of its Twister and Dragon Pulse moves due to its lower Special Attack, but Bite builds on its already-high Attack. Both of her Dragonair can inflict paralysis with Thunder Wave, before executing strong moves like Dragon Pulse, Fire Blast, and Aqua Tail. TM25 (Thunder) from the Goldenrod Department Store deals serious damage to Gyarados, while TM14 (Blizzard) from the Goldenrod Department Store or TM72 (Avalanche) from Ice Path can help against her two Dragonair. Her Kingdra's only weakness is Dragon-type attacks, and can beat its target down with the powerful Hydro Pump, Dragon Pulse, and Hyper Beam attacks. Unless your Pokémon happen to know a Dragon attack, you likely have to hammer it with strong, neutrally effective moves.
Clair refuses to accept defeat. She claims that you are still not ready for the Pokémon League, and directs you to take the "Dragon-master challenge". There is a small shrine in the Dragon's Den, a large cave located underneath the city. If you can reach it, she will give up the Rising Badge. Bring along a Pokémon with Surf and Whirlpool, and cross the lake behind the Gym.
|
HeartGold and SoulSilver walkthrough |
|

|
This article is part of Project Walkthroughs, a Bulbapedia project that aims to write comprehensive step-by-step guides on each Pokémon game. |


