Appendix:Gold and Silver walkthrough/Section 17: Difference between revisions
TyraniThrone (talk | contribs) m (→Route 6) |
N. Harmonik (talk | contribs) m (→Silph Co.) |
||
| (21 intermediate revisions by 11 users not shown) | |||
| Line 1: | Line 1: | ||
{{WalkthroughNotice|GS}} | |||
==Route 6== | |||
[[File:Kanto Route 6 GSC.png|thumb|Route 6]] | |||
- | Like with [[Vermilion City]], the terrain of {{rt|6|Kanto}} has shifted slightly, leaving the route shorter than it was in the past. There are no Trainers to worry about, and the [[Underground Path (Kanto Routes 5-6)|Underground Path]] is blocked off until the [[Kanto Power Plant]] is online again. | ||
{| class="expandable" align="center" style="background: #{{locationcolor/med|land}}; {{roundy}}; border: 5px solid #{{locationcolor/light|land}};" | |||
{| | |||
|- align="center" | |- align="center" | ||
! Available Pokémon | ! Available Pokémon | ||
|- | |- | ||
| | | | ||
{{Catch/header|land|yes}} | {{Catch/header|land|yes}} | ||
{{Catch/entry2|063|Abra|yes|yes|no|Grass|12-14|all=10% | {{Catch/entry2|063|Abra|yes|yes|no|Grass|12-14|all=10%|type1=Psychic}} | ||
{{Catch/entry2|081|Magnemite|yes|yes|no|Grass|15|all=10% | {{Catch/entry2|081|Magnemite|yes|yes|no|Grass|15|all=10%|type1=Electric|type2=Steel}} | ||
{{Catch/entry2|016|Pidgey|yes|no|no|Grass|13-14|50%|50%|0% | {{Catch/entry2|016|Pidgey|yes|no|no|Grass|13-14|50%|50%|0%|type1=Normal|type2=Flying}} | ||
{{Catch/entry2|016|Pidgey|no|yes|no|Grass|13|30%|30%|0% | {{Catch/entry2|016|Pidgey|no|yes|no|Grass|13|30%|30%|0%|type1=Normal|type2=Flying}} | ||
{{Catch/entry2|069|Bellsprout|yes|yes|no|Grass|13|30%|30%|20% | {{Catch/entry2|069|Bellsprout|yes|yes|no|Grass|13|30%|30%|20%|type1=Grass|type2=Poison}} | ||
{{Catch/entry2|052|Meowth|no|yes|no|Grass|14|20%|20%|30% | {{Catch/entry2|052|Meowth|no|yes|no|Grass|14|20%|20%|30%|type1=Normal}} | ||
{{Catch/entry2|043|Oddish|yes|no|no|Grass|13-14|0%|0%|60% | {{Catch/entry2|043|Oddish|yes|no|no|Grass|13-14|0%|0%|60%|type1=Grass|type2=Poison}} | ||
{{Catch/entry2|043|Oddish|no|yes|no|Grass|13|0%|0%|30% | {{Catch/entry2|043|Oddish|no|yes|no|Grass|13|0%|0%|30%|type1=Grass|type2=Poison}} | ||
{{Catch/div|water| | {{Catch/div|water|Surfing}} | ||
{{Catch/entry2|054|Psyduck|yes|yes| | {{Catch/entry2|054|Psyduck|yes|yes|no|Surf|5-14|all=90%|type1=Water}} | ||
{{Catch/entry2|055|Golduck|yes|yes| | {{Catch/entry2|055|Golduck|yes|yes|no|Surf|10-14|all=10%|type1=Water}} | ||
{{Catch/entry2|129|Magikarp|yes|yes| | {{Catch/div|water|Fishing}} | ||
{{Catch/entry2|060|Poliwag|yes|yes| | {{Catch/entry2|129|Magikarp|yes|yes|no|Fish Old|10|all=85%|type1=Water}} | ||
{{Catch/entry2|060|Poliwag|yes|yes| | {{Catch/entry2|060|Poliwag|yes|yes|no|Fish Old|10|all=15%|type1=Water}} | ||
{{Catch/entry2|129|Magikarp|yes|yes| | {{Catch/entry2|060|Poliwag|yes|yes|no|Fish Good|20|all=65%|type1=Water}} | ||
{{Catch/entry2|129|Magikarp|yes|yes|no|Fish Good|20|all=35%|type1=Water}} | |||
{{Catch/footer|land}} | {{Catch/footer|land}} | ||
|} | |} | ||
{{-}} | |||
== Saffron City == | ==Saffron City== | ||
[[File:Saffron City GSC.png|thumb|250px|Saffron City]] | |||
[[Saffron City]] is the largest city in [[Kanto]], and for good reason. [[Silph Co.]], which produces most forms of Poké Ball, Potion, and [[Technical Machine]], is headquartered here. It is the only city to host two Gyms, though only one is officially recognized. The station for the [[Magnet Train]], a high-speed link back to [[Goldenrod City]], is located in the northwest district. | |||
=== Mr. Psychic === | {| class="expandable" align="center" style="background: #F6D263; {{roundy}}; border: 5px solid #F9E197;" | ||
|- align="center" | |||
! Items | |||
|- | |||
| | |||
{{itlisth|road}} | |||
{{Itemlist|TM Psychic|From Mr. Psychic in the southeast house|G=yes|S=yes|display={{TM|29|Psychic}}}} | |||
{{Itemlist|Up-Grade|From the security guard in Silph Co.|G=yes|S=yes|display=[[Upgrade|Up-Grade]]}} | |||
{{Itemlist|Focus Band|Inside the Fighting Dojo|G=yes|S=yes}} | |||
{{itlistfoot|road}} | |||
|} | |||
=== | ===Mr. Psychic=== | ||
Stop by Mr. Psychic's house in the southeast district to receive {{TM|29|Psychic}}. | |||
=== | ===Silph Co.=== | ||
[[Silph Co.]] is open for business, but as it was [[Generation I|recently]] attacked by [[Team Rocket]], visitors are restricted to the first floor. The security guard blocking the stairs gives you an [[Upgrade|Up-Grade]], one of the company's latest products, as a souvenir. | |||
===Magnet Train Station=== | |||
The [[Magnet Train]] Station is located in the city's northwest district, but the train is not currently operational due to a problem at the [[Kanto Power Plant]]. Once the power is restored, this high-speed bullet train runs to [[Goldenrod City]] and back at any time. | |||
===Fighting Dojo=== | |||
The [[Fighting Dojo]] is located on the north side of the city. The Karate King is still training in [[Mt. Mortar]], but there is a [[Focus Band]] near the back wall. | |||
[[File:Saffron Gym GSC.png|thumb|Saffron Gym]] | |||
===Saffron Gym=== | |||
{{sign|RBY|header}} | {{sign|RBY|header}} | ||
{{sign|RBY|SAFFRON CITY <br> POKéMON GYM <br> LEADER: SABRINA | {{sign|RBY|title|SAFFRON CITY<br>POKéMON GYM<br>LEADER: SABRINA}} | ||
{{sign|RBY|The Master of<br>Psychic Pokémon!}} | |||
{{sign|RBY|footer}} | {{sign|RBY|footer}} | ||
Unlike Vermilion Gym, [[Saffron Gym]]'s puzzle of warp tiles is functioning normally. The Gym specializes in {{type|Psychic}} Pokémon, so {{t|Ghost}}-, {{t|Dark}}-, and {{type|Bug}} attacks work best. Avoid using {{t|Fighting}}- or {{type|Poison}} Pokémon. [[Sabrina]] has only three Pokémon, but they can become a serious problem if given the chance. {{p|Mr. Mime}} can raise her team's {{stat|Defense}} with {{m|Reflect}}, {{p|Espeon}} can hinder its opponent's accuracy with {{m|Sand-Attack}}, and {{p|Alakazam}} can restore its health with {{m|Recover}}. If all else fails, strike with powerful physical moves like {{m|Earthquake}}. | |||
The fastest way to Sabrina as as follows: | |||
*Step on the warp tile in the foyer. | |||
*Battle the trainer (optional), then walk to the top left warp tile. | |||
*Battle the trainer (optional), then walk to the bottom left warp tile. | |||
*Battle the trainer (optional), then walk to the bottom left warp tile. | |||
To exit, the path is: | |||
*Step on the warp tile in Sabrina's chamber. | |||
*Walk to the top left warp tile. | |||
*Walk to the top right warp tile. | |||
*Walk to the bottom right warp tile. | |||
{{User:KCorp4000/Gymtag | |||
|gym=Saffron | |||
|badge=Marsh | |||
|type=Psychic | |||
|trainers={{trainerheader|psychic}} | |||
{{trainerentry|Spr GS Medium.png|Medium|Rebecca|1400|2|096|Drowzee|♀|35|None|097|Hypno|♀|35|None}} | |||
{{trainerdiv|psychic}} | |||
{{trainerentry|Spr GS Psychic.png|Psychic|Jared|1120|3|122|Mr. Mime|♂|32|None|102|Exeggcute|♂|32|None|102|Exeggcute|♂|35|None}} | |||
{{trainerdiv|psychic}} | |||
{{trainerentry|Spr GS Medium.png|Medium|Doris|1440|2|079|Slowpoke|♀|34|None|080|Slowbro|♀|36|None}} | |||
{{trainerdiv|psychic}} | |||
{{trainerentry|Spr GS Psychic.png|Psychic|Franklin|1184|1|064|Kadabra|♂|37|None}} | |||
{{trainerfooter|psychic|I}} | |||
|leader={{Party/Single|color={{psychic color}}|bordercolor={{psychic color dark}}|headcolor={{psychic color light}} | |||
|sprite=Spr GS Sabrina.png | |||
{{Party | |prize={{PDollar}}4800 | ||
|color={{psychic color}} | |class=Leader|name=Sabrina | ||
|bordercolor={{psychic color dark}} | |game=GSC|location=Saffron Gym | ||
|headcolor={{psychic color light}} | |pokemon=3}} | ||
|sprite= | {{!}}{{Pokémon/2|game=Gold and Silver | ||
|prize={{ | |ndex=196|pokemon=Espeon | ||
|class=Leader | |||
|name=Sabrina | |||
|game=GSC | |||
|location=Saffron Gym | |||
|pokemon=3 | |||
|game=Gold | |||
|ndex=196 | |||
|pokemon=Espeon | |||
|type1=Psychic | |type1=Psychic | ||
|move1=Sand-Attack | |level=46|gender=male | ||
|move1type=Ground | |move1=Sand-Attack|move1type=Ground | ||
|move2=Quick Attack | |move2=Quick Attack|move2type=Normal | ||
|move2type=Normal | |move3=Swift|move3type=Normal | ||
|move3=Swift | |move4=Psychic|move4type=Psychic}} | ||
|move3type=Normal | |||
|move4=Psychic | {{!}}{{Pokémon/2|game=Gold and Silver | ||
|move4type=Psychic}} | |ndex=122|pokemon=Mr. Mime | ||
|game=Gold | |||
|ndex=122 | |||
|pokemon=Mr. Mime | |||
|type1=Psychic | |type1=Psychic | ||
|move1=Barrier | |level=46|gender=female | ||
|move1type=Psychic | |move1=Barrier|move1type=Psychic | ||
|move2=Reflect | |move2=Reflect|move2type=Psychic | ||
|move2type=Psychic | |move3=Baton Pass|move3type=Normal | ||
|move3=Baton Pass | |move4=Psychic|move4type=Psychic}} | ||
|move3type=Normal | |||
|move4=Psychic | {{!}}{{Pokémon/2|game=Gold and Silver | ||
|move4type=Psychic}} | |ndex=065|pokemon=Alakazam | ||
|game=Gold | |||
|ndex=065 | |||
|pokemon=Alakazam | |||
|type1=Psychic | |type1=Psychic | ||
|move1=Recover | |level=48|gender=male | ||
|move1type=Normal | |move1=Recover|move1type=Normal | ||
|move2=Future Sight | |move2=Future Sight|move2type=Psychic | ||
|move2type=Psychic | |move3=Psychic|move3type=Psychic | ||
|move3=Psychic | |move4=Reflect|move4type=Psychic}} | ||
|move3type=Psychic | {{Party/Footer}} | ||
|move4=Reflect | |||
|move4type=Psychic}} | |||
}} | }} | ||
Upon her defeat, Sabrina awards you the {{badge|Marsh}}. This Badge is only symbolic of your victory here, as it does not boost any of your party's stats. | |||
Rest up and head east to {{rt|8|Kanto}}. | |||
{ | |||
| | |||
{{WalkthroughPrevNext | |||
|game=Gold | |||
|game2=Silver | |||
|gamename=Gold and Silver | |||
|prev=yes | |||
|prevsection=16 | |||
|prevname=Back in New Bark Town, S.S. Aqua, Vermilion City | |||
|next=yes | |||
|nextsection=18 | |||
|nextname=Route 8, Lavender Town, Route 10, Rock Tunnel, Kanto Power Plant | |||
}} | |||
<br> | <br> | ||
{{Project Walkthroughs notice}} | {{Project Walkthroughs notice}} | ||
[[Category:Gold and Silver walkthrough]] | [[Category:Gold and Silver walkthrough]] | ||
Latest revision as of 21:31, 2 September 2021
These pages follow the original Game Boy Color iteration, not Pokémon HeartGold and SoulSilver. The guide for those games can be found here.
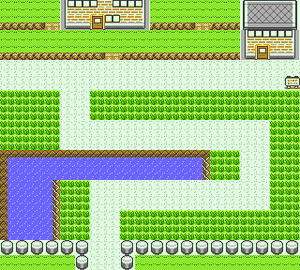
Route 6
Like with Vermilion City, the terrain of Route 6 has shifted slightly, leaving the route shorter than it was in the past. There are no Trainers to worry about, and the Underground Path is blocked off until the Kanto Power Plant is online again.
| Available Pokémon | |||||||||||||||||||||||||||||||||||||||||||||||||||||||||||||||||||||||||||||||||||||||||||||||||||||||||||||||||||||||||||||||||||||||||||||||||||||||||||||||||||||||||||||||||||||||||||||||||||||||||||||||||||||||||||||||||||||||||||||||||||||||||||||||||||||||||||||||||||||||||||
|---|---|---|---|---|---|---|---|---|---|---|---|---|---|---|---|---|---|---|---|---|---|---|---|---|---|---|---|---|---|---|---|---|---|---|---|---|---|---|---|---|---|---|---|---|---|---|---|---|---|---|---|---|---|---|---|---|---|---|---|---|---|---|---|---|---|---|---|---|---|---|---|---|---|---|---|---|---|---|---|---|---|---|---|---|---|---|---|---|---|---|---|---|---|---|---|---|---|---|---|---|---|---|---|---|---|---|---|---|---|---|---|---|---|---|---|---|---|---|---|---|---|---|---|---|---|---|---|---|---|---|---|---|---|---|---|---|---|---|---|---|---|---|---|---|---|---|---|---|---|---|---|---|---|---|---|---|---|---|---|---|---|---|---|---|---|---|---|---|---|---|---|---|---|---|---|---|---|---|---|---|---|---|---|---|---|---|---|---|---|---|---|---|---|---|---|---|---|---|---|---|---|---|---|---|---|---|---|---|---|---|---|---|---|---|---|---|---|---|---|---|---|---|---|---|---|---|---|---|---|---|---|---|---|---|---|---|---|---|---|---|---|---|---|---|---|---|---|---|---|---|---|---|---|---|---|---|---|---|---|---|---|---|---|---|---|---|---|---|---|---|---|---|---|---|---|---|---|---|---|---|---|---|---|
| |||||||||||||||||||||||||||||||||||||||||||||||||||||||||||||||||||||||||||||||||||||||||||||||||||||||||||||||||||||||||||||||||||||||||||||||||||||||||||||||||||||||||||||||||||||||||||||||||||||||||||||||||||||||||||||||||||||||||||||||||||||||||||||||||||||||||||||||||||||||||||
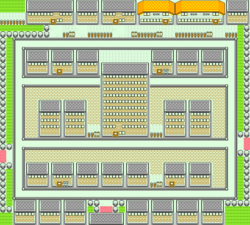
Saffron City
Saffron City is the largest city in Kanto, and for good reason. Silph Co., which produces most forms of Poké Ball, Potion, and Technical Machine, is headquartered here. It is the only city to host two Gyms, though only one is officially recognized. The station for the Magnet Train, a high-speed link back to Goldenrod City, is located in the northwest district.
| Items | ||||||||||||||||||||
|---|---|---|---|---|---|---|---|---|---|---|---|---|---|---|---|---|---|---|---|---|
| ||||||||||||||||||||
Mr. Psychic
Stop by Mr. Psychic's house in the southeast district to receive TM29 (Psychic).
Silph Co.
Silph Co. is open for business, but as it was recently attacked by Team Rocket, visitors are restricted to the first floor. The security guard blocking the stairs gives you an Up-Grade, one of the company's latest products, as a souvenir.
Magnet Train Station
The Magnet Train Station is located in the city's northwest district, but the train is not currently operational due to a problem at the Kanto Power Plant. Once the power is restored, this high-speed bullet train runs to Goldenrod City and back at any time.
Fighting Dojo
The Fighting Dojo is located on the north side of the city. The Karate King is still training in Mt. Mortar, but there is a Focus Band near the back wall.
Saffron Gym
SAFFRON CITY
POKéMON GYM
LEADER: SABRINA
The Master of
Psychic Pokémon!
Unlike Vermilion Gym, Saffron Gym's puzzle of warp tiles is functioning normally. The Gym specializes in Psychic-type Pokémon, so Ghost-, Dark-, and Bug-type attacks work best. Avoid using Fighting- or Poison-type Pokémon. Sabrina has only three Pokémon, but they can become a serious problem if given the chance. Mr. Mime can raise her team's Defense with Reflect, Espeon can hinder its opponent's accuracy with Sand-Attack, and Alakazam can restore its health with Recover. If all else fails, strike with powerful physical moves like Earthquake.
The fastest way to Sabrina as as follows:
- Step on the warp tile in the foyer.
- Battle the trainer (optional), then walk to the top left warp tile.
- Battle the trainer (optional), then walk to the bottom left warp tile.
- Battle the trainer (optional), then walk to the bottom left warp tile.
To exit, the path is:
- Step on the warp tile in Sabrina's chamber.
- Walk to the top left warp tile.
- Walk to the top right warp tile.
- Walk to the bottom right warp tile.
| ||||||||||||||||||||||||||||||||||||||||||||||||||||||||||||||||||||||||||||||||||||||||||||||||||||||||||||||||||||||||||||||||||||||||||||||||||||||||||||||||||||||||||||
Upon her defeat, Sabrina awards you the Marsh Badge. This Badge is only symbolic of your victory here, as it does not boost any of your party's stats.
Rest up and head east to Route 8.
|
Gold and Silver walkthrough |
|

|
This article is part of Project Walkthroughs, a Bulbapedia project that aims to write comprehensive step-by-step guides on each Pokémon game. |


