Glacier Palace Great Spire: Difference between revisions
(Created page with "{{DungeonPrevNext|Glacier Palace - West Tower|Northwind Shores|5}} {{Dungeon infobox |colorscheme=Rock |bordercolorscheme=Water |name=Glacier Palace - Big Crystal Tower |jname...") |
No edit summary |
||
| Line 6: | Line 6: | ||
|jname=グレッシャーパレス 大結晶の塔 | |jname=グレッシャーパレス 大結晶の塔 | ||
|jtrans=Glacier Palace - Big Crystal Tower | |jtrans=Glacier Palace - Big Crystal Tower | ||
|image=Glacier Palace | |image=Glacier Palace Big Crystal Tower PMDGTI.png | ||
|recruitable=Yes | |recruitable=Yes | ||
|floors=5 | |floors=5 | ||
Revision as of 14:02, 23 December 2012
|
|
|
| ||||||||||||||||||||||||||||||||||||||||||
| ||||||||||||||||||||||||||||||||||||||||||
| ||||||||||||||||||||||||||||||||||||||||||
| ||||||||||||||||||||||||||||||||||||||||||
(Japanese: グレッシャーパレス 大結晶の塔 Glacier Palace - Big Crystal) is a playable dungeon the player goes through in Pokémon Mystery Dungeon: Gates to Infinity. It has five floors and two bosses. This dungeon is accessible after completing the Glacier Palace - West Tower dungeon. Recruited Pokémon automatically get sent back to Pokémon Paradise instead of staying with the group.
Pokémon encountered
| Pokémon | Floors | Levels | Recruit Rate | |
|---|---|---|---|---|
| Klinklang | 2-5 | ? | ?% | |
| Bisharp | 1-2, 4-5 | ? | ?% | |
| Zweilous | 1-3 | ? | ?% | |
| Kyurem | 6 | ? | ?% Boss | |
Items
| Item | Floors | |
|---|---|---|
| 144-273 Poké | 1-5F | |
| File:MDBag Pecha Berry IV Sprite.png | Pecha Berry | 3F |
| Escape Orb | 4F | |
| Health Orb | 3F | |
| Slow Orb | 1F | |
| Pure Seed | 3F | |
| Sleep Seed | 5F | |
| File:MDBag Health Drink Sprite.png | Max Elixir | 1-2, 5F |
| File:MDBag Gravelerock IV Sprite.png | 5 Gravelerock | 4F |
| Gold Bar | 4F | |
Gallery
- Glacier Palace Big Crystal Tower entrance PMDGTI.png
Entrance
- Glacier Palace Big Crystal Tower boss area PMDGTI.png
Kyurem boss area
- Glacier Palace Big Crystal Tower Kyurem battle PMDGTI.png
battle vs Kyurem
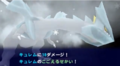
Kyurem using Glaciate
- Hyoshokutai.png
Hyōshokutai
- Hyoshokutai attack 1 PMDGTI.png
Hyōshokutai's first attack
- Hyoshokutai attack 2 PMDGTI.png
Hyōshokutai's second attack
- Hyoshokutai attack 3 PMDGTI.png
Hyōshokutai's third attack

Glacier Palace with a small rainbow mid-way through the boss battle
- HyoshokutaiCore.png
Hyōshokutai's red core exposed
- Attacking Hyoshokutai Core PMDGTI.png
attacking the red core
- Hyoshokutai exploding PMDGTI.png
Hyōshokutai exploding
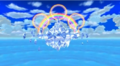
Glacier Palace with a large rainbow after Hyōshokutai's defeat

Glacier Palace breaking apart and collapsing


| This article is part of both Project Locations and Project Sidegames, Bulbapedia projects that, together, aim to write comprehensive articles on the Pokémon Locations and Sidegames, respectively. |