Reverse Mountain: Difference between revisions
Nescientist (talk | contribs) (format/wording; missing monsterhouses) |
CuteShaymin (talk | contribs) No edit summary |
||
| (21 intermediate revisions by 11 users not shown) | |||
| Line 1: | Line 1: | ||
{{samename| | {{samename|mountain in [[Unova]]|Reversal Mountain}} | ||
{{DungeonPrevNext|Calm Craggy Area|Submerged Cave|6}} | {{DungeonPrevNext|Calm Craggy Area|Submerged Cave|6}} | ||
{{incomplete|needs=monsterhouses, items, traps}} | {{incomplete|needs=monsterhouses, items, traps}} | ||
| Line 5: | Line 5: | ||
{{Dungeon infobox | {{Dungeon infobox | ||
|colorscheme=Ghost | |colorscheme=Ghost | ||
|bordercolorscheme= | |bordercolorscheme=fighting | ||
|name=Reverse Mountain | |name=Reverse Mountain | ||
|jname= | |jname={{tt|地天|ちてん}}の{{tt|山|やま}} | ||
|jtrans= | |jtrans=Earthsky Mountain | ||
|image=Reverse Mountain.png | |image=Reverse Mountain.png | ||
|size=300px | |size=300px | ||
|floors= | |floors=9 | ||
|rest=Yes | |rest=Yes{{tt|*|After 6F}} | ||
|traps=Yes | |traps=Yes | ||
|monsterhouses= | |monsterhouses= | ||
|maintype={{t|Ghost}}, <small>{{t| | |maintype={{t|Ghost}}, <small>{{t|Fighting}}, {{t|Steel}}</small> | ||
|boss={{me|Tyranitar}}, Mega {{p|Gengar}} ×2, [[Void Shadows]] ×2 | |boss={{me|Tyranitar}}, Mega {{p|Gengar}} ×2, [[Void Shadows]] ×2 | ||
|recruitable=No{{tt|*|These Pokémon are found and recruited via Connection Orb after completing the missions for them.}} | |recruitable=No{{tt|*|These Pokémon are found and recruited via the Connection Orb after completing the missions for them.}} | ||
|items=Current | |items=Current | ||
|money=Allowed | |money=Allowed | ||
|startlevel=Current | |startlevel=Current | ||
|teamsize= | |teamsize=Up to 3{{tt|*|The player, partner, and Mawile during the main story, with the Legenday Beasts as guests.}} | ||
}} | }} | ||
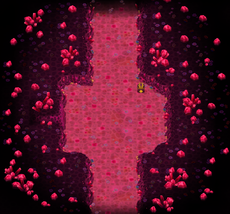
'''Reverse Mountain''' (Japanese: '''{{tt|地天|ちてん}}の{{tt|山|やま}}''' ''Earthsky Mountain'') is a [[Mystery Dungeon|dungeon]] in {{g|Super Mystery Dungeon}}. It is the final dungeon of the [[Voidlands]] the {{player}} treks through to return to the {{OBP|Pokémon world|Mystery Dungeon}}. Once Reverse Mountain has been completed in the main story, thus completing the trek through the Voidlands, it cannot be revisited in the main story. It can only be revisited through [[Pelipper Island]], where it is considered part of the [[Water Continent]]. | |||
'''Reverse Mountain''' (Japanese: ''' | |||
[[File:Reverse Mountain approach.png|thumb|left|Reverse Mountain as seen from afar]] | [[File:Reverse Mountain approach.png|thumb|left|Reverse Mountain as seen from afar]] | ||
After being saved by the [[Legendary beasts]], the player, their partner, and [[Expedition Society|Mawile]], are brought to Reverse Mountain, which the Legendary trio believe to be closely connected to [[Revelation Mountain]]. The trio warns the | After being saved by the [[Legendary beasts]], the player, their partner, and [[Expedition Society|Mawile]], are brought to Reverse Mountain, which the Legendary trio believe to be closely connected to [[Revelation Mountain]]. The trio warns the player's group that they will abandon them if they become a liability. | ||
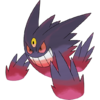
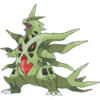
After an arduous climb, the group reaches the mountain's peak, only to discover that the Door to Light, the gateway to the real world, is being blocked by [[Void Shadows]]. Surrounded, they fight five shadows, one of which transforms into a {{me|Tyranitar}}, and two of which turn into Mega {{p|Gengar}}. Even after their victory, more Void Shadows continue to fall from the sky. In a last, desperate action, Mawile shoves the player and partner in front of the door, leaving her and the beasts behind. After discovering the beasts anticipated this would happen, and were acting distant to keep the two from worrying about them, the player's partner swears they'll find a way to save them, and the two escape just as the door disappears. | After an arduous climb, the group reaches the mountain's peak, only to discover that the Door to Light, the gateway to the real world, is being blocked by [[Void Shadows]]. Surrounded, they fight five shadows, one of which transforms into a {{me|Tyranitar}}, and two of which turn into Mega {{p|Gengar}}. Even after their victory, more Void Shadows continue to fall from the sky. In a last, desperate action, Mawile shoves the player and partner in front of the door, leaving her and the beasts behind. After discovering the beasts anticipated this would happen, and were acting distant to keep the two from worrying about them, the player's partner swears they'll find a way to save them, and the two escape just as the door disappears. | ||
{{endspoilers}} | {{endspoilers}} | ||
{{left clear}} | |||
==Pokémon encountered== | ==Pokémon encountered== | ||
{{mdloc/h|Ghost| | {{mdloc/h|Ghost|Fighting}} | ||
{{mdloc|092|Gastly| | {{mdloc|092|Gastly|1F-9F|22|0}} | ||
{{mdloc|308|Medicham| | {{mdloc|308|Medicham|1F-9F|37|0}} | ||
{{mdloc|437|Bronzong| | {{mdloc|437|Bronzong|1F-9F|33|0}} | ||
{{mdloc|442|Spiritomb| | {{mdloc|442|Spiritomb|1F-9F|22|0}} | ||
{{mdloc|538|Throh| | {{mdloc|538|Throh|1F-9F|22|0}} | ||
{{mdloc|539|Sawk| | {{mdloc|539|Sawk|1F-9F|22|0}} | ||
{{mdloc|598|Ferrothorn| | {{mdloc|598|Ferrothorn|1F-9F|40|0}} | ||
{{mdloc|609|Chandelure| | {{mdloc|609|Chandelure|1F-9F|41|0}} | ||
{{mdloc|681|Aegislash| | {{mdloc|681|Aegislash|1F-9F|35|0}} | ||
{{mdloc/f| | {{mdloc/f|steel|These Pokémon are recruited through the Connection Orb rather than fighting them.}} | ||
===Boss=== | ===Boss=== | ||
{{ | {| | ||
{{ | |- | ||
{{ | | '''Mega Gengar''' ×2<br>Boosts: +200 {{stat|HP}} | ||
|- style="text-align:center; background:#FFF" | | '''Mega Tyranitar'''<br>Boosts: +300 {{stat|HP}} | ||
| {{ | | '''Boss allies: Void Shadows''' ×2<br>Boosts: +150 {{stat|HP}} | ||
| {{ | |- | ||
| | |{{Pokémon/7 | ||
| | |ndex=094 | ||
| | |pokemon=Gengar | ||
{{ | |nickname=Mega Gengar | ||
|form=-Mega | |||
|type1=Ghost | |||
|type2=Poison | |||
|ability=Shadow Tag | |||
|level=35 | |||
|move1=Lick|move1type=Ghost|move1cat=Physical | |||
|move2=Night Shade|move2type=Ghost|move2cat=Special | |||
|move3=Shadow Punch|move3type=Ghost|move3cat=Physical | |||
|move4=Confuse Ray|move4type=Ghost|move4cat=Status}} | |||
|{{Pokémon/7 | |||
|ndex=248 | |||
|pokemon=Tyranitar | |||
|nickname=Mega Tyranitar | |||
|form=-Mega | |||
|type1=Rock | |||
|type2=Dark | |||
|ability=Sand Stream | |||
|level=55 | |||
|move1=Sandstorm|move1type=Rock|move1cat=Status | |||
|move2=Bite|move2type=Dark|move2cat=Physical | |||
|move3=Screech|move3type=Normal|move3cat=Status | |||
|move4=Chip Away|move4type=Normal|move4cat=Physical}} | |||
|{{Pokémon/7 | |||
|ndex= | |||
|pokemon=Void Shadows | |||
|character={{color2|000|Void Shadows}} | |||
|type1=Unknown | |||
|ability=Void Shadows | |||
|level=20 | |||
|move1=Drain|move1type=Unknown|move1cat=Special | |||
|move2=Peripheral Attack|move2type=Unknown|move2cat=Special | |||
|move3=Shadow Headbutt|move3type=Unknown|move3cat=Physical}} | |||
|} | |||
==Items found== | |||
{{DungeonItem/h|Ghost}} | |||
{{DungeonItem|Poké|3=1F-9|sprite=Poké currency}} | |||
{{DungeonItem|Elixir|Health drink|sprite=MDBag Elixir Sprite|1F-9}} | |||
{{DungeonItem|Grimy Food|Food|sprite=MDBag Grimy Food VI Sprite|1F-9}} | |||
{{DungeonItem|Cheri Berry|sprite=MDBag Cheri Berry VI Sprite|3=1F-9}} | |||
{{DungeonItem|Chesto Berry|sprite=MDBag Chesto Berry VI Sprite|3=1F-9}} | |||
{{DungeonItem|Oran Berry|3=1F-9|sprite=MDBag Oran Berry VI Sprite}} | |||
{{DungeonItem|Pecha Berry|3=1F-9|sprite=MDBag Pecha Berry VI Sprite}} | |||
{{DungeonItem|Rawst Berry|3=1F-9|sprite=MDBag Rawst Berry VI Sprite}} | |||
{{DungeonItem|Ban Seed|Seed|3=1F-9|sprite=MDBag Seed VI Sprite}} | |||
{{DungeonItem|Blast Seed|Seed|3=1F-9|sprite=MDBag Seed VI Sprite}} | |||
{{DungeonItem|Decoy Seed|Seed|3=1F-9|sprite=MDBag Seed VI Sprite}} | |||
{{DungeonItem|Tiny Reviver Seed|Seed|3=1F-9|sprite=MDBag Seed VI Sprite}} | |||
{{DungeonItem|Emera-Up Orb|Wonder Orb|3=1F-9|sprite=MDBag Wonder Orb VI Sprite}} | |||
{{DungeonItem|See-Trap Orb|Wonder Orb|3=1F-9|sprite=MDBag Wonder Orb VI Sprite}} | |||
{{DungeonItem|Totter Orb|Wonder Orb|3=1F-9|sprite=MDBag Wonder Orb VI Sprite}} | |||
{{DungeonItem|Confuse Wand|Wand|sprite=MDBag Wand Sprite|1F-?}} | |||
{{DungeonItem|Guiding Wand|Wand|sprite=MDBag Wand Sprite|1F-?}} | |||
{{DungeonItem|Petrify Wand|Wand|sprite=MDBag Wand Sprite|1F-?}} | |||
{{DungeonItem|Slow Wand|Wand|sprite=MDBag Wand Sprite|1F-?}} | |||
{{DungeonItem|Slumber Wand|Wand|sprite=MDBag Wand Sprite|1F-?}} | |||
{{DungeonItem|Stayaway Wand|Wand|sprite=MDBag Wand Sprite|1F-?}} | |||
{{DungeonItem|Surround Wand|Wand|sprite=MDBag Wand Sprite|1F-?}} | |||
{{DungeonItem|Truant Wand|Wand|sprite=MDBag Wand Sprite|1F-?}} | |||
{{DungeonItem|Tunnel Wand|Wand|sprite=MDBag Wand Sprite|1F-?}} | |||
{{DungeonItem|Barrage|Emera|sprite=MDBag Speed Emera VI Sprite|B1F-?}} | |||
{{DungeonItem|Barrage Guard|Emera|sprite=MDBag Sp Def Emera VI Sprite|3=B1F-?}} | |||
{{DungeonItem|Burn Guard|Emera|sprite=MDBag HP Emera VI Sprite|3=B1F-?}} | |||
{{DungeonItem|Clutch Performer|Emera|sprite=MDBag Speed Emera VI Sprite|B1F-?}} | |||
{{DungeonItem|Confusion Guard|Emera|sprite=MDBag HP Emera VI Sprite|3=B1F-?}} | |||
{{DungeonItem|Dizzying Payback|Emera|sprite=MDBag Sp Def Emera VI Sprite|3=B1F-?}} | |||
{{DungeonItem|Dizzying Stare|Emera|sprite=MDBag Sp Atk Emera VI Sprite|3=B1F-?}} | |||
{{DungeonItem|Guard Boost|Emera|sprite=MDBag Defense Emera VI Sprite|B1F-?}} | |||
{{DungeonItem|Intimidator|Emera|sprite=MDBag Speed Emera VI Sprite|B1F-?}} | |||
{{DungeonItem|Paralysis Guard|Emera|sprite=MDBag HP Emera VI Sprite|3=B1F-?}} | |||
{{DungeonItem|Poison Guard|Emera|sprite=MDBag HP Emera VI Sprite|3=B1F-?}} | |||
{{DungeonItem|Power Boost X|Emera|sprite=MDBag Attack Emera VI Sprite|3=B1F-?}} | |||
{{DungeonItem|Power Boost Y|Emera|sprite=MDBag Sp Atk Emera VI Sprite|3=B1F-?}} | |||
{{DungeonItem|Sleep Guard|Emera|sprite=MDBag HP Emera VI Sprite|3=B1F-?}} | |||
{{DungeonItem|Toughness|Emera|sprite=MDBag Sp Def Emera VI Sprite|3=B1F-?}} | |||
{{DungeonItem|Trap Proof|Emera|sprite=MDBag HP Emera VI Sprite|3=B1F-?}} | |||
{{DungeonItem|Type Bulldozer|Emera|sprite=MDBag Attack Emera VI Sprite|3=B1F-?}} | |||
{{DungeonItem/f|Ghost}} | |||
==Traps encountered== | |||
{| style="background: #{{ghost color}}; margin-left: 10px; margin-bottom: 10px; {{roundy|10px}} border: 3px solid #{{fighting color dark}}; text-align:center" | |||
! style="background:#{{steel color light}}; {{roundytl|5px}}"| Image | |||
! style="background:#{{steel color light}}" | Trap | |||
! style="background:#{{steel color light}}; {{roundytr|5px}}"| Floors | |||
|- style="background: #FFF" | |||
| [[File:GustTrapSMD.png]] | |||
| Gust Trap | |||
| 7F | |||
|- style="background: #FFF" | |||
| [[File:PoisonTrapSMD.png]] | |||
| Poison Trap | |||
| 2F, 9F | |||
|- style="background: #FFF" | |||
| [[File:SlowTrapSMD.png]] | |||
| Slow Trap | |||
| 4F | |||
|- style="background: #FFF" | |||
| [[File:SpikyTrapSMD.png]] | |||
| Spiky Trap | |||
| 2F, 4F, 7F | |||
|- | |||
| style="background: #FFF; {{roundybl|5px}}"| [[File:SummonTrapSMD.png]] | |||
| style="background: #FFF"| Summon Trap | |||
| style="background: #FFF; {{roundybr|5px}}"| 7F | |||
|} | |||
==Layout== | |||
{| class="roundy" style="margin:auto; background: #000; border: 3px solid #{{fighting color}}" | |||
|- | |||
! style="background:#{{ghost color light}}; {{roundytl|5px}}; {{roundytr|5px}}" | Rest stop | |||
|- | |||
| [[File:Reverse Mountain rest stop PSMD.png|230px]] | |||
|- | |||
| style="background:#{{ghost color light}}; {{roundybottom|5px}}" | | |||
|} | |||
==In other languages== | |||
{{ | {{langtable|color={{Ghost color}}|bordercolor={{Fighting color dark}} | ||
{{ | |fr=Mont Terrociel | ||
|de=Sphärenberg | |||
|it=Monte Terracielo | |||
|es=Cumbre Cosmoterra | |||
}} | |||
{{-}} | {{-}} | ||
| Line 70: | Line 187: | ||
[[de:Sphärenberg]] | [[de:Sphärenberg]] | ||
[[fr:Mont Terrociel]] | |||
[[ja:地天の山]] | |||
[[zh:地天之山]] | |||
Latest revision as of 19:31, 21 May 2024
- If you were looking for the mountain in Unova, see Reversal Mountain.
|
|
|

|
This article is incomplete. Please feel free to edit this article to add missing information and complete it. Reason: monsterhouses, items, traps |
| ||||||||||||||||||||||||||||||||||||||||||
| ||||||||||||||||||||||||||||||||||||||||||
| ||||||||||||||||||||||||||||||||||||||||||
Reverse Mountain (Japanese: 地天の山 Earthsky Mountain) is a dungeon in Pokémon Super Mystery Dungeon. It is the final dungeon of the Voidlands the player treks through to return to the Pokémon world. Once Reverse Mountain has been completed in the main story, thus completing the trek through the Voidlands, it cannot be revisited in the main story. It can only be revisited through Pelipper Island, where it is considered part of the Water Continent.
After being saved by the Legendary beasts, the player, their partner, and Mawile, are brought to Reverse Mountain, which the Legendary trio believe to be closely connected to Revelation Mountain. The trio warns the player's group that they will abandon them if they become a liability.
After an arduous climb, the group reaches the mountain's peak, only to discover that the Door to Light, the gateway to the real world, is being blocked by Void Shadows. Surrounded, they fight five shadows, one of which transforms into a Mega Tyranitar, and two of which turn into Mega Gengar. Even after their victory, more Void Shadows continue to fall from the sky. In a last, desperate action, Mawile shoves the player and partner in front of the door, leaving her and the beasts behind. After discovering the beasts anticipated this would happen, and were acting distant to keep the two from worrying about them, the player's partner swears they'll find a way to save them, and the two escape just as the door disappears.
| Spoilers end here. |
|---|
Pokémon encountered
| Pokémon | Floors | Levels | Recruit Rate | |
|---|---|---|---|---|
| Gastly | 1F-9F | 22 | Unrecruitable | |
| Medicham | 1F-9F | 37 | Unrecruitable | |
| Bronzong | 1F-9F | 33 | Unrecruitable | |
| Spiritomb | 1F-9F | 22 | Unrecruitable | |
| Throh | 1F-9F | 22 | Unrecruitable | |
| Sawk | 1F-9F | 22 | Unrecruitable | |
| Ferrothorn | 1F-9F | 40 | Unrecruitable | |
| Chandelure | 1F-9F | 41 | Unrecruitable | |
| Aegislash | 1F-9F | 35 | Unrecruitable | |
| These Pokémon are recruited through the Connection Orb rather than fighting them. | ||||
Boss
| Mega Gengar ×2 Boosts: +200 HP |
Mega Tyranitar Boosts: +300 HP |
Boss allies: Void Shadows ×2 Boosts: +150 HP | |||||||||||||||||||||||||||||||||||||||||||||||||||||||||||||||||||||||||||||||||||||||||||||||||||||
|
|
| |||||||||||||||||||||||||||||||||||||||||||||||||||||||||||||||||||||||||||||||||||||||||||||||||||||
Items found
| Item | Floors | |||||||
|---|---|---|---|---|---|---|---|---|
| Poké | 1F-9F | |||||||
| Elixir | 1F-9F | |||||||
| Grimy Food | 1F-9F | |||||||
| Cheri Berry | 1F-9F | |||||||
| Chesto Berry | 1F-9F | |||||||
| Oran Berry | 1F-9F | |||||||
| Pecha Berry | 1F-9F | |||||||
| Rawst Berry | 1F-9F | |||||||
| Ban Seed | 1F-9F | |||||||
| Blast Seed | 1F-9F | |||||||
| Decoy Seed | 1F-9F | |||||||
| Tiny Reviver Seed | 1F-9F | |||||||
| Emera-Up Orb | 1F-9F | |||||||
| See-Trap Orb | 1F-9F | |||||||
| Totter Orb | 1F-9F | |||||||
| Confuse Wand | 1F-?F | |||||||
| Guiding Wand | 1F-?F | |||||||
| Petrify Wand | 1F-?F | |||||||
| Slow Wand | 1F-?F | |||||||
| Slumber Wand | 1F-?F | |||||||
| Stayaway Wand | 1F-?F | |||||||
| Surround Wand | 1F-?F | |||||||
| Truant Wand | 1F-?F | |||||||
| Tunnel Wand | 1F-?F | |||||||
| Barrage | B1F-?F | |||||||
| Barrage Guard | B1F-?F | |||||||
| Burn Guard | B1F-?F | |||||||
| Clutch Performer | B1F-?F | |||||||
| Confusion Guard | B1F-?F | |||||||
| Dizzying Payback | B1F-?F | |||||||
| Dizzying Stare | B1F-?F | |||||||
| Guard Boost | B1F-?F | |||||||
| Intimidator | B1F-?F | |||||||
| Paralysis Guard | B1F-?F | |||||||
| Poison Guard | B1F-?F | |||||||
| Power Boost X | B1F-?F | |||||||
| Power Boost Y | B1F-?F | |||||||
| Sleep Guard | B1F-?F | |||||||
| Toughness | B1F-?F | |||||||
| Trap Proof | B1F-?F | |||||||
| Type Bulldozer | B1F-?F | |||||||
Traps encountered
| Image | Trap | Floors |
|---|---|---|

|
Gust Trap | 7F |

|
Poison Trap | 2F, 9F |

|
Slow Trap | 4F |

|
Spiky Trap | 2F, 4F, 7F |

|
Summon Trap | 7F |
Layout
| Rest stop |
|---|

|
In other languages
| ||||||||||||||||||

|
This article is part of both Project Locations and Project Sidegames, Bulbapedia projects that, together, aim to write comprehensive articles on the Pokémon Locations and Sidegames, respectively. | 
|


