Crags of Lament: Difference between revisions
From Bulbapedia, the community-driven Pokémon encyclopedia.
Jump to navigationJump to search
mNo edit summary |
m (→top: adding link to Mysteriosity page) |
||
| (30 intermediate revisions by 14 users not shown) | |||
| Line 4: | Line 4: | ||
|bordercolorscheme=Water | |bordercolorscheme=Water | ||
|name=Crags of Lament | |name=Crags of Lament | ||
|jname= | |jname=ドウコクの{{tt|谷|たに}} | ||
|jtrans=Wailing Valley | |jtrans=Wailing Valley | ||
|image=Crags of Lament PMDGTI.png | |image=Crags of Lament PMDGTI.png | ||
| Line 10: | Line 10: | ||
|floors=9 | |floors=9 | ||
|rest=Yes | |rest=Yes | ||
|traps=No | |traps=Yes | ||
|items= | |monsterhouses=No | ||
|items=Current | |||
|money=Allowed | |money=Allowed | ||
|teamsize=4 | |teamsize=4 | ||
|startlevel=Current | |startlevel=Current | ||
|maintype= | |maintype=None | ||
|boss= | |boss={{p|Purugly}} and {{p|Toxicroak}} | ||
}} | }} | ||
'''Crags of Lament''' (Japanese: ''' | '''Crags of Lament''' (Japanese: '''ドウコクの{{tt|谷|たに}}''' ''Wailing Valley'') is a playable dungeon the {{player}} goes through in [[Pokémon Mystery Dungeon: Gates to Infinity]]. It has nine floors and two bosses. There is a rest stop after floor five, before the player continues to floor six. This dungeon is accessible after [[Umbreon and Espeon (Gates to Infinity)|Umbreon]] shows the player a Magnagate and requests that the player save his sister {{p|Espeon}}. [[Tyrian Maze]] and [[Glacier Palace Western Spire]] are accessible through this dungeon at a high [[mysteriosity]] level. | ||
==Pokémon encountered== | ==Pokémon encountered== | ||
{{mdloc/h|Rock}} | {{mdloc/h|Rock}} | ||
{{mdloc|220|Swinub| | {{mdloc|220|Swinub|1F-9F|16|?}} | ||
{{mdloc|528|Swoobat| | {{mdloc|528|Swoobat|1F-9F|14|?}} | ||
{{mdloc|543|Venipede| | {{mdloc|543|Venipede|1F-9F|16|?}} | ||
{{mdloc|547|Whimsicott| | {{mdloc|547|Whimsicott|1F-9F|17|?}} | ||
{{mdloc|530|Excadrill| | {{mdloc|530|Excadrill|1F-9F|40|?}} | ||
{{mdloc|432|Purugly|Cliffside| | {{mdloc/f|Rock}} | ||
{{mdloc|454|Toxicroak|Cliffside| | |||
===Cliffside=== | |||
{{mdloc/h|Rock}} | |||
{{mdloc|432|Purugly|Cliffside|25|0|boss=yes}} | |||
{{mdloc|454|Toxicroak|Cliffside|23|0|boss=yes}} | |||
{{mdloc/f|Rock}} | {{mdloc/f|Rock}} | ||
==Items== | ==Items== | ||
{{DungeonItem/h|rock}} | {{DungeonItem/h|rock}} | ||
{{DungeonItem|Poké|4=53-110|sprite=Poké currency|3= | {{DungeonItem|Poké|4=53-110|sprite=Poké currency V|3=1F-9}} | ||
{{DungeonItem|Oran Berry|3= | {{DungeonItem|Oran Berry|sprite=MDBag Oran Berry V Sprite|3=1F-9}} | ||
{{DungeonItem|Pecha Berry|sprite=MDBag Pecha Berry Sprite|3= | {{DungeonItem|Pecha Berry|sprite=MDBag Pecha Berry V Sprite|3=1F-9}} | ||
{{DungeonItem|Rawst Berry|sprite=MDBag Rawst Berry Sprite|3= | {{DungeonItem|Rawst Berry|sprite=MDBag Rawst Berry V Sprite|3=1F-9}} | ||
{{DungeonItem| | {{DungeonItem|All-Protect Orb|Wonder Orb|sprite=MDBag Wonder Orb V Sprite|3=1F-9}} | ||
{{DungeonItem| | {{DungeonItem|Escape Orb|Wonder Orb|sprite=MDBag Wonder Orb V Sprite|3=1F-9}} | ||
{{DungeonItem|Foe-Hold Orb|Wonder Orb|3= | {{DungeonItem|Foe-Hold Orb|Wonder Orb|sprite=MDBag Wonder Orb V Sprite|3=1F-9}} | ||
{{DungeonItem| | {{DungeonItem|Rollcall Orb|Wonder Orb|sprite=MDBag Wonder Orb V Sprite|3=1F-9}} | ||
{{DungeonItem|Blast Seed|Seed|3= | {{DungeonItem|Blast Seed|Seed|sprite=MDBag Seed V Sprite|3=1F-9}} | ||
{{DungeonItem|Heal Seed|Seed|3= | {{DungeonItem|Heal Seed|Seed|sprite=MDBag Seed V Sprite|3=1F-9}} | ||
{{DungeonItem| | {{DungeonItem|Stun Seed|Seed|sprite=MDBag Seed V Sprite|3=1F-9}} | ||
{{DungeonItem| | {{DungeonItem|Cover Band|Scarf (Mystery Dungeon)|3=1F-9|sprite=MDBag Scarf V Sprite}} | ||
{{DungeonItem|Max Elixir|Health drink|sprite=MDBag | {{DungeonItem|Fickle Ribbon|Scarf (Mystery Dungeon)|3=1F-9|sprite=MDBag Scarf V Sprite}} | ||
{{DungeonItem|Max Elixir|Health drink|sprite=MDBag Max Elixir V Sprite|3=1F-9}} | |||
{{DungeonItem/f|rock}} | |||
==Traps encountered== | |||
{| style="background: #{{rock color}}; {{roundy|10px}} border: 3px solid #{{water color dark}}; text-align:center" | |||
! style="background:#{{rock color light}}; {{roundytl|5px}}"| Image | |||
! style="background:#{{rock color light}}" | Trap | |||
! style="background:#{{rock color light}}; {{roundytr|5px}}"| Floors | |||
|- | |||
| style="background: #FFF; {{roundybl|5px}}"| [[File:SlumberTrapGTI.png]] | |||
| style="background: #FFF"| Slumber Trap | |||
| style="background: #FFF; {{roundybr|5px}}"| 1F, 6F | |||
|} | |} | ||
==Gallery== | ==Gallery== | ||
<gallery> | <gallery> | ||
File:Crags of Lament 4F Espeon PMDGTI.png| | File:Crags of Lament 4F Espeon PMDGTI.png|Scene where Espeon runs away from enemies | ||
File:Crags of Lament boss area PMDGTI.png| | File:Crags of Lament boss area PMDGTI.png|Crags of Lament boss area | ||
File:Crags of Lament confrontation PMDGTI.png|Toxicroak and Purugly going after Espeon | File:Crags of Lament confrontation PMDGTI.png|Toxicroak and Purugly going after Espeon | ||
File:Crags of Lament boss battle PMDGTI.png| | File:Crags of Lament boss battle PMDGTI.png|Crags of Lament cliffside boss battle | ||
File:Crags of Lament Espeon encounter PMDGTI.png| | File:Crags of Lament Espeon encounter PMDGTI.png|Rescuing Espeon | ||
</gallery> | </gallery> | ||
==In other languages== | |||
{{langtable|color={{rock color}}|bordercolor={{water color dark}} | |||
|fr=Vallée des Larmes | |||
|de=Jammertal | |||
|it=Valle del Pianto | |||
|es=Valle del Lamento | |||
}} | |||
{{-}} | {{-}} | ||
{{PMD GTI locations}} | |||
{{DoubleProjectTag|Locations|Sidegames}} | {{DoubleProjectTag|Locations|Sidegames}} | ||
[[Category:Pokémon Mystery Dungeon: Gates to Infinity locations]] | [[Category:Pokémon Mystery Dungeon: Gates to Infinity locations]] | ||
[[Category: | [[Category:Canyons]] | ||
[[de:Jammertal]] | |||
[[es:Valle del Lamento]] | |||
[[fr:Vallée des Larmes]] | |||
[[it:Valle del Pianto]] | |||
[[ja:ドウコクの谷]] | |||
[[zh:慟哭之谷]] | |||
Latest revision as of 03:51, 21 September 2022
|
|
|
| ||||||||||||||||||||||||||||||||||||||||||
| ||||||||||||||||||||||||||||||||||||||||||
| ||||||||||||||||||||||||||||||||||||||||||

Crags of Lament (Japanese: ドウコクの谷 Wailing Valley) is a playable dungeon the player goes through in Pokémon Mystery Dungeon: Gates to Infinity. It has nine floors and two bosses. There is a rest stop after floor five, before the player continues to floor six. This dungeon is accessible after Umbreon shows the player a Magnagate and requests that the player save his sister Espeon. Tyrian Maze and Glacier Palace Western Spire are accessible through this dungeon at a high mysteriosity level.
Pokémon encountered
| Pokémon | Floors | Levels | Recruit Rate | |
|---|---|---|---|---|
| Swinub | 1F-9F | 16 | ?% | |
| Swoobat | 1F-9F | 14 | ?% | |
| Venipede | 1F-9F | 16 | ?% | |
| Whimsicott | 1F-9F | 17 | ?% | |
| Excadrill | 1F-9F | 40 | ?% | |
Cliffside
| Pokémon | Floors | Levels | Recruit Rate | |
|---|---|---|---|---|
| Purugly | Cliffside | 25 | Unrecruitable Boss | |
| Toxicroak | Cliffside | 23 | Unrecruitable Boss | |
Items
| Item | Floors | |||||||
|---|---|---|---|---|---|---|---|---|
| 53-110 Poké | 1F-9F | |||||||
| Oran Berry | 1F-9F | |||||||
| Pecha Berry | 1F-9F | |||||||
| Rawst Berry | 1F-9F | |||||||
| All-Protect Orb | 1F-9F | |||||||
| Escape Orb | 1F-9F | |||||||
| Foe-Hold Orb | 1F-9F | |||||||
| Rollcall Orb | 1F-9F | |||||||
| Blast Seed | 1F-9F | |||||||
| Heal Seed | 1F-9F | |||||||
| Stun Seed | 1F-9F | |||||||
| Cover Band | 1F-9F | |||||||
| Fickle Ribbon | 1F-9F | |||||||
| Max Elixir | 1F-9F | |||||||
Traps encountered
| Image | Trap | Floors |
|---|---|---|

|
Slumber Trap | 1F, 6F |
Gallery
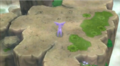
Scene where Espeon runs away from enemies
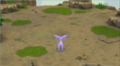
Crags of Lament boss area
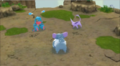
Toxicroak and Purugly going after Espeon
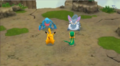
Crags of Lament cliffside boss battle

Rescuing Espeon


In other languages
| ||||||||||||||||||
| This article is part of both Project Locations and Project Sidegames, Bulbapedia projects that, together, aim to write comprehensive articles on the Pokémon Locations and Sidegames, respectively. |