|
|
| Line 474: |
Line 474: |
| ======Round 1====== | | ======Round 1====== |
| {{Trainerheader|Ground}} | | {{Trainerheader|Ground}} |
| {{Trainerentry|S2 Rocket GruntM.png|Rocket||N/A|6|042|Golbat||50-100|None|020|Raticate||50-100|None|053|Persian||50-100|None|146|Moltres||50-100|None|085|Dodrio||50-100|None|047|Parasect||50-100|None}} | | {{Trainerentry|SJP Rocket.png|Rocket||N/A|6|042|Golbat||50-100|None|020|Raticate||50-100|None|053|Persian||50-100|None|146|Moltres||50-100|None|085|Dodrio||50-100|None|047|Parasect||50-100|None}} |
| {{Trainerentry|S2 Scientist.png|Lab Man||N/A|6|141|Kabutops||50-100|None|082|Magneton||50-100|None|022|Fearow||50-100|None|107|Hitmonchan||50-100|None|062|Poliwrath||50-100|None|108|Lickitung||50-100|None}} | | {{Trainerentry|S2 Scientist.png|Lab Man||N/A|6|141|Kabutops||50-100|None|082|Magneton||50-100|None|022|Fearow||50-100|None|107|Hitmonchan||50-100|None|062|Poliwrath||50-100|None|108|Lickitung||50-100|None}} |
| {{Trainerentry|SJP Cool M.png|Cool♂||N/A|6|139|Omastar||50-100|None|085|Dodrio||50-100|None|073|Tentacruel||50-100|None|036|Clefable||50-100|None|145|Zapdos||50-100|None|127|Pinsir||50-100|None}} | | {{Trainerentry|SJP Cool M.png|Cool♂||N/A|6|139|Omastar||50-100|None|085|Dodrio||50-100|None|073|Tentacruel||50-100|None|036|Clefable||50-100|None|145|Zapdos||50-100|None|127|Pinsir||50-100|None}} |
| Line 545: |
Line 545: |
| ======Round 2====== | | ======Round 2====== |
| {{Trainerheader|Ground}} | | {{Trainerheader|Ground}} |
| {{Trainerentry|S2 Rocket GruntM.png|Rocket||N/A|6|042|Golbat||50-100|None|020|Raticate||50-100|None|053|Persian||50-100|None|115|Kangaskhan||50-100|None|085|Dodrio||50-100|None|047|Parasect||50-100|None}} | | {{Trainerentry|SJP Rocket.png|Rocket||N/A|6|042|Golbat||50-100|None|020|Raticate||50-100|None|053|Persian||50-100|None|115|Kangaskhan||50-100|None|085|Dodrio||50-100|None|047|Parasect||50-100|None}} |
| {{Trainerentry|S2 Scientist.png|Lab Man||N/A|6|141|Kabutops||50-100|None|082|Magneton||50-100|None|022|Fearow||50-100|None|107|Hitmonchan||50-100|None|062|Poliwrath||50-100|None|108|Lickitung||50-100|None}} | | {{Trainerentry|S2 Scientist.png|Lab Man||N/A|6|141|Kabutops||50-100|None|082|Magneton||50-100|None|022|Fearow||50-100|None|107|Hitmonchan||50-100|None|062|Poliwrath||50-100|None|108|Lickitung||50-100|None}} |
| {{Trainerentry|SJP Cool M.png|Cool♂||N/A|6|139|Omastar||50-100|None|085|Dodrio||50-100|None|073|Tentacruel||50-100|None|036|Clefable||50-100|None|145|Zapdos||50-100|None|127|Pinsir||50-100|None}} | | {{Trainerentry|SJP Cool M.png|Cool♂||N/A|6|139|Omastar||50-100|None|085|Dodrio||50-100|None|073|Tentacruel||50-100|None|036|Clefable||50-100|None|145|Zapdos||50-100|None|127|Pinsir||50-100|None}} |
The Viridian Gym (Japanese: トキワジム Tokiwa Gym) is the official Gym of Viridian City. During the events of Generations I and III, it is based on Ground-type Pokémon and the Gym Leader is Giovanni, the head of Team Rocket. After Team Rocket is disbanded at the end of Generations I and III, Blue takes over as the Leader, and the Gym no longer concentrates on any particular type.
Agatha of the Elite Four serves as a temporary Gym Leader in the anime.
Trainers who earn a win at the Viridian Gym receive the Earth Badge.
In the games
Viridian City Pokémon Gym
Leader: ...
Viridian City Pokémon Gym
Leader: ...
The rest of the text is illegible..
Viridian Gym appears in all games set in the Kanto region. In Generations I and III, when the player first reaches the Gym, it is locked due to the absence of the Gym Leader. With this acknowledged, the player journeys off to other Gyms to challenge them. Once the player has collected the other seven Gym Badges, the Viridian Gym reopens.
In Generations II and IV, Blue takes over the Gym. In Generation II, the Gym can be challenged as soon as Blue is spoken to on Cinnabar Island. In Generation IV, however, Blue will stay on Cinnabar Island and will not return to his Gym until the player speaks to him after obtaining the other seven Kanto Gym Badges.
Inside the Gym, the floor uses the same transporting tiles as are used in the Rocket Hideout. The player must use these tiles to navigate through the Gym to reach the Gym Leader. In Generation II, the Gym is completely remodeled and the tiles are gone; in Generation IV, the tiles are put back up.
A field based on the Gym also appears in Pokémon Stadium's Gym Leader Castle.
Appearance
Trainers
Main series

|
|
Reward: $4950
|
|
|
|
|
|

|
|
Reward: $5445
|
|
|
|
|
|

|
|
Reward: $5800
|
|
|
|
|
|
| Trainer
|
Pokémon
|

|
|
|
Tamer Cole
アキラ Akira
Reward: $1560
|
|
|
|
|
|
|
|
|
|
|
|
|
|
|
|
|
Tamer Jason
ヒロ Hiro
Reward: $1720
|
|
|
|
|
|
|
|
|
|
|
|
|
|
|
|
|
|
|
|
|
|
|
|
|
|
|
|
|
|
|
|
|
|
|
|
|
|
|
|
|
|
|
|
|
|
|
|
|
|
|
|
|
|
|
|
|
|
|
|
|

|
|
Reward: $5000
|
|
|
|
|
|

|
|
Reward: $9600
|
|
|
|
|
|
Side series
Round 1
Round 2
Round 1

|
|
Reward: N/A
|
|
|
|
|
|
Round 2
|
|
|
Reward: N/A
|
|
|
|
|
|
Items
In the anime

The Viridian Gym in its first appearance
The inside of the Gym in its first appearance
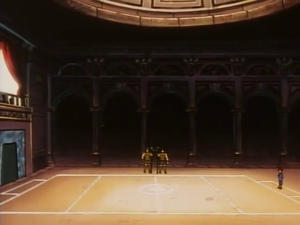
The Viridian Gym was led by Giovanni, as it was in Generation I. The Gym features Roman architecture, stately pillars, and an old mural depicting the proud tradition of this most prestigious Gym. The predominant brownish color suggests the Gym's affiliation with the Ground-type.
The Viridian Gym first made an appearance in The Battle of the Badge. Before Ash could challenge him however, Gary Oak appeared, taunting him with ten Badges, and insisting on challenging the Viridian Gym for fun. Gary faced Giovanni, though his confidence was quickly eroded after Giovanni brought out Mewtwo, who defeated each of Gary's Pokémon, even when Giovanni allowed him to use more than one Pokémon at a time against Mewtwo.
Ash Ketchum challenged the Gym soon after, but after Gary and his Pokémon had recovered. However, as the Team Rocket boss had unmentioned business to attend to, he left the Gym in the care of none other than Jessie, James, and Meowth. Giovanni also left them with several Pokémon that they could use against any challengers. Ash had a hard time beating them initially as the new Gym Leaders had rigged the Gym to shock anyone whose Pokémon took damage. Eventually, Ash overcame the borrowed Pokémon's power and defeated all of them, causing Team Rocket to rely on their usual duo of Arbok and Weezing. Ash quickly dispatched the two, shocking the trio due to the Gym's rigging. They blasted off, dropping an Earth Badge in their daze. Ash caught it, but he, Gary, Gary's cheerleaders, Brock, and Misty had to escape the Gym quickly, as it was collapsing.
The Gym appeared again (presumably rebuilt) when Ash returned to Kanto from Hoenn in The Scheme Team, where Agatha was now the temporary Gym Leader. Ash challenged her to an exhibition match, but lost.
Giovanni abdicating his position as Gym Leader is similar to the case in the Generation I games; however, in the anime, he is still in charge of Team Rocket, while in the games he disbands the team.
In the manga
The Viridian Gym is first visited in Bulbasaur, Come Home! in the Red, Green & Blue arc where Red and Professor Oak enters following a Bulbasaur. In this occasion the Gym is abandoned with only a Machoke and a Giovanni statue present.
The Viridian Gym made a brief appearance in at the end of A Hollow Victreebel and at the beginning of Make Way For Magmar in the Red, Green & Blue chapter where citizens were asking about Giovanni.
The Gym is visited again after Red's incident with Mewtwo. During this time, Giovanni is present and ready to fight. However, as the battle progresses, the Gym collapses due to Nidoking's Earthquake.
Even later, Red's Gym Leader test is held in the Gym. Even though he wins, Red declines the position as he was struggling throughout the battle. Currently, Blue is the Viridian Gym's Leader.
In the FireRed & LeafGreen arc, Yellow and Silver go to the Viridian Gym to seek Silver's past. At the same time, Giovanni and the Three Beasts are on their way to the Gym also, trying to reunite Silver with Giovanni. This succeeds when Sird lets Yellow use her power, thus exhausting her.
Pokémon
These Pokémon had escaped from Professor Oak's Laboratory and were found in the Gym:
In the TCG
The Viridian Gym was featured in the TCG. The following is a list of cards named Viridian City Gym.
Trivia
- Agatha's temporary position as Leader of the Viridian Gym when Ash returns to Kanto may be an anime reference to the fact that Giovanni quit Team Rocket and his status as Gym Leader after being defeated by Red. What this possibly means for Gary Oak, whose game counterpart Blue eventually assumed the title of leader in Generation II, is disputed.
- In all generations where this Gym is accessible, at least one Trainer inside the building owns a Rhydon.
- In fact, both of this Gym's Leaders have always had a member of the Rhyhorn evolutionary line in all of their Gym parties; the only time the Gym Leader does not own a Rhydon is in Pokémon FireRed and LeafGreen, in which Giovanni owns two Rhyhorn.
- In Generation II, it is possible to challenge Blue before beating any previous Gym Leader by talking to him on Cinnabar Island. In Pokémon HeartGold and SoulSilver, Blue can only be challenged when the player has seven Badges from Kanto.
- In HeartGold and SoulSilver, the exterior coloring of each Gym is based on the colors most associated with the type that the Gym specializes in. Viridian Gym, however, is both green and blue, likely referring to its Gym Leader's name.
- In HeartGold and SoulSilver, two male Ace Trainers in this Gym are named Arabella and Bonita, both being typically feminine names.


