Tyrian Maze: Difference between revisions
From Bulbapedia, the community-driven Pokémon encyclopedia.
Jump to navigationJump to search
mNo edit summary |
mNo edit summary |
||
| (8 intermediate revisions by 6 users not shown) | |||
| Line 1: | Line 1: | ||
{{DungeonPrevNext|Scorching Desert|Glacier Palace | {{DungeonPrevNext|Scorching Desert|Glacier Palace Eastern Spire|5}} | ||
{{Dungeon infobox | {{Dungeon infobox | ||
|colorscheme=Rock | |colorscheme=Rock | ||
|bordercolorscheme=Water | |bordercolorscheme=Water | ||
|name=Tyrian Maze | |name=Tyrian Maze | ||
|jname= | |jname=シアンの{{tt|迷|まよ}}い{{tt|道|みち}} | ||
|jtrans=Cyan Lost Road | |jtrans=Cyan Lost Road | ||
|image=Tyrian Maze PMDGTI.png | |image=Tyrian Maze PMDGTI.png | ||
| Line 12: | Line 12: | ||
|traps=Yes | |traps=Yes | ||
|monsterhouses=Yes | |monsterhouses=Yes | ||
|items= | |items=Current | ||
|money=Allowed | |money=Allowed | ||
|teamsize=4 | |teamsize=4 | ||
| Line 19: | Line 19: | ||
|boss={{p|Salamence}} | |boss={{p|Salamence}} | ||
}} | }} | ||
'''Tyrian Maze''' (Japanese: ''' | '''Tyrian Maze''' (Japanese: '''シアンの{{tt|迷|まよ}}い{{tt|道|みち}}''' ''Cyan Lost Road'') is a playable dungeon the {{player}} goes through in [[Pokémon Mystery Dungeon: Gates to Infinity]]. It has 12 floors and three bosses. This dungeon is accessible after completing the [[Scorching Desert]] dungeon and talking to {{OBP|Umbreon and Espeon|Gates to Infinity}}. Recruited Pokémon automatically get sent back to [[Pokémon Paradise]] instead of staying with the group. After the main storyline, the player may enter this dungeon from the dungeon [[Crags of Lament]] at a high mysteriosity level. Black locked doors appear on B9F, which require a {{DL|Key|Black Key}} to open. | ||
==Pokémon encountered== | ==Pokémon encountered== | ||
| Line 39: | Line 39: | ||
===Post story=== | ===Post story=== | ||
{{mdloc/h|Rock}} | {{mdloc/h|Rock}} | ||
{{mdloc|408|Cranidos|N/A|?| | {{mdloc|408|Cranidos|N/A|?|0}} | ||
{{mdloc|512|Simisage|N/A|?| | {{mdloc|512|Simisage|N/A|?|0}} | ||
{{mdloc|565|Carracosta|N/A|?| | {{mdloc|565|Carracosta|N/A|?|0}} | ||
{{mdloc|569|Garbodor|N/A|?| | {{mdloc|569|Garbodor|N/A|?|0}} | ||
{{mdloc|596|Galvantula|N/A|?| | {{mdloc|596|Galvantula|N/A|?|0}} | ||
{{mdloc|608|Lampent|N/A|?| | {{mdloc|608|Lampent|N/A|?|0}} | ||
{{mdloc|614|Beartic|N/A|?| | {{mdloc|614|Beartic|N/A|?|0}} | ||
{{mdloc|622|Golett|N/A|?| | {{mdloc|622|Golett|N/A|?|0}} | ||
{{mdloc|625|Bisharp|N/A|?| | {{mdloc|625|Bisharp|N/A|?|0}} | ||
{{mdloc|628|Braviary|N/A|?| | {{mdloc|628|Braviary|N/A|?|0}} | ||
{{mdloc/f|Rock}} | {{mdloc/f|Rock}} | ||
==Items== | ==Items== | ||
{{DungeonItem/h|rock}} | {{DungeonItem/h|rock}} | ||
{{DungeonItem|Poké|4=62-297|sprite=Poké currency|3=B1F-B11}}{{DungeonItem|Cheri Berry|sprite=MDBag Cheri Berry V Sprite|3=B1F-B11}} | {{DungeonItem|Poké|4=62-297|sprite=Poké currency V|3=B1F-B11}} | ||
{{DungeonItem|Cheri Berry|sprite=MDBag Cheri Berry V Sprite|3=B1F-B11}} | |||
{{DungeonItem|Chesto Berry|sprite=MDBag Chesto Berry V Sprite|3=B1F-B11}} | {{DungeonItem|Chesto Berry|sprite=MDBag Chesto Berry V Sprite|3=B1F-B11}} | ||
{{DungeonItem|Oran Berry|sprite=MDBag Oran Berry V Sprite|3=B1F-B11}} | {{DungeonItem|Oran Berry|sprite=MDBag Oran Berry V Sprite|3=B1F-B11}} | ||
{{DungeonItem|Pecha Berry|sprite=MDBag Pecha Berry V Sprite|3=B1F-B11}} | {{DungeonItem|Pecha Berry|sprite=MDBag Pecha Berry V Sprite|3=B1F-B11}} | ||
{{DungeonItem|Rawst Berry|sprite=MDBag Rawst Berry V Sprite|3=B1F-B11}} | {{DungeonItem|Rawst Berry|sprite=MDBag Rawst Berry V Sprite|3=B1F-B11}} | ||
{{DungeonItem|Gravelerock|4=5|Throwing item|sprite=MDBag Gravelerock Sprite|3=B1F-B11}} | {{DungeonItem|Gravelerock|4=5|Throwing item|sprite=MDBag Gravelerock V Sprite|3=B1F-B11}} | ||
{{DungeonItem|All Dodge Orb|Wonder Orb|3=B1F-B11}} | {{DungeonItem|All Dodge Orb|Wonder Orb|sprite=MDBag Wonder Orb V Sprite|3=B1F-B11}} | ||
{{DungeonItem|All Power-Up Orb|Wonder Orb|3=B1F-B11}} | {{DungeonItem|All Power-Up Orb|Wonder Orb|sprite=MDBag Wonder Orb V Sprite|3=B1F-B11}} | ||
{{DungeonItem|Foe-Hold Orb|Wonder Orb|3=B1F-B11}} | {{DungeonItem|Foe-Hold Orb|Wonder Orb|sprite=MDBag Wonder Orb V Sprite|3=B1F-B11}} | ||
{{DungeonItem|Health Orb|Wonder Orb|3=B1F-B11}} | {{DungeonItem|Health Orb|Wonder Orb|sprite=MDBag Wonder Orb V Sprite|3=B1F-B11}} | ||
{{DungeonItem|Slow Orb|Wonder Orb|3=B1F-B11}} | {{DungeonItem|Slow Orb|Wonder Orb|sprite=MDBag Wonder Orb V Sprite|3=B1F-B11}} | ||
{{DungeonItem|Petrify Orb|Wonder Orb|3=B1F-B11}} | {{DungeonItem|Petrify Orb|Wonder Orb|sprite=MDBag Wonder Orb V Sprite|3=B1F-B11}} | ||
{{DungeonItem|Totter Orb|Wonder Orb|3=B1F-B11}} | {{DungeonItem|Totter Orb|Wonder Orb|sprite=MDBag Wonder Orb V Sprite|3=B1F-B11}} | ||
{{DungeonItem|Blast Seed|Seed|3=B1F-B11}} | {{DungeonItem|Blast Seed|Seed|sprite=MDBag Seed V Sprite|3=B1F-B11}} | ||
{{DungeonItem|Totter Seed|Seed|3=B1F-B11}} | {{DungeonItem|Totter Seed|Seed|sprite=MDBag Seed V Sprite|3=B1F-B11}} | ||
{{DungeonItem|Warp Seed|Seed|3=B1F-B11}} | {{DungeonItem|Warp Seed|Seed|sprite=MDBag Seed V Sprite|3=B1F-B11}} | ||
{{DungeonItem|Joy Ribbon|Scarf (Mystery Dungeon)|3=B1F-B11|sprite=MDBag Scarf V Sprite}} | {{DungeonItem|Joy Ribbon|Scarf (Mystery Dungeon)|3=B1F-B11|sprite=MDBag Scarf V Sprite}} | ||
{{DungeonItem|Zinc Band|Scarf (Mystery Dungeon)|3=B1F-B11|sprite=MDBag Scarf V Sprite}} | {{DungeonItem|Zinc Band|Scarf (Mystery Dungeon)|3=B1F-B11|sprite=MDBag Scarf V Sprite}} | ||
{{DungeonItem|Max Elixir|Health drink|3=B1F-B11}} | {{DungeonItem|Max Elixir|Health drink|sprite=MDBag Max Elixir V Sprite|3=B1F-B11}} | ||
{{DungeonItem|Scope Lens|Glasses|3=B1F-B11|sprite=MDBag | {{DungeonItem|Scope Lens|Glasses|3=B1F-B11|sprite=MDBag Glasses V Sprite}} | ||
{{DungeonItem/f|rock}} | {{DungeonItem/f|rock}} | ||
| Line 97: | Line 98: | ||
File:Tyrian Maze boss battle PMDGTI.png|Boss battle against Chandelure and Salamence | File:Tyrian Maze boss battle PMDGTI.png|Boss battle against Chandelure and Salamence | ||
</gallery> | </gallery> | ||
==In other languages== | |||
{{langtable|color={{rock color}}|bordercolor={{water color dark}} | |||
|fr=Dédale Zinzolin | |||
|de=Wirrweg | |||
|it=Dedalo Tornasole | |||
|es=Laberinto Malva | |||
}} | |||
{{-}} | {{-}} | ||
| Line 107: | Line 116: | ||
[[de:Wirrweg]] | [[de:Wirrweg]] | ||
[[es:Laberinto Malva]] | [[es:Laberinto Malva]] | ||
[[fr:Dédale Zinzolin]] | |||
[[ja:シアンの迷い道]] | [[ja:シアンの迷い道]] | ||
[[zh:青色迷宫]] | [[zh:青色迷宫]] | ||
Revision as of 23:16, 1 April 2019
|
|
|
| ||||||||||||||||||||||||||||||||||||||||||
| ||||||||||||||||||||||||||||||||||||||||||
| ||||||||||||||||||||||||||||||||||||||||||

Tyrian Maze (Japanese: シアンの迷い道 Cyan Lost Road) is a playable dungeon the player goes through in Pokémon Mystery Dungeon: Gates to Infinity. It has 12 floors and three bosses. This dungeon is accessible after completing the Scorching Desert dungeon and talking to Umbreon and Espeon. Recruited Pokémon automatically get sent back to Pokémon Paradise instead of staying with the group. After the main storyline, the player may enter this dungeon from the dungeon Crags of Lament at a high mysteriosity level. Black locked doors appear on B9F, which require a Black Key to open.
Pokémon encountered
Main story
| Pokémon | Floors | Levels | Recruit Rate | |
|---|---|---|---|---|
| Cranidos | B1F-B11F | 28 | ?% | |
| Simisage | B1F-B11F | 37 | ?% | |
| Carracosta | B1F-B11F | 37 | ?% | |
| Garbodor | B1F-B11F | 36 | ?% | |
| Galvantula | B1F-B11F | 36 | ?% | |
| Lampent | B1F-B11F | 41 | ?% | |
| Beartic | B1F-B11F | 37 | ?% | |
| Golett | B1F-B11F | 30 | ?% | |
| Braviary | B9F | ? | ?% | |
| Salamence | Cliffside | ? | Unrecruitable Boss | |
| Chandelure ×2 | Cliffside | ? | Unrecruitable Boss | |
Post story
| Pokémon | Floors | Levels | Recruit Rate | |
|---|---|---|---|---|
| Cranidos | N/A | ? | Unrecruitable | |
| Simisage | N/A | ? | Unrecruitable | |
| Carracosta | N/A | ? | Unrecruitable | |
| Garbodor | N/A | ? | Unrecruitable | |
| Galvantula | N/A | ? | Unrecruitable | |
| Lampent | N/A | ? | Unrecruitable | |
| Beartic | N/A | ? | Unrecruitable | |
| Golett | N/A | ? | Unrecruitable | |
| Bisharp | N/A | ? | Unrecruitable | |
| Braviary | N/A | ? | Unrecruitable | |
Items
| Item | Floors | |||||||
|---|---|---|---|---|---|---|---|---|
| 62-297 Poké | B1F-B11F | |||||||
| Cheri Berry | B1F-B11F | |||||||
| Chesto Berry | B1F-B11F | |||||||
| Oran Berry | B1F-B11F | |||||||
| Pecha Berry | B1F-B11F | |||||||
| Rawst Berry | B1F-B11F | |||||||
| 5 Gravelerock | B1F-B11F | |||||||
| All Dodge Orb | B1F-B11F | |||||||
| All Power-Up Orb | B1F-B11F | |||||||
| Foe-Hold Orb | B1F-B11F | |||||||
| Health Orb | B1F-B11F | |||||||
| Slow Orb | B1F-B11F | |||||||
| Petrify Orb | B1F-B11F | |||||||
| Totter Orb | B1F-B11F | |||||||
| Blast Seed | B1F-B11F | |||||||
| Totter Seed | B1F-B11F | |||||||
| Warp Seed | B1F-B11F | |||||||
| Joy Ribbon | B1F-B11F | |||||||
| Zinc Band | B1F-B11F | |||||||
| Max Elixir | B1F-B11F | |||||||
| Scope Lens | B1F-B11F | |||||||
Traps encountered
| Image | Trap | Floors |
|---|---|---|

|
Slow Trap | B2F |

|
Slumber Trap | B2F, B10F |
Gallery
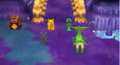
Entrance
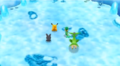
Boss area

View of Glacier Palace from the Tyrian Maze boss area prior to battle
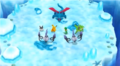
Boss battle against Chandelure and Salamence


In other languages
| ||||||||||||||||||
| This article is part of both Project Locations and Project Sidegames, Bulbapedia projects that, together, aim to write comprehensive articles on the Pokémon Locations and Sidegames, respectively. |