Solaceon Ruins: Difference between revisions
mNo edit summary |
Nescientist (talk | contribs) No edit summary |
||
| (23 intermediate revisions by 20 users not shown) | |||
| Line 1: | Line 1: | ||
{{Infobox location | {{Infobox location | ||
|image=Solaceon Ruins exterior Pt.png | |image=Solaceon Ruins exterior Pt.png | ||
|type= | |type=ruins | ||
|location_name=Solaceon Ruins | |location_name=Solaceon Ruins | ||
|japanese_name= | |japanese_name=ズイの{{tt|遺跡|いせき}} | ||
|translated_name=Zui Ruins | |translated_name=Zui Ruins | ||
|location=East of [[Solaceon Town]] | |location=East of [[Solaceon Town]] | ||
| Line 10: | Line 10: | ||
|map=Sinnoh Solaceon Town Map.png | |map=Sinnoh Solaceon Town Map.png | ||
}} | }} | ||
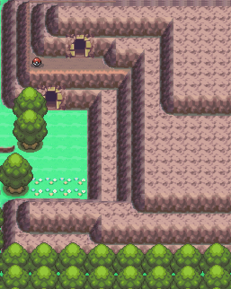
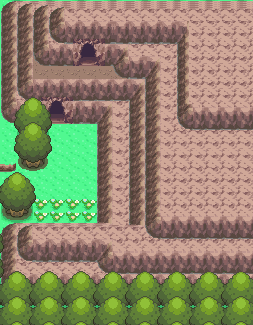
The '''Solaceon Ruins''' (Japanese: ''' | The '''Solaceon Ruins''' (Japanese: '''ズイの{{tt|遺跡|いせき}}''' ''Zui Ruins'') is the set of ruins where the player can find the {{p|Unown}} in [[Sinnoh]]. It is found east of [[Solaceon Town]]. If the player captures an Unown, then shows it to a boy in the town, the [[Seal]] corresponding to its letter will become available. | ||
==Geography== | ==Geography== | ||
| Line 18: | Line 18: | ||
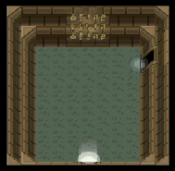
The first room has a plaque/inscription in the Unown alphabet that indicates which exits to take to get to the last room. It reads: | The first room has a plaque/inscription in the Unown alphabet that indicates which exits to take to get to the last room. It reads: | ||
{| style="background: #{{locationcolor/ | {| class="roundy" style="background: #{{locationcolor/med|ruins}}; border: 3px solid #{{locationcolor/dark|ruins}}" | ||
|- | |- | ||
| | ! style="background: #{{locationcolor/light|ruins}}; {{roundytl|5px}}" | Unown | ||
{| | ! style="background: #{{locationcolor/light|ruins}}; {{roundytr|5px}}" | Text | ||
|- style="background: #fff" | |||
| {{uwr|T}}{{uwr|O}}{{uwr|P}}[[File:None.png|12px]]{{uwr|R}}{{uwr|I}}{{uwr|G}}{{uwr|H}}{{uwr|T}} | |||
| Top right | |||
|- style="background: #fff" | |||
| {{uwr|L}}{{uwr|O}}{{uwr|W}}{{uwr|E}}{{uwr|R}}[[File:None.png|12px]]{{uwr|L}}{{uwr|E}}{{uwr|F}}{{uwr|T}} | |||
| Lower left | |||
|- style="background: #fff" | |||
| {{uwr|T}}{{uwr|O}}{{uwr|P}}[[File:None.png|12px]]{{uwr|R}}{{uwr|I}}{{uwr|G}}{{uwr|H}}{{uwr|T}} | |||
| Top right | |||
|- style="background: #fff" | |||
| {{uwr|T}}{{uwr|O}}{{uwr|P}}[[File:None.png|12px]]{{uwr|L}}{{uwr|E}}{{uwr|F}}{{uwr|T}} | |||
| Top left | |||
|- style="background: #fff" | |||
| {{uwr|T}}{{uwr|O}}{{uwr|P}}[[File:None.png|12px]]{{uwr|L}}{{uwr|E}}{{uwr|F}}{{uwr|T}} | |||
| Top left | |||
|- | |- | ||
| style="background: #fff; {{roundybl|5px}}" | {{uwr|L}}{{uwr|O}}{{uwr|W}}{{uwr|E}}{{uwr|R}}[[File:None.png|12px]]{{uwr|L}}{{uwr|E}}{{uwr|F}}{{uwr|T}} | |||
| style="background: #fff; {{roundybr|5px}}" | Lower left | |||
|{{uwr|L}}{{uwr|O}}{{uwr|W}}{{uwr|E}}{{uwr|R}}[[File: | |||
| | |||
|Lower left | |||
|} | |} | ||
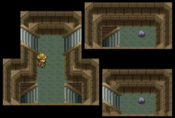
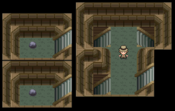
The second room has only Unown of the "F" variety, the third has "R" and so on, spelling out the word "friend". The dead-end rooms (reached by not following the Unown alphabet instructions) house the other twenty varieties of Unown. The last room holds four items and an inscription written in Unown script. In {{game|Platinum}} one of the items is {{HM|05|Defog}}. The writing reads as follows: | The second room has only Unown of the "F" variety, the third has "R" and so on, spelling out the word "friend". The dead-end rooms (reached by not following the Unown alphabet instructions) house the other twenty varieties of Unown. The last room holds four items and an inscription written in Unown script. In {{game|Platinum}} one of the items is {{HM|05|Defog}}. The writing reads as follows: | ||
{| style="background: | {| class="roundy" style="background: #{{locationcolor/med|ruins}}; border: 3px solid #{{locationcolor/dark|ruins}}" | ||
|- | |- | ||
|{{uwr|A}}{{uwr|L}}{{uwr|L}}[[File: | ! style="background: #{{locationcolor/light|ruins}}; {{roundytl|5px}}" | Unown | ||
|All lives | ! style="background: #{{locationcolor/light|ruins}}; {{roundytr|5px}}" | Text | ||
|- style="background: #fff" | |||
| {{uwr|F}}{{uwr|R}}{{uwr|I}}{{uwr|E}}{{uwr|N}}{{uwr|D}}{{uwr|S}}{{uwr|H}}{{uwr|I}}{{uwr|P}} | |||
| Friendship | |||
|- style="background: #fff" | |||
| {{uwr|A}}{{uwr|L}}{{uwr|L}}[[File:None.png|12px]]{{uwr|L}}{{uwr|I}}{{uwr|V}}{{uwr|E}}{{uwr|S}} | |||
| All lives | |||
|- style="background: #fff" | |||
| {{uwr|T}}{{uwr|O}}{{uwr|U}}{{uwr|C}}{{uwr|H}}[[File:None.png|12px]]{{uwr|O}}{{uwr|T}}{{uwr|H}}{{uwr|E}}{{uwr|R}} | |||
| touch other | |||
|- style="background: #fff" | |||
| {{uwr|L}}{{uwr|I}}{{uwr|V}}{{uwr|E}}{{uwr|S}}[[File:None.png|12px]]{{uwr|T}}{{uwr|O}}[[File:None.png|12px]]{{uwr|C}}{{uwr|R}}{{uwr|E}}{{uwr|A}}{{uwr|T}}{{uwr|E}} | |||
| lives to create | |||
|- style="background: #fff" | |||
| {{uwr|S}}{{uwr|O}}{{uwr|M}}{{uwr|E}}{{uwr|T}}{{uwr|H}}{{uwr|I}}{{uwr|N}}{{uwr|G}} | |||
| something | |||
|- | |- | ||
| | | style="background: #fff; {{roundybl|5px}}" | {{uwr|A}}{{uwr|N}}{{uwr|E}}{{uwr|W}}[[File:None.png|12px]]{{uwr|A}}{{uwr|N}}{{uwr|D}}[[File:None.png|12px]]{{uwr|A}}{{uwr|L}}{{uwr|I}}{{uwr|V}}{{uwr|E}} | ||
| style="background: #fff; {{roundybr|5px}}" | anew and alive | |||
|{{uwr|A}}{{uwr|N}}{{uwr|E}}{{uwr|W}}[[File: | |||
|anew and alive | |||
|} | |} | ||
| Line 78: | Line 70: | ||
The room above the rest of the ruins, only accessible after the Ruin Maniac has finished digging the [[Maniac Tunnel]] through from {{rt|214|Sinnoh}} (which occurs after obtaining one of each alphabetic Unown), has both "!" and "?" varieties. The inscription in there reads: | The room above the rest of the ruins, only accessible after the Ruin Maniac has finished digging the [[Maniac Tunnel]] through from {{rt|214|Sinnoh}} (which occurs after obtaining one of each alphabetic Unown), has both "!" and "?" varieties. The inscription in there reads: | ||
{| style="background: | {| class="roundy" style="background: #{{locationcolor/med|ruins}}; border: 3px solid #{{locationcolor/dark|ruins}}" | ||
|- | |- | ||
! Unown | ! style="background: #{{locationcolor/light|ruins}}; {{roundytl|5px}}" | Unown | ||
! Text | ! style="background: #{{locationcolor/light|ruins}}; {{roundytr|5px}}" | Text | ||
|- | |- | ||
|{{uwr|?}}{{uwr|!}} | | style="background: #fff; {{roundybl|5px}}" | {{uwr|?}}{{uwr|!}} | ||
|?! | | style="background: #fff; {{roundybr|5px}}" | ?! | ||
|} | |} | ||
==Items== | ==Items== | ||
{{Itlisth| | {{Itlisth|ruins}} | ||
{{Itemlist|Fire Stone|On the rock in the dead-end down the first top left stairwell | {{Itemlist|Fire Stone|On the rock in the dead-end down the first top left stairwell ''(hidden)''|Pt=yes|display={{evostone|Fire Stone}}}} | ||
{{Itemlist|Repel|On the rock in the dead-end down the first top left stairwell | {{Itemlist|Repel|On the rock in the dead-end down the first top left stairwell ''(hidden)''|D=yes|P=yes|display={{DL|Repel|Repel}}}} | ||
{{Itemlist|Water Stone|On the rock in the dead-end down the top right, bottom left, and then bottom left stairwells | {{Itemlist|Water Stone|On the rock in the dead-end down the top right, bottom left, and then bottom left stairwells ''(hidden)''|Pt=yes|display={{evostone|Water Stone}}}} | ||
{{Itemlist|Escape Rope|On the rock in the dead-end down the top right, bottom left, and then bottom left stairwells | {{Itemlist|Escape Rope|On the rock in the dead-end down the top right, bottom left, and then bottom left stairwells ''(hidden)''|D=yes|P=yes}} | ||
{{Itemlist|Thunder Stone|On the rock in the dead-end down the top right, bottom left, top right, top left, and then bottom right stairwells | {{Itemlist|Thunder Stone|On the rock in the dead-end down the top right, bottom left, top right, top left, and then bottom right stairwells ''(hidden)''|Pt=yes|display={{evostone|Thunderstone}}}} | ||
{{Itemlist|Big Mushroom|On the rock in the dead-end down the top right, bottom left, top right, top left, and then bottom right stairwells | {{Itemlist|Big Mushroom|On the rock in the dead-end down the top right, bottom left, top right, top left, and then bottom right stairwells ''(hidden)''|D=yes|P=yes}} | ||
{{Itemlist|Nugget|In the final room | {{Itemlist|Nugget|In the final room|D=yes|P=yes|Pt=yes}} | ||
{{Itemlist|Mind Plate|In the final room | {{Itemlist|Mind Plate|In the final room|D=yes|P=yes|Pt=yes}} | ||
{{Itemlist|Odd Incense|In the final room | {{Itemlist|Odd Incense|In the final room|D=yes|P=yes|Pt=yes}} | ||
{{Itemlist|Rare Candy|In the final room | {{Itemlist|Rare Candy|In the final room|D=yes|P=yes}} | ||
{{Itemlist|HM Flying|In the final room | {{Itemlist|HM Flying|In the final room|Pt=yes|display={{HM|05|Defog}}}} | ||
{{Itemlist|Green Shard|Given by the man in the second room after showing {{HM|05|Defog}} | {{Itemlist|Green Shard|Given by the man in the second room after showing {{HM|05|Defog}}|Pt=yes}} | ||
{{Itlistfoot| | {{Itemlist|Rare Candy|On top ledge (can only be accessed from [[Maniac Tunnel]] after capturing the 26 [[List of Pokémon with form differences#Unown|different kinds]] of {{p|Unown}})|Pt=yes}} | ||
{{Itlistfoot|ruins}} | |||
==Pokémon== | ==Pokémon== | ||
{{catch/header| | {{catch/header|ruins|4}} | ||
{{catch/div| | {{catch/div|ruins|Second big room}} | ||
{{catch/entry4|201F|Unown|yes|yes|yes|Cave|14-30|all=100%|type1=psychic}} | {{catch/entry4|201F|Unown|yes|yes|yes|Cave|14-30|all=100%|type1=psychic}} | ||
{{catch/div| | {{catch/div|ruins|Third big room}} | ||
{{catch/entry4|201R|Unown|yes|yes|yes|Cave|14-30|all=100%|type1=psychic}} | {{catch/entry4|201R|Unown|yes|yes|yes|Cave|14-30|all=100%|type1=psychic}} | ||
{{catch/div| | {{catch/div|ruins|Fourth big room}} | ||
{{catch/entry4|201I|Unown|yes|yes|yes|Cave|14-30|all=100%|type1=psychic}} | {{catch/entry4|201I|Unown|yes|yes|yes|Cave|14-30|all=100%|type1=psychic}} | ||
{{catch/div| | {{catch/div|ruins|Fifth big room}} | ||
{{catch/entry4|201E|Unown|yes|yes|yes|Cave|14-30|all=100%|type1=psychic}} | {{catch/entry4|201E|Unown|yes|yes|yes|Cave|14-30|all=100%|type1=psychic}} | ||
{{catch/div| | {{catch/div|ruins|Sixth big room}} | ||
{{catch/entry4|201N|Unown|yes|yes|yes|Cave|14-30|all=100%|type1=psychic}} | {{catch/entry4|201N|Unown|yes|yes|yes|Cave|14-30|all=100%|type1=psychic}} | ||
{{catch/div| | {{catch/div|ruins|Seventh big room}} | ||
{{catch/entry4|201D|Unown|yes|yes|yes|Cave|14-30|all=100%|type1=psychic}} | {{catch/entry4|201D|Unown|yes|yes|yes|Cave|14-30|all=100%|type1=psychic}} | ||
{{catch/div| | {{catch/div|ruins|Dead-end rooms}} | ||
{{catch/entry4|201|Unown|yes|yes|yes|Cave|14-30|all=5%|type1=psychic}} | {{catch/entry4|201|Unown|yes|yes|yes|Cave|14-30|all=5%|type1=psychic}} | ||
{{catch/entry4|201B|Unown|yes|yes|yes|Cave|14-30|all=5%|type1=psychic}} | {{catch/entry4|201B|Unown|yes|yes|yes|Cave|14-30|all=5%|type1=psychic}} | ||
| Line 142: | Line 131: | ||
{{catch/entry4|201Y|Unown|yes|yes|yes|Cave|14-30|all=5%|type1=psychic}} | {{catch/entry4|201Y|Unown|yes|yes|yes|Cave|14-30|all=5%|type1=psychic}} | ||
{{catch/entry4|201Z|Unown|yes|yes|yes|Cave|14-30|all=5%|type1=psychic}} | {{catch/entry4|201Z|Unown|yes|yes|yes|Cave|14-30|all=5%|type1=psychic}} | ||
{{catch/div| | {{catch/div|ruins|Room through {{color2|000|Maniac Tunnel}}}} | ||
{{catch/entry4|201QU|Unown|yes|yes|yes|Cave|14-30|all=50%|type1=psychic}} | {{catch/entry4|201QU|Unown|yes|yes|yes|Cave|14-30|all=50%|type1=psychic}} | ||
{{catch/entry4|201EX|Unown|yes|yes|yes|Cave|14-30|all=50%|type1=psychic}} | {{catch/entry4|201EX|Unown|yes|yes|yes|Cave|14-30|all=50%|type1=psychic}} | ||
{{catch/footer| | {{catch/footer|ruins}} | ||
==Trainers== | ==Trainers== | ||
=== | ==={{game|Diamond and Pearl|s}}=== | ||
{{trainerheader| | {{trainerheader|ruins}} | ||
{{Trainerentry|Spr DP Ruin Maniac.png|Ruin Maniac|Karl|864|3|074|Geodude|♂|16| | {{Trainerentry|Spr DP Ruin Maniac.png|Ruin Maniac|Karl|864|3|074|Geodude|♂|16||074|Geodude|♂|17||436|Bronzor||18|36=フユキ|37=Fuyuki}} | ||
{{Trainerfooter| | {{Trainerfooter|ruins|4}} | ||
=== | ==={{game|Platinum}}=== | ||
{{trainerheader| | {{trainerheader|ruins}} | ||
{{Trainerentry|Spr DP Ruin Maniac.png|Ruin Maniac|Karl|1104|3|074|Geodude|♂|19| | {{Trainerentry|Spr DP Ruin Maniac.png|Ruin Maniac|Karl|1104|3|074|Geodude|♂|19||074|Geodude|♂|21||436|Bronzor||23|36=フユキ|37=Fuyuki}} | ||
{{Trainerfooter| | {{Trainerfooter|ruins|4}} | ||
==Layout== | ==Layout== | ||
{| style="margin:auto; background: #000; {{ | ===2F-B1F=== | ||
{| class="roundy" style="margin:auto; background: #000; border: 3px solid #{{locationcolor/dark|ruins}}" | |||
|- | |||
! style="background:#{{locationcolor/light|ruins}}; {{roundytl|5px}};" | Version | |||
! style="background:#{{locationcolor/light|ruins}}" | 2F | |||
! style="background:#{{locationcolor/light|ruins}}" | 1F | |||
! style="background:#{{locationcolor/light|ruins}}; {{roundytr|5px}}" | B1F | |||
|- | |- | ||
! style="background:#{{diamond color}}" |{{color2|000|Pokémon Diamond and Pearl Versions|Diamond}} | ! style="background:#{{diamond color}}" |{{color2|000|Pokémon Diamond and Pearl Versions|Diamond}} | ||
| rowspan="3" | [[File:Solaceon Ruins | | rowspan="3" | [[File:Solaceon Ruins 2F DPPt.png|center|175px]] | ||
| rowspan="3" | [[File:Solaceon Ruins | | rowspan="3" | [[File:Solaceon Ruins 1F DPPt.png|center|200px]] | ||
| rowspan="3" | [[File:Solaceon Ruins B1F DPPt.png|center|175px]] | | rowspan="3" | [[File:Solaceon Ruins B1F DPPt.png|center|175px]] | ||
|- | |- | ||
| Line 175: | Line 165: | ||
! style="background:#{{platinum color}};" |{{color2|000|Pokémon Platinum Version|Platinum}} | ! style="background:#{{platinum color}};" |{{color2|000|Pokémon Platinum Version|Platinum}} | ||
|- | |- | ||
| colspan="4" style="{{roundybottom|5px}}; background:#{{locationcolor/light| | | colspan="4" style="{{roundybottom|5px}}; background:#{{locationcolor/light|ruins}}" | | ||
|} | |} | ||
{| style="margin:auto; background: #000; {{ | ===B2F-B4F=== | ||
{| class="roundy" style="margin:auto; background: #000; border: 3px solid #{{locationcolor/dark|ruins}}" | |||
|- | |||
! style="background:#{{locationcolor/light|ruins}}; {{roundytl|5px}};" | Version | |||
! style="background:#{{locationcolor/light|ruins}}" | B2F | |||
! style="background:#{{locationcolor/light|ruins}}" | B3F | |||
! style="background:#{{locationcolor/light|ruins}}; {{roundytr|5px}}" | B4F | |||
|- | |- | ||
! style="background:#{{diamond color}}" |{{color2|000|Pokémon Diamond and Pearl Versions|Diamond}} | ! style="background:#{{diamond color}}" |{{color2|000|Pokémon Diamond and Pearl Versions|Diamond}} | ||
| rowspan="3" | [[File:Solaceon Ruins B2F DPPt.png|center|175px]] | | rowspan="3" | [[File:Solaceon Ruins B2F DPPt.png|center|175px]] | ||
| Line 194: | Line 185: | ||
! style="background:#{{platinum color}};" |{{color2|000|Pokémon Platinum Version|Platinum}} | ! style="background:#{{platinum color}};" |{{color2|000|Pokémon Platinum Version|Platinum}} | ||
|- | |- | ||
| colspan="4" style="{{roundybottom|5px}}; background:#{{locationcolor/light| | | colspan="4" style="{{roundybottom|5px}}; background:#{{locationcolor/light|ruins}}" | | ||
|} | |} | ||
==In the anime== | ==In the anime== | ||
{{ | [[File:Solaceon Ruins anime.png|thumb|250px|The Solaceon Ruins in the {{pkmn|anime}}]] | ||
In the {{pkmn|anime}}, the Solaceon Ruins appeared in ''[[DP060|Journey to the Unown!]]'', in which they were visited by {{Ash}}, {{an|Dawn}}, {{an|Brock}}, and {{si|Kenny}}. In this [[canon]], the ruins are a temple dedicated to {{p|Dialga}} and {{p|Palkia}} rather than a [[cave]], and statues of the [[Legendary Pokémon]] can be found in front of the temple. There is also a stone tablet that reads ''"When every life meets another life, something will be born"'' — a direct translation of the Japanese version of this writing instead of the English version that is used in the {{pkmn|games}}. | |||
After arriving in the ruins, Ash and Kenny decided to have a {{pkmn|battle}}, but it had to be interrupted when the stairs where Dawn was sitting on began to lift, causing {{TP|Dawn|Piplup}} and {{TP|Dawn|Aipom}} to tumble down the steps and Dawn to jump off to save {{cat|Dawn's Pokémon|her Pokémon}}. Seeing that, Ash, Brock, and Kenny rushed to rescue Dawn and everyone ended up inside the ruins, where they encountered several {{p|Unown}}. The {{pkmn|category|Symbol Pokémon}} living there guarded [[Spear Key|a gold-colored cube]] that was stolen by {{tc|Commander}} [[Saturn]] of [[Team Galactic]]. | |||
Following the theft of the cube, Saturn ordered his {{p|Bronzor}} to use {{m|Confuse Ray}} on all the Unown, leaving them {{status|Confusion|confused}} and making them attack {{TRT}}, as well as Ash and {{ashfr}}. The group's Pokémon began attacking the Unown as well in order to defend themselves and their {{pkmn|Trainer}}s. Their [[Move|attacks]] managed to snap the Unown out of their confusion and the Unown eventually calmed down, allowing Ash and the others to safely leave the ruins. | |||
This is also the place where Dawn's {{p|Aipom}} [[Evolution|evolved]] into {{TP|Dawn|Ambipom}}. | |||
{{-}} | |||
==In the manga== | ==In the manga== | ||
===In the Pokémon Adventures manga=== | ===In the Pokémon Adventures manga=== | ||
The ruins are featured in ''[[PS354|Knowledge of the Unown I]]'' and ''[[PS355|Knowledge of the Unown II]]'' and are the main setting of the latter one. {{adv|Diamond}}, {{adv|Pearl}} and {{adv|Platinum}} encountered two | The ruins are featured in ''[[PS354|Knowledge of the Unown I]]'' and ''[[PS355|Knowledge of the Unown II]]'' and are the main setting of the latter one. {{adv|Diamond}}, {{adv|Pearl}}, and {{adv|Platinum}} encountered two {{p|Unown}}, later named by Platinum as Grumpy and Flaky, who led them into the ruins. The main trio helped the Unown free their friends who had been trapped. | ||
==In other languages== | ==In other languages== | ||
{{Langtable|color={{locationcolor/ | {{Langtable|color={{locationcolor/light|ruins}}|bordercolor={{locationcolor/dark|ruins}} | ||
|zh_cmn= | |zh_yue=隨意遺跡 ''{{tt|Chèuihyi Wàihjīk|Zui Ruins}}'' | ||
|zh_cmn=隨意遺跡 / 随意遗迹 ''{{tt|Suíyì Yíjì|Zui Ruins}}'' | |||
|fi=Solaceonin rauniot | |||
|fr=Ruines Bonville | |fr=Ruines Bonville | ||
|de=Trostu-Ruinen | |de=Trostu-Ruinen | ||
|it=Rovine Flemminia | |it=Rovine Flemminia | ||
|ko= | |ko=신수유적 ''Shinsu Yujeog'' | ||
|es_eu=Ruinas Sosiego}} | |es_eu=Ruinas Sosiego | ||
|vi=Di tích Zui | |||
}} | |||
{{-}} | {{-}} | ||
{{Sinnoh}}<br> | {{Sinnoh}}<br/> | ||
{{Project Locations notice}} | {{Project Locations notice}} | ||
| Line 221: | Line 223: | ||
[[Category:Diamond and Pearl locations]] | [[Category:Diamond and Pearl locations]] | ||
[[Category:Platinum locations]] | [[Category:Platinum locations]] | ||
[[de:Trostu-Ruinen]] | [[de:Trostu-Ruinen]] | ||
[[fr:Ruines Bonville]] | [[fr:Ruines Bonville]] | ||
[[it:Rovine Flemminia]] | |||
[[ja:ズイのいせき]] | [[ja:ズイのいせき]] | ||
[[zh:随意遗迹]] | [[zh:随意遗迹]] | ||
Revision as of 16:53, 26 October 2017
| ||||
| ||||
| Location: | East of Solaceon Town | |||
|---|---|---|---|---|
| Region: | Sinnoh | |||
| Generations: | IV | |||
 Location of Solaceon Ruins in Sinnoh. | ||||
| Pokémon world locations | ||||
The Solaceon Ruins (Japanese: ズイの遺跡 Zui Ruins) is the set of ruins where the player can find the Unown in Sinnoh. It is found east of Solaceon Town. If the player captures an Unown, then shows it to a boy in the town, the Seal corresponding to its letter will become available.
Geography
This map is the same in Pokémon Diamond, Pearl and Platinum versions.
The first room has a plaque/inscription in the Unown alphabet that indicates which exits to take to get to the last room. It reads:
| Unown | Text |
|---|---|
| TOP |
Top right |
| LOWER |
Lower left |
| TOP |
Top right |
| TOP |
Top left |
| TOP |
Top left |
| LOWER |
Lower left |
The second room has only Unown of the "F" variety, the third has "R" and so on, spelling out the word "friend". The dead-end rooms (reached by not following the Unown alphabet instructions) house the other twenty varieties of Unown. The last room holds four items and an inscription written in Unown script. In Pokémon Platinum one of the items is HM05 (Defog). The writing reads as follows:
| Unown | Text |
|---|---|
| FRIENDSHIP | Friendship |
| ALL |
All lives |
| TOUCH |
touch other |
| LIVES |
lives to create |
| SOMETHING | something |
| ANEW |
anew and alive |
The Japanese version of this writing is the same featured in Top-Down Training! and in Journey to the Unown!.
The room above the rest of the ruins, only accessible after the Ruin Maniac has finished digging the Maniac Tunnel through from Route 214 (which occurs after obtaining one of each alphabetic Unown), has both "!" and "?" varieties. The inscription in there reads:
| Unown | Text |
|---|---|
| ?! | ?! |
Items
| Item | Location | Games | |
|---|---|---|---|
| Fire Stone | On the rock in the dead-end down the first top left stairwell (hidden) | Pt | |
| Repel | On the rock in the dead-end down the first top left stairwell (hidden) | D P | |
| Water Stone | On the rock in the dead-end down the top right, bottom left, and then bottom left stairwells (hidden) | Pt | |
| Escape Rope | On the rock in the dead-end down the top right, bottom left, and then bottom left stairwells (hidden) | D P | |
| Thunderstone | On the rock in the dead-end down the top right, bottom left, top right, top left, and then bottom right stairwells (hidden) | Pt | |
| Big Mushroom | On the rock in the dead-end down the top right, bottom left, top right, top left, and then bottom right stairwells (hidden) | D P | |
| Nugget | In the final room | D P Pt | |
| Mind Plate | In the final room | D P Pt | |
| Odd Incense | In the final room | D P Pt | |
| Rare Candy | In the final room | D P | |
| HM05 (Defog) | In the final room | Pt | |
| Green Shard | Given by the man in the second room after showing HM05 (Defog) | Pt | |
| Rare Candy | On top ledge (can only be accessed from Maniac Tunnel after capturing the 26 different kinds of Unown) | Pt | |
Pokémon
| Pokémon | Games | Location | Levels | Rate | |||||||||||
|---|---|---|---|---|---|---|---|---|---|---|---|---|---|---|---|
| Second big room | |||||||||||||||
|
D | P | Pt |
|
14-30 | 100% | |||||||||
| Third big room | |||||||||||||||
|
D | P | Pt |
|
14-30 | 100% | |||||||||
| Fourth big room | |||||||||||||||
|
D | P | Pt |
|
14-30 | 100% | |||||||||
| Fifth big room | |||||||||||||||
|
D | P | Pt |
|
14-30 | 100% | |||||||||
| Sixth big room | |||||||||||||||
|
D | P | Pt |
|
14-30 | 100% | |||||||||
| Seventh big room | |||||||||||||||
|
D | P | Pt |
|
14-30 | 100% | |||||||||
| Dead-end rooms | |||||||||||||||
|
D | P | Pt |
|
14-30 | 5% | |||||||||
|
D | P | Pt |
|
14-30 | 5% | |||||||||
|
D | P | Pt |
|
14-30 | 5% | |||||||||
|
D | P | Pt |
|
14-30 | 5% | |||||||||
|
D | P | Pt |
|
14-30 | 5% | |||||||||
|
D | P | Pt |
|
14-30 | 5% | |||||||||
|
D | P | Pt |
|
14-30 | 5% | |||||||||
|
D | P | Pt |
|
14-30 | 5% | |||||||||
|
D | P | Pt |
|
14-30 | 5% | |||||||||
|
D | P | Pt |
|
14-30 | 5% | |||||||||
|
D | P | Pt |
|
14-30 | 5% | |||||||||
|
D | P | Pt |
|
14-30 | 5% | |||||||||
|
D | P | Pt |
|
14-30 | 5% | |||||||||
|
D | P | Pt |
|
14-30 | 5% | |||||||||
|
D | P | Pt |
|
14-30 | 5% | |||||||||
|
D | P | Pt |
|
14-30 | 5% | |||||||||
|
D | P | Pt |
|
14-30 | 5% | |||||||||
|
D | P | Pt |
|
14-30 | 5% | |||||||||
|
D | P | Pt |
|
14-30 | 5% | |||||||||
|
D | P | Pt |
|
14-30 | 5% | |||||||||
| Room through Maniac Tunnel | |||||||||||||||
|
D | P | Pt |
|
14-30 | 50% | |||||||||
|
D | P | Pt |
|
14-30 | 50% | |||||||||
| A colored background means that the Pokémon can be found in this location in the specified game. A white background with a colored letter means that the Pokémon cannot be found here. | |||||||||||||||
Trainers
Pokémon Diamond and Pearl
| Trainer | Pokémon | |||||||||||
|---|---|---|---|---|---|---|---|---|---|---|---|---|
|
| |||||||||||
| ||||||||||||
| ||||||||||||
| Trainers with a Vs. Seeker by their names, when alerted for a rematch using the item, may use higher-level Pokémon. | ||||||||||||
Pokémon Platinum
| Trainer | Pokémon | |||||||||||
|---|---|---|---|---|---|---|---|---|---|---|---|---|
|
| |||||||||||
| ||||||||||||
| ||||||||||||
| Trainers with a Vs. Seeker by their names, when alerted for a rematch using the item, may use higher-level Pokémon. | ||||||||||||
Layout
2F-B1F
| Version | 2F | 1F | B1F |
|---|---|---|---|
| Diamond | |||
| Pearl | |||
| Platinum | |||
B2F-B4F
| Version | B2F | B3F | B4F |
|---|---|---|---|
| Diamond | |||
| Pearl | |||
| Platinum | |||
In the anime

In the anime, the Solaceon Ruins appeared in Journey to the Unown!, in which they were visited by Ash, Dawn, Brock, and Kenny. In this canon, the ruins are a temple dedicated to Dialga and Palkia rather than a cave, and statues of the Legendary Pokémon can be found in front of the temple. There is also a stone tablet that reads "When every life meets another life, something will be born" — a direct translation of the Japanese version of this writing instead of the English version that is used in the games.
After arriving in the ruins, Ash and Kenny decided to have a battle, but it had to be interrupted when the stairs where Dawn was sitting on began to lift, causing Piplup and Aipom to tumble down the steps and Dawn to jump off to save her Pokémon. Seeing that, Ash, Brock, and Kenny rushed to rescue Dawn and everyone ended up inside the ruins, where they encountered several Unown. The Symbol Pokémon living there guarded a gold-colored cube that was stolen by Commander Saturn of Team Galactic.
Following the theft of the cube, Saturn ordered his Bronzor to use Confuse Ray on all the Unown, leaving them confused and making them attack Team Rocket, as well as Ash and his friends. The group's Pokémon began attacking the Unown as well in order to defend themselves and their Trainers. Their attacks managed to snap the Unown out of their confusion and the Unown eventually calmed down, allowing Ash and the others to safely leave the ruins.
This is also the place where Dawn's Aipom evolved into Ambipom.
In the manga
In the Pokémon Adventures manga
The ruins are featured in Knowledge of the Unown I and Knowledge of the Unown II and are the main setting of the latter one. Diamond, Pearl, and Platinum encountered two Unown, later named by Platinum as Grumpy and Flaky, who led them into the ruins. The main trio helped the Unown free their friends who had been trapped.
In other languages
| ||||||||||||||||||||||||||||||||

|
This article is part of Project Locations, a Bulbapedia project that aims to write comprehensive articles on every location in the Pokémon world. |
