Relic Passage: Difference between revisions
From Bulbapedia, the community-driven Pokémon encyclopedia.
Jump to navigationJump to search
(→Items: added the list of dust cloud items) |
m (→Exit to Driftveil City: removed: |display={{ball|Ultra}}) |
||
| (19 intermediate revisions by 12 users not shown) | |||
| Line 1: | Line 1: | ||
{{incomplete|2= | {{incomplete|2=Missing geography section}} | ||
{{Infobox location | {{Infobox location | ||
|image=Relic Passage B2W2.png | |image=Relic Passage south B2W2.png | ||
|location_name=Relic Passage | |location_name=Relic Passage | ||
|japanese_name={{tt|古代の抜け道|こだいのぬけみち}} | |japanese_name={{tt|古代の抜け道|こだいのぬけみち}} | ||
| Line 15: | Line 14: | ||
==Items== | ==Items== | ||
=== | ===Exit to Castelia City=== | ||
{{Itlisth|cave}} | {{Itlisth|cave}} | ||
{{Itemlist|Escape Rope| | {{Itemlist|Escape Rope| | ||
* North of male {{tc|Scientist}} | * North of male {{tc|Scientist}} | ||
* South of female Scientist ''(hidden)''|B2=yes|W2=yes|display=[[Escape Rope]] ×2}} | * South of female Scientist ''(hidden)''|B2=yes|W2=yes|display=[[Escape Rope]] ×2}} | ||
{{Itemlist|Hard Stone|West of male and female Scientists|B2=yes|W2=yes | {{Itemlist|Hard Stone|West of male and female Scientists|B2=yes|W2=yes}} | ||
{{Itemlist|Max Repel|Western part near ledges, accessible from north entrance|B2=yes|W2=yes | {{Itemlist|Max Repel|Western part near ledges, accessible from north entrance|B2=yes|W2=yes}} | ||
{{Itlistfoot|cave}} | {{Itlistfoot|cave}} | ||
=== | ===Exit to Driftveil City=== | ||
{{Itlisth|cave}} | {{Itlisth|cave}} | ||
{{Itemlist|Protein|Near {{tc|Backpacker}} Randall|B2=yes|W2=yes | {{Itemlist|Protein|Near {{tc|Backpacker}} Randall|B2=yes|W2=yes}} | ||
{{Itemlist|Green Shard|In a rock near {{tc|Psychic}} Tully ''(hidden)''|B2=yes|W2=yes | {{Itemlist|Green Shard|In a rock near {{tc|Psychic}} Tully ''(hidden)''|B2=yes|W2=yes}} | ||
{{Itemlist|Blue Shard|In a rock southwest of {{tc|Hiker}} Tobias ''(hidden)''|B2=yes|W2=yes | {{Itemlist|Blue Shard|In a rock southwest of {{tc|Hiker}} Tobias ''(hidden)''|B2=yes|W2=yes}} | ||
{{Itemlist|Max Repel|In a dead end south of {{tc|Hiker}} Tobias ''(hidden)''|B2=yes|W2=yes | {{Itemlist|Max Repel|In a dead end south of {{tc|Hiker}} Tobias ''(hidden)''|B2=yes|W2=yes}} | ||
{{Itemlist|Red Shard|In a rock near {{tc|Psychic}} Ena ''(hidden)''|B2=yes|W2=yes | {{Itemlist|Red Shard|In a rock near {{tc|Psychic}} Ena ''(hidden)''|B2=yes|W2=yes}} | ||
{{Itemlist|Yellow Shard|In a rock near {{tc|Backpacker}} Annie ''(hidden)''|B2=yes|W2=yes | {{Itemlist|Yellow Shard|In a rock near {{tc|Backpacker}} Annie ''(hidden)''|B2=yes|W2=yes}} | ||
{{Itemlist|Rock Gem|In a room accessible via south entrance (requires {{m|Strength}}) ''(hidden)''|B2=yes|W2=yes | {{Itemlist|Rock Gem|In a room accessible via south entrance (requires {{m|Strength}}) ''(hidden)''|B2=yes|W2=yes}} | ||
{{Itemlist|Ultra Ball|In a room accessible via south entrance (requires {{m|Strength}})|B2=yes|W2=yes | {{Itemlist|Ultra Ball|In a room accessible via south entrance (requires {{m|Strength}})|B2=yes|W2=yes}} | ||
{{Itemlist|Rare Candy|In a room accessible via south entrance (requires {{m|Strength}})|B2=yes|W2=yes | {{Itemlist|Rare Candy|In a room accessible via south entrance (requires {{m|Strength}})|B2=yes|W2=yes}} | ||
{{Itemlist|Rocky Helmet|In a room accessible via south entrance (requires {{m|Strength}})|B2=yes|W2=yes | {{Itemlist|Rocky Helmet|In a room accessible via south entrance (requires {{m|Strength}})|B2=yes|W2=yes}} | ||
{{Itemlist|Big Pearl|West of {{tc|Hiker}} Tobias (requires {{m|Surf}})|B2=yes|W2=yes | {{Itemlist|Big Pearl|West of {{tc|Hiker}} Tobias (requires {{m|Surf}})|B2=yes|W2=yes}} | ||
{{Itlistfoot|cave}} | {{Itlistfoot|cave}} | ||
===Phenomenon=== | ===Phenomenon=== | ||
{{Itlisth|cave}} | {{Itlisth|cave}} | ||
{{Itemlist|Red Shard|{{DL|Phenomenon|Dust cloud}}|B2=yes|W2=yes}} | |||
{{Itemlist|Blue Shard|{{DL|Phenomenon|Dust cloud}}|B2=yes|W2=yes}} | |||
{{Itemlist|Yellow Shard|{{DL|Phenomenon|Dust cloud}}|B2=yes|W2=yes}} | |||
{{Itemlist|Green Shard|{{DL|Phenomenon|Dust cloud}}|B2=yes|W2=yes}} | |||
{{Itemlist|Red Shard|{{DL|Phenomenon|Dust cloud}}|B2=yes|W2=yes | |||
{{Itemlist|Blue Shard|{{DL|Phenomenon|Dust cloud}}|B2=yes|W2=yes | |||
{{Itemlist|Yellow Shard|{{DL|Phenomenon|Dust cloud}}|B2=yes|W2=yes | |||
{{Itemlist|Green Shard|{{DL|Phenomenon|Dust cloud}}|B2=yes|W2=yes | |||
{{Itlistfoot|cave}} | {{Itlistfoot|cave}} | ||
==Pokémon== | ==Pokémon== | ||
=== | ===Exit to Castelia City=== | ||
{{catch/header|cave|4}} | {{catch/header|cave|4}} | ||
{{catch/entry5-2|019|Rattata|yes|yes|Cave|17|all=10%|type1=Normal}} | {{catch/entry5-2|019|Rattata|yes|yes|Cave|17|all=10%|type1=Normal}} | ||
| Line 88: | Line 59: | ||
{{catch/footer|cave}} | {{catch/footer|cave}} | ||
=== | ===Exit to Driftveil City=== | ||
{{catch/header|cave|4}} | {{catch/header|cave|4}} | ||
{{catch/entry5-2|020|Raticate|yes|yes|Cave|29|all=10%|type1=Normal}} | {{catch/entry5-2|020|Raticate|yes|yes|Cave|29|all=10%|type1=Normal}} | ||
| Line 102: | Line 73: | ||
{{catch/entry5-2|550|Basculin|yes|no|Surf|10-30|all=70%|type1=Water}} | {{catch/entry5-2|550|Basculin|yes|no|Surf|10-30|all=70%|type1=Water}} | ||
{{catch/entry5-2|550B|Basculin|no|yes|Surf|10-30|all=70%|type1=Water}} | {{catch/entry5-2|550B|Basculin|no|yes|Surf|10-30|all=70%|type1=Water}} | ||
{{catch/div|water| | {{catch/div|water|Surfing in rippling water}} | ||
{{catch/entry5-2|183|Marill|yes|yes|Rippling|5-15|all=60%|type1=Water}} | {{catch/entry5-2|183|Marill|yes|yes|Rippling|5-15|all=60%|type1=Water}} | ||
{{catch/entry5-2|184|Azumarill|yes|yes|Rippling|5-15|all=5%|type1=Water}} | {{catch/entry5-2|184|Azumarill|yes|yes|Rippling|5-15|all=5%|type1=Water}} | ||
| Line 111: | Line 82: | ||
{{catch/entry5-2|550|Basculin|yes|no|Fish Super|40-60|all=30%|type1=Water}} | {{catch/entry5-2|550|Basculin|yes|no|Fish Super|40-60|all=30%|type1=Water}} | ||
{{catch/entry5-2|550B|Basculin|no|yes|Fish Super|40-60|all=30%|type1=Water}} | {{catch/entry5-2|550B|Basculin|no|yes|Fish Super|40-60|all=30%|type1=Water}} | ||
{{catch/div|water| | {{catch/div|water|Fishing in rippling water}} | ||
{{catch/entry5-2|061|Poliwhirl|yes|yes|Rippling|40-70|all=65%|type1=Water}} | {{catch/entry5-2|061|Poliwhirl|yes|yes|Rippling|40-70|all=65%|type1=Water}} | ||
{{catch/entry5-2|062|Poliwrath|yes|yes|Rippling|50-70|all=5%|type1=Water}} | {{catch/entry5-2|062|Poliwrath|yes|yes|Rippling|50-70|all=5%|type1=Water|type2=Fighting}} | ||
{{catch/entry5-2|550B|Basculin|yes|no|Rippling|40-60|all=30%|type1=Water}} | {{catch/entry5-2|550B|Basculin|yes|no|Rippling|40-60|all=30%|type1=Water}} | ||
{{catch/entry5-2|550|Basculin|no|yes|Rippling|40-60|all=30%|type1=Water}} | {{catch/entry5-2|550|Basculin|no|yes|Rippling|40-60|all=30%|type1=Water}} | ||
| Line 120: | Line 91: | ||
==Trainers== | ==Trainers== | ||
{{trainerheader|cave}} | {{trainerheader|cave}} | ||
{{Trainerdiv|cave| | {{Trainerdiv|cave|Exit to Castelia City}} | ||
{{Trainerentry|Spr B2W2 Scientist M.png|Scientist|Terrance|{{tt|864|768 in Easy Mode, 960 in Challenge Mode}}|1|088|Grimer|♂|{{tt|18|16 in Easy Mode, 20 in Challenge Mode}}|None|36=ミキヒロ|37=Mikihiro}} | {{Trainerentry|Spr B2W2 Scientist M.png|Scientist|Terrance|{{tt|864|768 in Easy Mode, 960 in Challenge Mode}}|1|088|Grimer|♂|{{tt|18|16 in Easy Mode, 20 in Challenge Mode}}|None|36=ミキヒロ|37=Mikihiro}} | ||
{{Trainerdiv|cave}} | |||
{{Trainerentry|Spr B2W2 Scientist F.png|Scientist|Lumina|{{tt|816|720 in Easy Mode, 912 in Challenge Mode}}|2|543|Venipede|♀|{{tt|17|15 in Easy Mode, 19 in Challenge Mode}}|None|109|Koffing|♀|{{tt|17|15 in Easy Mode, 19 in Challenge Mode}}|None|36=ルミ|37=Rumi}} | {{Trainerentry|Spr B2W2 Scientist F.png|Scientist|Lumina|{{tt|816|720 in Easy Mode, 912 in Challenge Mode}}|2|543|Venipede|♀|{{tt|17|15 in Easy Mode, 19 in Challenge Mode}}|None|109|Koffing|♀|{{tt|17|15 in Easy Mode, 19 in Challenge Mode}}|None|36=ルミ|37=Rumi}} | ||
{{Trainerdiv|cave}} | |||
{{Trainerentry|Spr B2W2 Backpacker M.png|Backpacker|Kendall|{{tt|432|384 in Easy Mode, 480 in Challenge Mode}}|1|507|Herdier|♂|{{tt|18|16 in Easy Mode, 20 in Challenge Mode}}|None|36=ケネス|37=Kenneth}} | {{Trainerentry|Spr B2W2 Backpacker M.png|Backpacker|Kendall|{{tt|432|384 in Easy Mode, 480 in Challenge Mode}}|1|507|Herdier|♂|{{tt|18|16 in Easy Mode, 20 in Challenge Mode}}|None|36=ケネス|37=Kenneth}} | ||
{{Trainerdiv|cave| | {{Trainerdiv|cave|Exit to Driftveil City}} | ||
{{Trainerentry|Spr B2W2 Backpacker F.png|Backpacker|Eileen|{{tt|768|696 in Easy Mode, 840 in Challenge Mode}}|1|028|Sandslash|♀|{{tt|32|29 in Easy Mode, 35 in Challenge Mode}}|None|36=エリナ|37=Erina}} | {{Trainerentry|Spr B2W2 Backpacker F.png|Backpacker|Eileen|{{tt|768|696 in Easy Mode, 840 in Challenge Mode}}|1|028|Sandslash|♀|{{tt|32|29 in Easy Mode, 35 in Challenge Mode}}|None|36=エリナ|37=Erina}} | ||
{{Trainerdiv|cave}} | |||
{{Trainerentry|Spr B2W2 Hiker.png|Hiker|Keith|{{tt|992|896 in Easy Mode, 1088 in Challenge Mode}}|2|529|Drilbur|♂|{{tt|31|28 in Easy Mode, 34 in Challenge Mode}}|None|524|Roggenrola|♂|{{tt|31|28 in Easy Mode, 34 in Challenge Mode}}|None|36=マモル|37=Mamoru}} | {{Trainerentry|Spr B2W2 Hiker.png|Hiker|Keith|{{tt|992|896 in Easy Mode, 1088 in Challenge Mode}}|2|529|Drilbur|♂|{{tt|31|28 in Easy Mode, 34 in Challenge Mode}}|None|524|Roggenrola|♂|{{tt|31|28 in Easy Mode, 34 in Challenge Mode}}|None|36=マモル|37=Mamoru}} | ||
{{Trainerdiv|cave}} | |||
{{Trainerentry|Spr B2W2 Backpacker M.png|Backpacker|Randall|{{tt|768|696 in Easy Mode, 840 in Challenge Mode}}|1|020|Raticate|♂|{{tt|32|29 in Easy Mode, 35 in Challenge Mode}}|None|36=ナオユキ|37=Naoyuki}} | {{Trainerentry|Spr B2W2 Backpacker M.png|Backpacker|Randall|{{tt|768|696 in Easy Mode, 840 in Challenge Mode}}|1|020|Raticate|♂|{{tt|32|29 in Easy Mode, 35 in Challenge Mode}}|None|36=ナオユキ|37=Naoyuki}} | ||
{{Trainerdiv|cave}} | |||
{{Trainerentry|Spr B2W2 Hiker.png|Hiker|Tobias|{{tt|992|896 in Easy Mode, 1088 in Challenge Mode}}|2|524|Roggenrola|♂|{{tt|31|28 in Easy Mode, 34 in Challenge Mode}}|None|532|Timburr|♂|{{tt|31|28 in Easy Mode, 34 in Challenge Mode}}|None|36=テルオ|37=Teruo}} | {{Trainerentry|Spr B2W2 Hiker.png|Hiker|Tobias|{{tt|992|896 in Easy Mode, 1088 in Challenge Mode}}|2|524|Roggenrola|♂|{{tt|31|28 in Easy Mode, 34 in Challenge Mode}}|None|532|Timburr|♂|{{tt|31|28 in Easy Mode, 34 in Challenge Mode}}|None|36=テルオ|37=Teruo}} | ||
{{Trainerdiv|cave}} | |||
{{Trainerentry|Spr B2W2 Psychic M.png|Psychic|Tully|{{tt|1056|960 in Easy Mode, 1152 in Challenge Mode}}|1|528|Swoobat|♂|{{tt|33|30 in Easy Mode, 33 in Challenge Mode}}|None|36=ミノル|37=Minoru}} | {{Trainerentry|Spr B2W2 Psychic M.png|Psychic|Tully|{{tt|1056|960 in Easy Mode, 1152 in Challenge Mode}}|1|528|Swoobat|♂|{{tt|33|30 in Easy Mode, 33 in Challenge Mode}}|None|36=ミノル|37=Minoru}} | ||
{{Trainerdiv|cave}} | |||
{{Trainerentry|Spr B2W2 Backpacker F.png|Backpacker|Annie|{{tt|768|696 in Easy Mode, 840 in Challenge Mode}}|1|505|Watchog|♀|{{tt|32|29 in Easy Mode, 35 in Challenge Mode}}|None|36=アニー|37=Annie}} | {{Trainerentry|Spr B2W2 Backpacker F.png|Backpacker|Annie|{{tt|768|696 in Easy Mode, 840 in Challenge Mode}}|1|505|Watchog|♀|{{tt|32|29 in Easy Mode, 35 in Challenge Mode}}|None|36=アニー|37=Annie}} | ||
{{Trainerdiv|cave}} | |||
{{Trainerentry|Spr B2W2 Psychic F.png|Psychic|Ena|{{tt|1024|928 in Easy Mode, 1120 in Challenge Mode}}|2|343|Baltoy||{{tt|32|29 in Easy Mode, 35 in Challenge Mode}}|None|562|Yamask|♀|{{tt|32|29 in Easy Mode, 35 in Challenge Mode}}|None|36=エナ|37=Ena}} | {{Trainerentry|Spr B2W2 Psychic F.png|Psychic|Ena|{{tt|1024|928 in Easy Mode, 1120 in Challenge Mode}}|2|343|Baltoy||{{tt|32|29 in Easy Mode, 35 in Challenge Mode}}|None|562|Yamask|♀|{{tt|32|29 in Easy Mode, 35 in Challenge Mode}}|None|36=エナ|37=Ena}} | ||
{{Trainerfooter|cave|5}} | {{Trainerfooter|cave|5}} | ||
==Layout== | |||
{| class="roundy" style="margin:auto; background:#000; border:3px solid #{{locationcolor/dark|cave}}" | |||
! style="background:#{{locationcolor/light|cave}}; {{roundytl|5px}}" | Version | |||
! style="background:#{{locationcolor/light|cave}}" | Exit to Driftveil City | |||
! style="background:#{{locationcolor/light|cave}}" | Middle | |||
! style="background:#{{locationcolor/light|cave}}; {{roundytr|5px}}" | Exit to Castelia City | |||
|- | |||
! style="background:#{{black 2 color}}" | {{color2|FFF|Pokémon Black and White Versions 2|Black 2}} | |||
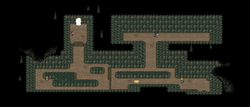
! rowspan="2" | [[File:Relic Passage north B2W2.png|250px]] | |||
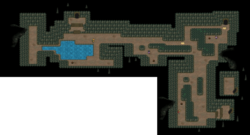
! rowspan="2" | [[File:Relic Passage center B2W2.png|250px]] | |||
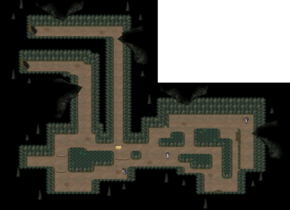
! rowspan="2" | [[File:Relic Passage south B2W2.png|250px]] | |||
|- | |||
! style="background:#{{white 2 color}}" | {{color2|000|Pokémon Black and White Versions 2|White 2}} | |||
|- | |||
! colspan="4" style="background:#{{locationcolor/light|cave}}; {{roundybottom|5px}}" | | |||
|} | |||
==In the manga== | |||
[[File:Relic Passage Adventures.png|thumb|250px|Relic Passage in Pokémon Adventures]] | |||
===In the Pokémon Adventures manga=== | |||
Relic Passage appeared in ''[[PS537|Colress Machine]]'', where {{adv|Blake}} traveled through it after apprehending [[Bronius]] and [[Ryoku]] in the [[Castelia Sewers]], following a stream of unusually cold air coming out of the cave. He eventually exited the tunnel near the [[Pokémon World Tournament]] construction site. | |||
{{-}} | |||
==In other languages== | ==In other languages== | ||
{{Langtable|color={{locationcolor/light|cave}}|bordercolor={{locationcolor/dark|cave}} | {{Langtable|color={{locationcolor/light|cave}}|bordercolor={{locationcolor/dark|cave}} | ||
|zh_cmn= | |zh_cmn=古代小徑 ''{{tt|Gǔdài Xiǎojìng|Ancient Passage}}'' | ||
|fr=Chemin Enfoui | |fr=Chemin Enfoui | ||
|de=Alter Fluchtweg | |de=Alter Fluchtweg | ||
|it=Antico Sentiero | |it=Antico Sentiero | ||
|ko=고대샛길 ''Godae Saesgil'' | |ko=고대샛길 ''Godae Saesgil'' | ||
|es=Pasadizo Ancestral}} | |es=Pasadizo Ancestral | ||
|vi=Con Đường Cổ Xưa}} | |||
{{-}} | {{-}} | ||
{{Unova}}<br | {{Unova}}<br> | ||
{{Project Locations notice}} | {{Project Locations notice}} | ||
| Line 150: | Line 153: | ||
[[Category:Caves]] | [[Category:Caves]] | ||
[[de:Alter Fluchtweg]] | [[de:Alter Fluchtweg]] | ||
[[es:Pasadizo Ancestral]] | |||
[[fr:Chemin Enfoui]] | [[fr:Chemin Enfoui]] | ||
[[it:Antico Sentiero]] | |||
[[ja:こだいのぬけみち]] | [[ja:こだいのぬけみち]] | ||
[[zh: | [[zh:古代小径]] | ||
Revision as of 17:40, 9 June 2019

|
This article is incomplete. Please feel free to edit this article to add missing information and complete it. Reason: Missing geography section |
| ||||
| ||||
| Map description: | A recently discovered passage that leads to the Relic Castle. | |||
|---|---|---|---|---|
| Location: | North of Castelia Sewers, west of Pokémon World Tournament and southwest of Relic Castle | |||
| Region: | Unova | |||
| Generations: | V | |||
 Location of Relic Passage in Unova. | ||||
| Pokémon world locations | ||||
Relic Passage (Japanese: 古代の抜け道 Ancient Passage) is a cave-like location in south Unova introduced in Pokémon Black and White 2. It connects Driftveil City with Castelia City via the Pokémon World Tournament and Castelia Sewers, and is also connected to Relic Castle.
Items
Exit to Castelia City
| Item | Location | Games | |
|---|---|---|---|
| Escape Rope ×2 |
|
B2 W2 | |
| Hard Stone | West of male and female Scientists | B2 W2 | |
| Max Repel | Western part near ledges, accessible from north entrance | B2 W2 | |
Exit to Driftveil City
| Item | Location | Games | |
|---|---|---|---|
| Protein | Near Backpacker Randall | B2 W2 | |
| Green Shard | In a rock near Psychic Tully (hidden) | B2 W2 | |
| Blue Shard | In a rock southwest of Hiker Tobias (hidden) | B2 W2 | |
| Max Repel | In a dead end south of Hiker Tobias (hidden) | B2 W2 | |
| Red Shard | In a rock near Psychic Ena (hidden) | B2 W2 | |
| Yellow Shard | In a rock near Backpacker Annie (hidden) | B2 W2 | |
| Rock Gem | In a room accessible via south entrance (requires Strength) (hidden) | B2 W2 | |
| Ultra Ball | In a room accessible via south entrance (requires Strength) | B2 W2 | |
| Rare Candy | In a room accessible via south entrance (requires Strength) | B2 W2 | |
| Rocky Helmet | In a room accessible via south entrance (requires Strength) | B2 W2 | |
| Big Pearl | West of Hiker Tobias (requires Surf) | B2 W2 | |
Phenomenon
| Item | Location | Games | |
|---|---|---|---|
| Red Shard | Dust cloud | B2 W2 | |
| Blue Shard | Dust cloud | B2 W2 | |
| Yellow Shard | Dust cloud | B2 W2 | |
| Green Shard | Dust cloud | B2 W2 | |
Pokémon
Exit to Castelia City
| Pokémon | Games | Location | Levels | Rate | ||||||||||||
|---|---|---|---|---|---|---|---|---|---|---|---|---|---|---|---|---|
|
B2 | W2 |
|
17 | 10% | |||||||||||
|
B2 | W2 |
|
18 | 5% | |||||||||||
|
B2 | W2 |
|
16-18 | 34% | |||||||||||
|
B2 | W2 |
|
16-18 | 31% | |||||||||||
|
B2 | W2 |
|
17-18 | 20% | |||||||||||
| Dust clouds | ||||||||||||||||
|
B2 | W2 |
|
16, 18 | 20% | |||||||||||
|
B2 | W2 |
|
16-19 | 80% | |||||||||||
| A colored background means that the Pokémon can be found in this location in the specified game. A white background with a colored letter means that the Pokémon cannot be found here. | ||||||||||||||||
Exit to Driftveil City
| Pokémon | Games | Location | Levels | Rate | ||||||||||||
|---|---|---|---|---|---|---|---|---|---|---|---|---|---|---|---|---|
|
B2 | W2 |
|
29 | 10% | |||||||||||
|
B2 | W2 |
|
30 | 5% | |||||||||||
|
B2 | W2 |
|
27-30 | 34% | |||||||||||
|
B2 | W2 |
|
27-30 | 31% | |||||||||||
|
B2 | W2 |
|
28-30 | 20% | |||||||||||
| Dust clouds | ||||||||||||||||
|
B2 | W2 |
|
27 | 20% | |||||||||||
|
B2 | W2 |
|
27-30 | 80% | |||||||||||
| Surfing | ||||||||||||||||
|
B2 | W2 |
|
10-30 | 30% | |||||||||||
|
B2 | W2 |
|
10-30 | 70% | |||||||||||
|
B2 | W2 |
|
10-30 | 70% | |||||||||||
| Surfing in rippling water | ||||||||||||||||
|
B2 | W2 |
|
5-15 | 60% | |||||||||||
|
B2 | W2 |
|
5-15 | 5% | |||||||||||
|
B2 | W2 |
|
5-15 | 35% | |||||||||||
|
B2 | W2 |
|
5-15 | 35% | |||||||||||
| Fishing | ||||||||||||||||
|
B2 | W2 |
|
40-70 | 70% | |||||||||||
|
B2 | W2 |
|
40-60 | 30% | |||||||||||
|
B2 | W2 |
|
40-60 | 30% | |||||||||||
| Fishing in rippling water | ||||||||||||||||
|
B2 | W2 |
|
40-70 | 65% | |||||||||||
|
B2 | W2 |
|
50-70 | 5% | |||||||||||
|
B2 | W2 |
|
40-60 | 30% | |||||||||||
|
B2 | W2 |
|
40-60 | 30% | |||||||||||
| A colored background means that the Pokémon can be found in this location in the specified game. A white background with a colored letter means that the Pokémon cannot be found here. | ||||||||||||||||
Trainers
| Trainer | Pokémon | |||||||||||
|---|---|---|---|---|---|---|---|---|---|---|---|---|
| Exit to Castelia City | ||||||||||||
|
| |||||||||||
|
| |||||||||||
| ||||||||||||
|
| |||||||||||
| Exit to Driftveil City | ||||||||||||
|
| |||||||||||
|
| |||||||||||
| ||||||||||||
|
| |||||||||||
|
| |||||||||||
| ||||||||||||
|
| |||||||||||
|
| |||||||||||
|
| |||||||||||
| ||||||||||||
Layout
| Version | Exit to Driftveil City | Middle | Exit to Castelia City |
|---|---|---|---|
| Black 2 | 
|

|

|
| White 2 | |||
In the manga
In the Pokémon Adventures manga
Relic Passage appeared in Colress Machine, where Blake traveled through it after apprehending Bronius and Ryoku in the Castelia Sewers, following a stream of unusually cold air coming out of the cave. He eventually exited the tunnel near the Pokémon World Tournament construction site.
In other languages
| |||||||||||||||||||||||||||

|
This article is part of Project Locations, a Bulbapedia project that aims to write comprehensive articles on every location in the Pokémon world. |


