Mossdeep Gym: Difference between revisions
Lady Ariel (talk | contribs) |
(TCG) |
||
| (38 intermediate revisions by 19 users not shown) | |||
| Line 13: | Line 13: | ||
|colorlight=D6EFD6 | |colorlight=D6EFD6 | ||
}} | }} | ||
The '''Mossdeep Gym''' (Japanese: '''トクサネジム''' ''Tokusane Gym'') is the official [[Gym]] of [[Mossdeep City]]. | The '''Mossdeep Gym''' (Japanese: '''トクサネジム''' ''Tokusane Gym'') is the official [[Gym]] of [[Mossdeep City]]. It is based on {{type|Psychic}} {{OBP|Pokémon|species}}. The [[Gym Leader]]s are [[Tate and Liza]]. {{pkmn|Trainer}}s who defeat them receive the {{Badge|Mind}}. | ||
==In the games== | ==In the games== | ||
===Generation III=== | |||
{{sign|E|header}} | |||
{{sign|E|title|Mossdeep City Pokémon Gym}} | |||
{{sign|E|title|Leaders: Liza & Tate}} | |||
{{sign|E|The mystic combination!}} | |||
{{sign|E|footer}} | |||
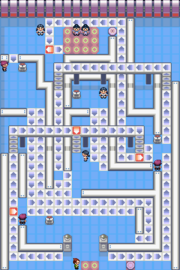
In Emerald, the Gym is similar to [[Saffron Gym]] in that it is a series of rooms connected by warp tiles. Each room contains Trainers and obstacles on | In Ruby and Sapphire, the Gym's floor is covered with tiles similar to [[spin tile]]s that whisk the player across to another area of the Gym when stepped on. Pulling switches changes the direction certain tiles point, allowing the player to reach Tate and Liza when all the switches are pulled. A [[warp tile]] next to them warps the player back to the entrance. | ||
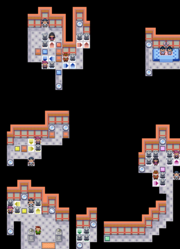
In Emerald, the Gym is similar to [[Saffron Gym]] in that it is a series of rooms connected by warp tiles. Each room contains Trainers and obstacles on spin tiles that rotate when certain tiles are stepped on, changing the path and often bringing the sight of enemy Trainers in-line with the player. Mossdeep Gym is the only Gym in Emerald to change its gimmick so drastically. Also, although other Trainers and statues spin on the spin tiles, the player is unaffected by them. | |||
At least one of the Gym Trainers must be battled in order to reach Tate and Liza. | |||
===Generation VI=== | |||
{{sign|RS|header}} | |||
{{sign|RS|title|Mossdeep City Pokémon Gym}} | |||
{{sign|RS|title|Leaders: Liza & Tate}} | |||
{{sign|RS|The mystic combination!}} | |||
{{sign|RS|footer}} | |||
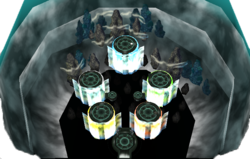
In Omega Ruby and Alpha Sapphire, the Gym is entirely redesigned. Platforms are connected by strings of energy orbs that automatically direct the player between them. The player must inspect stones on the various platforms to change which orbs are lit up, and thus which paths they can take through the Gym. | |||
When defeated, Tate and Liza will give the player the {{Badge|Mind}} as well as {{TM|04|Calm Mind}} as a reward. | When defeated, Tate and Liza will give the player the {{Badge|Mind}} as well as {{TM|04|Calm Mind}} as a reward. | ||
| Line 27: | Line 45: | ||
! style="background:#{{Ruby color}}; {{roundytl|5px}}" | {{color2|fff|Pokémon Ruby and Sapphire Versions|Ruby}} | ! style="background:#{{Ruby color}}; {{roundytl|5px}}" | {{color2|fff|Pokémon Ruby and Sapphire Versions|Ruby}} | ||
! style="background:#{{Sapphire color}}" | {{color2|fff|Pokémon Ruby and Sapphire Versions|Sapphire}} | ! style="background:#{{Sapphire color}}" | {{color2|fff|Pokémon Ruby and Sapphire Versions|Sapphire}} | ||
! style="background:#{{Emerald color}}; {{roundytr|5px}}" | {{color2| | ! style="background:#{{Emerald color}};" | {{color2|fff|Pokémon Emerald Version|Emerald}} | ||
! style="background:#{{Omega ruby color}};" | {{color2|fff|Pokémon Omega Ruby and Alpha Sapphire|Omega Ruby}} | |||
! style="background:#{{Alpha sapphire color}}; {{roundytr|5px}}" | {{color2|fff|Pokémon Omega Ruby and Alpha Sapphire|Alpha Sapphire}} | |||
|- | |- | ||
| colspan="2" | [[File:Mossdeep Gym RS.png|180px]] | | colspan="2" | [[File:Mossdeep Gym RS.png|180px]] | ||
| [[File:Mossdeep Gym E.png|180px]] | | [[File:Mossdeep Gym E.png|180px]] | ||
| colspan="2" | [[File:Mossdeep Gym ORAS.png|250px]] | |||
|- | |- | ||
| colspan=" | | colspan="5" style="background:#{{psychic color light}}; {{roundybottom|5px}}" | | ||
|} | |} | ||
| Line 40: | Line 61: | ||
{{Trainerentry|Spr RS Psychic M.png|Psychic|Preston|888|1|281|Kirlia|♂|37|None|36=ヒロム|37=Hiromu}} | {{Trainerentry|Spr RS Psychic M.png|Psychic|Preston|888|1|281|Kirlia|♂|37|None|36=ヒロム|37=Hiromu}} | ||
{{Trainerdiv|Psychic}} | {{Trainerdiv|Psychic}} | ||
{{Trainerentry|Spr RS Psychic F.png|Psychic|Maura|864|2| | {{Trainerentry|Spr RS Psychic F.png|Psychic|Maura|864|2|064|Kadabra|♂|36|None|281|Kirlia|♀|36|None|36=ヒカリ|37=Hikari}} | ||
{{Trainerdiv|Psychic}} | {{Trainerdiv|Psychic}} | ||
{{Trainerentry|Spr RS Psychic F.png|Psychic|Samantha|888|1|178|Xatu|♀|37|None|36=ミライ|37=Mirai}} | {{Trainerentry|Spr RS Psychic F.png|Psychic|Samantha|888|1|178|Xatu|♀|37|None|36=ミライ|37=Mirai}} | ||
| Line 59: | Line 80: | ||
|class=Leader | |class=Leader | ||
|classlink=Gym Leader | |classlink=Gym Leader | ||
|name={{color2| | |name={{color2|000|Tate and Liza|Tate & Liza}} | ||
|game=RS | |game=RS | ||
|location=Mossdeep Gym | |location=Mossdeep Gym | ||
|pokemon=2 | |pokemon=2}} | ||
}} | |||
|{{Pokémon/3 | |{{Pokémon/3 | ||
|game=Ruby | |game=Ruby | ||
| Line 92: | Line 112: | ||
===={{game|Emerald}}==== | ===={{game|Emerald}}==== | ||
{{Trainerheader|Psychic}} | {{Trainerheader|Psychic}} | ||
{{Trainerentry|Spr | {{Trainerdiv|Psychic|Entrance room}} | ||
{{Trainerentry|Spr RS Psychic M.png|Psychic|Preston|864<br><small>Potential [[Double Battle]] with Maura</small>|1|281|Kirlia|♂|36|None|36=ヒロム|37=Hiromu}} | |||
{{Trainerentry|Spr RS Psychic F.png|Psychic|Maura|864<br><small>Potential [[Double Battle]] with Preston</small>|1|064|Kadabra|♂|36|None|36=ヒカリ|37=Hikari}} | {{Trainerentry|Spr RS Psychic F.png|Psychic|Maura|864<br><small>Potential [[Double Battle]] with Preston</small>|1|064|Kadabra|♂|36|None|36=ヒカリ|37=Hikari}} | ||
{{Trainerdiv|Psychic}} | {{Trainerdiv|Psychic|West-central room}} | ||
{{Trainerentry|Spr RS Psychic F.png|Psychic|Samantha|864<br><small>Potential [[Double Battle]] with Blake</small>|1|178|Xatu|♀|36|None|36=ミライ|37=Mirai}} | {{Trainerentry|Spr RS Psychic F.png|Psychic|Samantha|864<br><small>Potential [[Double Battle]] with Blake</small>|1|178|Xatu|♀|36|None|36=ミライ|37=Mirai}} | ||
{{Trainerentry|Spr RS Psychic M.png|Psychic|Blake|864<br><small>Potential [[Double Battle]] with Samantha</small>|1|203|Girafarig|♂|36|None|36=サトキ|37=Satoki}} | {{Trainerentry|Spr RS Psychic M.png|Psychic|Blake|864<br><small>Potential [[Double Battle]] with Samantha</small>|1|203|Girafarig|♂|36|None|36=サトキ|37=Satoki}} | ||
{{Trainerdiv|Psychic}} | {{Trainerdiv|Psychic|Southeast room}} | ||
{{Trainerentry|Spr RS Psychic F.png|Psychic|Macey|864<br><small>Potential [[Double Battle]] with Clifford</small>|1|177|Natu|♀|36|None|36=フサコ|37=Fusako}} | |||
{{Trainerentry|Spr RS Gentleman.png|Gentleman|Clifford|2880<br><small>Potential [[Double Battle]] with Macey or Kathleen</small>|1|203|Girafarig|♂|36|None|36=スティーブ|37=Steve}} | |||
{{Trainerentry|Spr RS Hex Maniac.png|Hex Maniac|Kathleen|864<br><small>Potential [[Double Battle]] with Clifford or Nicholas</small>|1|064|Kadabra|♂|36|None|36=ユキヨ|37=Yukiyo}} | |||
{{Trainerentry|Spr RS Psychic M.png|Psychic|Nicholas|864<br><small>Potential [[Double Battle]] with Kathleen</small>|1|202|Wobbuffet|♂|36|None|36=リョウイチ|37=Ryouichi}} | |||
{{Trainerdiv|Psychic|Northwest room}} | |||
{{Trainerentry|Spr RS Gentleman.png|Gentleman|Nate|2880<br><small>Potential [[Double Battle]] with Virgil</small>|1|325|Spoink|♂|36|None|36=トニー|37=Tony}} | {{Trainerentry|Spr RS Gentleman.png|Gentleman|Nate|2880<br><small>Potential [[Double Battle]] with Virgil</small>|1|325|Spoink|♂|36|None|36=トニー|37=Tony}} | ||
{{Trainerentry|Spr RS Psychic M.png|Psychic|Virgil|864<br><small>Potential [[Double Battle]] with Nate or Slyvia</small>|1|280|Ralts|♂|36|None|36=ユウヤ|37=Yūya}} | {{Trainerentry|Spr RS Psychic M.png|Psychic|Virgil|864<br><small>Potential [[Double Battle]] with Nate or Slyvia</small>|1|280|Ralts|♂|36|None|36=ユウヤ|37=Yūya}} | ||
{{Trainerentry|Spr RS Hex Maniac.png|Hex Maniac|Sylvia|864<br><small>Potential [[Double Battle]] with Hannah or Virgil</small>|1|307|Meditite|♀|36|None|36=アサヨ|37=Asayo}} | {{Trainerentry|Spr RS Hex Maniac.png|Hex Maniac|Sylvia|864<br><small>Potential [[Double Battle]] with Hannah or Virgil</small>|1|307|Meditite|♀|36|None|36=アサヨ|37=Asayo}} | ||
{{Trainerentry|Spr RS Psychic F.png|Psychic|Hannah|864<br><small>Potential [[Double Battle]] with Sylvia</small>|1|281|Kirlia|♀|36|None|36=アスカ|37=Asuka}} | {{Trainerentry|Spr RS Psychic F.png|Psychic|Hannah|864<br><small>Potential [[Double Battle]] with Sylvia</small>|1|281|Kirlia|♀|36|None|36=アスカ|37=Asuka}} | ||
{{Trainerfooter|Psychic|3|Inside}} | {{Trainerfooter|Psychic|3|Inside}} | ||
| Line 117: | Line 138: | ||
|class=Leader | |class=Leader | ||
|classlink=Gym Leader | |classlink=Gym Leader | ||
|name={{color2| | |name={{color2|000|Tate and Liza|Tate & Liza}} | ||
|game=E | |game=E | ||
|location=Mossdeep Gym | |location=Mossdeep Gym | ||
|pokemon=4 | |pokemon=4}} | ||
}} | |{{Pokémon/3 | ||
|{{Pokémon/3|game=Emerald | |game=Emerald | ||
|ndex=344 | |ndex=344 | ||
|pokemon=Claydol | |pokemon=Claydol | ||
| Line 132: | Line 153: | ||
|move3=Psychic|move3type=Psychic | |move3=Psychic|move3type=Psychic | ||
|move4=Light Screen|move4type=Psychic}} | |move4=Light Screen|move4type=Psychic}} | ||
|{{Pokémon/3|game=Emerald | |{{Pokémon/3 | ||
|game=Emerald | |||
|ndex=178 | |ndex=178 | ||
|pokemon=Xatu | |pokemon=Xatu | ||
| Line 166: | Line 188: | ||
|move1=Sunny Day|move1type=Fire | |move1=Sunny Day|move1type=Fire | ||
|move2=SolarBeam|move2type=Grass | |move2=SolarBeam|move2type=Grass | ||
|move3= | |move3=Psychic|move3type=Psychic | ||
|move4= | |move4=Flamethrower|move4type=Fire}} | ||
{{Party/Footer}} | {{Party/Footer}} | ||
| Line 179: | Line 201: | ||
|class=Leader | |class=Leader | ||
|classlink=Gym Leader | |classlink=Gym Leader | ||
|name={{color2| | |name={{color2|000|Tate and Liza|Tate & Liza}} | ||
|game=E | |game=E | ||
|location=Mossdeep Gym | |location=Mossdeep Gym | ||
|pokemon=5 | |pokemon=5}} | ||
}} | |||
|{{Pokémon/3 | |{{Pokémon/3 | ||
|game=Emerald | |game=Emerald | ||
| Line 205: | Line 226: | ||
|ability=Levitate | |ability=Levitate | ||
|move1=Earthquake|move1type=Ground | |move1=Earthquake|move1type=Ground | ||
|move2= | |move2=AncientPower|move2type=Rock | ||
|move3=Psychic|move3type=Psychic | |move3=Psychic|move3type=Psychic | ||
|move4=Light Screen|move4type=Psychic}} | |move4=Light Screen|move4type=Psychic}} | ||
| Line 212: | Line 233: | ||
|ndex=178 | |ndex=178 | ||
|pokemon=Xatu | |pokemon=Xatu | ||
|level= | |level=49 | ||
|gender=male | |gender=male | ||
|type1=Psychic|type2=Flying | |type1=Psychic|type2=Flying | ||
|ability=Synchronize | |ability=Synchronize | ||
|held=Chesto Berry | |held=Chesto Berry | ||
|move1= | |move1=Psychic|move1type=Psychic | ||
|move2= | |move2=Rest|move2type=Psychic | ||
|move3=Confuse Ray|move3type=Ghost | |move3=Confuse Ray|move3type=Ghost | ||
|move4=Calm Mind|move4type=Psychic}} | |move4=Calm Mind|move4type=Psychic}} | ||
{{Party/Div|color={{psychic color}}}} | {{Party/Div|color={{psychic color}}}} | ||
| style="margin:auto" |{{Pokémon/3|game=Emerald | | style="margin:auto" |{{Pokémon/3 | ||
|game=Emerald | |||
|ndex=337 | |ndex=337 | ||
|pokemon=Lunatone | |pokemon=Lunatone | ||
|level= | |level=50 | ||
|type1=Rock|type2=Psychic | |type1=Rock|type2=Psychic | ||
|ability=Levitate | |ability=Levitate | ||
|held= | |held=Chesto Berry | ||
|move1=Earthquake|move1type=Ground | |move1=Earthquake|move1type=Ground | ||
|move2=Psychic|move2type=Psychic | |move2=Psychic|move2type=Psychic | ||
|move3= | |move3=Rest|move3type=Psychic | ||
|move4=Calm Mind|move4type=Psychic}} | |move4=Calm Mind|move4type=Psychic}} | ||
| style="margin:auto" |{{Pokémon/3|game=Emerald | | style="margin:auto" |{{Pokémon/3 | ||
|game=Emerald | |||
|ndex=338 | |ndex=338 | ||
|pokemon=Solrock | |pokemon=Solrock | ||
|level= | |level=50 | ||
|type1=Rock|type2=Psychic | |type1=Rock|type2=Psychic | ||
|ability=Levitate | |ability=Levitate | ||
|held=Sitrus Berry | |||
|move1=Sunny Day|move1type=Fire | |move1=Sunny Day|move1type=Fire | ||
|move2=SolarBeam|move2type=Grass | |move2=SolarBeam|move2type=Grass | ||
|move3= | |move3=Psychic|move3type=Psychic | ||
|move4= | |move4=Flamethrower|move4type=Fire}} | ||
{{Party/Footer}} | {{Party/Footer}} | ||
| Line 254: | Line 278: | ||
|class=Leader | |class=Leader | ||
|classlink=Gym Leader | |classlink=Gym Leader | ||
|name={{color2| | |name={{color2|000|Tate and Liza|Tate & Liza}} | ||
|game=E | |game=E | ||
|location=Mossdeep Gym | |location=Mossdeep Gym | ||
|pokemon=6 | |pokemon=6}} | ||
}} | |{{Pokémon/3 | ||
|{{Pokémon/3|game=Emerald | |game=Emerald | ||
|ndex=096 | |ndex=096 | ||
|pokemon=Drowzee | |pokemon=Drowzee | ||
| Line 270: | Line 294: | ||
|move3=Headbutt|move3type=Normal | |move3=Headbutt|move3type=Normal | ||
|move4=Protect|move4type=Normal}} | |move4=Protect|move4type=Normal}} | ||
|{{Pokémon/3|game=Emerald | |{{Pokémon/3 | ||
|game=Emerald | |||
|ndex=079 | |ndex=079 | ||
|pokemon=Slowpoke | |pokemon=Slowpoke | ||
| Line 281: | Line 306: | ||
|move3=Calm Mind|move3type=Psychic | |move3=Calm Mind|move3type=Psychic | ||
|move4=Protect|move4type=Normal}} | |move4=Protect|move4type=Normal}} | ||
|{{Pokémon/3|game=Emerald | |{{Pokémon/3 | ||
|game=Emerald | |||
|ndex=344 | |ndex=344 | ||
|pokemon=Claydol | |pokemon=Claydol | ||
| Line 292: | Line 318: | ||
|move4=Light Screen|move4type=Psychic}} | |move4=Light Screen|move4type=Psychic}} | ||
{{Party/Div|color={{psychic color}}}} | {{Party/Div|color={{psychic color}}}} | ||
|{{Pokémon/3|game=Emerald | |{{Pokémon/3 | ||
|game=Emerald | |||
|ndex=178 | |ndex=178 | ||
|pokemon=Xatu | |pokemon=Xatu | ||
| Line 300: | Line 327: | ||
|ability=Synchronize | |ability=Synchronize | ||
|held=Chesto Berry | |held=Chesto Berry | ||
|move1= | |move1=Psychic|move1type=Psychic | ||
|move2= | |move2=Rest|move2type=Psychic | ||
|move3=Confuse Ray|move3type=Ghost | |move3=Confuse Ray|move3type=Ghost | ||
|move4=Calm Mind|move4type=Psychic}} | |move4=Calm Mind|move4type=Psychic}} | ||
|{{Pokémon/3|game=Emerald|ndex=337 | |{{Pokémon/3 | ||
|game=Emerald | |||
|ndex=337 | |||
|pokemon=Lunatone | |pokemon=Lunatone | ||
|level=55 | |level=55 | ||
|type1=Rock|type2=Psychic | |type1=Rock|type2=Psychic | ||
|ability=Levitate | |ability=Levitate | ||
|held=Chesto Berry | |||
|move1=Earthquake|move1type=Ground | |move1=Earthquake|move1type=Ground | ||
|move2=Psychic|move2type=Psychic | |move2=Psychic|move2type=Psychic | ||
|move3= | |move3=Rest|move3type=Psychic | ||
|move4=Calm Mind|move4type=Psychic}} | |move4=Calm Mind|move4type=Psychic}} | ||
|{{Pokémon/3|game=Emerald | |{{Pokémon/3 | ||
|game=Emerald | |||
|ndex=338 | |ndex=338 | ||
|pokemon=Solrock | |pokemon=Solrock | ||
| Line 319: | Line 350: | ||
|type1=Rock|type2=Psychic | |type1=Rock|type2=Psychic | ||
|ability=Levitate | |ability=Levitate | ||
|held=Sitrus Berry | |||
|move1=Sunny Day|move1type=Fire | |move1=Sunny Day|move1type=Fire | ||
|move2=SolarBeam|move2type=Grass | |move2=SolarBeam|move2type=Grass | ||
|move3= | |move3=Psychic|move3type=Psychic | ||
|move4= | |move4=Flamethrower|move4type=Fire}} | ||
{{Party/Footer}} | {{Party/Footer}} | ||
| Line 334: | Line 366: | ||
|class=Leader | |class=Leader | ||
|classlink=Gym Leader | |classlink=Gym Leader | ||
|name={{color2| | |name={{color2|000|Tate and Liza|Tate & Liza}} | ||
|game=E | |game=E | ||
|location=Mossdeep Gym | |location=Mossdeep Gym | ||
|pokemon=6 | |pokemon=6}} | ||
}} | |{{Pokémon/3 | ||
|{{Pokémon/3|game=Emerald | |game=Emerald | ||
|ndex=097 | |ndex=097 | ||
|pokemon=Hypno | |pokemon=Hypno | ||
| Line 350: | Line 382: | ||
|move3=Headbutt|move3type=Normal | |move3=Headbutt|move3type=Normal | ||
|move4=Protect|move4type=Normal}} | |move4=Protect|move4type=Normal}} | ||
|{{Pokémon/3|game=Emerald | |{{Pokémon/3 | ||
|game=Emerald | |||
|ndex=344 | |||
|pokemon=Claydol | |||
|level=59 | |||
|type1=Ground|type2=Psychic | |||
|ability=Levitate | |||
|move1=Earthquake|move1type=Ground | |||
|move2=Explosion|move2type=Normal | |||
|move3=Psychic|move3type=Psychic | |||
|move4=Light Screen|move4type=Psychic}} | |||
|{{Pokémon/3 | |||
|game=Emerald | |||
|ndex=079 | |ndex=079 | ||
|pokemon=Slowpoke | |pokemon=Slowpoke | ||
| Line 361: | Line 405: | ||
|move3=Calm Mind|move3type=Psychic | |move3=Calm Mind|move3type=Psychic | ||
|move4=Protect|move4type=Normal}} | |move4=Protect|move4type=Normal}} | ||
{{Party/Div|color={{psychic color}}}} | |||
|{{Pokémon/3 | |{{Pokémon/3 | ||
|game=Emerald | |game=Emerald | ||
|ndex=178 | |ndex=178 | ||
|pokemon=Xatu | |pokemon=Xatu | ||
| Line 381: | Line 415: | ||
|ability=Synchronize | |ability=Synchronize | ||
|held=Chesto Berry | |held=Chesto Berry | ||
|move1= | |move1=Psychic|move1type=Psychic | ||
|move2= | |move2=Rest|move2type=Psychic | ||
|move3=Confuse Ray|move3type=Ghost | |move3=Confuse Ray|move3type=Ghost | ||
|move4=Calm Mind|move4type=Psychic}} | |move4=Calm Mind|move4type=Psychic}} | ||
|{{Pokémon/3|game=Emerald | |{{Pokémon/3 | ||
|game=Emerald | |||
|ndex=337 | |ndex=337 | ||
|pokemon=Lunatone | |pokemon=Lunatone | ||
|level=60 | |level=60 | ||
|type1=Rock|type2=Psychic | |type1=Rock|type2=Psychic | ||
|held= | |held=Chesto Berry | ||
|ability=Levitate | |ability=Levitate | ||
|move1=Earthquake|move1type=Ground | |move1=Earthquake|move1type=Ground | ||
|move2=Psychic|move2type=Psychic | |move2=Psychic|move2type=Psychic | ||
|move3= | |move3=Rest|move3type=Psychic | ||
|move4=Calm Mind|move4type=Psychic}} | |move4=Calm Mind|move4type=Psychic}} | ||
|{{Pokémon/3|game=Emerald | |{{Pokémon/3 | ||
|game=Emerald | |||
|ndex=338 | |ndex=338 | ||
|pokemon=Solrock | |pokemon=Solrock | ||
|level=60 | |level=60 | ||
|type1=Rock|type2=Psychic | |type1=Rock|type2=Psychic | ||
|held=Sitrus Berry | |||
|ability=Levitate | |ability=Levitate | ||
|move1=Sunny Day|move1type=Fire | |move1=Sunny Day|move1type=Fire | ||
|move2=SolarBeam|move2type=Grass | |move2=SolarBeam|move2type=Grass | ||
|move3= | |move3=Psychic|move3type=Psychic | ||
|move4= | |move4=Flamethrower|move4type=Fire}} | ||
{{Party/Footer}} | {{Party/Footer}} | ||
=====Fourth rematch===== | =====Fourth rematch onwards===== | ||
{{Party/Single | {{Party/Single | ||
|color={{psychic color}} | |color={{psychic color}} | ||
| Line 417: | Line 454: | ||
|class=Leader | |class=Leader | ||
|classlink=Gym Leader | |classlink=Gym Leader | ||
|name={{color2| | |name={{color2|000|Tate and Liza|Tate & Liza}} | ||
|game=E | |game=E | ||
|location=Mossdeep Gym | |location=Mossdeep Gym | ||
|pokemon=6 | |pokemon=6}} | ||
}} | |{{Pokémon/3 | ||
|{{Pokémon/3|game=Emerald | |game=Emerald | ||
|ndex=097 | |ndex=097 | ||
|pokemon=Hypno | |pokemon=Hypno | ||
| Line 433: | Line 470: | ||
|move3=Headbutt|move3type=Normal | |move3=Headbutt|move3type=Normal | ||
|move4=Protect|move4type=Normal}} | |move4=Protect|move4type=Normal}} | ||
|{{Pokémon/3|game=Emerald | |{{Pokémon/3 | ||
|game=Emerald | |||
|ndex=344 | |||
|pokemon=Claydol | |||
|level=64 | |||
|type1=Ground|type2=Psychic | |||
|ability=Levitate | |||
|move1=Earthquake|move1type=Ground | |||
|move2=Explosion|move2type=Normal | |||
|move3=Psychic|move3type=Psychic | |||
|move4=Light Screen|move4type=Psychic}} | |||
|{{Pokémon/3 | |||
|game=Emerald | |||
|ndex=199 | |ndex=199 | ||
|pokemon=Slowking | |pokemon=Slowking | ||
| Line 444: | Line 493: | ||
|move3=Calm Mind|move3type=Psychic | |move3=Calm Mind|move3type=Psychic | ||
|move4=Protect|move4type=Normal}} | |move4=Protect|move4type=Normal}} | ||
{{Party/Div|color={{psychic color}}}} | {{Party/Div|color={{psychic color}}}} | ||
|{{Pokémon/3|game=Emerald | |{{Pokémon/3|game=Emerald | ||
| Line 463: | Line 502: | ||
|ability=Synchronize | |ability=Synchronize | ||
|held=Chesto Berry | |held=Chesto Berry | ||
|move1= | |move1=Psychic|move1type=Psychic | ||
|move2= | |move2=Rest|move2type=Psychic | ||
|move3=Confuse Ray|move3type=Ghost | |move3=Confuse Ray|move3type=Ghost | ||
|move4=Calm Mind|move4type=Psychic}} | |move4=Calm Mind|move4type=Psychic}} | ||
|{{Pokémon/3|game=Emerald | |{{Pokémon/3 | ||
|game=Emerald | |||
|ndex=337 | |ndex=337 | ||
|pokemon=Lunatone | |pokemon=Lunatone | ||
| Line 473: | Line 513: | ||
|type1=Rock|type2=Psychic | |type1=Rock|type2=Psychic | ||
|ability=Levitate | |ability=Levitate | ||
|held=Chesto Berry | |||
|move1=Earthquake|move1type=Ground | |move1=Earthquake|move1type=Ground | ||
|move2=Psychic|move2type=Psychic | |move2=Psychic|move2type=Psychic | ||
|move3= | |move3=Rest|move3type=Psychic | ||
|move4=Calm Mind|move4type=Psychic}} | |move4=Calm Mind|move4type=Psychic}} | ||
|{{Pokémon/3|game=Emerald | |{{Pokémon/3|game=Emerald | ||
| Line 486: | Line 527: | ||
|move1=Sunny Day|move1type=Fire | |move1=Sunny Day|move1type=Fire | ||
|move2=SolarBeam|move2type=Grass | |move2=SolarBeam|move2type=Grass | ||
|move3=Flamethrower|move3type=Fire | |move3=Psychic|move3type=Psychic | ||
|move4= | |move4=Flamethrower|move4type=Fire}} | ||
{{Party/Footer}} | |||
===={{g|Omega Ruby and Alpha Sapphire}}==== | |||
{{Trainerheader|Psychic}} | |||
{{Trainerentry|VSPsychic.png{{!}}150px|Psychic|Preston|1,344|1|064|Kadabra|♂|42|36=ヒロム|37=Hiromu}} | |||
{{Trainerdiv|Psychic}} | |||
{{Trainerentry|VSPsychic.png{{!}}150px|Psychic|Joshua|1,280|2|064|Kadabra|♂|40||308|Medicham|♂|40|36=シュウイチ|37=Shūichi}} | |||
{{Trainerdiv|Psychic}} | |||
{{Trainerentry|VSPsychic.png{{!}}150px|Psychic|Fritz|1,312|2|344|Claydol||39||121|Starmie||41|36=サトル|37=Satoru}} | |||
{{Trainerdiv|Psychic}} | |||
{{Trainerentry|VSHex Maniac.png{{!}}150px|Hex Maniac|Kindra|1,092|2|281|Kirlia|♀|39||326|Grumpig|♀|39|36=サチコ|37=Sachiko}} | |||
{{Trainerdiv|Psychic}} | |||
{{Trainerentry|VSHex Maniac.png{{!}}150px|Hex Maniac|Patricia|1,148|1|358|Chimecho|♀|41|36=コトネ|37=Kotone}} | |||
{{Trainerdiv|Psychic}} | |||
{{Trainerentry|VSPsychic.png{{!}}150px|Psychic|Virgil|1,280|2|064|Kadabra|♂|40||203|Girafarig|♂|40|36=ユウヤ|37=Yūya}} | |||
{{Trainerfooter|Psychic|3|Inside}} | |||
{{Party/Single | |||
|color={{psychic color}} | |||
|headcolor={{psychic color light}} | |||
|bordercolor={{psychic color dark}} | |||
|sprite=VSLiza & Tate.png | |||
|size=150px | |||
|prize={{PDollar}}10,800 | |||
|class=Leaders | |||
|classlink=Gym Leader | |||
|name={{color2|000|Tate and Liza|Liza & Tate}} | |||
|game=ORAS | |||
|location=Mossdeep Gym | |||
|pokemon=2}} | |||
|{{Pokémon/6 | |||
|ndex=337 | |||
|pokemon=Lunatone | |||
|level=45 | |||
|type1=Rock | |||
|type2=Psychic | |||
|ability=Levitate | |||
|move1=Light Screen|move1type=Psychic|move1cat=Status | |||
|move2=Psychic|move2type=Psychic|move2cat=Special | |||
|move3=Hypnosis|move3type=Psychic|move3cat=Status | |||
|move4=Calm Mind|move4type=Psychic|move4cat=Status}} | |||
|{{Pokémon/6 | |||
|ndex=338 | |||
|pokemon=Solrock | |||
|level=45 | |||
|type1=Rock | |||
|type2=Psychic | |||
|ability=Levitate | |||
|move1=Sunny Day|move1type=Fire|move1cat=Status | |||
|move2=Rock Slide|move2type=Rock|move2cat=Physical | |||
|move3=Psychic|move3type=Psychic|move3cat=Special | |||
|move4=Solar Beam|move4type=Grass|move4cat=Special}} | |||
{{Party/Footer}} | {{Party/Footer}} | ||
===Items=== | ===Items=== | ||
{{itlisth|Psychic}} | {{itlisth|Psychic}} | ||
{{Itemlist|TM Psychic|Reward for defeating Tate and Liza|Ru=yes|Sa=yes|E=yes|display={{TM|04|Calm Mind}}}} | {{Itemlist|TM Psychic VI|Reward for defeating Tate and Liza|Ru=yes|Sa=yes|E=yes|OR=yes|AS=yes|display={{TM|04|Calm Mind}}}} | ||
{{itlistfoot|Psychic}} | {{itlistfoot|Psychic}} | ||
==In spin-off games== | |||
[[File:Tate Mindscape.png|100px|left|thumb|Tate's artwork of Mossdeep Gym]] | |||
[[File:Liza Mindscape.png|100px|thumb|Liza's artwork of Mossdeep Gym]] | |||
===Pokémon Masters=== | |||
In [[Pokémon Masters]], Mossdeep Gym is seen in artwork related to both Tate and Liza. | |||
{{-}} | |||
==In the anime== | ==In the anime== | ||
The Mossdeep Gym appeared in ''[[AG099|It's Still Rocket Roll to Me!]]'' and ' | The Mossdeep Gym first appeared in ''[[AG099|It's Still Rocket Roll to Me!]]'', where {{Ash}} and {{ashfr}} arrived there for Ash's Gym battle, only to learn that everyone at the Gym had left to witness a {{wp|space shuttle}} launch at the [[Mossdeep Space Center]]. | ||
Ash | In ''[[AG100|Solid as a Solrock]]'', Ash challenged [[Tate and Liza]] to a Gym battle at the Gym, using his {{AP|Pikachu}} and {{AP|Swellow}} against {{TP|Tate|Solrock}} and {{TP|Liza|Lunatone}}. Although they were powerful opponents, Tate and Liza ended up inadvertently sabotaging each other and subsequently had an argument, giving Ash a chance for a counterattack. However, the battle was interrupted by {{TRT}} bursting through the Gym's roof with their newest [[Team Rocket's mechas|robot]] to steal Solrock and Lunatone. Although Team Rocket was soon defeated and the stolen Pokémon were recovered, the Gym was so badly damaged by their attack that Ash's Gym battle had to continue outdoors. With the battle against Team Rocket having restored Tate and Liza's teamwork, Ash had trouble overcoming their strategies, but he eventually came up with a strategy of his own and ultimately defeated his opponents, earning him the {{badge|Mind}}. | ||
The Gym's battlefield has multiple planet-like objects floating around in the air, making it three-dimensional. The battles are [[Battle judge|refereed]] by Tate and Liza's mother, {{an|Rachel}}. | |||
===Pokémon used in Gym=== | |||
====Used by Liza==== | |||
{{TrainerPoké | |||
|main=yes | |||
|trainer=Liza | |||
|pkmn=Lunatone | |||
|type1=Rock | |||
|type2=Psychic | |||
|img=Liza Lunatone.png | |||
|epnum=AG099 | |||
|epname=It's Still Rocket Roll to Me! | |||
|desc=Liza's {{p|Lunatone}} is the Pokémon she uses in all of her Gym battles. When the twins battled each other in ''[[AG099|It's Still Rocket Roll to Me!]]'', Lunatone won the battle for Liza. She later used it against {{TRT}} after they failed to steal a space shuttle from the Mossdeep Space Center. In ''[[AG100|Solid as a Solrock!]]'', it fought with Tate's {{p|Solrock}} against [[Ash's Pikachu]] and {{AP|Swellow}} but lost.}} | |||
====Used by Tate==== | |||
{{TrainerPoké | |||
|main=yes | |||
|trainer=Tate | |||
|pkmn=Solrock | |||
|type1=Rock | |||
|type2=Psychic | |||
|img=Tate Solrock.png | |||
|epnum=AG099 | |||
|epname=It's Still Rocket Roll to Me! | |||
|desc=Tate's {{p|Solrock}} is the Pokémon he uses in all of his Gym battles. In ''[[AG099|It's Still Rocket Roll to Me!]]'', it battled Liza's {{p|Lunatone}} but lost. Later, in ''[[AG100|Solid as a Solrock!]]'', it fought with Liza's Lunatone against [[Ash's Pikachu]] and {{AP|Swellow}} but lost.}} | |||
==In the TCG== | |||
The following is a list of cards mentioning or featuring Mossdeep City Gym in the [[Pokémon Trading Card Game]]. | |||
{{cardlist/header|Mossdeep Gym|Psychic|char=yes}} | |||
{{cardlist/entry|cardname={{TCG ID|Celestial Storm|Tate & Liza|148}}|type=Supporter|standard=yes|enset=Celestial Storm|enrarity=Uncommon|ennum=148/168|jpset=Sky-Splitting Charisma|jprarity=U|jpnum=091/096|jpset2=SM-P Promotional cards|jpnum2=296/SM-P|jpset3=Tag Team GX Premium Trainer Box|jpnum3=030/035}} | |||
{{cardlist/footer|Psychic}} | |||
==Trivia== | ==Trivia== | ||
* In {{game|Emerald}}, Mossdeep Gym is tied with [[Lumiose Gym]] for the highest amount of common | * In {{game|Emerald}}, Mossdeep Gym is tied with [[Lumiose Gym]] for the highest amount of common {{pkmn|Trainer}}s out of all the [[Gym]]s in the series, with twelve. | ||
{{-}} | {{-}} | ||
{{Gym Leaders of Hoenn}} | {{Gym Leaders of Hoenn}} | ||
| Line 514: | Line 645: | ||
[[de:Pokémon-Arena von Moosbach City]] | [[de:Pokémon-Arena von Moosbach City]] | ||
[[es:Gimnasio Pokémon de Ciudad Algaria]] | |||
[[fr:Arène d'Algatia]] | [[fr:Arène d'Algatia]] | ||
[[it:Palestra di Verdeazzupoli]] | [[it:Palestra di Verdeazzupoli]] | ||
[[ja:トクサネジム]] | [[ja:トクサネジム]] | ||
[[zh:綠嶺道館]] | |||
Revision as of 15:47, 31 March 2020
| Mossdeep Gym トクサネジム Tokusane Gym | |
| |
| Location | Mossdeep City |
| Gym Leader | Tate and Liza |
| Badge | Mind Badge |
| Dominant Type | Psychic |
| Region | Hoenn |
| |
| Battlefield | |
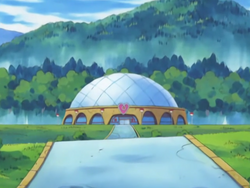
The Mossdeep Gym (Japanese: トクサネジム Tokusane Gym) is the official Gym of Mossdeep City. It is based on Psychic-type Pokémon. The Gym Leaders are Tate and Liza. Trainers who defeat them receive the Mind Badge.
In the games
Generation III
In Ruby and Sapphire, the Gym's floor is covered with tiles similar to spin tiles that whisk the player across to another area of the Gym when stepped on. Pulling switches changes the direction certain tiles point, allowing the player to reach Tate and Liza when all the switches are pulled. A warp tile next to them warps the player back to the entrance.
In Emerald, the Gym is similar to Saffron Gym in that it is a series of rooms connected by warp tiles. Each room contains Trainers and obstacles on spin tiles that rotate when certain tiles are stepped on, changing the path and often bringing the sight of enemy Trainers in-line with the player. Mossdeep Gym is the only Gym in Emerald to change its gimmick so drastically. Also, although other Trainers and statues spin on the spin tiles, the player is unaffected by them.
At least one of the Gym Trainers must be battled in order to reach Tate and Liza.
Generation VI
In Omega Ruby and Alpha Sapphire, the Gym is entirely redesigned. Platforms are connected by strings of energy orbs that automatically direct the player between them. The player must inspect stones on the various platforms to change which orbs are lit up, and thus which paths they can take through the Gym.
When defeated, Tate and Liza will give the player the Mind Badge as well as TM04 (Calm Mind) as a reward.
Appearance
| Ruby | Sapphire | Emerald | Omega Ruby | Alpha Sapphire |
|---|---|---|---|---|
|
|
| ||
Trainers
Pokémon Ruby and Sapphire
| Trainer | Pokémon | |||||||||||
|---|---|---|---|---|---|---|---|---|---|---|---|---|
|
| |||||||||||
|
| |||||||||||
| ||||||||||||
|
| |||||||||||
|
| |||||||||||
| ||||||||||||
| ||||||||||||
|
| |||||||||||
| ||||||||||||
|
| |||||||||||
| ||||||||||||
| Trainers with a PokéNav by their names will be registered in the Trainer's Eyes or Match Call function after the first battle, and may have a rematch with the player with higher-level Pokémon. | ||||||||||||
|
|||||||||||||||||||||||||||||||||||||||||||||||||||||||
| |||||||||||||||||||||||||||||||||||||||||||||||||||||||
Pokémon Emerald
| Trainer | Pokémon | |||||||||||
|---|---|---|---|---|---|---|---|---|---|---|---|---|
| Entrance room | ||||||||||||
|
| |||||||||||
|
| |||||||||||
| West-central room | ||||||||||||
|
| |||||||||||
|
| |||||||||||
| Southeast room | ||||||||||||
|
| |||||||||||
|
| |||||||||||
|
| |||||||||||
|
| |||||||||||
| Northwest room | ||||||||||||
|
| |||||||||||
|
| |||||||||||
|
| |||||||||||
|
| |||||||||||
| Trainers with a PokéNav by their names will be registered in the Trainer's Eyes or Match Call function after the first battle, and may have a rematch with the player with higher-level Pokémon. | ||||||||||||
|
|||||||||||||||||||||||||||||||||||||||||||||||||||||||||||||||||||||||||||||||||||||||||||||||||||||||||||||
| |||||||||||||||||||||||||||||||||||||||||||||||||||||||||||||||||||||||||||||||||||||||||||||||||||||||||||||
First rematch
|
||||||||||||||||||||||||||||||||||||||||||||||||||||||||||||||||||||||||||||||||||||||||||||||||||||||||||||||||||||||||||||||||||||||||
| ||||||||||||||||||||||||||||||||||||||||||||||||||||||||||||||||||||||||||||||||||||||||||||||||||||||||||||||||||||||||||||||||||||||||
Second rematch
|
|||||||||||||||||||||||||||||||||||||||||||||||||||||||||||||||||||||||||||||||||||||||||||||||||||||||||||||||||||||||||||||||||||||||||||||||||||||||||||||||||
| |||||||||||||||||||||||||||||||||||||||||||||||||||||||||||||||||||||||||||||||||||||||||||||||||||||||||||||||||||||||||||||||||||||||||||||||||||||||||||||||||
Third rematch
|
|||||||||||||||||||||||||||||||||||||||||||||||||||||||||||||||||||||||||||||||||||||||||||||||||||||||||||||||||||||||||||||||||||||||||||||||||||||||||||||||||
| |||||||||||||||||||||||||||||||||||||||||||||||||||||||||||||||||||||||||||||||||||||||||||||||||||||||||||||||||||||||||||||||||||||||||||||||||||||||||||||||||
Fourth rematch onwards
|
|||||||||||||||||||||||||||||||||||||||||||||||||||||||||||||||||||||||||||||||||||||||||||||||||||||||||||||||||||||||||||||||||||||||||||||||||||||||||||||||||
| |||||||||||||||||||||||||||||||||||||||||||||||||||||||||||||||||||||||||||||||||||||||||||||||||||||||||||||||||||||||||||||||||||||||||||||||||||||||||||||||||
Pokémon Omega Ruby and Alpha Sapphire
| Trainer | Pokémon | |||||||||||
|---|---|---|---|---|---|---|---|---|---|---|---|---|
|
| |||||||||||
|
| |||||||||||
| ||||||||||||
|
| |||||||||||
| ||||||||||||
|
| |||||||||||
| ||||||||||||
|
| |||||||||||
|
| |||||||||||
| ||||||||||||
| Trainers with a PokéNav by their names will be registered in the Trainer's Eyes or Match Call function after the first battle, and may have a rematch with the player with higher-level Pokémon. | ||||||||||||
|
|||||||||||||||||||||||||||||||||||||||||||||||||||||||||||||||||||||||
| |||||||||||||||||||||||||||||||||||||||||||||||||||||||||||||||||||||||
Items
| Item | Location | Games | |
|---|---|---|---|
| TM04 (Calm Mind) | Reward for defeating Tate and Liza | R S E OR AS | |
In spin-off games
Pokémon Masters
In Pokémon Masters, Mossdeep Gym is seen in artwork related to both Tate and Liza.
In the anime
The Mossdeep Gym first appeared in It's Still Rocket Roll to Me!, where Ash and his friends arrived there for Ash's Gym battle, only to learn that everyone at the Gym had left to witness a space shuttle launch at the Mossdeep Space Center.
In Solid as a Solrock, Ash challenged Tate and Liza to a Gym battle at the Gym, using his Pikachu and Swellow against Solrock and Lunatone. Although they were powerful opponents, Tate and Liza ended up inadvertently sabotaging each other and subsequently had an argument, giving Ash a chance for a counterattack. However, the battle was interrupted by Team Rocket bursting through the Gym's roof with their newest robot to steal Solrock and Lunatone. Although Team Rocket was soon defeated and the stolen Pokémon were recovered, the Gym was so badly damaged by their attack that Ash's Gym battle had to continue outdoors. With the battle against Team Rocket having restored Tate and Liza's teamwork, Ash had trouble overcoming their strategies, but he eventually came up with a strategy of his own and ultimately defeated his opponents, earning him the Mind Badge.
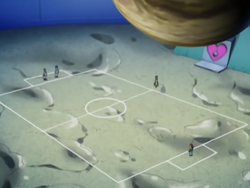
The Gym's battlefield has multiple planet-like objects floating around in the air, making it three-dimensional. The battles are refereed by Tate and Liza's mother, Rachel.
Pokémon used in Gym
Used by Liza
|
||
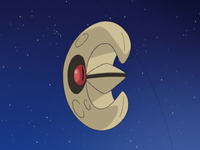
Liza's Lunatone is the Pokémon she uses in all of her Gym battles. When the twins battled each other in It's Still Rocket Roll to Me!, Lunatone won the battle for Liza. She later used it against Team Rocket after they failed to steal a space shuttle from the Mossdeep Space Center. In Solid as a Solrock!, it fought with Tate's Solrock against Ash's Pikachu and Swellow but lost. | ||
| Debut | It's Still Rocket Roll to Me! | |
|---|---|---|
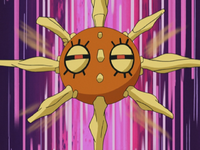
Used by Tate
|
||
Tate's Solrock is the Pokémon he uses in all of his Gym battles. In It's Still Rocket Roll to Me!, it battled Liza's Lunatone but lost. Later, in Solid as a Solrock!, it fought with Liza's Lunatone against Ash's Pikachu and Swellow but lost. | ||
| Debut | It's Still Rocket Roll to Me! | |
|---|---|---|
In the TCG
The following is a list of cards mentioning or featuring Mossdeep City Gym in the Pokémon Trading Card Game.
| Mossdeep Gym Cards listed with a blue background are only legal to use in the current Expanded format. Cards listed with a green background are legal to use in both the current Standard and Expanded formats. | |||||||
|---|---|---|---|---|---|---|---|
| Card | Type | English Expansion |
Rarity | # | Japanese Expansion |
Rarity | # |
| Tate & Liza | Su | Celestial Storm | 148/168 | Sky-Splitting Charisma | 091/096 | ||
| SM-P Promotional cards | 296/SM-P | ||||||
| Tag Team GX Premium Trainer Box | 030/035 | ||||||
Trivia
- In Pokémon Emerald, Mossdeep Gym is tied with Lumiose Gym for the highest amount of common Trainers out of all the Gyms in the series, with twelve.

|
This article is part of Project Locations, a Bulbapedia project that aims to write comprehensive articles on every location in the Pokémon world. |


