
|
This article is incomplete.
Please feel free to edit this article to add missing information and complete it.
Reason: Missing encounter rates and levels, Missing list of Pokemon available only pre-National Dex
|
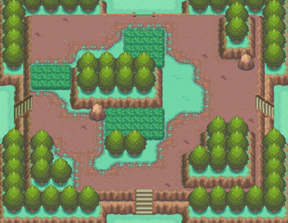
The Johto Safari Zone (Japanese: サファリゾーン Safari Zone) is a special Pokémon preserve where Trainers can capture certain types of Pokémon. The Johto Safari Zone made its debut appearance in Pokémon HeartGold and SoulSilver, where it was shown to be located northwest of Cianwood. It is located at the Safari Zone Gate, a bazaar that sprung up due to the Safari Zone's popularity. It is owned by Baoba, the owner of the former Kanto Safari Zone, which was, by then, made into a Pal Park by his son.
For $500, the player will receive 30 Safari Balls. Akin to previous Safari Zones, there is a large area to cover, but the six areas of the Zone can uniquely be rearranged to suit the player. Also, there is no time or step limit to how long the player can try to catch Pokémon. The only ways to leave are to retire, to walk back through the entrance or to run out of Safari Balls.
When a wild Pokémon appears, no Pokémon may be sent out to battle it; catching Pokémon here, as in most Safari Zones, requires sheer luck. There are four options in the battle screen: throw a Safari Ball, throw Bait, run away, and throw Mud. Throwing Bait makes a Pokémon less likely to run, but makes it harder to catch, while throwing Mud does the reverse, making it easier to catch but more likely to run.
Access to the Safari Zone is part of the storyline. When a player first arrives at Olivine City, the Gym is empty. The player must heal the Glitter Lighthouse's sick Ampharos, Amphy, to cause the Gym Leader to return to the Gym. Only then will Baoba phone the player and announce that the Safari Zone is open for business. Players can then traverse Routes 47 and 48 to get to the Safari Zone whenever they wish.
Details
This Safari Zone works identically to the Great Marsh: Pokémon are made easier or harder to catch by modifying the catch rate of a Pokémon. Each Pokémon appearing in the Safari Zone also has an escape rate, representing the probability that they flee from battle; a Pokémon's escape rate is identical across all Generation IV games (however, their escape rates are not defined in games which they cannot be found in their Great Marsh or Safari Zone). As a rule of thumb, Pokémon at higher evolutionary levels generally have lower escape rates.
At the start of an encounter, both the catch rate and escape rate are set to their species defaults. When Bait is thrown, it lowers the escape rate by one stage, but has a 90% chance of also lowering the catch rate by one stage. When Mud is thrown, it raises the catch rate by one stage, but has a 90% chance of raising the escape rate by one stage. Stages for catch rates and escape rates work identically to stat stages: they can be raised as high as +6 and as low as -6, where 0 is the starting stage; multipliers at each stat stage also work identically.
At the end of each turn, a random number between 0 and 255 is generated. If it is less than the modified stat stage, the Pokémon escapes.
Base flee rates
|
|
This section is incomplete.
Please feel free to edit this section to add missing information and complete it.
|
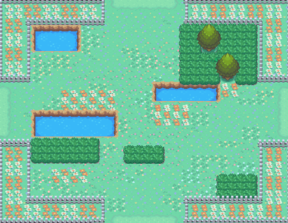
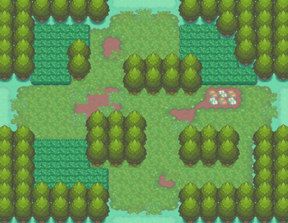
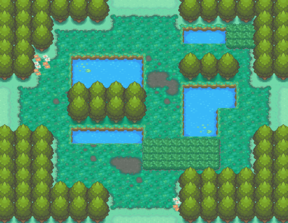
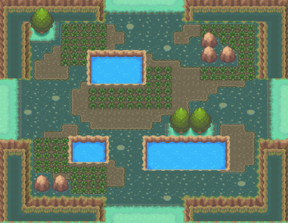
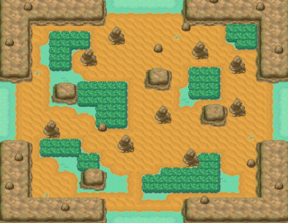
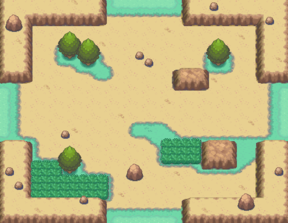
Areas
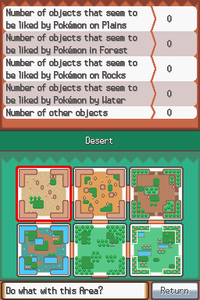
The six areas of the Safari Zone
Like the Safari Zone in Hoenn and Great Marsh in Sinnoh, the Johto Safari Zone has six areas, which are inhabited by different Pokémon. A feature unique to this Safari Zone, however, is the customization of these areas. Each of the six areas may be placed in any arrangement the player desires. This is a useful function, as it means the player does not have to traverse to the furthest area from the entrance to get the Pokémon living in it. This is taken even further due to the fact that there are 10 unique defaults from the moment the Safari Zone is unlocked.
Customization happens on the Nintendo DS touch screen. By dragging and sliding the tiles with the stylus, the player can move them with ease. The exits to each area are arranged so that every conceivable arrangement of areas is possible: up to 2,985,984. In each specific area, the player can choose from several different objects and put up to 30 into the area, which can potentially draw out rarer Pokémon, Pokémon not found in the area, or Pokémon not found in the zone any other way. The specific layout of the Safari Zone may be shared by multiple players at one time, like other events in Generation IV, through record mixing or by using the Safari Zone Link.
Default area layouts
There are ten possible layouts that the areas can be arranged in by default when the player first reaches the Safari Zone. Between the ten default layouts, all of the areas are utilized at least once with the exceptions of the Desert and Rocky Beach areas; each default arrangement positions the Peak area right in front of the entrance. Six more areas can be added once Baoba's second challenge is assigned to the player.
| Layout
|
Area Setup
|
| 1
|
Plains
|
Swamp
|
Meadow
|
| Wetland
|
Peak
|
Forest
|
|
|
| 2
|
Meadow
|
Marshland
|
Wetland
|
| Forest
|
Peak
|
Swamp
|
|
|
| 3
|
Wetland
|
Wasteland
|
Forest
|
| Swamp
|
Peak
|
Marshland
|
|
|
| 4
|
Forest
|
Mountain
|
Swamp
|
| Marshland
|
Peak
|
Wasteland
|
|
|
| 5
|
Swamp
|
Savannah
|
Marshland
|
| Wasteland
|
Peak
|
Mountain
|
|
|
| 6
|
Marshland
|
Plains
|
Wasteland
|
| Mountain
|
Peak
|
Savannah
|
|
|
| 7
|
Wasteland
|
Meadow
|
Mountain
|
| Savannah
|
Peak
|
Plains
|
|
|
| 8
|
Mountain
|
Wetland
|
Savannah
|
| Plains
|
Peak
|
Meadow
|
|
|
| 9
|
Savannah
|
Forest
|
Plains
|
| Meadow
|
Peak
|
Wetland
|
|
|
| 10
|
Plains
|
Savannah
|
Wetland
|
| Swamp
|
Peak
|
Wasteland
|
Challenges
First Challenge
When the player first visits the Safari Zone, its owner, Baoba, will give the player their first challenge of finding and catching a Geodude inside of the Safari Zone. No matter which of the 10 possible default Safari Zone area set-ups is in use, the Peak Area where Geodude can be found is always the first area that the player enters.
Second Challenge
Three game-play hours after completion of the first challenge, Baoba will call the player and give them their second challenge. The point of this challenge is to get the player to use the Area Customizer, a machine that allows the player to move around and order the different areas of the Safari Zone. Using the Area Customizer to add the Desert Area, the player must catch a Sandshrew. When Baoba is shown a captured Sandshrew, he makes the player the new Safari Zone Owner.
Blocks
After the player has both received the National Pokédex from Professor Oak, and 3 hours of gameplay have passed after completion of Baoba's second challenge, Baoba will call the player to tell them that he has come up with a new idea for the Safari Zone. After receiving this call, the player will be able to place blocks in each active area of the Safari Zone. Each active area can contain up to 30 blocks at one time. Initially, the player will have access to only 6 block items. After another 3 hours of gameplay, Baoba will call the player again and add 6 new blocks. This cycle will repeat 2 more times until the player has been granted access to all 24 different block items.
| Type
|
Name
|
| Plains
|
Shrubbery
|
| Red Flower
|
| White Flower
|
| Forest
|
Tree
|
| Stump
|
| Branches
|
| Peak
|
Small Rock
|
| Big Rock
|
| Mossy Rock
|
| Waterside
|
Puddle
|
| Fountain
|
| Water Hole
|
| Other
|
Guidepost (R)
|
| Guidepost (L)
|
| Trash Can
|
| Long Fence 1
|
| Long Fence 2
|
| Your Statue
|
| Bench
|
| Your Flag
|
| Outside Lamp
|
| Short Fence 1
|
| Short Fence 2
|
| Signboard
|
Area upgrades
Each active area of the Safari Zone keeps a hidden counter of how many days it has been active. After being active for ten days, a certain block type will be upgraded for each active area. Baoba will call to notify the player when this occurs. Once an area has been upgraded, the upgrade will not disappear if the player moves the area to be inactive or removes any blocks currently in the area. Each upgrade acts a multiplier for certain block types within the area. For example, a Plains block in an area with no upgrades counts as a single Plains block point. A Plains block in an area with one Plains upgrade counts as two Plains block points.
The day counter for each active area of the safari zone is not related to the internal game clock. In order to achieve area upgrades, the player must actually play the game on different days to increment the counters.
| Day
|
Block
|
Upgrade
|
| 10
|
Plains
|
Double block value
|
| 20
|
Forest
|
| 30
|
Peak
|
| 40
|
Waterside
|
| 50
|
Plains
|
Triple block value
|
| 60
|
Forest
|
| 70
|
Peak
|
| 80
|
Waterside
|
| 100
|
Plains
|
Quadruple block value
|
| 110
|
Forest
|
| 120
|
Peak
|
| 130
|
Waterside
|
Items
| Item
|
Location
|
Games
|

|
Safari Ball ×30
|
From the receptionist in the entrance building, to be used in the Safari Game, cannot be kept
|
HG SS
|
|
|
Pokémon
Many Pokémon are found in the Safari Zone with no additional input needed by the player. Other Pokémon will only appear if certain block objects are placed within each area. For example, Fearow will not appear in the Peak area unless there are five Forest objects placed in the Peak area. Some Pokémon need two types of block objects in order to appear. For example, Vigoroth requires both Plains and Forest objects.
The area upgrade mechanic within the Safari Zone is key to being able to encounter the more rare Pokémon types. For example, to encounter a Bagon within the Swamp area, the player must have unlocked the block capability and received enough notifications from Baoba that both Peak and Forest block items are available for placement. The Swamp area must then be made an active area within the Safari Zone for 120 days. This quadruples the block score for each forest and peak block placed within it. The player can then place 14 peak blocks (14*4=56) and 9 forest blocks (9*4=36), which achieves the required scores of 56 and 35 respectively to enable Bagon.
In all areas, there are 10 encounter slots which give to the Pokémon present a 10% chance to appear. All the Pokémon that appear due to blocks have a 10% chance to appear; however, some Pokémon can be in two slots, which gives them a 20% chance to appear.
The Safari Zone is not listed as a Pokédex area. Any Pokémon that can be encountered only here will have the area listed as “AREA UNKNOWN”.
Peak
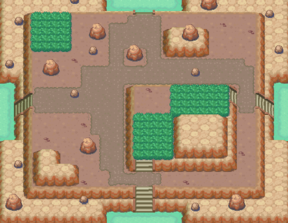
Peak Area of the Johto Safari Zone
| Pokémon
|
Location
|
Block 1
|
Block 2
|
Level
|
ID
|
Time
|

|
Fearow
|
Walking
|
Forest
|
5
|
---
|
44
|
10%
|
Any
|

|
Paras
|
Walking
|
Forest
|
3
|
---
|
42
|
10%
|
Any
|

|
Geodude
|
Walking
|
---
|
---
|
15-17
|
40%
|
Any
|

|
Graveler
|
Walking
|
---
|
---
|
16-17
|
20%
|
Morning/Day
|

|
Slowbro
|
Walking
|
Waterside
|
5
|
---
|
45
|
10%
|
Any
|

|
Magnemite
|
Walking
|
---
|
---
|
15-16
|
20%
|
Any
|

|
Magneton
|
Walking
|
---
|
---
|
17
|
20%
|
Any
|

|
Magmar
|
Walking
|
---
|
---
|
17
|
10%
|
Morning/Day
|
| Peak
|
10
|
---
|
41
|
10%
|

|
Wobbuffet
|
Walking
|
---
|
---
|
16-17
|
10%
|
Night
|
| Peak
|
10
|
---
|
41
|
10%
|

|
Linoone
|
Walking
|
Plains
|
5
|
---
|
46
|
10%
|
Any
|

|
Vigoroth
|
Walking
|
Forest
|
56
|
Plains
|
28
|
47
|
10%
|
Any
|

|
Lairon
|
Walking
|
Peak
|
24
|
---
|
45
|
10%
|
Any
|

|
Zangoose
|
Walking
|
Plains
|
12
|
---
|
43-45
|
10%
|
Any
|

|
Spheal
|
Walking
|
Waterside
|
35
|
---
|
44-45
|
10%
|
Any
|

|
Bronzor
|
Walking
|
Peak
|
35
|
Forest
|
14
|
45-46
|
10%
|
Any
|
Desert
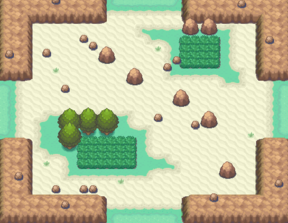
Desert Area of the Johto Safari Zone
| Pokémon
|
Location
|
Block 1
|
Block 2
|
Level
|
ID
|
Time
|
|
|
Fearow
|
Walking
|
---
|
---
|
15-17
|
30%
|
Night
|
| Plains
|
3
|
---
|
38
|
10%
|
Any
|
| Peak
|
6
|
---
|
41
|
10%
|
Night
|

|
Sandshrew
|
Walking
|
---
|
---
|
15-17
|
40%
|
Any
|

|
Sandslash
|
Walking
|
---
|
---
|
15-17
|
30%
|
Any
|

|
Cubone
|
Walking
|
---
|
---
|
16-17
|
20%
|
Morning/Day
|

|
Marowak
|
Walking
|
---
|
---
|
17
|
10%
|
Morning/Day
|
| Peak
|
6
|
---
|
41
|
10%
|

|
Lotad
|
Walking
|
Waterside
|
8
|
---
|
38
|
10%
|
Any
|

|
Spinda
|
Walking
|
Plains
|
14
|
---
|
45
|
10%
|
Any
|

|
Trapinch
|
Walking
|
Peak
|
50
|
---
|
46-47
|
10%
|
Any
|

|
Vibrava
|
Walking
|
Forest
|
49
|
---
|
44-45
|
10%
|
Any
|

|
Cacnea
|
Walking
|
Forest
|
35
|
---
|
35
|
10%
|
Any
|

|
Cacturne
|
Walking
|
Waterside
|
42
|
---
|
48
|
10%
|
Any
|

|
Hippopotas
|
Walking
|
Peak
|
28
|
---
|
43
|
10%
|
Any
|

|
Carnivine
|
Walking
|
Plains
|
49
|
---
|
48
|
10%
|
Any
|
Plains
Plains Area of the Johto Safari Zone
| Pokémon
|
Location
|
Block 1
|
Block 2
|
Level
|
ID
|
Time
|

|
Rattata
|
Walking
|
---
|
---
|
15-17
|
30%
|
Morning/Day
|

|
Raticate
|
Walking
|
---
|
---
|
16-17
|
30%
|
Night
|

|
Abra
|
Walking
|
---
|
---
|
15-17
|
30%
|
Any
|

|
Ponyta
|
Walking
|
Peak
|
5
|
---
|
42
|
10%
|
Any
|

|
Girafarig
|
Walking
|
---
|
---
|
15
|
10%
|
Any
|
| ---
|
---
|
17
|
10%
|
Morning/Day
|
| Plains
|
3
|
---
|
40
|
10%
|
Any
|

|
Houndoom
|
Walking
|
Peak
|
10
|
---
|
43-44
|
10%
|
Any
|

|
Stantler
|
Walking
|
---
|
---
|
17
|
40%
|
Night
|
| Plains
|
3
|
---
|
40
|
10%
|

|
Smeargle
|
Walking
|
---
|
---
|
17
|
10%
|
Morning/Day
|
| Forest
|
3
|
---
|
41
|
10%
|

|
Zigzagoon
|
Walking
|
Forest
|
15
|
---
|
44
|
10%
|
Any
|
|
|
Lotad
|
Walking
|
Waterside
|
12
|
---
|
42
|
10%
|
Any
|

|
Surskit
|
Walking
|
Waterside
|
28
|
---
|
46
|
10%
|
Any
|

|
Manectric
|
Walking
|
Plains
|
15
|
---
|
45
|
10%
|
Any
|
|
|
Zangoose
|
Walking
|
Peak
|
15
|
---
|
43-45
|
10%
|
Any
|

|
Shinx
|
Walking
|
Plains
|
10
|
---
|
43-44
|
10%
|
Any
|
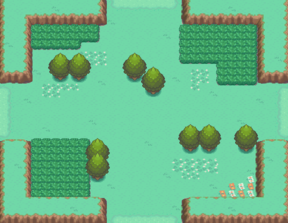
Meadow
Meadow Area of the Johto Safari Zone
| Pokémon
|
Location
|
Block 1
|
Block 2
|
Level
|
ID
|
Time
|
|
|
Raticate
|
Walking
|
Plains
|
5
|
---
|
40
|
15%
|
Any
|

|
Clefairy
|
Walking
|
---
|
---
|
17
|
10%
|
Night
|
| Peak
|
3
|
---
|
42
|
10%
|

|
Jigglypuff
|
Walking
|
---
|
---
|
15-17
|
40%
|
Any
|

|
Poliwag
|
Old Rod
|
---
|
---
|
12-15
|
Unknown
|
Any
|
| Good Rod
|
---
|
---
|
22-24
|
Unknown
|
| Super Rod
|
---
|
---
|
35-36
|
Unknown
|

|
Poliwhirl
|
Old Rod
|
Waterside
|
2
|
---
|
15
|
Unknown
|
Any
|
| Waterside
|
3
|
---
|
16
|
Unknown
|
| Good Rod
|
---
|
---
|
24-25
|
Unknown
|
| Waterside
|
5
|
---
|
27
|
Unknown
|
| Super Rod
|
---
|
---
|
35-37
|
Unknown
|
|
|
Geodude
|
Walking
|
Peak
|
3
|
---
|
45
|
10%
|
Any
|

|
Chansey
|
Walking
|
Plains
|
12
|
---
|
42
|
Unknown
|
Any
|

|
Magikarp
|
Surf
|
---
|
---
|
15-17
|
Unknown
|
Any
|
| Old Rod
|
---
|
---
|
12-15
|
Unknown
|
| Good Rod
|
---
|
---
|
22-24
|
Unknown
|

|
Gyarados
|
Good Rod
|
Waterside
|
7
|
---
|
28
|
Unknown
|
Any
|
| Super Rod
|
Waterside
|
10
|
---
|
42
|
Unknown
|
| Super Rod
|
Waterside
|
14
|
---
|
45
|
Unknown
|

|
Marill
|
Walking
|
---
|
---
|
15-17
|
20%
|
Night
|
| Surf
|
---
|
---
|
16-17
|
Unknown
|
Any
|

|
Hoppip
|
Walking
|
---
|
---
|
15-17
|
30%
|
Morning/Day
|

|
Skiploom
|
Walking
|
---
|
---
|
17
|
10%
|
Morning/Day
|
| Forest
|
8
|
---
|
40
|
10%
|
Any
|
| Surf
|
Waterside
|
3
|
---
|
47
|
Unknown
|

|
Sunkern
|
Walking
|
---
|
---
|
15-17
|
20%
|
Day
|

|
Wooper
|
Walking
|
---
|
---
|
15-17
|
30%
|
Night
|
| Waterside
|
3
|
---
|
40
|
Unknown
|
Any
|
| Surf
|
---
|
---
|
15-17
|
Unknown
|

|
Seedot
|
Walking
|
Plains
|
35
|
---
|
45
|
Unknown
|
Any
|

|
Nuzleaf
|
Walking
|
Forest
|
28
|
---
|
38
|
10%
|
Any
|
| Forest
|
35
|
---
|
48
|
10%
|

|
Masquerain
|
Surf
|
Waterside
|
10
|
---
|
42
|
Unknown
|
Any
|
| Waterside
|
14
|
---
|
46
|
Unknown
|

|
Nosepass
|
Walking
|
Peak
|
35
|
---
|
45
|
10%
|
Any
|

|
Riolu
|
Walking
|
Peak
|
42
|
Forest
|
28
|
45-46
|
Unknown
|
Any
|
Forest
Forest Area of the Johto Safari Zone
| Pokémon
|
Location
|
Block 1
|
Block 2
|
Level
|
ID
|
Time
|

|
Pidgey
|
Walking
|
---
|
---
|
15-17
|
20%
|
Morning/Day
|

|
Bellsprout
|
Walking
|
---
|
---
|
15-17
|
45%
|
Any
|

|
Gastly
|
Walking
|
---
|
---
|
15-17
|
10%
|
Night
|

|
Haunter
|
Walking
|
---
|
---
|
16-17
|
25%
|
Night
|

|
Lickitung
|
Walking
|
Waterside
|
3
|
---
|
40
|
Unknown
|
Any
|

|
Mr. Mime
|
Walking
|
---
|
---
|
16-17
|
15%
|
Morning/Day
|
| Walking
|
Plains
|
3
|
---
|
45
|
15%
|
Any
|

|
Electabuzz
|
Walking
|
Peak
|
4
|
---
|
41
|
10%
|
Any
|

|
Misdreavus
|
Walking
|
---
|
---
|
15-17
|
15%
|
Any
|
| Walking
|
Forest
|
4
|
---
|
42
|
15%
|
|
|
Surskit
|
Walking
|
Waterside
|
24
|
---
|
42
|
Unknown
|
Any
|

|
Shuppet
|
Walking
|
Forest
|
35
|
---
|
46
|
5%
|
Any
|

|
Beldum
|
Walking
|
Peak
|
63
|
---
|
44
|
Unknown
|
Any
|

|
Bidoof
|
Walking
|
Waterside
|
10
|
---
|
40
|
Unknown
|
Any
|

|
Budew
|
Walking
|
Plains
|
24
|
---
|
47
|
Unknown
|
Any
|

|
Bronzong
|
Walking
|
Peak
|
56
|
Forest
|
35
|
45
|
Unknown
|
Any
|
Swamp
Swamp Area of the Johto Safari Zone
| Pokémon
|
Location
|
Block 1
|
Block 2
|
Level
|
ID
|
Time
|
|
|
Jigglypuff
|
Walking
|
---
|
---
|
16-17
|
40%
|
Morning/Day
|
|
|
Paras
|
Walking
|
---
|
---
|
15-17
|
20%
|
Morning/Day
|

|
Parasect
|
Walking
|
Plains
|
3
|
---
|
41
|
10%
|
Any
|

|
Weepinbell
|
Walking
|
Forest
|
8
|
---
|
46
|
~22.41%
|
Any
|

|
Drowzee
|
Walking
|
---
|
---
|
15-17
|
10%
|
Night
|

|
Hypno
|
Walking
|
---
|
---
|
16-17
|
15%
|
Night
|
| Walking
|
Forest
|
5
|
---
|
37
|
10%
|

|
Voltorb
|
Walking
|
Peak
|
10
|
---
|
42
|
Unknown
|
Any
|

|
Goldeen
|
Good Rod
|
---
|
---
|
22-24
|
30%
|
Any
|
| Super Rod
|
---
|
---
|
35-37
|
50%
|
| Surf
|
---
|
---
|
15-17
|
50%
|
| Old Rod
|
Waterside
|
2
|
---
|
17
|
Unknown
|

|
Seaking
|
Good Rod
|
---
|
---
|
24-27
|
20%
|
Any
|
| Super Rod
|
---
|
---
|
35-37
|
30%
|
| Old Rod
|
Waterside
|
3
|
---
|
17
|
Unknown
|
| Good Rod
|
Waterside
|
6
|
---
|
24-25
|
Unknown
|
| Surf
|
Waterside
|
4
|
---
|
42
|
Unknown
|
|
|
Magikarp
|
Old Rod
|
---
|
---
|
12-15
|
100%
|
Any
|
| Good Rod
|
---
|
---
|
22-24
|
50%
|
| Surf
|
---
|
---
|
15-17
|
50%
|

|
Dratini
|
Super Rod
|
---
|
---
|
36-37
|
20%
|
Any
|
| Good Rod
|
Waterside
|
10
|
---
|
29
|
Unknown
|

|
Dragonair
|
Super Rod
|
Waterside
|
15
|
---
|
42
|
Unknown
|
Any
|
| Super Rod
|
Waterside
|
20
|
---
|
45
|
Unknown
|

|
Sentret
|
Walking
|
---
|
---
|
15-17
|
30%
|
Any
|

|
Furret
|
Walking
|
Plains
|
5
|
---
|
42
|
10%
|
Any
|

|
Murkrow
|
Walking
|
---
|
---
|
15-17
|
10%
|
Any
|
| Walking
|
Forest
|
5
|
---
|
37
|
~13.79%
|
Morning/Day
|
| Surf
|
Waterside
|
10
|
---
|
47
|
Unknown
|
Any
|

|
Duskull
|
Walking
|
Peak
|
28
|
---
|
38
|
Unknown
|
Any
|
| Surf
|
Waterside
|
35
|
---
|
48
|
Unknown
|

|
Chimecho
|
Walking
|
Forest
|
15
|
---
|
46-47
|
~22.41%
|
Any
|

|
Bagon
|
Walking
|
Peak
|
56
|
Forest
|
35
|
45
|
Unknown
|
Any
|

|
Pachirisu
|
Walking
|
Plains
|
10
|
---
|
47
|
20%
|
Any
|

|
Floatzel
|
Walking
|
Waterside
|
10
|
---
|
44
|
Unknown
|
Any
|
Marshland
Marshland Area of the Johto Safari Zone
| Pokémon
|
Location
|
Block 1
|
Block 2
|
Level
|
ID
|
Time
|

|
Ekans
|
Walking
|
---
|
---
|
15-17
|
20%
|
Morning/Day
|

|
Arbok
|
Walking
|
---
|
---
|
17
|
10%
|
Morning/Day
|

|
Oddish
|
Walking
|
---
|
---
|
15-17
|
5%
|
Night
|

|
Gloom
|
Walking
|
---
|
---
|
16-17
|
25%
|
Night
|
| Walking
|
Plains
|
2
|
---
|
42
|
Unknown
|
Any
|

|
Diglett
|
Walking
|
Peak
|
5
|
---
|
43
|
10%
|
Any
|
|
|
Poliwag
|
Old Rod
|
---
|
---
|
12-15
|
Unknown
|
Any
|
| Surf
|
---
|
---
|
16-17
|
Unknown
|
| Old Rod
|
Waterside
|
2
|
---
|
15-17
|
Unknown
|
| Old Rod
|
Waterside
|
3
|
---
|
16-18
|
Unknown
|
|
|
Poliwhirl
|
Good Rod
|
---
|
---
|
22
|
~25%
|
Any
|
| Super Rod
|
---
|
---
|
35-37
|
Unknown
|

|
Grimer
|
Walking
|
---
|
---
|
16-17
|
Unknown
|
Morning/Day
|
| Surf
|
---
|
---
|
15-17
|
Unknown
|
Any
|

|
Muk
|
Walking
|
Waterside
|
8
|
---
|
38
|
Unknown
|
Any
|
| Surf
|
Waterside
|
16
|
---
|
48
|
Unknown
|

|
Koffing
|
Walking
|
---
|
---
|
15-17
|
10%
|
Any
|

|
Weezing
|
Walking
|
---
|
---
|
15-17
|
Unknown
|
Morning/Day
|
|
|
Magikarp
|
Old Rod
|
---
|
---
|
12-15
|
Unknown
|
Any
|
| Good Rod
|
---
|
---
|
22-24
|
~75%
|
|
|
Gyarados
|
Super Rod
|
---
|
---
|
36-37
|
Unknown
|
Any
|
| Good Rod
|
Waterside
|
3
|
---
|
26-27
|
Unknown
|
| Good Rod
|
Waterside
|
4
|
---
|
28-29
|
Unknown
|

|
Jumpluff
|
Walking
|
Plains
|
5
|
---
|
38
|
Unknown
|
Any
|
| Surf
|
Waterside
|
10
|
---
|
47
|
Unknown
|
|
|
Wooper
|
Walking
|
---
|
---
|
15-17
|
10%
|
Night
|
| Surf
|
---
|
---
|
15-17
|
Unknown
|
Any
|

|
Quagsire
|
Surf
|
Waterside
|
13
|
---
|
43
|
Unknown
|
Any
|

|
Shuckle
|
Walking
|
Peak
|
8
|
---
|
44
|
10%
|
Any
|

|
Roselia
|
Walking
|
Forest
|
49
|
---
|
46
|
10%
|
Any
|

|
Seviper
|
Walking
|
Plains
|
35
|
---
|
47
|
Unknown
|
Any
|

|
Barboach
|
Super Rod
|
Waterside
|
4
|
---
|
42
|
Unknown
|
Any
|
| Super Rod
|
Waterside
|
5
|
---
|
45
|
Unknown
|

|
Banette
|
Walking
|
Peak
|
49
|
---
|
44
|
Unknown
|
Any
|

|
Croagunk
|
Walking
|
Forest
|
42
|
---
|
44
|
10%
|
Any
|
|
|
Carnivine
|
Walking
|
Forest
|
35
|
---
|
41
|
5%
|
Any
|
Mountain
Mountain Area of the Johto Safari Zone
| Pokémon
|
Location
|
Block 1
|
Block 2
|
Level
|
ID
|
Time
|
|
|
Rattata
|
Walking
|
---
|
---
|
15-16
|
30%
|
Morning/Day
|
| 10%
|
Night
|
|
|
Raticate
|
Walking
|
---
|
---
|
15-17
|
30%
|
Morning/Day
|

|
Zubat
|
Walking
|
---
|
---
|
15-17
|
50%
|
Night
|

|
Golbat
|
Walking
|
---
|
---
|
15-17
|
30%
|
Night
|
|
|
Magneton
|
Walking
|
---
|
---
|
17
|
10%
|
Any
|
| Walking
|
Plains
|
3
|
---
|
42
|
Unknown
|

|
Krabby
|
Walking
|
Waterside
|
3
|
---
|
43
|
Unknown
|
Any
|
|
|
Lickitung
|
Walking
|
---
|
---
|
15-17
|
20%
|
Morning/Day
|

|
Larvitar
|
Walking
|
---
|
---
|
17
|
10%
|
Morning/Day
|
| Walking
|
Peak
|
5
|
---
|
42
|
Unknown
|
Any
|

|
Meditite
|
Walking
|
Forest
|
20
|
---
|
43
|
Unknown
|
Any
|

|
Volbeat
|
Walking
|
Plains
|
10
|
---
|
46
|
Unknown
|
Any
|

|
Lunatone
|
Walking
|
Peak
|
15
|
---
|
46
|
20%
|
Any
|

|
Dusclops
|
Walking
|
Forest
|
35
|
---
|
46
|
Unknown
|
Any
|

|
Sealeo
|
Walking
|
Waterside
|
49
|
Peak
|
21
|
45
|
Unknown
|
Any
|

|
Metang
|
Walking
|
Peak
|
56
|
---
|
44
|
Unknown
|
Any
|

|
Chingling
|
Walking
|
Forest
|
10
|
---
|
38
|
Unknown
|
Any
|
Rocky Beach
Rocky Beach Area of the Johto Safari Zone
| Pokémon
|
Location
|
Block 1
|
Block 2
|
Level
|
ID
|
Time
|
|
|
Zubat
|
Walking
|
---
|
---
|
16-17
|
Unknown
|
Night
|
|
|
Poliwag
|
Surf
|
---
|
---
|
15-16
|
~30.19%
|
Any
|
|
|
Poliwhirl
|
Surf
|
---
|
---
|
15-17
|
~24.53%
|
Any
|

|
Slowpoke
|
Walking
|
---
|
---
|
16-17
|
Unknown
|
Any
|
|
|
Slowbro
|
Walking
|
---
|
---
|
17
|
Unknown
|
Any
|
| Walking
|
Peak
|
3
|
---
|
42
|
Unknown
|
| Walking
|
Waterside
|
5
|
---
|
37
|
Unknown
|

|
Doduo
|
Walking
|
---
|
---
|
17
|
Unknown
|
Morning/Day
|

|
Dodrio
|
Walking
|
Plains
|
4
|
---
|
42
|
Unknown
|
Any
|
|
|
Krabby
|
Walking
|
---
|
---
|
16-17
|
Unknown
|
Any
|
| Old Rod
|
---
|
---
|
13-15
|
30%
|
| Good Rod
|
---
|
---
|
22-25
|
40%
|
| Old Rod
|
Waterside
|
2
|
---
|
17
|
10%
|
| Old Rod
|
Waterside
|
3
|
---
|
18
|
10%
|

|
Kingler
|
Super Rod
|
---
|
---
|
38-39
|
~18.18%
|
Any
|
| Walking
|
Peak
|
8
|
---
|
40
|
Unknown
|
| Good Rod
|
Waterside
|
5
|
---
|
Unknown
|
Unknown
|
| Good Rod
|
Waterside
|
8
|
---
|
Unknown
|
Unknown
|
|
|
Goldeen
|
Old Rod
|
---
|
---
|
13-15
|
~39.13%
|
Any
|
| Good Rod
|
---
|
---
|
22
|
~16.67%
|
| Super Rod
|
---
|
---
|
35-38
|
~54.55%
|
|
|
Seaking
|
Super Rod
|
---
|
---
|
36-37
|
Unknown
|
Any
|
|
|
Magikarp
|
Old Rod
|
---
|
---
|
12-14
|
~47.83%
|
Any
|
| Good Rod
|
---
|
---
|
22
|
~50%
|
| Surf
|
---
|
---
|
15-16
|
~27.36%
|

|
Lapras
|
Surf
|
---
|
---
|
15-16
|
~17.92%
|
Any
|
| Surf
|
Waterside
|
10
|
---
|
36
|
Unknown
|
| Surf
|
Waterside
|
14
|
---
|
Unknown
|
Unknown
|
| Surf
|
Waterside
|
18
|
---
|
41-46
|
Unknown
|

|
Mareep
|
Walking
|
Forest
|
5
|
---
|
43
|
Unknown
|
Any
|

|
Aron
|
Walking
|
Peak
|
24
|
---
|
45
|
Unknown
|
Any
|

|
Electrike
|
Walking
|
Plains
|
10
|
---
|
42
|
Unknown
|
Any
|
|
|
Manectric
|
Walking
|
Forest
|
10
|
---
|
37
|
Unknown
|
Any
|

|
Corphish
|
Super Rod
|
Waterside
|
15
|
---
|
46
|
Unknown
|
Any
|
| Super Rod
|
Waterside
|
20
|
---
|
48
|
Unknown
|
|
|
Budew
|
Walking
|
Forest
|
18
|
---
|
40
|
Unknown
|
Any
|

|
Gible
|
Walking
|
Plains
|
52
|
Peak
|
68
|
44
|
Unknown
|
Any
|
Wasteland
Wasteland Area of the Johto Safari Zone
| Pokémon
|
Location
|
Block 1
|
Block 2
|
Level
|
ID
|
Time
|
|
|
Fearow
|
Walking
|
---
|
---
|
15-17
|
30-40%
|
Night
|

|
Golduck
|
Walking
|
Waterside
|
3
|
---
|
45
|
Unknown
|
Any
|

|
Machop
|
Walking
|
---
|
---
|
15-17
|
Unknown
|
Morning/Day
|

|
Machoke
|
Walking
|
---
|
---
|
17
|
Unknown
|
Morning
|
| Walking
|
Peak
|
5
|
---
|
40
|
Unknown
|
Any
|
|
|
Bellsprout
|
Walking
|
Forest
|
3
|
---
|
17
|
Unknown
|
Any
|
|
|
Magnemite
|
Walking
|
---
|
---
|
15-17
|
Unknown
|
Any
|

|
Onix
|
Walking
|
---
|
---
|
15-17
|
20%
|
Any
|
|
|
Kingler
|
Walking
|
Waterside
|
10
|
---
|
48
|
Unknown
|
Any
|

|
Kangaskhan
|
Walking
|
---
|
---
|
15-17
|
10%
|
Morning/Day
|

|
Breloom
|
Walking
|
Forest
|
42
|
---
|
46
|
Unknown
|
Any
|

|
Medicham
|
Walking
|
Forest
|
35
|
---
|
44
|
Unknown
|
Any
|
|
|
Manectric
|
Walking
|
Plains
|
3
|
---
|
41
|
Unknown
|
Any
|

|
Illumise
|
Walking
|
Plains
|
10
|
---
|
46
|
Unknown
|
Any
|

|
Solrock
|
Walking
|
Peak
|
42
|
---
|
45-46
|
Unknown
|
Any
|

|
Skorupi
|
Walking
|
Peak
|
28
|
---
|
44-45
|
10%
|
Any
|
Savannah
Savannah Area of the Johto Safari Zone
| Pokémon
|
Location
|
Block 1
|
Block 2
|
Level
|
ID
|
Time
|

|
Nidoran♀
|
Walking
|
---
|
---
|
15-17
|
~23.81%
|
Morning/Day
|

|
Nidorina
|
Walking
|
---
|
---
|
15-17
|
Unknown
|
Night
|

|
Nidoran♂
|
Walking
|
---
|
---
|
15-17
|
~14.29%
|
Morning/Day
|

|
Nidorino
|
Walking
|
---
|
---
|
15-17
|
Unknown
|
Night
|
|
|
Zubat
|
Walking
|
---
|
---
|
15-17
|
Unknown
|
Night
|
|
|
Golbat
|
Walking
|
---
|
---
|
17
|
Unknown
|
Night
|

|
Rhyhorn
|
Walking
|
---
|
---
|
17
|
Unknown
|
Morning/Day
|
| Walking
|
Peak
|
5
|
---
|
41
|
Unknown
|
Any
|

|
Rhydon
|
Walking
|
Peak
|
10
|
---
|
44
|
Unknown
|
Any
|

|
Tauros
|
Walking
|
---
|
---
|
15-17
|
~61.9%
|
Any
|
| Walking
|
Plains
|
5
|
---
|
41
|
Unknown
|
Any
|

|
Houndour
|
Walking
|
Forest
|
4
|
---
|
41-42
|
Unknown
|
Any
|
|
|
Zigzagoon
|
Walking
|
Plains
|
10
|
---
|
38
|
Unknown
|
Any
|

|
Shroomish
|
Walking
|
Forest
|
35
|
Plains
|
12
|
45
|
Unknown
|
Any
|

|
Azurill
|
Walking
|
Waterside
|
5
|
---
|
42
|
Unknown
|
Any
|

|
Torkoal
|
Walking
|
Peak
|
35
|
---
|
47
|
Unknown
|
Any
|
|
|
Cacturne
|
Walking
|
Forest
|
35
|
---
|
42
|
Unknown
|
Any
|

|
Luxio
|
Walking
|
Plains
|
24
|
---
|
45-46
|
Unknown
|
Any
|
Wetland

Wetland Area of the Johto Safari Zone
| Pokémon
|
Location
|
Block 1
|
Block 2
|
Level
|
ID
|
Time
|

|
Spearow
|
Walking
|
---
|
---
|
16-17
|
Unknown
|
Morning/Day
|

|
Psyduck
|
Walking
|
---
|
---
|
16
|
Unknown
|
Night
|
| Surf
|
---
|
---
|
16-17
|
Unknown
|
Any
|
|
|
Golduck
|
Walking
|
---
|
---
|
17
|
Unknown
|
Night
|
| Walking
|
Peak
|
5
|
---
|
40
|
Unknown
|
Any
|
| Surf
|
Waterside
|
4
|
---
|
45
|
Unknown
|
| Surf
|
Waterside
|
6
|
---
|
Unknown
|
Unknown
|
|
|
Poliwag
|
Old Rod
|
---
|
---
|
12-15
|
Unknown
|
Any
|
| Good Rod
|
---
|
---
|
22-24
|
Unknown
|
| Super Rod
|
---
|
---
|
36-37
|
Unknown
|
| Surf
|
---
|
---
|
16
|
Unknown
|
|
|
Poliwhirl
|
Old Rod
|
---
|
---
|
23-24
|
Unknown
|
Any
|
| Good Rod
|
---
|
---
|
24-25
|
Unknown
|
| Super Rod
|
---
|
---
|
35-36
|
Unknown
|
| Surf
|
---
|
---
|
17-18
|
Unknown
|

|
Farfetch'd
|
Walking
|
---
|
---
|
15-17
|
Unknown
|
Morning/Day
|
| Walking
|
Forest
|
3
|
---
|
41
|
Unknown
|
Any
|
|
|
Doduo
|
Walking
|
Peak
|
4
|
---
|
45-46
|
Unknown
|
Any
|
|
|
Magikarp
|
Old Rod
|
---
|
---
|
12-15
|
Unknown
|
Any
|
|
|
Gyarados
|
Super Rod
|
Waterside
|
6
|
---
|
Unknown
|
Unknown
|
Any
|
| Super Rod
|
Waterside
|
9
|
---
|
47
|
Unknown
|

|
Ditto
|
Walking
|
---
|
---
|
17
|
Unknown
|
Morning/Day
|
| Walking
|
Waterside
|
15
|
---
|
41
|
Unknown
|
Any
|
|
|
Sentret
|
Walking
|
---
|
---
|
15-17
|
Unknown
|
Morning/Day
|
|
|
Furret
|
Walking
|
Plains
|
2
|
---
|
37
|
Unknown
|
Any
|
|
|
Wooper
|
Walking
|
---
|
---
|
16-17
|
Unknown
|
Night
|
| Surf
|
---
|
---
|
15-16
|
Unknown
|
Any
|
|
|
Quagsire
|
Walking
|
---
|
---
|
16-17
|
Unknown
|
Night
|
| Surf
|
---
|
---
|
16-17
|
Unknown
|
Any
|
| Surf
|
Waterside
|
3
|
---
|
37
|
Unknown
|

|
Lombre
|
Walking
|
Plains
|
14
|
---
|
47
|
Unknown
|
Any
|
|
|
Surskit
|
Walking
|
Plains
|
6
|
---
|
40
|
Unknown
|
Any
|
|
|
Corphish
|
Good Rod
|
Waterside
|
10
|
---
|
26
|
Unknown
|
Any
|
| Good Rod
|
Waterside
|
14
|
---
|
28
|
Unknown
|

|
Shelgon
|
Walking
|
Peak
|
63
|
---
|
46
|
Unknown
|
Any
|
|
|
Pachirisu
|
Walking
|
Forest
|
8
|
---
|
43
|
Unknown
|
Any
|

|
Buizel
|
Walking
|
Waterside
|
35
|
---
|
45
|
Unknown
|
Any
|
In the manga
Pokémon Adventures
In Weavile Wobbles But It Won't Fall Down, Silver ventured to the newly opened Safari Zone after hearing about it from Clair. There he participated in a Safari Game, during which he was attacked by an Arbok and he countered its attack. In the midst of battle, Eusine stopped him and lectured him about the rules of the Safari Zone, which prohibit attacking the wild Pokémon. Silver, who had recently found out about Plates, showed Eusine a Plate he has found at Whirl Islands, but did not get any reaction out of him other than confusion. His actions were, however, seen by Petrel, who attacked him and Eusine with his army of Koffing. During the following battle, Petrel revealed information about the Plates and that he defeated Lance. The battle ended as Petrel left and Silver stole the Plates he had managed to find. Some time after, Silver encountered Crystal, who was on a field trip with the children from Pokémon academy, and they decided to travel to Ecruteak City together.
Trivia
| Pokémon
|
Games
|
Location
|
Levels
|
Rate
|

|

|

|
| Fishing
|
|
|
G
|
S
|
C
|
|
10
|
85%
|
|
|
G
|
S
|
C
|
|
10
|
15%
|
|
|
G
|
S
|
C
|
|
20
|
55%
|
|
|
G
|
S
|
C
|
|
20
|
35%
|
|
|
G
|
S
|
C
|
|
20
|
10%
|
10%
|
0%
|
|
|
G
|
S
|
C
|
|
20
|
0%
|
0%
|
10%
|
|
|
G
|
S
|
C
|
|
40
|
60%
|
|
|
G
|
S
|
C
|
|
40
|
30%
|
30%
|
0%
|
|
|
G
|
S
|
C
|
|
40
|
0%
|
0%
|
30%
|
|
|
G
|
S
|
C
|
|
40
|
10%
|
| A colored background means that the Pokémon can be found in this location in the specified game. A white background with a colored letter means that the Pokémon cannot be found here.
|
- The number of Pokémon species that can be acquired in this Safari Zone is by far the largest quantity in the main series to date, and includes several species that were never before available in the wild, most notably Shelgon, Metang, Breloom, Vigoroth, and Riolu.
- This is the only Safari Zone which the player can customize.
- This is the first Safari Zone in which there is no step limit. The Hoenn Safari Zone in Pokémon Omega Ruby and Alpha Sapphire also does not have a step limit.
- The two construction workers outside of the Safari Zone, in the Safari Zone Gate, imply that they are the ones who move the Safari Zone areas; they mention that most people would think a complicated system would be in place, as well as complaining about aches and pains.
- Should the player use a wallhack to walk through the Safari Zone Gate without going through reception first, the Safari Zone will be 6 plain squares and the only Pokémon that will show up is a level 20 Rattata. However, the battle will go as it would anywhere else, instead of bringing up the Safari Zone's catching interface.
- A graphical glitch occurs in the Swamp area. Four tiles at the top of the grassy patch appear to be empty at first, but when the player (or their partner Pokémon) walks over the tiles, tall grass will appear underfoot.
In other languages


