|
|
| Line 31: |
Line 31: |
| ==Items== | | ==Items== |
| {{Itlisth|cave}} | | {{Itlisth|cave}} |
| {{Itemlist|Max Ether|Outside, on the small rock in front of the house ''(hidden)''|D=yes|P=yes}} | | {{Itemlist|Max Ether|Exterior, on the small rock in front of the house ''(hidden)''|D=yes|P=yes}} |
| {{Itemlist|Star Piece|Outside, on the small rock in front of the house ''(hidden)''|Pt=yes}} | | {{Itemlist|Star Piece|Exterior, on the small rock in front of the house ''(hidden)''|Pt=yes}} |
| {{Itemlist|Metal Coat|In the house, from [[Byron]] after obtaining the [[National Pokédex]]|D=yes|P=yes|Pt=yes}} | | {{Itemlist|Metal Coat|In the house, from [[Byron]] after obtaining the [[National Pokédex]]|D=yes|P=yes|Pt=yes}} |
| {{Itemlist|HM Normal|Outside, from Riley when the player first arrives on the Island|Pt=yes|display={{HM|04|Strength}}}} | | {{Itemlist|HM Normal|Exterior, from Riley when the player first arrives on the Island|Pt=yes|display={{HM|04|Strength}}}} |
| {{Itemlist|Yellow Shard|B1F Left, center of the room|Pt=yes}} | | {{Itemlist|Yellow Shard|B1F 1, center of the room|Pt=yes}} |
| {{Itemlist|Iron Ball|B1F Left; upper-left part of raised section|D=yes|P=yes}} | | {{Itemlist|Iron Ball|B1F 1; upper-left part of raised section|D=yes|P=yes}} |
| {{Itemlist|Protector|B1F Left, upper-left part of raised section|Pt=yes}} | | {{Itemlist|Protector|B1F 1, upper-left part of raised section|Pt=yes}} |
| {{Itemlist|Escape Rope|B1F Right, northwest of the lift|D=yes|P=yes|Pt=yes}} | | {{Itemlist|Escape Rope|B1F 2, northwest of the lift|D=yes|P=yes|Pt=yes}} |
| {{Itemlist|Super Repel|B1F Right, in front of stone northeast of Picnicker Summer|D=yes|P=yes}} | | {{Itemlist|Super Repel|B1F 2, in front of stone northeast of Picnicker Summer|D=yes|P=yes}} |
| {{Itemlist|Max Repel|B1F Right, in front of stone northeast of Picnicker Summer|Pt=yes}} | | {{Itemlist|Max Repel|B1F 2, in front of stone northeast of Picnicker Summer|Pt=yes}} |
| {{Itemlist|Tiny Mushroom|B1F Right, on pile of beams next to Picnicker Summer ''(hidden)''|D=yes|P=yes|display=[[Tiny Mushroom|TinyMushroom]]}} | | {{Itemlist|Tiny Mushroom|B1F 2, on pile of beams next to Picnicker Summer ''(hidden)''|D=yes|P=yes|display=[[Tiny Mushroom|TinyMushroom]]}} |
| {{Itemlist|Star Piece|B1F Right, to the right of the three barrels northwest of Picnicker Summer ([[Item#Recurring items|daily]]) ''(hidden)''|Pt=yes}} | | {{Itemlist|Star Piece|B1F 2, to the right of the three barrels northwest of Picnicker Summer ([[Item#Recurring items|daily]]) ''(hidden)''|Pt=yes}} |
| {{Itemlist|Revive|B1F Right, left of lift|Pt=yes}} | | {{Itemlist|Revive|B1F 2, left of lift|Pt=yes}} |
| {{Itemlist|Max Ether|B2F Right; east of Worker Willy|D=yes|P=yes}} | | {{Itemlist|Max Ether|B2F 1; east of Worker Willy|D=yes|P=yes}} |
| {{Itemlist|Elixir|B2F Right, east of Worker Noel|Pt=yes}} | | {{Itemlist|Elixir|B2F 1, east of Worker Noel|Pt=yes}} |
| {{Itemlist|TM Steel|B2F Right, in western half of pit southeast of Worker Braden|D=yes|P=yes|Pt=yes|display={{TM|23|Iron Tail}}}} | | {{Itemlist|TM Steel|B2F 1, in western half of pit southeast of Worker Braden|D=yes|P=yes|Pt=yes|display={{TM|23|Iron Tail}}}} |
| {{Itemlist|Iron|B2F Right, in eastern half of pit southeast of Worker Braden ''(hidden)''|D=yes|P=yes}} | | {{Itemlist|Iron|B2F 1, in eastern half of pit southeast of Worker Braden ''(hidden)''|D=yes|P=yes}} |
| {{Itemlist|Star Piece|B2F Right, in eastern half of pit southeast of Worker Braden ([[Item#Recurring items|daily]]) ''(hidden)''|Pt=yes}} | | {{Itemlist|Star Piece|B2F 1, in eastern half of pit southeast of Worker Braden ([[Item#Recurring items|daily]]) ''(hidden)''|Pt=yes}} |
| {{Itemlist|Full Restore|B2F Left, on barrel south of Hiker Maurice past a raised section of rock ''(hidden)''|D=yes|P=yes}} | | {{Itemlist|Full Restore|B2F 2, on barrel south of Hiker Maurice past a raised section of rock ''(hidden)''|D=yes|P=yes}} |
| {{Itemlist|Magnet|B2F Left, northeast of Black Belt Kendal and Battle Girl Tyler|D=yes|P=yes}} | | {{Itemlist|Magnet|B2F 2, northeast of Black Belt Kendal and Battle Girl Tyler|D=yes|P=yes}} |
| {{Itemlist|Ultra Ball|B2F Left, northeast of Black Belt Kendal and Battle Girl Tyler|Pt=yes|display={{ball|Ultra}}}} | | {{Itemlist|Ultra Ball|B2F 2, northeast of Black Belt Kendal and Battle Girl Tyler|Pt=yes|display={{ball|Ultra}}}} |
| {{Itemlist|Ultra Ball|B2F Left, northwest corner beside two steel drums|D=yes|P=yes|display={{ball|Ultra}}}} | | {{Itemlist|Ultra Ball|B2F 2, northwest corner beside two steel drums|D=yes|P=yes|display={{ball|Ultra}}}} |
| {{Itemlist|Dusk Ball|B2F Left, northwest corner beside two steel drums|Pt=yes|display={{ball|Dusk}}}} | | {{Itemlist|Dusk Ball|B2F 2, northwest corner beside two steel drums|Pt=yes|display={{ball|Dusk}}}} |
| {{Itemlist|Max Potion|B2F Left, southwest of Ultra Ball{{sup/4|DP}}/Dusk Ball{{sup/4|Pt}} near two small rocks|D=yes|P=yes|Pt=yes}} | | {{Itemlist|Max Potion|B2F 2, southwest of Ultra Ball{{sup/4|DP}}/Dusk Ball{{sup/4|Pt}} near two small rocks|D=yes|P=yes|Pt=yes}} |
| {{Itemlist|Magnet|B2F Left, southwest of Max Potion|Pt=yes}} | | {{Itemlist|Magnet|B2F Left, southwest of Max Potion|Pt=yes}} |
| {{Itemlist|Star Piece|B2F Left, on the raised platform south of Worker Brendon and Worker Quentin ([[Item#Recurring items|daily]]) ''(hidden)''|Pt=yes}} | | {{Itemlist|Star Piece|B2F 2, on the raised platform south of Worker Brendon and Worker Quentin ([[Item#Recurring items|daily]]) ''(hidden)''|Pt=yes}} |
| {{Itemlist|Iron Plate|B2F Left, in pit in southeast corner ''(hidden)''|D=yes|P=yes|Pt=yes}} | | {{Itemlist|Iron Plate|B2F 2, in pit in southeast corner ''(hidden)''|D=yes|P=yes|Pt=yes}} |
| {{Itemlist|Revive|B2F Left, on the barrel just west of / directly behind Ace Trainer Jonah, only accessible from the west ''(hidden)''|D=yes|P=yes}} | | {{Itemlist|Revive|B2F 2, on the barrel just west of / directly behind Ace Trainer Jonah, only accessible from the west ''(hidden)''|D=yes|P=yes}} |
| {{Itemlist|Star Piece|B2F Left, on small rock right of Ace Trainer Jonah and Ace Trainer Brenda ([[Item#Recurring items|daily]]) ''(hidden)''|Pt=yes}} | | {{Itemlist|Star Piece|B2F 2, on small rock right of Ace Trainer Jonah and Ace Trainer Brenda ([[Item#Recurring items|daily]]) ''(hidden)''|Pt=yes}} |
| {{Itemlist|HP Up|B2F Left, just north of the two Galactic Grunts|D=yes|P=yes|Pt=yes}} | | {{Itemlist|HP Up|B2F 2, just north of the two Galactic Grunts|D=yes|P=yes|Pt=yes}} |
| {{Itemlist|Red Shard|B2F Left, just northeast of Worker Brendon and Worker Quentin|Pt=yes}} | | {{Itemlist|Red Shard|B2F 2, just northeast of Worker Brendon and Worker Quentin|Pt=yes}} |
| {{Itemlist|Shiny Stone|In the exit room|D=yes|P=yes|Pt=yes}} | | {{Itemlist|Shiny Stone|B3F 1|D=yes|P=yes|Pt=yes}} |
| {{Itemlist|Metal Coat|In Registeel's cave|Pt=yes}} | | {{Itemlist|Metal Coat|B3F 2|Pt=yes}} |
| {{Itemlist|Nugget|In Registeel's cave, northwest of Metal Coat ''(hidden)''|Pt=yes}} | | {{Itemlist|Nugget|B3F 2, northwest of Metal Coat ''(hidden)''|Pt=yes}} |
| {{Itlistfoot|cave}} | | {{Itlistfoot|cave}} |
|
| |
|
| ==Pokémon== | | ==Pokémon== |
| ===Outside=== | | ===Exterior=== |
| {{catch/header|cave|4}} | | {{catch/header|cave|4}} |
| {{Catch/div|water|Surfing}} | | {{Catch/div|water|Surfing}} |
| Line 121: |
Line 121: |
| {{catch/footer|cave}} | | {{catch/footer|cave}} |
|
| |
|
| ===B2F right=== | | ===B2F 1=== |
| {{catch/header|cave|4}} | | {{catch/header|cave|4}} |
| {{catch/entry4|042|Golbat|yes|yes|no|Cave|30-31|all=10%|type1=Poison|type2=Flying}} | | {{catch/entry4|042|Golbat|yes|yes|no|Cave|30-31|all=10%|type1=Poison|type2=Flying}} |
| Line 138: |
Line 138: |
| {{catch/footer|cave}} | | {{catch/footer|cave}} |
|
| |
|
| ===B2F left=== | | ===B2F 2=== |
| While Riley is partnered with the player, the Pokémon located here (excluding [[dual-slot mode]] Pokémon) will be faced in Double Battles. | | While Riley is partnered with the player, the Pokémon located here (excluding [[dual-slot mode]] Pokémon) will be faced in Double Battles. |
|
| |
|
| Line 178: |
Line 178: |
|
| |
|
| ==Trainers== | | ==Trainers== |
| ''Note: Trainers in B2F Left may be battled either in {{pkmn|battle|Single}} or in [[Double Battle]] mode, optionally with [[Riley]] as partner.'' | | ''Note: Trainers in B2F 2 may be battled either in {{pkmn|battle|Single}} or in [[Double Battle]] mode, optionally with [[Riley]] as partner.'' |
|
| |
|
| {{Party/Single | | {{Party/Single |
| Line 210: |
Line 210: |
| ==={{game|Diamond and Pearl|s}}=== | | ==={{game|Diamond and Pearl|s}}=== |
| {{trainerheader|cave}} | | {{trainerheader|cave}} |
| {{Trainerdiv|cave|B1F Left}} | | {{Trainerdiv|cave|B1F 1}} |
| {{Trainerentry|Spr DP Camper.png|Camper|Lawrence|496|2|404|Luxio|♂|31|None|434|Stunky|♂|31|None|36=セイギ|37=Seigi}} | | {{Trainerentry|Spr DP Camper.png|Camper|Lawrence|496|2|404|Luxio|♂|31|None|434|Stunky|♂|31|None|36=セイギ|37=Seigi}} |
| {{Trainerdiv|cave|B1F Right}} | | {{Trainerdiv|cave|B1F 2}} |
| {{Trainerentry|Spr DP Picnicker.png|Picnicker|Summer|496|2|397|Staravia|♀|31|None|421|Cherrim|♀ | | {{Trainerentry|Spr DP Picnicker.png|Picnicker|Summer|496|2|397|Staravia|♀|31|None|421|Cherrim|♀ |
| |31|None|36=ナルミ|37=Narumi}} | | |31|None|36=ナルミ|37=Narumi}} |
| {{Trainerdiv|cave|B2F Right}} | | {{Trainerdiv|cave|B2F 1}} |
| {{Trainerentry|Spr DP Worker.png|Worker|Willy|1240|2|095|Onix|♂|31|None|075|Graveler|♂|31|None|36=テツジ|37=Tetsuji}} | | {{Trainerentry|Spr DP Worker.png|Worker|Willy|1240|2|095|Onix|♂|31|None|075|Graveler|♂|31|None|36=テツジ|37=Tetsuji}} |
| {{Trainerdiv|cave}} | | {{Trainerdiv|cave}} |
| {{Trainerentry|Spr DP Worker.png|Worker|Braden|1320|1|075|Graveler|♂|33|None|36=ミチテル|37=Michiteru}} | | {{Trainerentry|Spr DP Worker.png|Worker|Braden|1320|1|075|Graveler|♂|33|None|36=ミチテル|37=Michiteru}} |
| {{Trainerdiv|cave|B2F Left}} | | {{Trainerdiv|cave|B2F 2}} |
| {{Trainerentry|Spr DP Hiker.png|Hiker|Damon|992<br><small>Potential [[Double Battle]] with Maurice</small>|3|041|Zubat|♂|28|None|095|Onix|♂|31|None|042|Golbat|♂ | | {{Trainerentry|Spr DP Hiker.png|Hiker|Damon|992<br><small>Potential [[Double Battle]] with Maurice</small>|3|041|Zubat|♂|28|None|095|Onix|♂|31|None|042|Golbat|♂ |
| |31|None|36=カツオ|37=Katsuo}} | | |31|None|36=カツオ|37=Katsuo}} |
| Line 244: |
Line 244: |
| ==={{game|Platinum}}=== | | ==={{game|Platinum}}=== |
| {{trainerheader|cave}} | | {{trainerheader|cave}} |
| {{Trainerdiv|cave|B1F Left}} | | {{Trainerdiv|cave|B1F 1}} |
| {{Trainerentry|Spr DP Camper.png|Camper|Lawrence|576|2|190|Aipom|♂|34|None|419|Floatzel|♂|36|None|36=セイギ|37=Seigi}} | | {{Trainerentry|Spr DP Camper.png|Camper|Lawrence|576|2|190|Aipom|♂|34|None|419|Floatzel|♂|36|None|36=セイギ|37=Seigi}} |
| {{Trainerdiv|cave|B1F Right}} | | {{Trainerdiv|cave|B1F 2}} |
| {{Trainerentry|Spr DP Picnicker.png|Picnicker|Summer|592|1|026|Raichu|♀|37|None|36=ナルミ|37=Narumi}} | | {{Trainerentry|Spr DP Picnicker.png|Picnicker|Summer|592|1|026|Raichu|♀|37|None|36=ナルミ|37=Narumi}} |
| {{Trainerdiv|cave|B2F Right}} | | {{Trainerdiv|cave|B2F 1}} |
| {{Trainerentry|Spr DP Worker.png|Worker|Noel|1440|2|081|Magnemite|-|34|None|081|Magnemite|-|36|None|36=ヨシミツ|37=Yoshimitsu}} | | {{Trainerentry|Spr DP Worker.png|Worker|Noel|1440|2|081|Magnemite|-|34|None|081|Magnemite|-|36|None|36=ヨシミツ|37=Yoshimitsu}} |
| {{Trainerdiv|cave}} | | {{Trainerdiv|cave}} |
| {{Trainerentry|Spr DP Worker.png|Worker|Braden|1480|1|208|Steelix|♂|37|None|36=ミチテル|37=Michiteru}} | | {{Trainerentry|Spr DP Worker.png|Worker|Braden|1480|1|208|Steelix|♂|37|None|36=ミチテル|37=Michiteru}} |
| {{Trainerdiv|cave|B2F Left}} | | {{Trainerdiv|cave|B2F 2}} |
| {{Trainerentry|Spr DP Hiker.png|Hiker|Damon|1088<br><small>Potential [[Double Battle]] with Maurice</small>|3|299|Nosepass|♂|35|None|095|Onix|♂ | | {{Trainerentry|Spr DP Hiker.png|Hiker|Damon|1088<br><small>Potential [[Double Battle]] with Maurice</small>|3|299|Nosepass|♂|35|None|095|Onix|♂ |
| |33|None|208|Steelix|♂|34|None|36=カツオ|37=Katsuo}} | | |33|None|208|Steelix|♂|34|None|36=カツオ|37=Katsuo}} |
| Line 281: |
Line 281: |
| |- | | |- |
| ! style="background:#{{locationcolor/light|cave}}; {{roundytl|5px}}" | Version | | ! style="background:#{{locationcolor/light|cave}}; {{roundytl|5px}}" | Version |
| ! style="background:#{{locationcolor/light|cave}}" | Outside | | ! style="background:#{{locationcolor/light|cave}}" | Exterior |
| ! style="background:#{{locationcolor/light|cave}}" | 1F | | ! style="background:#{{locationcolor/light|cave}}" | 1F |
| ! style="background:#{{locationcolor/light|cave}}" | B1F L | | ! style="background:#{{locationcolor/light|cave}}" | B1F 1 |
| ! style="background:#{{locationcolor/light|cave}}; {{roundytr|5px}}" | B1F R | | ! style="background:#{{locationcolor/light|cave}}; {{roundytr|5px}}" | B1F 2 |
| |- | | |- |
| ! style="background:#{{diamond color}}" | {{color2|000|Pokémon Diamond and Pearl Versions|Diamond}} | | ! style="background:#{{diamond color}}" | {{color2|000|Pokémon Diamond and Pearl Versions|Diamond}} |
| Line 303: |
Line 303: |
| |} | | |} |
|
| |
|
| ===B2F, Exit room, and Registeel's room=== | | ===B2F and B3F=== |
| {| class="roundy" style="margin:auto; background: #000; border: 3px solid #{{locationcolor/dark|cave}}" | | {| class="roundy" style="margin:auto; background: #000; border: 3px solid #{{locationcolor/dark|cave}}" |
| |- | | |- |
| ! style="background:#{{locationcolor/light|cave}}; {{roundytl|5px}}" | Version | | ! style="background:#{{locationcolor/light|cave}}; {{roundytl|5px}}" | Version |
| ! style="background:#{{locationcolor/light|cave}}" | B2F L | | ! style="background:#{{locationcolor/light|cave}}" | B2F 1 |
| ! style="background:#{{locationcolor/light|cave}}" | B2F R | | ! style="background:#{{locationcolor/light|cave}}" | B2F 2 |
| ! style="background:#{{locationcolor/light|cave}}" | Exit room | | ! style="background:#{{locationcolor/light|cave}}" | B3F 1 |
| ! style="background:#{{locationcolor/light|cave}}; {{roundytr|5px}}" | {{color2|000|Registeel}}'s room | | ! style="background:#{{locationcolor/light|cave}}; {{roundytr|5px}}" | B3F 2 |
| |- | | |- |
| ! style="background:#{{diamond color}}" | {{color2|000|Pokémon Diamond and Pearl Versions|Diamond}} | | ! style="background:#{{diamond color}}" | {{color2|000|Pokémon Diamond and Pearl Versions|Diamond}} |
| | | rowspan="2" | [[File:Iron Island B2F R DP.png|200px]] |
| | rowspan="2" | [[File:Iron Island B2F L DP.png|200px]] | | | rowspan="2" | [[File:Iron Island B2F L DP.png|200px]] |
| | rowspan="2" | [[File:Iron Island B2F R DP.png|200px]]
| |
| | rowspan="2" | [[File:Iron Island Exit DP.png|200px]] | | | rowspan="2" | [[File:Iron Island Exit DP.png|200px]] |
| | | | | |
| Line 321: |
Line 321: |
| |- | | |- |
| ! style="background:#{{platinum color}}" | {{color2|000|Pokémon Platinum Version|Platinum}} | | ! style="background:#{{platinum color}}" | {{color2|000|Pokémon Platinum Version|Platinum}} |
| | | [[File:Iron Island B2F R Pt.png|200px]] |
| | [[File:Iron Island B2F L Pt.png|200px]] | | | [[File:Iron Island B2F L Pt.png|200px]] |
| | [[File:Iron Island B2F R Pt.png|200px]]
| |
| | [[File:Iron Island Exit Pt.png|200px]] | | | [[File:Iron Island Exit Pt.png|200px]] |
| | [[File:Iron Island Registeel Pt.png|200px]] | | | [[File:Iron Island Registeel Pt.png|200px]] |
| Iron Island
|
|
こうてつじま
Steel Island
|
| "Wild Missingno. appeared!"
|
|
|
|
| Map description:
|
A small, ore-rich island that is off the coast of Eterna City.
Inside the island are remnants of an iron ore mining operation from the past.
|
| Location:
|
Off the west coast of Sinnoh
|
| Region:
|
Sinnoh
|
| Generations:
|
IV
|
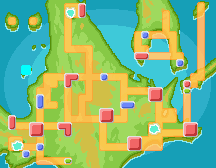
Location of Iron Island in Sinnoh.
|
| Pokémon world locations
|
Iron Island (Japanese: こうてつじま Steel Island) is an island off the northwestern coast of Sinnoh, which is only accessible by boat from Canalave City.
It was once a prosperous ore mine, but was shut down after the ore reserves dried up. Since then, it was kept open as a training area and habitat for wild Pokémon. Byron, Riley, and the members of the Canalave Gym come here to train, as did Roark in his childhood. Galactic Grunts are also found within the abandoned mine.
Geography
Exterior
The main point of access to Iron Island is at its southern-west corner, which has a dock for access by boat from Canalave City. One of the openings to the inside of the island is blocked by ledges, and thus its role is more like that of an exit. In front of the dock is two sets of stairs, separated by a landing on which a cabin apparently owned by Canalave Gym Leader Byron is located. The stairs lead to another cave opening, the only other way to enter the island.
Interior
The cave inside the island is brown in Diamond and Pearl, and black in Platinum. In all three games, the floor of the cave throughout the island is lined with oil drums and I-beams, with the former occasionally serving as obstacles which the player must navigate around in order to access certain parts of the cave sections.
When the player first enters, a pair of stairs facing left and right provide access to the first basement of the island. The left stair leads to a dead-end section, in which a single Camper can be battled. The right stair leads to a larger cave section with several Trainers, where a platform lift at the end can be used to gain access to the second basement of the cave. Once again, there are two sets of stairs facing left and right at the end of the platform lift; this time the right one leads to a dead-end section, where two Workers can be battled. The left stair leads to the largest single cave section of the island, where Riley will partner the player the first time he or she enters it, participating in Tag Battles with his Lucario. Following this point, the remaining Trainers present in the cave are set up in a way such that tag battles against them with Riley as partner are possible, though strictly optional save for the battle with the two Galactic Grunts at the end of the section.
After the battle with the Galactic Grunts, Riley will cease his partnership with the player, and presents him or her with a Riolu Egg as a parting gift; if the player's party is full, he will remain until the player returns with an empty slot in his or her party. The departure of the two Galactic Grunts will also allow the player to access another platform lift that takes him or her down to the third basement. A cave opening in the wall leads to the exit section with another lift, which will take the player straight back to entrance level, where he or she can leave the inside of the island. In Pokémon Platinum, this section also contains the entrance to the Iron Ruins, where Registeel can be battled if the player has a fateful encounter Regigigas in their party.
Riley
When entering Iron Island for the first time, Riley will offer to travel through the mine with the player, participating in wild Double Battles with his Lucario. At the end of their travels, he will give the player a Riolu Egg, if the player has a space for it in his/her party; if not, he will wait until the player returns with an empty space. Like all stat Trainers, he will fully heal all of a player's Pokémon after each battle.
Items
| Item
|
Location
|
Games
|

|
Max Ether
|
Exterior, on the small rock in front of the house (hidden)
|
D P
|

|
Star Piece
|
Exterior, on the small rock in front of the house (hidden)
|
Pt
|

|
Metal Coat
|
In the house, from Byron after obtaining the National Pokédex
|
D P Pt
|

|
HM04 (Strength)
|
Exterior, from Riley when the player first arrives on the Island
|
Pt
|

|
Yellow Shard
|
B1F 1, center of the room
|
Pt
|

|
Iron Ball
|
B1F 1; upper-left part of raised section
|
D P
|

|
Protector
|
B1F 1, upper-left part of raised section
|
Pt
|

|
Escape Rope
|
B1F 2, northwest of the lift
|
D P Pt
|

|
Super Repel
|
B1F 2, in front of stone northeast of Picnicker Summer
|
D P
|

|
Max Repel
|
B1F 2, in front of stone northeast of Picnicker Summer
|
Pt
|

|
TinyMushroom
|
B1F 2, on pile of beams next to Picnicker Summer (hidden)
|
D P
|
|
|
Star Piece
|
B1F 2, to the right of the three barrels northwest of Picnicker Summer (daily) (hidden)
|
Pt
|

|
Revive
|
B1F 2, left of lift
|
Pt
|
|
|
Max Ether
|
B2F 1; east of Worker Willy
|
D P
|

|
Elixir
|
B2F 1, east of Worker Noel
|
Pt
|

|
TM23 (Iron Tail)
|
B2F 1, in western half of pit southeast of Worker Braden
|
D P Pt
|

|
Iron
|
B2F 1, in eastern half of pit southeast of Worker Braden (hidden)
|
D P
|
|
|
Star Piece
|
B2F 1, in eastern half of pit southeast of Worker Braden (daily) (hidden)
|
Pt
|

|
Full Restore
|
B2F 2, on barrel south of Hiker Maurice past a raised section of rock (hidden)
|
D P
|

|
Magnet
|
B2F 2, northeast of Black Belt Kendal and Battle Girl Tyler
|
D P
|

|
Ultra Ball
|
B2F 2, northeast of Black Belt Kendal and Battle Girl Tyler
|
Pt
|
|
|
Ultra Ball
|
B2F 2, northwest corner beside two steel drums
|
D P
|

|
Dusk Ball
|
B2F 2, northwest corner beside two steel drums
|
Pt
|

|
Max Potion
|
B2F 2, southwest of Ultra BallDP/Dusk BallPt near two small rocks
|
D P Pt
|
|
|
Magnet
|
B2F Left, southwest of Max Potion
|
Pt
|
|
|
Star Piece
|
B2F 2, on the raised platform south of Worker Brendon and Worker Quentin (daily) (hidden)
|
Pt
|

|
Iron Plate
|
B2F 2, in pit in southeast corner (hidden)
|
D P Pt
|
|
|
Revive
|
B2F 2, on the barrel just west of / directly behind Ace Trainer Jonah, only accessible from the west (hidden)
|
D P
|
|
|
Star Piece
|
B2F 2, on small rock right of Ace Trainer Jonah and Ace Trainer Brenda (daily) (hidden)
|
Pt
|

|
HP Up
|
B2F 2, just north of the two Galactic Grunts
|
D P Pt
|

|
Red Shard
|
B2F 2, just northeast of Worker Brendon and Worker Quentin
|
Pt
|

|
Shiny Stone
|
B3F 1
|
D P Pt
|
|
|
Metal Coat
|
B3F 2
|
Pt
|

|
Nugget
|
B3F 2, northwest of Metal Coat (hidden)
|
Pt
|
|
|
Pokémon
Exterior
| Pokémon
|
Games
|
Location
|
Levels
|
Rate
|
| Surfing
|
|
|
D
|
P
|
Pt
|
|
20-30
|
60%
|
|
|
D
|
P
|
Pt
|
|
20-30
|
30%
|
|
|
D
|
P
|
Pt
|
|
20-40
|
5%
|
|
|
D
|
P
|
Pt
|
|
20-40
|
1%
|
|
|
D
|
P
|
Pt
|
|
20-30
|
30%
|
|
|
D
|
P
|
Pt
|
|
20-30
|
60%
|
|
|
D
|
P
|
Pt
|
|
20-40
|
5%
|
|
|
D
|
P
|
Pt
|
|
20-40
|
9%
|
| Fishing
|
|
|
D
|
P
|
Pt
|
|
3-10
|
100%
|
|
|
D
|
P
|
Pt
|
|
3-15
|
100%
|
|
|
D
|
P
|
Pt
|
|
10-25
|
65%
|
|
|
D
|
P
|
Pt
|
|
10-25
|
35%
|
|
|
D
|
P
|
Pt
|
|
30-40
|
60%
|
|
|
D
|
P
|
Pt
|
|
30-55
|
60%
|
|
|
D
|
P
|
Pt
|
|
20-40
|
5%
|
|
|
D
|
P
|
Pt
|
|
20-50
|
5%
|
|
|
D
|
P
|
Pt
|
|
20-50
|
35%
|
|
|
D
|
P
|
Pt
|
|
30-55
|
35%
|
| A colored background means that the Pokémon can be found in this location in the specified game. A white background with a colored letter means that the Pokémon cannot be found here.
|
Cave
1F
| Pokémon
|
Games
|
Location
|
Levels
|
Rate
|
|
|
D
|
P
|
Pt
|
|
30
|
10%
|
|
|
D
|
P
|
Pt
|
|
31
|
10%
|
|
|
D
|
P
|
Pt
|
|
32
|
10%
|
|
|
D
|
P
|
Pt
|
|
29-31
|
35%
|
|
|
D
|
P
|
Pt
|
|
30-32
|
35%
|
|
|
D
|
P
|
Pt
|
|
31-33
|
35%
|
|
|
D
|
P
|
Pt
|
|
32-33
|
10%
|
|
|
D
|
P
|
Pt
|
|
31-33
|
10%
|
| A colored background means that the Pokémon can be found in this location in the specified game. A white background with a colored letter means that the Pokémon cannot be found here.
|
B1F
| Pokémon
|
Games
|
Location
|
Levels
|
Rate
|
|
|
D
|
P
|
Pt
|
|
30-31
|
20%
|
|
|
D
|
P
|
Pt
|
|
30-32
|
20%
|
|
|
D
|
P
|
Pt
|
|
31
|
1%
|
|
|
D
|
P
|
Pt
|
|
29-33
|
69%
|
|
|
D
|
P
|
Pt
|
|
30-33
|
70%
|
|
|
D
|
P
|
Pt
|
|
32-33
|
10%
|
|
|
D
|
P
|
Pt
|
|
31-33
|
10%
|
| Special Pokémon
|
|
|
D
|
P
|
Pt
|
|
31-33
|
8%
|
|
|
D
|
P
|
Pt
|
|
30-31
|
8%
|
|
|
D
|
P
|
Pt
|
|
31-33
|
8%
|
|
|
D
|
P
|
Pt
|
|
30-31
|
8%
|
| A colored background means that the Pokémon can be found in this location in the specified game. A white background with a colored letter means that the Pokémon cannot be found here.
|
B2F 1
| Pokémon
|
Games
|
Location
|
Levels
|
Rate
|
|
|
D
|
P
|
Pt
|
|
30-31
|
10%
|
|
|
D
|
P
|
Pt
|
|
31-33
|
10%
|
|
|
D
|
P
|
Pt
|
|
31
|
1%
|
|
|
D
|
P
|
Pt
|
|
29-33
|
49%
|
|
|
D
|
P
|
Pt
|
|
31-34
|
50%
|
|
|
D
|
P
|
Pt
|
|
31-33
|
30%
|
|
|
D
|
P
|
Pt
|
|
32
|
20%
|
|
|
D
|
P
|
Pt
|
|
33-35
|
10%
|
| Special Pokémon
|
|
|
D
|
P
|
Pt
|
|
31-33
|
8%
|
|
|
D
|
P
|
Pt
|
|
31-32
|
8%
|
|
|
D
|
P
|
Pt
|
|
31-33
|
8%
|
|
|
D
|
P
|
Pt
|
|
31-32
|
8%
|
| A colored background means that the Pokémon can be found in this location in the specified game. A white background with a colored letter means that the Pokémon cannot be found here.
|
B2F 2
While Riley is partnered with the player, the Pokémon located here (excluding dual-slot mode Pokémon) will be faced in Double Battles.
| Pokémon
|
Games
|
Location
|
Levels
|
Rate
|
|
|
D
|
P
|
Pt
|
|
31-32
|
20%
|
|
|
D
|
P
|
Pt
|
|
31-33
|
20%
|
|
|
D
|
P
|
Pt
|
|
32
|
1%
|
|
|
D
|
P
|
Pt
|
|
30-34
|
39%
|
|
|
D
|
P
|
Pt
|
|
31-34
|
50%
|
|
|
D
|
P
|
Pt
|
|
32-33
|
30%
|
|
|
D
|
P
|
Pt
|
|
32
|
20%
|
|
|
D
|
P
|
Pt
|
|
33-34
|
10%
|
|
|
D
|
P
|
Pt
|
|
33-35
|
10%
|
| Gift Pokémon
|
|
|
D
|
P
|
Pt
|
|
1
|
One
|
| Special Pokémon
|
|
|
D
|
P
|
Pt
|
|
32-34
|
8%
|
|
|
D
|
P
|
Pt
|
|
31-32
|
8%
|
|
|
D
|
P
|
Pt
|
|
32-34
|
8%
|
|
|
D
|
P
|
Pt
|
|
31-32
|
8%
|
| A colored background means that the Pokémon can be found in this location in the specified game. A white background with a colored letter means that the Pokémon cannot be found here.
|
B3F
| Pokémon
|
Games
|
Location
|
Levels
|
Rate
|
|
|
D
|
P
|
Pt
|
|
31-32
|
20%
|
|
|
D
|
P
|
Pt
|
|
31-33
|
20%
|
|
|
D
|
P
|
Pt
|
|
32
|
1%
|
|
|
D
|
P
|
Pt
|
|
30-34
|
39%
|
|
|
D
|
P
|
Pt
|
|
31-34
|
50%
|
|
|
D
|
P
|
Pt
|
|
33-35
|
30%
|
|
|
D
|
P
|
Pt
|
|
33-34
|
10%
|
|
|
D
|
P
|
Pt
|
|
33-35
|
30%
|
| Special Pokémon
|
|
|
D
|
P
|
Pt
|
|
32-34
|
8%
|
|
|
D
|
P
|
Pt
|
|
31-32
|
8%
|
|
|
D
|
P
|
Pt
|
|
32-34
|
8%
|
|
|
D
|
P
|
Pt
|
|
31-32
|
8%
|
| A colored background means that the Pokémon can be found in this location in the specified game. A white background with a colored letter means that the Pokémon cannot be found here.
|
Trainers
Note: Trainers in B2F 2 may be battled either in Single or in Double Battle mode, optionally with Riley as partner.

|
|
Reward: N/A
|
|
|
|
|
|
| Trainer
|
Pokémon
|
| B1F 1
|

|
|
|
Camper Lawrence
セイギ Seigi
Reward: $496
|
|
|
|
|
|
| B1F 2
|
|
|
|
|
|
| B2F 1
|

|
|
|
Worker Willy
テツジ Tetsuji
Reward: $1240
|
|
|
|
|
|
|
|
|
|
|
|
Worker Braden
ミチテル Michiteru
Reward: $1320
|
|
|
|
| B2F 2
|
|
|
|
|
|
|
|
|
|
|
|
|
|
|
|
|
|
|
|
|
|
|
|
|
|
|
|
|
|
|
|
|
|
|
|
|
|
|
|
|
|
|
|
|
|
|
|
|
|
|
|
|
|
|
|
|
|
|
|
|
|
|
|
|
| Trainers with a Vs. Seeker by their names, when alerted for a rematch using the item, may use higher-level Pokémon.
|
| Trainer
|
Pokémon
|
| B1F 1
|
|
|
|
|
Camper Lawrence
セイギ Seigi
Reward: $576
|
|
|
|
|
|
| B1F 2
|
|
|
|
| B2F 1
|
|
|
|
|
Worker Noel
ヨシミツ Yoshimitsu
Reward: $1440
|
|
|
|
|
|
|
|
|
|
|
|
Worker Braden
ミチテル Michiteru
Reward: $1480
|
|
|
|
| B2F 2
|
|
|
|
|
|
|
|
|
|
|
|
|
|
|
|
|
|
|
|
|
|
|
|
|
|
|
|
|
|
|
|
|
|
|
|
|
|
|
|
|
|
|
|
|
|
|
|
|
|
|
|
|
|
|
|
|
|
|
|
|
|
|
|
|
|
|
|
|
| Trainers with a Vs. Seeker by their names, when alerted for a rematch using the item, may use higher-level Pokémon.
|
Layout
Outside and 1F-B1F
B2F and B3F
In the anime
Iron Island was first mentioned in Shield with a Twist! by Barry as the location he had trained previously and also plans to train again.
Iron Island first appears in Steeling Peace of Mind! as a rocky island populated with many Steel-type Pokémon. Ash and his friends head off on a ferry to the island on Barry's alert, to investigate why Steel-type Pokémon were running amok on the island. They meet Riley and his partner Lucario and find out the cause is due to Team Galactic's machines. The group then discover that Team Galactic are trying to activate the ruins present in the island. In the next episode, Team Galactic continue their plans at the ruins on Iron Island, where they use the Spear Key to scan Mt. Coronet to find the location of the Spear Pillar. Ash and the group succeed in stopping Team Galactic, and Riley and Lucario successively contain detonating bombs placed by Team Galactic which were to destroy the island.
In the manga

Iron Island in Pokémon Diamond and Pearl Adventure!

Iron Island in Pokémon Adventures
In the Pokémon Adventures manga
Byron sent Diamond to train here with Riley, under his supervision due to his lack of training compared to the other Sinnoh Pokédex holders. It was here that Diamond's Tru learned how to attack fast despite lacking in speed.
In the Pokémon Diamond and Pearl Adventure! manga
Hareta went to train at Iron Island after losing to Byron in a Gym battle. He met Riley, who gave him an Egg which soon hatched into a Riolu. After capturing several Pokémon, he drove off a Team Galactic Grunt, at which point his Shinx evolved into Luxio.
Trivia
In other languages


