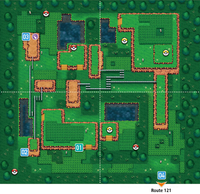
|
|
| (3 intermediate revisions by 3 users not shown) |
| Line 44: |
Line 44: |
| In Pokémon Ruby, Sapphire, and Emerald, this Safari Zone is only accessible to Trainers participating in the Safari Game. In a Safari Game, players may only use Safari Balls; rather than weaken them in battle, players must use non-conventional tactics to try and catch wild Pokémon. There are four options on the battle screen: throw a [[Safari Ball]], throw a [[Pokéblock]], go near, and run away. Throwing Pokéblocks makes a Pokémon less likely to run,<!-- but makes it harder to catch;--> while going near<!-- does the reverse,--> makes a Pokémon easier to catch but more likely to run. | | In Pokémon Ruby, Sapphire, and Emerald, this Safari Zone is only accessible to Trainers participating in the Safari Game. In a Safari Game, players may only use Safari Balls; rather than weaken them in battle, players must use non-conventional tactics to try and catch wild Pokémon. There are four options on the battle screen: throw a [[Safari Ball]], throw a [[Pokéblock]], go near, and run away. Throwing Pokéblocks makes a Pokémon less likely to run,<!-- but makes it harder to catch;--> while going near<!-- does the reverse,--> makes a Pokémon easier to catch but more likely to run. |
|
| |
|
| Players have to option to approach wild Pokémon to influence the [[catch rate]] of wild Pokémon to make them easier to catch, referred to as the "catch factor". Furthermore, there is an "escape factor", which represents the probability that a Pokémon will escape the following turn. At the start of an encounter, the catch factor starts at 100/1275 of the Pokémon's [[catch rate]], rounded down (if this is lower than 1, this will be set to 1), while the escape factor starts at 3. | | Players have the option to approach wild Pokémon to influence the [[catch rate]] of wild Pokémon to make them easier to catch, referred to as the "catch factor". Furthermore, there is an "escape factor", which represents the probability that a Pokémon will escape the following turn. At the start of an encounter, the catch factor starts at 100/1275 of the Pokémon's [[catch rate]], rounded down (if this is lower than 1, this will be set to 1), while the escape factor starts at 3. |
|
| |
|
| Depending on the action taken, the catch and escape factors are modified as follows (neither factor may increase to more than 20 nor decrease to less than 1): | | Depending on the action taken, the catch and escape factors are modified as follows (neither factor may increase to more than 20 nor decrease to less than 1): |
| Line 86: |
Line 86: |
|
| |
|
| When the battle starts... | | When the battle starts... |
| * If the Pokémon's catch rate is higher than 200, '''throw Safari Balls'''; | | * If the Pokémon's [[catch rate]] is higher than 200, '''throw Safari Balls'''; |
| * Else, throw a Pokéblock with a taste different from the one in the feeder (e.g., Blue). | | * Else, throw a Pokéblock with a taste different from the one in the feeder (e.g., Blue). |
| ** If the Pokémon is curious (escape factor = 0), '''throw Safari Balls'''. | | ** If the Pokémon is curious (escape factor = 0), '''throw Safari Balls'''. |
| Line 92: |
Line 92: |
| *** If the Pokémon is enthralled (escape factor = 0), '''throw Safari Balls'''. | | *** If the Pokémon is enthralled (escape factor = 0), '''throw Safari Balls'''. |
| ** If the Pokémon is enthralled, then... | | ** If the Pokémon is enthralled, then... |
| *** If it has a catch rate between 165 and 200 (escape factor = 0), '''throw Safari Balls'''. | | *** If it has a catch rate between 165 and 200, '''throw Safari Balls'''. |
| *** If it has a catch rate below 165, throw a Pokéblock with the same color as the one in the feeder (e.g., Red). | | *** If it has a catch rate below 165, throw a Pokéblock with the third color (e.g., Green). |
| **** If the Pokémon ignored the Pokéblock, throw the third color Pokéblock (e.g., Green) (escape factor = 0), then '''throw Safari Balls'''. | | **** If the Pokémon ignored the Pokéblock, then '''throw Safari Balls'''. |
| **** If the Pokémon is curious, throw the same Pokéblock again (escape factor = 0), then '''throw Safari Balls'''. | | **** If the Pokémon is curious, throw the same Pokéblock again (e.g., Green) (escape factor = 0), then '''throw Safari Balls'''. |
|
| |
|
| This strategy results in, at minimum, a 70% chance to catch any Pokémon that appears. | | This strategy results in, at minimum, a 70% chance to catch any Pokémon that appears. |
| Line 109: |
Line 109: |
| |- style="background:#FFF" | | |- style="background:#FFF" |
| | {{MSP|044|Gloom}} {{p|Gloom}} || 120 | | | {{MSP|044|Gloom}} {{p|Gloom}} || 120 |
| | |- style="background:#FFF" |
| | | {{MSP|054|Psyduck}} {{p|Psyduck}} || 190 |
| | |- style="background:#FFF" |
| | | {{MSP|055|Golduck}} {{p|Golduck}} || 75 |
| | |- style="background:#FFF" |
| | | {{MSP|074|Geodude}} {{p|Geodude}} || 255 |
| |- style="background:#FFF" | | |- style="background:#FFF" |
| | {{MSP|084|Doduo}} {{p|Doduo}} || 190 | | | {{MSP|084|Doduo}} {{p|Doduo}} || 190 |
| Line 114: |
Line 120: |
| | {{MSP|085|Dodrio}} {{p|Dodrio}} || 45 | | | {{MSP|085|Dodrio}} {{p|Dodrio}} || 45 |
| |- style="background:#FFF" | | |- style="background:#FFF" |
| | {{MSP|177|Natu}} {{p|Natu}} || 190 | | | {{MSP|111|Rhyhorn}} {{p|Rhyhorn}} || 120 |
| |- style="background:#FFF" | | |- style="background:#FFF" |
| | {{MSP|178|Xatu}} {{p|Xatu}} || 75 | | | {{MSP|118|Goldeen}} {{p|Goldeen}} || 255 |
| |- style="background:#FFF" | | |- style="background:#FFF" |
| | {{MSP|203|Girafarig}} {{p|Girafarig}} || 60 | | | {{MSP|119|Seaking}} {{p|Seaking}} || 60 |
| |- style="background:#FFF" | | |- style="background:#FFF" |
| | {{MSP|202|Wobbuffet}} {{p|Wobbuffet}} || 45 | | | {{MSP|127|Pinsir}} {{p|Pinsir}} || 45 |
| |- style="background:#FFF" | | |- style="background:#FFF" |
| | {{MSP|054|Psyduck}} {{p|Psyduck}} || 190 | | | {{MSP|129|Magikarp}} {{p|Magikarp}} || 255 |
| |- style="background:#FFF" | | |- style="background:#FFF" |
| | {{MSP|055|Golduck}} {{p|Golduck}} || 75 | | | {{MSP|163|Hoothoot}} {{p|Hoothoot}} || 255 |
| |- style="background:#FFF" | | |- style="background:#FFF" |
| | {{MSP|129|Magikarp}} {{p|Magikarp}} || 255 | | | {{MSP|165|Ledyba}} {{p|Ledyba}} || 255 |
| |- style="background:#FFF" | | |- style="background:#FFF" |
| | {{MSP|118|Goldeen}} {{p|Goldeen}} || 255 | | | {{MSP|167|Spinarak}} {{p|Spinarak}} || 255 |
| |- style="background:#FFF" | | |- style="background:#FFF" |
| | {{MSP|119|Seaking}} {{p|Seaking}} || 60 | | | {{MSP|177|Natu}} {{p|Natu}} || 190 |
| |- style="background:#FFF" | | |- style="background:#FFF" |
| | {{MSP|111|Rhyhorn}} {{p|Rhyhorn}} || 120 | | | {{MSP|178|Xatu}} {{p|Xatu}} || 75 |
| |- style="background:#FFF" | | |- style="background:#FFF" |
| | {{MSP|127|Pinsir}} {{p|Pinsir}} || 45 | | | {{MSP|179|Mareep}} {{p|Mareep}} || 235 |
| |- style="background:#FFF" | | |- style="background:#FFF" |
| | {{MSP|214|Heracross}} {{p|Heracross}} || 45 | | | {{MSP|183|Marill}} {{p|Marill}} || 190 |
| |- style="background:#FFF" | | |- style="background:#FFF" |
| | {{MSP|231|Phanpy}} {{p|Phanpy}} || 120 | | | {{MSP|190|Aipom}} {{p|Aipom}} || 45 |
| |- style="background:#FFF" | | |- style="background:#FFF" |
| | {{MSP|074|Geodude}} {{p|Geodude}} || 255 | | | {{MSP|191|Sunkern}} {{p|Sunkern}} || 235 |
| |- style="background:#FFF" | | |- style="background:#FFF" |
| | {{MSP|163|Hoothoot}} {{p|Hoothoot}} || 255 | | | {{MSP|194|Wooper}} {{p|Wooper}} || 255 |
| |- style="background:#FFF" | | |- style="background:#FFF" |
| | {{MSP|167|Spinarak}} {{p|Spinarak}} || 255 | | | {{MSP|195|Quagsire}} {{p|Quagsire}} || 90 |
| |- style="background:#FFF" | | |- style="background:#FFF" |
| | {{MSP|179|Mareep}} {{p|Mareep}} || 235 | | | {{MSP|202|Wobbuffet}} {{p|Wobbuffet}} || 45 |
| |- style="background:#FFF" | | |- style="background:#FFF" |
| | {{MSP|190|Aipom}} {{p|Aipom}} || 45 | | | {{MSP|203|Girafarig}} {{p|Girafarig}} || 60 |
| |- style="background:#FFF" | | |- style="background:#FFF" |
| | {{MSP|191|Sunkern}} {{p|Sunkern}} || 235 | | | {{MSP|204|Pineco}} {{p|Pineco}} || 190 |
| |- style="background:#FFF" | | |- style="background:#FFF" |
| | {{MSP|207|Gligar}} {{p|Gligar}} || 60 | | | {{MSP|207|Gligar}} {{p|Gligar}} || 60 |
| Line 156: |
Line 162: |
| | {{MSP|209|Snubbull}} {{p|Snubbull}} || 190 | | | {{MSP|209|Snubbull}} {{p|Snubbull}} || 190 |
| |- style="background:#FFF" | | |- style="background:#FFF" |
| | {{MSP|234|Stantler}} {{p|Stantler}} || 45 | | | {{MSP|213|Shuckle}} {{p|Shuckle}} || 190 |
| |- style="background:#FFF"
| |
| | {{MSP|183|Marill}} {{p|Marill}} || 190
| |
| |- style="background:#FFF" | | |- style="background:#FFF" |
| | {{MSP|194|Wooper}} {{p|Wooper}} || 255 | | | {{MSP|214|Heracross}} {{p|Heracross}} || 45 |
| |- style="background:#FFF" | | |- style="background:#FFF" |
| | {{MSP|195|Quagsire}} {{p|Quagsire}} || 90 | | | {{MSP|216|Teddiursa}} {{p|Teddiursa}} || 120 |
| |- style="background:#FFF" | | |- style="background:#FFF" |
| | {{MSP|223|Remoraid}} {{p|Remoraid}} || 190 | | | {{MSP|223|Remoraid}} {{p|Remoraid}} || 190 |
| Line 168: |
Line 172: |
| | {{MSP|224|Octillery}} {{p|Octillery}} || 75 | | | {{MSP|224|Octillery}} {{p|Octillery}} || 75 |
| |- style="background:#FFF" | | |- style="background:#FFF" |
| | {{MSP|165|Ledyba}} {{p|Ledyba}} || 255 | | | {{MSP|228|Houndour}} {{p|Houndour}} || 120 |
| |- style="background:#FFF" | | |- style="background:#FFF" |
| | {{MSP|204|Pineco}} {{p|Pineco}} || 190 | | | {{MSP|231|Phanpy}} {{p|Phanpy}} || 120 |
| |- style="background:#FFF" | | |- style="background:#FFF" |
| | {{MSP|216|Teddiursa}} {{p|Teddiursa}} || 120 | | | {{MSP|234|Stantler}} {{p|Stantler}} || 45 |
| |- style="background:#FFF"
| |
| | {{MSP|228|Houndour}} {{p|Houndour}} || 120
| |
| |- style="background:#FFF"
| |
| | {{MSP|241|Miltank}} {{p|Miltank}} || 45
| |
| |- | | |- |
| | style="background:#FFF; {{roundybl|5px}}" | {{MSP|213|Shuckle}} {{p|Shuckle}} | | | style="background:#FFF; {{roundybl|5px}}" | {{MSP|241|Miltank}} {{p|Miltank}} |
| | style="background:#FFF; {{roundybr|5px}}" | 190 | | | style="background:#FFF; {{roundybr|5px}}" | 45 |
| |} | | |} |
|
| |
|
| Line 205: |
Line 205: |
| {{Itlisth}} | | {{Itlisth}} |
| {{itemlist|TM Grass|North of the Area, on the bank east of the pond (requires [[Mach Bike]] and {{m|Surf}})|Ru=yes|Sa=yes|E=yes|display={{TM|22|SolarBeam}}}} | | {{itemlist|TM Grass|North of the Area, on the bank east of the pond (requires [[Mach Bike]] and {{m|Surf}})|Ru=yes|Sa=yes|E=yes|display={{TM|22|SolarBeam}}}} |
| {{itemlist|Nugget|Far north of the Area, east of the pond (requires [[Mach Bike]])|OR=yes|AS=yes}} | | {{itemlist|Nugget|Far north of the Area, west of the pond (requires [[Mach Bike]])|OR=yes|AS=yes}} |
| {{itemlist|Big Pearl|On the hill with muddy slopes south of the Area 3 pond (requires [[Mach Bike]])|OR=yes|AS=yes}} | | {{itemlist|Big Pearl|On the hill with muddy slopes south of the Area 3 pond (requires [[Mach Bike]])|OR=yes|AS=yes}} |
| {{itemlist|Absolite|In the northeast corner of the cliff south of the long grass patch, accessed via the [[Acro Bike]] railway (requires [[Acro Bike]])|OR=yes|AS=yes}} | | {{itemlist|Absolite|In the northeast corner of the cliff south of the long grass patch, accessed via the [[Acro Bike]] railway (requires [[Acro Bike]])|OR=yes|AS=yes}} |
| Line 499: |
Line 499: |
| ::'''Final Chapter: The Future.''' | | ::'''Final Chapter: The Future.''' |
| ::''"Having made my return, I began working as a volunteer at the Safari Zone. A desire to express my happiness at having returned welled up inside of me and led to my decision to continue to take good care of Pokémon every day."'' | | ::''"Having made my return, I began working as a volunteer at the Safari Zone. A desire to express my happiness at having returned welled up inside of me and led to my decision to continue to take good care of Pokémon every day."'' |
| | * Players cannot pick up the [[Rare Candy]] in area 6 if they stand north or west of the Rare Candy. |
|
| |
|
| ==In other languages== | | ==In other languages== |
| Line 509: |
Line 510: |
| |ko={{tt|사파리존|Sapari Jon}} ''Safari Zone'' | | |ko={{tt|사파리존|Sapari Jon}} ''Safari Zone'' |
| |es=Zona Safari | | |es=Zona Safari |
| | |pt=Zona de Safari{{tt|*|Anime}} |
| }} | | }} |
| {{-}} | | {{-}} |

|
The picture used in this article is unsatisfactory.
Please feel free to replace it so it conforms to Bulbapedia conventions.
Reason: Guidebook labels
|

|
This article is incomplete.
Please feel free to edit this article to add missing information and complete it.
Reason: Missing layout images of the entrance
|
| Safari Zone
|
|
サファリゾーン
Safari Zone
|
| "Wild Missingno. appeared!"
|
|
|
|
| Map description:
|
This amusement area provides a rich environment in which to catch many different kinds of Pokémon.
|
| Location:
|
North of Route 121
|
| Region:
|
Hoenn
|
| Generations:
|
III, VI
|
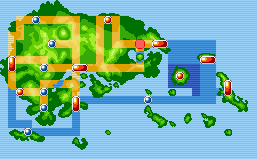
Location of Safari Zone in Hoenn.
|
| Pokémon world locations
|
The Hoenn Safari Zone (Japanese: サファリゾーン Safari Zone) is a special Pokémon preserve where Trainers can enter to capture certain types of Pokémon. The entrance is on Hoenn's Route 121.
In Pokémon Ruby, Sapphire, and Emerald, this Safari Zone is only accessible to Trainers participating in the Safari Game. In a Safari Game, players may only use Safari Balls, and rather than weaken wild Pokémon in battle, players must use non-conventional tactics to try and catch them. For $500, the player is granted entry and 30 Safari Balls. In Ruby, Sapphire, and Emerald, the player is limited to 500 steps and the player is only allowed entry if they also have a Pokéblock Case.
In Pokémon Omega Ruby and Alpha Sapphire, the Safari Game has been removed, and players can enter the Safari Zone area without paying a fee. Pokémon found here are now collected through normal battles. Each area also now has both tall and long grass, and while encounters between them are mostly the same, two rare Pokémon in each area can only be found in one type of grass specifically.
Geography
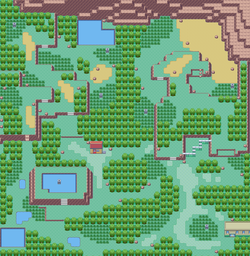
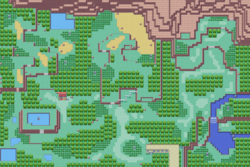
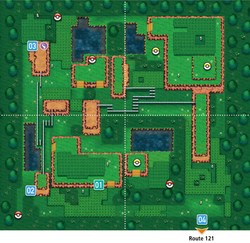
Certain areas of the Safari Zone can only be accessed with the Mach Bike or the Acro Bike. In Pokémon Omega Ruby and Alpha Sapphire, all areas are accessible with either Bike and Surf, but in some areas, only one type of grass will be accessible without using the other Bike. In Pokémon Ruby, Sapphire, and Emerald, there are also breakable rocks that can be used to encounter Pokémon. In Emerald, after the player obtains the National Pokédex, two new areas will open up to the east, featuring many Johto Pokémon not found in Pokémon Ruby and Sapphire or Pokémon FireRed and LeafGreen.
Areas
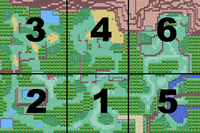
- Area 1 houses the entrance.
- Area 2 is directly west of Area 1.
- In Omega Ruby and Alpha Sapphire, the Mach Bike is required to reach the long grass within this area.
- Area 3 is directly north of Area 2. This area can only be accessed with a Bike.
- In Ruby, Sapphire, and Emerald, the Mach Bike is required to access this area.
- In Omega Ruby and Alpha Sapphire, the Mach Bike is required to reach the tall grass within this area, while the Acro Bike is required to reach the long grass.
- Area 4 is directly north of Area 1. This area can only be accessed with a Bike.
- In Ruby, Sapphire, and Emerald, the Acro Bike is required to access this area.
- In Omega Ruby and Alpha Sapphire, the Acro Bike is required to reach the tall grass within this area, while the Mach Bike and Surf are required to reach the long grass.
- Area 5 is directly east of Area 1. It is only accessible in Emerald, and only after the player has entered the Hall of Fame.
- Area 6 is directly north of Area 5. It is only accessible in Emerald, and only after the player has entered the Hall of Fame.
Pokéblock feeders
In Pokémon Ruby, Sapphire, and Emerald, there are Pokéblock feeders throughout the Safari Zone. If a Pokéblock is placed in a feeder, all wild Pokémon encountered in grass patches and water tiles up to five steps away from the feeder will have a Nature such that, if an identically flavored Pokéblock were thrown at it, the Pokémon would be enthralled (i.e. its preferred flavor dominates its disliked flavor in the Pokéblock); the feeder has no effect if no such Nature exists. Only one Pokéblock may occupy a feeder, and the feeder's effect disappears after 100 steps are taken.
Safari Game
In Pokémon Ruby, Sapphire, and Emerald, this Safari Zone is only accessible to Trainers participating in the Safari Game. In a Safari Game, players may only use Safari Balls; rather than weaken them in battle, players must use non-conventional tactics to try and catch wild Pokémon. There are four options on the battle screen: throw a Safari Ball, throw a Pokéblock, go near, and run away. Throwing Pokéblocks makes a Pokémon less likely to run, while going near makes a Pokémon easier to catch but more likely to run.
Players have the option to approach wild Pokémon to influence the catch rate of wild Pokémon to make them easier to catch, referred to as the "catch factor". Furthermore, there is an "escape factor", which represents the probability that a Pokémon will escape the following turn. At the start of an encounter, the catch factor starts at 100/1275 of the Pokémon's catch rate, rounded down (if this is lower than 1, this will be set to 1), while the escape factor starts at 3.
Depending on the action taken, the catch and escape factors are modified as follows (neither factor may increase to more than 20 nor decrease to less than 1):
| Action
|
Catch factor
|
Escape factor
|
| Go Near the first time |
Increase by 3 |
Increase by 4
|
| Go Near the second time |
Increase by 2 |
Increase by 4
|
| Go Near each subsequent time |
Increase by 1 |
Increase by 4
|
| Throwing a Pokéblock the first time, and the Pokémon is enthralled |
No change |
Decrease by 5
|
| Throwing a Pokéblock the second time, and the Pokémon is enthralled |
No change |
Decrease by 3
|
| Throwing a Pokéblock each subsequent time, and the Pokémon is enthralled |
No change |
Decrease by 2
|
| Throwing a Pokéblock the first time, and the Pokémon is curious |
No change |
Decrease by 3
|
| Throwing a Pokéblock the second time, and the Pokémon is curious |
No change |
Decrease by 2
|
| Throwing a Pokéblock each subsequent time, and the Pokémon is curious
|
No change
|
Decrease by 1
|
Throwing a Pokéblock that the Pokémon completely ignores does not directly affect the escape factor, but does increment the Pokéblock counter used for subsequent Pokéblock throws. A Pokémon is enthralled by a Pokéblock if its preferred flavor dominates its disliked flavor, while a Pokémon completely ignores it if its disliked flavor dominates its preferred flavor. If both preferred and disliked flavors are equal (including if neither are present), the Pokémon is curious about the Pokéblock.
If a player chooses to throw a Safari Ball, the catch factor is multiplied by 1275/100 (rounded down) to obtain the modified catch rate. At the end of a turn, a randomly generated value from 0 to 99 is obtained, and if this value is less than 5 times the escape factor, the Pokémon escapes.
These numbers translate to a 5% change in probability of escaping for every unit change (plus or minus 1) in the escape factor, with an initial 15% chance of escape; and approximately a 2.5% change in probability of capture for every unit change in the capture factor, with an initial capture probability of approximately catch rate/510 rounded down to the nearest multiple of 0.025 (2.5%), or 0.025 if it would be less.
Pokéblock throw bug
In Ruby, Sapphire, and Emerald, instead of the escape factor having a minimum value of 1 (5% chance to flee) like the catch factor, the game is coded to set the escape factor to 1 if it would become negative due to a thrown Pokéblock. This means it is possible for the player to throw Pokéblocks such that a Pokémon's escape factor becomes exactly 0, and the Pokémon will have a 0% chance to escape. Exploiting this can make it very easy to catch Hoenn Safari Zone Pokémon.
The optimal catching strategy for exploiting this is as follows:
Make three different colors of single-flavor Pokéblocks (e.g., Red, Blue, and Green). Put one into a feeder (e.g., Red) and start a wild encounter near that feeder.
When the battle starts...
- If the Pokémon's catch rate is higher than 200, throw Safari Balls;
- Else, throw a Pokéblock with a taste different from the one in the feeder (e.g., Blue).
- If the Pokémon is curious (escape factor = 0), throw Safari Balls.
- If the Pokémon ignores the Pokéblock, throw a Pokéblock with the same color as the one in the feeder (e.g., Red).
- If the Pokémon is enthralled (escape factor = 0), throw Safari Balls.
- If the Pokémon is enthralled, then...
- If it has a catch rate between 165 and 200, throw Safari Balls.
- If it has a catch rate below 165, throw a Pokéblock with the third color (e.g., Green).
- If the Pokémon ignored the Pokéblock, then throw Safari Balls.
- If the Pokémon is curious, throw the same Pokéblock again (e.g., Green) (escape factor = 0), then throw Safari Balls.
This strategy results in, at minimum, a 70% chance to catch any Pokémon that appears.
The Safari Zone Pokémon Catch Rate goes as follows:
Items
Entrance
Area 1
Area 2
Area 3
Area 4
Area 5
| Item
|
Location
|
Games
|

|
PP Up
|
Three squares south of the southernmost Pokéblock stand (hidden)
|
E
|

|
Full Restore
|
In the northmost bare square among the southeastern-most patch of grass (hidden)
|
E
|

|
Big Pearl
|
In the northeastern-most patch of grass beyond the top of the waterfall (requires Surf)
|
E
|
|
|
Area 6
| Item
|
Location
|
Games
|

|
Rare Candy
|
In the southeast portion of the area, in a 2×3 patch of light green grass, in the southeastern-most square (hidden)
|
E
|

|
Zinc
|
In a small nook among the wall in the rocky path to the north (hidden)
|
E
|

|
Nugget
|
Between two ledges at the end of the rocky path to the west
|
E
|
|
|
Vending Machine
In Pokémon Omega Ruby and Alpha Sapphire, there is a Vending Machine at the entrance to the Safari Zone.
Pokémon
Generation III
Area 1
| Pokémon
|
Games
|
Location
|
Levels
|
Rate
|
|
|
R
|
S
|
E
|
|
25, 27
|
5%
|
|
|
R
|
S
|
E
|
|
25, 27
|
40%
|
|
|
R
|
S
|
E
|
|
25
|
5%
|
|
|
R
|
S
|
E
|
|
25
|
10%
|
|
|
R
|
S
|
E
|
|
25
|
10%
|
|
|
R
|
S
|
E
|
|
25, 27
|
20%
|
|
|
R
|
S
|
E
|
|
27, 29
|
10%
|
| A colored background means that the Pokémon can be found in this location in the specified game. A white background with a colored letter means that the Pokémon cannot be found here.
|
Area 2
| Pokémon
|
Games
|
Location
|
Levels
|
Rate
|
|
|
R
|
S
|
E
|
|
25, 27
|
5%
|
|
|
R
|
S
|
E
|
|
25, 27
|
40%
|
|
|
R
|
S
|
E
|
|
25
|
5%
|
|
|
R
|
S
|
E
|
|
27
|
10%
|
|
|
R
|
S
|
E
|
|
25
|
10%
|
|
|
R
|
S
|
E
|
|
25, 27
|
20%
|
|
|
R
|
S
|
E
|
|
27, 29
|
10%
|
| Surfing
|
|
|
R
|
S
|
E
|
|
20-35
|
100%
|
| Fishing
|
|
|
R
|
S
|
E
|
|
5-10
|
30%
|
|
|
R
|
S
|
E
|
|
5-10
|
70%
|
|
|
R
|
S
|
E
|
|
10-30
|
40%
|
|
|
R
|
S
|
E
|
|
10-30
|
60%
|
|
|
R
|
S
|
E
|
|
25-35
|
80%
|
|
|
R
|
S
|
E
|
|
25-40
|
20%
|
| A colored background means that the Pokémon can be found in this location in the specified game. A white background with a colored letter means that the Pokémon cannot be found here.
|
Area 3
| Pokémon
|
Games
|
Location
|
Levels
|
Rate
|
|
|
R
|
S
|
E
|
|
27, 29
|
30%
|
|
|
R
|
S
|
E
|
|
29, 31
|
15%
|
|
|
R
|
S
|
E
|
|
27, 29
|
15%
|
|
|
R
|
S
|
E
|
|
29, 31
|
5%
|
|
|
R
|
S
|
E
|
|
27, 29
|
30%
|
|
|
R
|
S
|
E
|
|
27, 29
|
5%
|
| Surfing
|
|
|
R
|
S
|
E
|
|
20-35
|
95%
|
|
|
R
|
S
|
E
|
|
25-40
|
5%
|
| Fishing
|
|
|
R
|
S
|
E
|
|
5-10
|
30%
|
|
|
R
|
S
|
E
|
|
5-10
|
70%
|
|
|
R
|
S
|
E
|
|
10-30
|
40%
|
|
|
R
|
S
|
E
|
|
10-30
|
60%
|
|
|
R
|
S
|
E
|
|
25-35
|
80%
|
|
|
R
|
S
|
E
|
|
25-40
|
20%
|
| A colored background means that the Pokémon can be found in this location in the specified game. A white background with a colored letter means that the Pokémon cannot be found here.
|
Area 4
| Pokémon
|
Games
|
Location
|
Levels
|
Rate
|
|
|
R
|
S
|
E
|
|
27-29
|
30%
|
|
|
R
|
S
|
E
|
|
29, 31
|
15%
|
|
|
R
|
S
|
E
|
|
27, 29
|
15%
|
|
|
R
|
S
|
E
|
|
29, 31
|
5%
|
|
|
R
|
S
|
E
|
|
27, 29
|
5%
|
|
|
R
|
S
|
E
|
|
27, 29
|
30%
|
| Rock Smash
|
|
|
R
|
S
|
E
|
|
5-30
|
100%
|
| A colored background means that the Pokémon can be found in this location in the specified game. A white background with a colored letter means that the Pokémon cannot be found here.
|
Area 5
| Pokémon
|
Games
|
Location
|
Levels
|
Rate
|
|
|
R
|
S
|
E
|
|
35
|
5%
|
|
|
R
|
S
|
E
|
|
33
|
10%
|
|
|
R
|
S
|
E
|
|
34, 36
|
30%
|
|
|
R
|
S
|
E
|
|
34
|
10%
|
|
|
R
|
S
|
E
|
|
33, 35
|
30%
|
|
|
R
|
S
|
E
|
|
37, 40
|
5%
|
|
|
R
|
S
|
E
|
|
34
|
5%
|
|
|
R
|
S
|
E
|
|
36, 39
|
5%
|
| Surfing
|
|
|
R
|
S
|
E
|
|
25-35
|
39%
|
|
|
R
|
S
|
E
|
|
25-30
|
60%
|
|
|
R
|
S
|
E
|
|
35-40
|
1%
|
| Fishing
|
|
|
R
|
S
|
E
|
|
25-30
|
30%
|
|
|
R
|
S
|
E
|
|
25-30
|
70%
|
|
|
R
|
S
|
E
|
|
25-30
|
20%
|
|
|
R
|
S
|
E
|
|
25-30
|
60%
|
|
|
R
|
S
|
E
|
|
30-35
|
20%
|
|
|
R
|
S
|
E
|
|
25-30
|
40%
|
|
|
R
|
S
|
E
|
|
25-35
|
59%
|
|
|
R
|
S
|
E
|
|
35-40
|
1%
|
| A colored background means that the Pokémon can be found in this location in the specified game. A white background with a colored letter means that the Pokémon cannot be found here.
|
Area 6
| Pokémon
|
Games
|
Location
|
Levels
|
Rate
|
|
|
R
|
S
|
E
|
|
35
|
5%
|
|
|
R
|
S
|
E
|
|
33
|
10%
|
|
|
R
|
S
|
E
|
|
33, 35
|
30%
|
|
|
R
|
S
|
E
|
|
34
|
10%
|
|
|
R
|
S
|
E
|
|
34
|
5%
|
|
|
R
|
S
|
E
|
|
34, 36
|
30%
|
|
|
R
|
S
|
E
|
|
36, 39
|
5%
|
|
|
R
|
S
|
E
|
|
37, 40
|
5%
|
| Rock Smash
|
|
|
R
|
S
|
E
|
|
20-40
|
100%
|
| A colored background means that the Pokémon can be found in this location in the specified game. A white background with a colored letter means that the Pokémon cannot be found here.
|
Generation VI
Area 1
| Pokémon
|
Games
|
Location
|
Levels
|
Rate
|
|
|
OR
|
AS
|
|
28, 30
|
20%
|
|
|
OR
|
AS
|
|
28-30
|
30%
|
|
|
OR
|
AS
|
|
27, 29
|
20%
|
|
|
OR
|
AS
|
|
28-30
|
30%
|
| Long grass
|
|
|
OR
|
AS
|
|
28-30
|
30%
|
|
|
OR
|
AS
|
|
27, 29
|
20%
|
|
|
OR
|
AS
|
|
28-30
|
30%
|
|
|
OR
|
AS
|
|
28, 30
|
20%
|
| Horde Encounter
|
|
|
OR
|
AS
|

|
Horde Encounter
|
|
15
|
35%
|
|
|
OR
|
AS
|

|
Horde Encounter
|
|
15
|
5%
|
|
|
OR
|
AS
|

|
Horde Encounter
|
|
15
|
60%
|
Exclusively as hidden Pokémon
After defeating or catching Groudon/Kyogre
|
|
|
OR
|
AS
|
|
30
|
??%
|
|
|
OR
|
AS
|
|
30
|
??%
|
|
|
OR
|
AS
|
|
30
|
??%
|
| Surfing
|
|
|
OR
|
AS
|
|
20, 25, 30
|
100%
|
| Fishing
|
|
|
OR
|
AS
|
|
5
|
35%
|
|
|
OR
|
AS
|
|
10, 15
|
65%
|
|
|
OR
|
AS
|
|
25
|
35%
|
|
|
OR
|
AS
|
|
25
|
65%
|
|
|
OR
|
AS
|
|
30, 35, 40
|
100%
|
| A colored background means that the Pokémon can be found in this location in the specified game. A white background with a colored letter means that the Pokémon cannot be found here.
|
Area 2
| Pokémon
|
Games
|
Location
|
Levels
|
Rate
|
|
|
OR
|
AS
|
|
28-30
|
30%
|
|
|
OR
|
AS
|
|
27, 29
|
20%
|
|
|
OR
|
AS
|
|
28-30
|
30%
|
|
|
OR
|
AS
|
|
28, 30
|
20%
|
| Long grass
|
|
|
OR
|
AS
|
|
28-30
|
30%
|
|
|
OR
|
AS
|
|
27, 29
|
20%
|
|
|
OR
|
AS
|
|
28-30
|
30%
|
|
|
OR
|
AS
|
|
28, 30
|
20%
|
| Horde Encounter
|
|
|
OR
|
AS
|

|
Horde Encounter
|
|
15
|
35%
|
|
|
OR
|
AS
|

|
Horde Encounter
|
|
15
|
5%
|
|
|
OR
|
AS
|

|
Horde Encounter
|
|
15
|
60%
|
Exclusively as hidden Pokémon
After defeating or catching Groudon/Kyogre
|
|
|
OR
|
AS
|
|
30
|
??%
|
|
|
OR
|
AS
|
|
30
|
??%
|
|
|
OR
|
AS
|
|
30
|
??%
|
| Surfing
|
|
|
OR
|
AS
|
|
20, 25, 30
|
100%
|
| Fishing
|
|
|
OR
|
AS
|
|
5
|
35%
|
|
|
OR
|
AS
|
|
10, 15
|
65%
|
|
|
OR
|
AS
|
|
25
|
35%
|
|
|
OR
|
AS
|
|
25
|
65%
|
|
|
OR
|
AS
|
|
30, 35, 40
|
100%
|
| A colored background means that the Pokémon can be found in this location in the specified game. A white background with a colored letter means that the Pokémon cannot be found here.
|
Area 3
| Pokémon
|
Games
|
Location
|
Levels
|
Rate
|
|
|
OR
|
AS
|
|
28-30
|
30%
|
|
|
OR
|
AS
|
|
27, 29
|
20%
|
|
|
OR
|
AS
|
|
28-30
|
30%
|
|
|
OR
|
AS
|
|
28, 30
|
20%
|
| Long grass
|
|
|
OR
|
AS
|
|
28-30
|
30%
|
|
|
OR
|
AS
|
|
27, 29
|
20%
|
|
|
OR
|
AS
|
|
28-30
|
30%
|
|
|
OR
|
AS
|
|
28, 30
|
20%
|
| Horde Encounter
|
|
|
OR
|
AS
|

|
Horde Encounter
|
|
15
|
35%
|
|
|
OR
|
AS
|

|
Horde Encounter
|
|
15
|
5%
|
|
|
OR
|
AS
|

|
Horde Encounter
|
|
15
|
60%
|
Exclusively as hidden Pokémon
After defeating or catching Groudon/Kyogre
|
|
|
OR
|
AS
|
|
30
|
??%
|
|
|
OR
|
AS
|
|
30
|
??%
|
|
|
OR
|
AS
|
|
30
|
??%
|
| Surfing
|
|
|
OR
|
AS
|
|
20, 25, 30
|
100%
|
| Fishing
|
|
|
OR
|
AS
|
|
5
|
35%
|
|
|
OR
|
AS
|
|
10, 15
|
65%
|
|
|
OR
|
AS
|
|
25
|
35%
|
|
|
OR
|
AS
|
|
25
|
65%
|
|
|
OR
|
AS
|
|
30, 35, 40
|
100%
|
| A colored background means that the Pokémon can be found in this location in the specified game. A white background with a colored letter means that the Pokémon cannot be found here.
|
Area 4
| Pokémon
|
Games
|
Location
|
Levels
|
Rate
|
|
|
OR
|
AS
|
|
28-30
|
30%
|
|
|
OR
|
AS
|
|
27, 29
|
20%
|
|
|
OR
|
AS
|
|
28-30
|
30%
|
|
|
OR
|
AS
|
|
28, 30
|
20%
|
| Long grass
|
|
|
OR
|
AS
|
|
28-30
|
30%
|
|
|
OR
|
AS
|
|
27, 29
|
20%
|
|
|
OR
|
AS
|
|
28-30
|
30%
|
|
|
OR
|
AS
|
|
28, 30
|
20%
|
| Horde Encounter
|
|
|
OR
|
AS
|

|
Horde Encounter
|
|
15
|
35%
|
|
|
OR
|
AS
|

|
Horde Encounter
|
|
15
|
5%
|
|
|
OR
|
AS
|

|
Horde Encounter
|
|
15
|
60%
|
Exclusively as hidden Pokémon
After defeating or catching Groudon/Kyogre
|
|
|
OR
|
AS
|
|
30
|
??%
|
|
|
OR
|
AS
|
|
30
|
??%
|
|
|
OR
|
AS
|
|
30
|
??%
|
| Surfing
|
|
|
OR
|
AS
|
|
20, 25, 30
|
100%
|
| Fishing
|
|
|
OR
|
AS
|
|
5
|
35%
|
|
|
OR
|
AS
|
|
10, 15
|
65%
|
|
|
OR
|
AS
|
|
25
|
35%
|
|
|
OR
|
AS
|
|
25
|
65%
|
|
|
OR
|
AS
|
|
30, 35, 40
|
100%
|
| A colored background means that the Pokémon can be found in this location in the specified game. A white background with a colored letter means that the Pokémon cannot be found here.
|
Layout
Trivia
- Chapter One: Foundation.
- "A desire to provide the children of the Hoenn region with a chance to encounter many Pokémon welled up inside of me and led to my decision to open here."
- Chapter Two: Opening.
- "From the very day we opened, a long line wound its way from the Safari Zone. It was a huge success. A desire to make more money off of it welled up inside of me and led to my decision to raise the price of admission."
- Chapter Three: Bankruptcy.
- "As a result of the higher admission prices, customers stopped coming to the Safari Zone. A desire to save my own hide welled up inside of me and led to my decision to flee under cover of night."
- Chapter Four: Rebirth.
- "After I had made my escape, the Safari Zone was reborn thanks to the support of some thoughtful people. A desire to pretend that I had never run away welled up inside of me and led to my decision to return to Hoenn."
- Final Chapter: The Future.
- "Having made my return, I began working as a volunteer at the Safari Zone. A desire to express my happiness at having returned welled up inside of me and led to my decision to continue to take good care of Pokémon every day."
- Players cannot pick up the Rare Candy in area 6 if they stand north or west of the Rare Candy.
In other languages


 Pikachu
 Oddish
 Gloom
Gloom Psyduck
 Golduck
 Geodude
 Doduo
Doduo Dodrio
 Rhyhorn
 Goldeen
 Seaking
 Pinsir
 Magikarp
 Hoothoot
 Ledyba
 Spinarak
 Natu
Natu Xatu
Xatu Mareep
 Marill
 Aipom
Aipom Sunkern
 Wooper
 Quagsire
 Wobbuffet
 Girafarig
 Pineco
 Gligar
 Snubbull
 Shuckle
 Heracross
 Teddiursa
 Remoraid
 Octillery
 Houndour
 Phanpy
 Stantler
 Miltank
