Dowsing Machine: Difference between revisions
CiaobyDany (talk | contribs) |
|||
| (44 intermediate revisions by 18 users not shown) | |||
| Line 1: | Line 1: | ||
{{ItemInfobox/head | |||
|name=Dowsing Machine | |||
|jname=ダウジングマシン | |||
|jtrans=Dowsing Machine | |||
|sprite=Dowsing Machine ORAS | |||
|art=Key Dowsing MCHN Sprite | |||
|caption=Obtain sprite from the Generation V games | |||
|gen=I | |||
|colorscheme=key items | |||
}} | |||
{{ItemInfobox/BagRow|I|Key items}} | |||
{{ItemInfobox/BagRow|II|Key items}} | |||
{{ItemInfobox/BagRow|III|Key items}} | |||
{{ItemInfobox/BagRow|IV|Key items}} | |||
{{ItemInfobox/BagRow|V|Key items}} | |||
{{ItemInfobox/BagRow|VI|Key items}} | |||
{{ItemInfobox/BagRowBottom|VII|Key items}} | |||
|} | |||
The '''Dowsing Machine''' (Japanese: '''ダウジングマシン''' ''Dowsing Machine''), referred to as the '''Itemfinder''' prior to [[Generation IV]] and as the '''Dowsing MCHN''' in {{game|HeartGold and SoulSilver|s}} and the [[Generation V]] games, is a [[Key Item]] used to detect hidden items in the vicinity of the user. The way in which it detects items and provides feedback greatly varies between games. | The '''Dowsing Machine''' (Japanese: '''ダウジングマシン''' ''Dowsing Machine''), referred to as the '''Itemfinder''' prior to [[Generation IV]] and as the '''Dowsing MCHN''' in {{game|HeartGold and SoulSilver|s}} and the [[Generation V]] games, is a [[Key Item]] used to detect hidden items in the vicinity of the user. The way in which it detects items and provides feedback greatly varies between games. | ||
In [[Generation VII]], the role of locating hidden items is given to the [[Poké Ride|Ride Pokémon]] {{p|Stoutland}} with Stoutland Search in [[Pokémon Sun and Moon]] and [[Pokémon Ultra Sun and Ultra Moon]], and the [[Partner Pokémon (game)|Partner Pokémon]] and [[Walking Pokémon]] in [[Pokémon: Let's Go, Pikachu! and Let's Go, Eevee!]]. | |||
==In the games== | ==In the games== | ||
{{ | ===Price=== | ||
{{ItemPrice/head|key items}} | |||
{{ItemPrice|{{gameabbrev1|RGBY}}/{{gameabbrev1|RBY}}<br>{{gameabbrev2|GSC}}<br>{{gameabbrev3|RSEFRLG}}<br>{{gameabbrev4|DPPtHGSS}}<br>{{gameabbrev5|BWB2W2}}<br>{{gameabbrev6|XYORAS}}<br>{{gameabbrev7|SMUSUM}}|N/A|N/A}} | |||
|} | |||
|} | |||
===Effect=== | |||
A form of the Itemfinder has been present in all core series {{pkmn|games}} since [[Generation I]]. | |||
===Generation | ====Generation I==== | ||
The Itemfinder is used to find items. When used when the player is not near a tile with a hidden item, text will appear stating that there are no items nearby: "''Nope! ITEMFINDER isn't responding.''" If the Itemfinder is used while a tile with a hidden item is "on-screen", the item will give out four musical chimes, with text stating: "''Yes! ITEMFINDER indicates there's an item nearby.''" | |||
===Generation | ====Generation II==== | ||
In {{game2|Gold|Silver|Crystal}}, the Itemfinder works exactly as it did in Generation I. However, the Itemfinder is now classified as a [[Key Item]] and can be [[Feature registration|registered to the Select Button]], allowing for easy access. | |||
In {{game2| | |||
In {{ | ====Generation III==== | ||
* The | Generation III marks the first time that the Itemfinder shows the direction and closeness of an item. | ||
* The | |||
* The | =====Pokémon Ruby, Sapphire, and Emerald===== | ||
* The | In {{game2|Ruby|Sapphire|Emerald}}, the Itemfinder retains its previous mechanics from Generation I and II, requiring the hidden item to be "on-screen". However, the player will turn towards the direction of the hidden item after the chimes. The text when an item is near reads:"''Huh? The ITEMFINDER's responding! There's an item buried around here!''" | ||
When operating the Itemfinder under normal circumstances, text will appear stating that there is no item around which reads: "''... ... ... ...Nope! There's no response.''" | |||
=====Pokémon FireRed and LeafGreen===== | |||
In {{game|FireRed and LeafGreen|s}}, the Itemfinder receives an upgrade in the form of arrows that point towards the hidden item. The amount of arrows is based on how close the player is to the hidden item: Two arrows when the player is five to eight tiles away from the hidden item and four arrows when the player is within four tiles of the item. A musical chime will sound for each arrow that appears. The text used when operating the Itemfinder remains untouched from Pokémon Ruby, Sapphire and Emerald. | |||
There are also some items which require the Itemfinder to be used to obtain them, rather than simply being easier to find using it. These items can only be detected by the Itemfinder if the player is standing on top of them, at which point the item will be automatically obtained. When the Itemfinder is used on these tiles, three stars will appear above the player. In total, there are six items that can be found using this method: | |||
* The [[Soothe Bell]] in the [[Pokémon Tower]] after having rescued [[Mr. Fuji]] | |||
* The [[Leftovers]] on [[Route]]s {{rtn|12|Kanto}} and {{rtn|16|Kanto}} after having fought against each route's respective {{p|Snorlax}} | |||
* The [[Macho Brace]] in [[Viridian Gym]] after [[Giovanni]] disappears | |||
* The [[PP Max]] on [[Cape Brink]], located on a single patch of ground surrounded by the lake | |||
* The [[Sacred Ash]] on [[Navel Rock]] after having fought against {{p|Ho-Oh}} | * The [[Sacred Ash]] on [[Navel Rock]] after having fought against {{p|Ho-Oh}} | ||
The text that appears when operating the Itemfinder over these spots is, as follows:"''Oh! The ITEMFINDER's shaking wildly! There's an item buried underfoot!''" | |||
===Generation IV=== | ====Generation IV==== | ||
The Dowsing Machines in [[Generation IV]] are slightly different to those of previous generations; they make use of the [[Nintendo DS]]'s touch screen. | The Dowsing Machines in [[Generation IV]] are slightly different to those of previous generations; they make use of the [[Nintendo DS]]'s touch screen. | ||
In {{game2|Diamond|Pearl|Platinum}}, the [[Pokétch]]'s {{DL|Pokétch|Dowsing Machine}} app replaces the functions of the Itemfinder | =====Pokémon Diamond, Pearl, and Platinum===== | ||
In {{game2|Diamond|Pearl|Platinum}}, the [[Pokétch]]'s {{DL|Pokétch|Dowsing Machine}} app replaces the functions of the Itemfinder. The layout of the Dowsing Machine app is that of a {{wp|Cartesian coordinate system|Cartesian plane}} with the player at the center. The app functions similar to a radar. When the touch screen is pressed, a circle will radiate from the point where the stylus hits and give out a "ping". When an item is nearby, a dilating radar circle will repeatedly appear. If the hidden item is within the radius of the circle, a dot will continuously blink while the radar circle repeatedly appears from the touched area. The app will reset its display upon the player performing any action. | |||
[[File: | =====Pokémon HeartGold and SoulSilver===== | ||
In {{game|HeartGold and SoulSilver|s}}, | [[File:HGSS Dowsing Machine.png|thumb|250px|The Dowsing Machine as it appears in Pokémon HeartGold and SoulSilver]] | ||
In {{game|HeartGold and SoulSilver|s}}, the Dowsing MCHN is a [[Key Item]]. It uses the touch screen to locate items, with each grid tile representing a tile on the overworld. Unlike Pokémon Diamond, Pearl, and Platinum, the Dowsing Machine is a circular grid and can be operated while moving. There are four lines around the central grid that will move around when the touched area moves in relation to the hidden item and will light up when an item is near. When touching the grid under normal circumstances, the radius of dots and lines will be dark red and will let out a slow series of lower-frequency beeping. If the player moves near a hidden item while touching the grid, the dots and lines will gradually light up from red to white until the player touches the grid tile representing the tile containing the item, in which a blinking dot will appear; the beeping will also speed up and become higher in frequency in relation to the closeness of the area the player is touching. | |||
====Pokéwalker==== | =====Pokéwalker===== | ||
{{main|Pokéwalker#Dowsing Machine|Pokéwalker → Dowsing Machine}} | |||
{{main|Pokéwalker#Dowsing Machine|Pokéwalker}} | On the [[Pokéwalker]], the Dowsing Machine is a mini game that can be used to find items. It costs 3 {{OBP|watt|currency}}s to play. In this mini game, the player gets two guesses. If the player gets the first guess wrong, the game gives a message regarding whether the item is adjacent to the selected spot or not. | ||
On the [[Pokéwalker]] | {{-}} | ||
===Generation V=== | ====Generation V==== | ||
[[File: | [[File:Gen V Dowsing Machine.png|thumb|250px|The Dowsing Machine, as it appears in Generation V, when the player is standing over an item.]] | ||
In {{4v|Black|White}}, it is once again known as the Dowsing MCHN. While it still appears on the touch screen when in use, it no longer takes any input from stylus touches and uses the screen for display purposes only. | In {{4v|Black|White}}, it is once again known as the Dowsing MCHN. While it still appears on the touch screen when in use, it no longer takes any input from stylus touches and uses the screen for display purposes only. The bars and an arrow will face in the direction of a hidden item when the player is close. If the player is standing on a tile containing an item, the bars will cross and a square with four small arrows will appear. | ||
===Generation VI=== | ====Generation VI==== | ||
In {{g|X and Y}} and {{g|Omega Ruby and Alpha Sapphire}}, the Dowsing Machine works entirely differently from previous titles. | In {{g|X and Y}} and {{g|Omega Ruby and Alpha Sapphire}}, the Dowsing Machine works entirely differently from previous titles. | ||
=====Pokémon X and Y===== | |||
In X and Y, the Dowsing Machine takes the form of two rods that the player character holds in each hand that project the current forward. Once used, the rods project two streams of electric current in the air ahead as the character walks around. This current changes color depending on if the player is facing the direction of a hidden item and how close they are to it. The color cycles through blue, to green, to orange, with a musical chime playing when the color changes to let the player know they are getting close. When the player is directly in front of a hidden item, the electric currents cross each other and turn red, and a different musical chime plays | In X and Y, the Dowsing Machine takes the form of two rods that the player character holds in each hand that project the current forward. Once used, the rods project two streams of electric current in the air ahead as the character walks around. This current changes color depending on if the player is facing the direction of a hidden item and how close they are to it. The color cycles through blue, to green, to orange, with a musical chime playing when the color changes to let the player know they are getting close. When the player is directly in front of a hidden item, the electric currents cross each other and turn red, and a different musical chime plays. | ||
=====Pokémon Omega Ruby and Alpha Sapphire===== | |||
In Omega Ruby and Alpha Sapphire, the Dowsing Machine is worn on the head with two electrodes protruding from the top. The electrodes change color as in X and Y as the player approaches a hidden item, and the electrodes turn red and vibrate when the player is directly in front of a hidden item. While wearing the Dowsing Machine, the player cannot sneak. The Dowsing Machine cannot be used [[underwater]] nor in most buildings. The player cannot ride a [[Bicycle]] or {{m|Surf}} and use the Dowsing Machine simultaneously | In Omega Ruby and Alpha Sapphire, the Dowsing Machine is worn on the head with two electrodes protruding from the top. The electrodes change color as in X and Y as the player approaches a hidden item, and the electrodes turn red and vibrate when the player is directly in front of a hidden item. While wearing the Dowsing Machine, the player cannot sneak. The Dowsing Machine cannot be used [[underwater]] nor in most buildings. The player cannot ride a [[Bicycle]] or {{m|Surf}} and use the Dowsing Machine simultaneously. | ||
=== | ===Description=== | ||
{{movedesc|key items}} | {{movedesc|key items}} | ||
{{movedescentry|{{gameabbrevss|Stad}}|A machine for searching items on the ground.}} | {{movedescentry|{{gameabbrevss|Stad}}|A machine for searching items on the ground.}} | ||
| Line 58: | Line 92: | ||
{{movedescentry|{{gameabbrev4|HGSS}}<br>{{gameabbrev5|BWB2W2}}|It checks for unseen items in the area and makes noise and lights when it finds something.}} | {{movedescentry|{{gameabbrev4|HGSS}}<br>{{gameabbrev5|BWB2W2}}|It checks for unseen items in the area and makes noise and lights when it finds something.}} | ||
{{movedescentry|{{gameabbrev6|XY}}|It searches for hidden items in the area and emits different lights and sounds when it detects something.}} | {{movedescentry|{{gameabbrev6|XY}}|It searches for hidden items in the area and emits different lights and sounds when it detects something.}} | ||
{{movedescentry|{{gameabbrev6|ORAS}}|This high-tech machine shows the location of invisible items. It's attached to the head when in use.}} | {{movedescentry|{{gameabbrev6|ORAS}}<br>{{gameabbrev7|SMUSUM}}|This high-tech machine shows the location of invisible items. It's attached to the head when in use.}} | ||
|} | |||
|} | |||
===Acquisition=== | |||
{{ItemAvailability/keyhead|key items}} | |||
|- | |||
| {{gameabbrev1|RGBY}}<br>{{gameabbrev1|RBY}} | |||
| {{rt|11|Kanto}} [[gate]] 2F (from {{prof|Oak}}'s [[Professors' aides|aide]] after obtaining 30 Pokémon) | |||
|- | |||
| {{gameabbrev2|GSC}} | |||
| [[Ecruteak City]] (from a man in a house next to the [[Ecruteak Gym|Gym]]) | |||
|- | |||
| {{gameabbrev3|RSE}} | |||
| {{rt|110|Hoenn}} (from {{ga|Brendan}}/{{ga|May}} after defeating him/her) | |||
|- | |||
| {{gameabbrev3|FRLG}} | |||
| {{rt|11|Kanto}} [[gate]] 2F (from {{prof|Oak}}'s [[Professors' aides|aide]] after obtaining 30 Pokémon) | |||
|- | |||
| {{gameabbrev4|HGSS}} | |||
| [[Ecruteak City]] (from a man in a house next to the [[Ecruteak Gym|Gym]]) | |||
|- | |||
| {{gameabbrev5|BW}} | |||
| [[Nacrene City]] (from [[Bianca]] after obtaining the {{Badge|Basic}}) | |||
|- | |||
| {{gameabbrev5|B2W2}} | |||
| [[Castelia City]] (from [[Bianca]] in the [[gate]] leading to {{rt|4|Unova}}) | |||
|- | |||
| {{gameabbrev6|XY}} | |||
| {{rt|8|Kalos}} (from a {{tc|Swimmer}} after clearing [[Glittering Cave]]) | |||
|- | |||
| {{gameabbrev6|ORAS}} | |||
| {{rt|110|Hoenn}} (from {{ga|Brendan}}/{{ga|May}} after defeating him/her) | |||
|} | |||
|} | |||
===Appearance=== | |||
{| style="margin:auto; text-align:center; {{roundy|20px}} border: 2px solid #{{key items color dark}}; background: #{{key items color}}; font-size:80%" | |||
|- | |||
| style="{{roundy|80px}} border: 2px solid #{{Key items color dark}}; background: #{{Key items color light}}; width:96px; height:96px" | [[File:RG Itemfinder.png|x100px]] | |||
| style="{{roundy|80px}} border: 2px solid #{{Key items color dark}}; background: #{{Key items color light}}; width:96px; height:96px" | {{bag|Itemfinder}} | |||
| style="{{roundy|80px}} border: 2px solid #{{Key items color dark}}; background: #{{Key items color light}}; width:96px; height:96px" | {{bag|Dowsing MCHN IV}} | |||
| style="{{roundy|80px}} border: 2px solid #{{Key items color dark}}; background: #{{Key items color light}}; width:96px; height:96px" | [[File:Pokéwalker Dowsing Machine.png]] | |||
| style="{{roundy|80px}} border: 2px solid #{{Key items color dark}}; background: #{{Key items color light}}; width:96px; height:96px" | {{bag|Dowsing MCHN}} | |||
| style="{{roundy|80px}} border: 2px solid #{{Key items color dark}}; background: #{{Key items color light}}; width:96px; height:96px" | {{bag|Dowsing Machine XY}} | |||
| style="{{roundy|80px}} border: 2px solid #{{Key items color dark}}; background: #{{Key items color light}}; width:96px; height:96px" | {{bag|Dowsing Machine ORAS}} | |||
|- | |||
| Artwork from<br>{{color2|000|Generation I}} | |||
| {{color2|000|Bag}} sprite from<br>{{color2|000|Generation III}} | |||
| {{color2|000|Bag}} sprite from<br>{{color2|000|Pokémon HeartGold and SoulSilver Versions|HeartGold and SoulSilver}} | |||
| Sprite from the<br>{{color2|000|Pokéwalker}} | |||
| {{color2|000|Bag}} sprite from<br>{{color2|000|Generation V}} | |||
| {{color2|000|Bag}} sprite from<br>{{color2|000|Pokémon X and Y|X and Y}} | |||
| {{color2|000|Bag}} sprite from<br>{{color2|000|Pokémon Omega Ruby and Alpha Sapphire|Omega Ruby and Alpha Sapphire}} | |||
|- | |||
| | |||
| style="{{roundy|80px}} border: 2px solid #{{Key items color dark}}; background: #{{Key items color light}}; width:96px; height:96px" | [[File:Dowsing Machine XY.png|x100px]] | |||
| style="{{roundy|80px}} border: 2px solid #{{Key items color dark}}; background: #{{Key items color light}}; width:96px; height:96px" | [[File:Dowsing Machine 2 XY.png|x100px]] | |||
| style="{{roundy|80px}} border: 2px solid #{{Key items color dark}}; background: #{{Key items color light}}; width:96px; height:96px" | [[File:Dowsing Machine 3 XY.png|x100px]] | |||
| style="{{roundy|80px}} border: 2px solid #{{Key items color dark}}; background: #{{Key items color light}}; width:96px; height:96px" | [[File:Dowsing Machine 4 XY.png|x100px]] | |||
| style="{{roundy|80px}} border: 2px solid #{{Key items color dark}}; background: #{{Key items color light}}; width:96px; height:96px" | [[File:Dowsing Machine 5 XY.png|x100px]] | |||
|- | |||
| | |||
| colspan=5 | Overworld models from<br>{{color2|000|Pokémon X and Y|X and Y}} | |||
|- | |||
| | |||
| style="{{roundy|80px}} border: 2px solid #{{Key items color dark}}; background: #{{Key items color light}}; width:96px; height:96px" | [[File:Dowsing Machine ORAS.png|x100px]] | |||
| style="{{roundy|80px}} border: 2px solid #{{Key items color dark}}; background: #{{Key items color light}}; width:96px; height:96px" | [[File:Dowsing Machine 2 ORAS.png|x100px]] | |||
| style="{{roundy|80px}} border: 2px solid #{{Key items color dark}}; background: #{{Key items color light}}; width:96px; height:96px" | [[File:Dowsing Machine 3 ORAS.png|x100px]] | |||
| style="{{roundy|80px}} border: 2px solid #{{Key items color dark}}; background: #{{Key items color light}}; width:96px; height:96px" | [[File:Dowsing Machine 4 ORAS.png|x100px]] | |||
| style="{{roundy|80px}} border: 2px solid #{{Key items color dark}}; background: #{{Key items color light}}; width:96px; height:96px" | [[File:Dowsing Machine 5 ORAS.png|x100px]] | |||
|- | |||
| | |||
| colspan=5 | Overworld models from<br>{{color2|000|Pokémon Omega Ruby and Alpha Sapphire|Omega Ruby and Alpha Sapphire}} | |||
|} | |} | ||
==In the anime== | ==In the anime== | ||
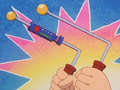
[[File:Dowsing Machine anime.png|thumb|250px|A Dowsing Machine in the {{pkmn|anime}}]] | |||
[[File:Dowsing Machine anime.png|thumb| | In ''[[EP181|A Ghost of a Chance]]'', a {{tc|Firebreather}} named [[Infernando]] tried to sell {{Ash}} and {{ashfr}} an Itemfinder, referred to in the English dub as a "Treasure Detector". Although the group refused the offer, the machine was soon after bought by [[James]]. He used it in an attempt to find treasures around [[Ecruteak City]], although he ended up just finding bottle caps. | ||
In ''[[EP181|A Ghost of a Chance]]'', [[ | |||
In ''[[EP182|From Ghost to Ghost]]'', the Treasure Detector led {{TRT}} to a storage full of valuable antiques. However, while looting the place, the group was ambushed and {{m|Hypnosis|hypnotized}} by a group of {{p|Gastly}}, scaring them away. | |||
In ''[[ | In ''[[AG085|Sky High Gym Battle!]]'', Team Rocket used a pair of golden dowsing rods, referred to as Itemfinders, in an attempt to lead them to a treasure supposedly buried underneath the [[Fortree Gym]]. | ||
In ''[[DP148|Try for the Family Stone!]]'', James used | In ''[[DP148|Try for the Family Stone!]]'', James used a pair of dowsing rods in an attempt to find a [[Dusk Stone]]. | ||
{{ | |||
In ''[[SM025|A Team-on-Team Tussle!]]'', James used a modified Dowsing Machine to locate a [[Z-Crystal]] for Team Rocket. However, soon after leading the Rocket trio to a [[Darkinium Z]], the machine was destroyed by the {{pkmn2|Totem}} {{p|Raticate}} guarding the Z-Crystal. | |||
<gallery> | |||
Itemfinder anime.png|The Itemfinder from the [[original series]] | |||
Itemfinder AG.png|The dowsing rods from the {{series|Advanced Generation}} | |||
Itemfinder DP.png|The dowsing rods from the {{series|Diamond & Pearl}} | |||
</gallery> | |||
==In the manga== | ==In the manga== | ||
[[File:Itemfinder Adventures.png|thumb|220px|An Itemfinder in Pokémon Adventures]] | [[File:Itemfinder Adventures.png|thumb|220px|An Itemfinder in Pokémon Adventures]] | ||
===In the Pokémon Adventures manga=== | ===In the Pokémon Adventures manga=== | ||
In | In ''[[PS022|A Hollow Victreebel]]'', an Itemfinder was one of the many items seen in {{adv|Red}}'s [[Bag]]. In ''[[PS024|What a Dragonite]]'', he used the Itemfinder to locate the hidden [[HM]] for {{m|Surf}} on {{rt|19|Kanto}}, coming across and being attacked by a wild {{p|Dragonite}} in the process. | ||
In ''[[PS391|Luring in a Lickilicky]]'', {{adv|Diamond}} used the Dowsing Machine app on his Pokétch to track down an item-stealing wild {{p|Lickilicky}}'s hiding place. | |||
{{-}} | {{-}} | ||
| Line 88: | Line 202: | ||
{{cardlist/entry|cardname={{TCG ID|Plasma Storm|Dowsing Machine|128}}|type=Item|enset=Plasma Storm|enrarity=Rare Holo|ennum=128/135|jpset=Plasma Gale|jprarity=Rare Holo|jpnum=069/070}} | {{cardlist/entry|cardname={{TCG ID|Plasma Storm|Dowsing Machine|128}}|type=Item|enset=Plasma Storm|enrarity=Rare Holo|ennum=128/135|jpset=Plasma Gale|jprarity=Rare Holo|jpnum=069/070}} | ||
{{cardlist/footer|Item}} | {{cardlist/footer|Item}} | ||
==In other languages== | ==In other languages== | ||
{{langtable|color={{key items color light}}|bordercolor={{key items color dark}} | {{langtable|color={{key items color light}}|bordercolor={{key items color dark}} | ||
|zh_yue=探寶器 ''{{tt|Taambóuhei|Treasure Detector}}'' | |||
|zh_cmn=探寶器 / 探宝器 ''{{tt|Tànbǎoqì|Treasure Detector}}'' | |||
|nl=Detector{{tt|*|TCG}} | |||
|de=Itemradar{{tt|*|Generation IV onwards}}<br>Detektor{{tt|*|Generations I-III}} | |de=Itemradar{{tt|*|Generation IV onwards}}<br>Detektor{{tt|*|Generations I-III}} | ||
|fi=Taikavarpukone | |||
|fr=Cherch'Objet | |fr=Cherch'Objet | ||
|it=Ricerca Strum.{{tt|*|Generation | |it=Ricerca Strum.{{tt|*|Generation VI}}<br>Ricerca Str.{{tt|*|HeartGold, SouSilver, and Generation V}}<br>Ricerca Strumenti{{tt|*|Diamond, Pearl, and Platinum}}<br>Detector{{tt|*|Generations I-III}} | ||
|es=Zahorí{{tt|*|Generation IV onwards}}<br>Buscaobjetos{{tt|*|Generations I-III}} | |es=Zahorí{{tt|*|Generation IV onwards}}<br>Buscaobjetos{{tt|*|Generations I-III}} | ||
|ko=다우징머신 ''Dowsing Machine'' | |ko=다우징머신 ''Dowsing Machine'' | ||
|pl=Urządzenie do radiestezji | |||
|pt_br=Máquina de Prospecção | |pt_br=Máquina de Prospecção | ||
|th=เครื่องดาวซิ่ง ''Machine Dowsing''<br>เครื่องค้นหา ''Machine Search'' ([[Sun & Moon series]]) | |||
|vi=Máy cảm xạ | |vi=Máy cảm xạ | ||
}} | }} | ||
| Line 109: | Line 226: | ||
[[Category:Key Items]] | [[Category:Key Items]] | ||
[[de: | [[de:Itemradar]] | ||
[[es:Zahorí]] | |||
[[fr:Cherch'Objet]] | [[fr:Cherch'Objet]] | ||
[[it: | [[it:Ricerca Strumenti]] | ||
[[ja:ダウジングマシン (どうぐ)]] | [[ja:ダウジングマシン (どうぐ)]] | ||
[[zh:探宝器(道具)]] | [[zh:探宝器(道具)]] | ||
Revision as of 16:35, 17 February 2019
| |||||||||||||||||
| |||||||||||||||||
| |||||||||||||||||
The Dowsing Machine (Japanese: ダウジングマシン Dowsing Machine), referred to as the Itemfinder prior to Generation IV and as the Dowsing MCHN in Pokémon HeartGold and SoulSilver and the Generation V games, is a Key Item used to detect hidden items in the vicinity of the user. The way in which it detects items and provides feedback greatly varies between games.
In Generation VII, the role of locating hidden items is given to the Ride Pokémon Stoutland with Stoutland Search in Pokémon Sun and Moon and Pokémon Ultra Sun and Ultra Moon, and the Partner Pokémon and Walking Pokémon in Pokémon: Let's Go, Pikachu! and Let's Go, Eevee!.
In the games
Price
|
Effect
A form of the Itemfinder has been present in all core series games since Generation I.
Generation I
The Itemfinder is used to find items. When used when the player is not near a tile with a hidden item, text will appear stating that there are no items nearby: "Nope! ITEMFINDER isn't responding." If the Itemfinder is used while a tile with a hidden item is "on-screen", the item will give out four musical chimes, with text stating: "Yes! ITEMFINDER indicates there's an item nearby."
Generation II
In Pokémon Gold, Silver, and Crystal, the Itemfinder works exactly as it did in Generation I. However, the Itemfinder is now classified as a Key Item and can be registered to the Select Button, allowing for easy access.
Generation III
Generation III marks the first time that the Itemfinder shows the direction and closeness of an item.
Pokémon Ruby, Sapphire, and Emerald
In Pokémon Ruby, Sapphire, and Emerald, the Itemfinder retains its previous mechanics from Generation I and II, requiring the hidden item to be "on-screen". However, the player will turn towards the direction of the hidden item after the chimes. The text when an item is near reads:"Huh? The ITEMFINDER's responding! There's an item buried around here!"
When operating the Itemfinder under normal circumstances, text will appear stating that there is no item around which reads: "... ... ... ...Nope! There's no response."
Pokémon FireRed and LeafGreen
In Pokémon FireRed and LeafGreen, the Itemfinder receives an upgrade in the form of arrows that point towards the hidden item. The amount of arrows is based on how close the player is to the hidden item: Two arrows when the player is five to eight tiles away from the hidden item and four arrows when the player is within four tiles of the item. A musical chime will sound for each arrow that appears. The text used when operating the Itemfinder remains untouched from Pokémon Ruby, Sapphire and Emerald.
There are also some items which require the Itemfinder to be used to obtain them, rather than simply being easier to find using it. These items can only be detected by the Itemfinder if the player is standing on top of them, at which point the item will be automatically obtained. When the Itemfinder is used on these tiles, three stars will appear above the player. In total, there are six items that can be found using this method:
- The Soothe Bell in the Pokémon Tower after having rescued Mr. Fuji
- The Leftovers on Routes 12 and 16 after having fought against each route's respective Snorlax
- The Macho Brace in Viridian Gym after Giovanni disappears
- The PP Max on Cape Brink, located on a single patch of ground surrounded by the lake
- The Sacred Ash on Navel Rock after having fought against Ho-Oh
The text that appears when operating the Itemfinder over these spots is, as follows:"Oh! The ITEMFINDER's shaking wildly! There's an item buried underfoot!"
Generation IV
The Dowsing Machines in Generation IV are slightly different to those of previous generations; they make use of the Nintendo DS's touch screen.
Pokémon Diamond, Pearl, and Platinum
In Pokémon Diamond, Pearl, and Platinum, the Pokétch's Dowsing Machine app replaces the functions of the Itemfinder. The layout of the Dowsing Machine app is that of a Cartesian plane with the player at the center. The app functions similar to a radar. When the touch screen is pressed, a circle will radiate from the point where the stylus hits and give out a "ping". When an item is nearby, a dilating radar circle will repeatedly appear. If the hidden item is within the radius of the circle, a dot will continuously blink while the radar circle repeatedly appears from the touched area. The app will reset its display upon the player performing any action.
Pokémon HeartGold and SoulSilver

In Pokémon HeartGold and SoulSilver, the Dowsing MCHN is a Key Item. It uses the touch screen to locate items, with each grid tile representing a tile on the overworld. Unlike Pokémon Diamond, Pearl, and Platinum, the Dowsing Machine is a circular grid and can be operated while moving. There are four lines around the central grid that will move around when the touched area moves in relation to the hidden item and will light up when an item is near. When touching the grid under normal circumstances, the radius of dots and lines will be dark red and will let out a slow series of lower-frequency beeping. If the player moves near a hidden item while touching the grid, the dots and lines will gradually light up from red to white until the player touches the grid tile representing the tile containing the item, in which a blinking dot will appear; the beeping will also speed up and become higher in frequency in relation to the closeness of the area the player is touching.
Pokéwalker
- Main article: Pokéwalker → Dowsing Machine
On the Pokéwalker, the Dowsing Machine is a mini game that can be used to find items. It costs 3 watts to play. In this mini game, the player gets two guesses. If the player gets the first guess wrong, the game gives a message regarding whether the item is adjacent to the selected spot or not.
Generation V

In Black, White, Black 2, and White 2, it is once again known as the Dowsing MCHN. While it still appears on the touch screen when in use, it no longer takes any input from stylus touches and uses the screen for display purposes only. The bars and an arrow will face in the direction of a hidden item when the player is close. If the player is standing on a tile containing an item, the bars will cross and a square with four small arrows will appear.
Generation VI
In Pokémon X and Y and Pokémon Omega Ruby and Alpha Sapphire, the Dowsing Machine works entirely differently from previous titles.
Pokémon X and Y
In X and Y, the Dowsing Machine takes the form of two rods that the player character holds in each hand that project the current forward. Once used, the rods project two streams of electric current in the air ahead as the character walks around. This current changes color depending on if the player is facing the direction of a hidden item and how close they are to it. The color cycles through blue, to green, to orange, with a musical chime playing when the color changes to let the player know they are getting close. When the player is directly in front of a hidden item, the electric currents cross each other and turn red, and a different musical chime plays.
Pokémon Omega Ruby and Alpha Sapphire
In Omega Ruby and Alpha Sapphire, the Dowsing Machine is worn on the head with two electrodes protruding from the top. The electrodes change color as in X and Y as the player approaches a hidden item, and the electrodes turn red and vibrate when the player is directly in front of a hidden item. While wearing the Dowsing Machine, the player cannot sneak. The Dowsing Machine cannot be used underwater nor in most buildings. The player cannot ride a Bicycle or Surf and use the Dowsing Machine simultaneously.
Description
|
Acquisition
|
Appearance

|
||||||
| Artwork from Generation I |
Bag sprite from Generation III |
Bag sprite from HeartGold and SoulSilver |
Sprite from the Pokéwalker |
Bag sprite from Generation V |
Bag sprite from X and Y |
Bag sprite from Omega Ruby and Alpha Sapphire |

|

|

|

|

| ||
| Overworld models from X and Y | ||||||

|

|

|

|

| ||
| Overworld models from Omega Ruby and Alpha Sapphire | ||||||
In the anime

In A Ghost of a Chance, a Firebreather named Infernando tried to sell Ash and his friends an Itemfinder, referred to in the English dub as a "Treasure Detector". Although the group refused the offer, the machine was soon after bought by James. He used it in an attempt to find treasures around Ecruteak City, although he ended up just finding bottle caps.
In From Ghost to Ghost, the Treasure Detector led Team Rocket to a storage full of valuable antiques. However, while looting the place, the group was ambushed and hypnotized by a group of Gastly, scaring them away.
In Sky High Gym Battle!, Team Rocket used a pair of golden dowsing rods, referred to as Itemfinders, in an attempt to lead them to a treasure supposedly buried underneath the Fortree Gym.
In Try for the Family Stone!, James used a pair of dowsing rods in an attempt to find a Dusk Stone.
In A Team-on-Team Tussle!, James used a modified Dowsing Machine to locate a Z-Crystal for Team Rocket. However, soon after leading the Rocket trio to a Darkinium Z, the machine was destroyed by the Totem Raticate guarding the Z-Crystal.
The Itemfinder from the original series

The dowsing rods from the Advanced Generation series

The dowsing rods from the Diamond & Pearl series


In the manga

In the Pokémon Adventures manga
In A Hollow Victreebel, an Itemfinder was one of the many items seen in Red's Bag. In What a Dragonite, he used the Itemfinder to locate the hidden HM for Surf on Route 19, coming across and being attacked by a wild Dragonite in the process.
In Luring in a Lickilicky, Diamond used the Dowsing Machine app on his Pokétch to track down an item-stealing wild Lickilicky's hiding place.
In the TCG
The following is a list of cards named either Item Finder or Dowsing Machine.
| Related cards Cards listed with a blue background are only legal to use in the current Expanded format. Cards listed with a green background are legal to use in both the current Standard and Expanded formats. | |||||||
|---|---|---|---|---|---|---|---|
| Card | Type | English Expansion |
Rarity | # | Japanese Expansion |
Rarity | # |
| Item Finder | T | Base Set | 74/102 | Expansion Pack | |||
| Base Set 2 | 103/130 | ||||||
| Dowsing Machine | I | Plasma Storm | 128/135 | Plasma Gale | 069/070 | ||
In other languages
| ||||||||||||||||||||||||||||||||||||||||||||
| This item article is part of Project ItemDex, a Bulbapedia project that aims to write comprehensive articles on all items. |