Crags of Lament: Difference between revisions
From Bulbapedia, the community-driven Pokémon encyclopedia.
Jump to navigationJump to search
No edit summary |
(Made an update to reflect the changes to the Dungeon info template) |
||
| (22 intermediate revisions by 8 users not shown) | |||
| Line 1: | Line 1: | ||
{{DungeonPrevNext| | {{DungeonPrevNext|Tempting Path|Telluric Path|5}} | ||
{{Dungeon infobox | {{Dungeon infobox | ||
|colorscheme=Rock | |colorscheme=Rock | ||
|bordercolorscheme=Water | |bordercolorscheme=Water | ||
|name= | |name=Crags of Lament | ||
|jname=ドウコクの谷 | |jname=ドウコクの谷 | ||
|jtrans=Wailing | |jtrans=Wailing Valley | ||
|image= | |image=Crags of Lament PMDGTI.png | ||
|recruitable=Yes | |recruitable=Yes | ||
|floors=9 | |floors=9 | ||
|rest=Yes | |rest=Yes | ||
|traps=No | |traps=No | ||
|monsterhouses=No | |||
|items=48 | |items=48 | ||
|money=Allowed | |money=Allowed | ||
| Line 19: | Line 20: | ||
}} | }} | ||
(Japanese: '''ドウコクの谷''' ''Wailing Valley'') is a playable dungeon the player goes through in [[Pokémon Mystery Dungeon: Gates to Infinity]]. It has nine floors and two bosses. This dungeon is accessible after {{p|Umbreon}} | '''Crags of Lament''' (Japanese: '''ドウコクの谷''' ''Wailing Valley'') is a playable dungeon the player goes through in [[Pokémon Mystery Dungeon: Gates to Infinity]]. It has nine floors and two bosses. This dungeon is accessible after {{p|Umbreon}} shows the player a Magnagate and requests that the player saves his sister {{p|Espeon}}. When the player enters the Mapless Street from this dungeon, it takes them directly to the [[Tyrian Maze]] dungeon for several floors before returning. | ||
==Pokémon encountered== | ==Pokémon encountered== | ||
{{mdloc/h|Rock}} | {{mdloc/h|Rock}} | ||
{{mdloc|220|Swinub|1 | {{mdloc|220|Swinub|1-9|16|?}} | ||
{{mdloc|528|Swoobat|1 | {{mdloc|528|Swoobat|1-9|14|?}} | ||
{{mdloc|543|Venipede|1 | {{mdloc|543|Venipede|1-9|16|?}} | ||
{{mdloc|547|Whimsicott| | {{mdloc|547|Whimsicott|1-9|17|?}} | ||
{{mdloc|530|Excadrill| | {{mdloc|530|Excadrill|1-9|?|?}} | ||
{{mdloc|432|Purugly|Cliffside|?| | {{mdloc|432|Purugly|Cliffside|?|0|boss=yes}} | ||
{{mdloc|454|Toxicroak|Cliffside|?| | {{mdloc|454|Toxicroak|Cliffside|?|0|boss=yes}} | ||
{{mdloc/f|Rock}} | {{mdloc/f|Rock}} | ||
| Line 35: | Line 36: | ||
{{DungeonItem/h|rock}} | {{DungeonItem/h|rock}} | ||
{{DungeonItem|Poké|4=53-110|sprite=Poké currency|3=1-9}} | {{DungeonItem|Poké|4=53-110|sprite=Poké currency|3=1-9}} | ||
{{DungeonItem|Oran Berry|3=1 | {{DungeonItem|Oran Berry|3=1-9}} | ||
{{DungeonItem|Pecha Berry|sprite=MDBag Pecha Berry | {{DungeonItem|Pecha Berry|sprite=MDBag Pecha Berry Sprite|3=1-9}} | ||
{{DungeonItem|Rawst Berry|sprite=MDBag Rawst Berry | {{DungeonItem|Rawst Berry|sprite=MDBag Rawst Berry Sprite|3=1-9}} | ||
{{DungeonItem|Escape Orb|Wonder Orb|3= | {{DungeonItem|Escape Orb|Wonder Orb|3=1-9}} | ||
{{DungeonItem|Rollcall Orb|Wonder Orb|3= | {{DungeonItem|Rollcall Orb|Wonder Orb|3=1-9}} | ||
{{DungeonItem|Foe-Hold Orb|Wonder Orb|3= | {{DungeonItem|Foe-Hold Orb|Wonder Orb|3=1-9}} | ||
{{DungeonItem| | {{DungeonItem|All-Protect Orb|Wonder Orb|3=1-9}} | ||
{{DungeonItem| | {{DungeonItem|Blast Seed|Seed|3=1-9}} | ||
{{DungeonItem| | {{DungeonItem|Heal Seed|Seed|3=1-9}} | ||
{{DungeonItem| | {{DungeonItem|Fickle Ribbon|Scarf (Mystery Dungeon)|3=1-9|sprite=MDBag Scarf Sprite}} | ||
{{DungeonItem| | {{DungeonItem|Cover Band|Scarf (Mystery Dungeon)|3=1-9|sprite=MDBag Scarf Sprite}} | ||
{{DungeonItem| | {{DungeonItem|Max Elixir|Health drink|sprite=MDBag Health drink Sprite|3=1-9}} | ||
|} | |} | ||
==Gallery== | ==Gallery== | ||
<gallery> | <gallery> | ||
File: | File:Crags of Lament 4F Espeon PMDGTI.png|Scene where Espeon runs away from enemies | ||
File: | File:Crags of Lament boss area PMDGTI.png|Wailing Valley boss area | ||
File: | File:Crags of Lament confrontation PMDGTI.png|Toxicroak and Purugly going after Espeon | ||
File: | File:Crags of Lament boss battle PMDGTI.png|Wailing Valley cliffside boss battle | ||
File: | File:Crags of Lament Espeon encounter PMDGTI.png|Rescuing Espeon | ||
</gallery> | </gallery> | ||
{{-}} | {{-}} | ||
{{PMD GTI locations}} | |||
{{DoubleProjectTag|Locations|Sidegames}} | {{DoubleProjectTag|Locations|Sidegames}} | ||
[[Category:Pokémon Mystery Dungeon: Gates to Infinity locations]] | [[Category:Pokémon Mystery Dungeon: Gates to Infinity locations]] | ||
[[Category:Mountains]] | [[Category:Mountains]] | ||
[[de:Jammertal]] | |||
[[ja:ドウコクの谷]] | |||
Revision as of 01:37, 20 March 2016
|
|
|
| ||||||||||||||||||||||||||||||||||||||||||
| ||||||||||||||||||||||||||||||||||||||||||
| ||||||||||||||||||||||||||||||||||||||||||

Crags of Lament (Japanese: ドウコクの谷 Wailing Valley) is a playable dungeon the player goes through in Pokémon Mystery Dungeon: Gates to Infinity. It has nine floors and two bosses. This dungeon is accessible after Umbreon shows the player a Magnagate and requests that the player saves his sister Espeon. When the player enters the Mapless Street from this dungeon, it takes them directly to the Tyrian Maze dungeon for several floors before returning.
Pokémon encountered
| Pokémon | Floors | Levels | Recruit Rate | |
|---|---|---|---|---|
| Swinub | 1-9 | 16 | ?% | |
| Swoobat | 1-9 | 14 | ?% | |
| Venipede | 1-9 | 16 | ?% | |
| Whimsicott | 1-9 | 17 | ?% | |
| Excadrill | 1-9 | ? | ?% | |
| Purugly | Cliffside | ? | Unrecruitable Boss | |
| Toxicroak | Cliffside | ? | Unrecruitable Boss | |
Items
| Item | Floors | |
|---|---|---|
| 53-110 Poké | 1-9F | |
| Oran Berry | 1-9F | |
| Pecha Berry | 1-9F | |
| Rawst Berry | 1-9F | |
| Escape Orb | 1-9F | |
| Rollcall Orb | 1-9F | |
| Foe-Hold Orb | 1-9F | |
| All-Protect Orb | 1-9F | |
| Blast Seed | 1-9F | |
| Heal Seed | 1-9F | |
| Fickle Ribbon | 1-9F | |
| Cover Band | 1-9F | |
| Max Elixir | 1-9F | |
Gallery
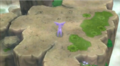
Scene where Espeon runs away from enemies
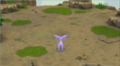
Wailing Valley boss area
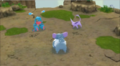
Toxicroak and Purugly going after Espeon
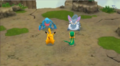
Wailing Valley cliffside boss battle

Rescuing Espeon


| This article is part of both Project Locations and Project Sidegames, Bulbapedia projects that, together, aim to write comprehensive articles on the Pokémon Locations and Sidegames, respectively. |