Castelia City: Difference between revisions
Dialgarules (talk | contribs) m (Undo revision 1223220 by Dialgarules (talk) never mind it doesn't have an English name) |
Storm Aurora (talk | contribs) m (Text replacement - "trainerfooter|city" to "trainerfooter|road") Tags: Mobile edit Mobile web edit |
||
| (661 intermediate revisions by more than 100 users not shown) | |||
| Line 1: | Line 1: | ||
{{incomplete}} | {{incomplete|2=Missing layout maps}} | ||
{{Town infobox | {{Town infobox | ||
|name= | |name=Castelia City | ||
|jpname=ヒウンシティ | |jpname=ヒウンシティ | ||
|jptrans=Hiun City | |jptrans=Hiun City | ||
|image= | |image=Castelia City.png | ||
|region= | |region=Unova | ||
|generation=5 | |generation=5 | ||
|slogan= | |slogan=A City of Grandeur | ||
|mapdesc=A big city with skyscrapers piercing the clouds. | |||
|north=Route 4 | |north=Route 4 | ||
|regionnorth= | |regionnorth=Unova | ||
|east= | |east=Skyarrow Bridge | ||
| | |south=Castelia Sewers | ||
| | |southalt=Castelia Sewers{{tt|*|Black 2 and White 2 only}} | ||
|gym=Castelia Gym | |||
|gymno=3 | |gymno=3 | ||
|leader= | |leader=Burgh | ||
|leadersprite= | |leadersprite=VSBurgh.png | ||
|badge= | |badge=Insect | ||
|gymtype=Bug | |gymtype=Bug | ||
|colordark= | |colordark=002D72 | ||
|colormed= | |colormed=0077C8 | ||
|colorlight= | |colorlight=D9E1E2 | ||
}} | }} | ||
(Japanese: '''ヒウンシティ''' ''Hiun City'') is a large seaside city located in south central [[ | [[File:Castelia City {{#switch: {{#expr: {{#time: n}} mod 4}}|0=Winter|1=Spring|2=Summer|3=Autumn}} B2W2.png|thumb|256px|Castelia City in {{2v2|Black|White|2}}]] | ||
'''Castelia City''' (Japanese: '''ヒウンシティ''' ''Hiun City'') is a large seaside city located in south central [[Unova]]. Unlike other cities, Castelia is a huge, sprawling metropolis, sporting many towering skyscrapers and other tall buildings. It is the heart of business and economy of the Unova [[region]], as opposed to its sister city, [[Nimbasa City]], which is the heart of leisure and entertainment. Most of its city streets are crowded with different people rushing around, trying to get to work, home, or other places, creating a hustle and bustle scene for city life. The city exists on the bottom of Unova's central peninsula, south of the desert and north of the sea, making for a perfect harbor city. | |||
The city has only two possible entrances on foot | The city has only two possible entrances on foot, from {{rt|4|Unova}}, a harsh desert in the north, and from the [[Skyarrow Bridge]], a large suspension bridge that connects the southern part of the eastern peninsula to the central peninsula and provides a scenic view of Castelia's vast skyline, which spans off in the east. There are several other ways to enter the city. Tourists and businessmen travel to Castelia City from other regions by boat and stop at Castelia's harbor side. | ||
Castelia City is geographically the largest city in the Unova region and contains many structural elements that have not been seen in cities in other regions. The city's core is a {{wp|central business district}}, with huge skyscrapers and other commercial buildings; a series of alleyways lead into this core, where smaller shops are set up among city traffic. The city's outskirts are bounded on all sides by harbor, where ships provide traffic to other regions in the Pokémon world. | |||
Despite its economic encouragement, Castelia also offers a worldly aspect. The city is a {{wp|melting pot}}, incorporating cultures and foods from other regions. From across the globe, artists also flock to Castelia to open their art galleries, offering a different sort of entertainment in comparison to Nimbasa City. | |||
==Slogan== | |||
'''''A City of Grandeur''''' (Japanese: '''{{j|ヒウンは 飛ぶ雲 めでたい雲}}''' ''Hiun is soaring clouds, auspicious clouds.'') | |||
==Places of interest== | ==Places of interest== | ||
[[File:Castelia City Map BW.png|thumb|250px|A map of Castelia City in Pokémon Black and White]] | |||
===Oceanfront Road=== | |||
Due to the geography of Unova's central peninsula, Castelia City's wharf is shaped so that it extends around most of the city. The wharf is considered the outer layer of the city, where many important skyscrapers and other buildings stand. The [[Pokémon Center]] can be found in the east of the wharf, and other important locations such as the Battle Company and [[Passerby Analytics HQ]] can be found in the west. | |||
====Battle Company==== | |||
{{sign|bwbuilding|Battle Company|Talented Trainers Welcome!}} | |||
The Battle Company is a multi-story building located on the corner of Mode Street along the wharf. The company is one of the lead researchers of battle items, and assists in the development of other items such as [[Poké Ball]]s, as well as goods for Pokémon and Trainers. An essential part of the research the company does is through battling, so most of the employees, who are usually {{tc|Clerk}}s and {{tc|Scientist}}s, are looking for a battle when they work. The stronger the employee is, the higher the floor they work on. Only three floors are accessible to Trainers and visitors, however: the ground floor, 47th floor, and 55th floor. The floors are all connected by an elevator at the back of the building. The ground floor is reception and the visitors' floor, where there are a few tables set up and a television. The 47th floor contains many Battle Company employees who will battle visitors. The head of the company works on the 55th floor. | |||
The 47th floor contains six{{sup/5|BW}}/five{{sup/5|B2W2}} employees, most of whom can be battled. There are many office desks and cubicles, as well as computer systems and servers. The 55th floor is very much similar to the 47th floor, with several desks, cubicles and meeting places. In Black and White, there are four employees working on this floor, as well as the president, who sits at the back of the room behind a desk. In Black 2 and White 2, only the new president and the janitor occupy the 55th floor. | |||
In Black and White, the president is an elderly man who disguises himself as a {{tc|Janitor}} to trick people. He will give the {{player}} an [[Exp. Share]] after he is defeated. In Black 2 and White 2, it is revealed that the old president has retired to become a full-time janitor. His successor is his grandson, {{tc|School Kid}} Neil. The janitor cannot be battled, but will still give the player an Exp. Share when they enter the building. | |||
====Passerby Analytics HQ==== | |||
{{main|Passerby Analytics HQ}} | |||
{{sign|bwbuilding|Passerby Analytics HQ|...People pass by as they walk along.}} | |||
The Passerby Analytics HQ is located on the corner of the street where Castelia Gym is. This is the place where the player may accept requests to conduct surveys, answer questionnaires or change his or her greeting or thanking phrase. | |||
====Ocean Piers==== | |||
[[File:BW Prerelease Castelia City harbor.png|thumb|220px|Liberty Pier with a boat]] | |||
There are five piers on the waterfront based on five human fingers<ref>[http://www.gamefreak.co.jp/blog/dir_english/?m=201108 Official Game Freak blog]</ref> where certain ferries are docked. | |||
=====Liberty Pier===== | |||
Liberty Pier is opposite the street in which the [[Castelia Gym|Gym]] resides. The ferry found here will take the {{player}} to [[Liberty Garden]]. In Black and White, the [[Liberty Pass]] is required to board the ferry. In Black 2 and White 2, this is no longer the case. | |||
=====Unity Pier===== | |||
Unity Pier is across from Narrow Street, and its ferry is transport to [[Unity Tower]], which is only available after making an international [[trade]]. | |||
=====Prime Pier===== | |||
Prime Pier is across from Mode Street. In Black and White, the Plasma Ship, a black boat that Team Plasma uses to get to Liberty Garden, is occasionally docked here prior to the player traveling to Liberty Garden themselves. One local citizen is curious about the ship, even after it has departed. In Black 2 and White 2, this is where [[Pop Roxie]] docks his boat and where the [[Plasma Frigate]] can be initially seen. | |||
=====Cruise Dock===== | |||
The Cruise Dock is opposite Castelia Street. It is where the [[Royal Unova]] docks. In Black and White, the player can only ride it in the evening after defeating [[Ghetsis]] at [[N's Castle]]. | |||
=====Thumb Pier===== | |||
Thumb Pier lies directly south of the Bridge Gate. In Black and White, a {{tc|Scientist}} will give away an [[Evolution stone]], depending on whether the Trainer wants to evolve a {{p|Pansage}}, {{p|Pansear}}, or {{p|Panpour}}. In Black 2 and White 2, the entrance to the [[Castelia Sewers]] is located here. | |||
===Castelia Street=== | |||
Castelia Street has many people coming and going, especially during the evenings when people are going home from work. This street has many tall skyscrapers and large buildings. The Game Freak HQ is on this street, as well as a building where, in Black and White, one Pokémon per day can receive a [[Pokémon groomer|massage]] to increase its [[friendship]]. The second building also has an elevator allowing access to its 11th floor, where a person will give away [[TM44]] ({{m|Rest}}). | |||
====Game Freak==== | |||
The [[Game Freak]] headquarters are located in a large building on Castelia Street's right side. The building has only one accessible floor—22F—where the Game Freak developers can be found. | |||
In Black and White, a girl on the ground floor will tell a story about a Pokémon that can cause {{a|illusion}}s and then show the player a photo of {{p|Zorua}}, thus adding it to the [[Pokédex]]. Next to her is a young boy who does not talk. If the player has a [[fateful encounter]] {{p|Celebi}} in his or her party and talks to the boy, Celebi will come out of its Poké Ball, and the boy will reveal himself to actually be a {{p|Zorua}}, who will then join the player if they have a {{i|Poké Ball}} to spare. | |||
The office on the 22nd floor is similar to the Battle Company's, with computers, cubicles, desks and servers around the place. Here is where the Game Freak developers are working on the game. The Game Director at the back of the room will give the player a [[Diploma]] if they complete the Regional Pokédex, as well as another Diploma if they fill up the [[National Pokédex]]. | |||
In Black and White, after defeating [[Ghetsis]] and [[Team Plasma]] at the {{un|Pokémon League}}, another Game Designer, [[Shigeki Morimoto|Morimoto]], will battle the player once per day. The Sound Director will play a special [[Team Rocket]] theme. In {{2v2|Black|White|2}}, Morimoto and [[Kōji Nishino|Nishino]] can be battled once per day here, but unlike Pokémon Black and White, they will battle the player at any stage in the game. | |||
===Mode Street=== | |||
Mode Street is another commuter-heavy street, but it is not as large or as busy as Castelia Street. Many trees and plants line its sides, giving the street a feeling of nature. Along the west side of Mode Street is the famous Casteliacone stand, and along the east side is Studio Castelia, a popular art gallery where people go to enjoy local artwork. | |||
====Studio Castelia==== | |||
Studio Castelia is a small art gallery in central Castelia which displays and showcases many painting from artists who live in Castelia; however, it does not display any of [[Burgh]]'s paintings, as he prefers to hang them in the [[Castelia Gym]]. Many artists from around Unova come to Castelia to get inspiration from [[Burgh]], and their paintings are hanging here. In Black and White, the studio is currently exhibiting works in the motif of legends of the Unova region, which have more to do with the myths of {{p|Reshiram}} and {{p|Zekrom}}. In Black 2 and White 2, the current focus is works by up-and-coming young artists. The owner of the studio likes to take walks along the Central Plaza and enjoys taking in the scenery and landscape with people and Pokémon. Every day, a {{tc|Harlequin}}{{sup/5|BW}} /{{tc|Clerk}}{{sup/5|B2W2}} inside will ask the player to bring him a Pokémon of a certain type (except {{t|Dark}}), and for doing so he will reward the player with their choice of one of the first five [[Berry|Berries]]. | |||
====Casteliacone==== | |||
[[File:BW Prerelease Market.png|thumb|220px|right|Casteliacone Stand]] | |||
{| | |||
| {{sign|bwbuilding|Castelia's Famous Casteliacone|Closed during Winter.}} | |||
| {{sign|bwbuilding|Castelia's Famous Casteliacone|<br>}} | |||
|} | |||
Casteliacone is a popular ice cream stand in Castelia City, which sells ice creams with the same name as the store. In Black and White, a single [[Casteliacone]] can be purchased once per week every {{DL|Days of the week|Tuesday 5|Tuesday}} for {{pdollar}}100, except in {{season|winter}} when the stand is closed. Due to its tremendous popularity, Casteliacone sells out very quickly, with crowds of people coming from all across Unova, even as far as [[Accumula Town]], just to have a taste. The line for the famous sweet is always long and the ice cream is often unavailable. | |||
In the two years between Pokémon Black and White and Pokémon Black 2 and White 2, the ice cream has diminished in popularity. In Black 2 and White 2, the player can either purchase one or a dozen Casteliacones, is no longer limited by day of the week, and the stand remains open even in winter, but the player may still only make one purchase per day. Initially, the stand has no line, but after the player has defeated the {{pkmn|Champion}}, a long line will again appear in front of the stand (if the player has bought a Casteliacone sometime previously), and the player must talk to the last person in line to get in line. | |||
The ice cream has the ability to cure a single Pokémon of all [[status condition]]s. | |||
{{shop|Casteliacone}} | |||
{{shoprow|{{shopitem|Casteliacone|100}}|{{shopitem|Casteliacone|1200|note= ×12{{sup/5|B2W2}}}}}} | |||
{{shopfooter}} | |||
===Narrow Street=== | |||
Narrow Street is a back alley with a number of dumpsters and rubbish bins lined up against its sides. Like the name suggests, the street is very narrow, containing dark buildings, and shady people. Unlike any of the other streets, it is poorly lit and contains very few people. A man hidden behind one of the dumpsters will give the player {{TM|70|Flash}}. Some thugs can be seen hanging around the street not saying much, just laughing and smirking. In Black and White, one of the city's three {{tc|Dancer}}s is originally located here. There is only one accessible building on this street, a small café called Café Sonata. | |||
====Café Sonata==== | |||
Café Sonata is a small café on the right side of Narrow Street. Many people come to the café to relax after a tiring day of work, and to listen to the {{tc|Musician}}'s guitar rhythm, who believes that a beautiful melody makes people happy and a sad melody makes people sorrowful. If a Trainer brings {{p|Meloetta}} to the Musician, he will teach it {{m|Relic Song}}. The manager of the café will give Trainers a [[Lemonade]] in Black and White and [[Moomoo Milk]] in Black 2 and White 2 for coming into the store for the first time; however, no [[drink]]s or items can be bought after this. | |||
In Black 2 and White 2, by showing Meloetta to a person here, the player can receive a special Funfest Mission. | |||
===Gym Street=== | |||
Gym Street is a large street which contains its namesake, the [[Castelia Gym]]. Another building is also on the west side of the street, being only an empty building in Black and White while in Black 2 and White 2 it contains the Medal Office and many people. | |||
====Castelia City Gym==== | |||
{{main|Castelia Gym}} | |||
The Castelia Gym is the official [[Gym]] of Castelia City, located on the western-most street above the Liberty Pier. The Gym also doubles as a working art gallery. It is based on {{type|Bug}} Pokémon. The [[Gym Leader]] is [[Burgh]]. | |||
The Castelia Gym is designed like a huge beehive in Black and White. It contains many small hexagonal rooms, several which are cut off by walls of honey which are at first barricaded by gates. There are buttons which are placed in the center of most of the rooms, and if certain buttons are stepped on, they trigger the gates to descend. However, not all the buttons trigger the doors to descend; some instead make Trainers appear who will then challenge the player. The player is able to walk through any wall of honey, as long as there is not a raised gate over it, allowing the player to navigate through the Gym and eventually reach Burgh. The Gym is also decorated with pictures painted by Burgh himself. For defeating Burgh, Trainers receive the {{Badge|Insect}} and {{TM|76|Struggle Bug}}. | |||
In the two-year gap in the series, Burgh's Gym gets a redesign, now featuring cocoons (perhaps created using {{m|String Shot}}) which a player uses much like elevators to reach Burgh. | |||
====Medal Office==== | |||
The Medal Office (Japanese: {{tt|メダル事務局|メダルじむきょく}} ''Medal Office'') is located opposite the Gym. | |||
In Black and White, when following a {{tc|Team Plasma Grunt}} to try to retrieve [[Bianca]]'s {{p|Munna}}, it is discovered that the strange, seemingly deserted building is currently hiding [[Ghetsis]], [[Bronius]], and [[Rood]], along with several Team Plasma Grunts. Ghetsis reveals that they are using the building as a hideout as they thought it would be ironic to have a hideout opposite a Gym, but they had not expected to be discovered so soon. Team Plasma then leaves the building, leaving only a [[Smoke Ball]]. | |||
In Black 2 and White 2, the second floor of this location has been turned into the {{OBP|Medal|Black 2 and White 2}} Office. The [[Name Rater]], [[Pokémon groomer|Pokémon masseuse]], and Feeling Reader can be found on the first floor, while [[Fennel]] and [[Amanita]] are on the third floor. After the player has entered the [[Hall of Fame]], Amanita will give the player an {{p|Eevee}} she received from a [[Bill|friend]] in the [[Kanto]] region. This Eevee has its [[Hidden Ability]] and is always male. | |||
===Central Plaza=== | |||
The Central Plaza, also known as the Castelia Central Area, is a park located at the intersection of all the streets in Castelia City. There is a large flowing fountain that is said to bring people and Pokémon together. There are [[vending machine]]s located here that sell [[drink]]s. In Black and White, a {{tc|Dancer}} named Mickey will give the player an [[Amulet Coin]] if they can round up two other Dancers in Castelia to form a dance team with him. The two other dancers that are located around the city are Edmond and Raymond, and they are located on Narrow Street and Unity Pier respectively. | |||
To the north of Central Plaza is another street with several tall skyscrapers that leads out to {{rt|4|Unova}}. Three buildings may be accessed from this street. | |||
On the west side is a building that contains many useful services in Black and White. On the ground floor is the [[Name Rater]], where Trainers may change the nicknames of their Pokémon, as well as the Feeling Reader, who offers advice about using the Feeling Check on the [[C-Gear]]. On the 11th floor is the [[Relocator]], which requires a password to be used. The Relocator is used to transfer any of the four Pokémon distributed to commemorate the {{pkmn|anime}} {{pkmn|movie}} ''[[M13|Zoroark: Master of Illusions]]''—{{DL|List of event Pokémon with in-game effects|Celebi}} and the {{Shiny}} [[legendary beasts]], {{DL|List of event Pokémon with in-game effects|Raikou, Entei, and Suicune}}. Also on the 11th floor is Mr. Lock, the "magical clown who can open anything." Using the [[Relocator]], the player can transfer the [[Lock Capsule]], an event item that was never given an official distribution, to Black or White. After giving the Lock Capsule to Mr. Lock, the player will receive {{TM|95|Snarl}}, which was locked within the Lock Capsule to protect it from [[Team Rocket]]. In Black 2 and White 2, an old man on the ground floor will give the player an Amulet Coin. | |||
The southernmost building on the east side of the street is hosting a party on its 47th floor. After getting past the guard on the ground floor who frisks anyone for suspicious items, the player may go up the elevator and talk with people at the party, some of whom speak in foreign languages. Some of the people upstairs will give away items or TMs. | |||
The northernmost building on the east side of the street is full of people on the ground floor, one of whom is a {{tc|Scientist}} who will give the player an [[Eviolite]] if they have seen enough Pokémon. On the 47th floor, a man will explain the effects of each of the eight [[Badge]]s. | |||
{{shop|[[Vending machine]]s}} | |||
{{shoprow|{{shopitem|Fresh Water|200}}|{{shopitem|Soda Pop|300}}}} | |||
{{shoprow|{{shopitem|Lemonade|350}}}} | |||
{{shopfooter}} | |||
===Castelia Park=== | |||
Only accessible via the [[Castelia Sewers]] in Black 2 and White 2, Castelia Park is a small area enclosed by buildings. Similar to (but much smaller than) the [[National Park]] in [[Johto]], it is shaped like a {{i|Poké Ball}}. {{DL|Tall grass|Dark grass}} is on the right, with regular tall grass on the left and a tree in the middle. It is said to be "where it all began" for Castelia City. | |||
===Pokémon Center=== | |||
A lady next to the PC will ask whether the Pokémon leading the team at that moment is the player's favorite Pokémon. This will change the favorite Pokémon's sprite in the {{DL|Vs. Recorder|Trainer's Profile}} from the Vs. Recorder. This action can be repeated anytime the player wants to change the favorite Pokémon again. | |||
=== | ===Castelia University=== | ||
Not seen but mentioned on [[television]], Castelia University is a school in which Dr. Technic Al'Machine often appears as a guest expert for "Moves for Living." | |||
=== | ==Demographics== | ||
===Pokémon Black and White=== | |||
Castelia City's population is 127 (excluding automatically regenerating NPCs that simply walk by the player if they are in the way on Castelia and Mode Streets, and the street leading to {{rt|4|Unova}}). | |||
=== | ===Pokémon Black 2 and White 2=== | ||
Castelia City's population is 137 (excluding automatically regenerating NPCs that simply walk by the player if they are in the way on Castelia and Mode Streets, and the street leading to {{rt|4|Unova}}). | |||
=== | ==Poké Mart== | ||
{{shop|Upper cashier}} | |||
{{shoprow|{{shopitem|Poké Ball (item)|200|5=Poké Ball|display=Poké Ball}}|{{shopitem|Great Ball|600}}}} | |||
{{shoprow|{{shopitem|Ultra Ball|1200|note=<sup>5 {{color2|000|Badge|Badges}}</sup>}}|{{shopitem|Potion|300}}}} | |||
{{shoprow|{{shopitem|Super Potion|700}}|{{shopitem|Hyper Potion|1200|note=<sup>3 {{color2|000|Badge|Badges}}</sup>}}}} | |||
{{shoprow|{{shopitem|Max Potion|2500|note=<sup>7 {{color2|000|Badge|Badges}}</sup>}}|{{shopitem|Full Restore|3000|note=<sup>8 {{color2|000|Badge|Badges}}</sup>}}}} | |||
{{shoprow|{{shopitem|Revive|1500|note=<sup>3 {{color2|000|Badge|Badges}}</sup>}}|{{shopitem|Antidote|100}}}} | |||
{{shoprow|{{shopitem|Paralyze Heal|200|display=Parlyz Heal}}|{{shopitem|Awakening|250}}}} | |||
{{shoprow|{{shopitem|Burn Heal|250}}|{{shopitem|Ice Heal|250}}}} | |||
{{shoprow|{{shopitem|Full Heal|600|note=<sup>5 {{color2|000|Badge|Badges}}</sup>}}|{{shopitem|Escape Rope|550}}}} | |||
{{shoprow|{{shopitem|Repel|350}}|{{shopitem|Super Repel|500|note=<sup>3 {{color2|000|Badge|Badges}}</sup>}}}} | |||
{{shoprow|{{shopitem|Max Repel|700|note=<sup>5 {{color2|000|Badge|Badges}}</sup>}}}} | |||
{{shopfooter|multiple=yes}} | |||
{{shop|Lower cashier}} | |||
{{shoprow|{{shopitem|Heal Ball|300}}|{{shopitem|Net Ball|1000}}}} | |||
{{shoprow|{{shopitem|Nest Ball|1000}}|{{shopitem|BridgeMail S|50|note={{sup/5|BW}}}}}} | |||
{{shoprow|{{shopitem|Greet Mail|50}}|{{shopitem|Favored Mail|50}}}} | |||
{{shoprow|{{shopitem|RSVP Mail|50}}|{{shopitem|Thanks Mail|50}}}} | |||
{{shoprow|{{shopitem|Inquiry Mail|50}}|{{shopitem|Like Mail|50}}}} | |||
{{shoprow|{{shopitem|Reply Mail|50}}}} | |||
{{shopfooter}} | |||
=== | ==Items== | ||
===Oceanfront Road=== | |||
{{Itlisth|road}} | |||
{{Itemlist|Bicycle|Received from a {{tc|Harlequin}} near Prime Pier|B2=yes|W2=yes}} | |||
{{Itemlist|Rare Candy|Reward for finding all three Harlequins|B2=yes|W2=yes}} | |||
{{Itlistfoot|road}} | |||
=== | ====Ocean Piers==== | ||
{{Itlisth|road}} | |||
{{Itemlist|Leaf Stone|Received from a {{tc|Scientist}} on Thumb Pier (only one [[Evolution stone|stone]] can be chosen)|Bl=yes|W=yes}} | |||
{{Itemlist|Fire Stone|Received from a Scientist on Thumb Pier (only one stone can be chosen)|Bl=yes|W=yes}} | |||
{{Itemlist|Water Stone|Received from a Scientist on Thumb Pier (only one stone can be chosen)|Bl=yes|W=yes}} | |||
{{Itemlist|Heart Scale|On southern part of Prime Pier|B2=yes|W2=yes}} | |||
{{Itemlist|Destiny Knot|Received from a woman on Unity Pier|B2=yes|W2=yes}} | |||
{{Itlistfoot|road}} | |||
=== | ====Pokémon Center==== | ||
{{Itlisth|building}} | |||
{{Itemlist|Wide Lens|Received from the man in black, if the player has Pokémon with 5 different {{pkmn2|outsider}} [[Trainer ID number|IDs]]|Bl=yes|W=yes}} | |||
{{Itemlist|Everstone|Received from the man in black, if the player has Pokémon with 10 different outsider IDs|Bl=yes|W=yes}} | |||
{{Itemlist|Zoom Lens|Received from the man in black, if the player has Pokémon with 20 different outsider IDs|Bl=yes|W=yes}} | |||
{{Itemlist|Choice Scarf|Received from the man in black, if the player has Pokémon with 30 different outsider IDs|Bl=yes|W=yes}} | |||
{{Itemlist|PP Max|Received from the man in black, if the player has Pokémon with 40 different outsider IDs|Bl=yes|W=yes}} | |||
{{Itemlist|Master Ball|Received from the man in black, if the player has Pokémon with 50 different outsider IDs|Bl=yes|W=yes}} | |||
{{Itlistfoot|building}} | |||
=== | ====Battle Company==== | ||
{{Itlisth|building}} | |||
{{Itemlist|Exp. Share|1F, received from the President upon entering|B2=yes|W2=yes}} | |||
{{Itemlist|Miracle Seed|1F, received from an {{tc|Ace Trainer}} if the first option is chosen|B2=yes|W2=yes|}} | |||
{{Itemlist|Mystic Water|1F, received from an Ace Trainer if the second option is chosen|B2=yes|W2=yes}} | |||
{{Itemlist|Charcoal|1F, received from an Ace Trainer if the third option is chosen|B2=yes|W2=yes}} | |||
{{Itemlist|Quick Ball|47F, received from a {{tc|Office Worker|Clerk ♂}} in the upper-right corner|Bl=yes|W=yes|display=[[Quick Ball]] ×3}} | |||
{{Itemlist|Timer Ball|47F, received from a Clerk ♂ in the upper-right corner|Bl=yes|W=yes|display=[[Timer Ball]] ×3}} | |||
{{Itemlist|Quick Ball|47F, reward for defeating Clerk ♂ Clemens|B2=yes|W2=yes|display=[[Quick Ball]] ×2}} | |||
{{Itemlist|Timer Ball|47F, reward for defeating Clerk ♂ Warren|B2=yes|W2=yes|display=[[Timer Ball]] ×5}} | |||
{{Itemlist|Scope Lens|47F, received from a Scientist in the lower-right corner|Bl=yes|W=yes|B2=yes|W2=yes}} | |||
{{Itemlist|Revive|47F, in the lower-left corner|Bl=yes|W=yes}} | |||
{{Itemlist|Guard Spec.|47F, in the lower-left corner|B2=yes|W2=yes}} | |||
{{Itemlist|Hyper Potion|55F, in the middle of the floor|Bl=yes|W=yes}} | |||
{{Itemlist|Ether|55F, in the upper-left corner|B2=yes|W2=yes}} | |||
{{Itemlist|Exp. Share|55F, reward for defeating {{tc|Janitor}}/President Geoff|Bl=yes|W=yes}} | |||
{{Itlistfoot|building}} | |||
=== | ===Castelia Street=== | ||
{{Itlisth|building}} | |||
{{Itemlist|TM Psychic|Received from a {{tc|Hiker}}{{sup/5|BW}}/{{tc|Guitarist}}{{sup/5|B2W2}} on 11F of the western building|Bl=yes|W=yes|B2=yes|W2=yes|display={{TM|44|Rest}}}} | |||
{{Itlistfoot|building}} | |||
== | ====Game Freak==== | ||
{{Itlisth|building}} | |||
{{Itemlist|Revive|22F, near [[Shigeki Morimoto|Morimoto]]|B2=yes|W2=yes}} | |||
{{Itlistfoot|building}} | |||
===Mode Street=== | |||
====Studio Castelia==== | |||
{{Itlisth|building}} | |||
{{Itemlist|Cheri Berry|Received from Harlequin{{sup/5|BW}}/Clerk ♂{{sup/5|B2W2}} if shown a Pokémon of the requested [[type]] (only one [[Berry]] can be chosen per day)|Bl=yes|W=yes|B2=yes|W2=yes}} | |||
{{Itemlist|Chesto Berry|Received from Harlequin{{sup/5|BW}}/Clerk ♂{{sup/5|B2W2}} if shown a Pokémon of the requested type (only one Berry can be chosen per day)|Bl=yes|W=yes|B2=yes|W2=yes}} | |||
{{Itemlist|Pecha Berry|Received from Harlequin{{sup/5|BW}}/Clerk ♂{{sup/5|B2W2}} if shown a Pokémon of the requested type (only one Berry can be chosen per day)|Bl=yes|W=yes|B2=yes|W2=yes}} | |||
{{Itemlist|Rawst Berry|Received from Harlequin{{sup/5|BW}}/Clerk ♂{{sup/5|B2W2}} if shown a Pokémon of the requested type (only one Berry can be chosen per day)|Bl=yes|W=yes|B2=yes|W2=yes}} | |||
{{Itemlist|Aspear Berry|Received from Harlequin{{sup/5|BW}}/Clerk ♂{{sup/5|B2W2}} if shown a Pokémon of the requested type (only one Berry can be chosen per day)|Bl=yes|W=yes|B2=yes|W2=yes}} | |||
{{Itlistfoot|building}} | |||
===Narrow Street=== | |||
{{Itlisth|road}} | |||
{{Itemlist|TM Normal|Received from the man behind a dumpster|Bl=yes|W=yes|B2=yes|W2=yes|display={{TM|70|Flash}}}} | |||
{{Itlistfoot|road}} | |||
====Café Sonata==== | |||
{{Itlisth|building}} | |||
{{Itemlist|Lemonade|Received from the manager|Bl=yes|W=yes}} | |||
{{Itemlist|Moomoo Milk III|Received from the manager|B2=yes|W2=yes|display=[[Moomoo Milk]]}} | |||
{{Itlistfoot|building}} | |||
===Gym Street=== | |||
{{Itlisth|building}} | |||
{{Itemlist|Yache Berry|In [[Team Plasma]]'s hideout, received from [[Iris]] after rescuing {{p|Munna}}|Bl=yes|W=yes}} | |||
{{Itemlist|Smoke Ball|In Team Plasma's hideout after rescuing Munna|Bl=yes|W=yes}} | |||
{{Itlistfoot|building}} | |||
===Central Plaza=== | |||
{{Itlisth|road}} | |||
{{Itemlist|Amulet Coin III|Reward from the {{tc|Dancer}}s after defeating all three of them|Bl=yes|W=yes|display=[[Amulet Coin]]}} | |||
{{Itlistfoot|road}} | |||
===Street connecting to Route 4=== | |||
{{Itlisth|building}} | |||
{{Itemlist|TM Normal|Received from a girl on 47F of the southeastern building|Bl=yes|W=yes|B2=yes|W2=yes|display={{TM|45|Attract}}}} | |||
{{Itemlist|Eviolite|Received from a Scientist on 1F of the northeastern building, if at least 25{{sup/5|BW}}/40{{sup/5|B2W2}} Pokémon have been seen in the [[Pokédex]]|Bl=yes|W=yes|B2=yes|W2=yes}} | |||
{{Itemlist|Charcoal|On 47F of the northeastern building|B2=yes|W2=yes}} | |||
{{Itemlist|Amulet Coin III|Received from a man on 1F of the western building|B2=yes|W2=yes|display=[[Amulet Coin]]}} | |||
{{Itemlist|TM Dark|Received from Mr. Lock via the [[Lock Capsule]] on 11F of the western building (the Lock Capsule was never made available, making this item [[List of unobtainable items|unobtainable]])|Bl=yes|W=yes|display={{TM|95|Snarl}}}} | |||
{{Itlistfoot|building}} | |||
====Castelia Gate==== | |||
{{Itlisth|building}} | |||
{{Itemlist|Dowsing MCHN|Received from [[Bianca]]|B2=yes|W2=yes|display=[[Dowsing Machine|Dowsing MCHN]]}} | |||
{{Itlistfoot|building}} | |||
===Castelia Park=== | |||
This area can only be accessed from the [[Castelia Sewers]]. | |||
{{Itlisth|land}} | |||
{{Itemlist|Miracle Seed|In the park area|B2=yes|W2=yes}} | |||
{{Itlistfoot|land}} | |||
===Back alley=== | |||
This area can only be accessed from the [[Castelia Sewers]] when the sewers are flooded in the spring and summer {{season}}s, and requires {{m|Surf}}. However, it is possible to change seasons to autumn or winter while entering the area from the sewers. | |||
{{Itlisth|road}} | |||
{{Itemlist|Repel|Northwest of the entrance|B2=yes|W2=yes}} | |||
{{Itemlist|BlackGlasses|Near the back alley Trainers|B2=yes|W2=yes|display=[[Black Glasses|BlackGlasses]]}} | |||
{{Itlistfoot|road}} | |||
==Pokémon== | |||
===Pokémon Black and White=== | |||
The Zorua gifted here is coded never to appear as {{Shiny}}. | |||
{{catch/header|building|4}} | |||
{{catch/div|building|Gift Pokémon}} | |||
{{catch/entry5|570|Zorua|yes|yes|yes|Gift|10|all={{tt|One|Requires an event Celebi in the party}}|type1=Dark}} | |||
{{catch/footer|building}} | |||
===Pokémon Black 2 and White 2=== | |||
====Castelia City proper==== | |||
{{catch/header|building|4}} | |||
{{catch/div|building|Gift Pokémon<br><small>After entering the Hall of Fame</small>}} | |||
{{catch/entry5-2|133|Eevee|yes|yes|Gift|10|all={{tt|One|Has its Hidden Ability and is always male}}|type1=Normal}} | |||
{{catch/footer|building}} | |||
====Castelia Park==== | |||
This area can only be accessed from the [[Castelia Sewers]]. | |||
{{catch/header|land|4}} | |||
{{catch/entry5-2|019|Rattata|yes|yes|Grass|15-16|all=30%|type1=Normal}} | |||
{{catch/entry5-2|133|Eevee|yes|yes|Grass|18|all=5%|type1=Normal}} | |||
{{catch/entry5-2|300|Skitty|no|yes|Grass|15-16|all=15%|type1=Normal}} | |||
{{catch/entry5-2|427|Buneary|yes|no|Grass|15-16|all=15%|type1=Normal}} | |||
{{catch/entry5-2|519|Pidove|yes|yes|Grass|15-16|all=15%|type1=Normal|type2=Flying}} | |||
{{catch/entry5-2|546|Cottonee|yes|no|Grass|15-17|all=35%|type1=Grass}} | |||
{{catch/entry5-2|548|Petilil|no|yes|Grass|15-17|all=35%|type1=Grass}} | |||
{{catch/div|land|Dark grass}} | |||
{{catch/entry5-2|019|Rattata|yes|yes|Dark|16-17|all=30%|type1=Normal}} | |||
{{catch/entry5-2|133|Eevee|yes|yes|Dark|19|all=5%|type1=Normal}} | |||
{{catch/entry5-2|300|Skitty|no|yes|Dark|16-17|all=15%|type1=Normal}} | |||
{{catch/entry5-2|427|Buneary|yes|no|Dark|16-17|all=15%|type1=Normal}} | |||
{{catch/entry5-2|519|Pidove|yes|yes|Dark|16-17|all=15%|type1=Normal|type2=Flying}} | |||
{{catch/entry5-2|546|Cottonee|yes|no|Dark|16-18|all=35%|type1=Grass}} | |||
{{catch/entry5-2|548|Petilil|no|yes|Dark|16-18|all=35%|type1=Grass}} | |||
{{catch/div|land|Rustling grass}} | |||
{{catch/entry5-2|301|Delcatty|no|yes|Rustling|18|all=5%|type1=Normal}} | |||
{{catch/entry5-2|428|Lopunny|yes|no|Rustling|18|all=5%|type1=Normal}} | |||
{{catch/entry5-2|531|Audino|yes|yes|Rustling|15-18|all=90%|type1=Normal}} | |||
{{catch/entry5-2|547|Whimsicott|yes|no|Rustling|18|all=5%|type1=Grass}} | |||
{{catch/entry5-2|549|Lilligant|no|yes|Rustling|18|all=5%|type1=Grass}} | |||
{{catch/footer|land}} | |||
==Trainers== | ==Trainers== | ||
===Battle Company=== | ===Pokémon Black and White=== | ||
==== | [[File:Castelia City 3D.png|thumb|250px|Castelia City image from a TV commercial]] | ||
====Battle Company==== | |||
{{trainerheader|building}} | |||
{{Trainerdiv|building|47F}} | |||
{{Trainerentry|Spr BW Clerk F.png|Clerk ♀|Ingrid|760|1|507|Herdier|♀|19|None|36=ミチコ|37=Michiko}} | |||
{{Trainerdiv|building}} | |||
{{Trainerentry|Spr BW Clerk M A.png|Clerk ♂|Clemens|760|1|532|Timburr|♂|19|None|36=カツノリ|37=Katsunori}} | |||
{{Trainerdiv|building}} | |||
{{Trainerentry|Spr BW Scientist M.png|Scientist|Randall|912|1|524|Roggenrola|♂|19|None|36=ナオユキ|37=Naoyuki}} | |||
{{Trainerdiv|building}} | |||
{{Trainerentry|Spr BW Clerk M A.png|Clerk ♂|Warren|680|3|550|Basculin|♂|17|None|550B|Basculin|♂|17|None|550|Basculin|♂|17|None|36=ヒロノブ|37=Hironobu}} | |||
{{Trainerdiv|building}} | |||
{{Trainerentry|Spr BW Clerk F.png|Clerk ♀|Alberta|720|2|548|Petilil|♀|18|None|546|Cottonee|♀|18|None|36=モモコ|37=Momoko}} | |||
{{Trainerdiv|building|55F}} | |||
{{Trainerentry|Spr BW Clerk M A.png|Clerk ♂|Ivan|800|1|527|Woobat|♂|20|None|36=カズヤ|37=Kazuya}} | |||
{{Trainerdiv|building}} | |||
{{Trainerentry|Spr BW Scientist F.png|Scientist|Samantha|960|1|517|Munna|♀|20|None|36=アカリ|37=Akari}} | |||
{{Trainerdiv|building}} | |||
{{Trainerentry|Spr BW Scientist M.png|Scientist|Steve|960|1|540|Sewaddle|♂|20|None|36=スティーブ|37=Steve}} | |||
{{Trainerdiv|building}} | |||
{{Trainerentry|Spr BW Clerk M B.png|Clerk ♂|Wade|1520|3|513|Pansear|♂|19|None|511|Pansage|♂|19|None|515|Panpour|♂|19|None|36=コウイチ|37=Kōichi}} | |||
{{Trainerdiv|building}} | |||
{{Trainerentry|Spr BW Janitor.png|Janitor|Geoff|4000|2|568|Trubbish|♂|20|None|572|Minccino|♀|20|None|36=シンノスケ|37=Shinnosuke}} | |||
{{Trainerfooter|building|5}} | |||
====Central Plaza==== | |||
{{trainerheader|road}} | {{trainerheader|road}} | ||
{{Trainerentry| | {{Trainerentry|Spr BW Dancer.png|Dancer|Mickey|672|1|511|Pansage|♂|21|None|36=ミッキー|37=Mickey}} | ||
{{Trainerfooter|road|5}} | {{Trainerfooter|road|5}} | ||
==== | ====Narrow Street==== | ||
{{trainerheader|road}} | {{trainerheader|road}} | ||
{{Trainerdiv|road|After defeating Mickey}} | |||
{{Trainerdiv|road | {{Trainerentry|Spr BW Dancer.png|Dancer|Edmond|672|1|515|Panpour|♂|21|None|36=エドモンド|37=Edmond}} | ||
{{Trainerentry| | |||
{{Trainerfooter|road|5}} | {{Trainerfooter|road|5}} | ||
=== | ====Unity Pier==== | ||
{{trainerheader|road}} | {{trainerheader|road}} | ||
{{Trainerentry| | {{Trainerdiv|road|After defeating Mickey}} | ||
{{Trainerentry|Spr BW Dancer.png|Dancer|Raymond|672|1|513|Pansear|♂|21|None|36=レイモンド|37=Raymond}} | |||
{{Trainerfooter|road|5}} | {{Trainerfooter|road|5}} | ||
=== | ====Gym Street==== | ||
{{trainerheader|road}} | {{trainerheader|road}} | ||
{{Trainerentry| | {{Trainerdiv|road|After meeting Bianca, Burgh, and Iris on Prime Pier}} | ||
{{Trainerentry|Spr BW Plasma Grunt M.png|Team Plasma Grunt||680|2|551|Sandile|♂|17|None|551|Sandile|♂|17|None}} | |||
{{Trainerfooter|road|5}} | {{Trainerfooter|road|5}} | ||
=== | ====Castelia Gate==== | ||
Bianca will challenge the player here once they've earned the {{badge|Insect}}. | |||
{{MSP/3|495|Snivy}} If the {{player}} chose {{p|Snivy}}: | |||
{{Party/Single | |||
|color={{white color}} | |||
|headcolor={{white color light}} | |||
|bordercolor={{white color dark}} | |||
|sprite=Spr BW Bianca.png | |||
|prize={{Pdollar}}2000 | |||
|class={{PK}}{{MN}} Trainer | |||
|classlink=Pokémon Trainer | |||
|name={{color2|000|Bianca}} | |||
|game=BW | |||
|location=Castelia City | |||
|locationname=Castelia Gate | |||
|pokemon=4}} | |||
|{{Pokémon/5 | |||
|game=Black | |||
|ndex=507 | |||
|pokemon=Herdier | |||
|level=18 | |||
|gender=female | |||
|type1=Normal | |||
|ability=Intimidate | |||
|move1=Odor Sleuth|move1type=Normal|move1cat=Status | |||
|move2=Bite|move2type=Dark|move2cat=Physical | |||
|move3=Helping Hand|move3type=Normal|move3cat=Status | |||
|move4=Take Down|move4type=Normal|move4cat=Physical}} | |||
|{{Pokémon/5 | |||
|game=Black | |||
|ndex=513 | |||
|pokemon=Pansear | |||
|level=18 | |||
|gender=male | |||
|type1=Fire | |||
|ability=Gluttony | |||
|move1=Lick|move1type=Ghost|move1cat=Physical | |||
|move2=Incinerate|move2type=Fire|move2cat=Special | |||
|move3=Fury Swipes|move3type=Normal|move3cat=Physical | |||
|move4=Yawn|move4type=Normal|move4cat=Status}} | |||
{{Party/Div|color={{white color}}}} | |||
|{{Pokémon/5 | |||
|game=Black | |||
|ndex=517 | |||
|pokemon=Munna | |||
|level=18 | |||
|gender=female | |||
|type1=Psychic | |||
|ability=Forewarn | |||
|move1=Yawn|move1type=Normal|move1cat=Status | |||
|move2=Psybeam|move2type=Psychic|move2cat=Special | |||
|move3=Imprison|move3type=Psychic|move3cat=Status | |||
|move4=Moonlight|move4type=Normal|move4cat=Status}} | |||
|{{Pokémon/5 | |||
|game=Black | |||
|ndex=502 | |||
|pokemon=Dewott | |||
|level=20 | |||
|gender=male | |||
|type1=Water | |||
|ability=Torrent | |||
|move1=Water Sport|move1type=Water|move1cat=Status | |||
|move2=Focus Energy|move2type=Normal|move2cat=Status | |||
|move3=Razor Shell|move3type=Water|move3cat=Physical | |||
|move4=Fury Cutter|move4type=Bug|move4cat=Physical}} | |||
{{Party/Footer}} | |||
{{MSP/3|498|Tepig}} If the {{player}} chose {{p|Tepig}}: | |||
{{Party/Single | |||
|color={{white color}} | |||
|headcolor={{white color light}} | |||
|bordercolor={{white color dark}} | |||
|sprite=Spr BW Bianca.png | |||
|prize={{Pdollar}}2000 | |||
|class={{PK}}{{MN}} Trainer | |||
|classlink=Pokémon Trainer | |||
|name={{color2|000|Bianca}} | |||
|game=BW | |||
|location=Castelia City | |||
|locationname=Castelia Gate | |||
|pokemon=4}} | |||
|{{Pokémon/5 | |||
|game=Black | |||
|ndex=507 | |||
|pokemon=Herdier | |||
|level=18 | |||
|gender=female | |||
|type1=Normal | |||
|ability=Intimidate | |||
|move1=Odor Sleuth|move1type=Normal|move1cat=Status | |||
|move2=Bite|move2type=Dark|move2cat=Physical | |||
|move3=Helping Hand|move3type=Normal|move3cat=Status | |||
|move4=Take Down|move4type=Normal|move4cat=Physical}} | |||
|{{Pokémon/5 | |||
|game=Black | |||
|ndex=515 | |||
|pokemon=Panpour | |||
|level=18 | |||
|gender=male | |||
|type1=Water | |||
|ability=Gluttony | |||
|move1=Lick|move1type=Ghost|move1cat=Physical | |||
|move2=Water Gun|move2type=Water|move2cat=Special | |||
|move3=Fury Swipes|move3type=Normal|move3cat=Physical | |||
|move4=Water Sport|move4type=Water|move4cat=Status}} | |||
{{Party/Div|color={{white color}}}} | |||
|{{Pokémon/5 | |||
|game=Black | |||
|ndex=517 | |||
|pokemon=Munna | |||
|level=18 | |||
|gender=female | |||
|type1=Psychic | |||
|ability=Forewarn | |||
|move1=Yawn|move1type=Normal|move1cat=Status | |||
|move2=Psybeam|move2type=Psychic|move2cat=Special | |||
|move3=Imprison|move3type=Psychic|move3cat=Status | |||
|move4=Moonlight|move4type=Normal|move4cat=Status}} | |||
|{{Pokémon/5 | |||
|game=Black | |||
|ndex=496 | |||
|pokemon=Servine | |||
|level=20 | |||
|gender=male | |||
|type1=Grass | |||
|ability=Overgrow | |||
|move1=Wrap|move1type=Normal|move1cat=Physical | |||
|move2=Growth|move2type=Grass|move2cat=Status | |||
|move3=Leaf Tornado|move3type=Grass|move3cat=Special | |||
|move4=Leech Seed|move4type=Grass|move4cat=Status}} | |||
{{Party/Footer}} | |||
{{MSP/3|501|Oshawott}} If the {{player}} chose {{p|Oshawott}}: | |||
{{Party/Single | |||
|color={{white color}} | |||
|headcolor={{white color light}} | |||
|bordercolor={{white color dark}} | |||
|sprite=Spr BW Bianca.png | |||
|prize={{Pdollar}}2000 | |||
|class={{PK}}{{MN}} Trainer | |||
|classlink=Pokémon Trainer | |||
|name={{color2|000|Bianca}} | |||
|game=BW | |||
|location=Castelia City | |||
|locationname=Castelia Gate | |||
|pokemon=4}} | |||
|{{Pokémon/5 | |||
|game=Black | |||
|ndex=507 | |||
|pokemon=Herdier | |||
|level=18 | |||
|gender=female | |||
|type1=Normal | |||
|ability=Intimidate | |||
|move1=Odor Sleuth|move1type=Normal|move1cat=Status | |||
|move2=Bite|move2type=Dark|move2cat=Physical | |||
|move3=Helping Hand|move3type=Normal|move3cat=Status | |||
|move4=Take Down|move4type=Normal|move4cat=Physical}} | |||
|{{Pokémon/5 | |||
|game=Black | |||
|ndex=511 | |||
|pokemon=Pansage | |||
|level=18 | |||
|gender=male | |||
|type1=Grass | |||
|ability=Gluttony | |||
|move1=Lick|move1type=Ghost|move1cat=Physical | |||
|move2=Vine Whip|move2type=Grass|move2cat=Physical | |||
|move3=Fury Swipes|move3type=Normal|move3cat=Physical | |||
|move4=Leech Seed|move4type=Grass|move4cat=Status}} | |||
{{Party/Div|color={{white color}}}} | |||
|{{Pokémon/5 | |||
|game=Black | |||
|ndex=517 | |||
|pokemon=Munna | |||
|level=18 | |||
|gender=female | |||
|type1=Psychic | |||
|ability=Forewarn | |||
|move1=Yawn|move1type=Normal|move1cat=Status | |||
|move2=Psybeam|move2type=Psychic|move2cat=Special | |||
|move3=Imprison|move3type=Psychic|move3cat=Status | |||
|move4=Moonlight|move4type=Normal|move4cat=Status}} | |||
|{{Pokémon/5 | |||
|game=Black | |||
|ndex=499 | |||
|pokemon=Pignite | |||
|level=20 | |||
|gender=male | |||
|type1=Fire | |||
|type2=Fighting | |||
|ability=Blaze | |||
|move1=Defense Curl|move1type=Normal|move1cat=Status | |||
|move2=Flame Charge|move2type=Fire|move2cat=Physical | |||
|move3=Arm Thrust|move3type=Fighting|move3cat=Physical | |||
|move4=Smog|move4type=Poison|move4cat=Special}} | |||
{{Party/Footer}} | |||
====Game Freak==== | |||
{{Party/Single | |||
|color={{white color}} | |||
|headcolor={{black color light}} | |||
|bordercolor={{white color dark}} | |||
|sprite=Spr BW Veteran M.png | |||
|prize={{Pdollar}}6160 | |||
|class=GAME FREAK | |||
|name={{color2|000|Shigeki Morimoto|Morimoto}} | |||
|game=BW | |||
|location=Castelia City | |||
|pokemon=6}} | |||
|{{Pokémon/5 | |||
|game=Black | |||
|ndex=510 | |||
|pokemon=Liepard | |||
|level=75 | |||
|gender=male | |||
|type1=Dark | |||
|ability=Limber | |||
|move1=Fake Out|move1type=Normal|move1cat=Physical | |||
|move2=Grass Knot|move2type=Grass|move2cat=Special | |||
|move3=Night Slash|move3type=Dark|move3cat=Physical | |||
|move4=Sucker Punch|move4type=Dark|move4cat=Physical}} | |||
|{{Pokémon/5 | |||
|game=Black | |||
|ndex=516 | |||
|pokemon=Simipour | |||
|level=75 | |||
|gender=male | |||
|type1=Water | |||
|ability=Gluttony | |||
|held=Petaya Berry | |||
|move1=Surf|move1type=Water|move1cat=Special | |||
|move2=Crunch|move2type=Dark|move2cat=Physical | |||
|move3=Payback|move3type=Dark|move3cat=Physical | |||
|move4=Acrobatics|move4type=Flying|move4cat=Physical}} | |||
|{{Pokémon/5 | |||
|game=Black | |||
|ndex=514 | |||
|pokemon=Simisear | |||
|level=75 | |||
|gender=male | |||
|type1=Fire | |||
|ability=Gluttony | |||
|held=Petaya Berry | |||
|move1=Flamethrower|move1type=Fire|move1cat=Special | |||
|move2=Crunch|move2type=Dark|move2cat=Physical | |||
|move3=Payback|move3type=Dark|move3cat=Physical | |||
|move4=Acrobatics|move4type=Flying|move4cat=Physical}} | |||
{{Party/Div|color={{white color}}}} | |||
|{{Pokémon/5 | |||
|game=Black | |||
|ndex=512 | |||
|pokemon=Simisage | |||
|level=75 | |||
|gender=male | |||
|type1=Grass | |||
|ability=Gluttony | |||
|held=Petaya Berry | |||
|move1=Energy Ball|move1type=Grass|move1cat=Special | |||
|move2=Crunch|move2type=Dark|move2cat=Physical | |||
|move3=Payback|move3type=Dark|move3cat=Physical | |||
|move4=Acrobatics|move4type=Flying|move4cat=Physical}} | |||
|{{Pokémon/5 | |||
|game=Black | |||
|ndex=528 | |||
|pokemon=Swoobat | |||
|level=75 | |||
|gender=male | |||
|type1=Psychic | |||
|type2=Flying | |||
|ability=Unaware | |||
|move1=Air Slash|move1type=Flying|move1cat=Special | |||
|move2=Endeavor|move2type=Normal|move2cat=Physical | |||
|move3=Psychic|move3type=Psychic|move3cat=Special | |||
|move4=Psyshock|move4type=Psychic|move4cat=Special}} | |||
|{{Pokémon/5 | |||
|game=Black | |||
|ndex=523 | |||
|pokemon=Zebstrika | |||
|level=77 | |||
|gender=male | |||
|type1=Electric | |||
|ability=Lightningrod | |||
|move1=Pursuit|move1type=Dark|move1cat=Physical | |||
|move2=Giga Impact|move2type=Normal|move2cat=Physical | |||
|move3=Flame Charge|move3type=Fire|move3cat=Physical | |||
|move4=Wild Charge|move4type=Electric|move4cat=Physical}} | |||
{{Party/Footer}} | |||
===Pokémon Black 2 and White 2=== | |||
====Battle Company==== | |||
{{trainerheader|building}} | |||
{{Trainerdiv|building|47F}} | |||
{{Trainerentry|Spr B2W2 Clerk M.png|Clerk ♂|Clemens|{{tt|640|560 in Easy Mode, 720 in Challenge Mode}}|1|058|Growlithe|♂|{{tt|16|14 in Easy Mode, 18 in Challenge Mode}}|None|36=カツノリ|37=Katsunori}} | |||
{{Trainerdiv|building}} | |||
{{Trainerentry|Spr B2W2 Clerk M.png|Clerk ♂|Warren|{{tt|640|560 in Easy Mode, 720 in Challenge Mode}}|1|183|Marill|♂|{{tt|16|14 in Easy Mode, 18 in Challenge Mode}}|None|36=ヒロノブ|37=Hironobu}} | |||
{{Trainerdiv|building}} | |||
{{Trainerentry|Spr B2W2 Clerk F.png|Clerk ♀|Britney|{{tt|640|560 in Easy Mode, 720 in Challenge Mode}}|1|406|Budew|♀|{{tt|16|14 in Easy Mode, 18 in Challenge Mode}}|None|36=サトコ|37=Satoko}} | |||
{{Trainerdiv|building}} | |||
{{Trainerentry|Spr B2W2 Clerk M B.png|Clerk ♂|Gilligan|{{tt|1360|1200 in Easy Mode, 1520 in Challenge Mode}}|1|519|Pidove|♂|{{tt|17|15 in Easy Mode, 19 in Challenge Mode}}|None|36=シゲオ|37=Shigeo}} | |||
{{Trainerdiv|building|55F}} | |||
{{Trainerentry|Spr B2W2 School Kid M.png|School Kid|Neil|{{tt|340|300 in Easy Mode, 380 in Challenge Mode}}|2|133|Eevee|♂|{{tt|17|15 in Easy Mode, 19 in Challenge Mode}}|None|507|Herdier|♂|{{tt|17|15 in Easy Mode, 19 in Challenge Mode}}|None|36=ノボル|37=Noboru}} | |||
{{Trainerfooter|building|5}} | |||
====Game Freak==== | |||
=====Pre-Hall of Fame===== | |||
{{Party/Single | |||
|color={{white 2 color}} | |||
|headcolor={{black 2 color light}} | |||
|bordercolor={{white 2 color dark}} | |||
|sprite=Spr B2W2 Veteran M.png | |||
|prize={{Pdollar}}{{tt|1120|960 in Easy Mode, 1280 in Challenge Mode}} | |||
|class=GAME FREAK | |||
|name={{color2|000|Shigeki Morimoto|Morimoto}} | |||
|game=B2W2 | |||
|location=Castelia City | |||
|pokemon=3}} | |||
|{{Pokémon/5 | |||
|game=Black | |||
|ndex=511 | |||
|pokemon=Pansage | |||
|level={{tt|14|12 in Easy Mode, 16 in Challenge Mode}} | |||
|gender=male | |||
|type1=Grass | |||
|ability=Gluttony | |||
|held=Oran Berry | |||
|move1=Vine Whip|move1type=Grass|move1cat=Physical | |||
|move2=Lick|move2type=Ghost|move2cat=Physical | |||
|move3=Fury Swipes|move3type=Normal|move3cat=Physical}} | |||
|{{Pokémon/5 | |||
|game=Black | |||
|ndex=513 | |||
|pokemon=Pansear | |||
|level={{tt|14|12 in Easy Mode, 16 in Challenge Mode}} | |||
|gender=male | |||
|type1=Fire | |||
|ability=Gluttony | |||
|held=Oran Berry | |||
|move1=Incinerate|move1type=Fire|move1cat=Special | |||
|move2=Lick|move2type=Ghost|move2cat=Physical | |||
|move3=Fury Swipes|move3type=Normal|move3cat=Physical}} | |||
|{{Pokémon/5 | |||
|game=Black | |||
|ndex=515 | |||
|pokemon=Panpour | |||
|level={{tt|14|12 in Easy Mode, 16 in Challenge Mode}} | |||
|gender=male | |||
|type1=Water | |||
|ability=Gluttony | |||
|held=Oran Berry | |||
|move1=Water Gun|move1type=Water|move1cat=Special | |||
|move2=Lick|move2type=Ghost|move2cat=Physical | |||
|move3=Fury Swipes|move3type=Normal|move3cat=Physical}} | |||
{{Party/Footer}} | |||
{{Party/Single | |||
|color={{white 2 color}} | |||
|headcolor={{black 2 color light}} | |||
|bordercolor={{white 2 color dark}} | |||
|sprite=Spr B2W2 Hiker.png | |||
|prize={{Pdollar}}{{tt|1280|1120 in Easy Mode, 1440 in Challenge Mode}} | |||
|class=GAME FREAK | |||
|name={{color2|000|Kōji Nishino|Nishino}} | |||
|game=B2W2 | |||
|location=Castelia City | |||
|pokemon=1}} | |||
| style="margin:auto" |{{Pokémon/5 | |||
|game=Black | |||
|ndex=035 | |||
|pokemon=Clefairy | |||
|level={{tt|16|14 in Easy Mode, 18 in Challenge Mode}} | |||
|gender=female | |||
|type1=Normal | |||
|ability=Cute Charm | |||
|held=Leftovers | |||
|move1=Growl|move1type=Normal|move1cat=Status | |||
|move2=DoubleSlap|move2type=Normal|move2cat=Physical | |||
|move3=Follow Me|move3type=Normal|move3cat=Status | |||
|move4=Encore|move4type=Normal|move4cat=Status}} | |||
{{Party/Footer}} | |||
=====Post-Hall of Fame===== | |||
{{Party/Single | |||
|color={{white 2 color}} | |||
|headcolor={{black 2 color light}} | |||
|bordercolor={{white 2 color dark}} | |||
|sprite=Spr B2W2 Veteran M.png | |||
|prize={{Pdollar}}{{tt|6240|6080 in Easy Mode, 6400 in Challenge Mode}} | |||
|class=GAME FREAK | |||
|name={{color2|000|Shigeki Morimoto|Morimoto}} | |||
|game=B2W2 | |||
|location=Castelia City | |||
|pokemon=6}} | |||
|{{Pokémon/5 | |||
|game=Black | |||
|ndex=510 | |||
|pokemon=Liepard | |||
|level={{tt|76|74 in Easy Mode, 78 in Challenge Mode}} | |||
|gender=male | |||
|type1=Dark | |||
|ability=Unburden | |||
|move1=Fake Out|move1type=Normal|move1cat=Physical | |||
|move2=Sucker Punch|move2type=Dark|move2cat=Physical | |||
|move3=Night Slash|move3type=Dark|move3cat=Physical | |||
|move4=Grass Knot|move4type=Grass|move4cat=Special}} | |||
|{{Pokémon/5 | |||
|game=Black | |||
|ndex=516 | |||
|pokemon=Simipour | |||
|level={{tt|76|74 in Easy Mode, 78 in Challenge Mode}} | |||
|gender=male | |||
|type1=Water | |||
|ability=Gluttony | |||
|held=Petaya Berry | |||
|move1=Surf|move1type=Water|move1cat=Special | |||
|move2=Crunch|move2type=Dark|move2cat=Physical | |||
|move3=Payback|move3type=Dark|move3cat=Physical | |||
|move4=Acrobatics|move4type=Flying|move4cat=Physical}} | |||
|{{Pokémon/5 | |||
|game=Black | |||
|ndex=514 | |||
|pokemon=Simisear | |||
|level={{tt|76|74 in Easy Mode, 78 in Challenge Mode}} | |||
|gender=male | |||
|type1=Fire | |||
|ability=Gluttony | |||
|held=Petaya Berry | |||
|move1=Crunch|move1type=Dark|move1cat=Physical | |||
|move2=Flamethrower|move2type=Fire|move2cat=Special | |||
|move3=Payback|move3type=Dark|move3cat=Physical | |||
|move4=Acrobatics|move4type=Flying|move4cat=Physical}} | |||
{{Party/Div|color={{white color}}}} | |||
|{{Pokémon/5 | |||
|game=Black | |||
|ndex=512 | |||
|pokemon=Simisage | |||
|level={{tt|76|74 in Easy Mode, 78 in Challenge Mode}} | |||
|gender=male | |||
|type1=Grass | |||
|ability=Gluttony | |||
|held=Petaya Berry | |||
|move1=Energy Ball|move1type=Grass|move1cat=Special | |||
|move2=Acrobatics|move2type=Flying|move2cat=Physical | |||
|move3=Payback|move3type=Dark|move3cat=Physical | |||
|move4=Crunch|move4type=Dark|move4cat=Physical}} | |||
|{{Pokémon/5 | |||
|game=Black | |||
|ndex=528 | |||
|pokemon=Swoobat | |||
|level={{tt|76|74 in Easy Mode, 78 in Challenge Mode}} | |||
|gender=male | |||
|type1=Psychic | |||
|type2=Flying | |||
|ability=Unaware | |||
|move1=Air Slash|move1type=Flying|move1cat=Special | |||
|move2=Psychic|move2type=Psychic|move2cat=Special | |||
|move3=Psyshock|move3type=Psychic|move3cat=Special | |||
|move4=Endeavor|move4type=Normal|move4cat=Physical}} | |||
|{{Pokémon/5 | |||
|game=Black | |||
|ndex=523 | |||
|pokemon=Zebstrika | |||
|level={{tt|78|76 in Easy Mode, 80 in Challenge Mode}} | |||
|gender=male | |||
|type1=Electric | |||
|ability=Motor Drive | |||
|move1=Pursuit|move1type=Dark|move1cat=Physical | |||
|move2=Giga Impact|move2type=Normal|move2cat=Physical | |||
|move3=Flame Charge|move3type=Fire|move3cat=Physical | |||
|move4=Wild Charge|move4type=Electric|move4cat=Physical}} | |||
{{Party/Footer}} | |||
{{Party/Single | |||
|color={{white 2 color}} | |||
|headcolor={{black 2 color light}} | |||
|bordercolor={{white 2 color dark}} | |||
|sprite=Spr B2W2 Hiker.png | |||
|prize={{Pdollar}}{{tt|6240|6080 in Easy Mode, 6400 in Challenge Mode}} | |||
|class=GAME FREAK | |||
|name={{color2|000|Kōji Nishino|Nishino}} | |||
|game=B2W2 | |||
|location=Castelia City | |||
|pokemon=6}} | |||
|{{Pokémon/5 | |||
|game=Black | |||
|ndex=036 | |||
|pokemon=Clefable | |||
|level={{tt|76|74 in Easy Mode, 78 in Challenge Mode}} | |||
|gender=female | |||
|type1=Normal | |||
|ability=Cute Charm | |||
|held=Leftovers | |||
|move1=Cosmic Power|move1type=Psychic|move1cat=Status | |||
|move2=Sing|move2type=Normal|move2cat=Status | |||
|move3=Metronome|move3type=Normal|move3cat=Status | |||
|move4=Stored Power|move4type=Psychic|move4cat=Special}} | |||
|{{Pokémon/5 | |||
|game=Black | |||
|ndex=184 | |||
|pokemon=Azumarill | |||
|level={{tt|76|74 in Easy Mode, 78 in Challenge Mode}} | |||
|gender=male | |||
|type1=Water | |||
|ability=Huge Power | |||
|held=Leftovers | |||
|move1=Double-Edge|move1type=Normal|move1cat=Physical | |||
|move2=Aqua Tail|move2type=Water|move2cat=Physical | |||
|move3=Superpower|move3type=Fighting|move3cat=Physical | |||
|move4=Bulldoze|move4type=Ground|move4cat=Physical}} | |||
|{{Pokémon/5 | |||
|game=Black | |||
|ndex=463 | |||
|pokemon=Lickilicky | |||
|level={{tt|76|74 in Easy Mode, 78 in Challenge Mode}} | |||
|gender=male | |||
|type1=Normal | |||
|ability=Own Tempo | |||
|held=Leftovers | |||
|move1=Fire Blast|move1type=Fire|move1cat=Special | |||
|move2=Earthquake|move2type=Ground|move2cat=Physical | |||
|move3=Blizzard|move3type=Ice|move3cat=Special | |||
|move4=Power Whip|move4type=Grass|move4cat=Physical}} | |||
{{Party/Div|color={{white color}}}} | |||
|{{Pokémon/5 | |||
|game=Black | |||
|ndex=040 | |||
|pokemon=Wigglytuff | |||
|level={{tt|76|74 in Easy Mode, 78 in Challenge Mode}} | |||
|gender=female | |||
|type1=Normal | |||
|ability=Cute Charm | |||
|held=Leftovers | |||
|move1=Flamethrower|move1type=Fire|move1cat=Special | |||
|move2=Hyper Voice|move2type=Normal|move2cat=Special | |||
|move3=Thunderbolt|move3type=Electric|move3cat=Special | |||
|move4=Ice Beam|move4type=Ice|move4cat=Special}} | |||
|{{Pokémon/5 | |||
|game=Black | |||
|ndex=594 | |||
|pokemon=Alomomola | |||
|level={{tt|76|74 in Easy Mode, 78 in Challenge Mode}} | |||
|gender=male | |||
|type1=Water | |||
|ability=Hydration | |||
|held=Leftovers | |||
|move1=Wish|move1type=Normal|move1cat=Status | |||
|move2=Toxic|move2type=Poison|move2cat=Status | |||
|move3=Protect|move3type=Normal|move3cat=Status | |||
|move4=Aqua Jet|move4type=Water|move4cat=Physical}} | |||
|{{Pokémon/5 | |||
|game=Black | |||
|ndex=143 | |||
|pokemon=Snorlax | |||
|level={{tt|78|76 in Easy Mode, 80 in Challenge Mode}} | |||
|gender=male | |||
|type1=Normal | |||
|ability=Thick Fat | |||
|held=Leftovers | |||
|move1=Body Slam|move1type=Normal|move1cat=Physical | |||
|move2=Yawn|move2type=Normal|move2cat=Status | |||
|move3=Superpower|move3type=Fighting|move3cat=Physical | |||
|move4=Crunch|move4type=Dark|move4cat=Physical}} | |||
{{Party/Footer}} | |||
====Back alley==== | |||
These Trainers are in an area accessible only from the [[Castelia Sewers]] when the sewers are flooded in the spring and summer {{season}}s, and requires {{m|Surf}}. However, it is possible to change seasons to autumn or winter while entering the area from the sewers. Defeating these Trainers will earn the player the Castelia Boss {{OBP|Medal|Black 2 and White 2}}. | |||
{{trainerheader|road}} | {{trainerheader|road}} | ||
{{Trainerentry| | {{Trainerentry|Spr B2W2 Roughneck.png|Roughneck|Ricky|{{tt|768|720 in Easy Mode, 816 in Challenge Mode}}|1|559|Scraggy|♂|{{tt|32|30 in Easy Mode, 34 in Challenge Mode}}|None|36=リッキー|37=Ricky}} | ||
{{ | {{Trainerdiv|road}} | ||
{{Trainerentry|Spr B2W2 Dancer.png|Dancer|Jean-Paul|{{tt|1024|960 in Easy Mode, 1088 in Challenge Mode}}|1|554|Darumaka|♂|{{tt|32|30 in Easy Mode, 34 in Challenge Mode}}|None|36=ベルモンド|37=Belmondo}} | |||
{{Trainerdiv|road}} | |||
{{Trainerentry|Spr B2W2 Guitarist.png|Guitarist|Tina|{{tt|1056|992 in Easy Mode, 1120 in Challenge Mode}}|2|552|Krokorok|♀|{{tt|33|31 in Easy Mode, 35 in Challenge Mode}}|None|510|Liepard|♀|{{tt|33|31 in Easy Mode, 35 in Challenge Mode}}|None|36=ティナ|37=Tina}} | |||
{{trainerfooter|road|5}} | |||
==Gallery== | |||
===Artwork=== | |||
{| style="margin:auto; text-align:center; {{roundy|20px}} border:2px solid #{{flying color dark}}; background:#{{flying color}}; font-size:80%" | |||
|style="{{roundy|5px}} border:2px solid #{{flying color dark}}; background:#{{flying color light}}"| [[File:Castelia City Concept Art.png|x200px]] | |||
|style="{{roundy|5px}} border:2px solid #{{flying color dark}}; background:#{{flying color light}}"| [[File:Castelia City Concept Art 2.png|x200px]] | |||
|style="{{roundy|5px}} border:2px solid #{{flying color dark}}; background:#{{flying color light}}"| [[File:Castelia City Concept Art 3.png|x200px]] | |||
|- | |||
| Concept art from {{color2|000|Pokémon Black and White Versions|Black and White}} by {{color2|000|Keiko Moritsugu}}<ref>https://web.archive.org/web/20230208105706/http://bystrousky.blogspot.com/2019/07/blog-post.html</ref> | |||
| colspan="2" | Concept art from {{color2|000|Pokémon Black and White Versions|Black and White}} | |||
|} | |||
==In the anime== | |||
===Main series=== | |||
[[File:Castelia City anime.png|thumb|310px|Castelia City in the {{pkmn|anime}}]] | |||
Like in the {{pkmn|games}}, Castelia City is depicted as extremely large, with an abundance of huge, colorful skyscrapers and shops lining its long wharf. | |||
The city made a brief cameo in ''[[BW021|The Lost World of Gothitelle!]]'', where a few skyscrapers could be seen from the [[Skyarrow Bridge]], and again in [[Sally]]'s flashback of {{p|Gothitelle}} in the alleyways. It appeared fully in ''[[BW022|A Venipede Stampede!]]'', when {{Ash}}, {{an|Iris}}, and {{an|Cilan}} arrived there. Cilan talked about its famous ice cream: Casteliacone. Ash and {{ashfr}} suddenly met [[Burgh]] at the Central Plaza. Burgh sensed something was wrong and they ventured into the underground sewer system. Here, they found an injured {{p|Venipede}}. Suddenly, a massive group of Venipede stormed in and attacked the city. | |||
Burgh became somewhat angry when he found out that the [[Mayor of Castelia City]] planned to get rid of the Venipede using force and protested the idea. The mayor eventually decided to let him handle it. Burgh's idea was to find the leader of the Venipede and have [[Nurse Joy's Audino]] use {{m|Heal Pulse}} on it. He, Ash, and Iris eventually located the leader only to see it was attacked by [[Trip]] and his {{p|Lampent}}. Burgh ordered him to stop and told him that he was only making things worse. | |||
Once Nurse Joy's Audino used Heal Pulse on the leader, Burgh played his Bug Flute and lead the Venipede into Central Plaza. In the episode's original, now-deleted ending, he saw Ash and his friends off when they decided to go with [[Professor Juniper]] to investigate the [[Desert Resort]], where a large amount of energy was detected and likely responsible for the Venipede swarming the city. | |||
Castelia City was to have been the site of [[Team Rocket]] and [[Team Plasma]]'s battle in the original [[BW023 (unaired)|BW023]] and [[BW024 (unaired)|BW024]]. During the conflict, the [[Meteonite]] was to release energy blasts that threatened to destroy Castelia City. However, these episodes were [[Banned episodes|never aired]] and were later retconned out of existence, leaving their events non-canonical. | |||
In ''[[BW023|Battling For The Love of Bug-Types!]]'', Ash had his Gym battle with Burgh. Ash won against Burgh, and his {{p|Sewaddle}} [[Evolution|evolved]] into a {{AP|Swadloon}}. | |||
A [[fishing]] contest in ''[[BW037|A Fishing Connoisseur in a Fishy Competition!]]'' was supposed to take place in Castelia City, but the episode was delayed in Japan until June 23 because of the {{wp|2011 Tōhoku earthquake and tsunami|Tōhoku earthquake and tsunami}}, and the contest was relocated to an unnamed city. | |||
Castelia City briefly appeared again at the end of ''[[BW110|The Name's N!]]''. Here, {{an|N}} got off the ship where he met Ash, Iris, and Cilan and bid farewell to them. | |||
Castelia City reappeared during ''[[JN014|Raid Battle in The Ruins!]]''. Ash and [[Goh]] traveled there in order to reach the [[Desert Resort]] and explore the [[Colossus Ruins]]. | |||
Castelia City reappeared in ''[[JN048|A Close Call... Practically!]]'', where Ash and Goh traveled there as a part of Goh's prize for [[JN047|winning]] the [[Pokémon Grand Eating Contest]]. While the two enjoyed some delicious food, {{TRT}}, having followed them, were planning to steal {{AP|Pikachu}} by swapping it with a near-identical robotic replica. However, their getaway was noticed by [[Goh's Cinderace]] and [[Ash's Lucario]], who gave pursuit. Due to {{MTR}} gluing their hands together, they constantly found themselves bumbling around, even as they snatched Pikachu back and tried to escape from the trio. Eventually, they managed to cooperate enough to defeat the trio, who, while blasting off with Pikachu, discovered that they had accidentally taken their robotic Pikachu replica instead of the real one. | |||
Castelia City made a cameo in ''[[JN065|Thrash of the Titans!]]'' as Ash and Goh flew over it on their way to [[Opelucid City]]. | |||
====Gallery==== | |||
<div class="scrollbox"> | |||
{| style="margin:auto; text-align:center; background: #838383; {{roundy}}; border: 3px solid #444" | |||
|- style="background:#C3C3C3" | |||
! style="{{roundytl|5px}}" | {{color2|000|Pokémon Center}} | |||
! style="{{roundytl|5px}}" | Central Plaza | |||
! style="{{roundytl|5px}}" | Casteliacone | |||
! style="{{roundytr|5px}}" | {{color2|000|Castelia Gym}} | |||
|- style="background:#fff" | |||
| [[File:Castelia City Pokémon Center.png|x150px]] | |||
| [[File:Central Plaza anime.png|x150px]] | |||
| [[File:Casteliacone stand anime.png|x150px]] | |||
| [[File:Castelia Gym anime.png|x150px]] | |||
|} | |||
</div> | |||
===Pokémon Black 2 and White 2 Animated Trailer=== | |||
Castelia City briefly appeared in the [[Pokémon Black Version 2 and Pokémon White Version 2 Animated Trailer]], in which {{ga|Nate}} met up with [[Colress]] at the local square. There, Colress explained [[Team Plasma]]'s beliefs to liberate Pokémon Trainers before commenting that he believed differently. | |||
==In the manga== | |||
===Pokémon Adventures=== | |||
[[File:Castelia City Adventures.png|thumb|250px|Castelia City in [[Pokémon Adventures]]]] | |||
===={{MangaArc|Platinum}}==== | |||
Castelia City first appeared in ''[[PS441|The Final Dimensional Duel XI]]'' as {{adv|Looker}} was shown flying towards it. | |||
===={{MangaArc|Black & White}}==== | |||
Castelia City was briefly shown in ''[[PS461|Fussing and Fighting]]''. | |||
{{adv|Black}} and {{adv|White}} first arrived in Castelia City at the end of ''[[PS476|A Direct Attack and a Daunting Defense]]''. There, [[Tep|Black's Tepig]] chased a {{TP|N|Zorua}} through the GAME FREAK building while both Black and White were away. In the following round, White started to fear for her business when told by Black that Tep is close to evolving, and tried to persuade him not to use it in battle, but to no avail. While Black had his battle with [[Burgh]], {{adv|Bianca}} arrived at the city looking for Black, and ended up at Narrow Street, where a {{tc|Team Plasma Grunt}} knocked her out and declared her {{p|Litwick}} to be liberated. [[Iris]], who visited Castelia earlier to critique Burgh's paintings, informed the Gym Leader about the incident, just after he lost to Black. Black helped solve the mystery by tracing the source of the spores on Bianca to the building opposite the Gym. They found the Grunts inside the building, accompanied by [[Bronius]], who fled the scene. The next day, White calmed down over her fears when she found out that Tep evolved. In another part of the city, {{adv|Cheren}} only then found out what happened to Bianca. | |||
White later returned to Castelia City with Bianca in ''[[PS500|With a Little Help from My Friends]]'' in an effort to cheer her up after finding out what happened to her after the incident. She was impressed by Bianca's musical skills and sent recordings of her music to a local guitarist at Café Sonata, who was also impressed. Thus she took Bianca to the café, which was on the same street where Bianca suffered the initial incident. They entered the café to find that it was attacked by a {{p|Vullaby}}, with the guitarist having broken his hand as a result of the attack. Vullaby began to attack a {{p|Meloetta}} residing in the café at the moment. White used her newly acquired battling skills to keep Vullaby at bay, but struggled when Vullaby called on an entire flock of its kind. Bianca volunteered to play Meloetta's forgotten {{m|Relic Song}} in the guitarist's place. This allowed Meloetta to relearn the song and transform into its Pirouette Forme, turning the battle against the flock of Vullaby. White concluded the battle by capturing the leading wild Vullaby, convincing Bianca to give her [[Pokédex]] to White. | |||
===={{MangaArc|Black 2 & White 2}}==== | |||
=== | Castelia City was due to host the Unova Choir Tournament, which Cheren's {{ci|Aspertia}} [[Pokémon academy|Trainers' School]] class qualified for by winning the [[Autumn Choir Tournament]]. In ''[[PS535|Angry Boy]]'', [[Roxie]] led the class to a member of the organizing committee, who, as the class found out, had been attacked and his {{p|Karrablast}} stolen. Hearing that the attacker hid in the [[Castelia Sewers]], {{adv|Blake}}, {{adv|Whitley}}, and [[Hugh]] went into the sewers to confront them, the culprits suspectedly turning out to be members of [[Team Plasma]]. After meeting up with the rest of the class back above ground on Castelia, Hugh told them of Team Plasma's revival, and revealed that he had evidence that one of their classmates was a member. When everybody started suspecting Whitley, her {{p|Foongus}}, [[Foongy]], put everyone besides her and Hugh asleep. Hugh demanded Whitley to take him to Team Plasma's hideout, but before she could convince him that she didn't know where the current hideout was, the [[Plasma Frigate]] appeared over the city and fired its {{p|Kyurem}} Cannon at it, freezing the city over in an instant. The cannon's blast knocked Hugh out, after which Whitley was confronted by [[Rood]], who had come for the memory card hidden inside Whitley's pendant, which held a program to stop the [[Colress Machine]]'s power to control Pokémon. However, the memory card, which Whitley had lost and Hugh had discovered earlier, was not in Hugh's possession, meaning that it was still in Aspertia City. Rood decided to leave N's Zorua behind to {{a|Illusion|impersonate}} Whitley while they would return to Aspertia City to retrieve the memory card. However, aboard the Plasma Frigate, Rood was spotted by [[Colress]] and [[Ghetsis]], with the latter ordering him to be captured. However, Whitley protected Rood from the capture attempt, causing her to get caught instead and giving Rood enough time to escape. Cheren and his class were later found by [[Benga]] and [[Marlon]] off-panel and taken to the [[Marine Tube]] to recover. | ||
{{ | |||
{{ | |||
{{ | |||
- | |||
In ''[[PS548|Epilogue: Graduation Ceremony]]'', Blake was reinstated of his rank at the [[International Police]] office in Castelia City. After Blake had left, it was revealed that Blake being discharged from the International Police had all been just a test for him, and that the {{adv|Magician}}, who had been supplying Blake with his equipment, was an International Police agent as well. | |||
{{ | |||
==Gallery== | ====Gallery==== | ||
<gallery> | <gallery perrow> | ||
File: | File:Narrow Street Adventures.png|Narrow Street in Pokémon Adventures | ||
PS500.png|Café Sonata in Pokémon Adventures | |||
Prime Pier Adventures.png|Prime Pier in Pokémon Adventures | |||
Ocean Piers Adventures.png|Ocean Piers in Pokémon Adventures | |||
Castelia City frozen Adventures.png|Castelia City frozen over in Pokémon Adventures | |||
</gallery> | </gallery> | ||
{{ | ==In the TCG== | ||
This listing is of cards mentioning or featuring Castelia City in the [[Pokémon Trading Card Game]]. | |||
{{cardlist/header|Related cards|Rainbow|char=yes}} | |||
{{cardlist/entry|cardname={{TCG ID|Next Destinies|Kricketot|3}}|type=Grass|expanded=yes|enset=Next Destinies|enrarity=Common|ennum=3/99|jpset=Psycho Drive|jprarity=C|jpnum=003/052}} | |||
{{cardlist/entry|cardname={{TCG ID|Next Destinies|Kricketune|4}}|type=Grass|expanded=yes|enset=Next Destinies|enrarity=Uncommon|ennum=4/99|jpset=Psycho Drive|jprarity=U|jpnum=004/052}} | |||
{{cardlist/entry|cardname={{TCG ID|Next Destinies|Amoonguss|9}}|type=Grass|expanded=yes|enset=Next Destinies|enrarity=Rare|ennum=9/99|jpset=Hail Blizzard|jprarity=U|jpnum=008/052}} | |||
{{cardlist/entry|cardname={{TCG ID|Next Destinies|Growlithe|10}}|type=Fire|expanded=yes|enset=Next Destinies|enrarity=Common|ennum=10/99|jpset=Hail Blizzard|jprarity=C|jpnum=009/052}} | |||
{{cardlist/entry|cardname={{TCG ID|Next Destinies|Simisear|16}}|type=Fire|expanded=yes|enset=Next Destinies|enrarity=Rare|ennum=16/99|jpset=Psycho Drive|jprarity=U|jpnum=011/052}} | |||
{{cardlist/entry|cardname={{TCG ID|Next Destinies|Lampent|19}}|type=Fire|expanded=yes|enset=Next Destinies|enrarity=Uncommon|ennum=19/99|jpset=Hail Blizzard|jprarity=C|jpnum=013/052}} | |||
{{cardlist/entry|cardname={{TCG ID|Next Destinies|Staryu|23}}|type=Water|expanded=yes|enset=Next Destinies|enrarity=Common|ennum=23/99|jpset=Psycho Drive|jprarity=C|jpnum=012/052}} | |||
{{cardlist/entry|cardname={{TCG ID|Next Destinies|Starmie|24}}|type=Water|expanded=yes|enset=Next Destinies|enrarity=Uncommon|ennum=24/99|jpset=Psycho Drive|jprarity=U|jpnum=013/052}} | |||
{{cardlist/entry|cardname={{TCG ID|Next Destinies|Lapras|25}}|type=Water|expanded=yes|enset=Next Destinies|enrarity=Rare|ennum=25/99|jpset=Hail Blizzard|jprarity=U|jpnum=015/052}} | |||
{{cardlist/entry|cardname={{TCG ID|Next Destinies|Simipour|29}}|type=Water|expanded=yes|enset=Next Destinies|enrarity=Rare|ennum=29/99|jpset=Psycho Drive|jprarity=U|jpnum=017/052}} | |||
{{cardlist/entry|cardname={{TCG ID|Next Destinies|Vanillite|31}}|type=Water|expanded=yes|enset=Next Destinies|enrarity=Common|ennum=31/99|jpset=Hail Blizzard|jprarity=C|jpnum=016/052}} | |||
{{cardlist/entry|cardname={{TCG ID|Next Destinies|Vanillish|32}}|type=Water|expanded=yes|enset=Next Destinies|enrarity=Uncommon|ennum=32/99|jpset=Hail Blizzard|jprarity=C|jpnum=017/052}} | |||
{{cardlist/entry|cardname={{TCG ID|Next Destinies|Raichu|40}}|type=Lightning|expanded=yes|enset=Next Destinies|enrarity=Uncommon|ennum=40/99|jpset=Hail Blizzard|jprarity=U|jpnum=024/052}} | |||
{{cardlist/entry|cardname={{TCG ID|Next Destinies|Luxio|44}}|type=Lightning|expanded=yes|enset=Next Destinies|enrarity=Uncommon|ennum=44/99|jpset=Psycho Drive|jprarity=U|jpnum=022/052}} | |||
{{cardlist/entry|cardname={{TCG ID|Next Destinies|Ralts|55}}|type=Psychic|expanded=yes|enset=Next Destinies|enrarity=Common|ennum=55/99|jpset=Hail Blizzard|jprarity=C|jpnum=026/052|jpset2=Master Deck Build Box EX|jpnum2=015/046}} | |||
{{cardlist/entry|cardname={{TCG ID|Next Destinies|Darmanitan|60}}|type=Psychic|expanded=yes|enset=Next Destinies|enrarity=Rare|ennum=60/99|jpset=Hail Blizzard|jprarity=U|jpnum=029/052}} | |||
{{cardlist/entry|cardname={{TCG ID|Noble Victories|Solosis|50}}|type=Psychic|expanded=Yes|enset=Noble Victories|enrarity=Common|ennum=50/101|jpset=Psycho Drive|jprarity=C|jpnum=031/052}} | |||
{{cardlist/entry|cardname={{TCG ID|Noble Victories|Duosion|51}}|type=Psychic|expanded=Yes|enset=Noble Victories|enrarity=Uncommon|ennum=51/101|jpset=Psycho Drive|jprarity=C|jpnum=032/052}} | |||
{{cardlist/entry|cardname={{TCG ID|Noble Victories|Reuniclus|52}}|type=Psychic|expanded=Yes|enset=Noble Victories|enrarity=Rare|ennum=52/101|jpset=Psycho Drive|jprarity=U|jpnum=033/052}} | |||
{{cardlist/entry|cardname={{TCG ID|Next Destinies|Elgyem|61}}|type=Psychic|expanded=yes|enset=Next Destinies|enrarity=Common|ennum=61/99|jpset=Hail Blizzard|jprarity=C|jpnum=030/052}} | |||
{{cardlist/entry|cardname={{TCG ID|Next Destinies|Beheeyem|62}}|type=Psychic|expanded=yes|enset=Next Destinies|enrarity=Rare|ennum=62/99|jpset=Hail Blizzard|jprarity=U|jpnum=031/052}} | |||
{{cardlist/entry|cardname={{TCG ID|Next Destinies|Riolu|63}}|type=Fighting|expanded=yes|enset=Next Destinies|enrarity=Common|ennum=63/99|jpset=Hail Blizzard|jprarity=C|jpnum=033/052}} | |||
{{cardlist/entry|cardname={{TCG ID|Noble Victories|Gurdurr|63}}|type=Fighting|expanded=yes|enset=Noble Victories|enrarity=Uncommon|ennum=63/101|jpset=Psycho Drive|jprarity=C|jpnum=035/052}} | |||
{{cardlist/entry|cardname={{TCG ID|Next Destinies|Mienfoo|67}}|type=Fighting|expanded=yes|enset=Next Destinies|enrarity=Common|ennum=67/99|jpset=Psycho Drive|jprarity=C|jpnum=037/052}} | |||
{{cardlist/entry|cardname={{TCG ID|Next Destinies|Sneasel|69}}|type=Darkness|expanded=yes|enset=Next Destinies|enrarity=Common|ennum=69/99|jpset=Hail Blizzard|jprarity=C|jpnum=037/052}} | |||
{{cardlist/entry|cardname={{TCG ID|Next Destinies|Meowth|80}}|type=Colorless|expanded=yes|enset=Next Destinies|enrarity=Common|ennum=80/99|jpset=Psycho Drive|jprarity=C|jpnum=045/052|enset2=Miscellaneous Promotional cards}} | |||
{{cardlist/entry|cardname={{TCG ID|Next Destinies|Persian|81}}|type=Colorless|expanded=yes|enset=Next Destinies|enrarity=Rare|ennum=81/99|jpset=Psycho Drive|jprarity=U|jpnum=046/052}} | |||
{{cardlist/entry|cardname={{TCG ID|Base Set|Pokémon Center|85}}|type=Stadium|expanded=yes|enset=Next Destinies|enrarity=Uncommon|ennum=90/99|jpset=Hail Blizzard|jprarity=U|jpnum=051/052}} | |||
{{cardlist/entry|cardname={{TCG ID|BW Promo|Riolu|33}}|type=Fighting|expanded=yes|enset=BW Black Star Promos|ennum=BW33|jpset=BW-P Promotional cards|jpnum=104/BW-P}} | |||
{{cardlist/entry|cardname={{TCG ID|BW Promo|Meowth|35}}|type=Colorless|expanded=yes|enset=BW Black Star Promos|ennum=BW35|jpset=BW-P Promotional cards|jpnum=105/BW-P|jpset2=BW-P Promotional cards|jpnum2=204/BW-P}} | |||
{{cardlist/entry|cardname={{TCG ID|Boundaries Crossed|Unfezant|125}}|type=Colorless|expanded=yes|enset=Boundaries Crossed|enrarity=Rare|ennum=125/149|jpset=Freeze Bolt|jprarity=U|jpnum=052/059}} | |||
{{cardlist/entry|cardname={{TCG ID|Plasma Storm|Magneton|44}}|type=Lightning|expanded=yes|enset=Plasma Storm|enrarity=Uncommon|ennum=44/135|jpset=Plasma Gale|jprarity=U|jpnum=024/070}} | |||
{{cardlist/entry|cardname={{TCG ID|Plasma Storm|Trubbish|65}}|type=Psychic|expanded=yes|enset=Plasma Storm|enrarity=Common|ennum=65/135|jpset=Plasma Gale|jprarity=C|jpnum=036/070}} | |||
{{cardlist/entry|cardname={{TCG ID|Plasma Storm|Purrloin|83}}|type=Darkness|expanded=yes|enset=Plasma Storm|enrarity=Common|ennum=83/135|jpset=Plasma Gale|jprarity=C|jpnum=044/070}} | |||
{{cardlist/entry|cardname={{TCG ID|Plasma Freeze|Leafeon|11}}|type=Grass|expanded=yes|enset=Plasma Freeze|enrarity=Rare|ennum=11/116|jpset=Thunder Knuckle|jprarity=U|jpnum=006/051}} | |||
{{cardlist/entry|cardname={{TCG ID|Plasma Freeze|Jolteon|34}}|type=Lightning|expanded=yes|enset=Plasma Freeze|enrarity=Uncommon|ennum=34/116|jpset=Spiral Force|jprarity=U|jpnum=016/051}} | |||
{{cardlist/entry|cardname={{TCG ID|Plasma Freeze|Muk|46}}|type=Psychic|expanded=yes|enset=Plasma Freeze|enrarity=Rare|ennum=46/116|jpset=Thunder Knuckle|jprarity=U|jpnum=024/051}} | |||
{{cardlist/entry|cardname={{TCG ID|Plasma Freeze|Dragonite|83}}|type=Dragon|expanded=yes|enset=Plasma Freeze|enrarity=Rare Holo|ennum=83/116|jpset=Thunder Knuckle|jprarity=R|jpnum=040/051}} | |||
{{cardlist/entry|cardname={{TCG ID|Plasma Freeze|Frozen City|100}}|type=Stadium|expanded=yes|enset=Plasma Freeze|enrarity=Uncommon|ennum=100/116|jpset=Spiral Force|jprarity=U|jpnum=049/051}} | |||
{{cardlist/entry|cardname={{TCG ID|Next Destinies|Moltres|14}}|type=Fire|expanded=yes|enset=Legendary Treasures|enrarity=Rare Holo|ennum=22/113|jpset=EX Battle Boost|jpnum=014/093}} | |||
{{cardlist/entry|cardname={{TCG ID|Legendary Treasures|Articuno|32}}|type=Water|expanded=yes|enset=Legendary Treasures|enrarity=Rare Holo|ennum=32/113|jpset=EX Battle Boost|jpnum=024/093}} | |||
{{cardlist/entry|cardname={{TCG ID|Noble Victories|Kyurem|34}}|type=Water|expanded=yes|enset=Legendary Treasures|enrarity=Rare Holo|ennum=43/113|jpset=EX Battle Boost|jpnum=035/093}} | |||
{{cardlist/entry|cardname={{TCG ID|Legendary Treasures|Minccino|104}}|type=Colorless|expanded=yes|enset=Legendary Treasures|enrarity=Common|ennum=104/113|jpset=EX Battle Boost|jpnum=088/093}} | |||
{{cardlist/footer|Rainbow}} | |||
==Trivia== | |||
[[File:Castelia Pikachu.png|thumb|220px|Pikachu inside the building]] | |||
* Even though it was officially stated that no Pokémon from previous generations would appear in {{game|Black and White|s}} before obtaining the [[National Pokédex]], a {{p|Pikachu}} can be seen with a {{tc|Hiker}} inside the same building as the [[Name Rater]] in Castelia City as a small cameo. | |||
** Even in {{2v2|Black|White|2}}, Pikachu is not in the [[List of Pokémon by Unova Pokédex number (Black 2 and White 2)|Unova Pokédex]]. In these games, however, the Hiker's Pikachu is replaced with a {{p|Minccino}}. | |||
* The Game Freak headquarters in Castelia City is a direct reference to the {{wp|Carrot Tower}} in {{wp|Setagaya, Tokyo}}. The 22nd floor of the Carrot Tower is the former headquarters of the game development company [[Game Freak]], which is the same floor that the Game Freak members are located on in the game. | |||
* Castelia City is based on the island of Manhattan, which is one of the five {{wp|Borough (New York City)|New York City boroughs}}. | |||
* Several locations in Castelia City are different than they are in other cities and towns: the [[Pokémon Center]] is located underneath another building, not a standalone building; the [[Gym]] faces the left, while others face south. | |||
* The "Moves for Living" [[Television|TV]] program broadcast around Unova features Dr. Technic Al'Machine, a professor from Castelia University. | |||
* Despite the Casteliacone stand closing in {{season|winter}}, it will still be advertised on TV and bulletin boards during that season. | |||
* Because of the many different camera angles used in the city, using {{m|Fly}} in Castelia City causes an abrupt change in the camera angle in order to center the player in the screen and zoom in on them. Other places in the game with multiple camera angles also employ this technique. | |||
* The man who gives the player {{TM|70|Flash}} says the target's {{stat|accuracy}} is lowered to half after Flash is used two times, but this is false; {{stat|Stat_modifiers|it must actually be used three times}}. | |||
* A painting of Castelia City is on display in [[Lumiose Museum]] in [[Pokémon X and Y]]. | |||
* In {{g|Scarlet and Violet}}, Castelia City is mentioned to be [[Amarys]]'s hometown. In addition, the city's theme can be unlocked as a possible background music track for the [[League Club Room]]. | |||
===Name origin=== | |||
{| class="roundy" style="float:left; background:#D9E1E2; border:3px solid #002D72" | |||
! Language | |||
! Name | |||
! Origin | |||
|- style="background:#FFF" | |||
| Japanese | |||
| ヒウンシティ ''Hiun City'' | |||
| From 飛雲文 ''hiun-mon'' (a [[Media:Hiun pattern.jpg|pattern]] based around swirling clouds) and 飛雲 ''hiun'' (soaring clouds) | |||
|- style="background:#FFF" | |||
| English | |||
| Castelia City | |||
| From ''{{wp|castellanus}}'', a cloud featuring a turreted appearance named after the Latin word for castle | |||
|- style="background:#FFF" | |||
| German | |||
| Stratos City | |||
| From ''Stratus'' ({{wp|stratus cloud}}) or ''Stratosphäre'' ({{wp|stratosphere}}) | |||
|- style="background:#FFF" | |||
| Spanish | |||
| Ciudad Porcelana | |||
| From ''porcelana'' ({{wp|porcelain}}) | |||
|- style="background:#FFF" | |||
| French | |||
| Volucité | |||
| From ''{{wp|Volute (disambiguation)|volute}}'' (spiral or scroll form) or ''volume'' and ''cité'' (city) | |||
|- style="background:#FFF" | |||
| Italian | |||
| Austropoli | |||
| From ''{{wp|Ostro|austro}}'' (southerly Mediterranean wind) and the suffix ''-poli'' (city) | |||
|- style="background:#FFF | |||
| Korean | |||
| 구름시티 ''Gureum City'' | |||
| From 구름무늬 ''gureum-munui'' (cloud pattern) | |||
|- style="background:#FFF" | |||
| Chinese ({{tt|Mandarin|Taiwan and Mainland China}}) | |||
| 飛雲市 / 飞云市 ''Fēiyún Shì'' | |||
| rowspan="2" | From 飛雲 / 飞云 ''fēiyún / fēiwàhn'' (soaring clouds) | |||
|- style="background:#FFF" | |||
| Chinese ({{tt|Cantonese|Hong Kong}}) | |||
| 飛雲市 ''Fēiwàhn Síh'' | |||
|- style="background:#FFF" | |||
| Polish | |||
| Castelia | |||
| From its English name | |||
|- style="background:#FFF" | |||
| Brazilian Portuguese | |||
| Cidade de Castelia | |||
| From its English name | |||
|- style="background:#FFF" | |||
| Vietnamese | |||
| Thành phố Hiun | |||
| Transcription of its Japanese name | |||
|} | |||
{{-}} | |||
==References== | |||
<references/> | |||
{{-}} | |||
{{Unova}}<br> | |||
{{Project Cities and Towns notice}} | {{Project Cities and Towns notice}} | ||
[[Category: | [[Category:Black and White locations]] | ||
[[Category:Black and White locations | [[Category:Black 2 and White 2 locations]] | ||
[[Category:Cities]] | [[Category:Cities]] | ||
[[de: | [[de:Stratos City]] | ||
[[fr: | [[es:Ciudad Porcelana]] | ||
[[fr:Volucité]] | |||
[[it:Austropoli]] | |||
[[ja:ヒウンシティ]] | |||
[[zh:飛雲市]] | |||
Latest revision as of 08:29, 17 April 2024

|
This article is incomplete. Please feel free to edit this article to add missing information and complete it. Reason: Missing layout maps |
| |||||||||||||||
| |||||||||||||||
Map description
| |||||||||||||||
Castelia City Gym - Unova Gym #3
| |||||||||||||||
| |||||||||||||||
Location  Location of Castelia City in Unova. | |||||||||||||||


Castelia City (Japanese: ヒウンシティ Hiun City) is a large seaside city located in south central Unova. Unlike other cities, Castelia is a huge, sprawling metropolis, sporting many towering skyscrapers and other tall buildings. It is the heart of business and economy of the Unova region, as opposed to its sister city, Nimbasa City, which is the heart of leisure and entertainment. Most of its city streets are crowded with different people rushing around, trying to get to work, home, or other places, creating a hustle and bustle scene for city life. The city exists on the bottom of Unova's central peninsula, south of the desert and north of the sea, making for a perfect harbor city.
The city has only two possible entrances on foot, from Route 4, a harsh desert in the north, and from the Skyarrow Bridge, a large suspension bridge that connects the southern part of the eastern peninsula to the central peninsula and provides a scenic view of Castelia's vast skyline, which spans off in the east. There are several other ways to enter the city. Tourists and businessmen travel to Castelia City from other regions by boat and stop at Castelia's harbor side.
Castelia City is geographically the largest city in the Unova region and contains many structural elements that have not been seen in cities in other regions. The city's core is a central business district, with huge skyscrapers and other commercial buildings; a series of alleyways lead into this core, where smaller shops are set up among city traffic. The city's outskirts are bounded on all sides by harbor, where ships provide traffic to other regions in the Pokémon world.
Despite its economic encouragement, Castelia also offers a worldly aspect. The city is a melting pot, incorporating cultures and foods from other regions. From across the globe, artists also flock to Castelia to open their art galleries, offering a different sort of entertainment in comparison to Nimbasa City.
Slogan
A City of Grandeur (Japanese: ヒウンは 飛ぶ雲 めでたい雲 Hiun is soaring clouds, auspicious clouds.)
Places of interest

Oceanfront Road
Due to the geography of Unova's central peninsula, Castelia City's wharf is shaped so that it extends around most of the city. The wharf is considered the outer layer of the city, where many important skyscrapers and other buildings stand. The Pokémon Center can be found in the east of the wharf, and other important locations such as the Battle Company and Passerby Analytics HQ can be found in the west.
Battle Company
|
||||
The Battle Company is a multi-story building located on the corner of Mode Street along the wharf. The company is one of the lead researchers of battle items, and assists in the development of other items such as Poké Balls, as well as goods for Pokémon and Trainers. An essential part of the research the company does is through battling, so most of the employees, who are usually Clerks and Scientists, are looking for a battle when they work. The stronger the employee is, the higher the floor they work on. Only three floors are accessible to Trainers and visitors, however: the ground floor, 47th floor, and 55th floor. The floors are all connected by an elevator at the back of the building. The ground floor is reception and the visitors' floor, where there are a few tables set up and a television. The 47th floor contains many Battle Company employees who will battle visitors. The head of the company works on the 55th floor.
The 47th floor contains sixBW/fiveB2W2 employees, most of whom can be battled. There are many office desks and cubicles, as well as computer systems and servers. The 55th floor is very much similar to the 47th floor, with several desks, cubicles and meeting places. In Black and White, there are four employees working on this floor, as well as the president, who sits at the back of the room behind a desk. In Black 2 and White 2, only the new president and the janitor occupy the 55th floor.
In Black and White, the president is an elderly man who disguises himself as a Janitor to trick people. He will give the player an Exp. Share after he is defeated. In Black 2 and White 2, it is revealed that the old president has retired to become a full-time janitor. His successor is his grandson, School Kid Neil. The janitor cannot be battled, but will still give the player an Exp. Share when they enter the building.
Passerby Analytics HQ
- Main article: Passerby Analytics HQ
|
||||
The Passerby Analytics HQ is located on the corner of the street where Castelia Gym is. This is the place where the player may accept requests to conduct surveys, answer questionnaires or change his or her greeting or thanking phrase.
Ocean Piers

There are five piers on the waterfront based on five human fingers[1] where certain ferries are docked.
Liberty Pier
Liberty Pier is opposite the street in which the Gym resides. The ferry found here will take the player to Liberty Garden. In Black and White, the Liberty Pass is required to board the ferry. In Black 2 and White 2, this is no longer the case.
Unity Pier
Unity Pier is across from Narrow Street, and its ferry is transport to Unity Tower, which is only available after making an international trade.
Prime Pier
Prime Pier is across from Mode Street. In Black and White, the Plasma Ship, a black boat that Team Plasma uses to get to Liberty Garden, is occasionally docked here prior to the player traveling to Liberty Garden themselves. One local citizen is curious about the ship, even after it has departed. In Black 2 and White 2, this is where Pop Roxie docks his boat and where the Plasma Frigate can be initially seen.
Cruise Dock
The Cruise Dock is opposite Castelia Street. It is where the Royal Unova docks. In Black and White, the player can only ride it in the evening after defeating Ghetsis at N's Castle.
Thumb Pier
Thumb Pier lies directly south of the Bridge Gate. In Black and White, a Scientist will give away an Evolution stone, depending on whether the Trainer wants to evolve a Pansage, Pansear, or Panpour. In Black 2 and White 2, the entrance to the Castelia Sewers is located here.
Castelia Street
Castelia Street has many people coming and going, especially during the evenings when people are going home from work. This street has many tall skyscrapers and large buildings. The Game Freak HQ is on this street, as well as a building where, in Black and White, one Pokémon per day can receive a massage to increase its friendship. The second building also has an elevator allowing access to its 11th floor, where a person will give away TM44 (Rest).
Game Freak
The Game Freak headquarters are located in a large building on Castelia Street's right side. The building has only one accessible floor—22F—where the Game Freak developers can be found.
In Black and White, a girl on the ground floor will tell a story about a Pokémon that can cause illusions and then show the player a photo of Zorua, thus adding it to the Pokédex. Next to her is a young boy who does not talk. If the player has a fateful encounter Celebi in his or her party and talks to the boy, Celebi will come out of its Poké Ball, and the boy will reveal himself to actually be a Zorua, who will then join the player if they have a Poké Ball to spare.
The office on the 22nd floor is similar to the Battle Company's, with computers, cubicles, desks and servers around the place. Here is where the Game Freak developers are working on the game. The Game Director at the back of the room will give the player a Diploma if they complete the Regional Pokédex, as well as another Diploma if they fill up the National Pokédex.
In Black and White, after defeating Ghetsis and Team Plasma at the Pokémon League, another Game Designer, Morimoto, will battle the player once per day. The Sound Director will play a special Team Rocket theme. In Black 2 and White 2, Morimoto and Nishino can be battled once per day here, but unlike Pokémon Black and White, they will battle the player at any stage in the game.
Mode Street
Mode Street is another commuter-heavy street, but it is not as large or as busy as Castelia Street. Many trees and plants line its sides, giving the street a feeling of nature. Along the west side of Mode Street is the famous Casteliacone stand, and along the east side is Studio Castelia, a popular art gallery where people go to enjoy local artwork.
Studio Castelia
Studio Castelia is a small art gallery in central Castelia which displays and showcases many painting from artists who live in Castelia; however, it does not display any of Burgh's paintings, as he prefers to hang them in the Castelia Gym. Many artists from around Unova come to Castelia to get inspiration from Burgh, and their paintings are hanging here. In Black and White, the studio is currently exhibiting works in the motif of legends of the Unova region, which have more to do with the myths of Reshiram and Zekrom. In Black 2 and White 2, the current focus is works by up-and-coming young artists. The owner of the studio likes to take walks along the Central Plaza and enjoys taking in the scenery and landscape with people and Pokémon. Every day, a HarlequinBW /ClerkB2W2 inside will ask the player to bring him a Pokémon of a certain type (except Dark), and for doing so he will reward the player with their choice of one of the first five Berries.
Casteliacone

|
|
Casteliacone is a popular ice cream stand in Castelia City, which sells ice creams with the same name as the store. In Black and White, a single Casteliacone can be purchased once per week every Tuesday for $100, except in winter when the stand is closed. Due to its tremendous popularity, Casteliacone sells out very quickly, with crowds of people coming from all across Unova, even as far as Accumula Town, just to have a taste. The line for the famous sweet is always long and the ice cream is often unavailable.
In the two years between Pokémon Black and White and Pokémon Black 2 and White 2, the ice cream has diminished in popularity. In Black 2 and White 2, the player can either purchase one or a dozen Casteliacones, is no longer limited by day of the week, and the stand remains open even in winter, but the player may still only make one purchase per day. Initially, the stand has no line, but after the player has defeated the Champion, a long line will again appear in front of the stand (if the player has bought a Casteliacone sometime previously), and the player must talk to the last person in line to get in line.
The ice cream has the ability to cure a single Pokémon of all status conditions.
| Casteliacone | |||||||
|---|---|---|---|---|---|---|---|
|
| ||||||
Narrow Street
Narrow Street is a back alley with a number of dumpsters and rubbish bins lined up against its sides. Like the name suggests, the street is very narrow, containing dark buildings, and shady people. Unlike any of the other streets, it is poorly lit and contains very few people. A man hidden behind one of the dumpsters will give the player TM70 (Flash). Some thugs can be seen hanging around the street not saying much, just laughing and smirking. In Black and White, one of the city's three Dancers is originally located here. There is only one accessible building on this street, a small café called Café Sonata.
Café Sonata
Café Sonata is a small café on the right side of Narrow Street. Many people come to the café to relax after a tiring day of work, and to listen to the Musician's guitar rhythm, who believes that a beautiful melody makes people happy and a sad melody makes people sorrowful. If a Trainer brings Meloetta to the Musician, he will teach it Relic Song. The manager of the café will give Trainers a Lemonade in Black and White and Moomoo Milk in Black 2 and White 2 for coming into the store for the first time; however, no drinks or items can be bought after this.
In Black 2 and White 2, by showing Meloetta to a person here, the player can receive a special Funfest Mission.
Gym Street
Gym Street is a large street which contains its namesake, the Castelia Gym. Another building is also on the west side of the street, being only an empty building in Black and White while in Black 2 and White 2 it contains the Medal Office and many people.
Castelia City Gym
- Main article: Castelia Gym
The Castelia Gym is the official Gym of Castelia City, located on the western-most street above the Liberty Pier. The Gym also doubles as a working art gallery. It is based on Bug-type Pokémon. The Gym Leader is Burgh.
The Castelia Gym is designed like a huge beehive in Black and White. It contains many small hexagonal rooms, several which are cut off by walls of honey which are at first barricaded by gates. There are buttons which are placed in the center of most of the rooms, and if certain buttons are stepped on, they trigger the gates to descend. However, not all the buttons trigger the doors to descend; some instead make Trainers appear who will then challenge the player. The player is able to walk through any wall of honey, as long as there is not a raised gate over it, allowing the player to navigate through the Gym and eventually reach Burgh. The Gym is also decorated with pictures painted by Burgh himself. For defeating Burgh, Trainers receive the Insect Badge and TM76 (Struggle Bug).
In the two-year gap in the series, Burgh's Gym gets a redesign, now featuring cocoons (perhaps created using String Shot) which a player uses much like elevators to reach Burgh.
Medal Office
The Medal Office (Japanese: メダル事務局 Medal Office) is located opposite the Gym.
In Black and White, when following a Team Plasma Grunt to try to retrieve Bianca's Munna, it is discovered that the strange, seemingly deserted building is currently hiding Ghetsis, Bronius, and Rood, along with several Team Plasma Grunts. Ghetsis reveals that they are using the building as a hideout as they thought it would be ironic to have a hideout opposite a Gym, but they had not expected to be discovered so soon. Team Plasma then leaves the building, leaving only a Smoke Ball.
In Black 2 and White 2, the second floor of this location has been turned into the Medal Office. The Name Rater, Pokémon masseuse, and Feeling Reader can be found on the first floor, while Fennel and Amanita are on the third floor. After the player has entered the Hall of Fame, Amanita will give the player an Eevee she received from a friend in the Kanto region. This Eevee has its Hidden Ability and is always male.
Central Plaza
The Central Plaza, also known as the Castelia Central Area, is a park located at the intersection of all the streets in Castelia City. There is a large flowing fountain that is said to bring people and Pokémon together. There are vending machines located here that sell drinks. In Black and White, a Dancer named Mickey will give the player an Amulet Coin if they can round up two other Dancers in Castelia to form a dance team with him. The two other dancers that are located around the city are Edmond and Raymond, and they are located on Narrow Street and Unity Pier respectively.
To the north of Central Plaza is another street with several tall skyscrapers that leads out to Route 4. Three buildings may be accessed from this street.
On the west side is a building that contains many useful services in Black and White. On the ground floor is the Name Rater, where Trainers may change the nicknames of their Pokémon, as well as the Feeling Reader, who offers advice about using the Feeling Check on the C-Gear. On the 11th floor is the Relocator, which requires a password to be used. The Relocator is used to transfer any of the four Pokémon distributed to commemorate the anime movie Zoroark: Master of Illusions—Celebi and the Shiny legendary beasts, Raikou, Entei, and Suicune. Also on the 11th floor is Mr. Lock, the "magical clown who can open anything." Using the Relocator, the player can transfer the Lock Capsule, an event item that was never given an official distribution, to Black or White. After giving the Lock Capsule to Mr. Lock, the player will receive TM95 (Snarl), which was locked within the Lock Capsule to protect it from Team Rocket. In Black 2 and White 2, an old man on the ground floor will give the player an Amulet Coin.
The southernmost building on the east side of the street is hosting a party on its 47th floor. After getting past the guard on the ground floor who frisks anyone for suspicious items, the player may go up the elevator and talk with people at the party, some of whom speak in foreign languages. Some of the people upstairs will give away items or TMs.
The northernmost building on the east side of the street is full of people on the ground floor, one of whom is a Scientist who will give the player an Eviolite if they have seen enough Pokémon. On the 47th floor, a man will explain the effects of each of the eight Badges.
| Vending machines | |||||||
|---|---|---|---|---|---|---|---|
|
| ||||||
|
|||||||
Castelia Park
Only accessible via the Castelia Sewers in Black 2 and White 2, Castelia Park is a small area enclosed by buildings. Similar to (but much smaller than) the National Park in Johto, it is shaped like a Poké Ball. Dark grass is on the right, with regular tall grass on the left and a tree in the middle. It is said to be "where it all began" for Castelia City.
Pokémon Center
A lady next to the PC will ask whether the Pokémon leading the team at that moment is the player's favorite Pokémon. This will change the favorite Pokémon's sprite in the Trainer's Profile from the Vs. Recorder. This action can be repeated anytime the player wants to change the favorite Pokémon again.
Castelia University
Not seen but mentioned on television, Castelia University is a school in which Dr. Technic Al'Machine often appears as a guest expert for "Moves for Living."
Demographics
Pokémon Black and White
Castelia City's population is 127 (excluding automatically regenerating NPCs that simply walk by the player if they are in the way on Castelia and Mode Streets, and the street leading to Route 4).
Pokémon Black 2 and White 2
Castelia City's population is 137 (excluding automatically regenerating NPCs that simply walk by the player if they are in the way on Castelia and Mode Streets, and the street leading to Route 4).
Poké Mart
| Upper cashier | |||||||
|---|---|---|---|---|---|---|---|
|
| ||||||
|
| ||||||
|
| ||||||
|
| ||||||
|
| ||||||
|
| ||||||
|
| ||||||
|
| ||||||
|
| ||||||
|
|||||||
| Lower cashier | |||||||
|---|---|---|---|---|---|---|---|
|
| ||||||
|
| ||||||
|
| ||||||
|
| ||||||
|
| ||||||
|
|||||||
Items
Oceanfront Road
| Item | Location | Games | |
|---|---|---|---|
| Bicycle | Received from a Harlequin near Prime Pier | B2 W2 | |
| Rare Candy | Reward for finding all three Harlequins | B2 W2 | |
Ocean Piers
| Item | Location | Games | |
|---|---|---|---|
| Leaf Stone | Received from a Scientist on Thumb Pier (only one stone can be chosen) | B W | |
| Fire Stone | Received from a Scientist on Thumb Pier (only one stone can be chosen) | B W | |
| Water Stone | Received from a Scientist on Thumb Pier (only one stone can be chosen) | B W | |
| Heart Scale | On southern part of Prime Pier | B2 W2 | |
| Destiny Knot | Received from a woman on Unity Pier | B2 W2 | |
Pokémon Center
| Item | Location | Games | |
|---|---|---|---|
| Wide Lens | Received from the man in black, if the player has Pokémon with 5 different outsider IDs | B W | |
| Everstone | Received from the man in black, if the player has Pokémon with 10 different outsider IDs | B W | |
| Zoom Lens | Received from the man in black, if the player has Pokémon with 20 different outsider IDs | B W | |
| Choice Scarf | Received from the man in black, if the player has Pokémon with 30 different outsider IDs | B W | |
| PP Max | Received from the man in black, if the player has Pokémon with 40 different outsider IDs | B W | |
| Master Ball | Received from the man in black, if the player has Pokémon with 50 different outsider IDs | B W | |
Battle Company
| Item | Location | Games | |
|---|---|---|---|
| Exp. Share | 1F, received from the President upon entering | B2 W2 | |
| Miracle Seed | 1F, received from an Ace Trainer if the first option is chosen | B2 W2 | |
| Mystic Water | 1F, received from an Ace Trainer if the second option is chosen | B2 W2 | |
| Charcoal | 1F, received from an Ace Trainer if the third option is chosen | B2 W2 | |
| Quick Ball ×3 | 47F, received from a Clerk ♂ in the upper-right corner | B W | |
| Timer Ball ×3 | 47F, received from a Clerk ♂ in the upper-right corner | B W | |
| Quick Ball ×2 | 47F, reward for defeating Clerk ♂ Clemens | B2 W2 | |
| Timer Ball ×5 | 47F, reward for defeating Clerk ♂ Warren | B2 W2 | |
| Scope Lens | 47F, received from a Scientist in the lower-right corner | B W B2 W2 | |
| Revive | 47F, in the lower-left corner | B W | |
| Guard Spec. | 47F, in the lower-left corner | B2 W2 | |
| Hyper Potion | 55F, in the middle of the floor | B W | |
| Ether | 55F, in the upper-left corner | B2 W2 | |
| Exp. Share | 55F, reward for defeating Janitor/President Geoff | B W | |
Castelia Street
| Item | Location | Games | |
|---|---|---|---|
| TM44 (Rest) | Received from a HikerBW/GuitaristB2W2 on 11F of the western building | B W B2 W2 | |
Game Freak
| Item | Location | Games | |
|---|---|---|---|
| Revive | 22F, near Morimoto | B2 W2 | |
Mode Street
Studio Castelia
| Item | Location | Games | |
|---|---|---|---|
| Cheri Berry | Received from HarlequinBW/Clerk ♂B2W2 if shown a Pokémon of the requested type (only one Berry can be chosen per day) | B W B2 W2 | |
| Chesto Berry | Received from HarlequinBW/Clerk ♂B2W2 if shown a Pokémon of the requested type (only one Berry can be chosen per day) | B W B2 W2 | |
| Pecha Berry | Received from HarlequinBW/Clerk ♂B2W2 if shown a Pokémon of the requested type (only one Berry can be chosen per day) | B W B2 W2 | |
| Rawst Berry | Received from HarlequinBW/Clerk ♂B2W2 if shown a Pokémon of the requested type (only one Berry can be chosen per day) | B W B2 W2 | |
| Aspear Berry | Received from HarlequinBW/Clerk ♂B2W2 if shown a Pokémon of the requested type (only one Berry can be chosen per day) | B W B2 W2 | |
Narrow Street
| Item | Location | Games | |
|---|---|---|---|
| TM70 (Flash) | Received from the man behind a dumpster | B W B2 W2 | |
Café Sonata
| Item | Location | Games | |
|---|---|---|---|
| Lemonade | Received from the manager | B W | |
| Moomoo Milk | Received from the manager | B2 W2 | |
Gym Street
| Item | Location | Games | |
|---|---|---|---|
| Yache Berry | In Team Plasma's hideout, received from Iris after rescuing Munna | B W | |
| Smoke Ball | In Team Plasma's hideout after rescuing Munna | B W | |
Central Plaza
| Item | Location | Games | |
|---|---|---|---|
| Amulet Coin | Reward from the Dancers after defeating all three of them | B W | |
Street connecting to Route 4
| Item | Location | Games | |
|---|---|---|---|
| TM45 (Attract) | Received from a girl on 47F of the southeastern building | B W B2 W2 | |
| Eviolite | Received from a Scientist on 1F of the northeastern building, if at least 25BW/40B2W2 Pokémon have been seen in the Pokédex | B W B2 W2 | |
| Charcoal | On 47F of the northeastern building | B2 W2 | |
| Amulet Coin | Received from a man on 1F of the western building | B2 W2 | |
| TM95 (Snarl) | Received from Mr. Lock via the Lock Capsule on 11F of the western building (the Lock Capsule was never made available, making this item unobtainable) | B W | |
Castelia Gate
| Item | Location | Games | |
|---|---|---|---|
| Dowsing MCHN | Received from Bianca | B2 W2 | |
Castelia Park
This area can only be accessed from the Castelia Sewers.
| Item | Location | Games | |
|---|---|---|---|
| Miracle Seed | In the park area | B2 W2 | |
Back alley
This area can only be accessed from the Castelia Sewers when the sewers are flooded in the spring and summer seasons, and requires Surf. However, it is possible to change seasons to autumn or winter while entering the area from the sewers.
| Item | Location | Games | |
|---|---|---|---|
| Repel | Northwest of the entrance | B2 W2 | |
| BlackGlasses | Near the back alley Trainers | B2 W2 | |
Pokémon
Pokémon Black and White
The Zorua gifted here is coded never to appear as Shiny.
| Pokémon | Games | Location | Levels | Rate | ||||||||||||
|---|---|---|---|---|---|---|---|---|---|---|---|---|---|---|---|---|
| Gift Pokémon | ||||||||||||||||
|
B | W |
|
10 | One | |||||||||||
| A colored background means that the Pokémon can be found in this location in the specified game. A white background with a colored letter means that the Pokémon cannot be found here. | ||||||||||||||||
Pokémon Black 2 and White 2
Castelia City proper
| Pokémon | Games | Location | Levels | Rate | ||||||||||||
|---|---|---|---|---|---|---|---|---|---|---|---|---|---|---|---|---|
| Gift Pokémon After entering the Hall of Fame | ||||||||||||||||
|
B2 | W2 |
|
10 | One | |||||||||||
| A colored background means that the Pokémon can be found in this location in the specified game. A white background with a colored letter means that the Pokémon cannot be found here. | ||||||||||||||||
Castelia Park
This area can only be accessed from the Castelia Sewers.
| Pokémon | Games | Location | Levels | Rate | ||||||||||||
|---|---|---|---|---|---|---|---|---|---|---|---|---|---|---|---|---|
|
B2 | W2 |
|
15-16 | 30% | |||||||||||
|
B2 | W2 |
|
18 | 5% | |||||||||||
|
B2 | W2 |
|
15-16 | 15% | |||||||||||
|
B2 | W2 |
|
15-16 | 15% | |||||||||||
|
B2 | W2 |
|
15-16 | 15% | |||||||||||
|
B2 | W2 |
|
15-17 | 35% | |||||||||||
|
B2 | W2 |
|
15-17 | 35% | |||||||||||
| Dark grass | ||||||||||||||||
|
B2 | W2 |
|
16-17 | 30% | |||||||||||
|
B2 | W2 |
|
19 | 5% | |||||||||||
|
B2 | W2 |
|
16-17 | 15% | |||||||||||
|
B2 | W2 |
|
16-17 | 15% | |||||||||||
|
B2 | W2 |
|
16-17 | 15% | |||||||||||
|
B2 | W2 |
|
16-18 | 35% | |||||||||||
|
B2 | W2 |
|
16-18 | 35% | |||||||||||
| Rustling grass | ||||||||||||||||
|
B2 | W2 |
|
18 | 5% | |||||||||||
|
B2 | W2 |
|
18 | 5% | |||||||||||
|
B2 | W2 |
|
15-18 | 90% | |||||||||||
|
B2 | W2 |
|
18 | 5% | |||||||||||
|
B2 | W2 |
|
18 | 5% | |||||||||||
| A colored background means that the Pokémon can be found in this location in the specified game. A white background with a colored letter means that the Pokémon cannot be found here. | ||||||||||||||||
Trainers
Pokémon Black and White

Battle Company
| Trainer | Pokémon | |||||||||||
|---|---|---|---|---|---|---|---|---|---|---|---|---|
| 47F | ||||||||||||
|
| |||||||||||
|
| |||||||||||
|
| |||||||||||
|
| |||||||||||
| ||||||||||||
| ||||||||||||
|
| |||||||||||
| ||||||||||||
| 55F | ||||||||||||
|
| |||||||||||
|
| |||||||||||
|
| |||||||||||
|
| |||||||||||
| ||||||||||||
| ||||||||||||
|
| |||||||||||
| ||||||||||||


Central Plaza
| Trainer | Pokémon | |||||||||||
|---|---|---|---|---|---|---|---|---|---|---|---|---|
|
| |||||||||||

Narrow Street
| Trainer | Pokémon | |||||||||||
|---|---|---|---|---|---|---|---|---|---|---|---|---|
| After defeating Mickey | ||||||||||||
|
| |||||||||||
Unity Pier
| Trainer | Pokémon | |||||||||||
|---|---|---|---|---|---|---|---|---|---|---|---|---|
| After defeating Mickey | ||||||||||||
|
| |||||||||||
Gym Street
| Trainer | Pokémon | |||||||||||
|---|---|---|---|---|---|---|---|---|---|---|---|---|
| After meeting Bianca, Burgh, and Iris on Prime Pier | ||||||||||||
|
| |||||||||||
| ||||||||||||

Castelia Gate
Bianca will challenge the player here once they've earned the Insect Badge.
|
|||||||||||||||||||||||||||||||||||||||||||||||||||||||||||||||||||||||||||||||||||||||||||||||||||||||||||||||||||||||||||||||||||||
| |||||||||||||||||||||||||||||||||||||||||||||||||||||||||||||||||||||||||||||||||||||||||||||||||||||||||||||||||||||||||||||||||||||


|
|||||||||||||||||||||||||||||||||||||||||||||||||||||||||||||||||||||||||||||||||||||||||||||||||||||||||||||||||||||||||||||||||||||
| |||||||||||||||||||||||||||||||||||||||||||||||||||||||||||||||||||||||||||||||||||||||||||||||||||||||||||||||||||||||||||||||||||||


|
|||||||||||||||||||||||||||||||||||||||||||||||||||||||||||||||||||||||||||||||||||||||||||||||||||||||||||||||||||||||||||||||||||||||
| |||||||||||||||||||||||||||||||||||||||||||||||||||||||||||||||||||||||||||||||||||||||||||||||||||||||||||||||||||||||||||||||||||||||


Game Freak


Pokémon Black 2 and White 2
Battle Company
| Trainer | Pokémon | |||||||||||
|---|---|---|---|---|---|---|---|---|---|---|---|---|
| 47F | ||||||||||||
|
| |||||||||||
|
| |||||||||||
|
| |||||||||||
|
| |||||||||||
| 55F | ||||||||||||
|
| |||||||||||
| ||||||||||||


Game Freak
Pre-Hall of Fame
|
|||||||||||||||||||||||||||||||||||||||||||||||||||||||||||||||||||||||||||||||||||||||||||||||||||||||
| |||||||||||||||||||||||||||||||||||||||||||||||||||||||||||||||||||||||||||||||||||||||||||||||||||||||

|
||||||||||||||||||||||||||||||||||
| ||||||||||||||||||||||||||||||||||


Post-Hall of Fame
|
|||||||||||||||||||||||||||||||||||||||||||||||||||||||||||||||||||||||||||||||||||||||||||||||||||||||||||||||||||||||||||||||||||||||||||||||||||||||||||||||||||||||||||||||||||||||||||||||||||||||||
| |||||||||||||||||||||||||||||||||||||||||||||||||||||||||||||||||||||||||||||||||||||||||||||||||||||||||||||||||||||||||||||||||||||||||||||||||||||||||||||||||||||||||||||||||||||||||||||||||||||||||
|
|||||||||||||||||||||||||||||||||||||||||||||||||||||||||||||||||||||||||||||||||||||||||||||||||||||||||||||||||||||||||||||||||||||||||||||||||||||||||||||||||||||||||||||||||||||||||||||||||||||||
| |||||||||||||||||||||||||||||||||||||||||||||||||||||||||||||||||||||||||||||||||||||||||||||||||||||||||||||||||||||||||||||||||||||||||||||||||||||||||||||||||||||||||||||||||||||||||||||||||||||||


Back alley
These Trainers are in an area accessible only from the Castelia Sewers when the sewers are flooded in the spring and summer seasons, and requires Surf. However, it is possible to change seasons to autumn or winter while entering the area from the sewers. Defeating these Trainers will earn the player the Castelia Boss Medal.
| Trainer | Pokémon | |||||||||||
|---|---|---|---|---|---|---|---|---|---|---|---|---|
|
| |||||||||||
|
| |||||||||||
|
| |||||||||||
| ||||||||||||


Gallery
Artwork

|

|

|
| Concept art from Black and White by Keiko Moritsugu[2] | Concept art from Black and White | |
In the anime
Main series

Like in the games, Castelia City is depicted as extremely large, with an abundance of huge, colorful skyscrapers and shops lining its long wharf.
The city made a brief cameo in The Lost World of Gothitelle!, where a few skyscrapers could be seen from the Skyarrow Bridge, and again in Sally's flashback of Gothitelle in the alleyways. It appeared fully in A Venipede Stampede!, when Ash, Iris, and Cilan arrived there. Cilan talked about its famous ice cream: Casteliacone. Ash and his friends suddenly met Burgh at the Central Plaza. Burgh sensed something was wrong and they ventured into the underground sewer system. Here, they found an injured Venipede. Suddenly, a massive group of Venipede stormed in and attacked the city.
Burgh became somewhat angry when he found out that the Mayor of Castelia City planned to get rid of the Venipede using force and protested the idea. The mayor eventually decided to let him handle it. Burgh's idea was to find the leader of the Venipede and have Nurse Joy's Audino use Heal Pulse on it. He, Ash, and Iris eventually located the leader only to see it was attacked by Trip and his Lampent. Burgh ordered him to stop and told him that he was only making things worse.
Once Nurse Joy's Audino used Heal Pulse on the leader, Burgh played his Bug Flute and lead the Venipede into Central Plaza. In the episode's original, now-deleted ending, he saw Ash and his friends off when they decided to go with Professor Juniper to investigate the Desert Resort, where a large amount of energy was detected and likely responsible for the Venipede swarming the city.
Castelia City was to have been the site of Team Rocket and Team Plasma's battle in the original BW023 and BW024. During the conflict, the Meteonite was to release energy blasts that threatened to destroy Castelia City. However, these episodes were never aired and were later retconned out of existence, leaving their events non-canonical.
In Battling For The Love of Bug-Types!, Ash had his Gym battle with Burgh. Ash won against Burgh, and his Sewaddle evolved into a Swadloon.
A fishing contest in A Fishing Connoisseur in a Fishy Competition! was supposed to take place in Castelia City, but the episode was delayed in Japan until June 23 because of the Tōhoku earthquake and tsunami, and the contest was relocated to an unnamed city.
Castelia City briefly appeared again at the end of The Name's N!. Here, N got off the ship where he met Ash, Iris, and Cilan and bid farewell to them.
Castelia City reappeared during Raid Battle in The Ruins!. Ash and Goh traveled there in order to reach the Desert Resort and explore the Colossus Ruins.
Castelia City reappeared in A Close Call... Practically!, where Ash and Goh traveled there as a part of Goh's prize for winning the Pokémon Grand Eating Contest. While the two enjoyed some delicious food, Team Rocket, having followed them, were planning to steal Pikachu by swapping it with a near-identical robotic replica. However, their getaway was noticed by Goh's Cinderace and Ash's Lucario, who gave pursuit. Due to Meowth gluing their hands together, they constantly found themselves bumbling around, even as they snatched Pikachu back and tried to escape from the trio. Eventually, they managed to cooperate enough to defeat the trio, who, while blasting off with Pikachu, discovered that they had accidentally taken their robotic Pikachu replica instead of the real one.
Castelia City made a cameo in Thrash of the Titans! as Ash and Goh flew over it on their way to Opelucid City.
Gallery
| Pokémon Center | Central Plaza | Casteliacone | Castelia Gym |
|---|---|---|---|

|

|

|

|
Pokémon Black 2 and White 2 Animated Trailer
Castelia City briefly appeared in the Pokémon Black Version 2 and Pokémon White Version 2 Animated Trailer, in which Nate met up with Colress at the local square. There, Colress explained Team Plasma's beliefs to liberate Pokémon Trainers before commenting that he believed differently.
In the manga
Pokémon Adventures

Platinum arc
Castelia City first appeared in The Final Dimensional Duel XI as Looker was shown flying towards it.
Black & White arc
Castelia City was briefly shown in Fussing and Fighting.
Black and White first arrived in Castelia City at the end of A Direct Attack and a Daunting Defense. There, Black's Tepig chased a Zorua through the GAME FREAK building while both Black and White were away. In the following round, White started to fear for her business when told by Black that Tep is close to evolving, and tried to persuade him not to use it in battle, but to no avail. While Black had his battle with Burgh, Bianca arrived at the city looking for Black, and ended up at Narrow Street, where a Team Plasma Grunt knocked her out and declared her Litwick to be liberated. Iris, who visited Castelia earlier to critique Burgh's paintings, informed the Gym Leader about the incident, just after he lost to Black. Black helped solve the mystery by tracing the source of the spores on Bianca to the building opposite the Gym. They found the Grunts inside the building, accompanied by Bronius, who fled the scene. The next day, White calmed down over her fears when she found out that Tep evolved. In another part of the city, Cheren only then found out what happened to Bianca.
White later returned to Castelia City with Bianca in With a Little Help from My Friends in an effort to cheer her up after finding out what happened to her after the incident. She was impressed by Bianca's musical skills and sent recordings of her music to a local guitarist at Café Sonata, who was also impressed. Thus she took Bianca to the café, which was on the same street where Bianca suffered the initial incident. They entered the café to find that it was attacked by a Vullaby, with the guitarist having broken his hand as a result of the attack. Vullaby began to attack a Meloetta residing in the café at the moment. White used her newly acquired battling skills to keep Vullaby at bay, but struggled when Vullaby called on an entire flock of its kind. Bianca volunteered to play Meloetta's forgotten Relic Song in the guitarist's place. This allowed Meloetta to relearn the song and transform into its Pirouette Forme, turning the battle against the flock of Vullaby. White concluded the battle by capturing the leading wild Vullaby, convincing Bianca to give her Pokédex to White.
Black 2 & White 2 arc
Castelia City was due to host the Unova Choir Tournament, which Cheren's Aspertia Trainers' School class qualified for by winning the Autumn Choir Tournament. In Angry Boy, Roxie led the class to a member of the organizing committee, who, as the class found out, had been attacked and his Karrablast stolen. Hearing that the attacker hid in the Castelia Sewers, Blake, Whitley, and Hugh went into the sewers to confront them, the culprits suspectedly turning out to be members of Team Plasma. After meeting up with the rest of the class back above ground on Castelia, Hugh told them of Team Plasma's revival, and revealed that he had evidence that one of their classmates was a member. When everybody started suspecting Whitley, her Foongus, Foongy, put everyone besides her and Hugh asleep. Hugh demanded Whitley to take him to Team Plasma's hideout, but before she could convince him that she didn't know where the current hideout was, the Plasma Frigate appeared over the city and fired its Kyurem Cannon at it, freezing the city over in an instant. The cannon's blast knocked Hugh out, after which Whitley was confronted by Rood, who had come for the memory card hidden inside Whitley's pendant, which held a program to stop the Colress Machine's power to control Pokémon. However, the memory card, which Whitley had lost and Hugh had discovered earlier, was not in Hugh's possession, meaning that it was still in Aspertia City. Rood decided to leave N's Zorua behind to impersonate Whitley while they would return to Aspertia City to retrieve the memory card. However, aboard the Plasma Frigate, Rood was spotted by Colress and Ghetsis, with the latter ordering him to be captured. However, Whitley protected Rood from the capture attempt, causing her to get caught instead and giving Rood enough time to escape. Cheren and his class were later found by Benga and Marlon off-panel and taken to the Marine Tube to recover.
In Epilogue: Graduation Ceremony, Blake was reinstated of his rank at the International Police office in Castelia City. After Blake had left, it was revealed that Blake being discharged from the International Police had all been just a test for him, and that the Magician, who had been supplying Blake with his equipment, was an International Police agent as well.
Gallery

Narrow Street in Pokémon Adventures

Café Sonata in Pokémon Adventures
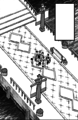
Prime Pier in Pokémon Adventures
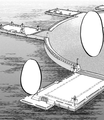
Ocean Piers in Pokémon Adventures
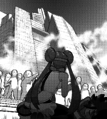
Castelia City frozen over in Pokémon Adventures


In the TCG
This listing is of cards mentioning or featuring Castelia City in the Pokémon Trading Card Game.
| Related cards Cards listed with a blue background are only legal to use in the current Expanded format. Cards listed with a green background are legal to use in both the current Standard and Expanded formats. | |||||||
|---|---|---|---|---|---|---|---|
| Card | Type | English Expansion |
Rarity | # | Japanese Expansion |
Rarity | # |
| Kricketot | Next Destinies | 3/99 | Psycho Drive | 003/052 | |||
| Kricketune | Next Destinies | 4/99 | Psycho Drive | 004/052 | |||
| Amoonguss | Next Destinies | 9/99 | Hail Blizzard | 008/052 | |||
| Growlithe | Next Destinies | 10/99 | Hail Blizzard | 009/052 | |||
| Simisear | Next Destinies | 16/99 | Psycho Drive | 011/052 | |||
| Lampent | Next Destinies | 19/99 | Hail Blizzard | 013/052 | |||
| Staryu | Next Destinies | 23/99 | Psycho Drive | 012/052 | |||
| Starmie | Next Destinies | 24/99 | Psycho Drive | 013/052 | |||
| Lapras | Next Destinies | 25/99 | Hail Blizzard | 015/052 | |||
| Simipour | Next Destinies | 29/99 | Psycho Drive | 017/052 | |||
| Vanillite | Next Destinies | 31/99 | Hail Blizzard | 016/052 | |||
| Vanillish | Next Destinies | 32/99 | Hail Blizzard | 017/052 | |||
| Raichu | Next Destinies | 40/99 | Hail Blizzard | 024/052 | |||
| Luxio | Next Destinies | 44/99 | Psycho Drive | 022/052 | |||
| Ralts | Next Destinies | 55/99 | Hail Blizzard | 026/052 | |||
| Master Deck Build Box EX | 015/046 | ||||||
| Darmanitan | Next Destinies | 60/99 | Hail Blizzard | 029/052 | |||
| Solosis | Noble Victories | 50/101 | Psycho Drive | 031/052 | |||
| Duosion | Noble Victories | 51/101 | Psycho Drive | 032/052 | |||
| Reuniclus | Noble Victories | 52/101 | Psycho Drive | 033/052 | |||
| Elgyem | Next Destinies | 61/99 | Hail Blizzard | 030/052 | |||
| Beheeyem | Next Destinies | 62/99 | Hail Blizzard | 031/052 | |||
| Riolu | Next Destinies | 63/99 | Hail Blizzard | 033/052 | |||
| Gurdurr | Noble Victories | 63/101 | Psycho Drive | 035/052 | |||
| Mienfoo | Next Destinies | 67/99 | Psycho Drive | 037/052 | |||
| Sneasel | Next Destinies | 69/99 | Hail Blizzard | 037/052 | |||
| Meowth | Next Destinies | 80/99 | Psycho Drive | 045/052 | |||
| Miscellaneous Promotional cards | |||||||
| Persian | Next Destinies | 81/99 | Psycho Drive | 046/052 | |||
| Pokémon Center | St | Next Destinies | 90/99 | Hail Blizzard | 051/052 | ||
| Riolu | BW Black Star Promos | BW33 | BW-P Promotional cards | 104/BW-P | |||
| Meowth | BW Black Star Promos | BW35 | BW-P Promotional cards | 105/BW-P | |||
| BW-P Promotional cards | 204/BW-P | ||||||
| Unfezant | Boundaries Crossed | 125/149 | Freeze Bolt | 052/059 | |||
| Magneton | Plasma Storm | 44/135 | Plasma Gale | 024/070 | |||
| Trubbish | Plasma Storm | 65/135 | Plasma Gale | 036/070 | |||
| Purrloin | Plasma Storm | 83/135 | Plasma Gale | 044/070 | |||
| Leafeon | Plasma Freeze | 11/116 | Thunder Knuckle | 006/051 | |||
| Jolteon | Plasma Freeze | 34/116 | Spiral Force | 016/051 | |||
| Muk | Plasma Freeze | 46/116 | Thunder Knuckle | 024/051 | |||
| Dragonite | Plasma Freeze | 83/116 | Thunder Knuckle | 040/051 | |||
| Frozen City | St | Plasma Freeze | 100/116 | Spiral Force | 049/051 | ||
| Moltres | Legendary Treasures | 22/113 | EX Battle Boost | 014/093 | |||
| Articuno | Legendary Treasures | 32/113 | EX Battle Boost | 024/093 | |||
| Kyurem | Legendary Treasures | 43/113 | EX Battle Boost | 035/093 | |||
| Minccino | Legendary Treasures | 104/113 | EX Battle Boost | 088/093 | |||
Trivia

- Even though it was officially stated that no Pokémon from previous generations would appear in Pokémon Black and White before obtaining the National Pokédex, a Pikachu can be seen with a Hiker inside the same building as the Name Rater in Castelia City as a small cameo.
- Even in Black 2 and White 2, Pikachu is not in the Unova Pokédex. In these games, however, the Hiker's Pikachu is replaced with a Minccino.
- The Game Freak headquarters in Castelia City is a direct reference to the Carrot Tower in Setagaya, Tokyo. The 22nd floor of the Carrot Tower is the former headquarters of the game development company Game Freak, which is the same floor that the Game Freak members are located on in the game.
- Castelia City is based on the island of Manhattan, which is one of the five New York City boroughs.
- Several locations in Castelia City are different than they are in other cities and towns: the Pokémon Center is located underneath another building, not a standalone building; the Gym faces the left, while others face south.
- The "Moves for Living" TV program broadcast around Unova features Dr. Technic Al'Machine, a professor from Castelia University.
- Despite the Casteliacone stand closing in winter, it will still be advertised on TV and bulletin boards during that season.
- Because of the many different camera angles used in the city, using Fly in Castelia City causes an abrupt change in the camera angle in order to center the player in the screen and zoom in on them. Other places in the game with multiple camera angles also employ this technique.
- The man who gives the player TM70 (Flash) says the target's accuracy is lowered to half after Flash is used two times, but this is false; it must actually be used three times.
- A painting of Castelia City is on display in Lumiose Museum in Pokémon X and Y.
- In Pokémon Scarlet and Violet, Castelia City is mentioned to be Amarys's hometown. In addition, the city's theme can be unlocked as a possible background music track for the League Club Room.
Name origin
| Language | Name | Origin |
|---|---|---|
| Japanese | ヒウンシティ Hiun City | From 飛雲文 hiun-mon (a pattern based around swirling clouds) and 飛雲 hiun (soaring clouds) |
| English | Castelia City | From castellanus, a cloud featuring a turreted appearance named after the Latin word for castle |
| German | Stratos City | From Stratus (stratus cloud) or Stratosphäre (stratosphere) |
| Spanish | Ciudad Porcelana | From porcelana (porcelain) |
| French | Volucité | From volute (spiral or scroll form) or volume and cité (city) |
| Italian | Austropoli | From austro (southerly Mediterranean wind) and the suffix -poli (city) |
| Korean | 구름시티 Gureum City | From 구름무늬 gureum-munui (cloud pattern) |
| Chinese (Mandarin) | 飛雲市 / 飞云市 Fēiyún Shì | From 飛雲 / 飞云 fēiyún / fēiwàhn (soaring clouds) |
| Chinese (Cantonese) | 飛雲市 Fēiwàhn Síh | |
| Polish | Castelia | From its English name |
| Brazilian Portuguese | Cidade de Castelia | From its English name |
| Vietnamese | Thành phố Hiun | Transcription of its Japanese name |
References
| Unova | ||||||||||||||||
|---|---|---|---|---|---|---|---|---|---|---|---|---|---|---|---|---|
|
| ||||||||||||||||
|
| This article is part of Project Cities and Towns, a Bulbapedia project that aims to write comprehensive articles on every city and town in the Pokémon world. |