Brine Cave: Difference between revisions
No edit summary |
m (Dungeon infobox:add Monster Houses info) |
||
| (32 intermediate revisions by 19 users not shown) | |||
| Line 1: | Line 1: | ||
{{DungeonPrevNext|Treeshroud Forest|Hidden Land|2}} | {{DungeonPrevNext|Treeshroud Forest|Hidden Land|2}} | ||
{{Dungeon infobox | {{Dungeon infobox | ||
|size=256 | |||
|colorscheme=water | |colorscheme=water | ||
|bordercolorscheme=water | |bordercolorscheme=water | ||
| Line 7: | Line 8: | ||
|jtrans=Beach Cave | |jtrans=Beach Cave | ||
|image=Brine Cave S.png | |image=Brine Cave S.png | ||
|recruitable=Yes | |recruitable=Yes{{tt|*|Not the first time}} | ||
|floors=15{{tt|*|Over all three areas}} | |floors=15{{tt|*|Over all three areas}} | ||
|rest=Yes | |rest=Yes | ||
|traps=Yes | |traps=Yes | ||
|monsterhouses= | |||
|items=48 | |items=48 | ||
|money=Allowed | |money=Allowed | ||
| Line 16: | Line 18: | ||
|startlevel=Current | |startlevel=Current | ||
|maintype={{t|Water}} | |maintype={{t|Water}} | ||
|boss={{p|Kabutops}}<br>{{p|Omastar}} ×2 | |boss={{p|Kabutops}}<br>{{p|Omastar}}×2 | ||
}} | }} | ||
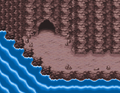
'''Brine Cave''' (Japanese: '''いそのどうくつ''' ''Beach Cave'') is a dungeon in [[Pokémon Mystery Dungeon: Explorers of Time and Explorers of Darkness]] and [[Pokémon Mystery Dungeon: Explorers of Sky]]. It is unlocked after the player talks to {{mdc|Torkoal|2}} when he visits the guild, the player's partner shows him the [[Relic Fragment]]'s pattern, and {{mdc|Wigglytuff|2}} and {{mdc|Chatot|2}} reveal the location of the pattern. On the first visit, Chatot will accompany the player. It has 15 floors total, with a relay point between the 9th floor and the first floor of Lower Brine Cave. At that relay, Chatot will chase after the | '''Brine Cave''' (Japanese: '''いそのどうくつ''' ''Beach Cave'') is a dungeon in [[Pokémon Mystery Dungeon: Explorers of Time and Explorers of Darkness]] and [[Pokémon Mystery Dungeon: Explorers of Sky]]. It is unlocked after the player talks to {{mdc|Torkoal|2}} when he visits the guild, the player's partner shows him the [[Relic Fragment]]'s pattern, and {{mdc|Wigglytuff|2}} and {{mdc|Chatot|2}} reveal the location of the pattern. On the first visit, Chatot will accompany the player. It has 15 floors total, with a relay point between the 9th floor and the first floor of Lower Brine Cave. At that relay, Chatot will chase after the {{mdc|Team Skull}}, leaving player and player's partner behind. The boss Pokémon are two {{p|Omastar}} and a {{p|Kabutops}}, who terrorized Wigglytuff and Chatot in the past. Earlier in the game {{mdc|Wigglytuff|2}} is seen talking to {{mdc|Lapras|2}} about letting the player travel to the [[Hidden Land]]. | ||
==Pokémon encountered== | ==Pokémon encountered== | ||
===Brine Cave=== | |||
{{mdloc/h|Water}} | {{mdloc/h|Water}} | ||
{{mdloc|086|Seel|1-5|34|3.9}} | {{mdloc|086|Seel|1-5|34|3.9}} | ||
| Line 26: | Line 29: | ||
{{mdloc|099|Kingler|1-8|35-36|-4.5}} | {{mdloc|099|Kingler|1-8|35-36|-4.5}} | ||
{{mdloc|279|Pelipper|1-8|36-37|-12}} | {{mdloc|279|Pelipper|1-8|36-37|-12}} | ||
{{mdloc|423|Gastrodon|1- | {{mdloc|423|Gastrodon|1-9|22-24|8.2}} | ||
{{mdloc| | {{mdloc|072|Tentacool|6-9|35-36|8.2}} | ||
{{mdloc| | {{mdloc|087|Dewgong|6-9|34,38|-4.5}} | ||
{{mdloc|120|Staryu|8- | {{mdloc|120|Staryu|8-9|38-39|8.2}} | ||
{{mdloc|148|Dragonair| | {{mdloc|148|Dragonair|8-9|36-37|-4.5}} | ||
{{mdloc/f|Water|Pokémon cannot be recruited during the first visit.}} | {{mdloc/f|Water|Pokémon cannot be recruited during the first visit.}} | ||
== Gallery == | ===Lower Brine Cave=== | ||
{{mdloc/h|Water}} | |||
{{mdloc|423|Gastrodon|1|22-24|8.2}} | |||
{{mdloc|087|Dewgong|1|34,38|-4.5}} | |||
{{mdloc|072|Tentacool|1-5|35-36|8.2}} | |||
{{mdloc|120|Staryu|1-5|38-39|8.2}} | |||
{{mdloc|148|Dragonair|1-5|36-37|-4.5}} | |||
{{mdloc|365|Walrein|2-5|36|0.5}} | |||
{{mdloc/f|Water|Pokémon cannot be recruited during the first visit.}} | |||
===Brine Cave Pit=== | |||
{{mdloc/h|Water}} | |||
{{mdloc|139|Omastar|Pit|35|0|boss=yes}} | |||
{{mdloc|141|Kabutops|Pit|42|0|boss=yes}} | |||
{{mdloc/f|Water|Can only be fought the first time}} | |||
==Items== | |||
{{DungeonItem/h|water}} | |||
{{DungeonItem|Poké|4=3-148|3=??|sprite=Poké currency}} | |||
{{DungeonItem|Power Band|Scarf|??}} | |||
{{DungeonItem|Twist Band|Scarf|??}} | |||
{{DungeonItem|Persim Band|Scarf|??}} | |||
{{DungeonItem|Special Band|Scarf|??}} | |||
{{DungeonItem|Joy Ribbon|Scarf|??}} | |||
{{DungeonItem|Heal Ribbon|Scarf|??}} | |||
{{DungeonItem|Sneak Scarf|Scarf|??}} | |||
{{DungeonItem|Pecha Scarf|Scarf|??}} | |||
{{DungeonItem|Apple|Apple|??}} | |||
{{DungeonItem|Geo Pebble|Geo Pebble|??|(5)}} | |||
{{DungeonItem|Oran Berry|Oran Berry|??}} | |||
{{DungeonItem|Pecha Berry|Pecha Berry|??}} | |||
{{DungeonItem|Heal Seed|Seed|??}} | |||
{{DungeonItem|X-Eye Seed|Seed|??}} | |||
{{DungeonItem|Blast Seed|Seed|??}} | |||
{{DungeonItem|Sleep Seed|Seed|??}} | |||
{{DungeonItem|Reviver Seed|Seed|??}} | |||
{{DungeonItem|Violent Seed|Seed|??}} | |||
{{DungeonItem|Hunger Seed|Seed|??}} | |||
{{DungeonItem|Warp Seed|Seed|??}} | |||
{{DungeonItem|Max Elixirs|Health drink|??}} | |||
{{DungeonItem|Totter Orb|Wonder Orb|??}} | |||
{{DungeonItem|Escape Orb|Wonder Orb|??}} | |||
{{DungeonItem|All-Hit Orb|Wonder Orb|??}} | |||
{{DungeonItem|All-Match Orb|Wonder Orb|??}} | |||
{{DungeonItem|Rollcall Orb|Wonder Orb|??}} | |||
{{DungeonItem|Foe-Fear Orb|Wonder Orb|??}} | |||
{{DungeonItem|Foe-Seal Orb|Wonder Orb|??}} | |||
{{DungeonItem|Mug Orb|Wonder Orb|??}} | |||
{{DungeonItem|Decoy Orb|Wonder Orb|??}} | |||
{{DungeonItem|Warp Orb|Wonder Orb|??}} | |||
{{DungeonItem|Stayaway Orb|Wonder Orb|??}} | |||
{{DungeonItem|Slumber Orb|Wonder Orb|??}} | |||
{{DungeonItem|Spurn Orb|Wonder Orb|??}} | |||
{{DungeonItem|Yellow Gummi|Yellow Gummi|??}} | |||
{{DungeonItem|Black Gummi|Black Gummi|??}} | |||
{{DungeonItem|Blue Gummi|Blue Gummi|??}} | |||
{{DungeonItem|Clear Gummi|Clear Gummi|??}} | |||
{{DungeonItem|Brown Gummi|Brown Gummi|??}} | |||
{{DungeonItem|Gray Gummi|Gray Gummi|??}} | |||
{{DungeonItem|Sky Gummi|Sky Gummi|??}} | |||
{{DungeonItem|Gold Gummi|Gold Gummi|??}} | |||
{{DungeonItem|Embargo|TM|??}} | |||
{{DungeonItem|Taunt|TM|??}} | |||
{{DungeonItem|Shadow Claw|TM|??}} | |||
{{DungeonItem|Vacuum-Cut|TM|??}} | |||
{{DungeonItem|Roost|TM|??}} | |||
{{DungeonItem|Reflect|TM|??}} | |||
{{DungeonItem|Cute Box|Treasure box|??|sprite=MDBag Box 1 Sprite}} | |||
{{DungeonItem|Deluxe Box|Treasure box|??|sprite=MDBag Box 2 Sprite}} | |||
{{DungeonItem|Heavy Box|Treasure box|??|sprite=MDBag Box 3 Sprite}} | |||
{{DungeonItem|Nifty Box|Treasure box|??|sprite=MDBag Box 1 Sprite}} | |||
{{DungeonItem|Shiny Box|Treasure box|??|sprite=MDBag Box 2 Sprite}} | |||
{{DungeonItem/f|water}} | |||
There seems to be no connection to items and floor. | |||
==Traps encountered== | |||
Along the way though this dungeon, players will encounter as many {{DL|Dungeon tile|traps}} as they did in [[Treeshroud Forest]]. | |||
{| style="background: #C3C3C3; margin-left: 10px; margin-bottom: 10px; {{roundy|10px}} border: 3px solid #2C2C2C" | |||
|- | |||
! style="background: #FFFFFF; {{roundytl|10px}}"| Image | |||
! style="background: #FFFFFF; {{roundytr|10px}}"| Trap | |||
|- style="background: #FFFFFF" | |||
| align="center"| [[File:ChestnutTrap.png]] | |||
| align="center"| '''Chestnut Trap''' | |||
|- style="background: #FFFFFF" | |||
| align="center"| [[File:SelfdestructTrap.png]] | |||
| align="center"| '''Selfdestruct Trap''' | |||
|- style="background: #FFFFFF" | |||
| align="center"| [[File:WarpTrap.png]] | |||
| align="center"| '''Warp Trap''' | |||
|- style="background: #FFFFFF" | |||
| align="center"| [[File:SlowTrap.png]] | |||
| align="center"| '''Slow Trap''' | |||
|- style="background: #FFFFFF" | |||
| align="center"| [[File:SpinTrap.png]] | |||
| align="center"| '''Spin Trap''' | |||
|- style="background: #FFFFFF" | |||
| align="center"| [[File:PokémonTrap.png]] | |||
| align="center"| '''Pokémon Trap''' | |||
|- style="background: #FFFFFF" | |||
| align="center"| [[File:SlumberTrap.png]] | |||
| align="center"| '''Slumber Trap''' | |||
|- style="background: #FFFFFF" | |||
| align="center"| [[File:SummonTrap.png]] | |||
| align="center"| '''Summon Trap''' | |||
|- style="background: #FFFFFF" | |||
| align="center"| [[File:GustTrap.png]] | |||
| align="center"| '''Gust Trap''' | |||
|- style="background: #FFFFFF" | |||
| align="center"| [[File:PoisonTrap.png]] | |||
| align="center"| '''Poison Trap''' | |||
|- style="background: #FFFFFF" | |||
| align="center"| [[File:TripTrap.png]] | |||
| align="center"| '''Trip Trap''' | |||
|- style="background: #FFFFFF" | |||
|} | |||
==Gallery== | |||
<gallery> | <gallery> | ||
File:Brine Cave entrance.png|[[Wigglytuff's Guild]] in the Brine Cave's entrance | File:Brine Cave entrance.png|[[Wigglytuff's Guild]] in the Brine Cave's entrance | ||
File:Lower Brine Cave S.png|Lower Brine Cave. Note that Chatot is missing. | File:Lower Brine Cave S.png|Lower Brine Cave. Note that Chatot is missing. | ||
File:Lower Brine Cave.png|Last floor, where {{p|Kabutops}} and {{p|Omastar}} are encountered | File:Lower Brine Cave.png|Last floor, where {{p|Kabutops}} and {{p|Omastar}} are encountered | ||
File:Brine Cave Ceiling Kabutops.png|{{p|Kabutops}} and {{p|Omastar}} | File:Brine Cave Ceiling Kabutops.png|{{p|Kabutops}} and {{p|Omastar}} on the ceiling | ||
File:Brine Cave Pattern.png|Pattern at the end of dungeon, same as on [[Relic Fragment]] | File:Brine Cave Pattern.png|Pattern at the end of dungeon, same as on [[Relic Fragment]] | ||
</gallery> | </gallery> | ||
==In the anime== | |||
[[File:Brine Cave anime.png|thumb|200px|Brine Cave in the anime]] | |||
Brine Cave made a brief appearance in ''[[SS021|Pokémon Mystery Dungeon: Explorers of Sky - Beyond Time & Darkness]]'', where [[Team Poképals]] and {{OBP|Grovyle|Explorers of Time, Darkness, and Sky}} were shown finding the pattern at the end of the dungeon, which reacted with {{p|Chimchar}}'s Relic Fragment and summoned Lapras, ready to take them to the Hidden Land. | |||
==In other languages== | |||
{| style="float:left;" | |||
|- | |||
| style="vertical-align:top;" | | |||
''Brine Cave'' | |||
{{langtable|color={{water color}}|bordercolor={{water color dark}} | |||
|fr=Caverne Saline | |||
|de=Salzwasserhöhle | |||
|it=Grotta Salmastra | |||
|ko=바닷가 동굴 ''Badatga Donggul'' | |||
|es=Cueva Aguamar | |||
}} | |||
| style="vertical-align:top;" | | |||
''Lower Brine Cave'' | |||
{{langtable|color={{water color}}|bordercolor={{water color dark}} | |||
|fr=Caverne Saline profondeurs | |||
|de=Untere Salzwasserhöhle | |||
|it=Antro Salmastro | |||
|ko=바닷가 동굴 최심부 ''Badatga Donggul Choesimbu'' | |||
|es=Fosa Aguamar | |||
}} | |||
| style="vertical-align:top;" | | |||
''Brine Cave Pit'' | |||
{{langtable|color={{water color}}|bordercolor={{water color dark}} | |||
|fr=Caverne Saline Fond | |||
|de=Salzwasserhöhlengrube | |||
|it=Fossa Salmastra | |||
|ko= | |||
|es=Sima Aguamar | |||
}} | |||
|} | |||
{{-}} | |||
{{PMD2 locations}} | |||
{{-}} | |||
{{DoubleProjectTag|Locations|Sidegames}} | {{DoubleProjectTag|Locations|Sidegames}} | ||
| Line 52: | Line 219: | ||
[[de:Salzwasserhöhle]] | [[de:Salzwasserhöhle]] | ||
[[fr:Caverne Saline]] | |||
[[it:Grotta Salmastra]] | |||
[[ja:いそのどうくつ]] | [[ja:いそのどうくつ]] | ||
[[zh:盐水洞窟]] | |||
Revision as of 08:17, 26 July 2017
|
|
|
| ||||||||||||||||||||||||||||||||||||||||||
| ||||||||||||||||||||||||||||||||||||||||||
| ||||||||||||||||||||||||||||||||||||||||||
Brine Cave (Japanese: いそのどうくつ Beach Cave) is a dungeon in Pokémon Mystery Dungeon: Explorers of Time and Explorers of Darkness and Pokémon Mystery Dungeon: Explorers of Sky. It is unlocked after the player talks to Torkoal when he visits the guild, the player's partner shows him the Relic Fragment's pattern, and Wigglytuff and Chatot reveal the location of the pattern. On the first visit, Chatot will accompany the player. It has 15 floors total, with a relay point between the 9th floor and the first floor of Lower Brine Cave. At that relay, Chatot will chase after the Team Skull, leaving player and player's partner behind. The boss Pokémon are two Omastar and a Kabutops, who terrorized Wigglytuff and Chatot in the past. Earlier in the game Wigglytuff is seen talking to Lapras about letting the player travel to the Hidden Land.
Pokémon encountered
Brine Cave
| Pokémon | Floors | Levels | Recruit Rate | |
|---|---|---|---|---|
| Seel | 1-5 | 34 | 3.9% | |
| Omanyte | 1-7 | 36-37 | 6.4% | |
| Kingler | 1-8 | 35-36 | -4.5% | |
| Pelipper | 1-8 | 36-37 | -12% | |
| Gastrodon West Sea |
1-9 | 22-24 | 8.2% | |
| Tentacool | 6-9 | 35-36 | 8.2% | |
| Dewgong | 6-9 | 34,38 | -4.5% | |
| Staryu | 8-9 | 38-39 | 8.2% | |
| Dragonair | 8-9 | 36-37 | -4.5% | |
| Pokémon cannot be recruited during the first visit. | ||||
Lower Brine Cave
| Pokémon | Floors | Levels | Recruit Rate | |
|---|---|---|---|---|
| Gastrodon West Sea |
1 | 22-24 | 8.2% | |
| Dewgong | 1 | 34,38 | -4.5% | |
| Tentacool | 1-5 | 35-36 | 8.2% | |
| Staryu | 1-5 | 38-39 | 8.2% | |
| Dragonair | 1-5 | 36-37 | -4.5% | |
| Walrein | 2-5 | 36 | 0.5% | |
| Pokémon cannot be recruited during the first visit. | ||||
Brine Cave Pit
| Pokémon | Floors | Levels | Recruit Rate | |
|---|---|---|---|---|
| Omastar | Pit | 35 | Unrecruitable Boss | |
| Kabutops | Pit | 42 | Unrecruitable Boss | |
| Can only be fought the first time | ||||
Items
| Item | Floors | |||||||
|---|---|---|---|---|---|---|---|---|
| 3-148 Poké | ??F | |||||||
| Power Band | ??F | |||||||
| Twist Band | ??F | |||||||
| Persim Band | ??F | |||||||
| Special Band | ??F | |||||||
| Joy Ribbon | ??F | |||||||
| Heal Ribbon | ??F | |||||||
| Sneak Scarf | ??F | |||||||
| Pecha Scarf | ??F | |||||||
| Apple | ??F | |||||||
| (5) Geo Pebble | ??F | |||||||
| Oran Berry | ??F | |||||||
| Pecha Berry | ??F | |||||||
| Heal Seed | ??F | |||||||
| X-Eye Seed | ??F | |||||||
| Blast Seed | ??F | |||||||
| Sleep Seed | ??F | |||||||
| Reviver Seed | ??F | |||||||
| Violent Seed | ??F | |||||||
| Hunger Seed | ??F | |||||||
| Warp Seed | ??F | |||||||
| File:MDBag Health drink TDS Sprite.png | Max Elixirs | ??F | ||||||
| Totter Orb | ??F | |||||||
| Escape Orb | ??F | |||||||
| All-Hit Orb | ??F | |||||||
| All-Match Orb | ??F | |||||||
| Rollcall Orb | ??F | |||||||
| Foe-Fear Orb | ??F | |||||||
| Foe-Seal Orb | ??F | |||||||
| Mug Orb | ??F | |||||||
| Decoy Orb | ??F | |||||||
| Warp Orb | ??F | |||||||
| Stayaway Orb | ??F | |||||||
| Slumber Orb | ??F | |||||||
| Spurn Orb | ??F | |||||||
| Yellow Gummi | ??F | |||||||
| Black Gummi | ??F | |||||||
| Blue Gummi | ??F | |||||||
| Clear Gummi | ??F | |||||||
| Brown Gummi | ??F | |||||||
| Gray Gummi | ??F | |||||||
| Sky Gummi | ??F | |||||||
| Gold Gummi | ??F | |||||||
| Embargo | ??F | |||||||
| Taunt | ??F | |||||||
| Shadow Claw | ??F | |||||||
| Vacuum-Cut | ??F | |||||||
| Roost | ??F | |||||||
| Reflect | ??F | |||||||
| Cute Box | ??F | |||||||
| Deluxe Box | ??F | |||||||
| Heavy Box | ??F | |||||||
| Nifty Box | ??F | |||||||
| Shiny Box | ??F | |||||||
There seems to be no connection to items and floor.
Traps encountered
Along the way though this dungeon, players will encounter as many traps as they did in Treeshroud Forest.
| Image | Trap |
|---|---|
| Chestnut Trap | |
| Selfdestruct Trap | |
| Warp Trap | |
| Slow Trap | |
| Spin Trap | |
| Pokémon Trap | |
| Slumber Trap | |
| Summon Trap | |
| Gust Trap | |
| Poison Trap | |
| Trip Trap |
Gallery
Wigglytuff's Guild in the Brine Cave's entrance
- Lower Brine Cave S.png
Lower Brine Cave. Note that Chatot is missing.
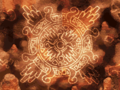
Pattern at the end of dungeon, same as on Relic Fragment


In the anime

Brine Cave made a brief appearance in Pokémon Mystery Dungeon: Explorers of Sky - Beyond Time & Darkness, where Team Poképals and Grovyle were shown finding the pattern at the end of the dungeon, which reacted with Chimchar's Relic Fragment and summoned Lapras, ready to take them to the Hidden Land.
In other languages
|
Brine Cave
|
Lower Brine Cave
|
Brine Cave Pit
| |||||||||||||||||||||||||||||||||||||||||||||||||||||||||||||||
| This article is part of both Project Locations and Project Sidegames, Bulbapedia projects that, together, aim to write comprehensive articles on the Pokémon Locations and Sidegames, respectively. |