Battle Tree: Difference between revisions
(→Items) |
m (→Challenges) |
||
| (18 intermediate revisions by 10 users not shown) | |||
| Line 13: | Line 13: | ||
}} | }} | ||
The '''Battle Tree''' (Japanese: '''バトルツリー''' ''Battle Tree'') is a facility located on [[Poni Island]] in [[Alola]]. It can be accessed through [[Poni Gauntlet]] after becoming {{pkmn|Champion}}. It is the equivalent to the [[Battle Maison]] from [[Generation VI]], the [[Battle Subway]] from [[Generation V]], and the [[Battle Tower]]s from other previous generations. It is led by {{ga|Red}} and {{ga|Blue}}. | The '''Battle Tree''' (Japanese: '''バトルツリー''' ''Battle Tree'') is a [[battle facility]] located on [[Poni Island]] in [[Alola]]. It is led by the {{tc|Battle Legend}}s. | ||
It can be accessed through [[Poni Gauntlet]] after becoming {{pkmn|Champion}}. It is the equivalent to the [[Battle Maison]] from [[Generation VI]], the [[Battle Subway]] from [[Generation V]], and the [[Battle Tower]]s from other previous generations. It is led by {{ga|Red}} and {{ga|Blue}}. | |||
==Challenges== | ==Challenges== | ||
At the Battle Tree, challengers compete to see how many Trainers they can defeat in a row. Losing one battle will reset the challenger's win streak to zero. Each time a challenger defeats a Trainer, [[Battle Point]]s, or BP, will be awarded. The longer the win streak, the more BP will be received. | At the Battle Tree, challengers compete to see how many Trainers they can defeat in a row. Losing one battle will reset the challenger's win streak to zero. Each time a challenger defeats a Trainer, [[Battle Point]]s, or BP, will be awarded. The longer the win streak, the more BP will be received. | ||
There are three formats a challenger can choose | There are three formats a challenger can choose: Single Battle, [[Double Battle]], or [[Multi Battle]]. The challenger needs three Pokémon for Single Battles, four for Double Battles, and for Multi Battles, two per Trainer. Lastly, challengers cannot use more than one of the same Pokémon or item. However, this does not restrict Multi Battle partners from using the same Pokémon or item across teams. | ||
There are two courses for each format: Normal Course and Super Course. A Normal Course challenge consists of 20 battles, the last of which will be against a {{tc|Battle Legend}}. Upon successfully completing a Normal Course, the Super Course for the respective format will be unlocked, in which the challenger may rebattle the same {{tc|Battle Legend}} on the 50th battle. Unlike the Normal Course, the Super Course is indefinite and ends only when the challenger loses a battle. | There are two courses for each format: Normal Course and Super Course. A Normal Course challenge consists of 20 battles, the last of which will be against a {{tc|Battle Legend}}. Upon successfully completing a Normal Course, the Super Course for the respective format will be unlocked, in which the challenger may rebattle the same {{tc|Battle Legend}} on the 50th battle. Unlike the Normal Course, the Super Course is indefinite and ends only when the challenger loses a battle. | ||
| Line 31: | Line 33: | ||
In [[Pokémon Sun and Moon]], both courses prohibit certain species Pokémon and are held under Flat Rules - any Pokémon higher than Lv. 50 will have their level lowered to 50. In [[Pokémon Ultra Sun and Ultra Moon]], the level and special Pokémon restrictions are lifted for the Normal Courses, while the opponents' Pokémon are still fixed at Lv. 50. | In [[Pokémon Sun and Moon]], both courses prohibit certain species Pokémon and are held under Flat Rules - any Pokémon higher than Lv. 50 will have their level lowered to 50. In [[Pokémon Ultra Sun and Ultra Moon]], the level and special Pokémon restrictions are lifted for the Normal Courses, while the opponents' Pokémon are still fixed at Lv. 50. | ||
====Pokémon Sun and Moon==== | |||
{| class="roundy" style="background:#{{locationcolor/med|forest}}; border:3px solid #{{locationcolor/dark|forest}}; margin:auto; text-align:center" | {| class="roundy" style="background:#{{locationcolor/med|forest}}; border:3px solid #{{locationcolor/dark|forest}}; margin:auto; text-align:center" | ||
|- | |- | ||
| Line 42: | Line 45: | ||
| Single | | Single | ||
| rowspan=2| 3 | | rowspan=2| 3 | ||
| {{ | | rowspan=6| Up to 50 | ||
| {{ | | rowspan=6| Banned | ||
| rowspan=6| Banned | |||
| style="background:#FFF; {{roundybr|5px}}" rowspan=6| Banned | |||
|- style="background:#FFF" | |||
| Super Single | |||
|- style="background:#FFF" | |||
| Double | |||
| rowspan=2| 4 | |||
|- style="background:#FFF" | |||
| Super Double | |||
|- style="background:#FFF" | |||
| Multi | |||
| rowspan=2 | 2 per Trainer | |||
|- style="background:#FFF" | |||
| style="background:#FFF; {{roundybl|5px}}" | Super Multi | |||
|} | |||
====Pokémon Ultra Sun and Ultra Moon==== | |||
{| class="roundy" style="background:#{{locationcolor/med|forest}}; border:3px solid #{{locationcolor/dark|forest}}; margin:auto; text-align:center" | |||
|- | |||
! style="background:#{{locationcolor/light|forest}}; {{roundytl|5px}}" | Battle format | |||
! style="background:#{{locationcolor/light|forest}}" | No. of Pokémon | |||
! style="background:#{{locationcolor/light|forest}}" | Pokémon Level | |||
! style="background:#{{locationcolor/light|forest}}" | Special Pokémon | |||
! style="background:#{{locationcolor/light|forest}}" | Same Pokémon | |||
! style="background:#{{locationcolor/light|forest}}; {{roundytr|5px}}" | Same items | |||
|- style="background:#FFF" | |||
| Single | |||
| rowspan=2| 3 | |||
| No restrictions | |||
| Permitted | |||
| rowspan=6| Banned | | rowspan=6| Banned | ||
| style="background:#FFF; {{roundybr|5px}}" rowspan=6| Banned | | style="background:#FFF; {{roundybr|5px}}" rowspan=6| Banned | ||
| Line 53: | Line 86: | ||
| Double | | Double | ||
| rowspan=2| 4 | | rowspan=2| 4 | ||
| No restrictions | |||
| Permitted | |||
|- style="background:#FFF" | |- style="background:#FFF" | ||
| Super Double | | Super Double | ||
| Line 62: | Line 95: | ||
| Multi | | Multi | ||
| rowspan=2 | 2 per Trainer | | rowspan=2 | 2 per Trainer | ||
| No restrictions | |||
| Permitted | |||
|- style="background:#FFF" | |- style="background:#FFF" | ||
| style="background:#FFF; {{roundybl|5px}}" | Super Multi | | style="background:#FFF; {{roundybl|5px}}" | Super Multi | ||
| Line 514: | Line 547: | ||
|color={{blue color}} | |color={{blue color}} | ||
|headcolor={{blue color light}} | |headcolor={{blue color light}} | ||
|bordercolor={{ | |bordercolor={{green color dark}} | ||
|sprite=VSBlue SM.png | |sprite=VSBlue SM.png | ||
|size=150px | |size=150px | ||
| Line 761: | Line 794: | ||
|color={{blue color}} | |color={{blue color}} | ||
|headcolor={{blue color light}} | |headcolor={{blue color light}} | ||
|bordercolor={{ | |bordercolor={{green color dark}} | ||
|sprite=VSBlue SM.png | |sprite=VSBlue SM.png | ||
|size=150px | |size=150px | ||
| Line 1,012: | Line 1,045: | ||
In Super Battles, special Trainers appear every ten battles. Like with the other Battle Tree Trainers, their [[party|teams]] are randomly selected from a group of Pokémon specifically preset for each of them. | In Super Battles, special Trainers appear every ten battles. Like with the other Battle Tree Trainers, their [[party|teams]] are randomly selected from a group of Pokémon specifically preset for each of them. | ||
{| class="roundy sortable" style="margin:auto; text-align:center; background-color: #{{locationcolor/med|forest}}; border: 3px solid #{{locationcolor/dark|forest}} | {| class="roundy sortable" style="margin:auto; text-align:center; background-color: #{{locationcolor/med|forest}}; border: 3px solid #{{locationcolor/dark|forest}}" | ||
|- | |- | ||
! style="background-color:#{{locationcolor/light|forest}}; {{roundytl|5px}}; color: #000" rowspan="2"| Trainer | ! style="background-color:#{{locationcolor/light|forest}}; {{roundytl|5px}}; color: #000" rowspan="2"| Trainer | ||
! style="background-color:#{{locationcolor/light|forest}}; {{roundytr|5px}}; color: #000" colspan="4" width=200px| Game | ! style="background-color:#{{locationcolor/light|forest}}; {{roundytr|5px}}; color: #000" colspan="4" width=200px| Game | ||
|- | |- | ||
! style="background-color:#{{sun color light}}; line-height: 1em"| {{ | ! style="background-color:#{{sun color light}}; line-height: 1em"| {{color2|{{sun color dark}}|Pokémon Sun and Moon|S}} | ||
! style="background-color:#{{moon color light}}; line-height: 1em"| {{ | ! style="background-color:#{{moon color light}}; line-height: 1em"| {{color2|{{moon color dark}}|Pokémon Sun and Moon|M}} | ||
! style="background-color:#{{ultra sun color light}}; line-height: 1em"| {{ | ! style="background-color:#{{ultra sun color light}}; line-height: 1em"| {{color2|{{ultra sun color dark}}|Pokémon Ultra Sun and Ultra Moon|US}} | ||
! style="background-color:#{{ultra moon color light}}; line-height: 1em"|{{ | ! style="background-color:#{{ultra moon color light}}; line-height: 1em"| {{color2|{{ultra moon color dark}}|Pokémon Ultra Sun and Ultra Moon|UM}} | ||
|- style="background:#fff" | |- style="background:#fff" | ||
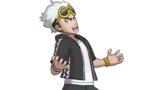
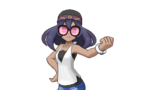
|[[File:VSAnabel.png|150px|link=Salon Maiden Anabel]]<br><small>[[List of Battle Tree Trainers#Anabel|Anabel]]</small> | |[[File:VSAnabel.png|150px|link=Salon Maiden Anabel]]<br><small>[[List of Battle Tree Trainers#Anabel|Anabel]]</small> | ||
| | | {{Yes}} | ||
| | | {{Yes}} | ||
| | | {{Yes}} | ||
| | | {{Yes}} | ||
|- style="background:#fff" | |- style="background:#fff" | ||
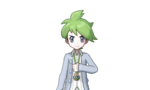
|[[File:VSColress SM.png|150px|link=Colress]]<br><small>[[List of Battle Tree Trainers#Colress|Colress]]</small> | |[[File:VSColress SM.png|150px|link=Colress]]<br><small>[[List of Battle Tree Trainers#Colress|Colress]]</small> | ||
| | | {{Yes}} | ||
| | | {{Yes}} | ||
| | | {{Yes}} | ||
| | | {{Yes}} | ||
|- style="background:#fff" | |- style="background:#fff" | ||
|[[File:VSCynthia SM.png|150px|link=Cynthia]]<br><small>[[List of Battle Tree Trainers#Cynthia|Cynthia]]</small> | |[[File:VSCynthia SM.png|150px|link=Cynthia]]<br><small>[[List of Battle Tree Trainers#Cynthia|Cynthia]]</small> | ||
| | | {{Yes}} | ||
| | | {{Yes}} | ||
| | | {{Yes}} | ||
| | | {{Yes}} | ||
|- style="background:#fff" | |- style="background:#fff" | ||
|[[File:VSDexio.png|150px|link=Dexio]]<br><small>[[List of Battle Tree Trainers#Dexio|Dexio]]</small> | |[[File:VSDexio.png|150px|link=Dexio]]<br><small>[[List of Battle Tree Trainers#Dexio|Dexio]]</small> | ||
| | | {{No}} | ||
| | | {{Yes}} | ||
| | | {{No}} | ||
| | | {{Yes}} | ||
|- style="background:#fff" | |- style="background:#fff" | ||
|[[File:VSGrimsley SM.png|150px|link=Grimsley]]<br><small>[[List of Battle Tree Trainers#Grimsley|Grimsley]]</small> | |[[File:VSGrimsley SM.png|150px|link=Grimsley]]<br><small>[[List of Battle Tree Trainers#Grimsley|Grimsley]]</small> | ||
| | | {{Yes}} | ||
| | | {{Yes}} | ||
| | | {{Yes}} | ||
| | | {{Yes}} | ||
|- style="background:#fff" | |- style="background:#fff" | ||
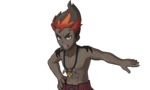
|[[File:VSGuzma 2.png|150px|link=Guzma]]<br><small>[[List of Battle Tree Trainers#Guzma|Guzma]]</small> | |[[File:VSGuzma 2.png|150px|link=Guzma]]<br><small>[[List of Battle Tree Trainers#Guzma|Guzma]]</small> | ||
| | | {{No}} | ||
| | | {{Yes}} | ||
| | | {{No}} | ||
| | | {{Yes}} | ||
|- style="background:#fff" | |- style="background:#fff" | ||
|[[File:VSKiawe.png|150px|link=Kiawe]]<br><small>[[List of Battle Tree Trainers#Kiawe|Kiawe]]</small> | |[[File:VSKiawe.png|150px|link=Kiawe]]<br><small>[[List of Battle Tree Trainers#Kiawe|Kiawe]]</small> | ||
| | | {{Yes}} | ||
| | | {{No}} | ||
| | | {{Yes}} | ||
| | | {{No}} | ||
|- style="background:#fff" | |- style="background:#fff" | ||
|[[File:VSKukui 3.png|150px|link=Professor Kukui]]<br><small>[[List of Battle Tree Trainers#Kukui|Kukui]]</small> | |[[File:VSKukui 3.png|150px|link=Professor Kukui]]<br><small>[[List of Battle Tree Trainers#Kukui|Kukui]]</small> | ||
| | | {{No}} | ||
| | | {{No}} | ||
| | | {{Yes}} | ||
| | | {{Yes}} | ||
|- style="background:#fff" | |- style="background:#fff" | ||
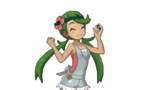
|[[File:VSMallow.png|150px|link=Mallow]]<br><small>[[List of Battle Tree Trainers#Mallow|Mallow]]</small> | |[[File:VSMallow.png|150px|link=Mallow]]<br><small>[[List of Battle Tree Trainers#Mallow|Mallow]]</small> | ||
| | | {{No}} | ||
| | | {{Yes}} | ||
| | | {{No}} | ||
| | | {{Yes}} | ||
|- style="background:#fff" | |- style="background:#fff" | ||
|[[File:VSPlumeria 2.png|150px|link=Plumeria]]<br><small>[[List of Battle Tree Trainers#Plumeria|Plumeria]]</small> | |[[File:VSPlumeria 2 USUM.png|150px|link=Plumeria]]<br><small>[[List of Battle Tree Trainers#Plumeria|Plumeria]]</small> | ||
| | | {{Yes}} | ||
| | | {{No}} | ||
| | | {{Yes}} | ||
| | | {{No}} | ||
|- style="background:#fff" | |- style="background:#fff" | ||
|[[File:VSSina.png|150px|link=Sina]]<br><small>[[List of Battle Tree Trainers#Sina|Sina]]</small> | |[[File:VSSina.png|150px|link=Sina]]<br><small>[[List of Battle Tree Trainers#Sina|Sina]]</small> | ||
| | | {{Yes}} | ||
| | | {{No}} | ||
| | | {{Yes}} | ||
| | | {{No}} | ||
|- style="background:#fff" | |- style="background:#fff" | ||
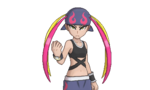
|[[File:VSWally SM.png|150px|link=Wally]]<br><small>[[List of Battle Tree Trainers#Wally|Wally]]</small> | |[[File:VSWally SM.png|150px|link=Wally]]<br><small>[[List of Battle Tree Trainers#Wally|Wally]]</small> | ||
| | | {{Yes}} | ||
| | | {{Yes}} | ||
| | | {{Yes}} | ||
| | | {{Yes}} | ||
|- | |- | ||
! style="background:#{{locationcolor/light|forest}}; {{roundybottom|5px}}" colspan=5 |<small>''Hyperlinks on a Trainer's name leads to full team listings.''</small> | ! style="background:#{{locationcolor/light|forest}}; {{roundybottom|5px}}" colspan=5 |<small>''Hyperlinks on a Trainer's name leads to full team listings.''</small> | ||
| Line 1,098: | Line 1,131: | ||
===Multi Battle partners=== | ===Multi Battle partners=== | ||
In the Multi Battle and Super Multi Battle challenges, the player can choose to partner with a friend or with the AI. Unlike the [[Battle Maison]] from previous generations, there is only one default AI partner, {{tc|Pokémon Breeder}} Rada. To increase the number of AI partners available, the player must Scout opponents after defeating them in Single or Double Battles. Scouting a Trainer costs 10 | In the Multi Battle and Super Multi Battle challenges, the player can choose to partner with a friend or with the AI. Unlike the [[Battle Maison]] from previous generations, there is only one default AI partner, {{tc|Pokémon Breeder}} Rada. To increase the number of AI partners available, the player must Scout opponents after defeating them in Single or Double Battles. Scouting a Trainer costs 10 [[Battle Point|BP]], and this will add the Trainer to the list of potential AI partners. Battle Legends cannot be scouted, but the other special Trainers can be. | ||
As a Multi Battle partner, the scouted Trainer uses the two Pokémon that were at the start of their party when they were scouted, retaining the same Abilities that they had in that battle. However, these Pokémon will become male unless their species cannot be male. If a Trainer who has already been scouted is scouted again, their new party overwrites their previously scouted party. | |||
In {{g|Ultra Sun and Ultra Moon}} only, the player can also recruit [[Lillie]] as a partner for Multi Battles by speaking to her at [[Professor Kukui]]'s laboratory at {{rt|1|Alola}} after finishing [[Episode RR]]. She uses a {{t|Fairy}}-based support set. | In {{g|Ultra Sun and Ultra Moon}} only, the player can also recruit [[Lillie]] as a partner for Multi Battles by speaking to her at [[Professor Kukui]]'s laboratory at {{rt|1|Alola}} after finishing [[Episode RR]]. She uses a {{t|Fairy}}-based support set. | ||
| Line 1,151: | Line 1,186: | ||
{{Party/Single | {{Party/Single | ||
|color={{moon color}} | |color={{moon color}} | ||
| | |headcolor={{moon color light}} | ||
|bordercolor={{moon color dark}} | |bordercolor={{moon color dark}} | ||
|sprite=VSLillie.png | |sprite=VSLillie.png | ||
| Line 1,157: | Line 1,192: | ||
|prize=N/A | |prize=N/A | ||
|class=Pokémon Trainer | |class=Pokémon Trainer | ||
|classlink=Pokémon Trainer | |||
|name={{color2|000|Lillie}} | |name={{color2|000|Lillie}} | ||
|game=USUM | |game=USUM | ||
| Line 1,199: | Line 1,235: | ||
==Items== | ==Items== | ||
{{itlisth|forest}} | {{itlisth|forest}} | ||
{{Itemlist|Moomoo Milk | {{Itemlist|Moomoo Milk|From the receptionist after 5 consecutive victories|Su=yes|M=yes|US=yes|UM=yes}} | ||
{{Itemlist|PP Up|From the receptionist after 10 consecutive victories|Su=yes|M=yes|US=yes|UM=yes}} | {{Itemlist|PP Up|From the receptionist after 10 consecutive victories|Su=yes|M=yes|US=yes|UM=yes}} | ||
{{Itemlist|Rare Candy|From the receptionist after 20 consecutive victories|Su=yes|M=yes|US=yes|UM=yes}} | {{Itemlist|Rare Candy|From the receptionist after 20 consecutive victories|Su=yes|M=yes|US=yes|UM=yes}} | ||
{{Itemlist|Bottle Cap|From the receptionist after 30 consecutive victories|Su=yes|M=yes|US=yes|UM=yes}} | {{Itemlist|Bottle Cap|From the receptionist after 30 consecutive victories|Su=yes|M=yes|US=yes|UM=yes}} | ||
{{Itemlist|PP Max|From the receptionist after 40 consecutive victories|Su=yes|M=yes|US=yes|UM=yes}} | {{Itemlist|PP Max|From the receptionist after 40 consecutive victories|Su=yes|M=yes|US=yes|UM=yes}} | ||
{{Itemlist|Ability Capsule|From the receptionist after 50 consecutive victories|Su=yes|M=yes|US=yes|UM=yes}} | {{Itemlist|Ability Capsule|From the receptionist after 50 consecutive victories|Su=yes|M=yes}} | ||
{{Itemlist|Gold Bottle Cap|From the receptionist after 50 consecutive victories|US=yes|UM=yes}} | |||
{{Itemlist|Lansat Berry|From the receptionist after 100 consecutive victories|Su=yes|M=yes|US=yes|UM=yes}} | {{Itemlist|Lansat Berry|From the receptionist after 100 consecutive victories|Su=yes|M=yes|US=yes|UM=yes}} | ||
{{Itemlist|Starf Berry|From the receptionist after 200 consecutive victories|Su=yes|M=yes|US=yes|UM=yes}} | {{Itemlist|Starf Berry|From the receptionist after 200 consecutive victories|Su=yes|M=yes|US=yes|UM=yes}} | ||
| Line 1,394: | Line 1,431: | ||
|color={{blue color}} | |color={{blue color}} | ||
|headcolor={{blue color light}} | |headcolor={{blue color light}} | ||
|bordercolor={{ | |bordercolor={{green color dark}} | ||
|sprite=VSBlue SM.png | |sprite=VSBlue SM.png | ||
|size=150px | |size=150px | ||
| Line 1,480: | Line 1,517: | ||
==Trivia== | ==Trivia== | ||
* Due to a [[glitch]], if a [[Multi Battle]] partner would have their Pokémon in special [[Poké Ball]]s, they will always appear as {{ | * Due to a [[glitch]], if a [[Multi Battle]] partner would have their Pokémon in special [[Poké Ball]]s, they will always appear as {{i|Poké Ball|standard Poké Balls}} while teaming up with the player. | ||
* No Trainer introduced in [[Generation II]] appears as a special Trainer here. | * No Trainer introduced in [[Generation II]] appears as a special Trainer here. | ||
| Line 1,501: | Line 1,538: | ||
[[Category:Sun and Moon locations]] | [[Category:Sun and Moon locations]] | ||
[[Category:Ultra Sun and Ultra Moon locations]] | [[Category:Ultra Sun and Ultra Moon locations]] | ||
[[Category:Battle | [[Category:Battle facilities]] | ||
[[de:Kampfbaum]] | [[de:Kampfbaum]] | ||
[[es:Árbol de Combate]] | |||
[[fr:Arbre de Combat]] | [[fr:Arbre de Combat]] | ||
[[it:Albero della Lotta]] | [[it:Albero della Lotta]] | ||
[[ja:バトルツリー]] | [[ja:バトルツリー]] | ||
[[zh:對戰樹]] | [[zh:對戰樹]] | ||
Revision as of 00:28, 19 September 2019

|
This article is incomplete. Please feel free to edit this article to add missing information and complete it. Reason: Missing complete layout map |
| ||||
| ||||
| Map description: | The sacred battle grounds for the toughest Trainers of the Alola region. | |||
|---|---|---|---|---|
| Location: | West of Poni Gauntlet | |||
| Region: | Alola | |||
| Generations: | VII | |||
 Location of Battle Tree in Alola. | ||||
| Pokémon world locations | ||||

The Battle Tree (Japanese: バトルツリー Battle Tree) is a battle facility located on Poni Island in Alola. It is led by the Battle Legends.
It can be accessed through Poni Gauntlet after becoming Champion. It is the equivalent to the Battle Maison from Generation VI, the Battle Subway from Generation V, and the Battle Towers from other previous generations. It is led by Red and Blue.
Challenges
At the Battle Tree, challengers compete to see how many Trainers they can defeat in a row. Losing one battle will reset the challenger's win streak to zero. Each time a challenger defeats a Trainer, Battle Points, or BP, will be awarded. The longer the win streak, the more BP will be received.
There are three formats a challenger can choose: Single Battle, Double Battle, or Multi Battle. The challenger needs three Pokémon for Single Battles, four for Double Battles, and for Multi Battles, two per Trainer. Lastly, challengers cannot use more than one of the same Pokémon or item. However, this does not restrict Multi Battle partners from using the same Pokémon or item across teams.
There are two courses for each format: Normal Course and Super Course. A Normal Course challenge consists of 20 battles, the last of which will be against a Battle Legend. Upon successfully completing a Normal Course, the Super Course for the respective format will be unlocked, in which the challenger may rebattle the same Battle Legend on the 50th battle. Unlike the Normal Course, the Super Course is indefinite and ends only when the challenger loses a battle.
All NPC Trainers in the Battle Tree use Pokémon from a list of 996 Pokémon and moveset combinations. Each of their Pokémon has a fixed Nature and EV spread for effort values. IVs are equal across all stats and based on the Trainer using it. The gender and Ability are randomly selected each battle. Each Trainer will use two to four Pokémon, depending on the format selected.
Restrictions
In Pokémon Sun and Moon, both courses prohibit certain species Pokémon and are held under Flat Rules - any Pokémon higher than Lv. 50 will have their level lowered to 50. In Pokémon Ultra Sun and Ultra Moon, the level and special Pokémon restrictions are lifted for the Normal Courses, while the opponents' Pokémon are still fixed at Lv. 50.
Pokémon Sun and Moon
| Battle format | No. of Pokémon | Pokémon Level | Special Pokémon | Same Pokémon | Same items |
|---|---|---|---|---|---|
| Single | 3 | Up to 50 | Banned | Banned | Banned |
| Super Single | |||||
| Double | 4 | ||||
| Super Double | |||||
| Multi | 2 per Trainer | ||||
| Super Multi |
Pokémon Ultra Sun and Ultra Moon
| Battle format | No. of Pokémon | Pokémon Level | Special Pokémon | Same Pokémon | Same items |
|---|---|---|---|---|---|
| Single | 3 | No restrictions | Permitted | Banned | Banned |
| Super Single | Up to 50 | Banned | |||
| Double | 4 | No restrictions | Permitted | ||
| Super Double | Up to 50 | Banned | |||
| Multi | 2 per Trainer | No restrictions | Permitted | ||
| Super Multi | Up to 50 | Banned |
Special Pokémon
The following Pokémon species and their forms are banned from challenges that ban special Pokémon. Eggs cannot be used in any battle.


Battle Points
Like in the Battle Maison, the player receives Battle Points (BP) at the end of every victorious match. The number of Battle Points (BP) awarded after a match varies with the length of the current win streak, as shown in the table below.
| Battle Points | ||
|---|---|---|
| Win streak | Normal | Super |
| 1-10 | 1 | 2 |
| 11-19 | 2 | 3 |
| 20 (Battle Legend) |
20 | 3 |
| 21-30 | — | 4 |
| 31-40 | — | 5 |
| 41-49 | — | 6 |
| 50 (Battle Legend) |
— | 50 |
| 51+ | — | 7 |
Battle Legends
On the 20th battle of normal challenges and the 50th battle of Super challenges, a Battle Legend will be challenged. Red is the Battle Legend for Single Battle challenges, using three Pokémon each time. Blue is the Battle Legend for Double Battles and uses four Pokémon. For Multi Battles, both Battle Legends will appear simultaneously, each using two Pokémon. Upon defeating the Battle Legend, the Pokémon used in that battle will be awarded a Battle Tree Great Ribbon or Battle Tree Master Ribbon for normal or Super mode, respectively.
Single Battle (on 20th consecutive battle)


Super Single Battle (on 50th consecutive battle)
|
|||||||||||||||||||||||||||||||||||||||||||||||||||||||||||||||||||||||||||||||||||||||||||||||||||||||||||||||||||||||||||||||||||||||||||||||||||||||||||||||||||||||||||||||||||||||||||||||||||||||||||||||||||||||||||||||||||||||||||||||||||||||||||||||||||||||||||||||||||||||||||||||||||||||||||||||||||||||||||||||||||||||||||||||||||||||
| |||||||||||||||||||||||||||||||||||||||||||||||||||||||||||||||||||||||||||||||||||||||||||||||||||||||||||||||||||||||||||||||||||||||||||||||||||||||||||||||||||||||||||||||||||||||||||||||||||||||||||||||||||||||||||||||||||||||||||||||||||||||||||||||||||||||||||||||||||||||||||||||||||||||||||||||||||||||||||||||||||||||||||||||||||||||
Double Battle (on 20th consecutive battle)
|
|||||||||||||||||||||||||||||||||||||||||||||||||||||||||||||||||||||||||||||||||||||||||||||||||||||||||||||||||||||||||||||||||||||||||||||||||||||||||||||||||||||||||||||||||||||||||||||||||||||||||||||||||||||||||||||||||||||||||||||||||||||||||||||||||||||||||||||||||||||||||||||||||||||||||||||||||||||||||||||||||||||||||||||||||||||||||||||||||||||||||||||||||||||||||||||||||||||||||||||||||||||||||||||||||||||||||||||||||||||||||||||||||||||||||||||||||||||||||||||||||||||||||||||||||||||||||||||||||||||||||||||||||||||||||||||||||||||||||||||||||||||||||||||||||||||||||||||
| |||||||||||||||||||||||||||||||||||||||||||||||||||||||||||||||||||||||||||||||||||||||||||||||||||||||||||||||||||||||||||||||||||||||||||||||||||||||||||||||||||||||||||||||||||||||||||||||||||||||||||||||||||||||||||||||||||||||||||||||||||||||||||||||||||||||||||||||||||||||||||||||||||||||||||||||||||||||||||||||||||||||||||||||||||||||||||||||||||||||||||||||||||||||||||||||||||||||||||||||||||||||||||||||||||||||||||||||||||||||||||||||||||||||||||||||||||||||||||||||||||||||||||||||||||||||||||||||||||||||||||||||||||||||||||||||||||||||||||||||||||||||||||||||||||||||||||||


Super Double Battle (on 50th consecutive battle)
|
||||||||||||||||||||||||||||||||||||||||||||||||||||||||||||||||||||||||||||||||||||||||||||||||||||||||||||||||||||||||||||||||||||||||||||||||||||||||||||||||||||||||||||||||||||||||||||||||||||||||||||||||||||||||||||||||||||||||||||||||||||||||||||||||||||||||||||||||||||||||||||||||||||||||||||||||||||||||||||||||||||||||||||||||||||||||||||||||||||||||||||||||||||||||||||||||||||||||||||||||||||||||||||||||||||||||||||||||||||||||||||||||||||||||||||||||||||||||||||||||||||||||||||||||||||||||||||||||||||||||||||||||||||||||||||||||||||||||||||||||||||||||||||||||||||||||
| ||||||||||||||||||||||||||||||||||||||||||||||||||||||||||||||||||||||||||||||||||||||||||||||||||||||||||||||||||||||||||||||||||||||||||||||||||||||||||||||||||||||||||||||||||||||||||||||||||||||||||||||||||||||||||||||||||||||||||||||||||||||||||||||||||||||||||||||||||||||||||||||||||||||||||||||||||||||||||||||||||||||||||||||||||||||||||||||||||||||||||||||||||||||||||||||||||||||||||||||||||||||||||||||||||||||||||||||||||||||||||||||||||||||||||||||||||||||||||||||||||||||||||||||||||||||||||||||||||||||||||||||||||||||||||||||||||||||||||||||||||||||||||||||||||||||||
Special Trainers
In Super Battles, special Trainers appear every ten battles. Like with the other Battle Tree Trainers, their teams are randomly selected from a group of Pokémon specifically preset for each of them.
| Trainer | Game | |||
|---|---|---|---|---|
| S | M | US | UM | |
 Anabel |
✔ | ✔ | ✔ | ✔ |
 Colress |
✔ | ✔ | ✔ | ✔ |
 Cynthia |
✔ | ✔ | ✔ | ✔ |
 Dexio |
✘ | ✔ | ✘ | ✔ |
 Grimsley |
✔ | ✔ | ✔ | ✔ |
 Guzma |
✘ | ✔ | ✘ | ✔ |
 Kiawe |
✔ | ✘ | ✔ | ✘ |
 Kukui |
✘ | ✘ | ✔ | ✔ |
 Mallow |
✘ | ✔ | ✘ | ✔ |
 Plumeria |
✔ | ✘ | ✔ | ✘ |
 Sina |
✔ | ✘ | ✔ | ✘ |
 Wally |
✔ | ✔ | ✔ | ✔ |
| Hyperlinks on a Trainer's name leads to full team listings. | ||||
Multi Battle partners
In the Multi Battle and Super Multi Battle challenges, the player can choose to partner with a friend or with the AI. Unlike the Battle Maison from previous generations, there is only one default AI partner, Pokémon Breeder Rada. To increase the number of AI partners available, the player must Scout opponents after defeating them in Single or Double Battles. Scouting a Trainer costs 10 BP, and this will add the Trainer to the list of potential AI partners. Battle Legends cannot be scouted, but the other special Trainers can be.
As a Multi Battle partner, the scouted Trainer uses the two Pokémon that were at the start of their party when they were scouted, retaining the same Abilities that they had in that battle. However, these Pokémon will become male unless their species cannot be male. If a Trainer who has already been scouted is scouted again, their new party overwrites their previously scouted party.
In Pokémon Ultra Sun and Ultra Moon only, the player can also recruit Lillie as a partner for Multi Battles by speaking to her at Professor Kukui's laboratory at Route 1 after finishing Episode RR. She uses a Fairy-based support set.
|
|||||||||||||||||||||||||||||||||||||||||||||||||||||||||||||||||||||||
| |||||||||||||||||||||||||||||||||||||||||||||||||||||||||||||||||||||||


|
|||||||||||||||||||||||||||||||||||||||||||||||||||||||||||||||||||||
| |||||||||||||||||||||||||||||||||||||||||||||||||||||||||||||||||||||


IV judge
- Main article: Stats judge
Next to the PC, the player can find a male Ace Trainer, who is supposed to judge the IVs of the player's lead Pokémon. However, unlike the judges in the previous games, he's unwilling to judge the player's Pokémon. If the player has hatched at least 21 Eggs, the judge will update the player's PC with a feature that allows them to view the IVs of their Pokémon themselves, after which he leaves.
Items
| Item | Location | Games | |
|---|---|---|---|
| Moomoo Milk | From the receptionist after 5 consecutive victories | S M US UM | |
| PP Up | From the receptionist after 10 consecutive victories | S M US UM | |
| Rare Candy | From the receptionist after 20 consecutive victories | S M US UM | |
| Bottle Cap | From the receptionist after 30 consecutive victories | S M US UM | |
| PP Max | From the receptionist after 40 consecutive victories | S M US UM | |
| Ability Capsule | From the receptionist after 50 consecutive victories | S M | |
| Gold Bottle Cap | From the receptionist after 50 consecutive victories | US UM | |
| Lansat Berry | From the receptionist after 100 consecutive victories | S M US UM | |
| Starf Berry | From the receptionist after 200 consecutive victories | S M US UM | |
| Charizardite X | From Red after defeating him or BlueUSUM in Battle Tree proper | S M US UM | |
| Charizardite Y | From Red after defeating him or BlueUSUM in Battle Tree proper | S M US UM | |
| Venusaurite | From Red after defeating him or BlueUSUM in Battle Tree proper | S M US UM | |
| Blastoisinite | From Red after defeating him or BlueUSUM in Battle Tree proper | S M US UM | |
Exchange Service Corner
The area includes three Exchange Service Corners, where the player can buy various items with Battle Points (BP) earned through battles in the Battle Tree.
BP Shop
Battle Points earned in the Battle Royal Dome or from Mantine Surf can be exchanged for prizes at the Battle Tree as well.
| Left attendant | |||||||
|---|---|---|---|---|---|---|---|
|
| ||||||
|
| ||||||
|
| ||||||
|
| ||||||
|
| ||||||
|
| ||||||
| Middle attendant | |||||||
|---|---|---|---|---|---|---|---|
|
| ||||||
|
| ||||||
|
| ||||||
|
| ||||||
|
| ||||||
|
| ||||||
|
| ||||||
|
| ||||||
|
| ||||||
|
| ||||||
|
|||||||
| Right attendantSM | |||||||
|---|---|---|---|---|---|---|---|
|
| ||||||
|
| ||||||
|
| ||||||
|
| ||||||
|
| ||||||
|
| ||||||
|
| ||||||
|
| ||||||
| Right attendantUSUM | |||||||
|---|---|---|---|---|---|---|---|
|
| ||||||
|
| ||||||
|
| ||||||
|
| ||||||
|
| ||||||
|
| ||||||
|
| ||||||
|
| ||||||
|
| ||||||
|
| ||||||
|
| ||||||
|
| ||||||
|
| ||||||
|
| ||||||
|
| ||||||
|
| ||||||
|
| ||||||
|
| ||||||
|
| ||||||
|
| ||||||
|
| ||||||
Move Tutor
In Pokémon Ultra Sun and Ultra Moon only, a Move Tutor is added to the corner.
| |||||||||||||||||||||||||||||||||||||||||||||||||||||||||||||||||||||||||||||||||||
Trainers
Upon entering the Battle Tree area for the first time, the player will encounter Red and Blue, and have a battle against one of them. The player gets to choose which one of the two they want to battle. In Pokémon Ultra Sun and Ultra Moon only, Blue will heal the player's Pokémon before the battle.
|
|||||||||||||||||||||||||||||||||||||||||||||||||||||||||||||||||||||||||||||||||||||||||||||||||||||||||||||||||||||||||||||||||||||||||||||||||||||||||||||||||||||||||||||||||||||||||||||||||||||||||||||
| |||||||||||||||||||||||||||||||||||||||||||||||||||||||||||||||||||||||||||||||||||||||||||||||||||||||||||||||||||||||||||||||||||||||||||||||||||||||||||||||||||||||||||||||||||||||||||||||||||||||||||||
Trivia
- Due to a glitch, if a Multi Battle partner would have their Pokémon in special Poké Balls, they will always appear as standard Poké Balls while teaming up with the player.
- No Trainer introduced in Generation II appears as a special Trainer here.
In other languages
| ||||||||||||||||||||||||||||||||
| Alola | |||||
|---|---|---|---|---|---|
| |||||
|


| This article is part of Project Cities and Towns, a Bulbapedia project that aims to write comprehensive articles on every city and town in the Pokémon world. |