Battle Royal Dome: Difference between revisions
m (→Restrictions) |
|||
| (67 intermediate revisions by 24 users not shown) | |||
| Line 1: | Line 1: | ||
{{Infobox location | {{Infobox location | ||
|image= | |image=Battle Royal Dome SMUSUM.png | ||
|type=building | |type=building | ||
|location_name=Battle Royal Dome | |location_name=Battle Royal Dome | ||
| Line 12: | Line 10: | ||
|mapsize=250px | |mapsize=250px | ||
}} | }} | ||
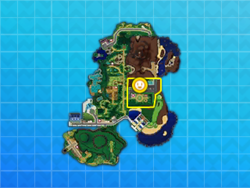
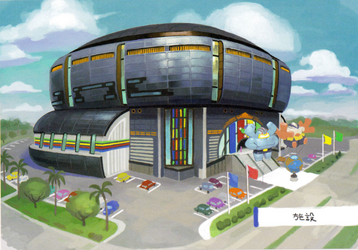
'''Battle Royal Dome''' (Japanese: '''ロイヤルドーム''' ''Royal Dome'') is a | '''Battle Royal Dome''' (Japanese: '''ロイヤルドーム''' ''Royal Dome'') is a [[battle facility]] located on [[Akala Island]] in [[Alola]], located on [[Royal Avenue]]. It is the venue for all [[Battle Royal]] matches. | ||
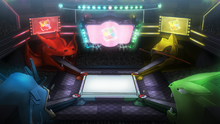
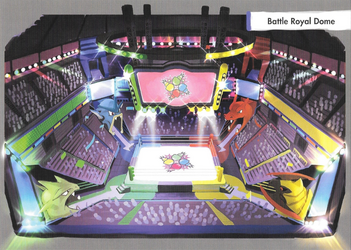
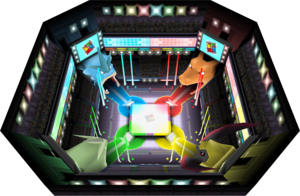
The arena where Battle Royal matches are conducted has four corners: red, blue, green, and yellow. Each corner has an entrance shaped like a {{OBP|Pokémon|species}}'s head: the red corner is shaped like {{p|Charizard}}, the blue corner is shaped like {{p|Gyarados}}, the green corner is shaped like {{p|Tyranitar}}, and the yellow corner is shaped like {{p|Haxorus}}. | The arena where Battle Royal matches are conducted has four corners: red, blue, green, and yellow. Each corner has an entrance shaped like a {{OBP|Pokémon|species}}'s head: the red corner is shaped like {{p|Charizard}}, the blue corner is shaped like {{p|Gyarados}}, the green corner is shaped like {{p|Tyranitar}}, and the yellow corner is shaped like {{p|Haxorus}}. | ||
==Challenges== | ==Challenges== | ||
The player can enter a Battle Royal challenge by speaking to the third receptionist from the left. There are four ranks that can be chosen from: Normal, Super, Hyper and Master, in increasing difficulty. Initially, Normal will be the only rank available. Winning first place in a Battle Royal challenge will unlock the next-level rank. | The {{player}} can enter a Battle Royal challenge by speaking to the third receptionist from the left. There are four ranks that can be chosen from: Normal, Super, Hyper and Master, in increasing difficulty. Initially, Normal will be the only rank available. Winning first place in a Battle Royal challenge will unlock the next-level rank. | ||
Each [[non-playable character|NPC]] Trainer will use teams of three Pokémon selected at random. As challenges go up in rank, the | Each [[non-playable character|NPC]] Trainer will use teams of three Pokémon selected at random. As challenges go up in rank, the Trainers battled become progressively stronger. | ||
: ''See also:'' | : ''See also:'' | ||
::''[[List of Battle Royal Dome Trainers]] | ::''[[List of Battle Royal Dome Trainers]] | ||
::''[[ | ::''[[Battle Royal Dome/Pokémon|List of Battle Royal Dome Pokémon]]'' | ||
===Restrictions=== | ===Restrictions=== | ||
Similar to the [[Battle Tree]], all standard Battle Royal challenges use [[Flat Battle|Flat Rules]]: | Similar to the [[Battle Tree]], all standard Battle Royal challenges use [[Flat Battle|Flat Rules]]: | ||
* Any Pokémon above Lv. 50 will be set to Lv. 50 in the Battle Royal | * Any Pokémon above Lv. 50 will be set to Lv. 50 in the Battle Royal. In {{g|Ultra Sun and Ultra Moon}}, Pokémon will be set to Lv. 30 in Normal Rank challenges only. | ||
* Pokémon of the same species are not allowed | * Pokémon of the same species are not allowed | ||
* Pokémon holding the same [[item]]s are not allowed | * Pokémon holding the same [[item]]s are not allowed | ||
* The following {{OBP|Pokémon|species}}, along with their respective [[List of Pokémon with form differences|alternate forms]], are not allowed: | * The following {{OBP|Pokémon|species}}, along with their respective [[List of Pokémon with form differences|alternate forms]], are not allowed: | ||
{{ResponsiveList/h|alola}} | |||
{{Pokeli|150|Mewtwo|msp=MSP/6}} | |||
{{Pokeli|151|Mew|msp=MSP/6}} | |||
| | {{Pokeli|249|Lugia|msp=MSP/6}} | ||
{{Pokeli|250|Ho-Oh|msp=MSP/6}} | |||
| | {{Pokeli|251|Celebi|msp=MSP/6}} | ||
{{Pokeli|382|Kyogre|msp=MSP/6}} | |||
| | {{Pokeli|383|Groudon|msp=MSP/6}} | ||
{{Pokeli|384|Rayquaza|msp=MSP/6}} | |||
| | {{Pokeli|385|Jirachi|msp=MSP/6}} | ||
{{Pokeli|386|Deoxys|msp=MSP/6}} | |||
| | {{Pokeli|483|Dialga|msp=MSP/6}} | ||
{{Pokeli|484|Palkia|msp=MSP/6}} | |||
| | {{Pokeli|487|Giratina|msp=MSP/6}} | ||
{{Pokeli|489|Phione|msp=MSP/6}} | |||
| | {{Pokeli|490|Manaphy|msp=MSP/6}} | ||
{{Pokeli|491|Darkrai|msp=MSP/6}} | |||
| | {{Pokeli|492|Shaymin|msp=MSP/6}} | ||
{{Pokeli|493|Arceus|msp=MSP/6}} | |||
{{Pokeli|494|Victini|msp=MSP/6}} | |||
| | {{Pokeli|643|Reshiram|msp=MSP/6}} | ||
{{Pokeli|644|Zekrom|msp=MSP/6}} | |||
| | {{Pokeli|646|Kyurem|msp=MSP/6}} | ||
{{Pokeli|647|Keldeo|msp=MSP/6}} | |||
| | {{Pokeli|648|Meloetta|msp=MSP/6}} | ||
{{Pokeli|649|Genesect|msp=MSP/6}} | |||
| | {{Pokeli|716|Xerneas|msp=MSP/6}} | ||
{{Pokeli|717|Yveltal|msp=MSP/6}} | |||
| | {{Pokeli|718|Zygarde|msp=MSP/6}} | ||
{{Pokeli|719|Diancie|msp=MSP/6}} | |||
| | {{Pokeli|720|Hoopa|msp=MSP/6}} | ||
{{Pokeli|721|Volcanion|msp=MSP/6}} | |||
| | {{Pokeli|789|Cosmog|msp=MSP/6}} | ||
{{Pokeli|790|Cosmoem|msp=MSP/6}} | |||
| | {{Pokeli|791|Solgaleo|msp=MSP/6}} | ||
{{Pokeli|792|Lunala|msp=MSP/6}} | |||
{{Pokeli|800|Necrozma|msp=MSP/6}} | |||
| | {{Pokeli|801|Magearna|msp=MSP/6}} | ||
{{Pokeli|802|Marshadow|msp=MSP/6}} | |||
| | {{Pokeli|807|Zeraora|msp=MSP/6}} | ||
{{Pokeli|Egg|Egg|msp=MSP/6}} | |||
| | {{ResponsiveList/f}} | ||
| | |||
| | |||
| | |||
| | |||
| | |||
| | |||
| | |||
| | |||
| | |||
| | |||
| | |||
| | |||
| | |||
| | |||
| | |||
| | |||
| | |||
| | |||
| | |||
===Battle Points=== | ===Battle Points=== | ||
Each Battle Royal challenge rewards [[Battle Point]]s (BP) depending on the | Each Battle Royal challenge rewards [[Battle Point]]s (BP) depending on the {{player}}'s performance and rank entered. | ||
{| class="roundy" style="background:#{{locationcolor/med|building}}; border:3px solid #{{locationcolor/dark|building}}; margin:auto; text-align:center" | {| class="roundy" style="background:#{{locationcolor/med|building}}; border:3px solid #{{locationcolor/dark|building}}; margin:auto; text-align:center" | ||
| Line 158: | Line 111: | ||
| style="background:#FFF; {{roundybr|5px}}" | 1 | | style="background:#FFF; {{roundybr|5px}}" | 1 | ||
|} | |} | ||
===The Royal=== | |||
If the player has won their last five consecutive Battle Royal challenges at Master Rank, [[Professor Kukui|the Masked Royal]] will be assigned as the red corner opponent in the next such challenge, and will greet the player at the reception desk before entering the arena. Regardless of the outcome, the win streak will reset to zero after battling against the Royal. | |||
{{Party/Single | |||
|color={{alola color}} | |||
|bordercolor={{alola color dark}} | |||
|headcolor={{alola color light}} | |||
|class=Pro Wrestler | |||
|classlink=Professor Kukui | |||
|sprite=VSThe Royal.png | |||
|size=150px | |||
|name={{color2|000|Professor Kukui|The Royal}} | |||
|prize=5{{color2|000|Battle Point|BP}} | |||
|game=SMUSUM | |||
|location=Battle Royal Dome | |||
|pokemon=3}} | |||
|- | |||
{{lop/facility/head|{{alola color light}}|{{alola color dark}}|{{alola color}}}} | |||
{{lop/facility|game=6|038A|Ninetales|Focus Sash|Ice Beam|Ice|Moonblast|Fairy|Protect|Normal|Nasty Plot|Dark|Timid||||252||252}} | |||
{{lop/facility|game=6|143|Snorlax|Sitrus Berry|Return|Normal|Protect|Normal|Curse|Ghost|Self-Destruct|Normal|Brave|252|252||||}} | |||
{{lop/facility|game=6|462|Magnezone|Choice Specs|Flash Cannon|Steel|Thunderbolt|Electric|Volt Switch|Electric|Discharge|Electric|Modest|252|||252||}} | |||
{{lop/facility|game=6|628|Braviary|Adrenaline Orb|Brave Bird|Flying|Rock Slide|Rock|Superpower|Fighting|Protect|Normal|Adamant||252||||252}} | |||
{{lop/facility|game=6|740|Crabominable|Quick Claw|Ice Hammer|Ice|Close Combat|Fighting|Pursuit|Dark|Protect|Normal|Brave|252|252||||}} | |||
{{lop/facility|game=6|745Mn|Lycanroc|Life Orb|Counter|Fighting|Stone Edge|Rock|Snarl|Dark|Protect|Normal|Adamant|252|252||||}} | |||
|} | |||
{{Party/Footer}} | |||
==Items== | ==Items== | ||
{{itlisth|building}} | {{itlisth|building}} | ||
{{Itemlist|Effort Ribbon|sprite=Effort Ribbon|Gift from the girl on the far right in the lobby if the {{player}}'s lead Pokémon has 510 [[effort values]]|Su=yes|M=yes|display={{DL|List of Ribbons in the games|Effort Ribbon}}}} | {{Itemlist|Effort Ribbon|sprite=Effort Ribbon|Gift from the girl on the far right in the lobby if the {{player}}'s lead Pokémon has 510 [[effort values]]|Su=yes|M=yes|US=yes|UM=yes|display={{DL|List of Ribbons in the games|Effort Ribbon}}}} | ||
{{Itemlist|Battle Royal Master Ribbon|sprite=Battle Royal Master Ribbon|Given to all the participating Pokémon after winning a Master Rank Battle Royal|Su=yes|M=yes|US=yes|UM=yes|display={{DL|List of Ribbons in the games|Battle Royal Master Ribbon|Battle Royal<br>Master Ribbon}}}} | |||
{{itlistfoot|building}} | {{itlistfoot|building}} | ||
===Totem Stickers=== | |||
{{Itlisth|building}} | |||
{{Itemlist||sprite=USUM Totem Sticker art|size=40px|1F, on the wall in the northwest corner, north of the {{p|Snubbull}}|US=yes|UM=yes|display=[[Totem Sticker]]}} | |||
{{Itemlist||sprite=USUM Totem Sticker art|size=40px|2F, on the railing at the top of the eastern stairs|US=yes|UM=yes|display=[[Totem Sticker]]}} | |||
{{Itlistfoot|building}} | |||
===Exchange Service Corner=== | ===Exchange Service Corner=== | ||
[[Battle Point]]s (BP) earned in Battle Royal matches may be exchanged at the first, second, and fourth counters at the front entrance to the Battle Royal Dome. The third counter is the receptionist for entering battles. | [[Battle Point]]s (BP) earned in Battle Royal matches may be exchanged at the first, second, and fourth counters at the front entrance to the Battle Royal Dome. The third counter is the receptionist for entering battles. | ||
Battle Points earned in the [[Battle Tree]] can be exchanged for prizes at the Battle Royal Dome as well. | Battle Points earned in the [[Battle Tree]] or from [[Mantine Surf]] can be exchanged for prizes at the Battle Royal Dome as well. | ||
{{shop|First counter}} | {{shop|First counter}} | ||
| Line 187: | Line 174: | ||
{{shoprow|{{shopitem|Muscle Band|48|BP}}|{{shopitem|Wise Glasses|48|BP}}}} | {{shoprow|{{shopitem|Muscle Band|48|BP}}|{{shopitem|Wise Glasses|48|BP}}}} | ||
{{shoprow|{{shopitem|Expert Belt|48|BP}}|{{shopitem|Zoom Lens|48|BP}}}} | {{shoprow|{{shopitem|Expert Belt|48|BP}}|{{shopitem|Zoom Lens|48|BP}}}} | ||
{{shoprow|{{shopitem|Metronome|48|BP}}|{{shopitem|Destiny Knot|48|BP}}}} | {{shoprow|{{shopitem|Metronome (item)|48|BP||Metronome|display=Metronome}}|{{shopitem|Destiny Knot|48|BP}}}} | ||
{{shoprow|{{shopitem|Icy Rock|48|BP}}|{{shopitem|Smooth Rock|48|BP}}}} | {{shoprow|{{shopitem|Icy Rock|48|BP}}|{{shopitem|Smooth Rock|48|BP}}}} | ||
{{shoprow|{{shopitem|Heat Rock|48|BP}}|{{shopitem|Damp Rock|48|BP}}}} | {{shoprow|{{shopitem|Heat Rock|48|BP}}|{{shopitem|Damp Rock|48|BP}}}} | ||
| Line 193: | Line 180: | ||
{{shopfooter}} | {{shopfooter}} | ||
== | ==Trainers== | ||
When the player first approaches the counter, they will be invited to participate in a [[Battle Royal]] with [[Gladion]], [[Professor Kukui|The Royal]], and [[Hau]]. They will automatically participate with the lead Pokémon in their [[party]], and will not be healed before the battle. | |||
===Pokémon Sun and Moon=== | ===Pokémon Sun and Moon=== | ||
{{Party/Single | {{Party/Single | ||
|color={{black color light}} | |color={{black color light}} | ||
| Line 212: | Line 193: | ||
|classlink=Gladion | |classlink=Gladion | ||
|name={{color2|000|Gladion}} | |name={{color2|000|Gladion}} | ||
|prize= | |prize=none | ||
|game=SM | |game=SM | ||
|location=Battle Royal Dome | |location=Battle Royal Dome | ||
| Line 235: | Line 216: | ||
|classlink=Professor Kukui | |classlink=Professor Kukui | ||
|name={{color2|000|Professor Kukui|The Royal}} | |name={{color2|000|Professor Kukui|The Royal}} | ||
|prize= | |prize=none | ||
|game=SM | |game=SM | ||
|location=Battle Royal Dome | |location=Battle Royal Dome | ||
| Line 252: | Line 233: | ||
{{Party/Footer}} | {{Party/Footer}} | ||
{{MSP|722|Rowlet}} If the {{player}} chose {{p|Rowlet}}: | {{MSP/6|722|Rowlet}} If the {{player}} chose {{p|Rowlet}}: | ||
{{Party/Single | {{Party/Single | ||
|color={{sun color}} | |color={{sun color}} | ||
| Line 262: | Line 243: | ||
|classlink=Pokémon Trainer | |classlink=Pokémon Trainer | ||
|name={{color2|000|Hau}} | |name={{color2|000|Hau}} | ||
|prize= | |prize=none | ||
|game=SM | |game=SM | ||
|location=Battle Royal Dome | |location=Battle Royal Dome | ||
| Line 280: | Line 261: | ||
{{Party/Footer}} | {{Party/Footer}} | ||
{{MSP|725|Litten}} If the {{player}} chose {{p|Litten}}: | {{MSP/6|725|Litten}} If the {{player}} chose {{p|Litten}}: | ||
{{Party/Single | {{Party/Single | ||
|color={{sun color}} | |color={{sun color}} | ||
| Line 290: | Line 271: | ||
|classlink=Pokémon Trainer | |classlink=Pokémon Trainer | ||
|name={{color2|000|Hau}} | |name={{color2|000|Hau}} | ||
|prize= | |prize=none | ||
|game=SM | |game=SM | ||
|location=Battle Royal Dome | |location=Battle Royal Dome | ||
| Line 308: | Line 289: | ||
{{Party/Footer}} | {{Party/Footer}} | ||
{{MSP|728|Popplio}} If the {{player}} chose {{p|Popplio}}: | {{MSP/6|728|Popplio}} If the {{player}} chose {{p|Popplio}}: | ||
{{Party/Single | {{Party/Single | ||
|color={{sun color}} | |color={{sun color}} | ||
| Line 318: | Line 299: | ||
|classlink=Pokémon Trainer | |classlink=Pokémon Trainer | ||
|name={{color2|000|Hau}} | |name={{color2|000|Hau}} | ||
|prize= | |prize=none | ||
|game=SM | |game=SM | ||
|location=Battle Royal Dome | |location=Battle Royal Dome | ||
| Line 337: | Line 318: | ||
===Pokémon Ultra Sun and Ultra Moon=== | ===Pokémon Ultra Sun and Ultra Moon=== | ||
{{Party/Single | {{Party/Single | ||
|color={{black color light}} | |color={{black color light}} | ||
| Line 349: | Line 327: | ||
|classlink=Gladion | |classlink=Gladion | ||
|name={{color2|000|Gladion}} | |name={{color2|000|Gladion}} | ||
|prize= | |prize=none | ||
|game=USUM | |game=USUM | ||
|location=Battle Royal Dome | |location=Battle Royal Dome | ||
| Line 372: | Line 350: | ||
|classlink=Professor Kukui | |classlink=Professor Kukui | ||
|name={{color2|000|Professor Kukui|The Royal}} | |name={{color2|000|Professor Kukui|The Royal}} | ||
|prize= | |prize=none | ||
|game=USUM | |game=USUM | ||
|location=Battle Royal Dome | |location=Battle Royal Dome | ||
| Line 389: | Line 367: | ||
{{Party/Footer}} | {{Party/Footer}} | ||
{{MSP|722|Rowlet}} If the {{player}} chose {{p|Rowlet}}: | {{MSP/6|722|Rowlet}} If the {{player}} chose {{p|Rowlet}}: | ||
{{Party/Single | {{Party/Single | ||
|color={{sun color}} | |color={{sun color}} | ||
|headcolor={{sun color light}} | |headcolor={{sun color light}} | ||
|bordercolor={{sun color dark}} | |bordercolor={{sun color dark}} | ||
|sprite=VSHau 2.png | |sprite=VSHau 2 USUM.png | ||
|size=150px | |size=150px | ||
|class=Pokémon Trainer | |class=Pokémon Trainer | ||
|classlink=Pokémon Trainer | |classlink=Pokémon Trainer | ||
|name={{color2|000|Hau}} | |name={{color2|000|Hau}} | ||
|prize= | |prize=none | ||
|game=USUM | |game=USUM | ||
|location=Battle Royal Dome | |location=Battle Royal Dome | ||
| Line 407: | Line 385: | ||
|ndex=729 | |ndex=729 | ||
|pokemon=Brionne | |pokemon=Brionne | ||
|gender= | |gender=female | ||
|type1=Water | |type1=Water | ||
|ability=Torrent | |ability=Torrent | ||
| Line 417: | Line 395: | ||
{{Party/Footer}} | {{Party/Footer}} | ||
{{MSP|725|Litten}} If the {{player}} chose {{p|Litten}}: | {{MSP/6|725|Litten}} If the {{player}} chose {{p|Litten}}: | ||
{{Party/Single | {{Party/Single | ||
|color={{sun color}} | |color={{sun color}} | ||
|headcolor={{sun color light}} | |headcolor={{sun color light}} | ||
|bordercolor={{sun color dark}} | |bordercolor={{sun color dark}} | ||
|sprite=VSHau 2.png | |sprite=VSHau 2 USUM.png | ||
|size=150px | |size=150px | ||
|class=Pokémon Trainer | |class=Pokémon Trainer | ||
|classlink=Pokémon Trainer | |classlink=Pokémon Trainer | ||
|name={{color2|000|Hau}} | |name={{color2|000|Hau}} | ||
|prize= | |prize=none | ||
|game=USUM | |game=USUM | ||
|location=Battle Royal Dome | |location=Battle Royal Dome | ||
| Line 445: | Line 423: | ||
{{Party/Footer}} | {{Party/Footer}} | ||
{{MSP|728|Popplio}} If the {{player}} chose {{p|Popplio}}: | {{MSP/6|728|Popplio}} If the {{player}} chose {{p|Popplio}}: | ||
{{Party/Single | {{Party/Single | ||
|color={{sun color}} | |color={{sun color}} | ||
|headcolor={{sun color light}} | |headcolor={{sun color light}} | ||
|bordercolor={{sun color dark}} | |bordercolor={{sun color dark}} | ||
|sprite=VSHau 2.png | |sprite=VSHau 2 USUM.png | ||
|size=150px | |size=150px | ||
|class=Pokémon Trainer | |class=Pokémon Trainer | ||
|classlink=Pokémon Trainer | |classlink=Pokémon Trainer | ||
|name={{color2|000|Hau}} | |name={{color2|000|Hau}} | ||
|prize= | |prize=none | ||
|game=USUM | |game=USUM | ||
|location=Battle Royal Dome | |location=Battle Royal Dome | ||
| Line 472: | Line 450: | ||
|move3=Scratch|move3type=Normal|move3cat=Physical}} | |move3=Scratch|move3type=Normal|move3cat=Physical}} | ||
{{Party/Footer}} | {{Party/Footer}} | ||
==Gallery== | |||
===Artwork=== | |||
{| style="margin:auto; text-align:center; {{roundy|20px}} border:2px solid #{{normal color dark}}; background:#{{normal color}}; font-size:80%" | |||
|style="{{roundy|5px}} border:2px solid #{{normal color dark}}; background:#{{normal color light}}"| [[File:Battle Royal SM Concept Art.png|x250px]] | |||
|style="{{roundy|5px}} border:2px solid #{{normal color dark}}; background:#{{normal color light}}"| [[File:Battle Royal SM Concept Art 2.png|x250px]] | |||
|- | |||
| colspan="2" | Concept art from {{color2|000|Pokémon Sun and Moon|Sun and Moon}} | |||
|} | |||
==Layout== | |||
{| class="roundy" style="margin:auto; background:#000; border:3px solid #{{Locationcolor/dark|building}}" | |||
|- | |||
! style="background:#{{Locationcolor/light|building}}; {{roundytl|5px}}" | Game | |||
! style="background:#{{Locationcolor/light|building}}" | Interior | |||
! style="background:#{{Locationcolor/light|building}}; {{roundytr|5px}}" | Arena | |||
|- | |||
! style="background:#{{sun color}}" | {{color2|000|Pokémon Sun and Moon|Sun}} | |||
| rowspan="4" | [[File:Battle Royal Dome interior SMUSUM.png|300px]] | |||
| rowspan="4" | [[File:Battle Royal Dome arena SMUSUM.png|300px]] | |||
|- | |||
! style="background:#{{moon color}}" | {{color2|000|Pokémon Sun and Moon|Moon}} | |||
|- | |||
! style="background:#{{Ultra sun color}}" | {{color2|000|Pokémon Ultra Sun and Ultra Moon|Ultra Sun}} | |||
|- | |||
! style="background:#{{Ultra moon color}}" | {{color2|000|Pokémon Ultra Sun and Ultra Moon|Ultra Moon}} | |||
|- | |||
| colspan=3 style="background:#{{Locationcolor/light|building}}; {{roundybottom|5px}}" | | |||
|} | |||
==In the spin-off games== | |||
===[[Pokémon Masters EX]]=== | |||
Artwork depicting the Battle Royal Dome is seen in {{mas|Kukui|The Masked Royal}}'s mindscape. | |||
{| style="background: #7B30B2; {{roundy}}; border: #7B30B2;" | |||
| | |||
{| style="background: #AB60E2; {{roundy}}; border: #AB60E2;" | |||
|- style="text-align:center" | |||
| | |||
{| style="background: #{{dark color light}}; {{roundy}}; border: #{{dark color light}}; padding: 0px 5px 5px 5px" | |||
|- | |||
|<big>'''{{color2|000|Kukui (Masters)#Incineroar|Masked Royal & Incineroar}}'''</big> | |||
|- | |||
| [[File:Masked Royal Mindscape.png|200px]] | |||
|} | |||
|} | |||
|} | |||
==In the anime== | |||
[[File:Battle Royal Dome anime.png|thumb|left|220px|The Battle Royal Dome in the {{pkmn|anime}}]] | |||
[[File:Battle Royal Dome arena anime.png|thumb|220px|The Battle Royal Dome arena in the anime]] | |||
The Battle Royal Dome first appeared in ''[[SM063|Pushing the Fiery Envelope!]]'', where {{Ash}}, after witnessing the {{an|Professor Kukui|Masked Royal}} earning his 20th consecutive [[Battle Royal]] victory on TV, traveled to the dome along with {{ashcl}} to take part in a special event, where any volunteers would get a chance to battle the Masked Royal. Ash's {{p|Litten}}, having become agitated after seeing the Masked Royal's {{TP|Professor Kukui|Incineroar}}, jumped down from the stands, leading to Ash taking part in a Battle Royal, along with {{an|Kiawe}} and {{an|Sophocles}}. | |||
Incineroar easily shrugged off all of the attacks its opponents threw at it, and was easily able to defeat [[Kiawe's Marowak]] and [[Sophocles's Charjabug]] with {{m|Darkest Lariat}}. Litten, however, managed to survive the attack, thanks to its sheer determination to battle its evolved form. After the Masked Royal revealed that he had been holding back, both he and Ash decided to get serious. However, this only resulted in Litten getting swiftly defeated by a {{m|Bulk Up}}-powered {{m|Throat Chop}} from Incineroar. | |||
The dome reappeared in ''[[SM081|A Young Royal Flame Ignites!]]'', where a group of Battle Royal Trainers known as the [[Revengers]], who fight dirty and do not care about the rules, issued a challenge to the Masked Royal to see who was the strongest Trainer at the Battle Royal Dome. The Masked Royal accepted the challenge, inspiring Ash, his classmates, and {{an|Professor Burnet}} to go watch the match the next day. Unfortunately for Professor Kukui, they invited him to be in the audience with them, forcing him to sneak away with the excuse of going for shopping in order to change into his Masked Royal costume and reach the arena just in the nick of time. | |||
When the Revengers once again started playing dirty, [[Ash's Torracat]] leaped down from the stands to stop them. The boss of the Revengers, [[Viren]], then entered the stage, and challenged the Masked Royal and Ash to a tag match, with the Revengers [[Mad Magmar]] and [[Mr. Electric]] facing off against the two, threatening to buy out the dome should they lose to his men. The Masked Royal and Ash accepted the challenge, and Royal gave Ash a mask of his own, making him "Ash Royal". During the battle, where the Revengers continued to ignore the rules and play dirty, Ash's Torracat learned {{m|Revenge}}, using it to defeat both of the opposing Pokémon. Even when Viren tried to force his way, he was easily swept aside by the Double Royals. Before departing, Ash and Royal promised each other to face each other at the dome one day to settle the rivalry between Torracat and Incineroar. | |||
In ''[[JN112|Helping the Hometown Hero!]]'', Ash, his classmates, [[Goh]], and [[Chloe]] visited the Dome, where Ash, Professor Kukui, Kiawe, and {{an|Gladion}} took part in a Battle Royal, held to celebrate Ash's return to [[Alola]]. Ash and Professor Kukui were the last two Trainers standing, but the winner was left unrevealed. | |||
In the anime, the Battle Royal Dome also supports Single Battles, in addition to Battle Royals. | |||
==In the manga== | |||
===Pokémon Adventures=== | |||
===={{MangaArc|Sun, Moon, Ultra Sun & Ultra Moon}}==== | |||
The Battle Royal Dome was first mentioned in ''[[PASM05|The Announcement and the Prize]]'', where it was revealed to have been opened recently, with [[Professor Kukui|the Masked Royal]] being a successful Trainer there. | |||
In ''[[PASM37|Finale!! The Battle Against the Other Dimension]]'', Professor Kukui revealed that his wife, [[Professor Burnet]], had found out about him being the Masked Royal, leading to the two starting to perform at the Battle Royal Dome together as "Kommo and Luran". | |||
==In other languages== | ==In other languages== | ||
| Line 477: | Line 523: | ||
|zh_yue=皇家巨蛋 ''{{tt|Wòhnggā Geuihdáan|Royal Dome}}'' | |zh_yue=皇家巨蛋 ''{{tt|Wòhnggā Geuihdáan|Royal Dome}}'' | ||
|zh_cmn=皇家巨蛋 ''{{tt|Huángjiā Jùdàn|Royal Dome}}'' | |zh_cmn=皇家巨蛋 ''{{tt|Huángjiā Jùdàn|Royal Dome}}'' | ||
|fi=Battle Royal-areena | |||
|de=Dome Royale | |de=Dome Royale | ||
|fr=Dôme Royal | |fr=Dôme Royal | ||
|it=Stadio Royale | |it=Stadio Royale | ||
|ko=로열돔 ''Royal Dome'' | |||
|pl=Stadion Królewskich Bitew | |||
|pt_br=Estádio Real | |||
|es=Estadio Royale | |es=Estadio Royale | ||
}} | }} | ||
| Line 489: | Line 538: | ||
[[Category:Sun and Moon locations]] | [[Category:Sun and Moon locations]] | ||
[[Category:Ultra Sun and Ultra Moon locations]] | [[Category:Ultra Sun and Ultra Moon locations]] | ||
[[Category:Battle | [[Category:Battle facilities]] | ||
[[de:Dome Royale]] | [[de:Dome Royale]] | ||
[[es:Estadio Royale]] | |||
[[fr:Dôme Royal]] | [[fr:Dôme Royal]] | ||
[[it:Stadio Royale]] | [[it:Stadio Royale]] | ||
[[ja:ロイヤルドーム]] | [[ja:ロイヤルドーム]] | ||
[[zh:皇家巨蛋]] | [[zh:皇家巨蛋]] | ||
Latest revision as of 18:25, 2 March 2024
| ||||
| ||||
| Location: | Royal Avenue | |||
|---|---|---|---|---|
| Region: | Alola | |||
| Generations: | VII | |||
 Location of Battle Royal Dome in Alola. | ||||
| Pokémon world locations | ||||
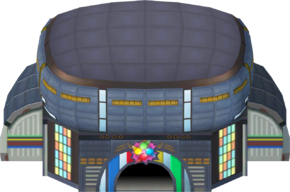
Battle Royal Dome (Japanese: ロイヤルドーム Royal Dome) is a battle facility located on Akala Island in Alola, located on Royal Avenue. It is the venue for all Battle Royal matches.
The arena where Battle Royal matches are conducted has four corners: red, blue, green, and yellow. Each corner has an entrance shaped like a Pokémon's head: the red corner is shaped like Charizard, the blue corner is shaped like Gyarados, the green corner is shaped like Tyranitar, and the yellow corner is shaped like Haxorus.
Challenges
The player can enter a Battle Royal challenge by speaking to the third receptionist from the left. There are four ranks that can be chosen from: Normal, Super, Hyper and Master, in increasing difficulty. Initially, Normal will be the only rank available. Winning first place in a Battle Royal challenge will unlock the next-level rank.
Each NPC Trainer will use teams of three Pokémon selected at random. As challenges go up in rank, the Trainers battled become progressively stronger.
Restrictions
Similar to the Battle Tree, all standard Battle Royal challenges use Flat Rules:
- Any Pokémon above Lv. 50 will be set to Lv. 50 in the Battle Royal. In Pokémon Ultra Sun and Ultra Moon, Pokémon will be set to Lv. 30 in Normal Rank challenges only.
- Pokémon of the same species are not allowed
- Pokémon holding the same items are not allowed
- The following Pokémon, along with their respective alternate forms, are not allowed:
Battle Points
Each Battle Royal challenge rewards Battle Points (BP) depending on the player's performance and rank entered.
| Battle Points | ||||
|---|---|---|---|---|
| Place | Normal | Super | Hyper | Master |
| 1st | 2 | 3 | 4 | 5 |
| 2nd | 1 | 2 | 3 | 3 |
| 3rd | 1 | 1 | 2 | 2 |
| 4th | 1 | 1 | 1 | 1 |
The Royal
If the player has won their last five consecutive Battle Royal challenges at Master Rank, the Masked Royal will be assigned as the red corner opponent in the next such challenge, and will greet the player at the reception desk before entering the arena. Regardless of the outcome, the win streak will reset to zero after battling against the Royal.
|
||||||||||||||||||||||||||||||||||||||||||||||||||||||||||||||||||||||||||||||||||||||||||||||||||||||||||||||||
| ||||||||||||||||||||||||||||||||||||||||||||||||||||||||||||||||||||||||||||||||||||||||||||||||||||||||||||||||
Items
| Item | Location | Games | |
|---|---|---|---|
| Effort Ribbon | Gift from the girl on the far right in the lobby if the player's lead Pokémon has 510 effort values | S M US UM | |
| Battle Royal Master Ribbon |
Given to all the participating Pokémon after winning a Master Rank Battle Royal | S M US UM | |
Totem Stickers
| Item | Location | Games | |
|---|---|---|---|
| Totem Sticker | 1F, on the wall in the northwest corner, north of the Snubbull | US UM | |
| Totem Sticker | 2F, on the railing at the top of the eastern stairs | US UM | |
Exchange Service Corner
Battle Points (BP) earned in Battle Royal matches may be exchanged at the first, second, and fourth counters at the front entrance to the Battle Royal Dome. The third counter is the receptionist for entering battles.
Battle Points earned in the Battle Tree or from Mantine Surf can be exchanged for prizes at the Battle Royal Dome as well.
| First counter | |||||||
|---|---|---|---|---|---|---|---|
|
| ||||||
|
| ||||||
|
| ||||||
|
| ||||||
| Second counter | |||||||
|---|---|---|---|---|---|---|---|
|
| ||||||
|
| ||||||
|
| ||||||
|
|||||||
| Fourth counter | |||||||
|---|---|---|---|---|---|---|---|
|
| ||||||
|
| ||||||
|
| ||||||
|
| ||||||
|
| ||||||
|
| ||||||
|
| ||||||
|
| ||||||
|
| ||||||
Trainers
When the player first approaches the counter, they will be invited to participate in a Battle Royal with Gladion, The Royal, and Hau. They will automatically participate with the lead Pokémon in their party, and will not be healed before the battle.
Pokémon Sun and Moon
|
||||||||||||||||||||||||||||||||||||
| ||||||||||||||||||||||||||||||||||||
|
|||||||||||||||||||||||||||||||||||
| |||||||||||||||||||||||||||||||||||
|
|||||||||||||||||||||||||||||||||||
| |||||||||||||||||||||||||||||||||||
|
|||||||||||||||||||||||||||||||||||||
| |||||||||||||||||||||||||||||||||||||
|
|||||||||||||||||||||||||||||||||||
| |||||||||||||||||||||||||||||||||||
Pokémon Ultra Sun and Ultra Moon
|
||||||||||||||||||||||||||||||||||||
| ||||||||||||||||||||||||||||||||||||
|
|||||||||||||||||||||||||||||||||||
| |||||||||||||||||||||||||||||||||||
|
|||||||||||||||||||||||||||||||||||
| |||||||||||||||||||||||||||||||||||
|
|||||||||||||||||||||||||||||||||||||
| |||||||||||||||||||||||||||||||||||||
|
|||||||||||||||||||||||||||||||||||
| |||||||||||||||||||||||||||||||||||
Gallery
Artwork
|
|
| Concept art from Sun and Moon | |
Layout
| Game | Interior | Arena |
|---|---|---|
| Sun | 
|
|
| Moon | ||
| Ultra Sun | ||
| Ultra Moon | ||
In the spin-off games
Pokémon Masters EX
Artwork depicting the Battle Royal Dome is seen in The Masked Royal's mindscape.
|
In the anime

The Battle Royal Dome first appeared in Pushing the Fiery Envelope!, where Ash, after witnessing the Masked Royal earning his 20th consecutive Battle Royal victory on TV, traveled to the dome along with his classmates to take part in a special event, where any volunteers would get a chance to battle the Masked Royal. Ash's Litten, having become agitated after seeing the Masked Royal's Incineroar, jumped down from the stands, leading to Ash taking part in a Battle Royal, along with Kiawe and Sophocles.
Incineroar easily shrugged off all of the attacks its opponents threw at it, and was easily able to defeat Kiawe's Marowak and Sophocles's Charjabug with Darkest Lariat. Litten, however, managed to survive the attack, thanks to its sheer determination to battle its evolved form. After the Masked Royal revealed that he had been holding back, both he and Ash decided to get serious. However, this only resulted in Litten getting swiftly defeated by a Bulk Up-powered Throat Chop from Incineroar.
The dome reappeared in A Young Royal Flame Ignites!, where a group of Battle Royal Trainers known as the Revengers, who fight dirty and do not care about the rules, issued a challenge to the Masked Royal to see who was the strongest Trainer at the Battle Royal Dome. The Masked Royal accepted the challenge, inspiring Ash, his classmates, and Professor Burnet to go watch the match the next day. Unfortunately for Professor Kukui, they invited him to be in the audience with them, forcing him to sneak away with the excuse of going for shopping in order to change into his Masked Royal costume and reach the arena just in the nick of time.
When the Revengers once again started playing dirty, Ash's Torracat leaped down from the stands to stop them. The boss of the Revengers, Viren, then entered the stage, and challenged the Masked Royal and Ash to a tag match, with the Revengers Mad Magmar and Mr. Electric facing off against the two, threatening to buy out the dome should they lose to his men. The Masked Royal and Ash accepted the challenge, and Royal gave Ash a mask of his own, making him "Ash Royal". During the battle, where the Revengers continued to ignore the rules and play dirty, Ash's Torracat learned Revenge, using it to defeat both of the opposing Pokémon. Even when Viren tried to force his way, he was easily swept aside by the Double Royals. Before departing, Ash and Royal promised each other to face each other at the dome one day to settle the rivalry between Torracat and Incineroar.
In Helping the Hometown Hero!, Ash, his classmates, Goh, and Chloe visited the Dome, where Ash, Professor Kukui, Kiawe, and Gladion took part in a Battle Royal, held to celebrate Ash's return to Alola. Ash and Professor Kukui were the last two Trainers standing, but the winner was left unrevealed.
In the anime, the Battle Royal Dome also supports Single Battles, in addition to Battle Royals.
In the manga
Pokémon Adventures
Sun, Moon, Ultra Sun & Ultra Moon arc
The Battle Royal Dome was first mentioned in The Announcement and the Prize, where it was revealed to have been opened recently, with the Masked Royal being a successful Trainer there.
In Finale!! The Battle Against the Other Dimension, Professor Kukui revealed that his wife, Professor Burnet, had found out about him being the Masked Royal, leading to the two starting to perform at the Battle Royal Dome together as "Kommo and Luran".
In other languages
| |||||||||||||||||||||||||||||||||||

|
This article is part of Project Locations, a Bulbapedia project that aims to write comprehensive articles on every location in the Pokémon world. |
