Battle Frontier (Generation IV): Difference between revisions
m (→Battle Arcade: What? Only one is weak to each of those types, according to the team listing on her page. Why is this mentioned?) |
Crunchdog29 (talk | contribs) m (→Overview) |
||
| (127 intermediate revisions by 57 users not shown) | |||
| Line 1: | Line 1: | ||
{{Featured | {{Featured|August 2, 2009}} | ||
{{Infobox location | {{Infobox location | ||
|image=Battle Frontier GenIV. | |image=Battle Frontier GenIV.png | ||
|type=road | |type=road | ||
|mapdesc=A place where people from all over come to show off their strength. {{sup/4|HGSS}} | |mapdesc=The Battle Frontier--where the best of the best Trainers gather to test their skills--is located here.{{sup/4|Pt}}<br>A place where people from all over come to show off their strength.{{sup/4|HGSS}} | ||
|location_name=Battle Frontier | |location_name=Battle Frontier | ||
|japanese_name=バトルフロンティア | |japanese_name=バトルフロンティア | ||
|translated_name=Battle Frontier | |translated_name=Battle Frontier | ||
|location=[[ | |location=[[Fight Area]] (Sinnoh)<br>{{rt|40|Johto}} (Johto) | ||
|region=Sinnoh | |region=Sinnoh | ||
|region2=Johto | |||
|generation={{gen|IV}} | |generation={{gen|IV}} | ||
|map=Sinnoh Battle Park Map.png | |map={{#switch: {{#expr:{{#time: U}} mod 2}}|0=Sinnoh Battle Park|Johto Frontier Access}} Map.png | ||
|mapname={{#switch: {{#expr:{{#time: U}} mod 2}}|0=Sinnoh|Johto}} | |||
}} | }} | ||
Only two of the facilities had been featured in Pokémon games prior to the Battle Frontier's debut in Platinum. The Battle Tower and Battle Factory were both present in Emerald; the Battle Tower | The '''Battle Frontier''' (Japanese: '''バトルフロンティア''' ''Battle Frontier'') is a special post-[[Pokémon League]] area featured in the [[Generation IV]] games {{game|Platinum}}, {{game|HeartGold and SoulSilver|s|HeartGold, and SoulSilver}}. It is similar to the Battle Frontier featured in {{game|Emerald}}, the [[Hoenn]] {{Gdis|Battle Frontier|III}}. The key difference is the number of [[battle facility|battle facilities]] and the challenges they hold. | ||
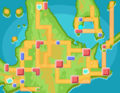
This Frontier is found in two [[region]]s, [[Sinnoh]] and [[Johto]]; each region's Frontier is identical in facilities and appearance. The Sinnoh Frontier is located north of the [[Fight Area]] in the place of {{game|Diamond and Pearl|s}}'s {{si|Battle Park}}. The Johto Frontier is located west of [[Olivine City]], where {{game|Crystal}}'s {{Gdis|Battle Tower|II}} was located. Access to Johto's Frontier is through the [[Frontier Access]]. Each of the facilities in the Battle Frontier has a leader, the [[Frontier Brain]], who may be challenged after certain {{wp|Winning streak (sports)|winning streaks}} have been made through their respective facilities. Defeating the Frontier Brains will earn the {{player}} [[commemorative print]]s. | |||
Only two of the facilities had been featured in Pokémon games prior to the Battle Frontier's debut in Platinum. The [[Battle Tower]] and Battle Factory were both present in Emerald; the Battle Tower had been in every game since its debut in Crystal, excluding FireRed and LeafGreen, which featured a similar facility called [[Trainer Tower]]. | |||
==Overview== | ==Overview== | ||
Upon the player's first entry into the Battle Frontier, their [[Vs. Recorder]] will be upgraded with a {{DL|Vs. Recorder|Frontier Record}} by a woman at the entrance. The Vs. Recorder keeps the amount of [[Battle Point]]s the players has. It also contains the commemorative prints obtained from the Battle Frontier. One {{pkmn|battle}} from within one of the facilities may be recorded and stored on the Frontier Record, which may be watched or overwritten with another at any time. | Upon the player's first entry into the Battle Frontier, their [[Vs. Recorder]] will be upgraded with a {{DL|Vs. Recorder|Frontier Record}} by a woman at the entrance. The Vs. Recorder keeps the amount of [[Battle Point]]s the players has. It also contains the commemorative prints obtained from the Battle Frontier. One {{pkmn|battle}} from within one of the facilities may be recorded and stored on the Frontier Record, which may be watched or overwritten with another at any time. | ||
On winning through a set amount of battles in any given facility, [[Battle | On winning through a set amount of battles in any given facility, [[Battle Point]]s, or BP, will be awarded, usually in small amounts, but gradually growing through each consecutive streak. The Frontier Brain will only appear in single battle mode. Defeating the Frontier Brain of a given facility for the first time awards the silver commemorative print of that facility, and the second defeat of the same Brain gives the commemorative print a golden color. They are similar to [[Badge]]s and equivalent to the [[Symbol]]s from [[Hoenn]]'s {{Gdis|Battle Frontier|III}}. Three of the five Frontier Brains always use a certain team for silver print battles and another for gold print battles. At the beginning of each battle, they send out a random one of their three Pokémon. Also, defeating a Brain will always yield a 20BP reward. Battles conducted here do not award [[experience]] or [[Pokémon Dollar|money]]. Also, Pokémon seen in the battles will not be added to the [[Pokédex]]. | ||
There are usually three forms of challenges. The first of these challenges is the standard single battle in which the challenger must engage in seven three on three battles in a row. Winning a set of seven battles earns the player [[Battle Point]]s. The second of these challenges follows the same layout as the standard single battle but are rather conducted as [[Double Battle]]s. Each facility also offers Multi Battles that two players can participate in, using the Nintendo DS's Wireless Connection, to increase their record. The Battle Frontier also allows players from around the world to connect together using {{wp|Nintendo Wi-Fi Connection}} to take part in Multi Battles in any of the Battle Frontier facilities. This can be done by going to the Wi-Fi Club on the basement floor of any [[Pokémon Center]], and selecting the Battle Frontier function. However, both players must have entered the [[Hall of Fame]] and visited the Battle Frontier at least once. | |||
There are usually three forms of challenges. The first of these challenges is the standard single battle in which the challenger must engage in seven three on three battles in a row. Winning a set of seven battles earns the player [[Battle Point]]s. The second of these challenges follows the same layout as the standard single battle but are rather conducted as [[Double Battle]]s. Each facility also offers Multi Battles that two players can participate in, using the Nintendo DS's Wireless Connection, to increase their record. The Battle Frontier also allows players from around the world connect together using {{wp|Nintendo Wi-Fi Connection}} to take part in | |||
Regardless of what challenge is taken, the following Pokémon are not allowed: | Regardless of what challenge is taken, the following Pokémon are not allowed: | ||
{{ResponsiveList/h|sinnoh}} | |||
{{Pokeli|150|Mewtwo|msp=MSP/3}} | |||
{{Pokeli|151|Mew|msp=MSP/3}} | |||
{{Pokeli|172|Pichu|4={{color2|000|Spiky-Eared Pichu}}|note={{sup/4|HGSS}}|msp=MSP/3}} | |||
{{Pokeli|249|Lugia|msp=MSP/3}} | |||
{{Pokeli|250|Ho-Oh|msp=MSP/3}} | |||
{{Pokeli|251|Celebi|msp=MSP/3}} | |||
{{Pokeli|382|Kyogre|msp=MSP/3}} | |||
{{Pokeli|383|Groudon|msp=MSP/3}} | |||
{{Pokeli|384|Rayquaza|msp=MSP/3}} | |||
{{Pokeli|385|Jirachi|msp=MSP/3}} | |||
{{Pokeli|386|Deoxys|4={{color2|000|List of Pokémon with form differences#Deoxys|All forms}}|msp=MSP/3}} | |||
{{Pokeli|479O|Rotom|4={{color2|000|List of Pokémon with form differences#Deoxys|Heat Rotom}}|note=<ref group=n name=rotom/>|msp=MSP/3}} | |||
{{Pokeli|479W|Rotom|4={{color2|000|List of Pokémon with form differences#Deoxys|Wash Rotom}}|note=<ref group=n name=rotom/>|msp=MSP/3}} | |||
{{Pokeli|479R|Rotom|4={{color2|000|List of Pokémon with form differences#Deoxys|Frost Rotom}}|note=<ref group=n name=rotom/>|msp=MSP/3}} | |||
{{Pokeli|479F|Rotom|4={{color2|000|List of Pokémon with form differences#Deoxys|Fan Rotom}}|note=<ref group=n name=rotom/>|msp=MSP/3}} | |||
{{Pokeli|479L|Rotom|4={{color2|000|List of Pokémon with form differences#Deoxys|Mow Rotom}}|note=<ref group=n name=rotom/>|msp=MSP/3}} | |||
{{Pokeli|483|Dialga|msp=MSP/3}} | |||
{{Pokeli|484|Palkia|msp=MSP/3}} | |||
{{Pokeli|487|Giratina|4={{color2|000|List of Pokémon with form differences#Giratina|Both forms}}|msp=MSP/3}} | |||
{{Pokeli|489|Phione|msp=MSP/3}} | |||
{{Pokeli|490|Manaphy|msp=MSP/3}} | |||
{{Pokeli|491|Darkrai|msp=MSP/3}} | |||
{{Pokeli|492|Shaymin|4={{color2|000|List of Pokémon with form differences#Shaymin|Both forms}}|msp=MSP/3}} | |||
{{Pokeli|493|Arceus|msp=MSP/3}} | |||
{{Pokeli|Egg|Egg|msp=MSP/3}} | |||
{{Pokeli|ManaphyEgg|Manaphy Egg|msp=MSP/3}} | |||
{{ResponsiveList/f}} | |||
<references group=n> | |||
<ref name=rotom>If an attempt is made to enter Rotom's alternate forms, it will revert to its base form.</ref> | |||
</references> | |||
{{-}} | {{-}} | ||
In addition, any Pokémon holding a [[Soul Dew]] is banned. Because the [[Griseous Orb]] is only allowed to be held by Giratina, a Pokémon that is itself banned, the Griseous Orb is effectively banned as well. | |||
=== | ===Gallery=== | ||
<gallery> | |||
| | File:JohtoSinnoh BF.png|The Battle Frontier logo | ||
File:Sinnoh Battle Park Map.png|Battle Frontier location in Sinnoh | |||
File:Johto Frontier Access Map.png|Battle Frontier location in Johto | |||
File:Battle Frontier Pt.png|Overview of the Battle Frontier at night | |||
| | File:Battle Frontier center Pt.png|The center of the Battle Frontier, with a map showing the five battle facilities | ||
| | </gallery> | ||
==Trainers== | |||
* [[List of Battle Frontier Trainers (Generation IV)]] | |||
** [[List of Battle Frontier Pokémon (Generation IV)/Group 1]] | |||
** [[List of Battle Frontier Pokémon (Generation IV)/Group 2]] | |||
== | ==Facilities== | ||
{| style="margin:auto; text-align:center; background:#{{sinnoh color dark}}; {{roundy}}; border: 4px solid #{{sinnoh color}}" cellspacing="1" cellpadding="2" | |||
! style="background:#{{sinnoh color light}}; {{roundytl|5px}}" | Facility | |||
! style="background:#{{sinnoh color light}}" | {{color2|000|Frontier Brain}} | |||
{| style="margin:auto; text-align:center; background: #{{ | ! colspan="2" style="background:#{{sinnoh color light}}; {{roundytr|5px}}" | {{color2|000|Commemorative print|Prints}} | ||
|- style="background:#{{tower color light}}" | |||
! style="background: #{{ | | [[File:Battle Tower IV.png|x120px]]<br>{{color2|000|Battle Tower (Sinnoh)|Battle Tower}} | ||
! style="background: #{{ | | [[File:VSPalmer.png]]<br>{{color2|000|Tower Tycoon (Trainer class)|Tower Tycoon}} {{color2|000|Palmer}} | ||
|- style="background: #{{ | | {{print|tower|Silver|L}}<br>{{print|tower|Silver|D}}<br>{{print|tower|Silver|Ly}}<br>{{print|tower|Silver|E}}<br>Silver Tower Prints | ||
| | | {{print|tower|Gold|L}}<br>{{print|tower|Gold|D}}<br>{{print|tower|Gold|Ly}}<br>{{print|tower|Gold|E}}<br>Gold Tower Prints | ||
| | |- style="background:#{{factory color light}}" | ||
| [[File:Battle Factory IV.png|x120px]]<br>{{color2|000|Battle Factory (Generation IV)|Battle Factory}} | |||
| | | [[File:VSThorton.png]]<br>{{color2|000|Factory Head (Trainer class)|Factory Head}} {{color2|000|Thorton}} | ||
| {{print|factory|Silver|L}}<br>{{print|factory|Silver|D}}<br>{{print|factory|Silver|Ly}}<br>{{print|factory|Silver|E}}<br>Silver Factory Prints | |||
| {{print|factory|Gold|L}}<br>{{print|factory|Gold|D}}<br>{{print|factory|Gold|Ly}}<br>{{print|factory|Gold|E}}<br>Gold Factory Prints | |||
| | |- style="background:#{{arcade color light}}" | ||
| | | [[File:Battle Roulette.png|x120px]]<br>{{color2|000|Battle Arcade}} | ||
| | | [[File:VSDahlia.png]]<br>{{color2|000|Dahlia|Arcade Star Dahlia}} | ||
| | | {{print|arcade|Silver|L}}<br>{{print|arcade|Silver|D}}<br>{{print|arcade|Silver|Ly}}<br>{{print|arcade|Silver|E}}<br>Silver Arcade Prints | ||
| | | {{print|arcade|Gold|L}}<br>{{print|arcade|Gold|D}}<br>{{print|arcade|Gold|Ly}}<br>{{print|arcade|Gold|E}}<br>Gold Arcade Prints | ||
| | |- style="background:#{{castle color light}}" | ||
| [[File:Battle Castle.png|x120px]]<br>{{color2|000|Battle Castle}} | |||
| | | [[File:VSDarach.png]]<br>{{color2|000|Darach|Castle Valet Darach}} | ||
| | | {{print|castle|Silver|L}}<br>{{print|castle|Silver|D}}<br>{{print|castle|Silver|Ly}}<br>{{print|castle|Silver|E}}<br>Silver Castle Prints | ||
| {{print|castle|Gold|L}}<br>{{print|castle|Gold|D}}<br>{{print|castle|Gold|Ly}}<br>{{print|castle|Gold|E}}<br>Gold Castle Prints | |||
|- | |||
{| | | style="background:#{{hall color light}}; {{roundybl|5px}};" | [[File:Battle Hall.png|x120px]]<br>{{color2|000|Battle Hall}} | ||
|- | | style="background:#{{hall color light}}" | [[File:VSArgenta.png]]<br>{{color2|000|Argenta|Hall Matron Argenta}} | ||
| style="background:#{{hall color light}};" | {{print|hall|Silver|L}}<br>{{print|hall|Silver|D}}<br>{{print|hall|Silver|Ly}}<br>{{print|hall|Silver|E}}<br>Silver Hall Prints | |||
| style="background:#{{hall color light}}; {{roundybr|5px}};" | {{print|hall|Gold|L}}<br>{{print|hall|Gold|D}}<br>{{print|hall|Gold|Ly}}<br>{{print|hall|Gold|E}}<br>Gold Hall Prints | |||
|}{{clear}} | |||
| | |||
| | |||
| | |||
| | |||
| | |||
| | |||
| | |||
| | |||
|- style="background: #{{ | |||
| | |||
| | |||
| | |||
| | |||
|}{{ | |||
{| | |||
| | |||
| | |||
| | |||
| | |||
| < | |||
| | |||
| < | |||
| | |||
= | |||
{{ | |||
| | |||
| | |||
| | |||
| | |||
| | |||
| | |||
| | |||
| | |||
| | |||
| | |||
| | |||
| | |||
}} | |||
{{ | |||
| | |||
| | |||
| | |||
| | |||
| | |||
| | |||
| | |||
| | |||
| | |||
| | |||
| | |||
|}{{ | |||
==Other areas of interest== | ==Other areas of interest== | ||
===Entrance hall=== | ===Entrance hall=== | ||
[[File:Sinnoh Battle Frontier Brain artwork.png|thumb|left|220px|Artwork of the Battle Frontier, featuring the Frontier Brains]] | [[File:Sinnoh Battle Frontier Brain artwork.png|thumb|left|220px|Artwork of the Battle Frontier, featuring the Frontier Brains]] | ||
[[File:Fight Area | [[File:Fight Area entrance Pt.png|thumb|right|180px|The entrance area in Pokémon HeartGold, SoulSilver, and Platinum Versions.]] | ||
The entrance hall is the entrance to the Battle Frontier from the [[Fight Area]]{{sup/4| | The entrance hall is the entrance to the Battle Frontier from the [[Fight Area]]{{sup/4|Pt}} or [[Frontier Access]]{{sup/4|HGSS}}. Because the Sinnoh Battle Frontier does not have a [[Pokémon Center]], unlike {{gdis|Battle Frontier|III|Hoenn's}}, it cannot be accessed by {{m|Fly}}. Upon the first entry into the Battle Frontier, the [[Vs. Recorder]] will be upgraded with a {{DL|Vs. Recorder|Frontier Record}} by the women at the entrance. There are several women who will guide and explain venues of the Battle Frontier. | ||
* The top left woman will explain the Battle Castle | * The top left woman will explain the Battle Castle | ||
| Line 992: | Line 126: | ||
===Stats judge=== | ===Stats judge=== | ||
{{main|Stats judge#In Generation IV|Stats judge}} | {{main|Stats judge#In Generation IV|Stats judge}} | ||
In the Battle Tower's lobby next to the PC is a man who considers himself a judge of Trainer's Pokémon. He can appraise one of the player's Pokémon by looking at its stats, specifically by checking how high the {{IV}}s are. First he describes the Pokémon's "potential", which is based on the sum of all six IVs. Then he indicates which stat has the highest IV and what range it falls in. If two or more IVs are tied for the highest then he will choose only one of them to comment on. In Sinnoh, he selects which highest stat he'll report randomly. In Johto, he cycles through the stats in the following order: {{stat|HP}}, {{stat|Attack}}, {{stat|Defense}}, {{stat|Speed}}, {{stat|Special Attack}}, {{stat|Special Defense}}. If a different Pokémon is shown, then the cycle will not reset. | In the Battle Tower's lobby next to the PC is a man who considers himself a judge of Trainer's Pokémon. He can appraise one of the player's Pokémon by looking at its stats, specifically by checking how high the {{IV}}s are. First he describes the Pokémon's "potential", which is based on the sum of all six IVs. Then he indicates which stat has the highest IV and what range it falls in. If two or more IVs are tied for the highest then he will choose only one of them to comment on. In Sinnoh, he selects which highest stat he'll report randomly. In Johto, he cycles through the stats in the following order: {{stat|HP}}, {{stat|Attack}}, {{stat|Defense}}, {{stat|Speed}}, {{stat|Special Attack}}, {{stat|Special Defense}}. If a different Pokémon is shown, then the cycle will not reset. | ||
{| style="margin:auto; text-align:center; background: #505050; {{roundy}}; border: 2px solid #6f6f6f" | {| style="margin:auto; text-align:center; background: #505050; {{roundy}}; border: 2px solid #6f6f6f" | ||
|- | |- style="color: #fff" | ||
! style="background: #6f6f6f; {{roundytl|5px}}" | Pokémon's Potential | ! style="background: #6f6f6f; {{roundytl|5px}}" | Pokémon's Potential | ||
! style="background: #6f6f6f; {{roundytr|5px}}" | IV Total | ! style="background: #6f6f6f; {{roundytr|5px}}" | IV Total | ||
| Line 1,013: | Line 147: | ||
{{-}} | {{-}} | ||
{| style="margin:auto; text-align:center; background: #505050; {{roundy}}; border: 2px solid #6f6f6f" | {| style="margin:auto; text-align:center; background: #505050; {{roundy}}; border: 2px solid #6f6f6f" | ||
|- style="color: #fff" | |- style="color: #fff" | ||
! style="background: #6f6f6f; {{roundytl|5px}}" | Highest IV | ! style="background: #6f6f6f; {{roundytl|5px}}" | Highest IV | ||
! style="background: #6f6f6f; {{roundytr|5px}}" | Range | ! style="background: #6f6f6f; {{roundytr|5px}}" | Range | ||
| Line 1,031: | Line 165: | ||
===Exchange Service Corner=== | ===Exchange Service Corner=== | ||
The Exchange Service Corner is located | The Exchange Service Corner is located at the center of the Battle Frontier. The player can buy various goods with [[Battle Point]]s won from the facilities. The Battle Frontier's prizes are the same as {{game|Diamond and Pearl|s}}'s {{si|Battle Tower}}'s prizes. They also use [[Battle Point]]s which are won in the Frontier's various facilities. They can be bought at the stalls at the center of the Frontier. | ||
While the menu structure differs, the items available in Pokémon Platinum are the same as the items available in Pokémon HeartGold and SoulSilver, except that {{TM|89|U-turn}} is only available in Pokémon HeartGold and SoulSilver. | |||
====Platinum==== | |||
{{shop|Left corner}} | {{shop|Left corner}} | ||
{{shoprow|{{shopitem|HP Up|1|BP}}|{{shopitem|Protein|1|BP}}}} | {{shoprow|{{shopitem|Protein|1|BP}}|{{shopitem|Calcium|1|BP}}}} | ||
{{shoprow|{{shopitem|Iron|1|BP}}|{{shopitem| | {{shoprow|{{shopitem|Iron|1|BP}}|{{shopitem|Zinc|1|BP}}}} | ||
{{shoprow|{{shopitem| | {{shoprow|{{shopitem|Carbos|1|BP}}|{{shopitem|HP Up|1|BP}}}} | ||
{{shoprow|{{shopitem|Rare Candy|48|BP}}|{{shopitem|Power Bracer|16|BP}}}} | {{shoprow|{{shopitem|Power Bracer|16|BP}}|{{shopitem|Power Belt|16|BP}}}} | ||
{{shoprow|{{shopitem|Power | {{shoprow|{{shopitem|Power Lens|16|BP}}|{{shopitem|Power Band|16|BP}}}} | ||
{{shoprow|{{shopitem|Power | {{shoprow|{{shopitem|Power Anklet|16|BP}}|{{shopitem|Power Weight|16|BP}}}} | ||
{{shoprow|{{shopitem| | {{shoprow|{{shopitem|Toxic Orb|16|BP}}|{{shopitem|Flame Orb|16|BP}}}} | ||
{{shoprow|{{shopitem| | {{shoprow|{{shopitem|White Herb|32|BP}}|{{shopitem|Power Herb|32|BP}}}} | ||
{{shoprow|{{shopitem| | {{shoprow|{{shopitem|Bright Powder|48|BP|display=BrightPowder}}|{{shopitem|Choice Band|48|BP}}}} | ||
{{shoprow|{{shopitem|Choice Band|48|BP}}|{{shopitem| | {{shoprow|{{shopitem|Focus Band|48|BP}}|{{shopitem|Scope Lens|48|BP}}}} | ||
{{shoprow|{{shopitem|Muscle Band|48|BP}}|{{shopitem|Focus Sash|48|BP}}}} | |||
{{shoprow|{{shopitem|Choice Scarf|48|BP}}|{{shopitem|Razor Claw|48|BP}}}} | |||
{{shoprow|{{shopitem|Razor Fang|48|BP}}|{{shopitem|Rare Candy|48|BP}}}} | |||
{{shopfooter|multiple=yes}} | |||
{{shop|Right corner}} | |||
{{shoprow|{{shopitem|TM06|32|BP||TM Poison|Toxic}}|{{shopitem|TM73|32|BP||TM Electric|Thunder Wave}}}} | |||
{{shoprow|{{shopitem|TM61|32|BP||TM Fire|Will-O-Wisp}}|{{shopitem|TM45|32|BP||TM Normal|Attract}}}} | |||
{{shoprow|{{shopitem|TM40|40|BP||TM Flying|Aerial Ace}}|{{shopitem|TM31|40|BP||TM Fighting|Brick Break}}}} | |||
{{shoprow|{{shopitem|TM08|48|BP||TM Fighting|Bulk Up}}|{{shopitem|TM04|48|BP||TM Psychic|Calm Mind}}}} | |||
{{shoprow|{{shopitem|TM81|64|BP||TM Bug|X-Scissor}}|{{shopitem|TM30|64|BP||TM Ghost|Shadow Ball}}}} | |||
{{shoprow|{{shopitem|TM53|64|BP||TM Grass|Energy Ball}}|{{shopitem|TM36|80|BP||TM Poison|Sludge Bomb}}}} | |||
{{shoprow|{{shopitem|TM59|80|BP||TM Dragon|Dragon Pulse}}|{{shopitem|TM71|80|BP||TM Rock|Stone Edge}}}} | |||
{{shoprow|{{shopitem|TM26|80|BP||TM Ground|Earthquake}}}} | |||
{{shopfooter}} | |||
====HeartGold and SoulSilver==== | |||
;Left counter | |||
{{shop|Training Items #1}} | |||
{{shoprow|{{shopitem|Protein|1|BP}}|{{shopitem|Calcium|1|BP}}}} | |||
{{shoprow|{{shopitem|Iron|1|BP}}|{{shopitem|Zinc|1|BP}}}} | |||
{{shoprow|{{shopitem|Carbos|1|BP}}|{{shopitem|HP Up|1|BP}}}} | |||
{{shoprow|{{shopitem|Rare Candy|48|BP}}}} | |||
{{shopfooter|multiple=yes}} | |||
{{shop|Training Items #2}} | |||
{{shoprow|{{shopitem|Power Bracer|16|BP}}|{{shopitem|Power Belt|16|BP}}}} | |||
{{shoprow|{{shopitem|Power Lens|16|BP}}|{{shopitem|Power Band|16|BP}}}} | |||
{{shoprow|{{shopitem|Power Anklet|16|BP}}|{{shopitem|Power Weight|16|BP}}}} | |||
{{shopfooter}} | |||
{{shop|Fighting Items #1}} | |||
{{shoprow|{{shopitem|Toxic Orb|16|BP}}|{{shopitem|Flame Orb|16|BP}}}} | |||
{{shoprow|{{shopitem|White Herb|32|BP}}|{{shopitem|Power Herb|32|BP}}}} | |||
{{shoprow|{{shopitem|Bright Powder|48|BP|display=BrightPowder}}|{{shopitem|Focus Band|48|BP}}}} | |||
{{shoprow|{{shopitem|Focus Sash|48|BP}}}} | |||
{{shopfooter|multiple=yes}} | |||
{{shop|Fighting Items #2}} | |||
{{shoprow|{{shopitem|Choice Band|48|BP}}|{{shopitem|Choice Scarf|48|BP}}}} | |||
{{shoprow|{{shopitem|Scope Lens|48|BP}}|{{shopitem|Muscle Band|48|BP}}}} | {{shoprow|{{shopitem|Scope Lens|48|BP}}|{{shopitem|Muscle Band|48|BP}}}} | ||
{{shoprow|{{shopitem|Razor Claw|48|BP}}|{{shopitem|Razor Fang|48|BP}}}} | {{shoprow|{{shopitem|Razor Claw|48|BP}}|{{shopitem|Razor Fang|48|BP}}}} | ||
{{shopfooter}} | |||
;Right counter | |||
{{shop|Physical Attacks}} | |||
{{shoprow|{{shopitem|TM40|40|BP||TM Flying|Aerial Ace}}|{{shopitem|TM31|40|BP||TM Fighting|Brick Break}}}} | |||
{{shoprow|{{shopitem|TM89|40|BP||TM Bug|U-turn}}|{{shopitem|TM81|64|BP||TM Bug|X-Scissor}}}} | |||
{{shoprow|{{shopitem|TM71|80|BP||TM Rock|Stone Edge}}|{{shopitem|TM26|80|BP||TM Ground|Earthquake}}}} | |||
{{shopfooter|multiple=yes}} | {{shopfooter|multiple=yes}} | ||
{{shop| | {{shop|Special Attacks}} | ||
{{shoprow|{{shopitem|TM30|64|BP||TM Ghost|Shadow Ball}}|{{shopitem|TM53|64|BP||TM Grass|Energy Ball}}}} | {{shoprow|{{shopitem|TM30|64|BP||TM Ghost|Shadow Ball}}|{{shopitem|TM53|64|BP||TM Grass|Energy Ball}}}} | ||
{{shoprow|{{shopitem|TM36|80|BP||TM Poison|Sludge Bomb}}|{{shopitem|TM59|80|BP||TM Dragon|Dragon Pulse}}}} | {{shoprow|{{shopitem|TM36|80|BP||TM Poison|Sludge Bomb}}|{{shopitem|TM59|80|BP||TM Dragon|Dragon Pulse}}}} | ||
{{shoprow|{{shopitem| | {{shopfooter|multiple=yes}} | ||
{{shop|Changing Attacks}} | |||
{{shoprow|{{shopitem|TM06|32|BP||TM Poison|Toxic}}|{{shopitem|TM73|32|BP||TM Electric|Thunder Wave}}}} | |||
{{shoprow|{{shopitem|TM61|32|BP||TM Fire|Will-O-Wisp}}|{{shopitem|TM45|32|BP||TM Normal|Attract}}}} | |||
{{shoprow|{{shopitem|TM08|48|BP||TM Fighting|Bulk Up}}|{{shopitem|TM04|48|BP||TM Psychic|Calm Mind}}}} | |||
{{shopfooter}} | {{shopfooter}} | ||
===Pokémon Scratch-Off Corner=== | ===Pokémon Scratch-Off Corner=== | ||
[[File:Scratchoff.png|thumb|right|Scratching a Pokémon Scratch-Off Card]] | [[File:Scratchoff.png|thumb|right|Scratching a Pokémon Scratch-Off Card]] | ||
The Pokémon Scratch-Off Corner is located just north of the Exchange Service Corner. Pokémon Scratch-Off is a game that can be played for 1BP. This 1BP purchases three different Scratch-Off Cards, which permits winning up to 3 items. Upon purchase, a selection of 3 cards from four cards: red, blue, green, and yellow. Once done, scratching mode will begin. Using the stylus to scratch off the upper layer, scratching off three Pokémon gets the particular item that matches the Pokémon revealed. As soon as any part of any of the 9 blocks is touched, that block must be selected as one of the three choices. The whole card cannot be scratched off—only three blocks may be selected. If the player gets a Ditto, it acts as a wild-card, transforming into any other Pokémon should the player manage to get two of them. There are a total of three out of twenty-three different Berries to be won, and there will always be a | The Pokémon Scratch-Off Corner is located just north of the Exchange Service Corner. Pokémon Scratch-Off is a game that can be played for 1BP. This 1BP purchases three different Scratch-Off Cards, which permits winning up to 3 items. Upon purchase, a selection of 3 cards from four cards: red, blue, green, and yellow. Once done, scratching mode will begin. Using the stylus to scratch off the upper layer, scratching off three Pokémon gets the particular item that matches the Pokémon revealed. As soon as any part of any of the 9 blocks is touched, that block must be selected as one of the three choices. The whole card cannot be scratched off—only three blocks may be selected. If the player gets a Ditto, it acts as a wild-card, transforming into any other Pokémon should the player manage to get two of them. There are a total of three out of twenty-three different Berries to be won, and there will always be a [[Nugget]] to be won. | ||
{| style="margin:auto; text-align:center; background: # | {| style="margin:auto; text-align:center; background: #{{sinnoh color dark}}; {{roundy}}; border: 2px solid #{{sinnoh color}}" | ||
|- style="color: #fff" | |- style="color: #fff" | ||
! style="background: # | ! style="background: #{{sinnoh color light}}; {{roundytl|5px}}" colspan=2 | Prize | ||
! style="background: # | ! style="background: #{{sinnoh color light}}; {{roundytr|5px}}" | No. won | ||
|- style="background: #fff" | |- style="background: #fff" | ||
| {{Bag|Nugget}} | |||
| {{color2|000|Nugget}} | | {{color2|000|Nugget}} | ||
| 1 | | 1 | ||
|- style="background: #fff" | |- style="background: #fff" | ||
| {{Bag|Qualot Berry}} | |||
| {{color2|000|Qualot Berry}} | | {{color2|000|Qualot Berry}} | ||
| 3 | | 3 | ||
|- style="background: #fff" | |- style="background: #fff" | ||
| {{Bag|Tamato Berry}} | |||
| {{color2|000|Tamato Berry}} | | {{color2|000|Tamato Berry}} | ||
| 3 | | 3 | ||
|- style="background: #fff" | |- style="background: #fff" | ||
| {{Bag|Wacan Berry}} | |||
| {{color2|000|Wacan Berry}} | | {{color2|000|Wacan Berry}} | ||
| 3 | | 3 | ||
|- style="background: #fff" | |- style="background: #fff" | ||
| {{Bag|Chople Berry}} | |||
| {{color2|000|Chople Berry}} | | {{color2|000|Chople Berry}} | ||
| 3 | | 3 | ||
|- style="background: #fff" | |- style="background: #fff" | ||
| {{Bag|Coba Berry}} | |||
| {{color2|000|Coba Berry}} | | {{color2|000|Coba Berry}} | ||
| 3 | | 3 | ||
|- style="background: #fff" | |- style="background: #fff" | ||
| {{Bag|Pomeg Berry}} | |||
| {{color2|000|Pomeg Berry}} | | {{color2|000|Pomeg Berry}} | ||
| 3 | | 3 | ||
|- style="background: #fff" | |- style="background: #fff" | ||
| {{Bag|Hondew Berry}} | |||
| {{color2|000|Hondew Berry}} | | {{color2|000|Hondew Berry}} | ||
| 3 | | 3 | ||
|- style="background: #fff" | |- style="background: #fff" | ||
| {{Bag|Occa Berry}} | |||
| {{color2|000|Occa Berry}} | | {{color2|000|Occa Berry}} | ||
| 3 | | 3 | ||
|- style="background: #fff" | |- style="background: #fff" | ||
| {{Bag|Rindo Berry}} | |||
| {{color2|000|Rindo Berry}} | | {{color2|000|Rindo Berry}} | ||
| 3 | | 3 | ||
|- style="background: #fff" | |- style="background: #fff" | ||
| {{Bag|Kebia Berry}} | |||
| {{color2|000|Kebia Berry}} | | {{color2|000|Kebia Berry}} | ||
| 3 | | 3 | ||
|- style="background: #fff" | |- style="background: #fff" | ||
| {{Bag|Payapa Berry}} | |||
| {{color2|000|Payapa Berry}} | | {{color2|000|Payapa Berry}} | ||
| 3 | | 3 | ||
|- style="background: #fff" | |- style="background: #fff" | ||
| {{Bag|Kelpsy Berry}} | |||
| {{color2|000|Kelpsy Berry}} | | {{color2|000|Kelpsy Berry}} | ||
| 3 | | 3 | ||
|- style="background: #fff" | |- style="background: #fff" | ||
| {{Bag|Grepa Berry}} | |||
| {{color2|000|Grepa Berry}} | | {{color2|000|Grepa Berry}} | ||
| 3 | | 3 | ||
|- style="background: #fff" | |- style="background: #fff" | ||
| {{Bag|Passho Berry}} | |||
| {{color2|000|Passho Berry}} | | {{color2|000|Passho Berry}} | ||
| 3 | | 3 | ||
|- style="background: #fff" | |- style="background: #fff" | ||
| {{Bag|Yache Berry}} | |||
| {{color2|000|Yache Berry}} | | {{color2|000|Yache Berry}} | ||
| 3 | | 3 | ||
|- style="background: #fff" | |- style="background: #fff" | ||
| {{Bag|Shuca Berry}} | |||
| {{color2|000|Shuca Berry}} | | {{color2|000|Shuca Berry}} | ||
| 3 | | 3 | ||
|- style="background: #fff" | |- style="background: #fff" | ||
| {{Bag|Tanga Berry}} | |||
| {{color2|000|Tanga Berry}} | | {{color2|000|Tanga Berry}} | ||
| 3 | | 3 | ||
|- style="background: #fff" | |- style="background: #fff" | ||
| {{Bag|Charti Berry}} | |||
| {{color2|000|Charti Berry}} | | {{color2|000|Charti Berry}} | ||
| 3 | | 3 | ||
|- style="background: #fff" | |- style="background: #fff" | ||
| {{Bag|Colbur Berry}} | |||
| {{color2|000|Colbur Berry}} | | {{color2|000|Colbur Berry}} | ||
| 3 | | 3 | ||
|- style="background: #fff" | |- style="background: #fff" | ||
| {{Bag|Kasib Berry}} | |||
| {{color2|000|Kasib Berry}} | | {{color2|000|Kasib Berry}} | ||
| 3 | | 3 | ||
|- style="background: #fff" | |- style="background: #fff" | ||
| {{Bag|Babiri Berry}} | |||
| {{color2|000|Babiri Berry}} | | {{color2|000|Babiri Berry}} | ||
| 3 | | 3 | ||
|- style="background: #fff" | |- style="background: #fff" | ||
| {{Bag|Haban Berry}} | |||
| {{color2|000|Haban Berry}} | | {{color2|000|Haban Berry}} | ||
| 3 | | 3 | ||
|- style="background: #fff" | |- style="background: #fff" | ||
| style="{{roundybl|5px}}" | {{color2|000|Chilan Berry}} | | style="{{roundybl|5px}}" | {{Bag|Chilan Berry}} | ||
| {{color2|000|Chilan Berry}} | |||
| style="{{roundybr|5px}}" | 3 | | style="{{roundybr|5px}}" | 3 | ||
|}{{-}} | |}{{-}} | ||
==In the anime== | |||
The Battle Frontier was mentioned in ''[[DP141|Challenging a Towering Figure!]]'', where {{an|Barry}} told {{Ash}} and {{ashfr}} how his father, [[Palmer]], is a [[Frontier Brain]] there. | |||
==In the manga== | ==In the manga== | ||
[[File: | [[File:Battle Frontier Sinnoh Adventures.png|thumb|200px|The Battle Frontier in [[Pokémon Adventures]]]] | ||
===Pokémon Adventures=== | ===Pokémon Adventures=== | ||
A [[Pidgebot|robotic]] {{p|Starly}} works as the challengers' guide in the area. | |||
===={{MangaArc|Platinum}}==== | |||
Starting from ''[[PS418|Deprogramming Porygon-Z]]'', {{adv|Platinum}} challenged the Battle Frontier while she and {{adv|Looker}} conducted research on {{p|Giratina}} and the [[Distortion World]], where Platinum's supposed-to-be bodyguards, [[Paka and Uji]], had been sent to by [[Saturn]] in {{MangaArc|Diamond & Pearl|the previous chapter}}. By the end of the chapter, she had managed to defeat four of the five facilities, and was also intending to soon challenge the fifth one, the Battle Tower, led by {{adv|Pearl}}'s father, Palmer. | |||
===={{MangaArc|HeartGold & SoulSilver}}==== | |||
In ''[[PS460|All About Arceus IX]]'', it was revealed that the Sinnoh Battle Frontier was originally located in Johto. | |||
{{-}} | {{-}} | ||
==Trivia== | ==Trivia== | ||
* The Battle Frontier logo is the color code of the venues corresponding to the five battle venues and their position in the Battle Frontier. | * The Battle Frontier logo is the color code of the venues corresponding to the five battle venues and their position in the Battle Frontier. | ||
** The color code of each of the venues corresponds approximately to the color codes of each of the five [[flavor]]s of [[Berry]] and to the | ** The color code of each of the venues corresponds approximately to the color codes of each of the five [[flavor]]s of [[Berry]] and to the five [[Contest condition|condition stats]]. | ||
** If the Poké Ball design in the middle is counted, as well, the logo contains the seven colors of [[Apricorn]]. | ** If the Poké Ball design in the middle is counted, as well, the logo contains the seven colors of [[Apricorn]]. | ||
* Due to the pairing of | * Due to the pairing of [[Darach]] and [[Caitlin]], there is an equal number of male and female Frontier Brains. This is the case with Sinnoh's [[Gym Leader]]s as well. | ||
* Several of the Frontier Brains have Pokémon with moves they normally learn at a higher level. This may | * Several of the Frontier Brains have Pokémon with moves they normally learn at a higher level. This may suggest that their Pokémon also decrease in level when they are above level 50. | ||
* All Frontier Brains with a fixed team have at least one legendary Pokémon in their party when they are battled for the gold commemorative print. | * All Frontier Brains with a fixed team have at least one legendary Pokémon in their party when they are battled for the gold commemorative print. | ||
* Although Pokémon under level 30 are banned from use by the player at the Battle Hall, opponent Trainers can use Pokémon under this level. | * Although Pokémon under level 30 are banned from use by the player at the Battle Hall, opponent Trainers can use Pokémon under this level. | ||
* This Battle Frontier is the first one of its kind to appear in two separate locations in one generation. | * This Battle Frontier is the first one of its kind to appear in two separate locations in one generation. | ||
** Also, it is the first one to appear in the mainland of one region, in this case, the Johto region. | ** Also, it is the first one to appear in the mainland of one region, in this case, the Johto region. | ||
* {{p|Rotom}}'s forms | * {{p|Rotom}}'s forms and the [[Spiky-eared Pichu]] are the only non-{{pkmn2|Legendary}} or [[Mythical Pokémon]] that are disallowed in the Frontier. | ||
* The Battle Factory is the only facility to not have a [[PC]], due to the fact that players rent Pokémon instead of using their own. | * The Battle Factory is the only facility to not have a [[PC]], due to the fact that players rent Pokémon instead of using their own. | ||
* The Battle Arcade is the only location in a Generation IV game to have moving animation while the player is saving | * The Battle Arcade is the only location in a Generation IV game to have moving animation while the player is saving, as the screens that show the player and their opponent's Pokémon flash, despite everything else pausing during the save. | ||
* In the Battle Castle, there are crosses above the foe's entrance which change depending on the round the player is on. For example, if the player is on round 1, then there is 1 cross. | * In the Battle Castle, there are crosses above the foe's entrance which change depending on the round the player is on. For example, if the player is on round 1, then there is 1 cross. | ||
* In {{game|HeartGold and SoulSilver|s}}, the player cannot [[walking Pokémon|keep | * In {{game|HeartGold and SoulSilver|s}}, the player cannot [[walking Pokémon|keep their Pokémon outside of its Poké Ball]] in the Battle Frontier, despite being an open place. This is likely due to the fact that once the player steps into the opening of a facility, they are automatically drawn deeper inside, and would cause problems with the walking Pokémon. | ||
* In HeartGold and SoulSilver, the [[Pokégear]] will not play any radio channels whatsoever when the player is in any facilities. It is unknown why this happens. | * In HeartGold and SoulSilver, the [[Pokégear]] will not play any radio channels whatsoever when the player is in any facilities. It is unknown why this happens. | ||
* In HeartGold and SoulSilver, the [[stat Trainers]] all appear in the Battle Tower without any reason | * In HeartGold and SoulSilver, the [[stat Trainers]] all appear in the Battle Tower without any reason, as the player character has never met them before in these games. This is possibly done to ensure full compatibility with {{game|Platinum}}. | ||
* Trainers that received different overworld sprites in HeartGold and SoulSilver still use their Platinum sprites here. | * Trainers that received different overworld sprites in HeartGold and SoulSilver still use their Platinum sprites here. | ||
** Additionally, {{tc|Scientist}}s use their Platinum battle sprite and a {{tc|School Kid}} overworld sprite. | ** Additionally, {{tc|Scientist}}s use their Platinum battle sprite and a {{tc|School Kid}} overworld sprite. | ||
* In HeartGold and SoulSilver, a boy in the Battle Tower mentions that | * In HeartGold and SoulSilver, a boy in the Battle Tower mentions that "...similar facilities are available outside of Johto", probably referring to Sinnoh's Battle Frontier. | ||
* Aside from the stat-enhancing vitamins, which each have a price of only 1 BP, all prizes buyable with Battle Points have a price that is divisible by 8. | * Aside from the stat-enhancing vitamins, which each have a price of only 1 BP, all prizes buyable with Battle Points have a price that is divisible by 8. | ||
* The Battle Frontier is featured in one of the paintings on display in [[Lumiose Museum]] in [[Pokémon X and Y]]. | |||
==In other languages== | ==In other languages== | ||
{{langtable|color={{locationcolor/med|road}}|bordercolor={{locationcolor/dark|road}} | {{langtable|color={{locationcolor/med|road}}|bordercolor={{locationcolor/dark|road}} | ||
|zh_cmn=對戰開拓區 ''{{tt|Duìzhàn Kaītuòqū|Battle Frontier}}'' | |zh_yue=對戰開拓區 ''{{tt|Deuijin Hōitokkēui|Battle Frontier}}'' | ||
|fr_ca=Zone de Combat | |zh_cmn=對戰開拓區 / 对战开拓区 ''{{tt|Duìzhàn Kaītuòqū|Battle Frontier}}'' | ||
|fr_ca=Zone de Combat<br>Battle Frontier{{tt|*|Platinum box}} | |||
|fr_eu=Zone de Combat | |fr_eu=Zone de Combat | ||
|de=Kampfzone | |de=Kampfzone | ||
|it=Parco Lotta | |it=Parco Lotta | ||
|ko=배틀프런티어 ''Battle Frontier'' | |ko=배틀프런티어 ''Battle Frontier'' | ||
| | |pl=Strefa Walk | ||
| | |es=Frente Batalla | ||
|ru=Боевой Рубеж ''Boyevoi Rubezh'' | |||
|vi=Biên giới giao đấu | |||
|pt=Fronteira de Batalha{{tt|*|Platinum manual}} | |||
| | |||
| | |||
| | |||
}} | }} | ||
{{Sinnoh}} | {{Sinnoh}} | ||
{{Johto}}<br> | {{Johto}}<br> | ||
| Line 1,251: | Line 403: | ||
[[Category:Platinum locations]] | [[Category:Platinum locations]] | ||
[[Category:HeartGold and SoulSilver locations]] | [[Category:HeartGold and SoulSilver locations]] | ||
[[Category:Battle | [[Category:Battle Frontier|*]] | ||
[[de:Kampfzone (4. Generation)]] | [[de:Kampfzone (4. Generation)]] | ||
[[es:Frente Batalla ( | [[es:Frente Batalla (cuarta generación)]] | ||
[[fr:Zone de Combat ( | [[fr:Zone de Combat (Quatrième génération)]] | ||
[[it:Parco Lotta (quarta generazione)]] | [[it:Parco Lotta (quarta generazione)]] | ||
[[ja:バトルフロンティア (第四世代)]] | [[ja:バトルフロンティア (第四世代)]] | ||
[[zh:对战开拓区(第四世代)]] | |||
Latest revision as of 03:55, 23 March 2024
| This article is a featured article. This means that it has been identified as one of the best articles produced on Bulbapedia. |
| ||||
| ||||
| Map description: | The Battle Frontier--where the best of the best Trainers gather to test their skills--is located here.Pt A place where people from all over come to show off their strength.HGSS | |||
|---|---|---|---|---|
| Location: | Fight Area (Sinnoh) Route 40 (Johto) | |||
| Region: | Sinnoh and Johto | |||
| Generations: | IV | |||
 Location of Battle Frontier in Johto. | ||||
| Pokémon world locations | ||||

The Battle Frontier (Japanese: バトルフロンティア Battle Frontier) is a special post-Pokémon League area featured in the Generation IV games Pokémon Platinum, HeartGold, and SoulSilver. It is similar to the Battle Frontier featured in Pokémon Emerald, the Hoenn Battle Frontier. The key difference is the number of battle facilities and the challenges they hold.
This Frontier is found in two regions, Sinnoh and Johto; each region's Frontier is identical in facilities and appearance. The Sinnoh Frontier is located north of the Fight Area in the place of Pokémon Diamond and Pearl's Battle Park. The Johto Frontier is located west of Olivine City, where Pokémon Crystal's Battle Tower was located. Access to Johto's Frontier is through the Frontier Access. Each of the facilities in the Battle Frontier has a leader, the Frontier Brain, who may be challenged after certain winning streaks have been made through their respective facilities. Defeating the Frontier Brains will earn the player commemorative prints.
Only two of the facilities had been featured in Pokémon games prior to the Battle Frontier's debut in Platinum. The Battle Tower and Battle Factory were both present in Emerald; the Battle Tower had been in every game since its debut in Crystal, excluding FireRed and LeafGreen, which featured a similar facility called Trainer Tower.
Overview
Upon the player's first entry into the Battle Frontier, their Vs. Recorder will be upgraded with a Frontier Record by a woman at the entrance. The Vs. Recorder keeps the amount of Battle Points the players has. It also contains the commemorative prints obtained from the Battle Frontier. One battle from within one of the facilities may be recorded and stored on the Frontier Record, which may be watched or overwritten with another at any time.
On winning through a set amount of battles in any given facility, Battle Points, or BP, will be awarded, usually in small amounts, but gradually growing through each consecutive streak. The Frontier Brain will only appear in single battle mode. Defeating the Frontier Brain of a given facility for the first time awards the silver commemorative print of that facility, and the second defeat of the same Brain gives the commemorative print a golden color. They are similar to Badges and equivalent to the Symbols from Hoenn's Battle Frontier. Three of the five Frontier Brains always use a certain team for silver print battles and another for gold print battles. At the beginning of each battle, they send out a random one of their three Pokémon. Also, defeating a Brain will always yield a 20BP reward. Battles conducted here do not award experience or money. Also, Pokémon seen in the battles will not be added to the Pokédex.
There are usually three forms of challenges. The first of these challenges is the standard single battle in which the challenger must engage in seven three on three battles in a row. Winning a set of seven battles earns the player Battle Points. The second of these challenges follows the same layout as the standard single battle but are rather conducted as Double Battles. Each facility also offers Multi Battles that two players can participate in, using the Nintendo DS's Wireless Connection, to increase their record. The Battle Frontier also allows players from around the world to connect together using Nintendo Wi-Fi Connection to take part in Multi Battles in any of the Battle Frontier facilities. This can be done by going to the Wi-Fi Club on the basement floor of any Pokémon Center, and selecting the Battle Frontier function. However, both players must have entered the Hall of Fame and visited the Battle Frontier at least once.
Regardless of what challenge is taken, the following Pokémon are not allowed:
In addition, any Pokémon holding a Soul Dew is banned. Because the Griseous Orb is only allowed to be held by Giratina, a Pokémon that is itself banned, the Griseous Orb is effectively banned as well.
Gallery

The Battle Frontier logo
Battle Frontier location in Sinnoh

Battle Frontier location in Johto
Overview of the Battle Frontier at night

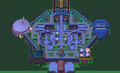
The center of the Battle Frontier, with a map showing the five battle facilities


Trainers
Facilities
| Facility | Frontier Brain | Prints | |
|---|---|---|---|
 Battle Tower |
 Tower Tycoon Palmer |
Silver Tower Prints |
Gold Tower Prints |
 Battle Factory |
 Factory Head Thorton |
Silver Factory Prints |
Gold Factory Prints |
 Battle Arcade |
 Arcade Star Dahlia |
Silver Arcade Prints |
Gold Arcade Prints |
 Battle Castle |
 Castle Valet Darach |
Silver Castle Prints |
Gold Castle Prints |
 Battle Hall |
 Hall Matron Argenta |
Silver Hall Prints |
Gold Hall Prints |
Other areas of interest
Entrance hall


The entrance hall is the entrance to the Battle Frontier from the Fight AreaPt or Frontier AccessHGSS. Because the Sinnoh Battle Frontier does not have a Pokémon Center, unlike Hoenn's, it cannot be accessed by Fly. Upon the first entry into the Battle Frontier, the Vs. Recorder will be upgraded with a Frontier Record by the women at the entrance. There are several women who will guide and explain venues of the Battle Frontier.
- The top left woman will explain the Battle Castle
- The top right woman will explain the Battle Arcade
- The middle left woman will explain the Battle Factory
- The middle right woman will explain the Battle Hall
- The bottom left woman will explain about the Battle Frontier itself.
- The bottom right woman will explain the Battle Tower
Stats judge
- Main article: Stats judge
In the Battle Tower's lobby next to the PC is a man who considers himself a judge of Trainer's Pokémon. He can appraise one of the player's Pokémon by looking at its stats, specifically by checking how high the IVs are. First he describes the Pokémon's "potential", which is based on the sum of all six IVs. Then he indicates which stat has the highest IV and what range it falls in. If two or more IVs are tied for the highest then he will choose only one of them to comment on. In Sinnoh, he selects which highest stat he'll report randomly. In Johto, he cycles through the stats in the following order: HP, Attack, Defense, Speed, Special Attack, Special Defense. If a different Pokémon is shown, then the cycle will not reset.
| Pokémon's Potential | IV Total |
|---|---|
| Decent | 0 to 90 |
| Above Average | 91 to 120 |
| Relatively Superior | 121 to 150 |
| Outstanding | 151 to 186 |
| Highest IV | Range |
|---|---|
| Rather Decent | 0 to 15 |
| Very Good | 16 to 25 |
| Fantastic | 26 to 30 |
| Can't Be Better | 31 |
Exchange Service Corner
The Exchange Service Corner is located at the center of the Battle Frontier. The player can buy various goods with Battle Points won from the facilities. The Battle Frontier's prizes are the same as Pokémon Diamond and Pearl's Battle Tower's prizes. They also use Battle Points which are won in the Frontier's various facilities. They can be bought at the stalls at the center of the Frontier.
While the menu structure differs, the items available in Pokémon Platinum are the same as the items available in Pokémon HeartGold and SoulSilver, except that TM89 (U-turn) is only available in Pokémon HeartGold and SoulSilver.
Platinum
| Left corner | |||||||
|---|---|---|---|---|---|---|---|
|
| ||||||
|
| ||||||
|
| ||||||
|
| ||||||
|
| ||||||
|
| ||||||
|
| ||||||
|
| ||||||
|
| ||||||
|
| ||||||
|
| ||||||
|
| ||||||
|
| ||||||
| Right corner | |||||||
|---|---|---|---|---|---|---|---|
|
| ||||||
|
| ||||||
|
| ||||||
|
| ||||||
|
| ||||||
|
| ||||||
|
| ||||||
|
|||||||
HeartGold and SoulSilver
- Left counter
| Training Items #1 | |||||||
|---|---|---|---|---|---|---|---|
|
| ||||||
|
| ||||||
|
| ||||||
|
|||||||
| Training Items #2 | |||||||
|---|---|---|---|---|---|---|---|
|
| ||||||
|
| ||||||
|
| ||||||
| Fighting Items #1 | |||||||
|---|---|---|---|---|---|---|---|
|
| ||||||
|
| ||||||
|
| ||||||
|
|||||||
| Fighting Items #2 | |||||||
|---|---|---|---|---|---|---|---|
|
| ||||||
|
| ||||||
|
| ||||||
- Right counter
| Physical Attacks | |||||||
|---|---|---|---|---|---|---|---|
|
| ||||||
|
| ||||||
|
| ||||||
| Special Attacks | |||||||
|---|---|---|---|---|---|---|---|
|
| ||||||
|
| ||||||
| Changing Attacks | |||||||
|---|---|---|---|---|---|---|---|
|
| ||||||
|
| ||||||
|
| ||||||
Pokémon Scratch-Off Corner

The Pokémon Scratch-Off Corner is located just north of the Exchange Service Corner. Pokémon Scratch-Off is a game that can be played for 1BP. This 1BP purchases three different Scratch-Off Cards, which permits winning up to 3 items. Upon purchase, a selection of 3 cards from four cards: red, blue, green, and yellow. Once done, scratching mode will begin. Using the stylus to scratch off the upper layer, scratching off three Pokémon gets the particular item that matches the Pokémon revealed. As soon as any part of any of the 9 blocks is touched, that block must be selected as one of the three choices. The whole card cannot be scratched off—only three blocks may be selected. If the player gets a Ditto, it acts as a wild-card, transforming into any other Pokémon should the player manage to get two of them. There are a total of three out of twenty-three different Berries to be won, and there will always be a Nugget to be won.
| Prize | No. won | |
|---|---|---|
| Nugget | 1 | |
| Qualot Berry | 3 | |
| Tamato Berry | 3 | |
| Wacan Berry | 3 | |
| Chople Berry | 3 | |
| Coba Berry | 3 | |
| Pomeg Berry | 3 | |
| Hondew Berry | 3 | |
| Occa Berry | 3 | |
| Rindo Berry | 3 | |
| Kebia Berry | 3 | |
| Payapa Berry | 3 | |
| Kelpsy Berry | 3 | |
| Grepa Berry | 3 | |
| Passho Berry | 3 | |
| Yache Berry | 3 | |
| Shuca Berry | 3 | |
| Tanga Berry | 3 | |
| Charti Berry | 3 | |
| Colbur Berry | 3 | |
| Kasib Berry | 3 | |
| Babiri Berry | 3 | |
| Haban Berry | 3 | |
| Chilan Berry | 3 | |
In the anime
The Battle Frontier was mentioned in Challenging a Towering Figure!, where Barry told Ash and his friends how his father, Palmer, is a Frontier Brain there.
In the manga

Pokémon Adventures
A robotic Starly works as the challengers' guide in the area.
Platinum arc
Starting from Deprogramming Porygon-Z, Platinum challenged the Battle Frontier while she and Looker conducted research on Giratina and the Distortion World, where Platinum's supposed-to-be bodyguards, Paka and Uji, had been sent to by Saturn in the previous chapter. By the end of the chapter, she had managed to defeat four of the five facilities, and was also intending to soon challenge the fifth one, the Battle Tower, led by Pearl's father, Palmer.
HeartGold & SoulSilver arc
In All About Arceus IX, it was revealed that the Sinnoh Battle Frontier was originally located in Johto.
Trivia
- The Battle Frontier logo is the color code of the venues corresponding to the five battle venues and their position in the Battle Frontier.
- The color code of each of the venues corresponds approximately to the color codes of each of the five flavors of Berry and to the five condition stats.
- If the Poké Ball design in the middle is counted, as well, the logo contains the seven colors of Apricorn.
- Due to the pairing of Darach and Caitlin, there is an equal number of male and female Frontier Brains. This is the case with Sinnoh's Gym Leaders as well.
- Several of the Frontier Brains have Pokémon with moves they normally learn at a higher level. This may suggest that their Pokémon also decrease in level when they are above level 50.
- All Frontier Brains with a fixed team have at least one legendary Pokémon in their party when they are battled for the gold commemorative print.
- Although Pokémon under level 30 are banned from use by the player at the Battle Hall, opponent Trainers can use Pokémon under this level.
- This Battle Frontier is the first one of its kind to appear in two separate locations in one generation.
- Also, it is the first one to appear in the mainland of one region, in this case, the Johto region.
- Rotom's forms and the Spiky-eared Pichu are the only non-Legendary or Mythical Pokémon that are disallowed in the Frontier.
- The Battle Factory is the only facility to not have a PC, due to the fact that players rent Pokémon instead of using their own.
- The Battle Arcade is the only location in a Generation IV game to have moving animation while the player is saving, as the screens that show the player and their opponent's Pokémon flash, despite everything else pausing during the save.
- In the Battle Castle, there are crosses above the foe's entrance which change depending on the round the player is on. For example, if the player is on round 1, then there is 1 cross.
- In Pokémon HeartGold and SoulSilver, the player cannot keep their Pokémon outside of its Poké Ball in the Battle Frontier, despite being an open place. This is likely due to the fact that once the player steps into the opening of a facility, they are automatically drawn deeper inside, and would cause problems with the walking Pokémon.
- In HeartGold and SoulSilver, the Pokégear will not play any radio channels whatsoever when the player is in any facilities. It is unknown why this happens.
- In HeartGold and SoulSilver, the stat Trainers all appear in the Battle Tower without any reason, as the player character has never met them before in these games. This is possibly done to ensure full compatibility with Pokémon Platinum.
- Trainers that received different overworld sprites in HeartGold and SoulSilver still use their Platinum sprites here.
- Additionally, Scientists use their Platinum battle sprite and a School Kid overworld sprite.
- In HeartGold and SoulSilver, a boy in the Battle Tower mentions that "...similar facilities are available outside of Johto", probably referring to Sinnoh's Battle Frontier.
- Aside from the stat-enhancing vitamins, which each have a price of only 1 BP, all prizes buyable with Battle Points have a price that is divisible by 8.
- The Battle Frontier is featured in one of the paintings on display in Lumiose Museum in Pokémon X and Y.
In other languages
| ||||||||||||||||||||||||||||||||||||||||
| Johto | ||||||||
|---|---|---|---|---|---|---|---|---|
|
| ||||||||
|
| This article is part of Project Locations, a Bulbapedia project that aims to write comprehensive articles on every location in the Pokémon world. |