Appendix:Yellow walkthrough/Section 4: Difference between revisions
No edit summary |
mNo edit summary |
||
| Line 2: | Line 2: | ||
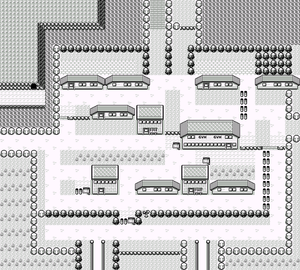
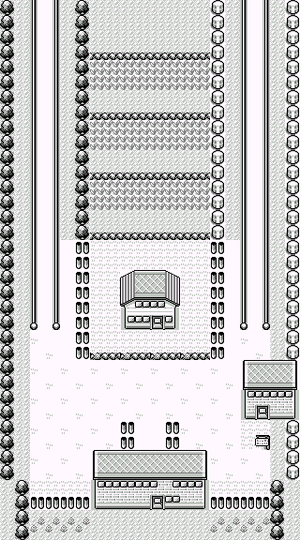
[[File:Cerulean City RBY.png|thumb|300px|Cerulean City]] | [[File:Cerulean City RBY.png|thumb|300px|Cerulean City]] | ||
[[Cerulean City]] is a peaceful seaside city located in the north-central part of [[Kanto]]. Places of interest include the [[Miracle Cycle|Bike Shop]], [[Cerulean Gym]], and [[Cerulean Cave|a mysterious cave]] on the edge of town. | |||
=== | {| class="expandable" align="center" style="background: #3F9BBC; {{roundy}}; border: 5px solid #7FBCD2;" | ||
|- align="center" | |||
! Available Pokémon | |||
{| align="center" | |- | ||
| | |||
{{catch/header|water|no}} | |||
{{catch/div|water|Gift Pokémon}} | |||
{{catch/entry1|001|Bulbasaur|no|no|yes|Gift|10|One|type1=Grass|type2=Poison}} | |||
{{catch/footer|water}} | |||
|} | |||
{| class="expandable" align="center" style="background: #3F9BBC; {{roundy}}; border: 5px solid #7FBCD2;" | |||
|- align="center" | |||
! Items | |||
|- | |||
| | | | ||
{{ | {{itlisth|water}} | ||
{{ | {{itemlist|Rare Candy|In the backyard of the Gym Badge man's house (hidden)|Y=yes|display={{DL|Vitamin|Rare Candy}}}} | ||
{{ | {{itemlist|TM Water|From Misty after defeating her|Y=yes|display={{TM|11|BubbleBeam}}}} | ||
{{ | {{itemlist|TM Ground|From the Rocket Grunt behind the burgled house|Y=yes|display={{TM|28|Dig}}}} | ||
{{itlistfoot|water}} | |||
|} | |} | ||
=== A Rare Addition === | |||
In the house next to the Pokémon Center is a girl who cares for injured Pokémon. She has nursed a {{p|Bulbasaur}} back to health, but now it needs a good Trainer to raise it properly. | |||
=== Gym Badge Man === | === Gym Badge Man === | ||
In the northwest house is a man who will explain | In the northwest house is a man who will explain the effects of the eight [[Badge|Gym Badges]]. The first five badges enable the use of [[HM]] moves in the field. Four badges increase a certain stat during battle, raising each respective skill to 112.5% of the normal value. The four other badges ensure a Pokémon's obedience during battle. | ||
{| style="background: #3F9BBC; {{roundy}}; border: 2px solid #007BA7;" colspan="3" cellspacing="2" cellpadding="4" | |||
|- | |||
! colspan="2" style="background: #7FBCD2; {{roundytl|5px}};" | Badge | |||
! style="background: #7FBCD2;" | Effect | |||
! colspan="2" style="background: #7FBCD2;" | Badge | |||
! style="background: #7FBCD2; {{roundytr|5px}};" | Effect | |||
|- style="background: #FFFFFF;" | |||
| align="center" | [[File:Boulder Badge.png|20px|Boulder Badge]] | |||
| align="center" | {{badge|Boulder}} | |||
| align="center" | Increases {{stat|Attack}};<br>Allows {{m|Flash}} in the field | |||
| align="center" | [[File:Soul Badge.png|20px|Soul Badge]] | |||
| align="center" | {{badge|Soul}} | |||
| align="center" | Increases {{stat|Defense}};<br>Allows {{m|Surf}} in the field | |||
|- style="background: #FFFFFF;" | |||
| align="center" | [[File:Cascade Badge.png|20px|Cascade Badge]] | |||
| align="center" | {{badge|Cascade}} | |||
| align="center" | Ensures obedience up to level 30;<br>Allows {{m|Cut}} in the field | |||
| align="center" | [[File:Marsh Badge.png|20px|Marsh Badge]] | |||
| align="center" | {{badge|Marsh}} | |||
| align="center" | Ensures obedience up to level 70 | |||
|- style="background: #FFFFFF;" | |||
| align="center" | [[File:Thunder Badge.png|20px|Thunder Badge]] | |||
| align="center" | {{badge|Thunder}} | |||
| align="center" | Increases {{stat|Speed}};<br>Allows {{m|Fly}} in the field | |||
| align="center" | [[File:Volcano Badge.png|20px|Volcano Badge]] | |||
| align="center" | {{badge|Volcano}} | |||
| align="center" | Increases {{stat|Special}} | |||
|- style="background: #FFFFFF;" | |||
| align="center" | [[File:Rainbow Badge.png|20px|Rainbow Badge]] | |||
| align="center" | {{badge|Rainbow}} | |||
| align="center" | Ensures obedience up to level 50;<br>Allows {{m|Strength}} in the field | |||
| align="center" | [[File:Earth Badge.png|20px|Earth Badge]] | |||
| align="center" | {{badge|Earth}} | |||
| align="center" | Ensures obedience up to level 100 | |||
|- style="background: #FFFFFF;" | |||
| colspan="6" style="background: #7FBCD2; {{roundybottom|5px}};" | | |||
|} | |||
=== Bike Shop === | === Bike Shop === | ||
The [[Miracle Cycle|Bike Shop]] has bicycles for sale, but the price is a whopping {{PDollar}}1,000,000! You can't carry that much cash, so it seems that you are out of luck for now. | |||
=== Something Shady === | === Something Shady === | ||
The house behind the Gym is blocked off by a police officer. It seems that [[Team Rocket]] has stolen [[TM28|a valuable item]] from the people living here. Nothing can be done about this now, so set your sights on the Gym. | |||
=== Cerulean Gym === | === Cerulean Gym === | ||
| Line 31: | Line 84: | ||
{{sign|RBY|footer}} | {{sign|RBY|footer}} | ||
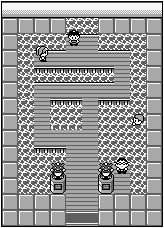
The [[Cerulean Gym]] specializes in {{type|Water}} Pokémon, so {{t|Grass}}- and {{type|Electric}} attacks will work wonders. This | The [[Cerulean Gym]] specializes in {{type|Water}} Pokémon, so {{t|Grass}}- and {{type|Electric}} attacks will work wonders. This will likely be one of the easiest Gyms to defeat, as you have both {{p|Pikachu}} and {{p|Bulbasaur}} on your team. With moves like {{m|ThunderShock}} and {{m|Vine Whip}} at your disposal, you should have little trouble winning your second badge. | ||
{| align="center" | {| align="center" | ||
|- align="center" valign="top" | |- align="center" valign="top" | ||
| | | | ||
{| align="center" style="background: #{{water color}}; {{roundy | {| align="center" style="background: #{{water color}}; {{roundy}} border: 5px solid #{{water color light}};" | ||
|- align="center" | |- align="center" | ||
! Cerulean Gym <br> [[File:Cascade Badge.png|35px|The Cascade Badge]] <br><br> | ! Cerulean Gym <br> [[File:Cascade Badge.png|35px|The Cascade Badge]] <br><br> | ||
|- | |- | ||
| | | | ||
{| align="center" class="expandable" style="background: #{{water color}}; {{roundy | {| align="center" class="expandable" style="background: #{{water color}}; {{roundy}} border: 5px solid #{{water color light}};" | ||
|- align="center" | |- align="center" | ||
! Trainers | ! Trainers | ||
| Line 57: | Line 110: | ||
{| align="center" style="background: #{{water color}};" | {| align="center" style="background: #{{water color}};" | ||
| | | | ||
{{Party|color={{water color}}|bordercolor={{water color dark}}|headcolor={{water color light}}|sprite=Spr Y Misty.png|prize={{PDollar}} 2079|class=Leader|name={{color2|000000|Misty}}|game=Y|location=Cerulean Gym|pokemon=2| | {{Party|color={{water color}}|bordercolor={{water color dark}}|headcolor={{water color light}} | ||
pokemon1={{Pokémon/1|ndex=120|pokemon=Staryu | |sprite=Spr Y Misty.png | ||
move1=Tackle|move1type=Normal|move2=Water Gun|move2type=Water}}| | |prize={{PDollar}}2079 | ||
pokemon2={{Pokémon/1|ndex=121|pokemon=Starmie | |class=Leader|name={{color2|000000|Misty}} | ||
move1=Tackle|move1type=Normal|move2=Water Gun|move2type=Water|move3=Harden|move3type=Normal|move4=BubbleBeam|move4type=Water}} | |game=Y|location=Cerulean Gym | ||
|pokemon=2 | |||
|pokemon1={{Pokémon/1|game=Yellow | |||
|ndex=120|pokemon=Staryu | |||
|type1=Water | |||
|level=18 | |||
|move1=Tackle|move1type=Normal | |||
|move2=Water Gun|move2type=Water}} | |||
|pokemon2={{Pokémon/1|game=Yellow | |||
|ndex=121|pokemon=Starmie | |||
|type1=Water|type2=Psychic | |||
|level=21 | |||
|move1=Tackle|move1type=Normal | |||
|move2=Water Gun|move2type=Water | |||
|move3=Harden|move3type=Normal | |||
|move4=BubbleBeam|move4type=Water}} | |||
}} | }} | ||
|} | |} | ||
| Line 68: | Line 138: | ||
Defeated, [[Misty]] awards you the {{badge|Cascade}}, which ensures obedience from all of your Pokémon, even those you got in a trade. It also enables the use of {{m|Cut}} outside of battle. Misty then presents you with {{TM|11|BubbleBeam}} as a prize. | |||
Rest up and head north to {{rt|24|Kanto}}. | |||
== Route 24 == | == Route 24 == | ||
[[File:Kanto Route 24 RBY.png|thumb|Route 24]] | [[File:Kanto Route 24 RBY.png|thumb|150px|right|Route 24]] | ||
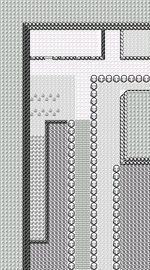
As soon as you head for | As soon as you head for Nugget Bridge, {{ga|Blue|your rival}} appears. He taunts you like usual before challenging you to another battle. | ||
{| align="center" | {| align="center" | ||
| | | | ||
{{Party | {{Party|color={{blue color}}|headcolor={{blue color light}}|bordercolor={{blue color dark}} | ||
|color={{blue color}} | |||
|headcolor={{blue color light}} | |||
|bordercolor={{blue color dark}} | |||
|sprite=Spr Y Blue 1.png | |sprite=Spr Y Blue 1.png | ||
|prize={{PDollar}}595 | |prize={{PDollar}}595 | ||
|class=Rival | |class=Rival|name={{color2|000000|Blue (game)|Blue}} | ||
|name={{color2|000000|Blue (game)|Blue}} | |game=Y|location=Cerulean City | ||
|game=Y | |||
|location=Cerulean City | |||
|pokemon=4 | |pokemon=4 | ||
|pokemon1={{Pokémon/1 | |||
|game=Yellow | |pokemon1={{Pokémon/1|game=Yellow | ||
|ndex=021 | |ndex=021|pokemon=Spearow | ||
|pokemon=Spearow | |type1=Normal|type2=Flying | ||
|level=18 | |level=18 | ||
|move1=Peck|move1type=Flying | |||
|move2=Growl|move2type=Normal | |||
|move3=Leer|move3type=Normal | |||
|move4=Fury Attack|move4type=Normal}} | |||
|pokemon2={{Pokémon/1|game=Yellow | |||
|ndex=027|pokemon=Sandshrew | |||
|type1=Ground | |||
|level=15 | |||
|move1=Scratch|move1type=Normal | |||
|move2=Sand-Attack|move2type=Normal}} | |||
|pokemon3={{Pokémon/1|game=Yellow | |||
|ndex=019|pokemon=Rattata | |||
|type1=Normal | |type1=Normal | ||
|level=15 | |level=15 | ||
|move1=Tackle|move1type=Normal | |||
|move2=Tail Whip|move2type=Normal | |||
|move3=Quick Attack|move3type=Normal | |||
|move4=Hyper Fang|move4type=Normal}} | |||
|pokemon4={{Pokémon/1|game=Yellow | |||
|ndex=133|pokemon=Eevee | |||
|type1=Normal | |type1=Normal | ||
|level=17 | |level=17 | ||
|move1=Tackle|move1type=Normal | |||
|move1=Tackle | |move2=Tail Whip|move2type=Normal | ||
|move1type=Normal | |move3=Sand-Attack|move3type=Normal}} | ||
|move2=Tail Whip | |||
|move2type=Normal | |||
|move3=Sand-Attack | |||
|move3type=Normal}} | |||
}} | }} | ||
|} | |} | ||
After | After he runs off, there are sixteen Trainers between [[Cerulean City]] and the [[Cerulean Cape|Sea Cottage]]; luckily you can backtrack to the Pokémon Center to heal up as necessary. When you beat the five Trainers on the bridge, a disguised [[Team Rocket]] Grunt tries to get you to join the organization. He attacks when you decline his offer, but gives up a valuable {{DL|Valuable item|Nugget}} when you defeat him. | ||
{| class="expandable" align="center" style="background: #{{ | {| class="expandable" align="center" style="background: #{{locationcolor/med|land}}; {{roundy}}; border: 5px solid #{{locationcolor/light|land}};" | ||
|- align="center" | |- align="center" | ||
! Trainers | ! Trainers | ||
|- | |- | ||
| | | | ||
{{Trainerheader}} | {{Trainerheader|land}} | ||
{{Trainerentry|Spr RG Bug Catcher.png|Bug Catcher||140|2|010|Caterpie||14||013|Weedle||14||}} | {{Trainerentry|Spr RG Bug Catcher.png|Bug Catcher||140|2|010|Caterpie||14||013|Weedle||14||}} | ||
{{Trainerdiv}} | {{Trainerdiv|land}} | ||
{{Trainerentry|Spr RG Lass.png|Lass||210|2|016|Pidgey||14||029|Nidoran♀||14||}} | {{Trainerentry|Spr RG Lass.png|Lass||210|2|016|Pidgey||14||029|Nidoran♀||14||}} | ||
{{Trainerdiv}} | {{Trainerdiv|land}} | ||
{{Trainerentry|Spr RG Youngster.png|Youngster||210|3|019|Rattata||14||023|Ekans||14||041|Zubat||14||}} | {{Trainerentry|Spr RG Youngster.png|Youngster||210|3|019|Rattata||14||023|Ekans||14||041|Zubat||14||}} | ||
{{Trainerdiv}} | {{Trainerdiv|land}} | ||
{{Trainerentry|Spr RG Lass.png|Lass||240|2|016|Pidgey||16||029|Nidoran♀||16||}} | {{Trainerentry|Spr RG Lass.png|Lass||240|2|016|Pidgey||16||029|Nidoran♀||16||}} | ||
{{Trainerdiv}} | {{Trainerdiv|land}} | ||
{{Trainerentry|Spr RG Jr Trainer M.png|Jr. Trainer||360|1|056|Mankey||18||}} | {{Trainerentry|Spr RG Jr Trainer M.png|Jr. Trainer||360|1|056|Mankey||18||}} | ||
{{Trainerdiv}} | {{Trainerdiv|land}} | ||
{{Trainerentry|Spr RG Rocket.png|Rocket||450|2|023|Ekans||15||041|Zubat||15||}} | {{Trainerentry|Spr RG Rocket.png|Rocket||450|2|023|Ekans||15||041|Zubat||15||}} | ||
{{Trainerdiv}} | {{Trainerdiv|land}} | ||
{{Trainerentry|Spr RG Jr Trainer M.png|Jr. Trainer||280|2|019|Rattata||14||023|Ekans||14||}} | {{Trainerentry|Spr RG Jr Trainer M.png|Jr. Trainer||280|2|019|Rattata||14||023|Ekans||14||}} | ||
{{Trainerfooter|land|I}} | {{Trainerfooter|land|I}} | ||
|} | |} | ||
{| class="expandable" align="center" style="background: #{{ | {| class="expandable" align="center" style="background: #{{locationcolor/med|land}}; {{roundy}}; border: 5px solid #{{locationcolor/light|land}};" | ||
|- align="center" | |- align="center" | ||
! Available Pokémon | ! Available Pokémon | ||
| Line 181: | Line 229: | ||
{{catch/entry1|004|Charmander|no|no|yes|Gift|10|Only one|type1=Fire}} | {{catch/entry1|004|Charmander|no|no|yes|Gift|10|Only one|type1=Fire}} | ||
{{catch/footer|land}} | {{catch/footer|land}} | ||
|} | |||
{| class="expandable" align="center" style="background: #{{locationcolor/med|land}}; {{roundy}}; border: 5px solid #{{locationcolor/light|land}};" | |||
|- align="center" | |||
! Items | |||
|- | |||
| | |||
{{itlisth|land}} | |||
{{itemlist|Nugget|From the disguised Rocket Grunt|Y=yes|display={{DL|Valuable item|Nugget}}}} | |||
{{itemlist|TM Electric|On the hill to the north of the bridge|Y=yes|display={{TM|45|Thunder Wave}}}} | |||
{{itlistfoot|land}} | |||
|} | |} | ||
There is a guy on the hill who thinks that he should release his {{p|Charmander}} because he is no good at raising Pokémon. Agree to take good care of it and it's yours! Pick up {{TM|45|Thunder Wave}} before leaving; this non-damaging move causes {{status|paralysis}}, which can be useful when catching new Pokémon. | |||
{{-}} | |||
== Route 25 == | == Route 25 == | ||
[[File:Kanto Route 25 RBY.png|thumb| | [[File:Kanto Route 25 RBY.png|thumb|400px|Route 25]] | ||
There are nine more Trainers to fight on your way to the cape. One of them is standing in a line of trees, and you'll need to lure him out with a battle to reach the {{TM|19|Seismic Toss}} lying behind him. {{m|Seismic Toss}} can be helpful against durable Pokémon because it inflicts damage equal to the user's level, regardless of the combatants' {{stat|Attack}} or {{stat|Defense}}. | |||
{| class="expandable" align="center" style="background: #{{ | {| class="expandable" align="center" style="background: #{{locationcolor/med|land}}; {{roundy}}; border: 5px solid #{{locationcolor/light|land}};" | ||
|- align="center" | |- align="center" | ||
! Trainers | ! Trainers | ||
| Line 218: | Line 275: | ||
{{trainerfooter|land|I}} | {{trainerfooter|land|I}} | ||
|} | |} | ||
{| class="expandable" align="center" style="background: #{{ | {| class="expandable" align="center" style="background: #{{locationcolor/med|land}}; {{roundy}}; border: 5px solid #{{locationcolor/light|land}};" | ||
|- align="center" | |- align="center" | ||
! Available Pokémon | ! Available Pokémon | ||
| Line 231: | Line 288: | ||
{{catch/footer|land}} | {{catch/footer|land}} | ||
|} | |} | ||
{| class="expandable" align="center" style="background: #{{ | {| class="expandable" align="center" style="background: #{{locationcolor/med|land}}; {{roundy}}; border: 5px solid #{{locationcolor/light|land}};" | ||
|- align="center" | |- align="center" | ||
! Items | ! Items | ||
|- | |- | ||
| | | | ||
{{itlisth}} | {{itlisth|land}} | ||
{{itemlist|TM Fighting| | {{itemlist|TM Fighting|Behind the tree line|Y=yes|display={{TM|19|Seismic Toss}}}} | ||
{{itemlist|Elixir| | {{itemlist|Elixir|Northwest part of the tree maze (hidden)|Y=yes|display={{DL|Ether|Elixir|Elixer}}}} | ||
{{itlistfoot}} | {{itemlist|Ether|On the fence next to Bill's house (hidden)|Y=yes}} | ||
{{itemlist|S.S. Ticket|Reward from Bill for returning him to normal|Y=yes|display={{DL|List of key items in Generation I|S.S. Ticket}}}} | |||
{{itlistfoot|land}} | |||
|} | |} | ||
[[File:Sea Cottage interior RBY.png|thumb|right|Bill as a Pokémon]] | |||
=== Sea Cottage === | === Sea Cottage === | ||
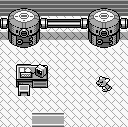
[[Bill]] | The Sea Cottage on [[Cerulean Cape]] belongs to [[Bill]], a famous Pokémon researcher. His latest experiment has gone wrong, and his DNA was combine with that of a Pokémon! He asks for your help, so when he steps into the machine, activate the program on his PC to return him to normal. As thanks, he gives you an {{DL|List of key items in Generation I|S.S. Ticket}}. This ticket lets you board the [[S.S. Anne|luxury cruiseliner]] that is docked in [[Vermilion City]], which also happens to be the location of the third Gym. Before leaving the cape, re-enter the cottage and check out Bill's PC to view his favorite Pokémon, the [[Eeveelutions|Eevee family]]. This adds {{p|Vaporeon|three}} {{p|Jolteon|new}} {{p|Flareon|pages}} to your Pokédex. | ||
{{-}} | |||
== Cerulean City == | == Cerulean City == | ||
Back in {{ci|Cerulean}}, you'll see that the officer blocking the burgled house has move out of the way. Inside lie obvious signs of a break-in, including muddy footprints, overturned plants, and a gaping hole in the wall that was used as an escape route. Step through the hole to find the thief. | |||
{| align="center" | {| align="center" | ||
| Line 257: | Line 314: | ||
{{trainerheader|road}} | {{trainerheader|road}} | ||
{{trainerentry|Spr RG Rocket.png|Team Rocket|Grunt|510|2|066|Machop||17||096|Drowzee||17|}} | {{trainerentry|Spr RG Rocket.png|Team Rocket|Grunt|510|2|066|Machop||17||096|Drowzee||17|}} | ||
{{trainerfooter|road}} | {{trainerfooter|road|no}} | ||
|} | |} | ||
When he loses, the [[Team Rocket|Rocket]] hands over the stolen [[TM28]] before running off. {{m|Dig}} is useful when in a cave, as it instantly returns you to the entrance. | |||
== Route 5 == | == Route 5 == | ||
| Line 269: | Line 325: | ||
The tall grass here is home to a few new Pokémon. An {{p|Abra}} is always quick to {{m|teleport}} away, meaning that you'll need to be even faster to prevent that. It's a good idea to have a {{p|Jigglypuff}} {{m|sing}} it to {{status|sleep}}, or have Pikachu {{status|paralyze}} it with {{m|Thunder Wave}}, before throwing a Poké Ball. | The tall grass here is home to a few new Pokémon. An {{p|Abra}} is always quick to {{m|teleport}} away, meaning that you'll need to be even faster to prevent that. It's a good idea to have a {{p|Jigglypuff}} {{m|sing}} it to {{status|sleep}}, or have Pikachu {{status|paralyze}} it with {{m|Thunder Wave}}, before throwing a Poké Ball. | ||
You can't get through the [[gate]] to [[Saffron City]] yet, so take the [[Underground Path (Routes 5-6)| | You can't get through the [[gate]] to [[Saffron City]] yet, so take the [[Underground Path (Routes 5-6)|Underground Path]] to {{rt|6|Kanto}}. At the north end is a woman who offers to trade her {{p|Machoke}} for your {{p|Cubone}}. | ||
{| class="expandable" align="center" style="background: #{{ | {| class="expandable" align="center" style="background: #{{locationcolor/med|land}}; {{roundy|10px}}; border: 5px solid #{{locationcolor/light|land}};" | ||
|- align="center" | |- align="center" | ||
! Available Pokémon | ! Available Pokémon | ||
| Line 289: | Line 345: | ||
=== Pokémon Daycare === | === Pokémon Daycare === | ||
The house on the hill is the [[Pokémon Day Care]]. The old man inside will raise one Pokémon at a time for you while you are away. A Pokémon left here will gain one [[Experience|experience point]] for every step you take. If you bought the {{p|Magikarp}} near [[Mt. Moon]], this is a good way to raise it. The downside is that he will make every decision for you; he may delete a move you like, or ignore a new move. He charges {{PDollar}}100, plus another {{PDollar}}100 for every new level, to return a Pokémon. | |||
| Line 301: | Line 357: | ||
|next=yes | |next=yes | ||
|nextsection=5 | |nextsection=5 | ||
|nextname=Route 6, Vermilion City, S.S. Anne, Vermilion Gym}} | |nextname=Route 6, Vermilion City, S.S. Anne, Vermilion Gym | ||
}} | |||
<br> | <br> | ||
{{Project Walkthroughs notice}} | {{Project Walkthroughs notice}} | ||
[[Category:Yellow walkthrough]] | [[Category:Yellow walkthrough]] | ||
Revision as of 18:57, 27 September 2012
Cerulean City
Cerulean City is a peaceful seaside city located in the north-central part of Kanto. Places of interest include the Bike Shop, Cerulean Gym, and a mysterious cave on the edge of town.
| Available Pokémon | |||||||||||||||||||||||||||||||||||||||||||||||||||||||||
|---|---|---|---|---|---|---|---|---|---|---|---|---|---|---|---|---|---|---|---|---|---|---|---|---|---|---|---|---|---|---|---|---|---|---|---|---|---|---|---|---|---|---|---|---|---|---|---|---|---|---|---|---|---|---|---|---|---|
| |||||||||||||||||||||||||||||||||||||||||||||||||||||||||
| Items | ||||||||||||||||||||
|---|---|---|---|---|---|---|---|---|---|---|---|---|---|---|---|---|---|---|---|---|
| ||||||||||||||||||||
A Rare Addition
In the house next to the Pokémon Center is a girl who cares for injured Pokémon. She has nursed a Bulbasaur back to health, but now it needs a good Trainer to raise it properly.
Gym Badge Man
In the northwest house is a man who will explain the effects of the eight Gym Badges. The first five badges enable the use of HM moves in the field. Four badges increase a certain stat during battle, raising each respective skill to 112.5% of the normal value. The four other badges ensure a Pokémon's obedience during battle.
| Badge | Effect | Badge | Effect | ||
|---|---|---|---|---|---|
| Boulder Badge | Increases Attack; Allows Flash in the field |
Soul Badge | Increases Defense; Allows Surf in the field | ||
| Cascade Badge | Ensures obedience up to level 30; Allows Cut in the field |
Marsh Badge | Ensures obedience up to level 70 | ||
| Thunder Badge | Increases Speed; Allows Fly in the field |
Volcano Badge | Increases Special | ||
| Rainbow Badge | Ensures obedience up to level 50; Allows Strength in the field |
Earth Badge | Ensures obedience up to level 100 | ||
Bike Shop
The Bike Shop has bicycles for sale, but the price is a whopping $1,000,000! You can't carry that much cash, so it seems that you are out of luck for now.
Something Shady
The house behind the Gym is blocked off by a police officer. It seems that Team Rocket has stolen a valuable item from the people living here. Nothing can be done about this now, so set your sights on the Gym.
Cerulean Gym
CERULEAN CITY
POKéMON GYM
LEADER: MISTY
The Tomboyish
Mermaid!
The Cerulean Gym specializes in Water-type Pokémon, so Grass- and Electric-type attacks will work wonders. This will likely be one of the easiest Gyms to defeat, as you have both Pikachu and Bulbasaur on your team. With moves like ThunderShock and Vine Whip at your disposal, you should have little trouble winning your second badge.
| ||||||||||||||||||||||||||||||||||||||||||||||||||||||||||||||||||||||||||||||||||||||||||||||||||||||||||
Defeated, Misty awards you the Cascade Badge, which ensures obedience from all of your Pokémon, even those you got in a trade. It also enables the use of Cut outside of battle. Misty then presents you with TM11 (BubbleBeam) as a prize.
Rest up and head north to Route 24.
Route 24
As soon as you head for Nugget Bridge, your rival appears. He taunts you like usual before challenging you to another battle.
| ||||||||||||||||||||||||||||||||||||||||||||||||||||||||||||||||||||||||||||||||||||||||||||||||||||||||||||
After he runs off, there are sixteen Trainers between Cerulean City and the Sea Cottage; luckily you can backtrack to the Pokémon Center to heal up as necessary. When you beat the five Trainers on the bridge, a disguised Team Rocket Grunt tries to get you to join the organization. He attacks when you decline his offer, but gives up a valuable Nugget when you defeat him.
| Trainers | |||||||||||||||||||||||||||||||||||||||||||||||||||||||||||||||||||||||||||||||||||||||||||||||||||||||||||||||||||||||||||||||||||||||||||||||||||||
|---|---|---|---|---|---|---|---|---|---|---|---|---|---|---|---|---|---|---|---|---|---|---|---|---|---|---|---|---|---|---|---|---|---|---|---|---|---|---|---|---|---|---|---|---|---|---|---|---|---|---|---|---|---|---|---|---|---|---|---|---|---|---|---|---|---|---|---|---|---|---|---|---|---|---|---|---|---|---|---|---|---|---|---|---|---|---|---|---|---|---|---|---|---|---|---|---|---|---|---|---|---|---|---|---|---|---|---|---|---|---|---|---|---|---|---|---|---|---|---|---|---|---|---|---|---|---|---|---|---|---|---|---|---|---|---|---|---|---|---|---|---|---|---|---|---|---|---|---|---|
| |||||||||||||||||||||||||||||||||||||||||||||||||||||||||||||||||||||||||||||||||||||||||||||||||||||||||||||||||||||||||||||||||||||||||||||||||||||
| Available Pokémon | |||||||||||||||||||||||||||||||||||||||||||||||||||||||||||||||||||||||||||||||||||||||||||||||||||||||||||||||||||||||||||||||||||||||||
|---|---|---|---|---|---|---|---|---|---|---|---|---|---|---|---|---|---|---|---|---|---|---|---|---|---|---|---|---|---|---|---|---|---|---|---|---|---|---|---|---|---|---|---|---|---|---|---|---|---|---|---|---|---|---|---|---|---|---|---|---|---|---|---|---|---|---|---|---|---|---|---|---|---|---|---|---|---|---|---|---|---|---|---|---|---|---|---|---|---|---|---|---|---|---|---|---|---|---|---|---|---|---|---|---|---|---|---|---|---|---|---|---|---|---|---|---|---|---|---|---|---|---|---|---|---|---|---|---|---|---|---|---|---|---|---|---|---|
| |||||||||||||||||||||||||||||||||||||||||||||||||||||||||||||||||||||||||||||||||||||||||||||||||||||||||||||||||||||||||||||||||||||||||
| Items | ||||||||||||||||
|---|---|---|---|---|---|---|---|---|---|---|---|---|---|---|---|---|
| ||||||||||||||||
There is a guy on the hill who thinks that he should release his Charmander because he is no good at raising Pokémon. Agree to take good care of it and it's yours! Pick up TM45 (Thunder Wave) before leaving; this non-damaging move causes paralysis, which can be useful when catching new Pokémon.
Route 25
There are nine more Trainers to fight on your way to the cape. One of them is standing in a line of trees, and you'll need to lure him out with a battle to reach the TM19 (Seismic Toss) lying behind him. Seismic Toss can be helpful against durable Pokémon because it inflicts damage equal to the user's level, regardless of the combatants' Attack or Defense.
| Trainers | |||||||||||||||||||||||||||||||||||||||||||||||||||||||||||||||||||||||||||||||||||||||||||||||||||||||||||||||||||||||||||||||||||||||||||||||||||||||||||||||||||||||||||||||||||||||||||||||||||||
|---|---|---|---|---|---|---|---|---|---|---|---|---|---|---|---|---|---|---|---|---|---|---|---|---|---|---|---|---|---|---|---|---|---|---|---|---|---|---|---|---|---|---|---|---|---|---|---|---|---|---|---|---|---|---|---|---|---|---|---|---|---|---|---|---|---|---|---|---|---|---|---|---|---|---|---|---|---|---|---|---|---|---|---|---|---|---|---|---|---|---|---|---|---|---|---|---|---|---|---|---|---|---|---|---|---|---|---|---|---|---|---|---|---|---|---|---|---|---|---|---|---|---|---|---|---|---|---|---|---|---|---|---|---|---|---|---|---|---|---|---|---|---|---|---|---|---|---|---|---|---|---|---|---|---|---|---|---|---|---|---|---|---|---|---|---|---|---|---|---|---|---|---|---|---|---|---|---|---|---|---|---|---|---|---|---|---|---|---|---|---|---|---|---|---|---|---|---|
| |||||||||||||||||||||||||||||||||||||||||||||||||||||||||||||||||||||||||||||||||||||||||||||||||||||||||||||||||||||||||||||||||||||||||||||||||||||||||||||||||||||||||||||||||||||||||||||||||||||
| Available Pokémon | ||||||||||||||||||||||||||||||||||||||||||||||||||||||||||||||||||||||||||||||||||||||||||||||||||||||||||
|---|---|---|---|---|---|---|---|---|---|---|---|---|---|---|---|---|---|---|---|---|---|---|---|---|---|---|---|---|---|---|---|---|---|---|---|---|---|---|---|---|---|---|---|---|---|---|---|---|---|---|---|---|---|---|---|---|---|---|---|---|---|---|---|---|---|---|---|---|---|---|---|---|---|---|---|---|---|---|---|---|---|---|---|---|---|---|---|---|---|---|---|---|---|---|---|---|---|---|---|---|---|---|---|---|---|---|
| ||||||||||||||||||||||||||||||||||||||||||||||||||||||||||||||||||||||||||||||||||||||||||||||||||||||||||
| Items | ||||||||||||||||||||||||
|---|---|---|---|---|---|---|---|---|---|---|---|---|---|---|---|---|---|---|---|---|---|---|---|---|
| ||||||||||||||||||||||||
Sea Cottage
The Sea Cottage on Cerulean Cape belongs to Bill, a famous Pokémon researcher. His latest experiment has gone wrong, and his DNA was combine with that of a Pokémon! He asks for your help, so when he steps into the machine, activate the program on his PC to return him to normal. As thanks, he gives you an S.S. Ticket. This ticket lets you board the luxury cruiseliner that is docked in Vermilion City, which also happens to be the location of the third Gym. Before leaving the cape, re-enter the cottage and check out Bill's PC to view his favorite Pokémon, the Eevee family. This adds three new pages to your Pokédex.
Cerulean City
Back in Cerulean, you'll see that the officer blocking the burgled house has move out of the way. Inside lie obvious signs of a break-in, including muddy footprints, overturned plants, and a gaping hole in the wall that was used as an escape route. Step through the hole to find the thief.
| |||||||||||||||||||||||
When he loses, the Rocket hands over the stolen TM28 before running off. Dig is useful when in a cave, as it instantly returns you to the entrance.
Route 5
The tall grass here is home to a few new Pokémon. An Abra is always quick to teleport away, meaning that you'll need to be even faster to prevent that. It's a good idea to have a Jigglypuff sing it to sleep, or have Pikachu paralyze it with Thunder Wave, before throwing a Poké Ball.
You can't get through the gate to Saffron City yet, so take the Underground Path to Route 6. At the north end is a woman who offers to trade her Machoke for your Cubone.
| Available Pokémon | |||||||||||||||||||||||||||||||||||||||||||||||||||||||||||||||||||||||||||||||||||||||||||||||||||||||||||||||||||||||||||||||||||||||||
|---|---|---|---|---|---|---|---|---|---|---|---|---|---|---|---|---|---|---|---|---|---|---|---|---|---|---|---|---|---|---|---|---|---|---|---|---|---|---|---|---|---|---|---|---|---|---|---|---|---|---|---|---|---|---|---|---|---|---|---|---|---|---|---|---|---|---|---|---|---|---|---|---|---|---|---|---|---|---|---|---|---|---|---|---|---|---|---|---|---|---|---|---|---|---|---|---|---|---|---|---|---|---|---|---|---|---|---|---|---|---|---|---|---|---|---|---|---|---|---|---|---|---|---|---|---|---|---|---|---|---|---|---|---|---|---|---|---|
| |||||||||||||||||||||||||||||||||||||||||||||||||||||||||||||||||||||||||||||||||||||||||||||||||||||||||||||||||||||||||||||||||||||||||
Pokémon Daycare
The house on the hill is the Pokémon Day Care. The old man inside will raise one Pokémon at a time for you while you are away. A Pokémon left here will gain one experience point for every step you take. If you bought the Magikarp near Mt. Moon, this is a good way to raise it. The downside is that he will make every decision for you; he may delete a move you like, or ignore a new move. He charges $100, plus another $100 for every new level, to return a Pokémon.
|
Yellow walkthrough |
|

|
This article is part of Project Walkthroughs, a Bulbapedia project that aims to write comprehensive step-by-step guides on each Pokémon game. |
