Route 2
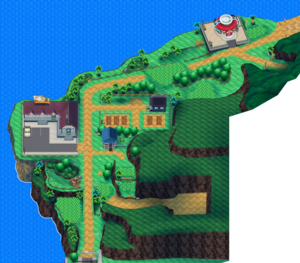
Route 2 encompasses the northwest part of Melemele Island, leading from Hau'oli City in the south to Route 3 in the northeast. Hau'oli Cemetery, a Motel, the Berry fields, and Verdant Cavern can all be found here.
| Trainers
|
| Trainer
|
Pokémon
|
|
|
|
|
|
|
|
|
| After defeating Team Skull at the Berry fields
|
|
|
|
|
|
|
|
|
|
|

|
|
|
Lass Isabella
Reward: $216
|
|
|
|
|
|
|
|
|
|
|
|
| Items
|
| Item
|
Location
|
Games
|

|
Heal Ball
|
On the ledge overlooking the Hau'oli Cemetery entrance
|
S M
|

|
Super Potion ×2
|
- Northwest corner of the motel parking lot
- South of the Pokémon Center, northeast of the tall grass patch
|
S M
|

|
Repel
|
Southwest corner of the motel parking lot, behind the lamppost (hidden)
|
S M
|

|
Nest Ball ×2
|
From a Collector inside the motel
|
S M
|

|
Stardust
|
Berry fields; behind the house, next to the palm tree (hidden)
|
S M
|

|
Revive ×4
|
- On the ledge west of the Pokémon Center
- Inside the Pokémon Center, from Hau (×3)
|
S M
|

|
X Attack
|
Held by Macho, the traded Machop
|
S M
|
| Later visit
|

|
Star Piece
|
Behind the rocks near the motel (requires Tauros Charge)
|
S M
|

|
TM87 (Swagger)
|
Guzma's house; from his mother, after defeating Team Skull
|
S M
|

|
$3,000
|
Pokémon Center; from a female Sightseer, if Cutiefly is registered in the Pokédex
|
S M
|
|
|
|
Hau'oli Cemetery
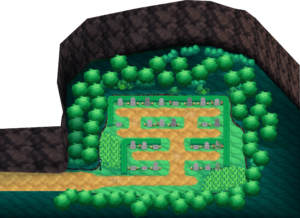
Hau'oli Cemetery is located in the southeastern part of the route. The graveyard acts as the final resting place for people and Pokémon alike. With such a strong connection to the spirit world, several species of Ghost Pokémon have made their home here.
| Available Pokémon
|
| Pokémon
|
Allies
|
Games
|
Location
|
Levels
|
Rate
|

|

|
|
|
 Gastly Gastly
|
S
|
M
|
|
7-10
|
50%
|
|
|
 Drifloon Drifloon
|
S
|
M
|
|
7-10
|
30%
|
-
|
|
|
 Misdreavus Misdreavus
|
S
|
M
|
|
7-10
|
-
|
30%
|
|
|
 Zubat Zubat
|
S
|
M
|
|
7-10
|
20%
|
| Exclusively from Island Scan
|
|
|
N/A
|
S
|
M
|
|
10
|
OneSa
|
| A colored background means that the Pokémon can be found in this location in the specified game. A white background with a colored letter means that the Pokémon cannot be found here.
|
|
Motel
There is not much happening at the motel right now, but you can speak to a Collector inside to receive two Nest Balls.
Guzma's House
A small house stands across the street from the motel. The man inside says that he tried to stop his son from running away, but failed. The bedroom in the back has several trophies on display, each with a thin layer of dust.
Berry Fields
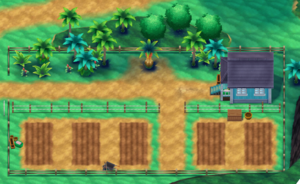
The Berry fields lay farther north. Despite the name, Berries cannot actually be grown here. The current owners moved here from the far-off Kalos region to promote the use of Mulch when growing Berries. However, due to Alola's tropical climate, Berries are able to grow very well on their own and so the fields have fallen out of use.
VS Team Skull
There is a Delibird standing in the road, looking helplessly toward the fields. When it notices you, it grabs onto your Bag and will not let go. Follow it into the fields to find a pair of Team Skull Grunts harassing the area's caretaker, in an attempt to steal the Berries stored here. The caretaker is unconcerned and tells you not to worry, but the pair attacks you before you can leave. Defeat the first Grunt's single Pokémon and the pair run off to harass Ilima in Verdant Cavern. The man then gives you an Oran Berry as thanks for your help.
Pokémon Center
Hau is waiting outside the Pokémon Center for you. He informs you that Verdant Cavern is considered a sacred place to Tapu Koko, and is off-limits except to those on an island challenge. He gives you three Revives before stopping by the café.
A female Sightseer near the café is looking for a Cutiefly. Catch one on Route 3 and speak with her again to receive a $3,000 reward.
Time for a Trade
There is a Lass near the Poké Mart who is looking to get a Spearow. If you have one to spare, she will happily trade her Machop for it. As Ilima's upcoming trial makes use of Normal Pokémon, the Fighting-type Machop will be especially helpful. Spearow are commonly found in Routes 2 and 3.
Verdant Cavern
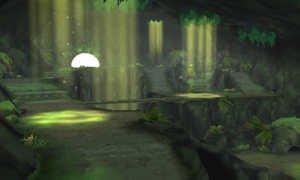
Verdant Cavern lies on the northeast part of the route. Ilima can be found standing outside the cave. He warns of the fierce Pokémon inside and suggests bringing extra Potions. Until the trial is complete, challengers are unable to leave the cave and wild Pokémon may not be caught.
| Available Pokémon
|
| Pokémon
|
Allies
|
Games
|
Location
|
Levels
|
Rate
|
|
|
 Zubat Zubat
|
S
|
M
|
|
8-11
|
70%
|
|
|
 Diglett Diglett
|
S
|
M
|
|
8-11
|
30%
|
| Ambush encounters
|
|
|
 Yungoos Yungoos
|
S
|
M
|
|
11
|
100%
|
|
|
 Rattata Rattata
|
S
|
M
|
|
11
|
100%
|
| A colored background means that the Pokémon can be found in this location in the specified game. A white background with a colored letter means that the Pokémon cannot be found here.
|
|
| Items
|
| Item
|
Location
|
Games
|

|
Super Potion ×2
|
- Southeast corner, near the entrance
- Northeast corner, through the tunnel
|
S M
|

|
Revive
|
In front of the second den, south of the mossy rock (hidden)
|
S M
|

|
TM31 (Brick Break)
|
On the ledge northwest of the entrance
|
S M
|

|
X Defense
|
West side, south of the western den
|
S M
|
| Totem’s Den
|

|
Normalium Z
|
Reward from Ilima, after clearing his trial
|
S M
|

|
Great Ball ×10
|
Reward from Ilima, after clearing his trial
|
S M
|

|
Energy Root
|
On the land jutting over the edge (hidden, requires Tauros Charge)
|
S M
|

|
TM56 (Fling)
|
On the hill overlooking the clearing (requires Tauros Charge)
|
S M
|
|
|
|
Captain Ilima's Trial
Inside the entrance, Captain Ilima welcomes you to Verdant Cavern and explains the basics of his trial. The goal is to defeat three of the Pokémon that lurk inside their dens, then reach the pedestal in the next part of the cave and collect the Z-Crystal there. A loud noise from deep in the cave prompts Ilima to warn you of the Totem Pokémon, a creature stronger than all others here.
To begin, inspect the nearby den to battle the first Pokémon. Next, head east to find a Super Potion, then go north and inspect the mossy rock in the path to find a hidden Revive. A second den is located just north of the rock, and the second Pokémon runs out to attack you. Fight it off, then climb westward up the hill to a fork in the path. Go south first to find TM31 (Brick Break) atop a few ledges that lead back to the entrance, then head north. Cross eastward over the wooden bridge to spot another Pokémon running into the third den. Climb the hill in the northeast and inspect the crawlspace to reach the other side. Pick up the Super Potion and inspect the den to find... nothing?! The Pokémon suddenly pops out from another den behind this one, on the upper level. Inspect that upper den, and the Pokémon appears from another den to the west. Grab the X Defense and check the western den to see the Pokémon back at the first den of the three. Cross back over the wooden bridge to encounter the two Team Skull Grunts from the Berry fields, here to disrupt your trial challenge. Defeat the first Grunt and his Drowzee. Then, as payback for their defeat, they block off two of the dens in an attempt to steal the Pokémon. Now that they have unwittingly helped you corner the remaining creature, check the third den to battle the final Pokémon.
VS Totem GumshoosS / RaticateM
Climb the hill and speak to the trial guide to enter the Totem's Den. The pedestal with the glittering Z-Crystal stands straight ahead. As you move to collect the treasure, you feel a piercing gaze. Pick up the crystal and the Totem Pokémon attacks! The creature is surrounded by an aura that raises its Defense by one stage. It calls its ally on the first turn; once the ally is defeated, it cannot be called again. Use Fighting-type attacks for best results.
| Pokémon Sun
|
| Totem Gumshoos
|
Ally Yungoos
|
| Aura: +1 Defense
|
|
|
|
| Pokémon Moon
|
| Totem Raticate
|
Ally Rattata
|
| Aura: +1 Defense
|
|
|
|
|
After the Totem Pokémon and its ally are defeated, Ilima arrives and congratulates you on completing his trial. He rewards you with the Normalium Z and teaches you the pose for Breakneck Blitz, then gives you ten Great Balls before healing your Pokémon to full health. He claims to have something interesting to show you and asks that you meet him on Route 3.
With the first trial cleared, wild Pokémon may now attempt to call an ally for help, turning a Single Battle into an SOS Battle.
Leave the cave to find Ilima waiting outside. Having defeated his trial, he opens the nearby barricade so that you can proceed to the northeast. He explains that since he is the only captain on Melemele Island, your next step is to inform Kahuna Hala of your victory. Professor Kukui arrives, and having spotted your new Z-Crystal, gives a quick tutorial on Z-Moves. When held by a Pokémon, a Z-Crystal upgrades any move of the corresponding type. Normalium Z affects Normal-type moves; damaging moves become Breakneck Blitz, while most Status moves will result in stat boosts. Z-Power can only be used once per battle.
Kukui suddenly remembers that he had lost Lillie somewhere on Route 3, and asks for your help in finding her.

