Appendix:Ruby and Sapphire walkthrough/Section 12
These pages follow the original Game Boy Advance iteration, not Pokémon Omega Ruby and Alpha Sapphire. The guide for those games can be found here.
Lilycove City
The hideout belonging to Team MagmaR/Team AquaS can be found in a cave to the northeast of Lilycove's beach. You'll need to storm their hideout in order to retrieve Captain Stern's submarine, so bring a party that can handle plenty of battles against them. When choosing your team, remember that Team Magma often uses Fire- and Dark-type Pokémon, while Team Aqua often uses Water- and Dark-type Pokémon.
Magma HideoutR
Team Magma has been working hard to build an impressive hideout in this spacious cave near Lilycove City. Storming this heavily-guarded base won't be easy, but you must risk it all to prevent Maxie's misguided vision from becoming reality!
| Trainers | ||||||||||||||||||||||||||||||||||||||||||||||||||||||||||||||||||||||||||||||||||||||||||||||||||||||||||||||||||||||||||||||||||||||
|---|---|---|---|---|---|---|---|---|---|---|---|---|---|---|---|---|---|---|---|---|---|---|---|---|---|---|---|---|---|---|---|---|---|---|---|---|---|---|---|---|---|---|---|---|---|---|---|---|---|---|---|---|---|---|---|---|---|---|---|---|---|---|---|---|---|---|---|---|---|---|---|---|---|---|---|---|---|---|---|---|---|---|---|---|---|---|---|---|---|---|---|---|---|---|---|---|---|---|---|---|---|---|---|---|---|---|---|---|---|---|---|---|---|---|---|---|---|---|---|---|---|---|---|---|---|---|---|---|---|---|---|---|---|---|
| ||||||||||||||||||||||||||||||||||||||||||||||||||||||||||||||||||||||||||||||||||||||||||||||||||||||||||||||||||||||||||||||||||||||
| Available Pokémon | |||||||||||||||||||||||||||||||||||||||||||||||||||||||||
|---|---|---|---|---|---|---|---|---|---|---|---|---|---|---|---|---|---|---|---|---|---|---|---|---|---|---|---|---|---|---|---|---|---|---|---|---|---|---|---|---|---|---|---|---|---|---|---|---|---|---|---|---|---|---|---|---|---|
| |||||||||||||||||||||||||||||||||||||||||||||||||||||||||
| Items | ||||||||||||||||||||||||||||||||||||||||||||||||||||||
|---|---|---|---|---|---|---|---|---|---|---|---|---|---|---|---|---|---|---|---|---|---|---|---|---|---|---|---|---|---|---|---|---|---|---|---|---|---|---|---|---|---|---|---|---|---|---|---|---|---|---|---|---|---|---|
| ||||||||||||||||||||||||||||||||||||||||||||||||||||||
1F
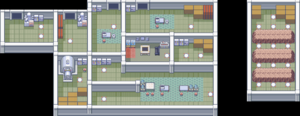
Climb out of the water and up the three stairways. At the top, a single Magma Grunt patrols around the hill. Battle him and climb the stairs to the north.
2F (west)
There are two warp panels in the northwest room; take the southern panel first to reach the southwest room and a Max Elixir. Warp back and take the other to reach the north-northwest room, and head downstairs to the submarine room.
B1F
Defeat the Magma Grunt in the northwest room, then climb the nearby stairs back to 2F.
2F (west)
In the north-central room, there is only a single warp panel, which leads to the southwest room. Pass by the two Magma Grunts and take the warp panel in the southwest. This leads to the east-central room, and another warp panel.
2F (east)
The previous warp panel leads to a small room with several more. Follow them in the correct order—left, center, right, right—to reach the interior room on 2F.
2F (west)
In Maxie's office, you'll find four items near the far wall. Two of them are actually Electrode in disguise, while the bottom-left item is a Nugget and the top-left item is a Master Ball! This type of Poké Ball will catch any wild Pokémon without fail, and is best used on hard-to-catch legendary Pokémon. Backtrack through the warp-filled hallway to 2F's southeast room, and step on the southeast warp panel. This transports you to the northeast room; take out the single Grunt and head down the stairs.
B1F
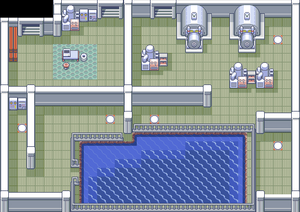
Pass by the two generators and take the northeast warp panel to the southeast area and a Nest Ball before warping back. Head southwest past another Grunt to the next warp panel; this one leads a short distance to the west. Go south to find one of the Magma Admins, Tabitha, standing at the water's edge. He's the only thing standing between you and stopping Maxie's getaway!
| |||||||||||||||||||||||||||||||||||||||||||||||||||||||||||||||||||||||||||||||||||||||||||
The battle lasted just long enough for Maxie to escape in his souped-up submarine. You've got to chase after him to the Seafloor Cavern, but you have no means of diving underwater like he can in his sub. For now, you'll have to keep to the surface. Head west then north and take the warp panel there back to the cave entrance and Lilycove City. The Grunt and his Wailmer blockade have disappeared from the beach, leaving you free to venture out into the eastern ocean.
Aqua HideoutS
Team Aqua has been working hard to build an impressive hideout in this spacious cave near Lilycove City. Storming this heavily-guarded base won't be easy, but you must risk it all to prevent Archie's misguided vision from becoming reality!
| Trainers | ||||||||||||||||||||||||||||||||||||||||||||||||||||||||||||||||||||||||||||||||||||||||||||||||||||||||||||||||||||||||||||||||||||||
|---|---|---|---|---|---|---|---|---|---|---|---|---|---|---|---|---|---|---|---|---|---|---|---|---|---|---|---|---|---|---|---|---|---|---|---|---|---|---|---|---|---|---|---|---|---|---|---|---|---|---|---|---|---|---|---|---|---|---|---|---|---|---|---|---|---|---|---|---|---|---|---|---|---|---|---|---|---|---|---|---|---|---|---|---|---|---|---|---|---|---|---|---|---|---|---|---|---|---|---|---|---|---|---|---|---|---|---|---|---|---|---|---|---|---|---|---|---|---|---|---|---|---|---|---|---|---|---|---|---|---|---|---|---|---|
| ||||||||||||||||||||||||||||||||||||||||||||||||||||||||||||||||||||||||||||||||||||||||||||||||||||||||||||||||||||||||||||||||||||||
| Available Pokémon | |||||||||||||||||||||||||||||||||||||||||||||||||||||||||
|---|---|---|---|---|---|---|---|---|---|---|---|---|---|---|---|---|---|---|---|---|---|---|---|---|---|---|---|---|---|---|---|---|---|---|---|---|---|---|---|---|---|---|---|---|---|---|---|---|---|---|---|---|---|---|---|---|---|
| |||||||||||||||||||||||||||||||||||||||||||||||||||||||||
| Items | ||||||||||||||||||||||||||||||||||||||||||||||||||||||
|---|---|---|---|---|---|---|---|---|---|---|---|---|---|---|---|---|---|---|---|---|---|---|---|---|---|---|---|---|---|---|---|---|---|---|---|---|---|---|---|---|---|---|---|---|---|---|---|---|---|---|---|---|---|---|
| ||||||||||||||||||||||||||||||||||||||||||||||||||||||
1F
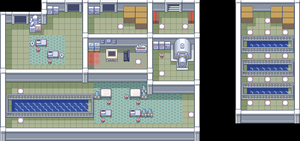
Climb out of the water and up the stairway. At the top, a single Aqua Grunt patrols around the pool of water. Battle him and head down the stairs to the northeast.
B1F (west)
There are two warp panels in the northeast room; take the eastern panel first to reach the east-central room and a Max Elixir. Warp back and take the other to reach the northwest panel in the southern room. Pass by the two Aqua Grunts and take the warp panel in the southwest.
B1F (east)
The previous warp panel leads to a small room with several more. Follow them in the correct order—left, center, left, left—to reach the interior room on B1F.
B1F (west)
In Archie's office, you'll find four items near the far wall. Two of them are actually Electrode in disguise, while the bottom-left item is a Nugget and the top-left item is a Master Ball! This type of Poké Ball will catch any wild Pokémon without fail, and is best used on hard-to-catch legendary Pokémon. Backtrack through the warp-filled hallway to B1F's southern room, and step on the southeast warp panel. This transports you to the north-central room; head down the stairs to B2F.
B2F
Go south and step on the warp panel there to be transported a short distance to the west; collect the Nest Ball from this enclosed area before warping back. Head northeast past another patrolling Aqua Grunt and take the warp panel there to the northwest room. Climb the stairs back to B1F.
B1F (west)
Battle past the single Aqua Grunt here and head down the stairs to the northeast.
B2F
Battle the female Aqua Grunt and step on the warp panel to the southwest; this leads to the southeast corner of B2F. Go west to find one of the Aqua Admins, Matt, standing at the water's edge. He's the only thing standing between you and stopping Archie's getaway!
| |||||||||||||||||||||||||||||||||||||||||||||||||||||||||||||||||||||||||||||||||||||||||||
The battle lasted just long enough for Archie to escape in his souped-up submarine. You've got to chase after him to the Seafloor Cavern, but you have no means of diving underwater like he can in his sub. For now, you'll have to keep to the surface. Head south then east and take the warp panel there back to the cave entrance and Lilycove City. The Grunt and his Wailmer blockade have disappeared from the beach, leaving you free to venture out into the eastern ocean.
Route 124
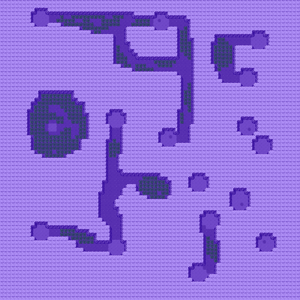
Route 124 holds all sorts of treasure, but most lie on the ocean floor far below. It's not possible to fully explore the area without a certain field move, so for now the route simply serves as a connector between Lilycove to the west, Route 126 to the south, and Mossdeep City to the east.
| Trainers | ||||||||||||||||||||||||||||||||||||||||||||||||||||||||||||||||||||||||||||||||||||||||||||||||||||||||||||||||||||||||||||||||
|---|---|---|---|---|---|---|---|---|---|---|---|---|---|---|---|---|---|---|---|---|---|---|---|---|---|---|---|---|---|---|---|---|---|---|---|---|---|---|---|---|---|---|---|---|---|---|---|---|---|---|---|---|---|---|---|---|---|---|---|---|---|---|---|---|---|---|---|---|---|---|---|---|---|---|---|---|---|---|---|---|---|---|---|---|---|---|---|---|---|---|---|---|---|---|---|---|---|---|---|---|---|---|---|---|---|---|---|---|---|---|---|---|---|---|---|---|---|---|---|---|---|---|---|---|---|---|---|---|
| ||||||||||||||||||||||||||||||||||||||||||||||||||||||||||||||||||||||||||||||||||||||||||||||||||||||||||||||||||||||||||||||||
| Available Pokémon | ||||||||||||||||||||||||||||||||||||||||||||||||||||||||||||||||||||||||||||||||||||||||||||||||||||||||||||||||||||||||||||||||||||||||||||||||||||||||||||||||||||||||||||||||||||||||
|---|---|---|---|---|---|---|---|---|---|---|---|---|---|---|---|---|---|---|---|---|---|---|---|---|---|---|---|---|---|---|---|---|---|---|---|---|---|---|---|---|---|---|---|---|---|---|---|---|---|---|---|---|---|---|---|---|---|---|---|---|---|---|---|---|---|---|---|---|---|---|---|---|---|---|---|---|---|---|---|---|---|---|---|---|---|---|---|---|---|---|---|---|---|---|---|---|---|---|---|---|---|---|---|---|---|---|---|---|---|---|---|---|---|---|---|---|---|---|---|---|---|---|---|---|---|---|---|---|---|---|---|---|---|---|---|---|---|---|---|---|---|---|---|---|---|---|---|---|---|---|---|---|---|---|---|---|---|---|---|---|---|---|---|---|---|---|---|---|---|---|---|---|---|---|---|---|---|---|---|---|---|---|---|---|
| ||||||||||||||||||||||||||||||||||||||||||||||||||||||||||||||||||||||||||||||||||||||||||||||||||||||||||||||||||||||||||||||||||||||||||||||||||||||||||||||||||||||||||||||||||||||||
| Items | ||||||||||||||||||||||||||||||||||||||||||||||||||||||||||||||||||||||||||
|---|---|---|---|---|---|---|---|---|---|---|---|---|---|---|---|---|---|---|---|---|---|---|---|---|---|---|---|---|---|---|---|---|---|---|---|---|---|---|---|---|---|---|---|---|---|---|---|---|---|---|---|---|---|---|---|---|---|---|---|---|---|---|---|---|---|---|---|---|---|---|---|---|---|---|
| ||||||||||||||||||||||||||||||||||||||||||||||||||||||||||||||||||||||||||
Treasure Hunter's House
The Treasure Hunter's house stands on a small island to the southeast. He loves to collect Shards, and is happy to trade for them with certain Evolution stones. The kind of Shard you trade him determines the kind of stone you get in return.
| Shard Given | Stone Received | ||
|---|---|---|---|
| Red Shard | Fire Stone | ||
| Yellow Shard | Thunderstone | ||
| Blue Shard | Water Stone | ||
| Green Shard | Leaf Stone | ||
|
Ruby and Sapphire walkthrough |
|

|
This article is part of Project Walkthroughs, a Bulbapedia project that aims to write comprehensive step-by-step guides on each Pokémon game. |


