Appendix:Pokémon Stadium walkthrough/Section 1: Difference between revisions
Chickasaurus (talk | contribs) |
mNo edit summary |
||
| (16 intermediate revisions by 9 users not shown) | |||
| Line 1: | Line 1: | ||
== Introduction == | == Introduction == | ||
Welcome to {{Eng|Pokémon Stadium}} | Welcome to {{Eng|Pokémon Stadium}}! Before you begin to play, there are some features that you should be aware of. (If you ''do'' know how to play, then you can skip this section.) This walkthrough will not only help you understand how to play the game, but give you an in-depth rundown of all the features and how to use them properly. | ||
== | == Stadium Mode == | ||
The main mode for the game is '''Stadium Mode'''. Here, you battle against eight Trainers representing different levels of difficulty, in one of four cups: [[Pika Cup]], [[Petit Cup]], [[Poké Cup]], and [[Prime Cup]]. For a more detailed run down, refer to the "[[Appendix:Pokémon Stadium walkthrough/Section 3|Stadium Mode]]" section of this walkthrough. | |||
=== | == Gym Leader Castle == | ||
: | The '''Gym Leader Castle''' is the secondary mode for the game. More difficult even than Stadium Mode, in the Gym Leader Castle you must battle your Pokémon against the eight [[Pokémon Gyms]], face the [[Elite Four]], and finally defeat your [[Blue (game)|Rival]]. Winning here rewards you with one of eight Pokémon that can only be obtained in the [[core series]] games once. More details for this mode can be found in the "[[Appendix:Pokémon Stadium walkthrough/Section 2|Gym Leader Castle]]" section of this walkthrough. | ||
== Vs. Mewtwo == | |||
'''Vs. Mewtwo''' is a special mode that is only available if you complete both the Stadium and Gym Leader Castle modes. Mewtwo's silhouette appears over the stadium. Mewtwo is Lv. 100 and battles under "anything goes" freestyle rules. Details can be found in the "[[Appendix:Pokémon Stadium walkthrough/Section 4|Post-Stadium/Castle]]" section of this walkthrough. | |||
== Free Battle == | |||
'''Free Battle''' is a mode that allows you to play against a friend or the computer AI for fun. The rules are similar to that of [[Battle Tower]], and are thus: | |||
*Pokémon battles consist of Pokémon at level 50, 100, or free-for-all. | |||
*The number of Pokémon on your team can range from one to six. | |||
*Your opponent's team can be selected by you. | |||
*You can use your own Pokémon. | |||
*When playing with more than two players, up to three Pokémon can be chosen for the team(s) with two players. | |||
== Rental Pokémon == | |||
Pokémon battles make up the "backbone" of the game. In the core series games, trainers generally battle using strictly their own Pokémon. However, Stadium utilizes a system of "Rental Pokémon", as well as the ability to battle with your own via the [[Transfer Pak]] (see below). | |||
Rental Pokémon, as the name suggests, are Pokémon provided for your use in game battles on a temporary or "rental" basis. Their [[ID]]'s are "00000", and the [[OT]] is "Trainer". Unlike the core series games, in which high-level Pokémon may not always follow orders, Rental Pokémon will obey you. At first, there are 149 Pokémon available to rent instead of 151, as {{p|Mewtwo}} and {{p|Mew}} need to be unlocked. Rental Pokémon levels are preset according to the game's different battle rules. All of them have standard moves and stats. Finally, Rental Pokémon cannot be transferred. | |||
== Prof. Oak's Lab == | == Prof. Oak's Lab == | ||
Prof. Oak has his lab set up next the stadium | [[Prof. Oak]] has his lab set up next the stadium, and is accessible only if you have a Transfer Pak. Inside, you can view your Pokémon in 3D, move items, and [[trade]] with another game (see below). If you have completed certain events, then prize Pokémon can be transferred as well. | ||
=== Transfer Pak === | === Transfer Pak === | ||
The [[Transfer Pak]] is a physical add-on accessory that works only with Pokémon Stadium. It allows you to battle using your own Pokémon from {{3v|Red|Blue|Yellow}} instead of Stadium's Rental Pokémon. It also allows you to save your Pokémon on the game, but their data is ''completely'' transferred, not just copied, although they can be transferred back and forth. The Transfer Pak also allows items to be transferred from the [[Bag]] to the [[PC]], and allows you to reshuffle your PC boxes. In addition, you can trade with another game that is plugged into another Transfer Pak. | |||
== Gallery == | == Gallery == | ||
This is used to take pictures of Pokémon from a Red, Blue, or Yellow cartridge inserted into the | This is used to take pictures of Pokémon from a Red, Blue, or Yellow cartridge inserted into the Transfer Pak or any rental Pokémon. Any of the game's arenas can be selected for a backdrop and the photos are stored in an in-game album. These pictures can be printed out as stickers (in 16×1 or 4×4 sizes) via the Sticker Station. Only 24 shots per Pokémon. | ||
== GB Tower == | |||
The [[Game Boy Tower]] is a [[Game Boy]] shaped tower located on the right side of the map. Here, you can play any of the [[Generation I]] games within Pokémon Stadium using a Transfer Pak. The Tower has three modes: Normal, {{p|Doduo}}, and {{p|Dodrio}}. In Normal mode, which is available at the start, speed and graphics are at regular levels. Doduo mode increases the game's speed to double, and can be accessed when you win Stadium Mode once. Dodrio mode increases the speed to four times as much, and is only available if you beat Stadium Mode twice. To activate these modes, if they are available, press the yellow arrow button pointing to the right. | |||
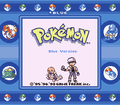
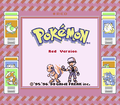
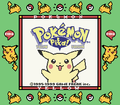
The border surrounding the playing screen is different for each of the three Generation I games, as well as for each speed mode. The change the background back and forth, press the "Z" button. | |||
<gallery> | |||
File:SGB Blue E.png|{{game|Red and Blue|s|Pokémon Blue}} | |||
File:SGB Red E.png|{{game|Red and Blue|s|Pokémon Red}} | |||
File:SGB Yellow E.png|{{game|Yellow}} | |||
</gallery> | |||
== Kid's Club == | |||
The '''Kid's Club''' provides mini-games to play as a break from battling Pokémon. There are nine mini-games to choose from and four levels of difficulty. More details can be found in the "[[Appendix:Pokémon Stadium walkthrough/Section 4|Post-Stadium/Castle]]" section of this walkthrough. | |||
{{WalkthroughPrevNext | | |||
gamename=Pokémon Stadium| | |||
prev=no | | |||
next=yes | | |||
prevsection=no | | |||
nextsection=2 | | |||
prevname=no | | |||
nextname=Gym Leader Castle | | |||
}} | |||
{{Project Walkthroughs notice}} | |||
[[Category:Pokémon Stadium walkthrough]] | |||
Latest revision as of 18:37, 23 January 2020
Introduction
Welcome to Pokémon Stadium! Before you begin to play, there are some features that you should be aware of. (If you do know how to play, then you can skip this section.) This walkthrough will not only help you understand how to play the game, but give you an in-depth rundown of all the features and how to use them properly.
Stadium Mode
The main mode for the game is Stadium Mode. Here, you battle against eight Trainers representing different levels of difficulty, in one of four cups: Pika Cup, Petit Cup, Poké Cup, and Prime Cup. For a more detailed run down, refer to the "Stadium Mode" section of this walkthrough.
Gym Leader Castle
The Gym Leader Castle is the secondary mode for the game. More difficult even than Stadium Mode, in the Gym Leader Castle you must battle your Pokémon against the eight Pokémon Gyms, face the Elite Four, and finally defeat your Rival. Winning here rewards you with one of eight Pokémon that can only be obtained in the core series games once. More details for this mode can be found in the "Gym Leader Castle" section of this walkthrough.
Vs. Mewtwo
Vs. Mewtwo is a special mode that is only available if you complete both the Stadium and Gym Leader Castle modes. Mewtwo's silhouette appears over the stadium. Mewtwo is Lv. 100 and battles under "anything goes" freestyle rules. Details can be found in the "Post-Stadium/Castle" section of this walkthrough.
Free Battle
Free Battle is a mode that allows you to play against a friend or the computer AI for fun. The rules are similar to that of Battle Tower, and are thus:
- Pokémon battles consist of Pokémon at level 50, 100, or free-for-all.
- The number of Pokémon on your team can range from one to six.
- Your opponent's team can be selected by you.
- You can use your own Pokémon.
- When playing with more than two players, up to three Pokémon can be chosen for the team(s) with two players.
Rental Pokémon
Pokémon battles make up the "backbone" of the game. In the core series games, trainers generally battle using strictly their own Pokémon. However, Stadium utilizes a system of "Rental Pokémon", as well as the ability to battle with your own via the Transfer Pak (see below).
Rental Pokémon, as the name suggests, are Pokémon provided for your use in game battles on a temporary or "rental" basis. Their ID's are "00000", and the OT is "Trainer". Unlike the core series games, in which high-level Pokémon may not always follow orders, Rental Pokémon will obey you. At first, there are 149 Pokémon available to rent instead of 151, as Mewtwo and Mew need to be unlocked. Rental Pokémon levels are preset according to the game's different battle rules. All of them have standard moves and stats. Finally, Rental Pokémon cannot be transferred.
Prof. Oak's Lab
Prof. Oak has his lab set up next the stadium, and is accessible only if you have a Transfer Pak. Inside, you can view your Pokémon in 3D, move items, and trade with another game (see below). If you have completed certain events, then prize Pokémon can be transferred as well.
Transfer Pak
The Transfer Pak is a physical add-on accessory that works only with Pokémon Stadium. It allows you to battle using your own Pokémon from Red, Blue, and Yellow Versions instead of Stadium's Rental Pokémon. It also allows you to save your Pokémon on the game, but their data is completely transferred, not just copied, although they can be transferred back and forth. The Transfer Pak also allows items to be transferred from the Bag to the PC, and allows you to reshuffle your PC boxes. In addition, you can trade with another game that is plugged into another Transfer Pak.
Gallery
This is used to take pictures of Pokémon from a Red, Blue, or Yellow cartridge inserted into the Transfer Pak or any rental Pokémon. Any of the game's arenas can be selected for a backdrop and the photos are stored in an in-game album. These pictures can be printed out as stickers (in 16×1 or 4×4 sizes) via the Sticker Station. Only 24 shots per Pokémon.
GB Tower
The Game Boy Tower is a Game Boy shaped tower located on the right side of the map. Here, you can play any of the Generation I games within Pokémon Stadium using a Transfer Pak. The Tower has three modes: Normal, Doduo, and Dodrio. In Normal mode, which is available at the start, speed and graphics are at regular levels. Doduo mode increases the game's speed to double, and can be accessed when you win Stadium Mode once. Dodrio mode increases the speed to four times as much, and is only available if you beat Stadium Mode twice. To activate these modes, if they are available, press the yellow arrow button pointing to the right.
The border surrounding the playing screen is different for each of the three Generation I games, as well as for each speed mode. The change the background back and forth, press the "Z" button.
Kid's Club
The Kid's Club provides mini-games to play as a break from battling Pokémon. There are nine mini-games to choose from and four levels of difficulty. More details can be found in the "Post-Stadium/Castle" section of this walkthrough.
| Pokémon Stadium walkthrough |
|

|
This article is part of Project Walkthroughs, a Bulbapedia project that aims to write comprehensive step-by-step guides on each Pokémon game. |


