Appendix:Platinum walkthrough/Section 22: Difference between revisions
mNo edit summary |
m (→Celestic Town) |
||
| (2 intermediate revisions by 2 users not shown) | |||
| Line 1: | Line 1: | ||
== | ==Trophy Garden== | ||
{| class="expandable" align="center" style="background: #{{platinum color}}; {{roundy|10px}}; border: 5px solid #{{platinum color light}};" | {| class="expandable" align="center" style="background: #{{platinum color}}; {{roundy|10px}}; border: 5px solid #{{platinum color light}};" | ||
|- align="center" | |- align="center" | ||
| Line 6: | Line 5: | ||
|- | |- | ||
| | | | ||
{ | {{catch/header|land}} | ||
| | {{catch/entry4|025|Pikachu|no|no|yes|Grass|22,24|all=10%|type1=electric}} | ||
{{catch/entry4|172|Pichu|no|no|yes|Grass|21-22|all=30%|type1=electric}} | |||
| | {{catch/entry4|315|Roselia|no|no|yes|Grass|22-23|all=30%|type1=grass|type2=poison}} | ||
| | {{catch/entry4|397|Staravia|no|no|yes|Grass|22,24|20%|0%|0%|type2=flying}} | ||
{{catch/entry4|397|Staravia|no|no|yes|Grass|22-24|0%|30%|0%|type2=flying}} | |||
{{catch/entry4| | {{catch/entry4|397|Staravia|no|no|yes|Grass|24|0%|0%|10%|type2=flying}} | ||
{{catch/entry4| | {{catch/entry4|402|Kricketune|no|no|yes|Grass|23|10%|0%|0%|type1=bug}} | ||
{{catch/entry4| | {{catch/entry4|402|Kricketune|no|no|yes|Grass|22-23|0%|0%|20%|type1=bug}} | ||
{{catch/entry4| | |||
{{catch/entry4| | |||
{{catch/entry4| | |||
{{catch/entry4| | |||
{{catch/div|land|Special}} | {{catch/div|land|Special}} | ||
{{catch/entry4| | {{catch/entry4|035|Clefairy|no|no|yes|Backlot|22|all=5%}} | ||
{{catch/entry4|039|Jigglypuff|no|no|yes|Backlot|22|all=5%}} | |||
{{catch/entry4|052|Meowth|no|no|yes|Backlot|22|all=5%}} | |||
{{catch/entry4|113|Chansey|no|no|yes|Backlot|22|all=5%}} | |||
{{catch/entry4|132|Ditto|no|no|yes|Backlot|22|all=5%}} | |||
{{catch/entry4|133|Eevee|no|no|yes|Backlot|22|all=5%}} | |||
{{catch/entry4|173|Cleffa|no|no|yes|Backlot|22|all=5%}} | |||
{{catch/entry4|174|Igglybuff|no|no|yes|Backlot|22|all=5%}} | |||
{{catch/entry4|183|Marill|no|no|yes|Backlot|22|all=5%|type1=water}} | |||
{{catch/entry4|298|Azurill|no|no|yes|Backlot|22|all=5%}} | |||
{{catch/entry4|311|Plusle|no|no|yes|Backlot|22|all=5%|type1=electric}} | |||
{{catch/entry4| | {{catch/entry4|312|Minun|no|no|yes|Backlot|22|all=5%|type1=electric}} | ||
{{catch/entry4|351|Castform|no|no|yes|Backlot|22|all=5%}} | |||
{{catch/entry4|438|Bonsly|no|no|yes|Backlot|22|all=5%|type1=rock}} | |||
{{catch/entry4| | {{catch/entry4|439|Mime Jr.|no|no|yes|Backlot|22|all=5%|type1=psychic}} | ||
{{catch/entry4| | {{catch/entry4|440|Happiny|no|no|yes|Backlot|22|all=5%}} | ||
{{catch/entry4| | |||
{{catch/entry4| | |||
{{catch/entry4| | |||
{{catch/entry4| | |||
{{catch/entry4| | |||
{{catch/entry4| | |||
{{catch/entry4| | |||
{{catch/entry4| | |||
{{catch/entry4| | |||
{{catch/entry4| | |||
{{catch/entry4| | |||
{{catch/entry4| | |||
{{catch/footer|land}} | {{catch/footer|land}} | ||
|} | |} | ||
There are many Pokémon that can be found here without any interaction with the [[Trophy Garden]]'s owner, [[Mr. Backlot]]. All of these Pokémon are in the [[List of Pokémon by Sinnoh Pokédex number|Sinnoh Pokédex]], and many can be found in other areas. After you have gotten the [[National Pokédex]] upgrade, however, you can talk to [[Mr. Backlot]] and he will mention a particular rare Pokémon in his garden. That Pokémon will be placed in the Trophy Garden by Backlot's butler to cover up for his fibs. The butler can place a different one there daily. The last two Pokémon placed in the garden at any given time will remain available until more Pokémon are placed in the garden. | |||
==Pal Park== | |||
Fly to Pal Park. Now you're free to go inside! You'll meet Professor Oak who will explain that Pal Park can be used to import Pokémon from [[Hoenn]] and [[Kanto]]. He gives you the {{DL|Pokétch|Trainer Counter}} app for your Pokétch and then leaves for [[Eterna City]]. You can import Pokémon from Pokémon {{5v|Ruby|Sapphire|Emerald|FireRed|LeafGreen}}, by inserting the GBA cartridge into the front slot of your [[Nintendo DS]] or [[Nintendo DS Lite|DS Lite]] and selecting "Migrate" from the opening menu. | |||
You can get the {{DL|Pokétch|Kitchen Timer}} app from a girl in [[Pal Park]]'s lobby after showing a {{p|Snorlax}} to her and the {{DL|Pokétch|Color Changer}} app after receiving the Kitchen Timer and showing a {{p|Kecleon}} to her. | |||
You will need to import {{p|Regirock}}, {{p|Regice}}, and {{p|Registeel}} in order to catch {{p|Regigigas}} in the [[Snowpoint Temple]], unless you have an [[List of local English event Pokémon distributions in Generation IV|event Regigigas]]. | |||
==Canalave City== | |||
Your next destination is [[Canalave City]]. Enter Sailor [[Eldritch]]'s house in the southwestern area of town. You'll see that his son is trapped in a nightmare. Talk to his mother and you'll learn that you need to find an item called the [[Lunar Feather|Lunar Wing]] on [[Fullmoon Island]] to save him. Talk to Sailor Eldritch and he will take you to Fullmoon Island. | |||
==Fullmoon Island== | |||
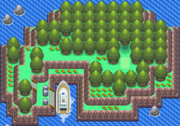
[[File:Fullmoon Island DP.png|left|thumb|180px|Fullmoon Island]] | |||
[[File:Fullmoon Island Cresselia Pt.png|right|thumb|180px|Cresselia]] | |||
{| class="expandable" align="center" style="background: #{{platinum color}}; {{roundy|10px}}; border: 5px solid #{{platinum color light}};" | {| class="expandable" align="center" style="background: #{{platinum color}}; {{roundy|10px}}; border: 5px solid #{{platinum color light}};" | ||
|- align="center" | |- align="center" | ||
! Items | ! Items | ||
|- | |- | ||
| | |{{itlisth}} | ||
{{Itemlist|Lunar Wing|In clearing, once Cresselia has fled|D=no|P=no|Pt=yes|display=[[Lunar Feather|Lunar Wing]]}} | |||
{{itlistfoot}} | |||
{{itlisth | |||
{{Itemlist| | |||
{{itlistfoot | |||
|} | |} | ||
{| class="expandable" align="center" style="background: #{{platinum color}}; {{roundy|10px}}; border: 5px solid #{{platinum color light}};" | |||
Follow the path and head into the forest clearing where {{p|Cresselia}} is. When you interact with her, she will flee, but she leaves the Lunar Wing behind. Return to Eldritch and have him take you back to Canalave City, then return to the house and use the Lunar Wing to heal his son. As for Cresselia, she's similar to {{p|Mesprit}}, {{p|Zapdos}}, {{p|Articuno}}, and {{p|Moltres}}— she is [[Roaming Pokémon|roaming]] around the Sinnoh region so you need to use the Marking Map to track her. | |||
==Snowpoint Temple== | |||
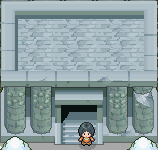
[[File:Snowpoint Temple DPPt.png|right|thumb|180px|Outside the Snowpoint Temple]] | |||
{| class="expandable" align="center" style="background: #{{platinum color}}; {{roundy|10px}}; border: 5px solid #{{platinum color light}};" | |||
|- align="center" | |- align="center" | ||
! | ! Available Pokémon | ||
|- | |- | ||
| | |{{catch/header|snow|4}} | ||
{{ | {{catch/div|snow|1F}} | ||
{{ | {{catch/entry4|042|Golbat|no|no|yes|Cave|47-50|all=80%|type1=Poison|type2=Flying}} | ||
{{ | {{catch/entry4|215|Sneasel|no|no|yes|Cave|49|all=10%|type1=Dark|type2=Ice}} | ||
{{ | {{catch/entry4|238|Smoochum|no|no|yes|Cave|47,49|all=10%|type1=Ice|type2=Psychic}} | ||
{{ | {{catch/div|snow|B1F}} | ||
{{catch/entry4|042|Golbat|no|no|yes|Cave|47-50|all=80%|type1=Poison|type2=Flying}} | |||
{{catch/entry4|124|Jynx|no|no|yes|Cave|47,49|all=10%|type1=Ice|type2=Psychic}} | |||
{{catch/entry4|215|Sneasel|no|no|yes|Cave|49|all=10%|type1=Dark|type2=Ice}} | |||
{{catch/div|snow|B2F-B3F}} | |||
{{catch/entry4|042|Golbat|no|no|yes|Cave|47-50|all=80%|type1=Poison|type2=Flying}} | |||
{{catch/entry4|124|Jynx|no|no|yes|Cave|48,50|all=10%|type1=Ice|type2=Psychic}} | |||
{{catch/entry4|215|Sneasel|no|no|yes|Cave|50|all=10%|type1=Dark|type2=Ice}} | |||
{{catch/div|snow|B4F-B5F}} | |||
{{catch/entry4|042|Golbat|no|no|yes|Cave|47-50|all=80%|type1=Poison|type2=Flying}} | |||
{{catch/entry4|124|Jynx|no|no|yes|Cave|49,51|all=10%|type1=Ice|type2=Psychic}} | |||
{{catch/entry4|215|Sneasel|no|no|yes|Cave|51|all=10%|type1=Dark|type2=Ice}} | |||
{{catch/footer|snow}} | |||
|} | |} | ||
{| class="expandable" align="center" style="background: #{{platinum color}}; {{roundy|10px}}; border: 5px solid #{{platinum color light}};" | {| class="expandable" align="center" style="background: #{{platinum color}}; {{roundy|10px}}; border: 5px solid #{{platinum color light}};" | ||
|- align="center" | |- align="center" | ||
! | ! Items | ||
|- | |- | ||
| | |{{itlisth|snow}} | ||
{{itlisth| | {{Itemlist|Calcium|B1F|Pt=yes}} | ||
{{ | {{Itemlist|Full Restore|B3F, in second stone from top of ice ''(hidden)''|Pt=yes}} | ||
{{ | {{Itemlist|Full Heal|B4F, (Requires {{m|Strength}})|Pt=yes}} | ||
{{itlistfoot|snow}} | |||
{{ | |||
| | |||
{{itlistfoot| | |||
|} | |} | ||
If you | You will need {{p|Regirock}}, {{p|Regice}}, and {{p|Registeel}} in your party for this mission if you want to battle and catch {{p|Regigigas}}. Your only option is to migrate them from {{3v2|Ruby|Sapphire|Emerald}} through [[Pal Park]] or, with the aid of a Regigigas received from a special {{pkmn2|event}}, [[Appendix:Platinum walkthrough/Catching the Legendary titans|catch them]] before returning here. If you're planning to catch Regigigas, you will want a Pokémon with {{m|False Swipe}} and plenty of [[Nest Ball]]s. | ||
When you approach the temple, the guard states that you are not qualified to enter, but [[Candice]] appears and says that you are. | |||
===1F=== | |||
[[File:Snowpoint Temple 1F DPPt.png|left|thumb|180px|Snowpoint Temple 1F]] | |||
Travel down the stairs to B1F. | |||
===B1F=== | |||
[[File:Snowpoint Temple B1F DPPt.png|right|thumb|180px|Snowpoint Temple B1F]] | |||
Carefully slide down the ice and reach the stairs to B2F. | |||
===B2F=== | |||
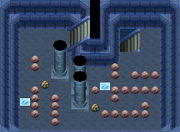
[[File:Snowpoint Temple B2F DPPt.png|left|thumb|180px|Snowpoint Temple B2F]] | |||
{{m|Rock Smash}} can help here, although you do not actually need it to get through. After following the path, take the stairs to B3F. | |||
===B3F=== | |||
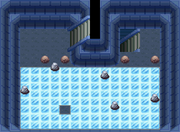
[[File:Snowpoint Temple B3F DPPt.png|right|thumb|180px|Snowpoint Temple B3F]] | |||
Sliding on the ice is a bit tricky. First, slide until you got to the part where there is no ice. Next slide ←, ↑, →, then ↑ to reach the stairs. You can now go to B4F. | |||
===B4F=== | |||
[[File:Snowpoint Temple B4F DPPt.png|left|thumb|180px|Snowpoint Temple B4F]] | |||
While there is nothing to worry about you can use {{m|Strength}} and move the boulder ↑, →, → to be able to reach the item. When ready use the stairs to descend to BF5, the final floor. | |||
===BF5=== | |||
[[File:Snowpoint Temple B5F DPPt.png|right|thumb|180px|Snowpoint Temple B5F]] | |||
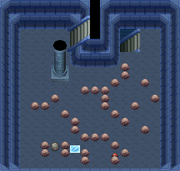
While this new sliding puzzle looks difficult, it can be easy with the right steps. From the tile next to the first rock nearest your entry point travel ↓ to reach the unfrozen tile southwest of Regigigas. Now very carefully slide in this order: ↓, →, ↑, ←, ↓, →, ↑ to reach Regigigas. If you have the three Regis in your party, Regigigas will awaken and face you when you interact with it. '''Save the game''' before interacting with it. | |||
{{Pokémon/4 | |||
|game=Platinum | |||
|ndex=486 | |||
|pokemon=Regigigas | |||
|type1=Normal | |||
|level=1 | |||
|ability=Slow Start | |||
|move1=Dizzy Punch|move1type=Normal|move1cat=Physical | |||
|move2=Knock Off|move2type=Dark|move2cat=Physical | |||
|move3=Confuse Ray|move3type=Ghost|move3cat=Status | |||
|move4=Foresight|move4type=Normal|move4cat=Status}} | |||
It may come as a bit of a shock that Regigigas is only Level 1! Use False Swipe to reduce its HP bar to the red zone and then throw [[Dusk Ball]]s or [[Nest Ball]]s until you catch it. Hopefully, it won't be too much trouble. | |||
Once it's captured, exit the temple and {{m|Fly}} to [[Celestic Town]]. | |||
==Mt. Coronet (south)== | |||
[[File:Mt Coronet 1F tunnel Pt.png|left|thumb|180px|Tunnel]] | |||
''Before heading out, make sure that you have Pokémon with the HMs {{m|Surf}}, {{m|Waterfall}}, {{m|Strength}}, {{m|Rock Smash}}, and {{m|Rock Climb}}.'' | |||
Backtrack your way to the area where you were first outside in the summit earlier. ''(See {{DL|Appendix:Platinum walkthrough/Section 17|Mt. Coronet South Side (second visit)|this section}} for a refresher on how to get there.)'' Then, use the eastern entrance to the part of Mt. Coronet 4F below the waterfall. Climb the waterfall and go inside the cave to find the [[Adamant Orb]] and the [[Lustrous Orb]] (as well as the hidden [[Stone Plate]]). You will need both Orbs to catch {{p|Dialga}} and {{p|Palkia}}. | |||
If you return to the tunnel, since [[Team Galactic]] is gone now, you can go through the door that was previously inaccessible. That will take you to Mt. Coronet's north area, where you can find {{TM|02|Dragon Claw}} (as well as the hidden [[Nugget]] on the rock just north of it). | |||
==Celestic Town== | |||
In order to battle {{p|Dialga}} and {{p|Palkia}}, you must first talk to [[Professor Carolina|Cynthia's grandmother]]. If you got the [[Adamant Orb]] or [[Lustrous Orb]] at [[Mt. Coronet]] earlier after beating the [[Sunyshore Gym]], Cynthia's grandmother will explain their connection to {{p|Dialga}} and {{p|Palkia}}. Now, they will appear when you return to [[Spear Pillar]]. | |||
Fly to [[Oreburgh City]] and go north from there to Mt. Coronet's entrance. You'll need the HMs {{m|Surf}}, {{m|Strength}}, {{m|Rock Smash}}, and {{m|Rock Climb}}, as well as several [[Timer Ball]]s, [[Net Ball]]s, or [[Dusk Ball]]s. It's time to head back to Spear Pillar! ''(See [[Appendix:Platinum walkthrough/Section 16|this section]] if you need a refresher on how to get there.)'' | |||
==Spear Pillar== | |||
Here, you'll see a blue dimensional rift which is another dimension where Dialga is. '''Save your game''', then interact with it to challenge Dialga. After that, step back inside Mt. Coronet and quickly return. This time, a purple-colored rift will appear: Palkia. | |||
{| | |||
|- | |||
|{{Pokémon/4 | |||
|game=Platinum | |||
|ndex=483 | |||
|pokemon=Dialga | |||
|type1=Steel | |||
|type2=Dragon | |||
|level=70 | |||
|ability=Pressure | |||
|move1=Roar of Time|move1type=Dragon|move1cat=Special | |||
|move2=Heal Block|move2type=Psychic|move2cat=Status | |||
|move3=Earth Power|move3type=Ground|move3cat=Special | |||
|move4=Slash|move4type=Normal|move4cat=Physical}} | |||
|{{Pokémon/4 | |||
|game=Platinum | |||
|ndex=484 | |||
|pokemon=Palkia | |||
|type1=Water | |||
|type2=Dragon | |||
|level=70 | |||
|ability=Pressure | |||
|move1=Spacial Rend|move1type=Dragon|move1cat=Special | |||
|move2=Heal Block|move2type=Psychic|move2cat=Status | |||
|move3=Earth Power|move3type=Ground|move3cat=Special | |||
|move4=Slash|move4type=Normal|move4cat=Physical}} | |||
|} | |||
When you face them, be careful as they are at Lv. 70. Make sure your team is at least Lv. 65 or higher. Weaken them with [[Damage modification|normally-effective]] moves and inflict either {{status|paralysis}} or {{status|sleep}}. They have {{m|Earth Power}} to counter {{type|Steel}}s that could withstand their other moves, but certain Steel-types like {{p|Skarmory}} or {{p|Bronzong}} still work for the resistance tactic as their additional types (or {{a|Levitate|ability}}) prevent supereffective damage. Additionally, {{p|Shedinja}} is immune to all their moves. | |||
[[ | |||
Net Balls will make it easier to catch Palkia, as it is part Water-type. When playing at {{DL|time|Generation IV|night}}, [[Dusk Ball]]s will work great on both Legendaries. | |||
==Turnback Cave== | ==Turnback Cave== | ||
[[File:Turnback Cave Entrance Pt.png|180px|thumb|left|Turnback Cave Entrance]] | [[File:Turnback Cave Entrance Pt.png|180px|thumb|left|Turnback Cave Entrance]] | ||
[[File:Turnback Cave Pillar Room DPPt.png|right|180px|thumb|Pillar Room]] | [[File:Turnback Cave Pillar Room DPPt.png|right|180px|thumb|Pillar Room]] | ||
It's time to return to [[Turnback Cave]] and the [[Distortion World]] to catch {{p|Giratina}} if you didn't already. If you didn't catch Giratina yet, you'll want to take about 40 [[Dusk Ball]]s with you. Either way, there is an important item to pick up. Return to {{rt|214}} and head through [[Spring Path]], which will take you back to Sendoff Spring. Enter [[Turnback Cave]] at the north side of the lake. | |||
Use {{m|Defog}} to remove the [[fog]]. Read the pillar that says ''"...Past three pillars...to the sleeping... ...before 30 is surpassed..."''. It means that to access the room with a portal to the [[Distortion World]], you must find 3 rooms with a pillar before going through 30 rooms. This cave is highly unusual in that the layout of rooms is randomized each time you visit. Inside the maze, for a hint on which doorway to take, study the [[breakable rock]]s and go through the doorway that the odd pattern points to. The further you go, the stronger the wild Pokémon will be. | Use {{m|Defog}} to remove the [[fog]]. Read the pillar that says ''"...Past three pillars...to the sleeping... ...before 30 is surpassed..."''. It means that to access the room with a portal to the [[Distortion World]], you must find 3 rooms with a pillar before going through 30 rooms. This cave is highly unusual in that the layout of rooms is randomized each time you visit. Inside the maze, for a hint on which doorway to take, study the [[breakable rock]]s and go through the doorway that the odd pattern points to. The further you go, the stronger the wild Pokémon will be. | ||
| Line 296: | Line 298: | ||
When ready, use the portal to return to the Distortion World. | When ready, use the portal to return to the Distortion World. | ||
{{WalkthroughPrevNext | | {{WalkthroughPrevNext | | ||
| Line 337: | Line 306: | ||
prevsection=21 | | prevsection=21 | | ||
nextsection=23 | | nextsection=23 | | ||
prevname=Twinleaf Town, Sandgem Town | prevname=Twinleaf Town, Sandgem Town, Eterna City, Great Marsh| | ||
nextname=Victory Road | nextname=Distortion World, Victory Road, Route 224 | ||
}} | }} | ||
Latest revision as of 00:48, 22 August 2022
Trophy Garden
| Available Pokémon | ||||||||||||||||||||||||||||||||||||||||||||||||||||||||||||||||||||||||||||||||||||||||||||||||||||||||||||||||||||||||||||||||||||||||||||||||||||||||||||||||||||||||||||||||||||||||||||||||||||||||||||||||||||||||||||||||||||||||||||||||||||||||||||||||||||||||||||||||||||||||||||||||||||||||||||||||||||||||||||||||||||||||||||||||||||||||||||||||||||||||||||||||||||||||||||||||||||||||||||||||||||||||||||||||||||||||||||
|---|---|---|---|---|---|---|---|---|---|---|---|---|---|---|---|---|---|---|---|---|---|---|---|---|---|---|---|---|---|---|---|---|---|---|---|---|---|---|---|---|---|---|---|---|---|---|---|---|---|---|---|---|---|---|---|---|---|---|---|---|---|---|---|---|---|---|---|---|---|---|---|---|---|---|---|---|---|---|---|---|---|---|---|---|---|---|---|---|---|---|---|---|---|---|---|---|---|---|---|---|---|---|---|---|---|---|---|---|---|---|---|---|---|---|---|---|---|---|---|---|---|---|---|---|---|---|---|---|---|---|---|---|---|---|---|---|---|---|---|---|---|---|---|---|---|---|---|---|---|---|---|---|---|---|---|---|---|---|---|---|---|---|---|---|---|---|---|---|---|---|---|---|---|---|---|---|---|---|---|---|---|---|---|---|---|---|---|---|---|---|---|---|---|---|---|---|---|---|---|---|---|---|---|---|---|---|---|---|---|---|---|---|---|---|---|---|---|---|---|---|---|---|---|---|---|---|---|---|---|---|---|---|---|---|---|---|---|---|---|---|---|---|---|---|---|---|---|---|---|---|---|---|---|---|---|---|---|---|---|---|---|---|---|---|---|---|---|---|---|---|---|---|---|---|---|---|---|---|---|---|---|---|---|---|---|---|---|---|---|---|---|---|---|---|---|---|---|---|---|---|---|---|---|---|---|---|---|---|---|---|---|---|---|---|---|---|---|---|---|---|---|---|---|---|---|---|---|---|---|---|---|---|---|---|---|---|---|---|---|---|---|---|---|---|---|---|---|---|---|---|---|---|---|---|---|---|---|---|---|---|---|---|---|---|---|---|---|---|---|---|---|---|---|---|---|---|---|---|---|---|---|---|---|---|---|---|---|---|---|---|---|---|---|---|---|---|---|---|---|---|---|---|---|---|---|---|---|---|---|---|---|---|---|---|---|---|---|---|---|---|---|---|---|---|---|---|---|---|
| ||||||||||||||||||||||||||||||||||||||||||||||||||||||||||||||||||||||||||||||||||||||||||||||||||||||||||||||||||||||||||||||||||||||||||||||||||||||||||||||||||||||||||||||||||||||||||||||||||||||||||||||||||||||||||||||||||||||||||||||||||||||||||||||||||||||||||||||||||||||||||||||||||||||||||||||||||||||||||||||||||||||||||||||||||||||||||||||||||||||||||||||||||||||||||||||||||||||||||||||||||||||||||||||||||||||||||||
There are many Pokémon that can be found here without any interaction with the Trophy Garden's owner, Mr. Backlot. All of these Pokémon are in the Sinnoh Pokédex, and many can be found in other areas. After you have gotten the National Pokédex upgrade, however, you can talk to Mr. Backlot and he will mention a particular rare Pokémon in his garden. That Pokémon will be placed in the Trophy Garden by Backlot's butler to cover up for his fibs. The butler can place a different one there daily. The last two Pokémon placed in the garden at any given time will remain available until more Pokémon are placed in the garden.
Pal Park
Fly to Pal Park. Now you're free to go inside! You'll meet Professor Oak who will explain that Pal Park can be used to import Pokémon from Hoenn and Kanto. He gives you the Trainer Counter app for your Pokétch and then leaves for Eterna City. You can import Pokémon from Pokémon Ruby, Sapphire, Emerald, FireRed, and LeafGreen Versions, by inserting the GBA cartridge into the front slot of your Nintendo DS or DS Lite and selecting "Migrate" from the opening menu.
You can get the Kitchen Timer app from a girl in Pal Park's lobby after showing a Snorlax to her and the Color Changer app after receiving the Kitchen Timer and showing a Kecleon to her.
You will need to import Regirock, Regice, and Registeel in order to catch Regigigas in the Snowpoint Temple, unless you have an event Regigigas.
Canalave City
Your next destination is Canalave City. Enter Sailor Eldritch's house in the southwestern area of town. You'll see that his son is trapped in a nightmare. Talk to his mother and you'll learn that you need to find an item called the Lunar Wing on Fullmoon Island to save him. Talk to Sailor Eldritch and he will take you to Fullmoon Island.
Fullmoon Island
| Items | ||||||||||||
|---|---|---|---|---|---|---|---|---|---|---|---|---|
| ||||||||||||
Follow the path and head into the forest clearing where Cresselia is. When you interact with her, she will flee, but she leaves the Lunar Wing behind. Return to Eldritch and have him take you back to Canalave City, then return to the house and use the Lunar Wing to heal his son. As for Cresselia, she's similar to Mesprit, Zapdos, Articuno, and Moltres— she is roaming around the Sinnoh region so you need to use the Marking Map to track her.
Snowpoint Temple
| Available Pokémon | ||||||||||||||||||||||||||||||||||||||||||||||||||||||||||||||||||||||||||||||||||||||||||||||||||||||||||||||||||||||||||||||||||||||||||||||||||||||||||||||||||||||||||||||||||||||||||||||||||||||||||||||||||||||||||||||||||||||||||||||||||||||||||||||||||||||||||||||||||||||
|---|---|---|---|---|---|---|---|---|---|---|---|---|---|---|---|---|---|---|---|---|---|---|---|---|---|---|---|---|---|---|---|---|---|---|---|---|---|---|---|---|---|---|---|---|---|---|---|---|---|---|---|---|---|---|---|---|---|---|---|---|---|---|---|---|---|---|---|---|---|---|---|---|---|---|---|---|---|---|---|---|---|---|---|---|---|---|---|---|---|---|---|---|---|---|---|---|---|---|---|---|---|---|---|---|---|---|---|---|---|---|---|---|---|---|---|---|---|---|---|---|---|---|---|---|---|---|---|---|---|---|---|---|---|---|---|---|---|---|---|---|---|---|---|---|---|---|---|---|---|---|---|---|---|---|---|---|---|---|---|---|---|---|---|---|---|---|---|---|---|---|---|---|---|---|---|---|---|---|---|---|---|---|---|---|---|---|---|---|---|---|---|---|---|---|---|---|---|---|---|---|---|---|---|---|---|---|---|---|---|---|---|---|---|---|---|---|---|---|---|---|---|---|---|---|---|---|---|---|---|---|---|---|---|---|---|---|---|---|---|---|---|---|---|---|---|---|---|---|---|---|---|---|---|---|---|---|---|---|---|---|---|---|---|---|---|---|---|---|---|---|---|---|---|---|---|---|---|---|
| ||||||||||||||||||||||||||||||||||||||||||||||||||||||||||||||||||||||||||||||||||||||||||||||||||||||||||||||||||||||||||||||||||||||||||||||||||||||||||||||||||||||||||||||||||||||||||||||||||||||||||||||||||||||||||||||||||||||||||||||||||||||||||||||||||||||||||||||||||||||
| Items | ||||||||||||||||||||
|---|---|---|---|---|---|---|---|---|---|---|---|---|---|---|---|---|---|---|---|---|
| ||||||||||||||||||||
You will need Regirock, Regice, and Registeel in your party for this mission if you want to battle and catch Regigigas. Your only option is to migrate them from Ruby, Sapphire, and Emerald through Pal Park or, with the aid of a Regigigas received from a special event, catch them before returning here. If you're planning to catch Regigigas, you will want a Pokémon with False Swipe and plenty of Nest Balls.
When you approach the temple, the guard states that you are not qualified to enter, but Candice appears and says that you are.
1F
Travel down the stairs to B1F.
B1F
Carefully slide down the ice and reach the stairs to B2F.
B2F
Rock Smash can help here, although you do not actually need it to get through. After following the path, take the stairs to B3F.
B3F
Sliding on the ice is a bit tricky. First, slide until you got to the part where there is no ice. Next slide ←, ↑, →, then ↑ to reach the stairs. You can now go to B4F.
B4F
While there is nothing to worry about you can use Strength and move the boulder ↑, →, → to be able to reach the item. When ready use the stairs to descend to BF5, the final floor.
BF5
While this new sliding puzzle looks difficult, it can be easy with the right steps. From the tile next to the first rock nearest your entry point travel ↓ to reach the unfrozen tile southwest of Regigigas. Now very carefully slide in this order: ↓, →, ↑, ←, ↓, →, ↑ to reach Regigigas. If you have the three Regis in your party, Regigigas will awaken and face you when you interact with it. Save the game before interacting with it.
|
| ||||||||||||||||||||
| Regigigas Lv.1 | |||||||||||||||||||||
| |||||||||||||||||||||
It may come as a bit of a shock that Regigigas is only Level 1! Use False Swipe to reduce its HP bar to the red zone and then throw Dusk Balls or Nest Balls until you catch it. Hopefully, it won't be too much trouble.
Once it's captured, exit the temple and Fly to Celestic Town.
Mt. Coronet (south)
Before heading out, make sure that you have Pokémon with the HMs Surf, Waterfall, Strength, Rock Smash, and Rock Climb.
Backtrack your way to the area where you were first outside in the summit earlier. (See this section for a refresher on how to get there.) Then, use the eastern entrance to the part of Mt. Coronet 4F below the waterfall. Climb the waterfall and go inside the cave to find the Adamant Orb and the Lustrous Orb (as well as the hidden Stone Plate). You will need both Orbs to catch Dialga and Palkia.
If you return to the tunnel, since Team Galactic is gone now, you can go through the door that was previously inaccessible. That will take you to Mt. Coronet's north area, where you can find TM02 (Dragon Claw) (as well as the hidden Nugget on the rock just north of it).
Celestic Town
In order to battle Dialga and Palkia, you must first talk to Cynthia's grandmother. If you got the Adamant Orb or Lustrous Orb at Mt. Coronet earlier after beating the Sunyshore Gym, Cynthia's grandmother will explain their connection to Dialga and Palkia. Now, they will appear when you return to Spear Pillar.
Fly to Oreburgh City and go north from there to Mt. Coronet's entrance. You'll need the HMs Surf, Strength, Rock Smash, and Rock Climb, as well as several Timer Balls, Net Balls, or Dusk Balls. It's time to head back to Spear Pillar! (See this section if you need a refresher on how to get there.)
Spear Pillar
Here, you'll see a blue dimensional rift which is another dimension where Dialga is. Save your game, then interact with it to challenge Dialga. After that, step back inside Mt. Coronet and quickly return. This time, a purple-colored rift will appear: Palkia.
|
| ||||||||||||||||||||||||||||||||||||||||||||||||||||||||||||||||||||
When you face them, be careful as they are at Lv. 70. Make sure your team is at least Lv. 65 or higher. Weaken them with normally-effective moves and inflict either paralysis or sleep. They have Earth Power to counter Steel-types that could withstand their other moves, but certain Steel-types like Skarmory or Bronzong still work for the resistance tactic as their additional types (or ability) prevent supereffective damage. Additionally, Shedinja is immune to all their moves.
Net Balls will make it easier to catch Palkia, as it is part Water-type. When playing at night, Dusk Balls will work great on both Legendaries.
Turnback Cave
It's time to return to Turnback Cave and the Distortion World to catch Giratina if you didn't already. If you didn't catch Giratina yet, you'll want to take about 40 Dusk Balls with you. Either way, there is an important item to pick up. Return to Route 214 and head through Spring Path, which will take you back to Sendoff Spring. Enter Turnback Cave at the north side of the lake.
Use Defog to remove the fog. Read the pillar that says "...Past three pillars...to the sleeping... ...before 30 is surpassed...". It means that to access the room with a portal to the Distortion World, you must find 3 rooms with a pillar before going through 30 rooms. This cave is highly unusual in that the layout of rooms is randomized each time you visit. Inside the maze, for a hint on which doorway to take, study the breakable rocks and go through the doorway that the odd pattern points to. The further you go, the stronger the wild Pokémon will be.
Available Pokémon
Before encountering a pillar
| Available Pokémon | ||||||||||||||||||||||||||||||||||||||||||||||||||||||||||||||||||||||||||||||||||||||||||||||||||||||||||||||||||||||||||||||||||||||||||||||||||||||||||||||||||||||||||||||||||||||||||||
|---|---|---|---|---|---|---|---|---|---|---|---|---|---|---|---|---|---|---|---|---|---|---|---|---|---|---|---|---|---|---|---|---|---|---|---|---|---|---|---|---|---|---|---|---|---|---|---|---|---|---|---|---|---|---|---|---|---|---|---|---|---|---|---|---|---|---|---|---|---|---|---|---|---|---|---|---|---|---|---|---|---|---|---|---|---|---|---|---|---|---|---|---|---|---|---|---|---|---|---|---|---|---|---|---|---|---|---|---|---|---|---|---|---|---|---|---|---|---|---|---|---|---|---|---|---|---|---|---|---|---|---|---|---|---|---|---|---|---|---|---|---|---|---|---|---|---|---|---|---|---|---|---|---|---|---|---|---|---|---|---|---|---|---|---|---|---|---|---|---|---|---|---|---|---|---|---|---|---|---|---|---|---|---|---|---|---|---|---|
| ||||||||||||||||||||||||||||||||||||||||||||||||||||||||||||||||||||||||||||||||||||||||||||||||||||||||||||||||||||||||||||||||||||||||||||||||||||||||||||||||||||||||||||||||||||||||||||
Between first and second pillars
| Available Pokémon | ||||||||||||||||||||||||||||||||||||||||||||||||||||||||||||||||||||||||||||||||||||||||||||||||||||||||||||||||||||||||||||||||||||||||||||||||||||||||||||||||||||||||||||||||||||||||||||||||||||||||||||||||||||||||||||
|---|---|---|---|---|---|---|---|---|---|---|---|---|---|---|---|---|---|---|---|---|---|---|---|---|---|---|---|---|---|---|---|---|---|---|---|---|---|---|---|---|---|---|---|---|---|---|---|---|---|---|---|---|---|---|---|---|---|---|---|---|---|---|---|---|---|---|---|---|---|---|---|---|---|---|---|---|---|---|---|---|---|---|---|---|---|---|---|---|---|---|---|---|---|---|---|---|---|---|---|---|---|---|---|---|---|---|---|---|---|---|---|---|---|---|---|---|---|---|---|---|---|---|---|---|---|---|---|---|---|---|---|---|---|---|---|---|---|---|---|---|---|---|---|---|---|---|---|---|---|---|---|---|---|---|---|---|---|---|---|---|---|---|---|---|---|---|---|---|---|---|---|---|---|---|---|---|---|---|---|---|---|---|---|---|---|---|---|---|---|---|---|---|---|---|---|---|---|---|---|---|---|---|---|---|---|---|---|---|---|---|---|---|---|---|---|---|---|---|---|---|
| ||||||||||||||||||||||||||||||||||||||||||||||||||||||||||||||||||||||||||||||||||||||||||||||||||||||||||||||||||||||||||||||||||||||||||||||||||||||||||||||||||||||||||||||||||||||||||||||||||||||||||||||||||||||||||||
Between second and third pillars
| Available Pokémon | ||||||||||||||||||||||||||||||||||||||||||||||||||||||||||||||||||||||||||||||||||||||||||||||||||||||||||||||||||||||||||||||||||||||||||||||||||||||||||||||||||||||||||||||||||||||||||||
|---|---|---|---|---|---|---|---|---|---|---|---|---|---|---|---|---|---|---|---|---|---|---|---|---|---|---|---|---|---|---|---|---|---|---|---|---|---|---|---|---|---|---|---|---|---|---|---|---|---|---|---|---|---|---|---|---|---|---|---|---|---|---|---|---|---|---|---|---|---|---|---|---|---|---|---|---|---|---|---|---|---|---|---|---|---|---|---|---|---|---|---|---|---|---|---|---|---|---|---|---|---|---|---|---|---|---|---|---|---|---|---|---|---|---|---|---|---|---|---|---|---|---|---|---|---|---|---|---|---|---|---|---|---|---|---|---|---|---|---|---|---|---|---|---|---|---|---|---|---|---|---|---|---|---|---|---|---|---|---|---|---|---|---|---|---|---|---|---|---|---|---|---|---|---|---|---|---|---|---|---|---|---|---|---|---|---|---|---|
| ||||||||||||||||||||||||||||||||||||||||||||||||||||||||||||||||||||||||||||||||||||||||||||||||||||||||||||||||||||||||||||||||||||||||||||||||||||||||||||||||||||||||||||||||||||||||||||
There is a room between the second and third pillars where the rocks partly block off the left and right doors in which no Pokémon will be encountered.
After the third pillar
| Items | ||||||||||||||||||||
|---|---|---|---|---|---|---|---|---|---|---|---|---|---|---|---|---|---|---|---|---|
| ||||||||||||||||||||
Once you've gotten past the three pillars and got whichever item was waiting for you, you'll find the room with the portal to the Distortion World. If you failed to catch Giratina last time, you'll find it guarding the portal. This time, it's in Altered Forme.
|
| ||||||||||||||||||||
| Giratina Lv.47 | |||||||||||||||||||||
| |||||||||||||||||||||
One slight advantage if you decided to KO Giratina in the Distortion World earlier is that in Altered Forme, it prioritizes defenses over offense, so its attacks are not as strong. Its moveset is still the same, though. Save before facing it; otherwise you'll have to defeat the Elite Four again to get another chance to catch it. If it does come to that, rechallenge the Elite Four before completing the mission at Stark Mountain. Otherwise, their teams' levels are increased, making it harder to defeat them.
In this battle, use the same tactics as you did when facing Azelf and Uxie and you'll be fine.
When ready, use the portal to return to the Distortion World.
|
Platinum walkthrough |
|

|
This article is part of Project Walkthroughs, a Bulbapedia project that aims to write comprehensive step-by-step guides on each Pokémon game. |
