Appendix:Platinum walkthrough/Section 18: Difference between revisions
(stop suggesting Scizor and Bastiodon. 1 requires trading and the other is really bad.) |
mNo edit summary |
||
| Line 10: | Line 10: | ||
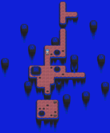
[[File:Distortion World B7F Pt.png|right|thumb|110px|Distortion World B7F]] | [[File:Distortion World B7F Pt.png|right|thumb|110px|Distortion World B7F]] | ||
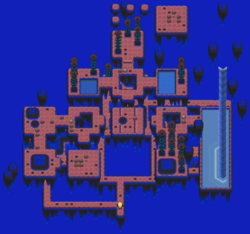
You'll quickly discover that | You'll quickly discover that in the [[Distortion World]], gravity works a little differently sometimes! Be careful when going through the Distortion World as it is easy to get lost, not to mention there are plenty of confusing puzzles. | ||
Starting from 1F, follow [[Cynthia]] to a small hovering square slab where she will mention stepping on the gray markers. This will cause it to descend to B1F; apparently these square slabs serve like elevators here in the Distortion World. At B1F, follow Cynthia across the small floating platforms to find another area with a platform hanging sideways above you. {{p|Mesprit}} will appear before floating away. Stand on the gray marker to manipulate gravity so you can stand on this floating platform. Travel across to the other side and use the gray marker there to jump off this floating platform and then follow the path that will take you to the elevator-platform down to B2F. | Starting from 1F, follow [[Cynthia]] to a small hovering square slab where she will mention stepping on the gray markers. This will cause it to descend to B1F; apparently these square slabs serve like elevators here in the Distortion World. At B1F, follow Cynthia across the small floating platforms to find another area with a platform hanging sideways above you. {{p|Mesprit}} will appear before floating away. Stand on the gray marker to manipulate gravity so you can stand on this floating platform. Travel across to the other side and use the gray marker there to jump off this floating platform and then follow the path that will take you to the elevator-platform down to B2F. | ||
| Line 161: | Line 161: | ||
|} | |} | ||
After returning to the regular world, Cynthia suggests that you visit [[Sandgem Town]] since [[Professor Rowan]] was worried about you. If you don’t have {{m|Fly}} with you, go south to [[Spring Path]] and | After returning to [[Sendoff Spring]] in the regular world, Cynthia suggests that you visit [[Sandgem Town]] since [[Professor Rowan]] was worried about you. If you don’t have {{m|Fly}} with you, go south to [[Spring Path]] and you'll find yourself on {{rt|214|Sinnoh}} where there were previously only trees. From there, head to [[Veilstone City]] to get the Pokémon you need before Flying off to Sandgem Town. | ||
==Sandgem Town== | ==Sandgem Town== | ||
When you arrive at Professor Rowan's lab, it turns out both he and {{ga|Lucas}}/{{ga|Dawn}} are relieved to see you alive, as they had been trying to | When you arrive at Professor Rowan's lab in [[Sandgem Town]], it turns out both he and {{ga|Lucas}}/{{ga|Dawn}} are relieved to see you alive, as they had been trying to find you. Professor Rowan will mention that the Lake Guardians have returned to their homes. Seeing the number of Pokémon you have, and your seven Badges, he suggests that you head to [[Sunyshore City]] where the final Gym is and eventually challenge the [[Elite Four#Sinnoh|Elite Four]] to broaden your horizons. | ||
You are now free to continue east through [[Valor Lakefront]] to access {{rt|222|Sinnoh}} and Sunyshore City, but let's visit the Lake Guardians first, as they need to be encountered for you to get the [[National Pokédex]]. | You are now free to continue east through [[Valor Lakefront]] to access {{rt|222|Sinnoh}} and Sunyshore City, but let's visit the Lake Guardians first, as they need to be encountered for you to get the [[National Pokédex]]. | ||
==Catching the Lake Guardians== | ==Catching the Lake Guardians== | ||
To get the National [[Pokédex]], you only need to see the Lake Guardians. If you still want to catch them, then your Pokémon should be at reasonably high Levels, as the Lake Guardians are at Level 50. It's recommended you bring a Steel-type with you to resist the Lake Guardians' attacks. To catch {{p|Azelf}} and {{p|Uxie}}, you should bring about 40 {{ball|Dusk}}s or {{ball|Timer}}s. Also, you'll need the HM {{m|Surf}} to get across each lake. As always, saving before encountering them is a good idea. | |||
===Lake Verity (third visit)=== | ===Lake Verity (third visit)=== | ||
| Line 206: | Line 206: | ||
|} | |} | ||
When you arrive, Surf over to the southwestern corner of the lake to find {{TM|38|Fire Blast}}. After that, Surf to the cavern in the center and talk to {{p|Mesprit}} inside. It quickly leaves, but is counted as seen in your Pokédex. Professor Rowan shows up and after you listen to him babble about his research, he mentions that Mesprit is likely playing with you and you'll need to track it with the {{DL|Pokétch|Marking Map}} app on your Pokétch, which can track roaming Pokémon. If you didn't get it yet, Fly to [[Jubilife City]] and go to the [[Pokétch Company]] building. Talk to the company President inside. This is the second app you'll receive from him anytime after collecting your third Badge. | When you arrive at [[Lake Verity]], Surf over to the southwestern corner of the lake to find {{TM|38|Fire Blast}}. After that, Surf to the cavern in the center and talk to {{p|Mesprit}} inside. It quickly leaves, but is counted as seen in your Pokédex. Professor Rowan shows up and after you listen to him babble about his research, he mentions that Mesprit is likely playing with you and you'll need to track it with the {{DL|Pokétch|Marking Map}} app on your Pokétch, which can track roaming Pokémon. If you didn't get it yet, Fly to [[Jubilife City]] and go to the [[Pokétch Company]] building. Talk to the company President inside. This is the second app you'll receive from him anytime after collecting your third Badge. | ||
Mesprit [[Roaming Pokémon|roams]] Sinnoh, moving every time you enter a different town or Route. On the first turn of battle, it will flee. This mission will take either patience or a {{ball|Master}}. As long as your lead Pokémon is at or below level 50, [[Repel]]s can make it easier to find in the grass. | Mesprit [[Roaming Pokémon|roams]] Sinnoh, moving every time you enter a different town or Route. On the first turn of battle, it will flee. This mission will take either patience or a {{ball|Master}}. As long as your lead Pokémon is at or below level 50, [[Repel]]s can make it easier to find in the grass. | ||
| Line 265: | Line 265: | ||
|} | |} | ||
Now that Team Galactic is long gone, | Now that Team Galactic is long gone, [[Lake Valor]] has been fully restored. Surf to the southeastern corner of this lake to find {{TM|25|Thunder}}. Then, enter the cave and '''save your game''' before talking to Azelf. | ||
{{Pokémon/4 | {{Pokémon/4 | ||
| Line 321: | Line 321: | ||
|} | |} | ||
Once you arrive, Surf to the northeastern corner of the area to find {{TM|14|Blizzard}}. Now, enter the cavern and prepare to battle Uxie. | Once you arrive at [[Lake Acuity]], Surf to the northeastern corner of the area to find {{TM|14|Blizzard}}. Now, enter the cavern and prepare to battle Uxie. | ||
{{Pokémon/4 | {{Pokémon/4 | ||
Revision as of 00:41, 27 December 2018
Distortion World (first visit)
You'll quickly discover that in the Distortion World, gravity works a little differently sometimes! Be careful when going through the Distortion World as it is easy to get lost, not to mention there are plenty of confusing puzzles.
Starting from 1F, follow Cynthia to a small hovering square slab where she will mention stepping on the gray markers. This will cause it to descend to B1F; apparently these square slabs serve like elevators here in the Distortion World. At B1F, follow Cynthia across the small floating platforms to find another area with a platform hanging sideways above you. Mesprit will appear before floating away. Stand on the gray marker to manipulate gravity so you can stand on this floating platform. Travel across to the other side and use the gray marker there to jump off this floating platform and then follow the path that will take you to the elevator-platform down to B2F.
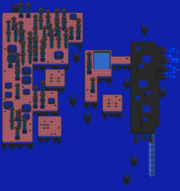
On B2F, head to the first platform and stand on the gray marker located at the top to activate this platform and reach the next one. On the next platform, take the obvious marker on the left to reach another special floating platform with sideways gravity, where you will find Cynthia. After talking with her, follow the path that will take you to more moving platforms. Touch each correct marker in this order to progress: right, right, down, left (don't hop to the nearby platform in this area or you'll just find a dead end). Then, hop across the nearby platform in front of you and hit the upper marker, then the right-hand one, and lastly the center to activate the elevator-platform that leads to B3F.
On B3F, head towards the lower gray marker on the elevator to expose some hidden platforms and travel down to meet Cyrus. He reveals that the shadowy Pokémon abandoned him and went further below, and talks about DNA and how one thing cannot exist without the other. He theorizes that if someone were to defeat the shadowy Pokémon, this world should disappear and no longer interfere with his plans. For the puzzle on this floor, you must touch the gray markers on the floor to expose hidden platforms. Only one path will get you to B5F, and platforms here sometimes become visible or invisible.
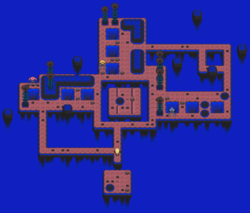
First, head for the marker on the upper right and it will expose a hidden platform. Next, travel to the marker you see below you by traveling right, then down to find another hidden platform. Next travel right and you will reach the elevator that descends to B5F. On B5F, from the elevator, continue forward until you see Uxie, then use Strength to push a boulder to the platform below you on B6F. Then, head downwards to the elevator that leads to B6F, but do not take it yet. Instead, use the ledge that will take you to a platform to the left and Mesprit will appear. Here, you will have to push another boulder down to B6F. Then, take the elevator that will take you to B4F. Continue navigating forward and carefully go through the path of trees and rocks that can turn visible or invisible to reach a new elevator. That will take you to a new area of B3F. From here, use the nearby gray marker. Then, travel left then down to find an invisible platform, then travel right, then right again to get to an elevator that leads to another area of B4F.
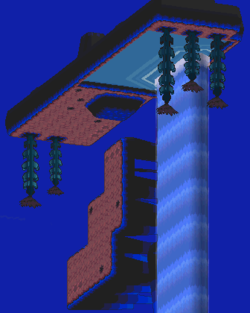
On your way down, you will see Cyrus again, but this time he mysteriously disappears. Surf across the water, then touch the gray markers to jump to a platform with sideways gravity. Then, use another set that leads to another platform with upside-down gravity. Now use Surf again and travel down the waterfall. This should get you back to B5F, where you can find Azelf along with another boulder to push down to B6F. Now, head to the nearby elevator and this time use it to descend to B6F. The secret to B6F's puzzle is to carefully push each of the boulders you pushed down from B5F into the special holes where each of the Lake Guardians are. If you mess up, you'll have to push them down from the various floors again. Now, go back to the elevator and travel south from it to find Cynthia and talk to her. If you've completed the puzzle correctly, a new elevator will appear that you can use to travel down to B7F.
Here, you will both encounter Cyrus again, and Cynthia asks why he is so determined to create a new world. Cyrus refuses to listen. Talk to him, and he will challenge you to a battle.
|
||||||||||||||||||||||||||||||||||||||||||||||||||||||||||||||||||||||||||||||||||||||||||||||||||||||||||||||||||||||||||||||||||||||||||||||||||||||||||||||||||||||||||||||||
| ||||||||||||||||||||||||||||||||||||||||||||||||||||||||||||||||||||||||||||||||||||||||||||||||||||||||||||||||||||||||||||||||||||||||||||||||||||||||||||||||||||||||||||||||
Cyrus is a lot tougher than in the last battle, since he added two Pokémon and his Sneasel has evolved. A fast Electric-type such as Jolteon is useful in this battle, since half of his team is weak to Electric-type moves. Additionally, his entire team is weak to Rock attacks. His first Pokémon, Houndoom, is quite fast and possesses Thunder Fang to counter Water-types. Will-O-Wisp will inflict a burn if it hits, halving your Pokémon's Attack stat. Take it down as quickly as you can and it won't be a problem. Be careful when Cyrus send out his Gyarados, as it can threaten Electric and Grass Pokémon with its various attacks. Giga Impact will do a lot of damage, but Gyarados must rest for one turn after using it. Crobat's Speed is a problem, especially with its ability to use the status moves Toxic and Confuse Ray. Simply taking it out with super effective attacks and firstly paralyzing it to cut down its Speed are both valid strategies. Against Honchkrow, the same strategy as before will work; just remember it uses Heat Wave to counter Ice-types and Steel-types. His main Pokémon, Weavile, is incredibly fast and can prevent your Pokémon from moving, not just from Fake Out on its first turn, but also with Ice Punch, which has a chance of freezing your Pokémon. A powerful Fighting-type move should easily defeat it, though Rock, Steel, or Fire-type moves can also help.
After the battle, Cyrus will think it is hopeless since if Giratina is defeated, this world will disappear. However, Cynthia points out the problems are due to the Distortion World being forcibly merged with the real one, and by defeating Giratina the connection can be severed. Cynthia will then heal your team. Before going forward to face Giratina, you need to decide if you want to catch it now or later. Save your game before using the platforms to reach it. Once you move forward and see Giratina fly by, move forward again and then some invisible platforms will become visible, allowing you to reach Giratina.
Catching Giratina
| ||||||||||||||||||||||||||||||||||
The Dusk Ball is the best Poké Ball variant to use in this fight, although Ultra Balls and Timer Balls can also be useful. It can take 10, 20, or even 30 or 40 Poké Balls to catch Giratina, so prepare for a long battle. Since you saved beforehand, you can turn off your game if something goes wrong and get another chance. Unlike Dialga and Palkia, Giratina's catch rate remained 3 (0.4% when using Poké Ball at full health).
One thing which makes Origin Forme Giratina a difficult opponent is that in this form, it specializes more in offense over defense. If you have a status move that inflicts paralysis or sleep, you can use them to make Giratina easier to catch. Avoid or minimize use of Ice-, Ghost-, Dragon- or Dark-type moves as they carry the risk of knocking it out. After reducing its HP bar to the red zone, a good tactic is to bring out a Steel-type that has good defenses and resistances to all of Giratina's attacks.
Unlike in the previous Pokémon games, you do not have to catch Giratina right away, since legendaries that you failed to catch will reappear each time you defeat the Elite Four and Pokémon Champion during your playthrough of this game. If Giratina’s attacks are too much for you to deal with right now, just defeat it. You can face it later in Turnback Cave in its Altered Forme, which is more defense-oriented stat-wise. Also, if you run out of Poké Balls or so many turns of battle elapse that Giratina is forced to Struggle, it would also be okay to either reset (assuming you saved beforehand) or knock it out and try again later on.
After the battle, Cynthia is happy that Giratina understood your intentions and will point out a nearby portal that will take you back to your world. Cyrus then appears and is surprised that Giratina was defeated or captured and that his perfect world will never be complete. After he and Cynthia express their different views about the world, Cyrus leaves, convinced they will never understand each other. Now enter the portal, which will take you to Sendoff Spring, the fourth lake of Sinnoh.
Sendoff Spring
| Available Pokémon | ||||||||||||||||||||||||||||||||||||||||||||||||||||||||||||||||||||||||||||||||||||||||||||||||||||||||||||||||||||||||||||||||||||||||||||||||||||||||||||||||||||||||||||||||||||||||||||||||||||||||||||||||||||||||||||||||||||||||||||||||||||||||||||||||||||||||||||||||||||||||||||||||||||||||||||||||||||||||||||||||||||||||||||||||||||||||||
|---|---|---|---|---|---|---|---|---|---|---|---|---|---|---|---|---|---|---|---|---|---|---|---|---|---|---|---|---|---|---|---|---|---|---|---|---|---|---|---|---|---|---|---|---|---|---|---|---|---|---|---|---|---|---|---|---|---|---|---|---|---|---|---|---|---|---|---|---|---|---|---|---|---|---|---|---|---|---|---|---|---|---|---|---|---|---|---|---|---|---|---|---|---|---|---|---|---|---|---|---|---|---|---|---|---|---|---|---|---|---|---|---|---|---|---|---|---|---|---|---|---|---|---|---|---|---|---|---|---|---|---|---|---|---|---|---|---|---|---|---|---|---|---|---|---|---|---|---|---|---|---|---|---|---|---|---|---|---|---|---|---|---|---|---|---|---|---|---|---|---|---|---|---|---|---|---|---|---|---|---|---|---|---|---|---|---|---|---|---|---|---|---|---|---|---|---|---|---|---|---|---|---|---|---|---|---|---|---|---|---|---|---|---|---|---|---|---|---|---|---|---|---|---|---|---|---|---|---|---|---|---|---|---|---|---|---|---|---|---|---|---|---|---|---|---|---|---|---|---|---|---|---|---|---|---|---|---|---|---|---|---|---|---|---|---|---|---|---|---|---|---|---|---|---|---|---|---|---|---|---|---|---|---|---|---|---|---|---|---|---|---|---|---|---|---|---|---|---|---|---|---|---|---|---|---|---|---|---|---|---|---|---|---|---|---|---|---|---|---|---|---|---|---|---|---|---|---|---|---|---|---|---|---|---|---|---|---|---|---|---|---|---|---|---|---|---|
| ||||||||||||||||||||||||||||||||||||||||||||||||||||||||||||||||||||||||||||||||||||||||||||||||||||||||||||||||||||||||||||||||||||||||||||||||||||||||||||||||||||||||||||||||||||||||||||||||||||||||||||||||||||||||||||||||||||||||||||||||||||||||||||||||||||||||||||||||||||||||||||||||||||||||||||||||||||||||||||||||||||||||||||||||||||||||||
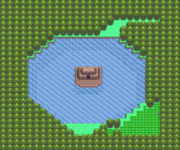
After returning to Sendoff Spring in the regular world, Cynthia suggests that you visit Sandgem Town since Professor Rowan was worried about you. If you don’t have Fly with you, go south to Spring Path and you'll find yourself on Route 214 where there were previously only trees. From there, head to Veilstone City to get the Pokémon you need before Flying off to Sandgem Town.
Sandgem Town
When you arrive at Professor Rowan's lab in Sandgem Town, it turns out both he and Lucas/Dawn are relieved to see you alive, as they had been trying to find you. Professor Rowan will mention that the Lake Guardians have returned to their homes. Seeing the number of Pokémon you have, and your seven Badges, he suggests that you head to Sunyshore City where the final Gym is and eventually challenge the Elite Four to broaden your horizons.
You are now free to continue east through Valor Lakefront to access Route 222 and Sunyshore City, but let's visit the Lake Guardians first, as they need to be encountered for you to get the National Pokédex.
Catching the Lake Guardians
To get the National Pokédex, you only need to see the Lake Guardians. If you still want to catch them, then your Pokémon should be at reasonably high Levels, as the Lake Guardians are at Level 50. It's recommended you bring a Steel-type with you to resist the Lake Guardians' attacks. To catch Azelf and Uxie, you should bring about 40 Dusk Balls or Timer Balls. Also, you'll need the HM Surf to get across each lake. As always, saving before encountering them is a good idea.
Lake Verity (third visit)
| Available Pokémon | |||||||||||||||||||||||||||||||||||||||||||||||||||||||||||||||||||||||||||||||||||||||||||||||||||||||||||||||||||||||||||||||||||||||||||||||||||||||||||||||||||||||||||||||||||||||||||||||||||||||||||||||||||||||||||||||||||||||||||||||||||||||||||||||||||||||||||
|---|---|---|---|---|---|---|---|---|---|---|---|---|---|---|---|---|---|---|---|---|---|---|---|---|---|---|---|---|---|---|---|---|---|---|---|---|---|---|---|---|---|---|---|---|---|---|---|---|---|---|---|---|---|---|---|---|---|---|---|---|---|---|---|---|---|---|---|---|---|---|---|---|---|---|---|---|---|---|---|---|---|---|---|---|---|---|---|---|---|---|---|---|---|---|---|---|---|---|---|---|---|---|---|---|---|---|---|---|---|---|---|---|---|---|---|---|---|---|---|---|---|---|---|---|---|---|---|---|---|---|---|---|---|---|---|---|---|---|---|---|---|---|---|---|---|---|---|---|---|---|---|---|---|---|---|---|---|---|---|---|---|---|---|---|---|---|---|---|---|---|---|---|---|---|---|---|---|---|---|---|---|---|---|---|---|---|---|---|---|---|---|---|---|---|---|---|---|---|---|---|---|---|---|---|---|---|---|---|---|---|---|---|---|---|---|---|---|---|---|---|---|---|---|---|---|---|---|---|---|---|---|---|---|---|---|---|---|---|---|---|---|---|---|---|---|---|---|---|---|---|---|---|---|---|---|---|---|---|---|---|---|---|---|---|---|---|---|
| |||||||||||||||||||||||||||||||||||||||||||||||||||||||||||||||||||||||||||||||||||||||||||||||||||||||||||||||||||||||||||||||||||||||||||||||||||||||||||||||||||||||||||||||||||||||||||||||||||||||||||||||||||||||||||||||||||||||||||||||||||||||||||||||||||||||||||
| Items | ||||||||||||
|---|---|---|---|---|---|---|---|---|---|---|---|---|
| ||||||||||||
When you arrive at Lake Verity, Surf over to the southwestern corner of the lake to find TM38 (Fire Blast). After that, Surf to the cavern in the center and talk to Mesprit inside. It quickly leaves, but is counted as seen in your Pokédex. Professor Rowan shows up and after you listen to him babble about his research, he mentions that Mesprit is likely playing with you and you'll need to track it with the Marking Map app on your Pokétch, which can track roaming Pokémon. If you didn't get it yet, Fly to Jubilife City and go to the Pokétch Company building. Talk to the company President inside. This is the second app you'll receive from him anytime after collecting your third Badge.
Mesprit roams Sinnoh, moving every time you enter a different town or Route. On the first turn of battle, it will flee. This mission will take either patience or a Master Ball. As long as your lead Pokémon is at or below level 50, Repels can make it easier to find in the grass.
Jubilife City is a good place to use for moving between Routes to draw Mesprit closer, as it has four different exits. The guardpost leading to Route 218 or the cave that leads to the upper area of Route 204 are helpful if Mesprit makes it to those places and you are in the right position, since moving through them does not count as changing locations. You can also try moving back and forth across a boundary between two routes until Mesprit appears on your route.
|
| ||||||||||||||||||||
| Mesprit Lv.50 | |||||||||||||||||||||
| |||||||||||||||||||||
One method to catch it without a Master Ball is to Paralyze Mesprit or put it to sleep with a faster Pokémon the first time you encounter it. On subsequent encounters, attack it to carefully cut down its HP and soft-reset in case you knock it out. Once you've had enough battles to cut its HP bar down to the red zone, throw Quick Balls each time you see it until you catch it.
The second strategy is to use the escape-preventing moves Block or Mean Look, then continue into a battle similar to the one when you caught Giratina. Once you have it trapped, throw Dusk Balls (if it is nighttime) or Timer Balls to catch it. Out of the three Lake Guardians, Mesprit is the slowest, but it has better HP and more balanced offensive and defensive stats compared to Azelf and Uxie.
Lake Valor (second visit)
| Available Pokémon | |||||||||||||||||||||||||||||||||||||||||||||||||||||||||||||||||||||||||||||||||||||||||||||||||||||||||||||||||||||||||||||||||||||||||||||||||||||||||||||||||||||||||||||||||||||||||||||||||||||||||||||||||||||||||||||||||||||||||||||||||||||||||||||||||||||||||||||||||||||||||||||||||||||||||||||||||||||||
|---|---|---|---|---|---|---|---|---|---|---|---|---|---|---|---|---|---|---|---|---|---|---|---|---|---|---|---|---|---|---|---|---|---|---|---|---|---|---|---|---|---|---|---|---|---|---|---|---|---|---|---|---|---|---|---|---|---|---|---|---|---|---|---|---|---|---|---|---|---|---|---|---|---|---|---|---|---|---|---|---|---|---|---|---|---|---|---|---|---|---|---|---|---|---|---|---|---|---|---|---|---|---|---|---|---|---|---|---|---|---|---|---|---|---|---|---|---|---|---|---|---|---|---|---|---|---|---|---|---|---|---|---|---|---|---|---|---|---|---|---|---|---|---|---|---|---|---|---|---|---|---|---|---|---|---|---|---|---|---|---|---|---|---|---|---|---|---|---|---|---|---|---|---|---|---|---|---|---|---|---|---|---|---|---|---|---|---|---|---|---|---|---|---|---|---|---|---|---|---|---|---|---|---|---|---|---|---|---|---|---|---|---|---|---|---|---|---|---|---|---|---|---|---|---|---|---|---|---|---|---|---|---|---|---|---|---|---|---|---|---|---|---|---|---|---|---|---|---|---|---|---|---|---|---|---|---|---|---|---|---|---|---|---|---|---|---|---|---|---|---|---|---|---|---|---|---|---|---|---|---|---|---|---|---|---|---|---|---|---|---|---|---|---|---|---|---|---|---|---|---|---|---|---|---|---|---|---|---|---|---|---|
| |||||||||||||||||||||||||||||||||||||||||||||||||||||||||||||||||||||||||||||||||||||||||||||||||||||||||||||||||||||||||||||||||||||||||||||||||||||||||||||||||||||||||||||||||||||||||||||||||||||||||||||||||||||||||||||||||||||||||||||||||||||||||||||||||||||||||||||||||||||||||||||||||||||||||||||||||||||||
| Items | ||||||||||||
|---|---|---|---|---|---|---|---|---|---|---|---|---|
| ||||||||||||
Now that Team Galactic is long gone, Lake Valor has been fully restored. Surf to the southeastern corner of this lake to find TM25 (Thunder). Then, enter the cave and save your game before talking to Azelf.
|
| ||||||||||||||||||||
| Azelf Lv.50 | |||||||||||||||||||||
| |||||||||||||||||||||
Azelf is the fastest Lake Guardian and has the best offensive stats compared to the others, but it has the weakest defenses. With Nasty Plot, it can quickly become a serious threat by boosting its Special Attack. Steel-types are good Pokémon to use because they resist Azelf's attacks. Paralyze it or put it to sleep, then carefully weaken it with a not-too-powerful move. Once its HP is in the red zone, keep throwing Dusk Balls until you catch it.
Lake Acuity (second visit)
| Available Pokémon | ||||||||||||||||||||||||||||||||||||||||||||||||||||||||||||||||||||||||||||||||||||||||||||||||||||||||||||||||||||||||||||||||||||||||||||||||||||||||||||||||||||||||||||||||||||||||||||||||||||||||||||||||||||||||||||||||||||||||||||||||||||||||||||||||||||||||||||||||||||||||||||||||||||||||||||||||||||||||||||||||||||||||||||||||||||||||||||||||||||||||||
|---|---|---|---|---|---|---|---|---|---|---|---|---|---|---|---|---|---|---|---|---|---|---|---|---|---|---|---|---|---|---|---|---|---|---|---|---|---|---|---|---|---|---|---|---|---|---|---|---|---|---|---|---|---|---|---|---|---|---|---|---|---|---|---|---|---|---|---|---|---|---|---|---|---|---|---|---|---|---|---|---|---|---|---|---|---|---|---|---|---|---|---|---|---|---|---|---|---|---|---|---|---|---|---|---|---|---|---|---|---|---|---|---|---|---|---|---|---|---|---|---|---|---|---|---|---|---|---|---|---|---|---|---|---|---|---|---|---|---|---|---|---|---|---|---|---|---|---|---|---|---|---|---|---|---|---|---|---|---|---|---|---|---|---|---|---|---|---|---|---|---|---|---|---|---|---|---|---|---|---|---|---|---|---|---|---|---|---|---|---|---|---|---|---|---|---|---|---|---|---|---|---|---|---|---|---|---|---|---|---|---|---|---|---|---|---|---|---|---|---|---|---|---|---|---|---|---|---|---|---|---|---|---|---|---|---|---|---|---|---|---|---|---|---|---|---|---|---|---|---|---|---|---|---|---|---|---|---|---|---|---|---|---|---|---|---|---|---|---|---|---|---|---|---|---|---|---|---|---|---|---|---|---|---|---|---|---|---|---|---|---|---|---|---|---|---|---|---|---|---|---|---|---|---|---|---|---|---|---|---|---|---|---|---|---|---|---|---|---|---|---|---|---|---|---|---|---|---|---|---|---|---|---|---|---|---|---|---|---|---|---|---|---|---|---|---|---|---|---|---|---|---|---|---|---|---|---|---|---|---|---|---|---|
| ||||||||||||||||||||||||||||||||||||||||||||||||||||||||||||||||||||||||||||||||||||||||||||||||||||||||||||||||||||||||||||||||||||||||||||||||||||||||||||||||||||||||||||||||||||||||||||||||||||||||||||||||||||||||||||||||||||||||||||||||||||||||||||||||||||||||||||||||||||||||||||||||||||||||||||||||||||||||||||||||||||||||||||||||||||||||||||||||||||||||||
| Items | ||||||||||||
|---|---|---|---|---|---|---|---|---|---|---|---|---|
| ||||||||||||
Once you arrive at Lake Acuity, Surf to the northeastern corner of the area to find TM14 (Blizzard). Now, enter the cavern and prepare to battle Uxie.
|
| ||||||||||||||||||||
| Uxie Lv.50 | |||||||||||||||||||||
| |||||||||||||||||||||
Uxie in terms of base stats is the opposite of Azelf, where it is the strongest in its defensive stats and weakest in its offensive stats. It can use Amnesia to raise its Sp. Defense stat by 2 levels. Use non-supereffective physical moves to lower its HP and then use False Swipe if necessary. Uxie may try to put your Pokémon to sleep with Yawn which can be an annoyance until Uxie's HP is in the red zone and you can focus on catching it. Just like with Azelf, Dusk Balls are the best way to go, though Timer Balls may be needed as backup.
Now that you have dealt with the Lake Guardians, Fly back to Pastoria City, then head to Hotel Grand Lake at Valor Lakefront. Time to travel east to your final Gym battle!
|
Platinum walkthrough |
|

|
This article is part of Project Walkthroughs, a Bulbapedia project that aims to write comprehensive step-by-step guides on each Pokémon game. |


