Appendix:Gold and Silver walkthrough/Section 28: Difference between revisions
(→Summit) |
(→Summit: important observation) |
||
| (13 intermediate revisions by 8 users not shown) | |||
| Line 1: | Line 1: | ||
{{WalkthroughNotice|GS}} | |||
==Mt. Silver== | |||
== Mt. Silver == | |||
[[File:Mt Silver 1F GSC.png|thumb|Mt. Silver, 1F]] | [[File:Mt Silver 1F GSC.png|thumb|Mt. Silver, 1F]] | ||
=== 1F === | ===1F=== | ||
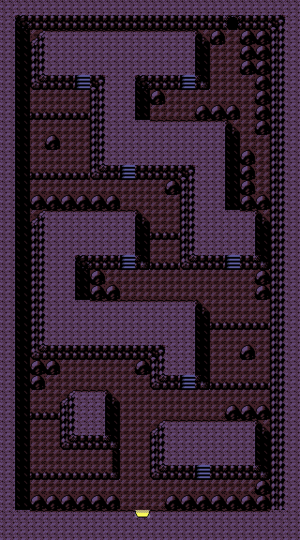
The first chamber is the only part of [[Mt. Silver]] that is dark enough to require the use of {{m|Flash}}. | The first chamber is the only part of [[Mt. Silver]] that is dark enough to require the use of {{m|Flash}}. Grab the {{DL|Battle item|X Accuracy}} on the southeast platform, then loop around to the west to reach an [[Escape Rope]]. West of the middle platform between the ledges is a [[Dire Hit]] hidden on the rock. The northern, largest platform opens into a T-intersection; turn left to get a [[Max Elixir|Max Elixer]], then go right and south to find a hidden {{ball|Ultra}}. Head back north to reach the opening in the northeast. | ||
{| class="expandable" align="center" style="background: #{{ | {| class="expandable" align="center" style="background: #{{locationcolor/med|cave}}; {{roundy}}; border: 5px solid #{{locationcolor/light|cave}};" | ||
|- align="center" | |- align="center" | ||
! Available Pokémon | ! Available Pokémon | ||
| Line 21: | Line 19: | ||
{{catch/footer|cave}} | {{catch/footer|cave}} | ||
|} | |} | ||
{| class="expandable" align="center" style="background: #{{ | {| class="expandable" align="center" style="background: #{{locationcolor/med|cave}}; {{roundy}}; border: 5px solid #{{locationcolor/light|cave}};" | ||
|- align="center" | |- align="center" | ||
! Items | ! Items | ||
| Line 27: | Line 25: | ||
| | | | ||
{{itlisth|cave}} | {{itlisth|cave}} | ||
{{ | {{Itemlist|Ultra Ball|Dead-end path in the northeast corner (hidden)|G=yes|S=yes|display={{ball|Ultra}}}} | ||
{{Itemlist|X Accuracy|On the southeast platform|G=yes|S=yes|display={{DL|Battle item|X Accuracy}}}} | |||
{{Itemlist|Escape Rope|On the southwest ledge|G=yes|S=yes}} | |||
{{ | {{Itemlist|Dire Hit|On a rock, between two ledges on the east side (hidden)|G=yes|S=yes|display={{DL|Battle item|Dire Hit}}}} | ||
{{ | {{Itemlist|Max Elixer|Between two ledges in the northwest corner|G=yes|S=yes|display=[[Max Elixir|Max Elixer]]|sprite=Bag Max Elixir Sprite}} | ||
{{ | |||
{{ | |||
{{itlistfoot|cave}} | {{itlistfoot|cave}} | ||
|} | |} | ||
[[File:Mt Silver 2F GSC.png|thumb|left|Mt. Silver, 2F]] | |||
===2F=== | |||
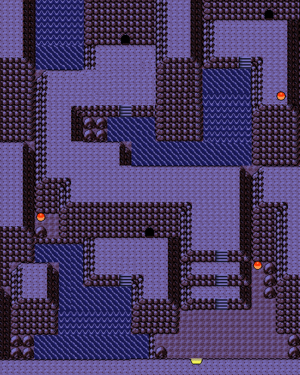
=== 2F === | {{m|Surf}} out into the lake, climb the {{m|waterfall}}, and enter the small chamber to find a {{DL|Revive|Max Revive}}. After that, go north to climb up a triple stairway. Climb the northeast waterfall to reach another small chamber with a {{DL|Potion|Full Restore}}. Swim back across the lake and enter the opening to the north. | ||
{{m|Surf}} out into the lake, climb the {{m|waterfall}}, and enter the small chamber to find a {{DL|Revive|Max Revive}}. | |||
{| class="expandable" align="center" style="background: #{{ | {| class="expandable" align="center" style="background: #{{locationcolor/med|cave}}; {{roundy}}; border: 5px solid #{{locationcolor/light|cave}};" | ||
|- align="center" | |- align="center" | ||
! Available Pokémon | ! Available Pokémon | ||
| Line 68: | Line 64: | ||
{{catch/footer|cave}} | {{catch/footer|cave}} | ||
|} | |} | ||
{| class="expandable" align="center" style="background: #{{ | {| class="expandable" align="center" style="background: #{{locationcolor/med|cave}}; {{roundy}}; border: 5px solid #{{locationcolor/light|cave}};" | ||
|- align="center" | |- align="center" | ||
! Items | ! Items | ||
| Line 74: | Line 70: | ||
| | | | ||
{{itlisth|cave}} | {{itlisth|cave}} | ||
{{ | {{Itemlist|Max Revive|In the small southern chamber (requires {{m|Surf}}, {{m|Waterfall}})|G=yes|S=yes|display={{DL|Revive|Max Revive}}}} | ||
{{ | {{Itemlist|Full Restore|In the small northeast chamber (requires {{m|Surf}}, {{m|Waterfall}})|G=yes|S=yes|display={{DL|Potion|Full Restore}}}} | ||
{{itlistfoot|cave}} | {{itlistfoot|cave}} | ||
|} | |} | ||
{{-}} | {{-}} | ||
[[File:Mt Silver | [[File:Mt. Silver Summit GSC.png|thumb|Mt Silver, 3F]] | ||
=== Summit === | ===Summit=== | ||
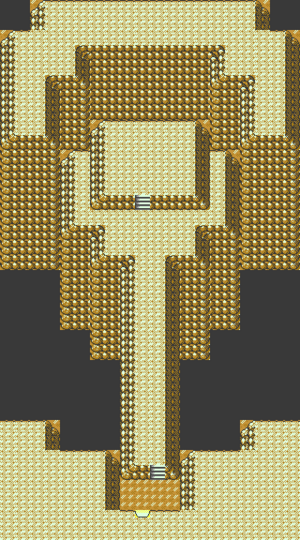
Cross the land bridge to meet the strongest opponent in the game, former Champion {{ga|Red}}. | Cross the land bridge to meet the strongest opponent in the game, former Champion {{ga|Red}}. His is the highest-leveled team of any Trainer, ranging from 73 to 81. To stand a chance against him, it is advisable to raise a team to about level 75. Even with a type advantage, Red's Pokémon won't go down without a fight. | ||
Red's {{p|Pikachu}} is incredibly high-leveled, so its {{type|Electric}} moves can deal some serious damage. | Red's {{p|Pikachu}} is incredibly high-leveled, so its {{type|Electric}} moves can deal some serious damage. But even so, it is still vulnerable to {{type|Ground}} attacks like {{m|Earthquake}}. {{p|Espeon}} can be dangerous for any Pokémon with low {{stat|Special Defense}}, so take it out fast with {{t|Ghost}}- or {{type|Dark}} attacks. {{p|Snorlax}} knows {{m|Rest}} and {{m|Snore}}, so it can both heal itself and attack while asleep; use {{type|Fighting}} moves like {{m|Cross Chop}} to take down his {{type|Normal}} behemoth. {{p|Venusaur}} can't stand extreme {{t|Fire|heat}} or {{t|Ice|cold}}. Look out for its {{m|Sunny Day}}, which lets it use {{m|SolarBeam}} without charging, and fully restore its health with {{m|Synthesis}}. {{p|Charizard}} is vulnerable to water and electricity, and takes massive damage from {{type|Rock}} moves. Lastly, his {{p|Blastoise}} is susceptible to {{t|Grass}}- and Electric-type attacks, but can retaliate with {{m|Blizzard}}. | ||
{| align="center" | {| align="center" | ||
| | | | ||
{{Party | {{Party/Single|color={{red color}}|headcolor={{red color light}}|bordercolor={{red color dark}} | ||
|color={{red color}} | |||
|headcolor={{red color light}} | |||
|bordercolor={{red color dark}} | |||
|sprite=Spr GS Red.png | |sprite=Spr GS Red.png | ||
|prize={{PDollar}}7700 | |prize={{PDollar}}7700 | ||
|class=Pokémon Trainer | |class=Pokémon Trainer|name=Red | ||
|name=Red | |game=GSC|location=Mt. Silver | ||
|game=GSC | |pokemon=6}} | ||
|location=Mt. Silver | |{{Pokémon/2|game=Gold and Silver | ||
|pokemon=6 | |ndex=025|pokemon=Pikachu | ||
| | |||
|game= | |||
|ndex=025 | |||
|pokemon=Pikachu | |||
|type1=Electric | |type1=Electric | ||
|move1=Charm | |level=81|gender=male | ||
|move1type=Normal | |move1=Charm|move1type=Normal | ||
|move2=Quick Attack | |move2=Quick Attack|move2type=Normal | ||
|move2type=Normal | |move3=Thunderbolt|move3type=Electric | ||
|move3=Thunderbolt | |move4=Thunder|move4type=Electric}} | ||
|move3type=Electric | |||
|move4=Thunder | |{{Pokémon/2|game=Gold and Silver | ||
|move4type=Electric}} | |ndex=196|pokemon=Espeon | ||
| | |||
|game= | |||
|ndex=196 | |||
|pokemon=Espeon | |||
|type1=Psychic | |type1=Psychic | ||
|move1=Mud-Slap | |level=73|gender=male | ||
|move1type=Ground | |move1=Mud-Slap|move1type=Ground | ||
|move2=Swift | |move2=Swift|move2type=Normal | ||
|move2type=Normal | |move3=Reflect|move3type=Psychic | ||
|move3=Reflect | |move4=Psychic|move4type=Psychic}} | ||
|move3type=Psychic | |||
|move4=Psychic | |{{Pokémon/2|game=Gold and Silver | ||
|move4type=Psychic}} | |ndex=143|pokemon=Snorlax | ||
| | |||
|game= | |||
|ndex=143 | |||
|pokemon=Snorlax | |||
|type1=Normal | |type1=Normal | ||
|move1=Amnesia | |level=75|gender=male | ||
|move1type=Psychic | |move1=Amnesia|move1type=Psychic | ||
|move2=Snore | |move2=Snore|move2type=Normal | ||
|move2type=Normal | |move3=Rest|move3type=Psychic | ||
|move3=Rest | |move4=Body Slam|move4type=Normal}} | ||
|move3type=Psychic | |||
|move4=Body Slam | {{Party/Div|color={{red color}}}} | ||
|move4type=Normal}} | |{{Pokémon/2|game=Gold and Silver | ||
| | |ndex=003|pokemon=Venusaur | ||
| | |type1=Grass|type2=Poison | ||
|game= | |level=77|gender=male | ||
|ndex=003 | |move1=Sunny Day|move1type=Fire | ||
|pokemon=Venusaur | |move2=Giga Drain|move2type=Grass | ||
| | |move3=Synthesis|move3type=Grass | ||
|level=77 | |move4=SolarBeam|move4type=Grass}} | ||
| | |||
|{{Pokémon/2|game=Gold and Silver | |||
|move1=Sunny Day | |ndex=006|pokemon=Charizard | ||
|move1type=Fire | |type1=Fire|type2=Flying | ||
|move2=Giga Drain | |level=77|gender=male | ||
|move2type=Grass | |move1=Flamethrower|move1type=Fire | ||
|move3=Synthesis | |move2=Wing Attack|move2type=Flying | ||
|move3type=Grass | |move3=Slash|move3type=Normal | ||
|move4=SolarBeam | |move4=Fire Spin|move4type=Fire}} | ||
|move4type=Grass}} | |||
| | |{{Pokémon/2|game=Gold and Silver | ||
|ndex=009|pokemon=Blastoise | |||
|game= | |||
|ndex=006 | |||
|pokemon=Charizard | |||
| | |||
|level=77 | |||
| | |||
|move1=Flamethrower | |||
|move1type=Fire | |||
|move2=Wing Attack | |||
|move2type=Flying | |||
|move3=Slash | |||
|move3type=Normal | |||
|move4=Fire Spin | |||
|move4type=Fire}} | |||
| | |||
|game= | |||
|ndex=009 | |||
|pokemon=Blastoise | |||
|type1=Water | |type1=Water | ||
|move1=Rain Dance | |level=77|gender=male | ||
|move1type=Water | |move1=Rain Dance|move1type=Water | ||
|move2=Blizzard | |move2=Blizzard|move2type=Ice | ||
|move2type=Ice | |move3=Surf|move3type=Water | ||
|move3=Surf | |move4=Whirlpool|move4type=Water}} | ||
|move3type=Water | {{Party/Footer}} | ||
|move4=Whirlpool | |||
|move4type=Water}} | |||
}} | |||
|} | |} | ||
Defeated, he pauses for a second in stunned silence. | Defeated, he pauses for a second in stunned silence. Then in the blink of an eye, Red is gone. It is possible to battle him again, by defeating the Elite Four again and returning to the mountaintop. A moment later, the credits roll for the second time but the game is not saved automatically - you will resume your adventure just outside the [[Pokémon Center]] next to [[Mt. Silver]]. | ||
Having scaled [[Mt. Silver]] and defeated the legendary Trainer, the only thing left to do is to complete the Pokédex. | Having scaled [[Mt. Silver]] and defeated the legendary Trainer, the only thing left to do is to complete the Pokédex. {{game|Gold and Silver|s}} brought the total number of Pokémon up to 251, so there is plenty of training left to do! | ||
| Line 213: | Line 159: | ||
|gamename=Gold and Silver | |gamename=Gold and Silver | ||
|prev=yes | |prev=yes | ||
|prevsection=27 | |prevsection=27 | ||
|prevname=Route 22, Route 28 | |prevname=Route 22, Route 28 | ||
|next=no | |||
}} | }} | ||
Revision as of 19:03, 3 September 2017
These pages follow the original Game Boy Color iteration, not Pokémon HeartGold and SoulSilver. The guide for those games can be found here.
Mt. Silver
1F
The first chamber is the only part of Mt. Silver that is dark enough to require the use of Flash. Grab the X Accuracy on the southeast platform, then loop around to the west to reach an Escape Rope. West of the middle platform between the ledges is a Dire Hit hidden on the rock. The northern, largest platform opens into a T-intersection; turn left to get a Max Elixer, then go right and south to find a hidden Ultra Ball. Head back north to reach the opening in the northeast.
| Available Pokémon | |||||||||||||||||||||||||||||||||||||||||||||||||||||||||||||||||||||||||||||||||||||||||||||||||||||||||||||||||||||||||||||
|---|---|---|---|---|---|---|---|---|---|---|---|---|---|---|---|---|---|---|---|---|---|---|---|---|---|---|---|---|---|---|---|---|---|---|---|---|---|---|---|---|---|---|---|---|---|---|---|---|---|---|---|---|---|---|---|---|---|---|---|---|---|---|---|---|---|---|---|---|---|---|---|---|---|---|---|---|---|---|---|---|---|---|---|---|---|---|---|---|---|---|---|---|---|---|---|---|---|---|---|---|---|---|---|---|---|---|---|---|---|---|---|---|---|---|---|---|---|---|---|---|---|---|---|---|---|
| |||||||||||||||||||||||||||||||||||||||||||||||||||||||||||||||||||||||||||||||||||||||||||||||||||||||||||||||||||||||||||||
| Items | ||||||||||||||||||||||||||||
|---|---|---|---|---|---|---|---|---|---|---|---|---|---|---|---|---|---|---|---|---|---|---|---|---|---|---|---|---|
| ||||||||||||||||||||||||||||
2F
Surf out into the lake, climb the waterfall, and enter the small chamber to find a Max Revive. After that, go north to climb up a triple stairway. Climb the northeast waterfall to reach another small chamber with a Full Restore. Swim back across the lake and enter the opening to the north.
| Available Pokémon | |||||||||||||||||||||||||||||||||||||||||||||||||||||||||||||||||||||||||||||||||||||||||||||||||||||||||||||||||||||||||||||||||||||||||||||||||||||||||||||||||||||||||||||||||||||||||||||||||||||||||||||||||||||||||||||||||||||||||||||||||||||||||||||||||||||||||||||||||||||||||||||||||||||||||||||||||||||||||||
|---|---|---|---|---|---|---|---|---|---|---|---|---|---|---|---|---|---|---|---|---|---|---|---|---|---|---|---|---|---|---|---|---|---|---|---|---|---|---|---|---|---|---|---|---|---|---|---|---|---|---|---|---|---|---|---|---|---|---|---|---|---|---|---|---|---|---|---|---|---|---|---|---|---|---|---|---|---|---|---|---|---|---|---|---|---|---|---|---|---|---|---|---|---|---|---|---|---|---|---|---|---|---|---|---|---|---|---|---|---|---|---|---|---|---|---|---|---|---|---|---|---|---|---|---|---|---|---|---|---|---|---|---|---|---|---|---|---|---|---|---|---|---|---|---|---|---|---|---|---|---|---|---|---|---|---|---|---|---|---|---|---|---|---|---|---|---|---|---|---|---|---|---|---|---|---|---|---|---|---|---|---|---|---|---|---|---|---|---|---|---|---|---|---|---|---|---|---|---|---|---|---|---|---|---|---|---|---|---|---|---|---|---|---|---|---|---|---|---|---|---|---|---|---|---|---|---|---|---|---|---|---|---|---|---|---|---|---|---|---|---|---|---|---|---|---|---|---|---|---|---|---|---|---|---|---|---|---|---|---|---|---|---|---|---|---|---|---|---|---|---|---|---|---|---|---|---|---|---|---|---|---|---|---|---|---|---|---|---|---|---|---|---|---|---|---|---|---|---|---|---|---|---|---|---|---|---|---|---|---|---|---|---|---|---|---|
| |||||||||||||||||||||||||||||||||||||||||||||||||||||||||||||||||||||||||||||||||||||||||||||||||||||||||||||||||||||||||||||||||||||||||||||||||||||||||||||||||||||||||||||||||||||||||||||||||||||||||||||||||||||||||||||||||||||||||||||||||||||||||||||||||||||||||||||||||||||||||||||||||||||||||||||||||||||||||||
| Items | ||||||||||||||||
|---|---|---|---|---|---|---|---|---|---|---|---|---|---|---|---|---|
| ||||||||||||||||
Summit
Cross the land bridge to meet the strongest opponent in the game, former Champion Red. His is the highest-leveled team of any Trainer, ranging from 73 to 81. To stand a chance against him, it is advisable to raise a team to about level 75. Even with a type advantage, Red's Pokémon won't go down without a fight.
Red's Pikachu is incredibly high-leveled, so its Electric-type moves can deal some serious damage. But even so, it is still vulnerable to Ground-type attacks like Earthquake. Espeon can be dangerous for any Pokémon with low Special Defense, so take it out fast with Ghost- or Dark-type attacks. Snorlax knows Rest and Snore, so it can both heal itself and attack while asleep; use Fighting-type moves like Cross Chop to take down his Normal-type behemoth. Venusaur can't stand extreme heat or cold. Look out for its Sunny Day, which lets it use SolarBeam without charging, and fully restore its health with Synthesis. Charizard is vulnerable to water and electricity, and takes massive damage from Rock-type moves. Lastly, his Blastoise is susceptible to Grass- and Electric-type attacks, but can retaliate with Blizzard.
| ||||||||||||||||||||||||||||||||||||||||||||||||||||||||||||||||||||||||||||||||||||||||||||||||||||||||||||||||||||||||||||||||||||||||||||||||||||||||||
Defeated, he pauses for a second in stunned silence. Then in the blink of an eye, Red is gone. It is possible to battle him again, by defeating the Elite Four again and returning to the mountaintop. A moment later, the credits roll for the second time but the game is not saved automatically - you will resume your adventure just outside the Pokémon Center next to Mt. Silver.
Having scaled Mt. Silver and defeated the legendary Trainer, the only thing left to do is to complete the Pokédex. Pokémon Gold and Silver brought the total number of Pokémon up to 251, so there is plenty of training left to do!
|
Gold and Silver walkthrough |

|
This article is part of Project Walkthroughs, a Bulbapedia project that aims to write comprehensive step-by-step guides on each Pokémon game. |


