Appendix:Gold and Silver walkthrough/Section 16: Difference between revisions
No edit summary |
(→Fast Ship S.S. Aqua: Updated more Pokédollar yields to reflect raw yield w/o Amulet Coin) |
||
| (19 intermediate revisions by 7 users not shown) | |||
| Line 1: | Line 1: | ||
{{WalkthroughNotice|GS}} | |||
==Return to New Bark== | |||
Congratulations, you are now the Indigo League Champion! That marks you as the strongest Trainer in all of [[Johto]] and [[Kanto]]. | |||
After the credits roll, you wind up back home in {{to|New Bark}}. {{prof|Elm}} calls shortly after, asking you to visit the lab. Swing by to get the {{key|II|S.S. Ticket}}, a pass to board the [[S.S. Aqua]] in [[Olivine City]]. Head to the harbor to set sail for [[Vermilion City]]! | |||
==Fast Ship S.S. Aqua== | |||
[[File:SS Aqua 1F GSC.png|thumb|S.S. Aqua, 1F]] | |||
[[File:SS Aqua B1F GSC.png|thumb|S.S. Aqua, B1F]] | |||
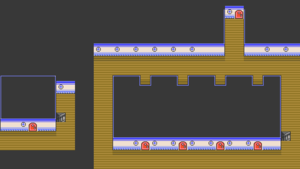
Upon boarding the ship, a frantic old man runs into you. His granddaughter is missing, and he asks for your help before running off. Luckily, there are only so many places where she could be on the ship. Before starting the search, check you your cabin at the west end of the hallway; it has a PC and a cozy bed to rest in, which is important to have with so many Trainers on board. | |||
{| class="expandable" align="center" style="background: #{{locationcolor/med|ocean}}; {{roundy}}; border: 5px solid #{{locationcolor/light|ocean}};" | |||
{| class="expandable" align="center" style="background: #{{ | |||
|- align="center" | |- align="center" | ||
! Trainers | ! Trainers | ||
|- | |- | ||
| | | | ||
{{trainerheader|ocean|I}} | {{trainerheader|ocean|I}} | ||
{{Trainerentry| | {{catch/div|ocean|Upper deck}} | ||
{{Trainerentry|Spr GS Hiker.png|Hiker|Noland|1056|2|028|Sandslash|♂|31|None|076|Golem|♂|33|None}} | |||
{{Trainerdiv|ocean}} | |||
{{Trainerentry|Spr GS Pokéfan M.png|Pokéfan|Colin|2560|1|225|Delibird|♂|32|None}} | |||
{{Trainerdiv|ocean}} | |||
{{Trainerentry|Spr GS Twins.png|Twins|Meg & Peg|620|2|216|Teddiursa|♀|31|None|231|Phanpy|♀|31|None}} | |||
{{Trainerdiv|ocean}} | {{Trainerdiv|ocean}} | ||
{{Trainerentry| | {{Trainerentry|Spr GS Firebreather.png|Firebreather|Lyle|1344|3|109|Koffing|♂|28|None|136|Flareon|♂|31|None|109|Koffing|♂|28|None}} | ||
{{Trainerdiv|ocean}} | {{Trainerdiv|ocean}} | ||
{{Trainerentry| | {{Trainerentry|Spr GS Sailor.png|Sailor|Stanly|1040|3|066|Machop|♂|31|None|067|Machoke|♂|33|None|054|Psyduck|♂|26|None}} | ||
{{catch/div|ocean|Lower deck}} | |||
{{Trainerentry|Spr GS Juggler.png|Juggler|Fritz|1040|3|122|Mr. Mime|♂|29|None|067|Machoke|♂|29|None|126|Magmar|♂|29|None}} | |||
{{Trainerdiv|ocean}} | {{Trainerdiv|ocean}} | ||
{{Trainerentry| | {{Trainerentry|Spr GS Sailor.png|Sailor|Jeff|1280|2|020|Raticate|♂|32|None|020|Raticate|♂|32|None}} | ||
{{Trainerdiv|ocean}} | {{Trainerdiv|ocean}} | ||
{{Trainerentry| | {{Trainerentry|Spr GS Picnicker.png|Picnicker|Debra|660|1|119|Seaking|♀|33|None}} | ||
{{Trainerfooter|ocean|I}} | {{Trainerfooter|ocean|I}} | ||
|} | |} | ||
{| class="expandable" align="center" style="background: #{{ | {| class="expandable" align="center" style="background: #{{locationcolor/med|ocean}}; {{roundy}}; border: 5px solid #{{locationcolor/light|ocean}};" | ||
|- align="center" | |- align="center" | ||
! | ! Items | ||
|- | |- | ||
| | | | ||
{{ | {{itlisth|ocean}} | ||
{{ | {{Itemlist|Metal Coat|From the old man for finding his granddaughter|G=yes|S=yes|display={{DL|Type-enhancing item|Metal Coat}}}} | ||
{{ | {{itlistfoot|ocean}} | ||
{{ | |||
|} | |} | ||
== | ===Upper deck=== | ||
Two of the other cabins on the north side are empty, while the one between them has a Hiker. On the south side, only one cabin is unoccupied; the cabin near the stairs belongs to the old man, the next has a PokéFan and a pair of Twins, while the last has a Firebreather. No little girl to be found, so check out the lower deck. | |||
===Lower deck=== | |||
A Sailor blocks the way, and asks that you track down another Sailor for their shift change. This Sailor is snoozing in the cabin next to yours; beat him in battle and he returns to his post. Further along, there is a Juggler hunched over a trash can, and a Sailor and a Picnicker beyond that. The western stairs lead to the Captain's cabin. | |||
{| class="expandable" align="center" style="background: #{{ | ===Captain's cabin=== | ||
The little girl is with the Captain, safe but bored, and keeps trying to get him to play. Realizing that her grandfather is worried about her, she runs off and you both end up in the old man's cabin. For taking care of his granddaughter, he rewards you with a {{DL|Type-enhancing item|Metal Coat}}, a power-up for {{type|Steel}} attacks and an essential part of {{p|Steelix|certain}} {{p|Scizor|trade}} evolutions. Just then, the Captain announces that the ship has docked in Vermilion Harbor, and passengers may now disembark. | |||
{{-}} | |||
==Vermilion City== | |||
[[File:Vermilion City GSC.png|thumb|300px|Vermilion City]] | |||
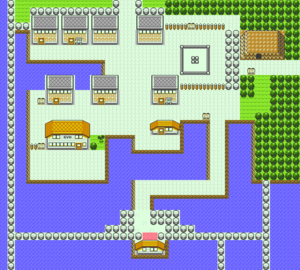
[[Vermilion City]] has not changed much over the past [[Generation I|three years]], though the land around [[Diglett's Cave]] has shifted a bit. A sleeping {{p|Snorlax}} blocks the path to the east, and the old man is still clearing the ground for construction with his {{p|Machop}}. Stop by the Poké Mart if you need more Potions or Poké Balls, then visit the Pokémon Fan Club on the west side. | |||
{| class="expandable" align="center" style="background: #F99349; {{roundy}}; border: 5px solid #FBB786;" | |||
|- align="center" | |- align="center" | ||
! Available Pokémon | ! Available Pokémon | ||
|- | |- | ||
| | | | ||
{| class="expandable" align="center" style="background: #F99349; {{roundy}}; border: 5px solid #FBB786;" | |||
|- align="center" | |||
! City | |||
|- | |||
| | |||
{{Catch/header|sand|yes}} | {{Catch/header|sand|yes}} | ||
{{Catch/div|water| | {{Catch/div|water|Surfing}} | ||
{{Catch/entry2|072|Tentacool|yes|yes| | {{Catch/entry2|072|Tentacool|yes|yes|no|Surf|30-39|all=90%|type1=Water|type2=Poison}} | ||
{{Catch/entry2|073|Tentacruel|yes|yes| | {{Catch/entry2|073|Tentacruel|yes|yes|no|Surf|35-39|all=10%|type1=Water|type2=Poison}} | ||
{{Catch/entry2|129|Magikarp|yes|yes| | {{catch/div|water|Fishing}} | ||
{{Catch/entry2|072|Tentacool|yes|yes| | {{Catch/entry2|129|Magikarp|yes|yes|no|Fish Old|10|all=85%|type1=Water}} | ||
{{Catch/entry2|072|Tentacool|yes|yes| | {{Catch/entry2|072|Tentacool|yes|yes|no|Fish Old|10|all=15%|type1=Water|type2=Poison}} | ||
{{Catch/entry2|129|Magikarp|yes|yes| | {{Catch/entry2|072|Tentacool|yes|yes|no|Fish Good|20|all=35%|type1=Water|type2=Poison}} | ||
{{Catch/entry2|170|Chinchou|yes|yes| | {{Catch/entry2|129|Magikarp|yes|yes|no|Fish Good|20|all=35%|type1=Water}} | ||
{{Catch/entry2|090|Shellder|yes|yes| | {{Catch/entry2|170|Chinchou|yes|yes|no|Fish Good|20|all=20%|type1=Water|type2=Electric}} | ||
{{Catch/entry2|090|Shellder|yes|yes|no|Fish Good|20|all=10%|type1=Water}} | |||
{{Catch/footer|sand}} | {{Catch/footer|sand}} | ||
|} | |||
{| class="expandable" align="center" style="background: #F99349; {{roundy}}; border: 5px solid #FBB786;" | |||
|- align="center" | |||
! Harbor | |||
|- | |||
| | |||
{{Catch/header|water|yes}} | |||
{{Catch/div|water|Surfing}} | |||
{{Catch/entry2|072|Tentacool|yes|yes|no|Surf|30-39|all=90%|type1=Water|type2=Poison}} | |||
{{Catch/entry2|073|Tentacruel|yes|yes|no|Surf|35-39|all=10%|type1=Water|type2=Poison}} | |||
{{catch/div|water|Fishing}} | |||
{{Catch/entry2|129|Magikarp|yes|yes|no|Fish Old|10|all=85%|type1=Water}} | |||
{{Catch/entry2|072|Tentacool|yes|yes|no|Fish Old|10|all=15%|type1=Water|type2=Poison}} | |||
{{Catch/entry2|072|Tentacool|yes|yes|no|Fish Good|20|all=35%|type1=Water|type2=Poison}} | |||
{{Catch/entry2|129|Magikarp|yes|yes|no|Fish Good|20|all=35%|type1=Water}} | |||
{{Catch/entry2|170|Chinchou|yes|yes|no|Fish Good|20|all=20%|type1=Water|type2=Electric}} | |||
{{Catch/entry2|090|Shellder|yes|yes|no|Fish Good|20|all=10%|type1=Water}} | |||
{{Catch/footer|water}} | |||
|} | |||
|} | |||
{| class="expandable" align="center" style="background: #F99349; {{roundy}}; border: 5px solid #FBB786;" | |||
|- align="center" | |||
! Items | |||
|- | |||
| | |||
{{itlisth|sand}} | |||
{{Itemlist|Rare Candy|From the Fan Club Chairman|G=yes|S=yes|display={{DL|Vitamin|Rare Candy}}}} | |||
{{Itemlist|Full Heal|In the bush outside the Gym (hidden)|G=yes|S=yes|display={{DL|Status ailment healing item|Full Heal}}}} | |||
{{catch/div|sand|After earning all 16 Badges}} | |||
{{Itemlist|HP Up|From the man near Diglett's Cave|G=yes|S=yes|display={{DL|Vitamin|HP Up}}}} | |||
{{itlistfoot|sand}} | |||
|} | |} | ||
Listen to the Chairman's | ===Pokémon Fan Club=== | ||
Listen to the Chairman's long story about his prized {{p|Rapidash}}, and he gives you a {{DL|Vitamin|Rare Candy}} for sticking around through the whole thing. Take note of the guy with the {{p|Clefairy}}; it is actually a {{DL|Battle item|Poké Doll}} that will need to be returned to its owner later. | |||
[[File:Vermilion Gym GSC.png|thumb|Vermilion Gym]] | |||
[[ | |||
===Vermilion Gym=== | |||
{{sign|RBY|header}} | {{sign|RBY|header}} | ||
{{sign|RBY|VERMILION CITY <br> POKéMON GYM <br> LEADER: LT. SURGE | {{sign|RBY|title|VERMILION CITY<br>POKéMON GYM<br>LEADER: LT. SURGE}} | ||
{{sign|RBY|The Lightning<br>American!}} | |||
{{sign|RBY|footer}} | {{sign|RBY|footer}} | ||
The [[Vermilion Gym]] specializes in {{ | The [[Vermilion Gym]] specializes in {{type|Electric}} Pokémon, so avoid using {{t|Water}} or {{t|Flying}} Pokémon. Conversely, {{t|Ground}} Pokémon are not only immune to electrical attacks, but their Ground-type attacks inflict serious damage on Electric Pokémon. | ||
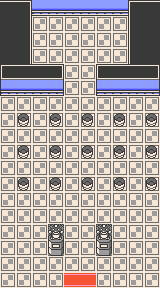
[[Lt. Surge]] has three Gym Trainers, but his hidden switches are broken so you can walk right up to him. His {{p|Magneton}} knows the useful {{m|Lock-On}}-and-{{m|Zap Cannon}} combo, which inflicts serious damage and {{status|paralysis}}, and his two {{p|Electrode}} may {{m|Explosion|explode}} without warning. If the battle drags on for too long, his Pokémon may be harder to hit thanks to {{m|Double Team}}. Use the {{TM|26|Earthquake}} from {{ka|Victory Road}} to sweep through his five Pokémon. | |||
{ | |||
{{ | |||
{{ | |||
{{ | |||
{{ | |||
{{ | |||
{{ | |||
{{ | |||
{{User:KCorp4000/Gymtag | |||
|gym=Vermilion | |||
|badge=Thunder | |||
|type=Electric | |||
|trainers={{trainerheader|electric}} | |||
{{trainerentry|Spr GS Juggler.png|Juggler|Horton|1320|4|101|Electrode||33|None|101|Electrode||33|None|101|Electrode||33|None|101|Electrode||33|None}} | |||
{{trainerdiv|electric}} | |||
{{trainerentry|Spr GS Guitarist.png|Guitarist|Vincent|1024|4|081|Magnemite||27|None|081|Magnemite||32|None|081|Magnemite||32|None|100|Voltorb||33|None}} | |||
{{trainerdiv|electric}} | |||
{{trainerentry|Spr GS Gentleman.png|Gentleman|Gregory|2376|2|025|Pikachu|♂|37|None|180|Flaaffy|♂|33|None}} | |||
{{trainerfooter|electric|I}} | |||
|leader={{Party/Single|color={{electric color}}|bordercolor={{electric color dark}}|headcolor={{electric color light}} | |||
|sprite=Spr GS Lt Surge.png | |||
{{Party|color={{electric color}}|bordercolor={{electric color dark}}|headcolor={{electric color light}} | |||
|sprite= | |||
|prize={{pdollar}}4600 | |prize={{pdollar}}4600 | ||
|class=Leader | |class=Leader|name=Lt. Surge | ||
|name=Lt. Surge | |game=GSC|location=Vermilion Gym | ||
|game=GSC | |pokemon=5}} | ||
|location=Vermilion Gym | {{!}}{{Pokémon/2|game=Gold and Silver | ||
|pokemon=5 | |ndex=026|pokemon=Raichu | ||
|type1=Electric | |||
|level=44|gender=male | |level=44|gender=male | ||
|move1=Thunderbolt|move1type=Electric | |move1=Thunderbolt|move1type=Electric | ||
|move2=Thunder|move2type=Electric | |move2=Thunder|move2type=Electric | ||
|move3=Thunder Wave|move3type=Electric | |move3=Thunder Wave|move3type=Electric | ||
|move4=Quick Attack|move4type=Normal}} | |move4=Quick Attack|move4type=Normal}} | ||
|level=40 | {{!}}{{Pokémon/2|game=Gold and Silver | ||
|ndex=101|pokemon=Electrode | |||
|type1=Electric | |||
|level=40 | |||
|move1=Screech|move1type=Normal | |move1=Screech|move1type=Normal | ||
|move2=Double Team|move2type=Normal | |move2=Double Team|move2type=Normal | ||
|move3=Swift|move3type=Normal | |move3=Swift|move3type=Normal | ||
|move4=Explosion|move4type=Normal}} | |move4=Explosion|move4type=Normal}} | ||
| | |||
{{Party/Div|color={{electric color}}}} | |||
{{!}}style="margin:auto"{{!}}{{Pokémon/2|game=Gold and Silver | |||
|ndex=082|pokemon=Magneton | |||
|type1=Electric|type2=Steel | |||
|level=44 | |||
|move1=Zap Cannon|move1type=Electric | |move1=Zap Cannon|move1type=Electric | ||
|move2=Lock-On|move2type=Normal | |move2=Lock-On|move2type=Normal | ||
|move3=Double Team|move3type=Normal | |move3=Double Team|move3type=Normal | ||
|move4=Swift|move4type=Normal}} | |move4=Swift|move4type=Normal}} | ||
|level=46|gender=male | {{!}}style="margin:auto"{{!}}{{Pokémon/2|game=Gold and Silver | ||
|ndex=125|pokemon=Electabuzz | |||
|type1=Electric | |||
|level=46|gender=male | |||
|move1=ThunderPunch|move1type=Electric | |move1=ThunderPunch|move1type=Electric | ||
|move2=Thunder|move2type=Electric | |move2=Thunder|move2type=Electric | ||
|move3=Light Screen|move3type=Psychic | |move3=Light Screen|move3type=Psychic | ||
|move4=Quick Attack|move4type=Normal}} | |move4=Quick Attack|move4type=Normal}} | ||
{{Party/Footer}} | |||
}} | }} | ||
With | Defeated, [[Lt. Surge]] awards you the {{badge|Thunder}}, which gives your party members a {{stat|Speed}} boost during battle. That's all, though; unlike the Johto Gym Leaders, only two of their Kanto counterparts give out TMs. | ||
With Snorlax blocking the east road, the only way forward is north to {{rt|6|Kanto}}. | |||
{{WalkthroughPrevNext | |||
|game=Gold | |||
|game2=Silver | |||
|gamename=Gold and Silver | |||
|prev=yes | |||
|prevsection=15 | |||
|prevname=Indigo Plateau: The Pokémon League | |||
|next=yes | |||
|nextsection=17 | |||
|nextname=Route 6, Saffron City | |||
}} | |||
<br> | <br> | ||
{{Project Walkthroughs notice}} | {{Project Walkthroughs notice}} | ||
[[Category:Gold and Silver walkthrough]] | [[Category:Gold and Silver walkthrough]] | ||
Revision as of 18:29, 9 November 2015
These pages follow the original Game Boy Color iteration, not Pokémon HeartGold and SoulSilver. The guide for those games can be found here.
Return to New Bark
Congratulations, you are now the Indigo League Champion! That marks you as the strongest Trainer in all of Johto and Kanto.
After the credits roll, you wind up back home in New Bark. Elm calls shortly after, asking you to visit the lab. Swing by to get the S.S. Ticket, a pass to board the S.S. Aqua in Olivine City. Head to the harbor to set sail for Vermilion City!
Fast Ship S.S. Aqua
Upon boarding the ship, a frantic old man runs into you. His granddaughter is missing, and he asks for your help before running off. Luckily, there are only so many places where she could be on the ship. Before starting the search, check you your cabin at the west end of the hallway; it has a PC and a cozy bed to rest in, which is important to have with so many Trainers on board.
| Trainers | ||||||||||||||||||||||||||||||||||||||||||||||||||||||||||||||||||||||||||||||||||||||||||||||||||||||||||||||||||||||||||||||||||||||||||||||||||||||||||||||||||||||||||||||||||||||||||||||||||||||||||||
|---|---|---|---|---|---|---|---|---|---|---|---|---|---|---|---|---|---|---|---|---|---|---|---|---|---|---|---|---|---|---|---|---|---|---|---|---|---|---|---|---|---|---|---|---|---|---|---|---|---|---|---|---|---|---|---|---|---|---|---|---|---|---|---|---|---|---|---|---|---|---|---|---|---|---|---|---|---|---|---|---|---|---|---|---|---|---|---|---|---|---|---|---|---|---|---|---|---|---|---|---|---|---|---|---|---|---|---|---|---|---|---|---|---|---|---|---|---|---|---|---|---|---|---|---|---|---|---|---|---|---|---|---|---|---|---|---|---|---|---|---|---|---|---|---|---|---|---|---|---|---|---|---|---|---|---|---|---|---|---|---|---|---|---|---|---|---|---|---|---|---|---|---|---|---|---|---|---|---|---|---|---|---|---|---|---|---|---|---|---|---|---|---|---|---|---|---|---|---|---|---|---|---|---|---|
| ||||||||||||||||||||||||||||||||||||||||||||||||||||||||||||||||||||||||||||||||||||||||||||||||||||||||||||||||||||||||||||||||||||||||||||||||||||||||||||||||||||||||||||||||||||||||||||||||||||||||||||
| Items | ||||||||||||
|---|---|---|---|---|---|---|---|---|---|---|---|---|
| ||||||||||||
Upper deck
Two of the other cabins on the north side are empty, while the one between them has a Hiker. On the south side, only one cabin is unoccupied; the cabin near the stairs belongs to the old man, the next has a PokéFan and a pair of Twins, while the last has a Firebreather. No little girl to be found, so check out the lower deck.
Lower deck
A Sailor blocks the way, and asks that you track down another Sailor for their shift change. This Sailor is snoozing in the cabin next to yours; beat him in battle and he returns to his post. Further along, there is a Juggler hunched over a trash can, and a Sailor and a Picnicker beyond that. The western stairs lead to the Captain's cabin.
Captain's cabin
The little girl is with the Captain, safe but bored, and keeps trying to get him to play. Realizing that her grandfather is worried about her, she runs off and you both end up in the old man's cabin. For taking care of his granddaughter, he rewards you with a Metal Coat, a power-up for Steel-type attacks and an essential part of certain trade evolutions. Just then, the Captain announces that the ship has docked in Vermilion Harbor, and passengers may now disembark.
Vermilion City
Vermilion City has not changed much over the past three years, though the land around Diglett's Cave has shifted a bit. A sleeping Snorlax blocks the path to the east, and the old man is still clearing the ground for construction with his Machop. Stop by the Poké Mart if you need more Potions or Poké Balls, then visit the Pokémon Fan Club on the west side.
| Available Pokémon | ||||||||||||||||||||||||||||||||||||||||||||||||||||||||||||||||||||||||||||||||||||||||||||||||||||||||||||||||||||||||||||||||||||||||||||||||||||||||||||||||||||||||||||||||||||||||||||||||||||||||||||||||||||||||||||||||||||||||||||||||||||||||||||||||||||||||||||||||||||||||||||||||||||||||||||||||||||||||||||||||||||||||||||||||||||||||||||||||||||||||||||||||||||||||||
|---|---|---|---|---|---|---|---|---|---|---|---|---|---|---|---|---|---|---|---|---|---|---|---|---|---|---|---|---|---|---|---|---|---|---|---|---|---|---|---|---|---|---|---|---|---|---|---|---|---|---|---|---|---|---|---|---|---|---|---|---|---|---|---|---|---|---|---|---|---|---|---|---|---|---|---|---|---|---|---|---|---|---|---|---|---|---|---|---|---|---|---|---|---|---|---|---|---|---|---|---|---|---|---|---|---|---|---|---|---|---|---|---|---|---|---|---|---|---|---|---|---|---|---|---|---|---|---|---|---|---|---|---|---|---|---|---|---|---|---|---|---|---|---|---|---|---|---|---|---|---|---|---|---|---|---|---|---|---|---|---|---|---|---|---|---|---|---|---|---|---|---|---|---|---|---|---|---|---|---|---|---|---|---|---|---|---|---|---|---|---|---|---|---|---|---|---|---|---|---|---|---|---|---|---|---|---|---|---|---|---|---|---|---|---|---|---|---|---|---|---|---|---|---|---|---|---|---|---|---|---|---|---|---|---|---|---|---|---|---|---|---|---|---|---|---|---|---|---|---|---|---|---|---|---|---|---|---|---|---|---|---|---|---|---|---|---|---|---|---|---|---|---|---|---|---|---|---|---|---|---|---|---|---|---|---|---|---|---|---|---|---|---|---|---|---|---|---|---|---|---|---|---|---|---|---|---|---|---|---|---|---|---|---|---|---|---|---|---|---|---|---|---|---|---|---|---|---|---|---|---|---|---|---|---|---|---|---|---|---|---|---|---|---|---|---|---|---|---|---|---|---|---|---|---|---|---|---|---|---|---|---|---|---|---|---|---|---|---|---|---|---|---|---|---|---|---|---|---|
| ||||||||||||||||||||||||||||||||||||||||||||||||||||||||||||||||||||||||||||||||||||||||||||||||||||||||||||||||||||||||||||||||||||||||||||||||||||||||||||||||||||||||||||||||||||||||||||||||||||||||||||||||||||||||||||||||||||||||||||||||||||||||||||||||||||||||||||||||||||||||||||||||||||||||||||||||||||||||||||||||||||||||||||||||||||||||||||||||||||||||||||||||||||||||||
| Items | |||||||||||||||||||||||||||||||||||
|---|---|---|---|---|---|---|---|---|---|---|---|---|---|---|---|---|---|---|---|---|---|---|---|---|---|---|---|---|---|---|---|---|---|---|---|
| |||||||||||||||||||||||||||||||||||
Pokémon Fan Club
Listen to the Chairman's long story about his prized Rapidash, and he gives you a Rare Candy for sticking around through the whole thing. Take note of the guy with the Clefairy; it is actually a Poké Doll that will need to be returned to its owner later.
Vermilion Gym
VERMILION CITY
POKéMON GYM
LEADER: LT. SURGE
The Lightning
American!
The Vermilion Gym specializes in Electric-type Pokémon, so avoid using Water or Flying Pokémon. Conversely, Ground Pokémon are not only immune to electrical attacks, but their Ground-type attacks inflict serious damage on Electric Pokémon.
Lt. Surge has three Gym Trainers, but his hidden switches are broken so you can walk right up to him. His Magneton knows the useful Lock-On-and-Zap Cannon combo, which inflicts serious damage and paralysis, and his two Electrode may explode without warning. If the battle drags on for too long, his Pokémon may be harder to hit thanks to Double Team. Use the TM26 (Earthquake) from Victory Road to sweep through his five Pokémon.
Defeated, Lt. Surge awards you the Thunder Badge, which gives your party members a Speed boost during battle. That's all, though; unlike the Johto Gym Leaders, only two of their Kanto counterparts give out TMs.
With Snorlax blocking the east road, the only way forward is north to Route 6.
|
Gold and Silver walkthrough |
|

|
This article is part of Project Walkthroughs, a Bulbapedia project that aims to write comprehensive step-by-step guides on each Pokémon game. |


