Appendix:Emerald walkthrough/Section 16: Difference between revisions
mNo edit summary |
|||
| (33 intermediate revisions by 20 users not shown) | |||
| Line 1: | Line 1: | ||
{{ | ==Sootopolis City== | ||
===Rayquaza to the Rescue=== | |||
When you return to {{ci|Sootopolis}}, you find the two super-ancient Pokémon still locked in battle. {{p|Rayquaza}} suddenly appears in a beam of green light shining through the storm clouds, and quickly descends to the city. It hovers above the two combatants, and ends the fighting with a single, intimidating roar. {{p|Groudon}} and {{p|Kyogre}} flee, Rayquaza flies off back to [[Sky Pillar]] with another loud cry, and the weather returns to normal. | |||
[[Maxie]], [[Archie]], {{Steven}}, and [[Wallace]] all witness these events from the Gym island. The team leaders realize and accept their mistakes, then leave for [[Mt. Pyre]] to return the {{key|III|Red Orb|Red}} and {{key|III|Blue Orb}}s. Wallace thanks you on behalf of the people of [[Hoenn]], and gives you {{HM|07|Waterfall}} as a gift. With this, a Pokémon can force its way up a waterfall, but using it requires defeating the Sootopolis Gym first! | |||
===Move Tutor=== | |||
Visit the Pokémon Center to prepare for the upcoming Gym. Inside, you find a girl near the bookcase on the left side of the counter. Speak to her, and she offers to teach the move {{m|Double-Edge}} to a Pokémon, one time only. | |||
== | ===Sootopolis Gym=== | ||
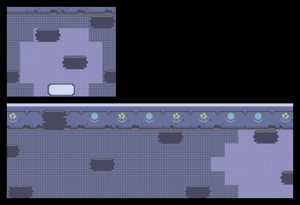
[[File:Sootopolis Gym 1F E.png|thumb|Sootopolis Gym, 1F]] | |||
[[File:Sootopolis Gym B1F E.png|thumb|Sootopolis Gym, B1F]] | |||
{{ | {{sign|E|header}} | ||
| | {{sign|E|title|Sootopolis City Pokémon Gym<br>Leader: Juan}} | ||
{{sign|E|The Gym Leader with the beauty of pure water!}} | |||
{{sign|E|footer}} | |||
| | |||
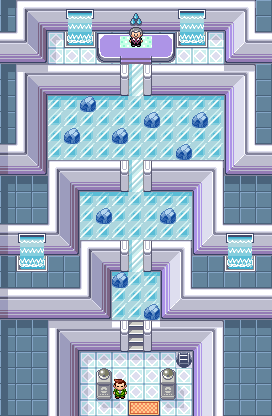
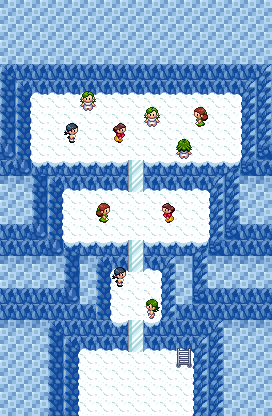
| | The [[Sootopolis Gym]] Specializes in {{type|Water}} Pokémon. {{t|Grass}}- and {{type|Electric}} moves are best here, while {{t|Fire}}, {{t|Ground}}, and {{t|Rock}} Pokémon may struggle. The Gym features three platforms where each icy tile must be traversed once in order to defrost the next stairway. Walking over an ice tile once cracks it; passing by a second time shatters it, leaving you to fall to the Gym's snowy underbelly where plenty of Trainers await. | ||
The first puzzle is a 3×3 grid of ice, with two icy rocks as obstacles. Starting on the south-central tile, move ←1, ↑1, →2, ↑1 and ←1. This reveals the first stairway. | |||
| | |||
| | The second puzzle is a 7×3 grid, with two icy rocks as obstacles. From the south-central tile, move ←3, ↑2, →2, ↓1, →2, ↓1, →2, ↑2, and ←3. This reveals the second stairway. | ||
| | |||
| | |||
| | |||
| | |||
The final puzzle is an 11×4 grid, with six icy rocks as obstacles. Starting on the south-central tile, move ←5, ↑3, →1, ↓1, →1, ↓1, →1, ↑2, →1, ↓1, →1, ↓1, →2, ↑1, →1, ↓1, →1, ↓1, →1, ↑3, and ←5. This reveals the stairway to the Gym Leader. | |||
[[Juan]] leads with his {{p|Luvdisc}}; not much of a threat, but it may still confuse its target with {{m|Sweet Kiss}}, and further hinder male targets with {{m|Attract}}. As a {{2t|Water|Ground}} Pokémon, his {{p|Whiscash}} is only vulnerable to Grass moves; its {{m|Rain Dance}} temporarily strengthens Water moves, while {{m|Earthquake}} can deter {{type|Electric}} opponents. {{p|Sealeo}}'s {{2t|Ice|Water}} typing gives it additional weaknesses to {{t|Fighting}} and {{t|Rock}} moves; {{m|Water Pulse}} and {{m|Body Slam}} deal damage while {{m|Encore}} forces the target to repeat its previous move. His {{p|Crawdaunt}} is not a major threat, as all Water moves are [[Special move]]s and its {{stat|Special Attack}} is lower than its {{stat|Attack}}, but it can still deal damage. Finally, his {{p|Kingdra}} can inflict serious damage with Water Pulse, and use {{m|Ice Beam}} to deal with Grass types; use powerful moves to defeat it quickly, before it can regain health with {{m|Rest}}. | |||
=== | {| align="center" | ||
|- align="center" valign="top" | |||
| | |||
{| align="center" style="background: #{{water color}}; {{roundy}}; border: 5px solid #{{water color light}};" | |||
|- align="center" | |||
! Sootopolis Gym<br>[[File:Rain Badge.png|35px|The Rain Badge]]<br><br> | |||
|- | |||
| | |||
{| align="center" class="expandable" style="background: #{{water color}}; {{roundy}}; border: 5px solid #{{water color light}};" | |||
|- align="center" | |||
! Trainers | |||
|- | |||
| | |||
{{Trainerheader|Water}} | |||
{{Trainerentry|Spr RS Beauty.png|Beauty|Connie|3200|1|118|Goldeen|♀|40|}} | |||
{{Trainerdiv|Water}} | |||
{{Trainerentry|Spr RS Lass.png|Lass|Andrea|640|1|370|Luvdisc|♀|40|}} | |||
{{Trainerdiv|Water}} | |||
{{Trainerentry|Spr RS Lady.png|Lady|Daphne|7800<br><small>Potential [[Double Battle]] with Annika</small>|2|370|Luvdisc|♀|39|Nugget|370|Luvdisc|♀|39|Nugget}} | |||
{{Trainerdiv|Water}} | |||
{{Trainerentry|Spr RS Pokéfan F.png|Pokéfan|Annika|3120<br><small>Potential [[Double Battle]] with Daphne</small>|2|349|Feebas|♀|39|Oran Berry|349|Feebas|♀|39|Oran Berry}} | |||
{{Trainerdiv|Water}} | |||
{{Trainerentry|Spr RS Beauty.png|Beauty|Tiffany|3120<br><small>Potential [[Double Battle]] with Crissy</small>|2|318|Carvanha|♀|39|None|319|Sharpedo|♀|39|}} | |||
{{Trainerdiv|Water}} | |||
{{Trainerentry|Spr RS Lass.png|Lass|Crissy|624<br><small>Potential [[Double Battle]] with Tiffany</small>|2|118|Goldeen|♀|39|None|320|Wailmer|♀|39|}} | |||
{{Trainerdiv|Water}} | |||
{{Trainerentry|Spr RS Pokéfan F.png|Pokéfan|Bethany|3120<br><small>Potential [[Double Battle]] with Olivia</small>|3|298|Azurill|♀|35|Oran Berry|183|Marill|♀|37|Oran Berry|184|Azumarill|♀|39|Oran Berry}} | |||
{{Trainerdiv|Water}} | |||
{{Trainerentry|Spr RS Beauty.png|Beauty|Olivia|3120<br><small>Potential [[Double Battle]] with Bethany</small>|3|366|Clamperl|♀|35|None|341|Corphish|♀|37|None|271|Lombre|♀|39|}} | |||
{{Trainerdiv|Water}} | |||
{{Trainerentry|Spr RS Lady.png|Lady|Brianna|8000<br><small>Potential [[Double Battle]] with Bridget</small>|1|119|Seaking|♀|40|Nugget}} | |||
{{Trainerdiv|Water}} | |||
{{Trainerentry|Spr RS Beauty.png|Beauty|Bridget|3200<br><small>Potential [[Double Battle]] with Brianna</small>|1|184|Azumarill|♀|40|}} | |||
{{Trainerfooter|Water|3|inside}} | |||
|} | |||
{| style="margin: auto;" | |||
| | |||
{{Party/Single | |||
|color={{water color}}|headcolor={{water color light}}|bordercolor={{water color dark}} | |||
|sprite=Spr E Juan.png | |||
|prize={{PDollar}}4600 | |||
|class=Leader|classlink=Gym Leader|name={{color2|000|Juan}} | |||
|game=E|location=Sootopolis Gym | |||
|pokemon=5}} | |||
=== | |{{Pokémon/3|game=Emerald | ||
|ndex=370|pokemon=Luvdisc | |||
|type1=Water | |||
|level=41|gender=female | |||
|ability=Swift Swim | |||
|move1=Water Pulse|move1type=Water | |||
|move2=Attract|move2type=Normal | |||
|move3=Sweet Kiss|move3type=Normal | |||
|move4=Flail|move4type=Normal}} | |||
{{ | |{{Pokémon/3|game=Emerald | ||
| | |ndex=340|pokemon=Whiscash | ||
| | |type1=Water|type2=Ground | ||
| | |level=41|gender=male | ||
| | |ability=Oblivious | ||
| | |move1=Rain Dance|move1type=Water | ||
| | |move2=Water Pulse|move2type=Water | ||
| | |move3=Amnesia|move3type=Psychic | ||
|move4=Earthquake|move4type=Ground}} | |||
| | |{{Pokémon/3|game=Emerald | ||
|game=Emerald | |ndex=364|pokemon=Sealeo | ||
|ndex=364 | |type1=Ice|type2=Water | ||
|pokemon=Sealeo | |level=43|gender=male | ||
|ability=Thick Fat | |ability=Thick Fat | ||
|move1=Encore|move1type=Normal | |||
|move1= | |||
|move2=Body Slam|move2type=Normal | |move2=Body Slam|move2type=Normal | ||
|move3= | |move3=Aurora Beam|move3type=Ice | ||
|move4=Ice Ball| | |move4=Water Pulse|move4type=Water}} | ||
{{Party/Div|color={{water color}}}} | |||
| style="margin:auto" |{{Pokémon/3|game=Emerald | |||
|ndex=342|pokemon=Crawdaunt | |||
|type1=Water|type2=Dark | |||
|level=43|gender=male | |||
|ability=Hyper Cutter | |||
|move1=Water Pulse|move1type=Water | |||
|move2=Crabhammer|move2type=Water | |||
|move3=Taunt|move3type=Dark | |||
|move4=Leer|move4type=Normal}} | |||
| style="margin:auto" |{{Pokémon/3|game=Emerald | |||
|ndex=230|pokemon=Kingdra | |||
|type1=Water|type2=Dragon | |||
|level=46|gender=male | |||
|ability=Swift Swim | |||
|held=Chesto Berry | |||
|move1=Water Pulse|move1type=Water | |||
|move2=Double Team|move2type=Normal | |||
|move3=Ice Beam|move3type=Ice | |||
|move4=Rest|move4type=Psychic}} | |||
{{Party/Footer}} | |||
|} | |||
|} | |||
|} | |||
Defeated, Juan awards you the {{badge|Rain}}, which ensures obedience from all Pokémon and enables the use of {{m|Waterfall}} in the field. He also gives you {{TM|03|Water Pulse}} as a prize, and registers himself in your PokéNav. With all eight Badges, your next destination is the {{ho|Pokémon League}} in [[Ever Grande City]] to the southeast. But first, consider exploring Hoenn's remaining areas, including the [[Abandoned Ship]], [[New Mauville]], and the remaining stretch of ocean west of {{rt|131|Hoenn}}. | |||
{{-}} | |||
==Route 108== | |||
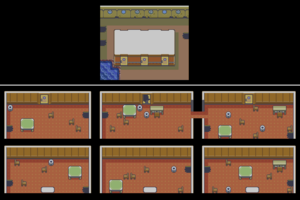
[[File:Abandoned Ship exterior RSE.png|thumb|Abandoned Ship, exterior]] | |||
[[File:Abandoned Ship 1F and rooms RSE.png|thumb|left|Abandoned Ship, 1F]] | |||
[[File:Abandoned Ship B1F and rooms RSE.png|thumb|left|Abandoned Ship, B1F]] | |||
[[File:Abandoned Ship UF RSE.png|thumb|Abandoned Ship, underwater hallway]] | |||
[[File:Abandoned Ship HF and rooms RSE.png|thumb|Abandoned Ship, hidden floor]] | |||
===Abandoned Ship=== | |||
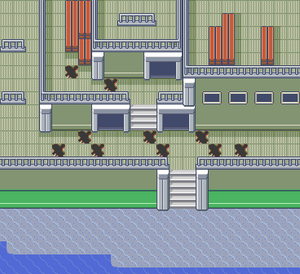
Located on {{rt|108|Hoenn}}, the [[Abandoned Ship]] is all that remains from when the S.S. Cactus ran aground. The old vessel has many rusted holes, broken doors, and furniture scattered around. Navigating the structure requires the use of both {{m|Surf}} and {{m|Dive}}. Once slated for demolition, the half-sunken vessel now exists as a refuge for water-dwelling Pokémon. | |||
{| class="expandable" style="margin: auto; background: #{{locationcolor/med|ocean}}; {{roundy}}; border: 5px solid #{{locationcolor/light|ocean}};" | |||
|- align="center" | |||
! Trainers | |||
|- | |||
| | |||
{{trainerheader|ocean}} | |||
{{catch/div|ocean|1F (east)}} | |||
{{trainerentry|Spr RS Beauty.png|Beauty|Thalia|2000<br/><small>Potential [[Double Battle]] with Demetrius</small>|2|320|Wailmer|♀|25||116|Horsea|♀|25||38=Nav}} | |||
{{trainerdiv|ocean}} | |||
{{trainerentry|Spr RS Youngster.png|Youngster|Demetrius|400<br/><small>Potential [[Double Battle]] with Thalia</small>|2|263|Zigzagoon|♂|25||309|Electrike|♂|25|}} | |||
{{catch/div|ocean|B1F}} | |||
{{trainerentry|Spr RS Sailor.png|Sailor|Duncan|800|2|363|Spheal|♂|25||067|Machoke|♂|25|}} | |||
{{catch/div|ocean|1F (west)}} | |||
{{trainerentry|Spr RS Tuber M.png|Tuber|Charlie|104|1|183|Marill|♂|26|}} | |||
{{trainerdiv|ocean}} | |||
{{trainerentry|Spr RS Ruin Maniac.png|Ruin Maniac|Garrison|1560<br/><small>Potential [[Double Battle]] with Jani</small>|1|028|Sandslash|♂|26|}} | |||
{{trainerdiv|ocean}} | |||
{{trainerentry|Spr RS Tuber F.png|Tuber|Jani|104<br/><small>Potential [[Double Battle]] with Garrison</small>|1|183|Marill|♀|26|}} | |||
{{trainerdiv|ocean}} | |||
{{trainerentry|Spr RS Young Couple.png|Young Couple|Kira & Dan|1600|2|313|Volbeat|♂|25||314|Illumise|♀|25||38=Nav}} | |||
{{catch/div|ocean|Rematch}} | |||
{{trainerentry|Spr RS Beauty.png|Beauty|Thalia{{tt|*|First rematch}}|2720|2|320|Wailmer|♀|34||116|Horsea|♀|34||38=Nav}} | |||
{{trainerentry|Spr RS Beauty.png|Beauty|Thalia{{tt|*|Second and third rematch}}|{{tt|2880|Second rematch}}/{{tt|3040|Third rematch}}|3|370|Luvdisc|♀|{{tt|36|Second rematch}}/{{tt|38|Third rematch}}||320|Wailmer|♀|{{tt|36|Second rematch}}/{{tt|38|Third rematch}}||117|Seadra|♀|{{tt|36|Second rematch}}/{{tt|38|Third rematch}}||38=Nav}} | |||
{{trainerentry|Spr RS Beauty.png|Beauty|Thalia{{tt|*|Fourth rematch onwards}}|3200|3|370|Luvdisc|♀|40||321|Wailord|♀|40||230|Kingdra|♀|40||38=Nav}} | |||
{{trainerdiv|ocean}} | |||
{{trainerentry|Spr RS Young Couple.png|Young Couple|Kira & Dan|{{tt|1920|First rematch}}/{{tt|2112|Second rematch}}/{{tt|2304|Third rematch}}/{{tt|2496|Fourth rematch onwards}}|2|313|Volbeat|♂|{{tt|30|First rematch}}/{{tt|33|Second rematch}}/{{tt|36|Third rematch}}/{{tt|39|Fourth rematch onwards}}||314|Illumise|♀|{{tt|30|First rematch}}/{{tt|33|Second rematch}}/{{tt|36|Third rematch}}/{{tt|39|Fourth rematch onwards}}||38=Nav}} | |||
{{trainerfooter|ocean|3}} | |||
|} | |||
{| class="expandable" style="margin: auto; background: #{{locationcolor/med|ocean}}; {{roundy}}; border: 5px solid #{{locationcolor/light|ocean}};" | |||
|- align="center" | |||
! Available Pokémon | |||
|- | |||
| | |||
{{Catch/header|ocean|no}} | |||
{{Catch/div|ocean|Surfing}} | |||
{{Catch/entry3|072|Tentacool|no|no|yes|Surf|5-35|99%|type1=Water|type2=Poison}} | |||
{{Catch/entry3|073|Tentacruel|no|no|yes|Surf|30-35|1%|type1=Water|type2=Poison}} | |||
{{Catch/div|ocean|Fishing}} | |||
{{Catch/entry3|129|Magikarp|no|no|yes|Fish Old|5-10|70%|type1=Water}} | |||
{{Catch/entry3|072|Tentacool|no|no|yes|Fish Old|5-10|30%|type1=Water|type2=Poison}} | |||
{{Catch/entry3|129|Magikarp|no|no|yes|Fish Good|10-30|60%|type1=Water}} | |||
{{Catch/entry3|072|Tentacool|no|no|yes|Fish Good|10-30|40%|type1=Water|type2=Poison}} | |||
{{Catch/entry3|072|Tentacool|no|no|yes|Fish Super|25-35|80%|type1=Water|type2=Poison}} | |||
{{Catch/entry3|073|Tentacruel|no|no|yes|Fish Super|20-35|20%|type1=Water|type2=Poison}} | |||
{{Catch/footer|ocean}} | |||
|} | |||
{| class="expandable" style="margin: auto; background: #{{locationcolor/med|ocean}}; {{roundy}}; border: 5px solid #{{locationcolor/light|ocean}};" | |||
|- align="center" | |||
! Items | |||
|- | |||
| | |||
{{itlisth|ocean}} | |||
{{catch/div|ocean|1F}} | |||
{{itemlist|Harbor Mail|East side, northwest room|E=yes|display={{DL|Mail|Harbor Mail}}}} | |||
{{itemlist|Revive|West side, north room|E=yes|display={{DL|Revive|Revive}}}} | |||
{{catch/div|ocean|B1F}} | |||
{{itemlist|Dive Ball|In the cabin with the broken door|E=yes|display={{ball|Dive}}}} | |||
{{itemlist|Escape Rope|Southwest cabin|E=yes}} | |||
{{itemlist|TM Ice|Northeast room (requires {{key|III|Storage Key}})|E=yes|display={{TM|13|Ice Beam}}}} | |||
{{catch/div|ocean|2F}} | |||
{{itemlist|Storage Key III|Captain's office|E=yes|display={{key|III|Storage Key}}}} | |||
{{catch/div|ocean|Hidden Floor}} | |||
{{itemlist|Key to Room 1|Room 3, northeast corner (hidden)|E=yes|display={{key|III|Rm. 1 Key}}}} | |||
{{itemlist|Water Stone|Room 3|E=yes|display={{evostone|Water Stone}}}} | |||
{{itemlist|Key to Room 4|Room 1, near the west wall (hidden)|E=yes|display={{key|III|Rm. 4 Key}}}} | |||
{{itemlist|TM Water|Room 1|E=yes|display={{TM|18|Rain Dance}}}} | |||
{{itemlist|Key to Room 6|Room 4, in the trash can (hidden)|E=yes|display={{key|III|Rm. 6 Key}}}} | |||
{{itemlist|Luxury Ball|Room 6|E=yes|display={{ball|Luxury}}}} | |||
{{itemlist|Key to Room 2|Room 5, three step south of the left-hand trash can (hidden)|E=yes|display={{key|III|Rm. 2 Key}}}} | |||
{{itemlist|Scanner|Room 2|E=yes|display={{key|III|Scanner}}}} | |||
{{itlistfoot|ocean}} | |||
|} | |||
===1F (east)=== | |||
Three of the four cabins here are connected. Visit the isolated northwest cabin for a {{DL|Mail|Harbor Mail}} and head downstairs. | |||
| | ===B1F=== | ||
Fight Sailor Duncan and collect a {{ball|Dive}} from the north-central cabin. Visit the southwest cabin for an [[Escape Rope]] and climb the stairs in the northwest corner. | |||
| | |||
| | ===1F (west)=== | ||
| | Pass through the north cabin to get a {{DL|Revive|Revive}}, then go through the south door to reach the outside of the ship. Climb the stairway there to reach the Captain's office. | ||
| | |||
| | ===Captain's Office=== | ||
| | The Scientist inside is investigating the ship on [[Captain Stern]]'s behalf. Stern asked him to find a Scanner, but he hasn't had much success. Pick up the nearby {{key|III|Storage Key}} and return to the basement floor. | ||
| | |||
| | ===B1F=== | ||
| | Inspect the locked door to the northeast cabin to insert the Storage Key. The key becomes stuck in the lock, but the door opens. Inside, you find {{TM|13|Ice Beam}}. After that, head for the south-central cabin. Seawater has flooded into the room, so use {{m|Dive}} to traverse an underwater hallway that leads to an isolated part of the ship. | ||
| | |||
===Hidden Floor=== | |||
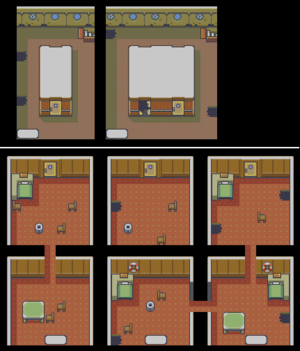
This part of the ship has six cabins. Rooms 1-3 are located on the south side, and Rooms 4-6 are found to the north. Four of these rooms are locked, and although Room 5 is unlocked, there is debris blocking the door. | |||
Enter Room 3 to see a sparkle on the floor; this signifies a hidden item. Pick up the {{key|III|Rm. 1 Key}} from the northeast corner, and the {{evostone|Water Stone}} to the left before leaving. | |||
There are two hidden items in Room 1. The {{key|III|Rm. 4 Key}} is located near the west wall, while the other item is just trash. The visible item is {{TM|18|Rain Dance}}. | |||
In Room 4, inspect the trash can in the northeast corner to find the {{key|III|Rm. 6 Key}}. | |||
Enter Room 6 and collect the {{ball|Luxury}}, then use the narrow hallway to reach the adjoining room. Room 5 has three pieces of trash and one item; the {{key|III|Rm. 2 Key}} is located three steps south of the left-hand trash can. | |||
Visit Room 2 to find the {{key|III|Scanner}}. If you show this to the Scientist in the Captain's office, he asks you to take it to Captain Stern back in {{DL|Slateport City|Slateport Harbor}}. Once there, Stern offers to trade either a [[Deep Sea Tooth|DeepSeaTooth]] or a [[Deep Sea Scale|DeepSeaScale}} for it. The DeepSeaTooth doubles a {{p|Clamperl}}'s {{stat|Special Attack}} when held, and triggers Clamperl's evolution into {{p|Huntail}} when traded. The DeepSeaScale doubles a Clamperl's {{stat|Special Defense}} when held, and triggers its evolution into {{p|Gorebyss}} when traded. | |||
==Mauville City== | |||
When you return to {{ci|Mauville}}, you find [[Wattson]] standing near the Pokémon Center. He asks for a favor, and explains that the city has an underground sector known as [[New Mauville]]. There's a generator inside that hasn't been functioning properly, and he needs you to go and turn it off before the situation gets out of control. He gives you the {{key|III|Basement Key}} and directs you to the facility's entrance on {{rt|110|Hoenn}}. {{m|Surf}} eastward under the north end of [[Seaside Cycling Road]] to reach the facility. | |||
==Route 110== | |||
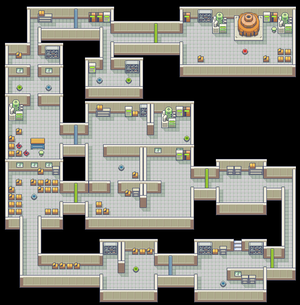
[[File:New Mauville entrance E.png|thumb|left|New Mauville, Entrance]] | |||
[[File:New Mauville RSE.png|thumb|New Mauville, B1F]] | |||
===New Mauville=== | |||
[[New Mauville]] was intended to be an underground city extending dozens of floors below the surface. However, the project died in development when it was discovered to be a habitat for wild Pokémon. | |||
| | {| class="expandable" style="margin: auto; background: #{{locationcolor/med|building}}; {{roundy}}; border: 5px solid #{{locationcolor/light|building}};" | ||
| | |- align="center" | ||
| | ! Available Pokémon | ||
| | |- | ||
| | | | ||
| | {{Catch/header|building|no}} | ||
| | {{Catch/div|building|Entrance}} | ||
|type1= | {{Catch/entry3|081|Magnemite|no|no|yes|Entrance|22-26|50%|type1=Electric|type2=Steel}} | ||
| | {{Catch/entry3|100|Voltorb|no|no|yes|Entrance|22-26|50%|type1=Electric}} | ||
| | {{Catch/div|building|Basement}} | ||
| | {{Catch/entry3|081|Magnemite|no|no|yes|Basement|22-26|49%|type1=Electric|type2=Steel}} | ||
| | {{Catch/entry3|100|Voltorb|no|no|yes|Basement|22-26|49%|type1=Electric}} | ||
{{Catch/entry3|082|Magneton|no|no|yes|Basement|26|1%|type1=Electric|type2=Steel}} | |||
{{Catch/entry3|101|Electrode|no|no|yes|Basement|26|1%|type1=Electric}} | |||
{{Catch/div|building|Special}} | |||
{{Catch/entry3|100|Voltorb|no|no|yes|Fake|25|Three|type1=Electric}} | |||
{{Catch/footer|building}} | |||
|} | |||
{| class="expandable" style="margin: auto; background: #{{locationcolor/med|building}}; {{roundy}}; border: 5px solid #{{locationcolor/light|building}};" | |||
|- align="center" | |||
! Items | |||
|- | |||
| | |||
{{itlisth|building}} | |||
{{itemlist|Escape Rope|Near the center of the floor, on a blue switch|E=yes}} | |||
{{itemlist|Paralyze Heal|Northwest part of the floor, on a green switch|E=yes|display={{DL|Status ailment healing item|Paralyze Heal}}}} | |||
{{itemlist|Full Heal|North-central room, on a green switch|E=yes|display={{DL|Status ailment healing item|Full Heal}}}} | |||
{{itemlist|Thunder Stone|East of the generator in the northeast room|E=yes|display={{evostone|Thunder Stone}}}} | |||
{{itemlist|Ultra Ball|East-southeast room, north of the entrance|E=yes|display={{ball|Ultra}}}} | |||
{{catch/div|building|Fake Items}} | |||
{{itemlist|None| | |||
* Near the center of the floor, on a green switch | |||
* Northwest part of the floor, on a blue switch | |||
* North-central room, on a blue switch|E=yes|display={{p|Voltorb}} ×3|sprite=100MS}} | |||
{{itlistfoot|building}} | |||
|} | |||
====Entrance==== | |||
Use the Basement Key to unlock the door, and step inside to reach the southeast room. | |||
====B1F==== | |||
The lower floor uses a series of colored buttons as a security measure; when stepped on, all similarly-colored doors open while all others close. Step on the blue button in the entrance room and go west. Press the green button in the next room and continue on. Pass by the third button and head north to reach an [[Escape Rope]]; collect the item and press the blue button beneath it. Go northwest to find a room with two items, a {{DL|Status ailment healing item|Paralyze Heal|Parlyz Heal}} to the left and a {{p|Voltorb}} to the right. Follow the hallway eastward to the north-central room and another pair of items, a Voltorb to the left and a {{DL|Status ailment healing item|Full Heal}} to the right; collect the item and step on the green button beneath it. The generator is located in the northeast room; press the red button to shut it down and collect the {{evostone|Thunder Stone|ThunderStone}} before leaving the area. | |||
With your task complete, return to [[Wattson]] outside the Pokémon Center. Inform him that everything is all right in New Mauville, and the grateful Gym Leader rewards you with {{TM|24|Thunderbolt}}. | |||
== | ==Pacifidlog Town== | ||
[[File:Pacifidlog Town E.png|thumb|Pacifidlog Town]] | |||
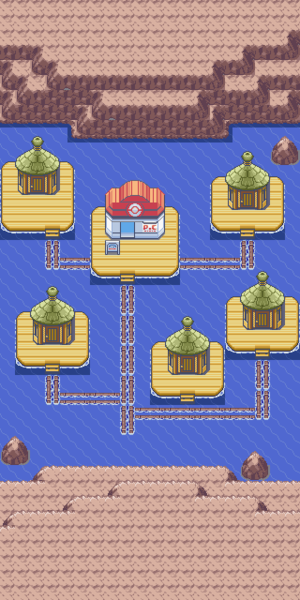
[[Pacifidlog Town]] is a humble community resting on the calm waters of eastern [[Hoenn]]. These floating homes surround a central Pokémon Center, where weary Trainers can catch a break from the waves. | |||
{| class="expandable" style="margin: auto; background: #5B73D0; {{roundy}}; border: 5px solid #6880D0;" | |||
|- align="center" | |||
! Available Pokémon | |||
|- | |||
| | |||
{{Catch/header|ocean|no}} | |||
{{Catch/div|ocean|Surfing}} | |||
{{Catch/entry3|072|Tentacool|no|no|yes|Surf|5-35|60%|type1=Water|type2=Poison}} | |||
{{Catch/entry3|278|Wingull|no|no|yes|Surf|10-30|35%|type1=Water|type2=Flying}} | |||
{{Catch/entry3|279|Pelipper|no|no|yes|Surf|25-30|5%|type1=Water|type2=Flying}} | |||
{{Catch/div|ocean|Fishing}} | |||
{{Catch/entry3|129|Magikarp|no|no|yes|Fish Old|5-10|70%|type1=Water}} | |||
{{Catch/entry3|072|Tentacool|no|no|yes|Fish Old|5-10|30%|type1=Water|type2=Poison}} | |||
{{Catch/entry3|129|Magikarp|no|no|yes|Fish Good|10-30|60%|type1=Water}} | |||
{{Catch/entry3|072|Tentacool|no|no|yes|Fish Good|10-30|20%|type1=Water|type2=Poison}} | |||
{{Catch/entry3|320|Wailmer|no|no|yes|Fish Good|10-30|20%|type1=Water}} | |||
{{Catch/entry3|320|Wailmer|no|no|yes|Fish Super|30-45|60%|type1=Water}} | |||
{{Catch/entry3|319|Sharpedo|no|no|yes|Fish Super|25-35|40%|type1=Water|type2=Dark}} | |||
{{Catch/div|ocean|Special}} | |||
{{Catch/entry3|116|Horsea|no|no|yes|Trade|tradenum=371|tradename=Bagon|The same as the Traded Pokémon|One|type1=Water}} | |||
{{Catch/footer|ocean}} | |||
|} | |||
{| class="expandable" style="margin: auto; background: #5B73D0; {{roundy}}; border: 5px solid #6880D0;" | |||
|- align="center" | |||
! Items | |||
|- | |||
| | |||
{{itlisth|ocean}} | |||
{{itemlist|TM Normal|Southwest house, from the Fan Club Chairman's brother if lead Pokémon's [[friendship]] is low|E=yes|display={{TM|21|Frustration}}}} | |||
{{itemlist|TM Normal|Southwest house, from the Fan Club Chairman's brother if lead Pokémon's friendship is high|E=yes|display={{TM|27|Return}}}} | |||
{{itemlist|Wave Mail|Held by Seasor, the traded {{p|Horsea}}|E=yes|display={{DL|Mail|Wave Mail}}}} | |||
{{itlistfoot|ocean}} | |||
|} | |||
== | ===An Old Legend=== | ||
Visit the northeast house and talk to the girl inside. She tells you a mysterious bit of wisdom passed down from her grandfather: ''Six dots open three doors''. Her father also remembers hearing tales of three Pokémon representing the powers of {{t|Rock}}, {{t|Ice}}, and {{t|Steel}}. It seems that Hoenn still has some secrets to discover! | |||
===Mirage Man=== | |||
The old man in the southeast house spends his time by scanning the horizon for {{gdis|Mirage Island|III}}. Speak with him every day to learn if the island has appeared. | |||
| | |||
}} | |||
===Move Tutor=== | |||
Visit the Pokémon Center and speak to the young man near the entrance. He offers to teach the move {{m|Explosion}} to a Pokémon, one time only. | |||
===Time for a Trade=== | |||
The woman in the south-central house is having trouble catching different Pokémon around town. She wishes to trade her {{p|Horsea}} for a {{p|Bagon}}. Horsea can be found on Routes {{rtn|132|Hoenn}}, {{rtn|133|Hoenn}}, and {{rtn|134|Hoenn}} to the west, while Bagon can only be found in [[Meteor Falls]]. | |||
===Friendship is Everything=== | |||
Stop by the southwest house to meet the brother of the Pokémon Fan Club chairman. Have him evaluate your relationship with your lead Pokémon, and he'll reward your friendship with {{TM|27|Return}}. If your Pokémon is unfriendly toward you, he'll give you {{TM|21|Frustration}} instead. | |||
{{WalkthroughPrevNext | | {{WalkthroughPrevNext | ||
game=Emerald | |game=Emerald | ||
|gamename=Emerald | |||
gamename=Emerald | |prevsection=15 | ||
|prevname=Route 126, Sootopolis City, Cave of Origin, Routes 129, 130, and 131, Sky Pillar | |||
|nextsection=17 | |||
prevsection=15 | |nextname=Routes 132, 133, and 134, Sealed Chamber, Island Cave, Desert Ruins, Ancient Tomb | ||
prevname= | |||
nextname= | |||
}} | }} | ||
<br> | |||
{{Project Walkthroughs notice}} | {{Project Walkthroughs notice}} | ||
[[Category:Emerald walkthrough]] | [[Category:Emerald walkthrough]] | ||
Revision as of 06:15, 28 April 2017
Sootopolis City
Rayquaza to the Rescue
When you return to Sootopolis, you find the two super-ancient Pokémon still locked in battle. Rayquaza suddenly appears in a beam of green light shining through the storm clouds, and quickly descends to the city. It hovers above the two combatants, and ends the fighting with a single, intimidating roar. Groudon and Kyogre flee, Rayquaza flies off back to Sky Pillar with another loud cry, and the weather returns to normal.
Maxie, Archie, Steven, and Wallace all witness these events from the Gym island. The team leaders realize and accept their mistakes, then leave for Mt. Pyre to return the Red and Blue Orbs. Wallace thanks you on behalf of the people of Hoenn, and gives you HM07 (Waterfall) as a gift. With this, a Pokémon can force its way up a waterfall, but using it requires defeating the Sootopolis Gym first!
Move Tutor
Visit the Pokémon Center to prepare for the upcoming Gym. Inside, you find a girl near the bookcase on the left side of the counter. Speak to her, and she offers to teach the move Double-Edge to a Pokémon, one time only.
Sootopolis Gym
The Sootopolis Gym Specializes in Water-type Pokémon. Grass- and Electric-type moves are best here, while Fire, Ground, and Rock Pokémon may struggle. The Gym features three platforms where each icy tile must be traversed once in order to defrost the next stairway. Walking over an ice tile once cracks it; passing by a second time shatters it, leaving you to fall to the Gym's snowy underbelly where plenty of Trainers await.
The first puzzle is a 3×3 grid of ice, with two icy rocks as obstacles. Starting on the south-central tile, move ←1, ↑1, →2, ↑1 and ←1. This reveals the first stairway.
The second puzzle is a 7×3 grid, with two icy rocks as obstacles. From the south-central tile, move ←3, ↑2, →2, ↓1, →2, ↓1, →2, ↑2, and ←3. This reveals the second stairway.
The final puzzle is an 11×4 grid, with six icy rocks as obstacles. Starting on the south-central tile, move ←5, ↑3, →1, ↓1, →1, ↓1, →1, ↑2, →1, ↓1, →1, ↓1, →2, ↑1, →1, ↓1, →1, ↓1, →1, ↑3, and ←5. This reveals the stairway to the Gym Leader.
Juan leads with his Luvdisc; not much of a threat, but it may still confuse its target with Sweet Kiss, and further hinder male targets with Attract. As a Water/Ground Pokémon, his Whiscash is only vulnerable to Grass moves; its Rain Dance temporarily strengthens Water moves, while Earthquake can deter Electric-type opponents. Sealeo's Ice/Water typing gives it additional weaknesses to Fighting and Rock moves; Water Pulse and Body Slam deal damage while Encore forces the target to repeat its previous move. His Crawdaunt is not a major threat, as all Water moves are Special moves and its Special Attack is lower than its Attack, but it can still deal damage. Finally, his Kingdra can inflict serious damage with Water Pulse, and use Ice Beam to deal with Grass types; use powerful moves to defeat it quickly, before it can regain health with Rest.
| ||||||||||||||||||||||||||||||||||||||||||||||||||||||||||||||||||||||||||||||||||||||||||||||||||||||||||||||||||||||||||||||||||||||||||||||||||||||||||||||||||||||||||||||||||||||||||||||||||||||||||||||||||||||||||||||||||||||||||||||||||||||||||||||||||||||||||||||||||||||||||||||||||||||||||||||||||||||||||||||||||||||||||||||||||||||||||||||
Defeated, Juan awards you the Rain Badge, which ensures obedience from all Pokémon and enables the use of Waterfall in the field. He also gives you TM03 (Water Pulse) as a prize, and registers himself in your PokéNav. With all eight Badges, your next destination is the Pokémon League in Ever Grande City to the southeast. But first, consider exploring Hoenn's remaining areas, including the Abandoned Ship, New Mauville, and the remaining stretch of ocean west of Route 131.
Route 108
Abandoned Ship
Located on Route 108, the Abandoned Ship is all that remains from when the S.S. Cactus ran aground. The old vessel has many rusted holes, broken doors, and furniture scattered around. Navigating the structure requires the use of both Surf and Dive. Once slated for demolition, the half-sunken vessel now exists as a refuge for water-dwelling Pokémon.
| Trainers | |||||||||||||||||||||||||||||||||||||||||||||||||||||||||||||||||||||||||||||||||||||||||||||||||||||||||||||||||||||||||||||||||||||||||||||||||||||||||||||||||||||||||||||||||||||||||||||||||||||||||||||||||||||||||||||||||||||||||||||||||||||||||||||||||||||||||||||||||||||
|---|---|---|---|---|---|---|---|---|---|---|---|---|---|---|---|---|---|---|---|---|---|---|---|---|---|---|---|---|---|---|---|---|---|---|---|---|---|---|---|---|---|---|---|---|---|---|---|---|---|---|---|---|---|---|---|---|---|---|---|---|---|---|---|---|---|---|---|---|---|---|---|---|---|---|---|---|---|---|---|---|---|---|---|---|---|---|---|---|---|---|---|---|---|---|---|---|---|---|---|---|---|---|---|---|---|---|---|---|---|---|---|---|---|---|---|---|---|---|---|---|---|---|---|---|---|---|---|---|---|---|---|---|---|---|---|---|---|---|---|---|---|---|---|---|---|---|---|---|---|---|---|---|---|---|---|---|---|---|---|---|---|---|---|---|---|---|---|---|---|---|---|---|---|---|---|---|---|---|---|---|---|---|---|---|---|---|---|---|---|---|---|---|---|---|---|---|---|---|---|---|---|---|---|---|---|---|---|---|---|---|---|---|---|---|---|---|---|---|---|---|---|---|---|---|---|---|---|---|---|---|---|---|---|---|---|---|---|---|---|---|---|---|---|---|---|---|---|---|---|---|---|---|---|---|---|---|---|---|---|---|---|---|---|---|---|---|---|---|---|---|---|---|---|---|---|---|---|
| |||||||||||||||||||||||||||||||||||||||||||||||||||||||||||||||||||||||||||||||||||||||||||||||||||||||||||||||||||||||||||||||||||||||||||||||||||||||||||||||||||||||||||||||||||||||||||||||||||||||||||||||||||||||||||||||||||||||||||||||||||||||||||||||||||||||||||||||||||||
| Available Pokémon | ||||||||||||||||||||||||||||||||||||||||||||||||||||||||||||||||||||||||||||||||||||||||||||||||||||||||||||||||||||||||||||||||||||||||||||||||||||||||||||||||||||||||||||||||||||||||
|---|---|---|---|---|---|---|---|---|---|---|---|---|---|---|---|---|---|---|---|---|---|---|---|---|---|---|---|---|---|---|---|---|---|---|---|---|---|---|---|---|---|---|---|---|---|---|---|---|---|---|---|---|---|---|---|---|---|---|---|---|---|---|---|---|---|---|---|---|---|---|---|---|---|---|---|---|---|---|---|---|---|---|---|---|---|---|---|---|---|---|---|---|---|---|---|---|---|---|---|---|---|---|---|---|---|---|---|---|---|---|---|---|---|---|---|---|---|---|---|---|---|---|---|---|---|---|---|---|---|---|---|---|---|---|---|---|---|---|---|---|---|---|---|---|---|---|---|---|---|---|---|---|---|---|---|---|---|---|---|---|---|---|---|---|---|---|---|---|---|---|---|---|---|---|---|---|---|---|---|---|---|---|---|---|
| ||||||||||||||||||||||||||||||||||||||||||||||||||||||||||||||||||||||||||||||||||||||||||||||||||||||||||||||||||||||||||||||||||||||||||||||||||||||||||||||||||||||||||||||||||||||||
| Items | ||||||||||||||||||||||||||||||||||||||||||||||||||||||||||||||||||||||||||||||||||||||||||||||||||||||||||||||||||||||||||||
|---|---|---|---|---|---|---|---|---|---|---|---|---|---|---|---|---|---|---|---|---|---|---|---|---|---|---|---|---|---|---|---|---|---|---|---|---|---|---|---|---|---|---|---|---|---|---|---|---|---|---|---|---|---|---|---|---|---|---|---|---|---|---|---|---|---|---|---|---|---|---|---|---|---|---|---|---|---|---|---|---|---|---|---|---|---|---|---|---|---|---|---|---|---|---|---|---|---|---|---|---|---|---|---|---|---|---|---|---|---|---|---|---|---|---|---|---|---|---|---|---|---|---|---|---|
| ||||||||||||||||||||||||||||||||||||||||||||||||||||||||||||||||||||||||||||||||||||||||||||||||||||||||||||||||||||||||||||
1F (east)
Three of the four cabins here are connected. Visit the isolated northwest cabin for a Harbor Mail and head downstairs.
B1F
Fight Sailor Duncan and collect a Dive Ball from the north-central cabin. Visit the southwest cabin for an Escape Rope and climb the stairs in the northwest corner.
1F (west)
Pass through the north cabin to get a Revive, then go through the south door to reach the outside of the ship. Climb the stairway there to reach the Captain's office.
Captain's Office
The Scientist inside is investigating the ship on Captain Stern's behalf. Stern asked him to find a Scanner, but he hasn't had much success. Pick up the nearby Storage Key and return to the basement floor.
B1F
Inspect the locked door to the northeast cabin to insert the Storage Key. The key becomes stuck in the lock, but the door opens. Inside, you find TM13 (Ice Beam). After that, head for the south-central cabin. Seawater has flooded into the room, so use Dive to traverse an underwater hallway that leads to an isolated part of the ship.
Hidden Floor
This part of the ship has six cabins. Rooms 1-3 are located on the south side, and Rooms 4-6 are found to the north. Four of these rooms are locked, and although Room 5 is unlocked, there is debris blocking the door.
Enter Room 3 to see a sparkle on the floor; this signifies a hidden item. Pick up the Rm. 1 Key from the northeast corner, and the Water Stone to the left before leaving.
There are two hidden items in Room 1. The Rm. 4 Key is located near the west wall, while the other item is just trash. The visible item is TM18 (Rain Dance).
In Room 4, inspect the trash can in the northeast corner to find the Rm. 6 Key.
Enter Room 6 and collect the Luxury Ball, then use the narrow hallway to reach the adjoining room. Room 5 has three pieces of trash and one item; the Rm. 2 Key is located three steps south of the left-hand trash can.
Visit Room 2 to find the Scanner. If you show this to the Scientist in the Captain's office, he asks you to take it to Captain Stern back in Slateport Harbor. Once there, Stern offers to trade either a DeepSeaTooth or a [[Deep Sea Scale|DeepSeaScale}} for it. The DeepSeaTooth doubles a Clamperl's Special Attack when held, and triggers Clamperl's evolution into Huntail when traded. The DeepSeaScale doubles a Clamperl's Special Defense when held, and triggers its evolution into Gorebyss when traded.
Mauville City
When you return to Mauville, you find Wattson standing near the Pokémon Center. He asks for a favor, and explains that the city has an underground sector known as New Mauville. There's a generator inside that hasn't been functioning properly, and he needs you to go and turn it off before the situation gets out of control. He gives you the Basement Key and directs you to the facility's entrance on Route 110. Surf eastward under the north end of Seaside Cycling Road to reach the facility.
Route 110
New Mauville
New Mauville was intended to be an underground city extending dozens of floors below the surface. However, the project died in development when it was discovered to be a habitat for wild Pokémon.
| Available Pokémon | |||||||||||||||||||||||||||||||||||||||||||||||||||||||||||||||||||||||||||||||||||||||||||||||||||||||||||||||||||||||||||||||||||||||||||||||||||||||||||||||||||||||||||||||||||||||
|---|---|---|---|---|---|---|---|---|---|---|---|---|---|---|---|---|---|---|---|---|---|---|---|---|---|---|---|---|---|---|---|---|---|---|---|---|---|---|---|---|---|---|---|---|---|---|---|---|---|---|---|---|---|---|---|---|---|---|---|---|---|---|---|---|---|---|---|---|---|---|---|---|---|---|---|---|---|---|---|---|---|---|---|---|---|---|---|---|---|---|---|---|---|---|---|---|---|---|---|---|---|---|---|---|---|---|---|---|---|---|---|---|---|---|---|---|---|---|---|---|---|---|---|---|---|---|---|---|---|---|---|---|---|---|---|---|---|---|---|---|---|---|---|---|---|---|---|---|---|---|---|---|---|---|---|---|---|---|---|---|---|---|---|---|---|---|---|---|---|---|---|---|---|---|---|---|---|---|---|---|---|---|---|
| |||||||||||||||||||||||||||||||||||||||||||||||||||||||||||||||||||||||||||||||||||||||||||||||||||||||||||||||||||||||||||||||||||||||||||||||||||||||||||||||||||||||||||||||||||||||
| Items | |||||||||||||||||||||||||||||||||||||||||||||||
|---|---|---|---|---|---|---|---|---|---|---|---|---|---|---|---|---|---|---|---|---|---|---|---|---|---|---|---|---|---|---|---|---|---|---|---|---|---|---|---|---|---|---|---|---|---|---|---|
| |||||||||||||||||||||||||||||||||||||||||||||||
Entrance
Use the Basement Key to unlock the door, and step inside to reach the southeast room.
B1F
The lower floor uses a series of colored buttons as a security measure; when stepped on, all similarly-colored doors open while all others close. Step on the blue button in the entrance room and go west. Press the green button in the next room and continue on. Pass by the third button and head north to reach an Escape Rope; collect the item and press the blue button beneath it. Go northwest to find a room with two items, a Parlyz Heal to the left and a Voltorb to the right. Follow the hallway eastward to the north-central room and another pair of items, a Voltorb to the left and a Full Heal to the right; collect the item and step on the green button beneath it. The generator is located in the northeast room; press the red button to shut it down and collect the ThunderStone before leaving the area.
With your task complete, return to Wattson outside the Pokémon Center. Inform him that everything is all right in New Mauville, and the grateful Gym Leader rewards you with TM24 (Thunderbolt).
Pacifidlog Town
Pacifidlog Town is a humble community resting on the calm waters of eastern Hoenn. These floating homes surround a central Pokémon Center, where weary Trainers can catch a break from the waves.
| Available Pokémon | |||||||||||||||||||||||||||||||||||||||||||||||||||||||||||||||||||||||||||||||||||||||||||||||||||||||||||||||||||||||||||||||||||||||||||||||||||||||||||||||||||||||||||||||||||||||||||||||||||||||||||||||||||||||||||||||||||||||||||||||||||||||
|---|---|---|---|---|---|---|---|---|---|---|---|---|---|---|---|---|---|---|---|---|---|---|---|---|---|---|---|---|---|---|---|---|---|---|---|---|---|---|---|---|---|---|---|---|---|---|---|---|---|---|---|---|---|---|---|---|---|---|---|---|---|---|---|---|---|---|---|---|---|---|---|---|---|---|---|---|---|---|---|---|---|---|---|---|---|---|---|---|---|---|---|---|---|---|---|---|---|---|---|---|---|---|---|---|---|---|---|---|---|---|---|---|---|---|---|---|---|---|---|---|---|---|---|---|---|---|---|---|---|---|---|---|---|---|---|---|---|---|---|---|---|---|---|---|---|---|---|---|---|---|---|---|---|---|---|---|---|---|---|---|---|---|---|---|---|---|---|---|---|---|---|---|---|---|---|---|---|---|---|---|---|---|---|---|---|---|---|---|---|---|---|---|---|---|---|---|---|---|---|---|---|---|---|---|---|---|---|---|---|---|---|---|---|---|---|---|---|---|---|---|---|---|---|---|---|---|---|---|---|---|---|---|---|---|---|---|---|---|---|---|---|---|---|---|---|---|---|
| |||||||||||||||||||||||||||||||||||||||||||||||||||||||||||||||||||||||||||||||||||||||||||||||||||||||||||||||||||||||||||||||||||||||||||||||||||||||||||||||||||||||||||||||||||||||||||||||||||||||||||||||||||||||||||||||||||||||||||||||||||||||
| Items | ||||||||||||||||||||
|---|---|---|---|---|---|---|---|---|---|---|---|---|---|---|---|---|---|---|---|---|
| ||||||||||||||||||||
An Old Legend
Visit the northeast house and talk to the girl inside. She tells you a mysterious bit of wisdom passed down from her grandfather: Six dots open three doors. Her father also remembers hearing tales of three Pokémon representing the powers of Rock, Ice, and Steel. It seems that Hoenn still has some secrets to discover!
Mirage Man
The old man in the southeast house spends his time by scanning the horizon for Mirage Island. Speak with him every day to learn if the island has appeared.
Move Tutor
Visit the Pokémon Center and speak to the young man near the entrance. He offers to teach the move Explosion to a Pokémon, one time only.
Time for a Trade
The woman in the south-central house is having trouble catching different Pokémon around town. She wishes to trade her Horsea for a Bagon. Horsea can be found on Routes 132, 133, and 134 to the west, while Bagon can only be found in Meteor Falls.
Friendship is Everything
Stop by the southwest house to meet the brother of the Pokémon Fan Club chairman. Have him evaluate your relationship with your lead Pokémon, and he'll reward your friendship with TM27 (Return). If your Pokémon is unfriendly toward you, he'll give you TM21 (Frustration) instead.

|
This article is part of Project Walkthroughs, a Bulbapedia project that aims to write comprehensive step-by-step guides on each Pokémon game. |
